NISSAN TERRANO 2004 Service Repair Manual
Manufacturer: NISSAN, Model Year: 2004, Model line: TERRANO, Model: NISSAN TERRANO 2004Pages: 1833, PDF Size: 53.42 MB
Page 1141 of 1833
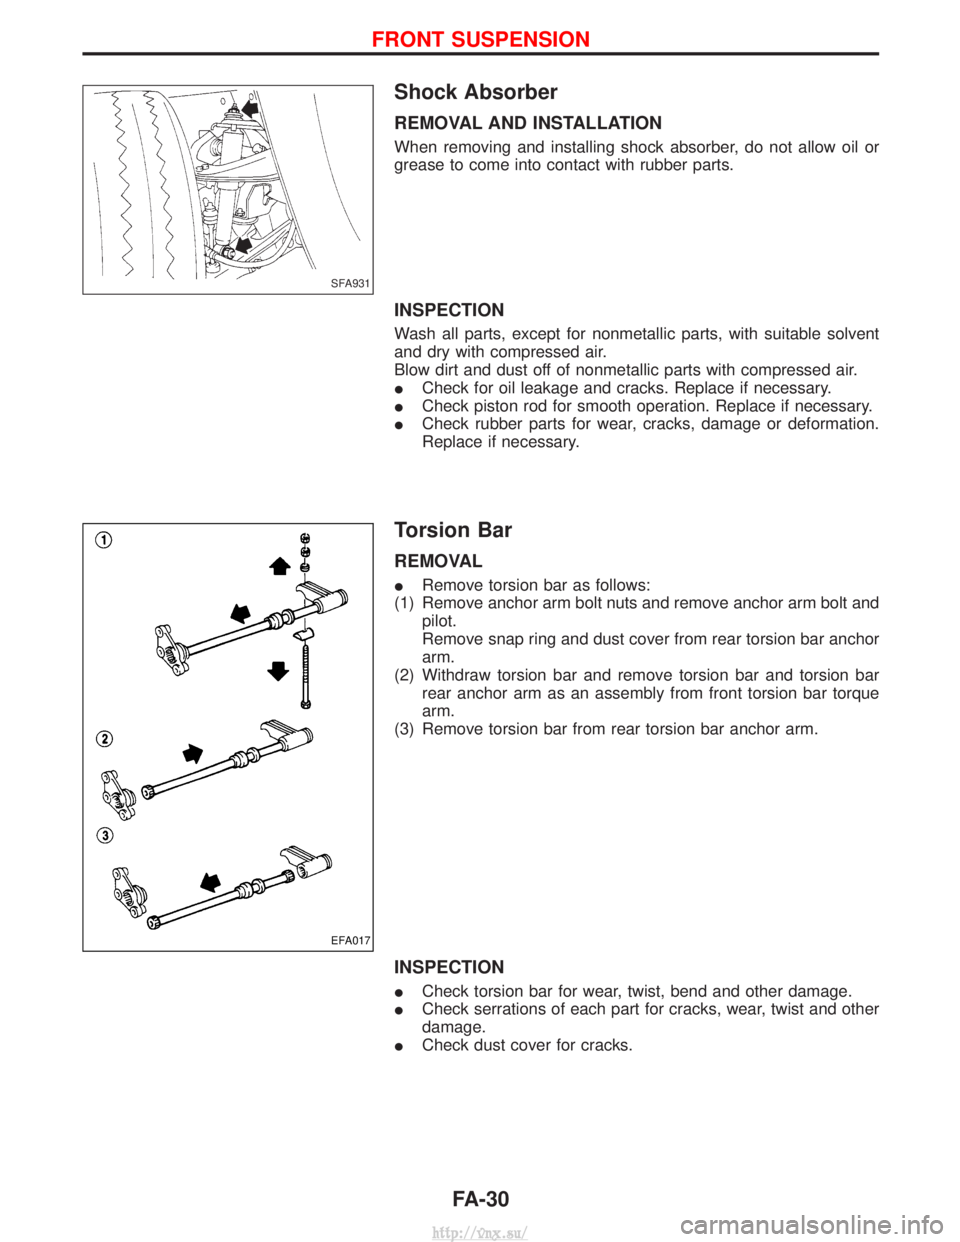
Shock Absorber
REMOVAL AND INSTALLATION
When removing and installing shock absorber, do not allow oil or
grease to come into contact with rubber parts.
INSPECTION
Wash all parts, except for nonmetallic parts, with suitable solvent
and dry with compressed air.
Blow dirt and dust off of nonmetallic parts with compressed air.
ICheck for oil leakage and cracks. Replace if necessary.
I Check piston rod for smooth operation. Replace if necessary.
I Check rubber parts for wear, cracks, damage or deformation.
Replace if necessary.
Torsion Bar
REMOVAL
IRemove torsion bar as follows:
(1) Remove anchor arm bolt nuts and remove anchor arm bolt and pilot.
Remove snap ring and dust cover from rear torsion bar anchor
arm.
(2) Withdraw torsion bar and remove torsion bar and torsion bar rear anchor arm as an assembly from front torsion bar torque
arm.
(3) Remove torsion bar from rear torsion bar anchor arm.
INSPECTION
I Check torsion bar for wear, twist, bend and other damage.
I Check serrations of each part for cracks, wear, twist and other
damage.
I Check dust cover for cracks.
SFA931
EFA017
FRONT SUSPENSION
FA-30
http://vnx.su/
Page 1142 of 1833
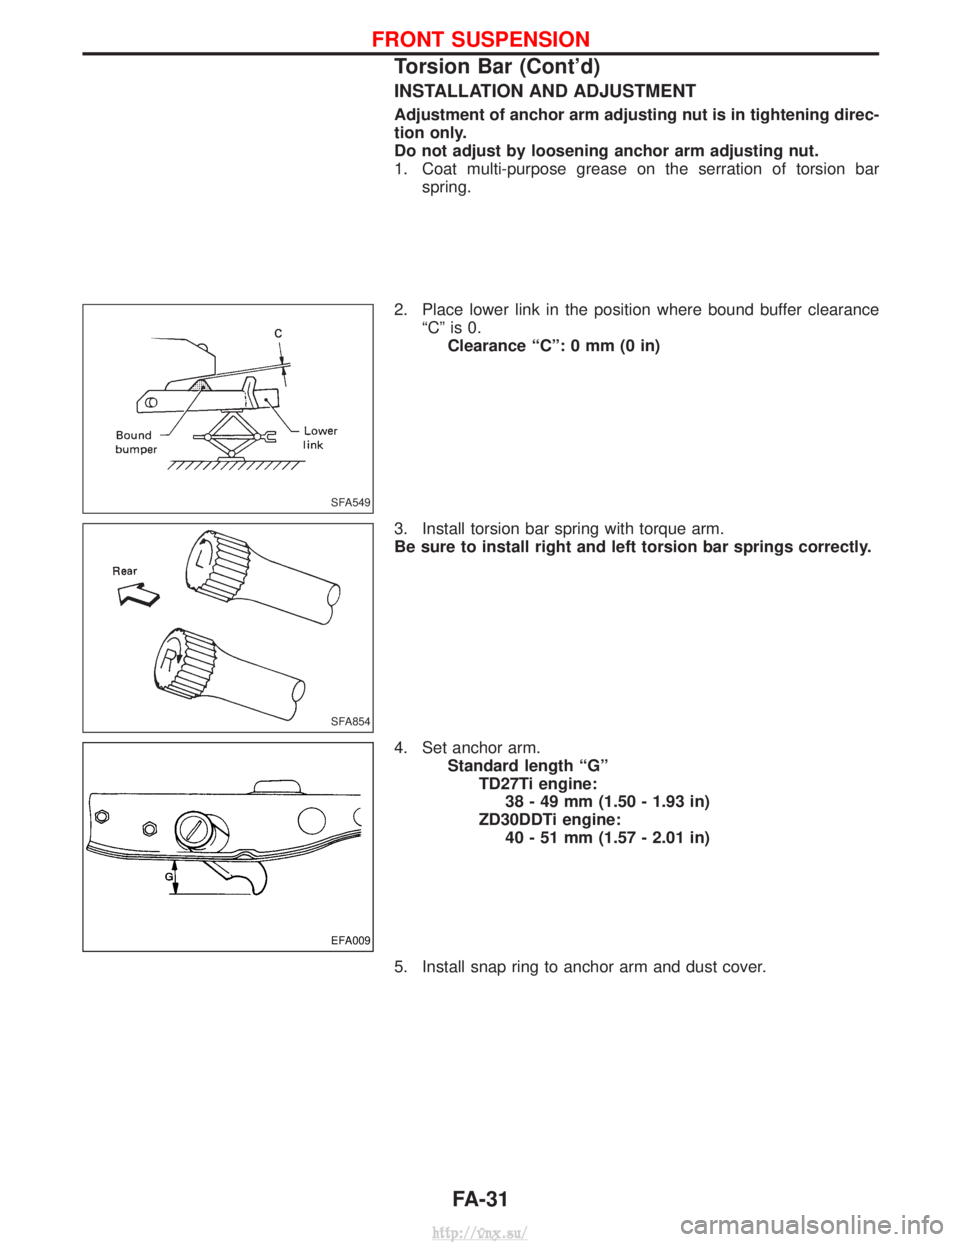
INSTALLATION AND ADJUSTMENT
Adjustment of anchor arm adjusting nut is in tightening direc-
tion only.
Do not adjust by loosening anchor arm adjusting nut.
1. Coat multi-purpose grease on the serration of torsion barspring.
2. Place lower link in the position where bound buffer clearance ªCº is 0.Clearance ªCº: 0 mm (0 in)
3. Install torsion bar spring with torque arm.
Be sure to install right and left torsion bar springs correctly.
4. Set anchor arm. Standard length ªGºTD27Ti engine:38 - 49 mm (1.50 - 1.93 in)
ZD30DDTi engine: 40 - 51 mm (1.57 - 2.01 in)
5. Install snap ring to anchor arm and dust cover.
SFA549
SFA854
EFA009
FRONT SUSPENSION
Torsion Bar (Cont'd)
FA-31
http://vnx.su/
Page 1143 of 1833
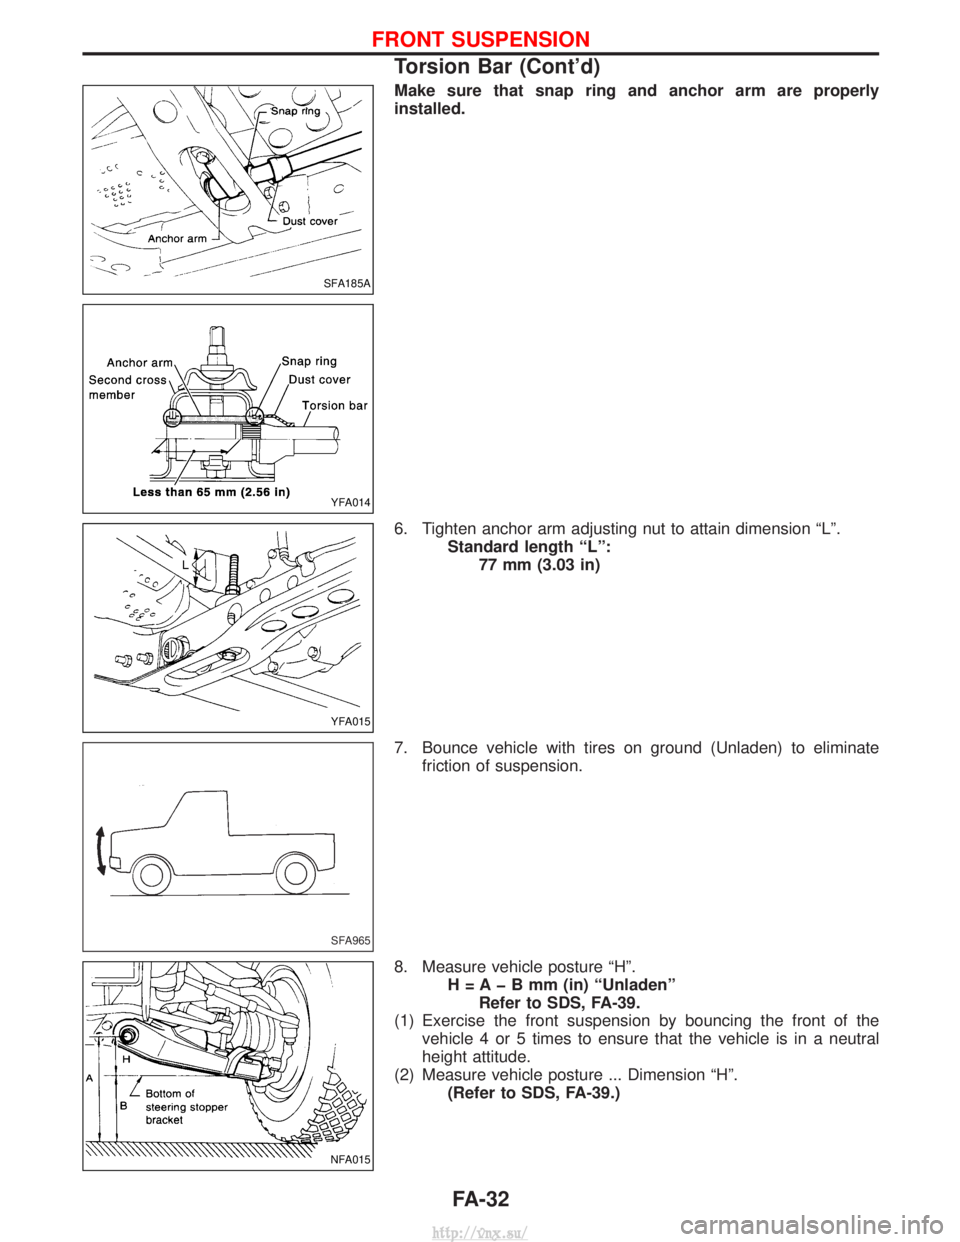
Make sure that snap ring and anchor arm are properly
installed.
6. Tighten anchor arm adjusting nut to attain dimension ªLº.Standard length ªLº:77 mm (3.03 in)
7. Bounce vehicle with tires on ground (Unladen) to eliminate friction of suspension.
8. Measure vehicle posture ªHº. H = A þ B mm (in) ªUnladenºRefer to SDS, FA-39.
(1) Exercise the front suspension by bouncing the front of the vehicle 4 or 5 times to ensure that the vehicle is in a neutral
height attitude.
(2) Measure vehicle posture ... Dimension ªHº. (Refer to SDS, FA-39.)
SFA185A
YFA014
YFA015
SFA965
NFA015
FRONT SUSPENSION
Torsion Bar (Cont'd)
FA-32
http://vnx.su/
Page 1144 of 1833
(3) If height of the vehicle is not as specified, adjust vehicle pos-ture.(Refer to SDS, FA-39.)
(4) Check wheel alignment if necessary. (Refer to SDS, FA-39.)
9. If ªHº dimension is not within the specified value, readjust vehicle posture using anchor arm adjusting nut.
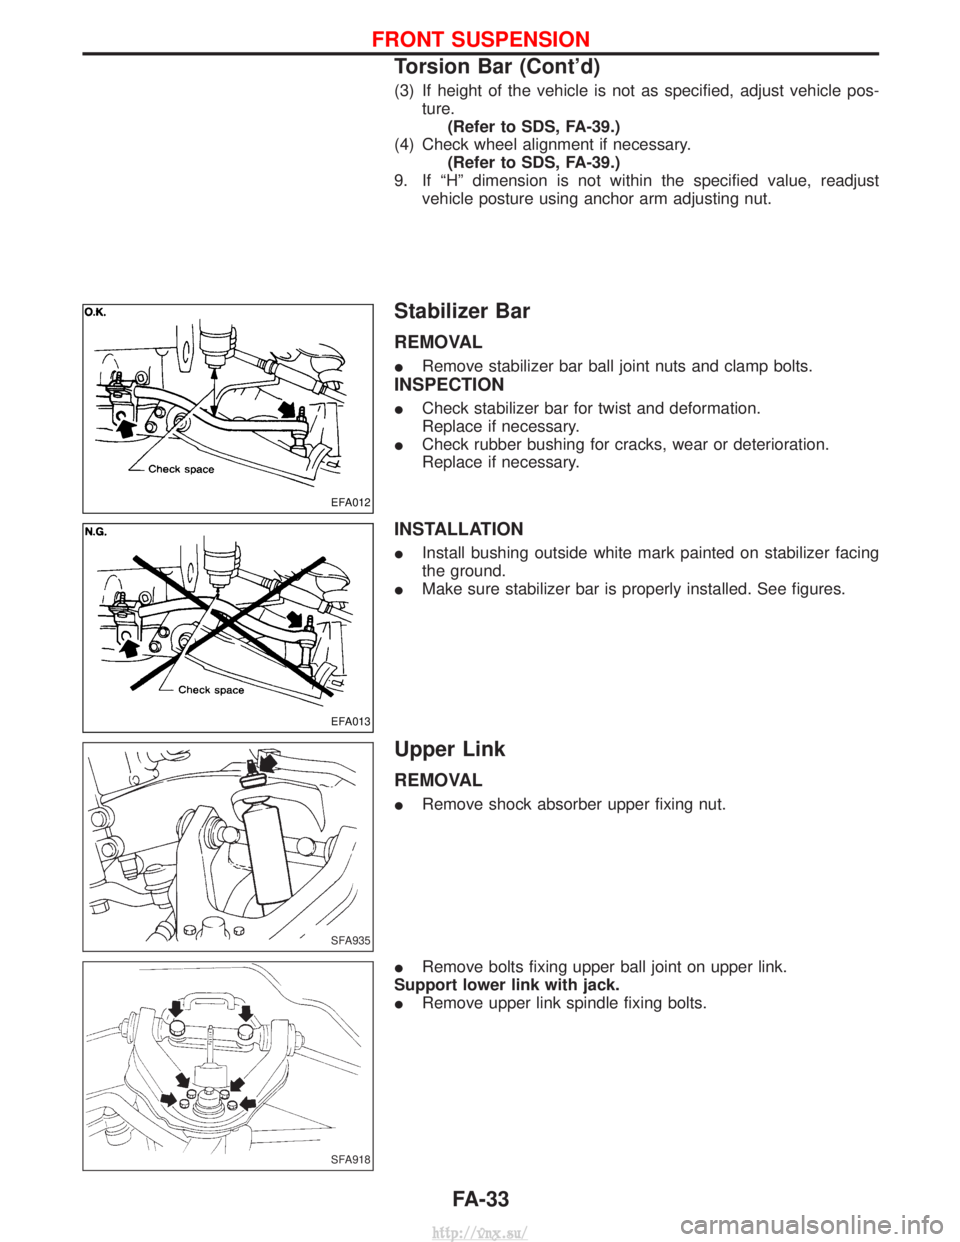
Stabilizer Bar
REMOVAL
IRemove stabilizer bar ball joint nuts and clamp bolts.
INSPECTION
ICheck stabilizer bar for twist and deformation.
Replace if necessary.
I Check rubber bushing for cracks, wear or deterioration.
Replace if necessary.
INSTALLATION
IInstall bushing outside white mark painted on stabilizer facing
the ground.
I Make sure stabilizer bar is properly installed. See figures.
Upper Link
REMOVAL
IRemove shock absorber upper fixing nut.
I Remove bolts fixing upper ball joint on upper link.
Support lower link with jack.
I Remove upper link spindle fixing bolts.
EFA012
EFA013
SFA935
SFA918
FRONT SUSPENSION
Torsion Bar (Cont'd)
FA-33
http://vnx.su/
Page 1145 of 1833
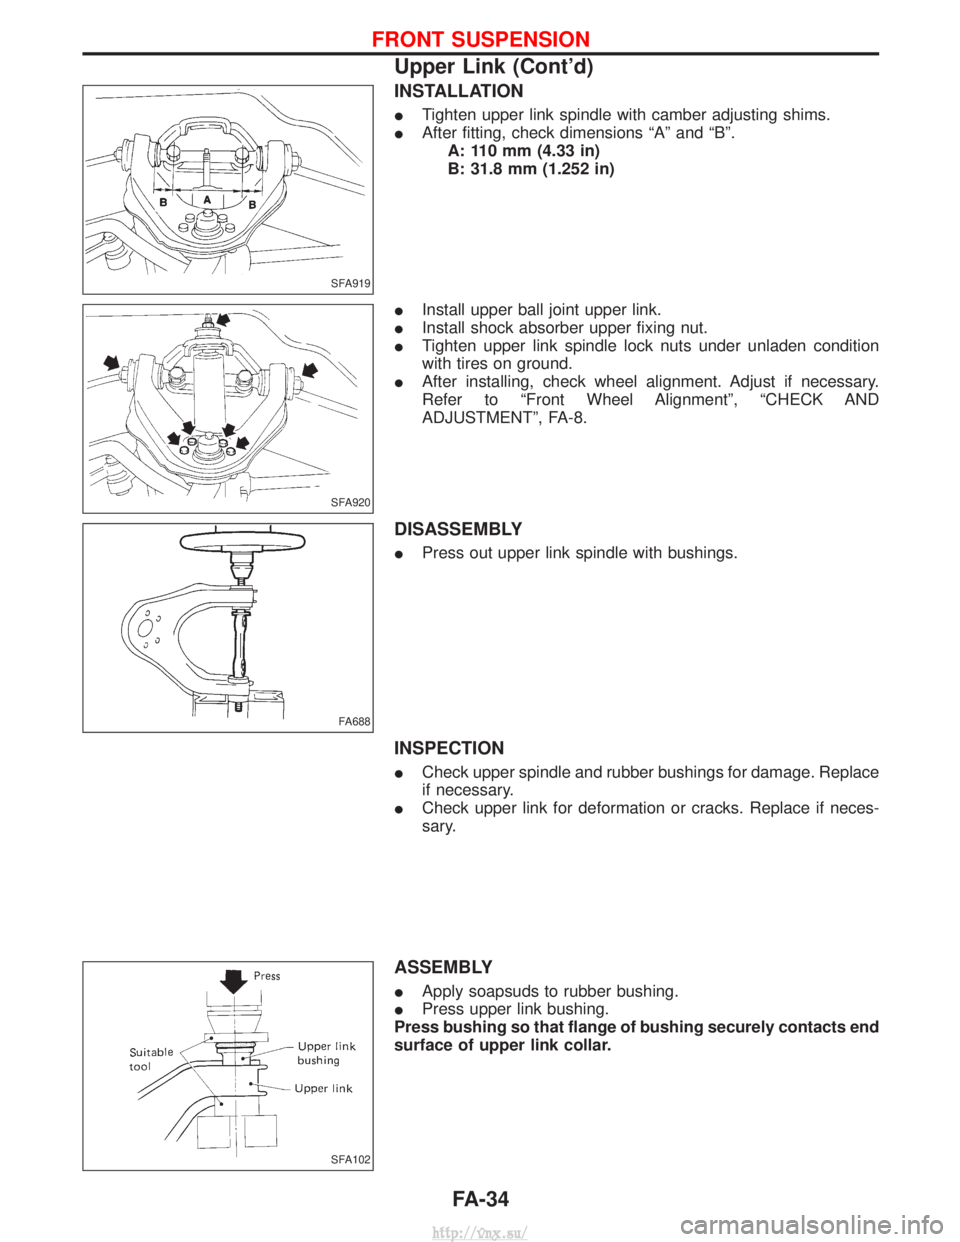
INSTALLATION
ITighten upper link spindle with camber adjusting shims.
I After fitting, check dimensions ªAº and ªBº.
A: 110 mm (4.33 in)
B: 31.8 mm (1.252 in)
I Install upper ball joint upper link.
I Install shock absorber upper fixing nut.
I Tighten upper link spindle lock nuts under unladen condition
with tires on ground.
I After installing, check wheel alignment. Adjust if necessary.
Refer to ªFront Wheel Alignmentº, ªCHECK AND
ADJUSTMENTº, FA-8.
DISASSEMBLY
IPress out upper link spindle with bushings.
INSPECTION
ICheck upper spindle and rubber bushings for damage. Replace
if necessary.
I Check upper link for deformation or cracks. Replace if neces-
sary.
ASSEMBLY
IApply soapsuds to rubber bushing.
I Press upper link bushing.
Press bushing so that flange of bushing securely contacts end
surface of upper link collar.
SFA919
SFA920
FA688
SFA102
FRONT SUSPENSION
Upper Link (Cont'd)
FA-34
http://vnx.su/
Page 1146 of 1833
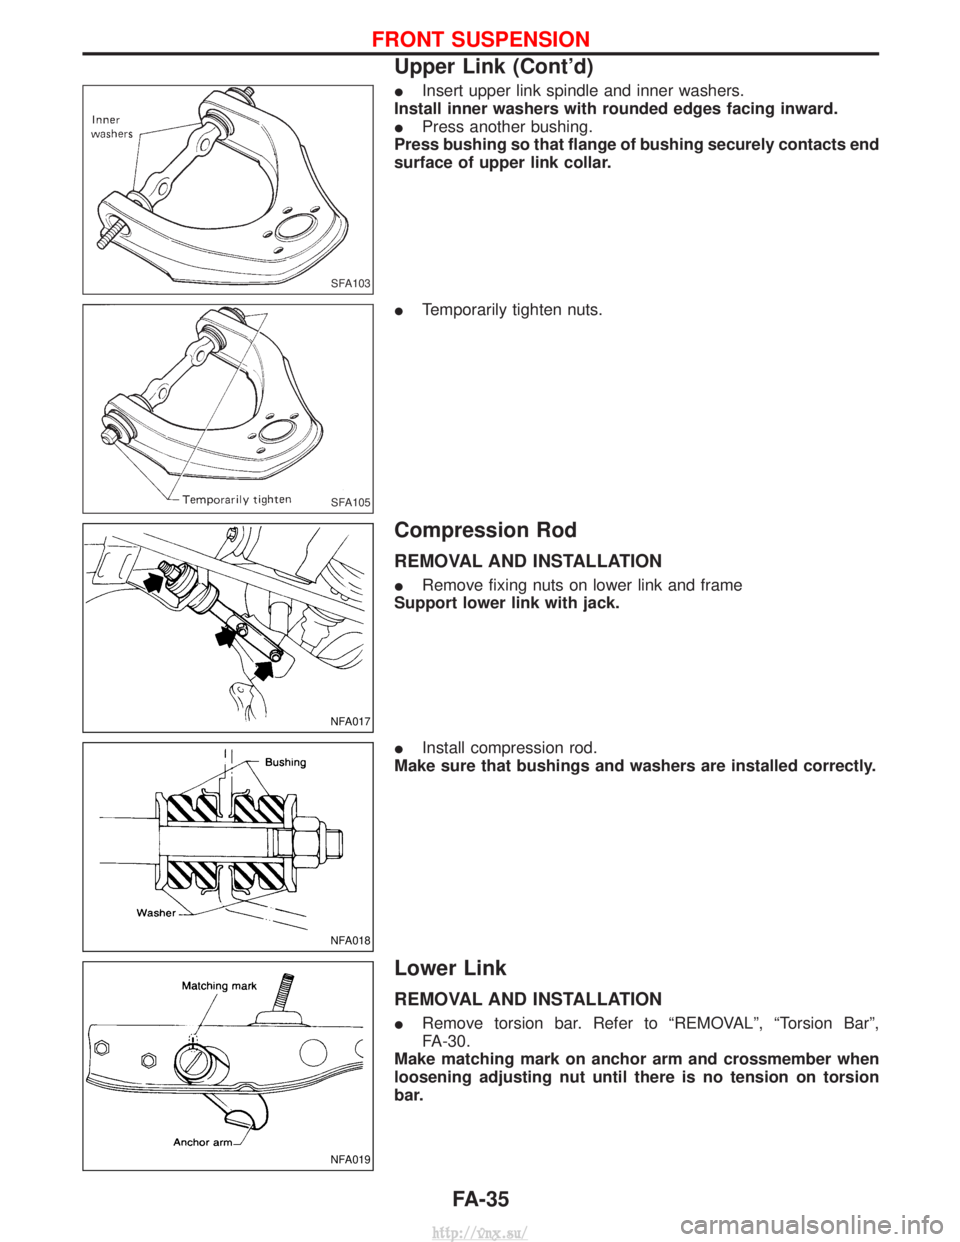
IInsert upper link spindle and inner washers.
Install inner washers with rounded edges facing inward.
I Press another bushing.
Press bushing so that flange of bushing securely contacts end
surface of upper link collar.
I Temporarily tighten nuts.
Compression Rod
REMOVAL AND INSTALLATION
IRemove fixing nuts on lower link and frame
Support lower link with jack.
I Install compression rod.
Make sure that bushings and washers are installed correctly.
Lower Link
REMOVAL AND INSTALLATION
I Remove torsion bar. Refer to ªREMOVALº, ªTorsion Barº,
FA-30.
Make matching mark on anchor arm and crossmember when
loosening adjusting nut until there is no tension on torsion
bar.
SFA103
SFA105
NFA017
NFA018
NFA019
FRONT SUSPENSION
Upper Link (Cont'd)
FA-35
http://vnx.su/
Page 1147 of 1833
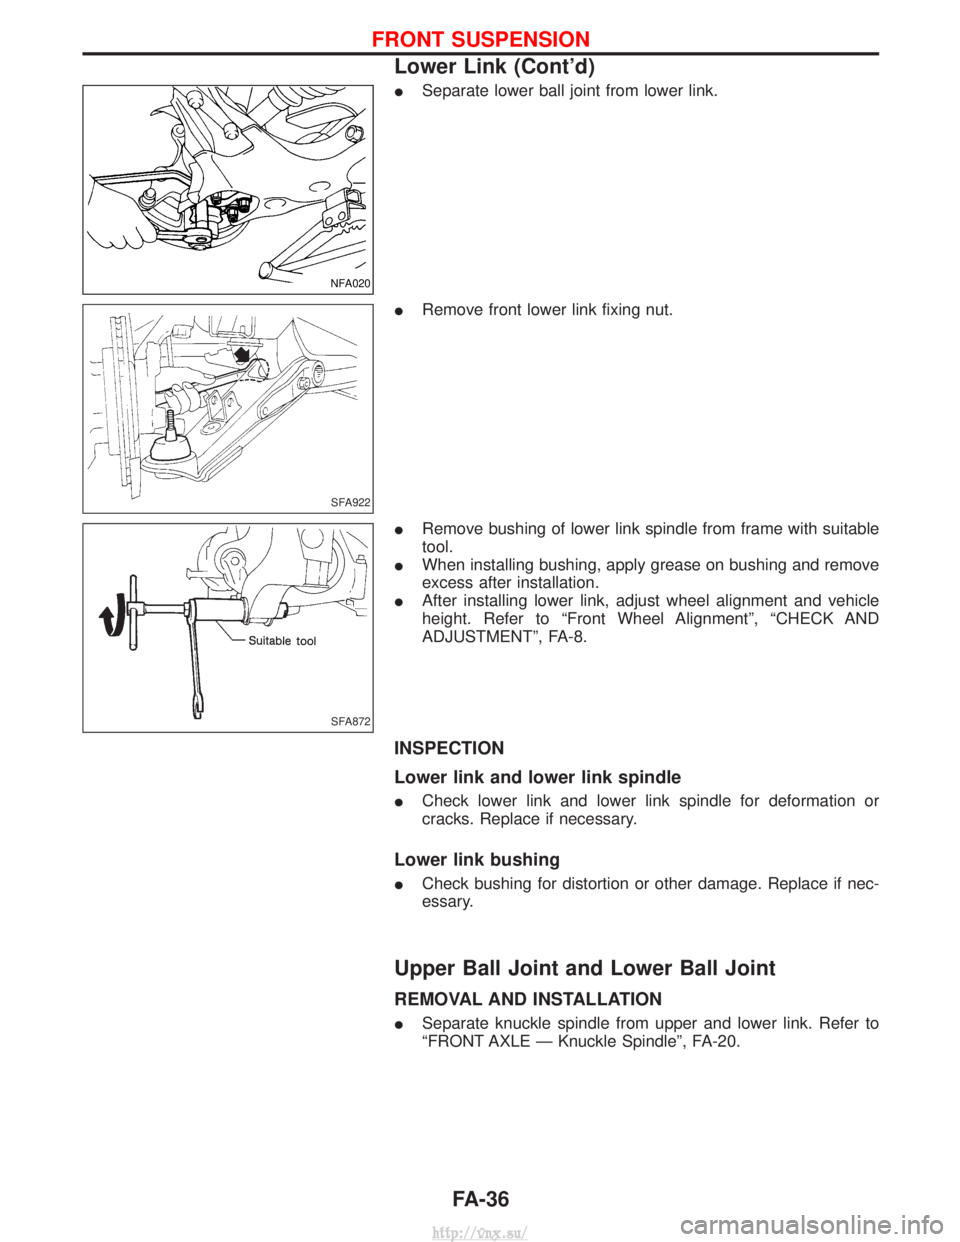
ISeparate lower ball joint from lower link.
I Remove front lower link fixing nut.
I Remove bushing of lower link spindle from frame with suitable
tool.
I When installing bushing, apply grease on bushing and remove
excess after installation.
I After installing lower link, adjust wheel alignment and vehicle
height. Refer to ªFront Wheel Alignmentº, ªCHECK AND
ADJUSTMENTº, FA-8.
INSPECTION
Lower link and lower link spindle
ICheck lower link and lower link spindle for deformation or
cracks. Replace if necessary.
Lower link bushing
ICheck bushing for distortion or other damage. Replace if nec-
essary.
Upper Ball Joint and Lower Ball Joint
REMOVAL AND INSTALLATION
ISeparate knuckle spindle from upper and lower link. Refer to
ªFRONT AXLE Ð Knuckle Spindleº, FA-20.
NFA020
SFA922
SFA872
FRONT SUSPENSION
Lower Link (Cont'd)
FA-36
http://vnx.su/
Page 1148 of 1833
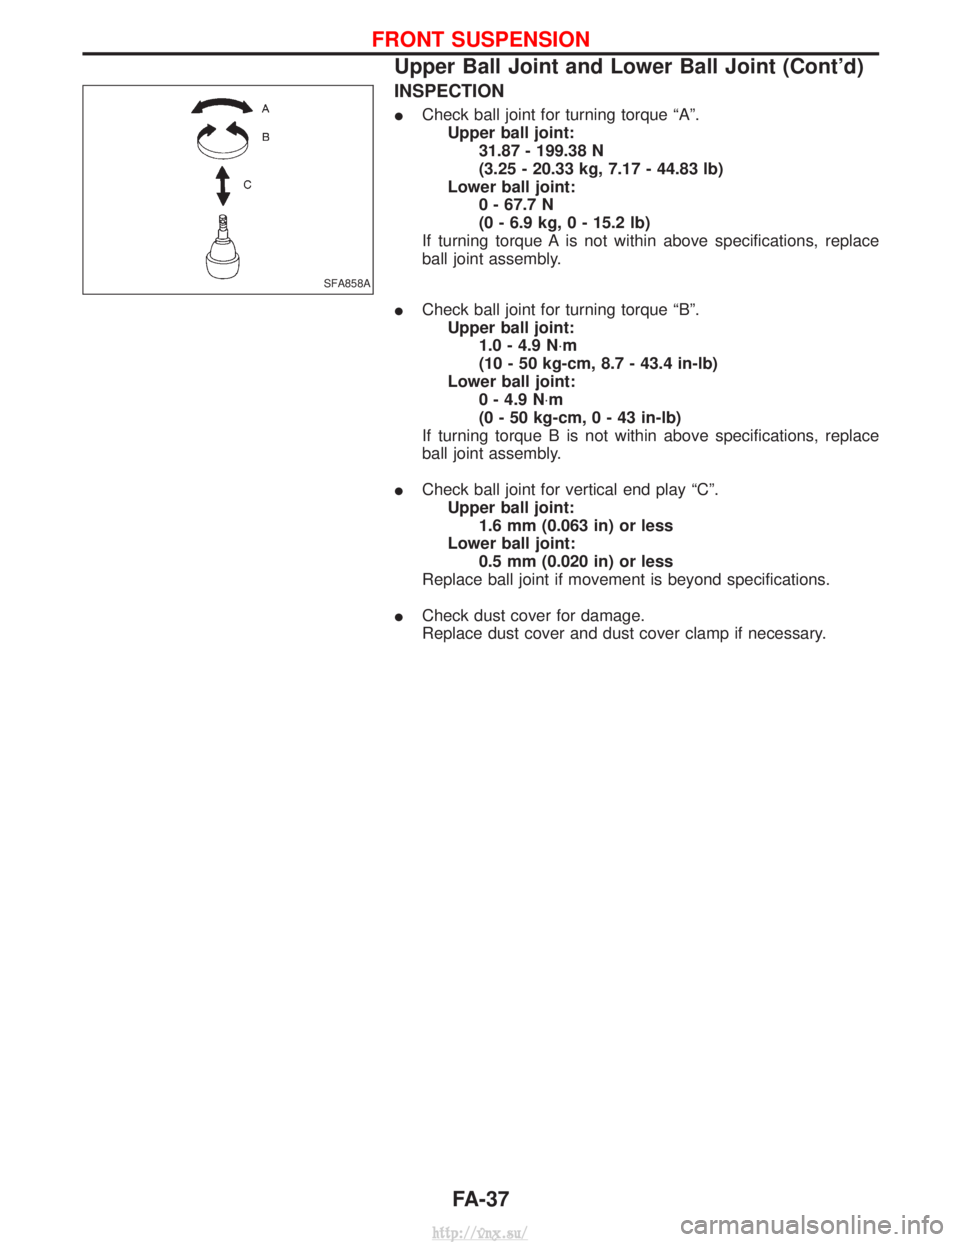
INSPECTION
ICheck ball joint for turning torque ªAº.
Upper ball joint: 31.87 - 199.38 N
(3.25 - 20.33 kg, 7.17 - 44.83 lb)
Lower ball joint: 0 - 67.7 N
(0 - 6.9 kg, 0 - 15.2 lb)
If turning torque A is not within above specifications, replace
ball joint assembly.
I Check ball joint for turning torque ªBº.
Upper ball joint: 1.0 - 4.9 N ×m
(10 - 50 kg-cm, 8.7 - 43.4 in-lb)
Lower ball joint: 0 - 4.9 N ×m
(0 - 50 kg-cm,0-43 in-lb)
If turning torque B is not within above specifications, replace
ball joint assembly.
I Check ball joint for vertical end play ªCº.
Upper ball joint: 1.6 mm (0.063 in) or less
Lower ball joint: 0.5 mm (0.020 in) or less
Replace ball joint if movement is beyond specifications.
I Check dust cover for damage.
Replace dust cover and dust cover clamp if necessary.
SFA858A
FRONT SUSPENSION
Upper Ball Joint and Lower Ball Joint (Cont'd)
FA-37
http://vnx.su/
Page 1149 of 1833
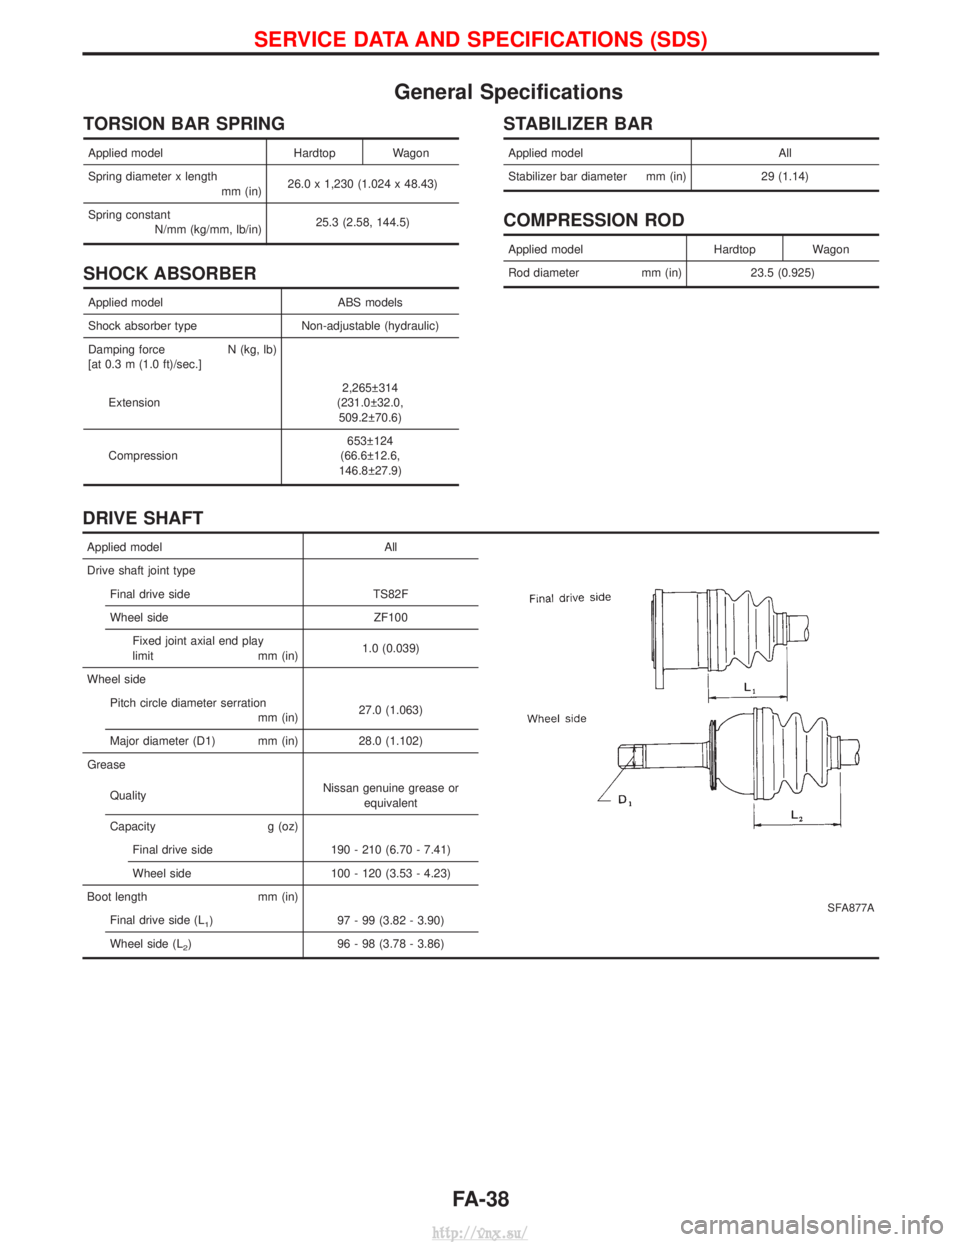
General Specifications
TORSION BAR SPRING
Applied modelHardtop Wagon
Spring diameter x length mm (in)26.0 x 1,230 (1.024 x 48.43)
Spring constant N/mm (kg/mm, lb/in) 25.3 (2.58, 144.5)
SHOCK ABSORBER
Applied model
ABS models
Shock absorber type Non-adjustable (hydraulic)
Damping force N (kg, lb)
[at 0.3 m (1.0 ft)/sec.]
Extension 2,265 314
(231.0 32.0, 509.2 70.6)
Compression 653 124
(66.6 12.6,
146.8 27.9)
STABILIZER BAR
Applied model All
Stabilizer bar diameter mm (in) 29 (1.14)
COMPRESSION ROD
Applied model Hardtop Wagon
Rod diameter mm (in) 23.5 (0.925)
DRIVE SHAFT
Applied model All
SFA877A
Drive shaft joint type
Final drive side TS82F
Wheel side ZF100Fixed joint axial end play
limit mm (in) 1.0 (0.039)
Wheel side Pitch circle diameter serration mm (in)27.0 (1.063)
Major diameter (D1) mm (in) 28.0 (1.102)
Grease
Quality Nissan genuine grease or
equivalent
Capacity g (oz) Final drive side 190 - 210 (6.70 - 7.41)
Wheel side 100 - 120 (3.53 - 4.23)
Boot length mm (in) Final drive side (L
1) 97 - 99 (3.82 - 3.90)
Wheel side (L
2) 96 - 98 (3.78 - 3.86)
SERVICE DATA AND SPECIFICATIONS (SDS)
FA-38
http://vnx.su/
Page 1150 of 1833
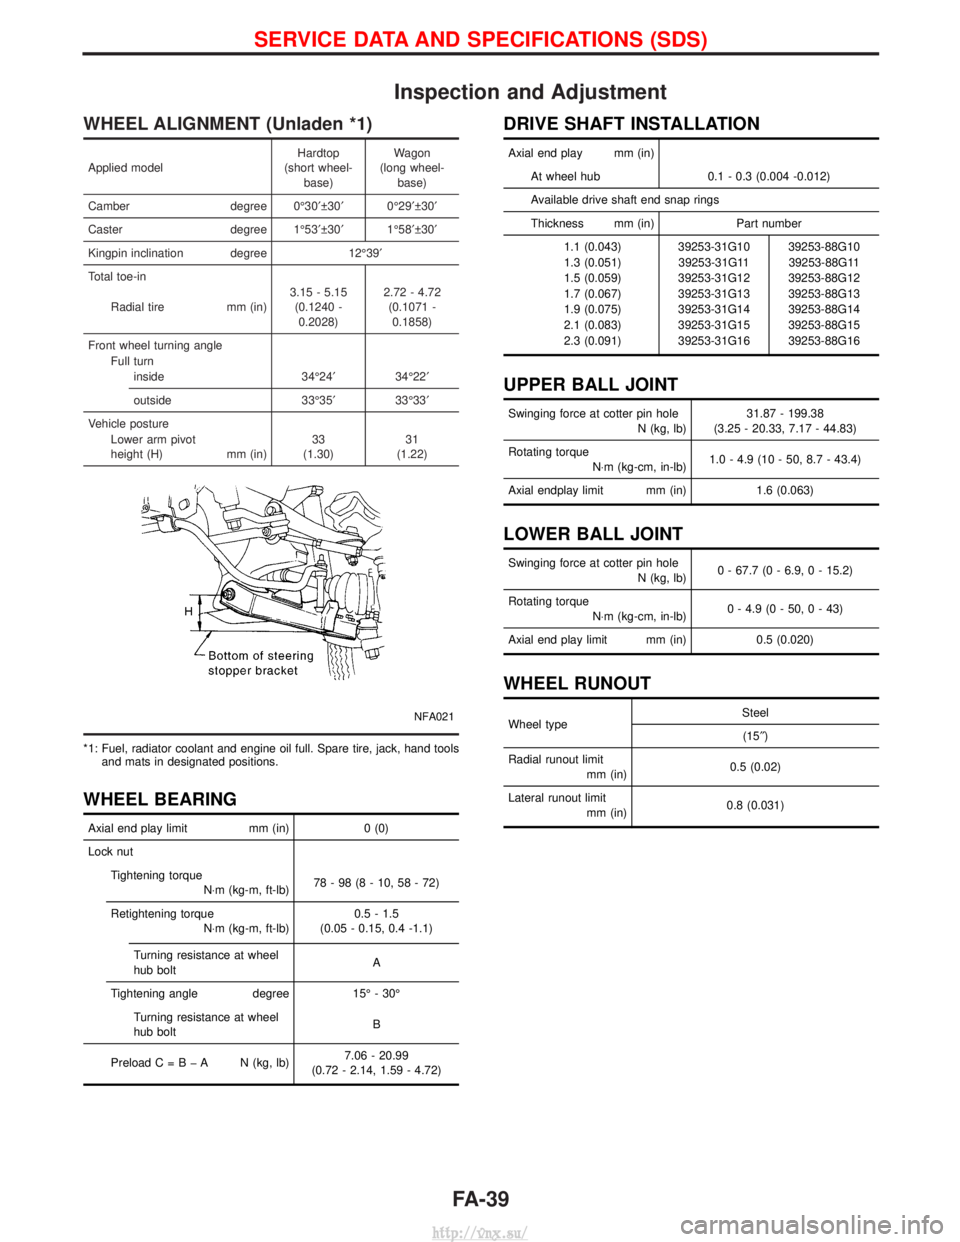
Inspection and Adjustment
WHEEL ALIGNMENT (Unladen *1)
Applied modelHardtop
(short wheel- base) Wagon
(long wheel- base)
Camber degree 0É30¢ 30¢0É29¢ 30¢
Caster degree 1É53¢ 30¢1É58¢ 30¢
Kingpin inclination degree 12É39¢
Total toe-in
Radial tire mm (in)3.15 - 5.15
(0.1240 -0.2028) 2.72 - 4.72
(0.1071 -0.1858)
Front wheel turning angle Full turninside 34É24¢34É22¢
outside 33É35¢33É33¢
Vehicle posture Lower arm pivot
height (H) mm (in)33
(1.30) 31
(1.22)
NFA021
*1: Fuel, radiator coolant and engine oil full. Spare tire, jack, hand tools and mats in designated positions.
WHEEL BEARING
Axial end play limit mm (in)0 (0)
Lock nut Tightening torque N×m (kg-m, ft-lb) 78-98(8-10,58-72)
Retightening torque N×m (kg-m, ft-lb) 0.5 - 1.5
(0.05 - 0.15, 0.4 -1.1)
Turning resistance at wheel
hub bolt A
Tightening angle degree 15É - 30É
Turning resistance at wheel
hub bolt B
PreloadC=BþA N(kg, lb) 7.06 - 20.99
(0.72 - 2.14, 1.59 - 4.72)
DRIVE SHAFT INSTALLATION
Axial end play mm (in)
At wheel hub 0.1 - 0.3 (0.004 -0.012)
Available drive shaft end snap rings
Thickness mm (in) Part number 1.1 (0.043) 39253-31G10 39253-88G10
1.3 (0.051) 39253-31G11 39253-88G11
1.5 (0.059) 39253-31G12 39253-88G12
1.7 (0.067) 39253-31G13 39253-88G13
1.9 (0.075) 39253-31G14 39253-88G14
2.1 (0.083) 39253-31G15 39253-88G15
2.3 (0.091) 39253-31G16 39253-88G16
UPPER BALL JOINT
Swinging force at cotter pin hole N (kg, lb)31.87 - 199.38
(3.25 - 20.33, 7.17 - 44.83)
Rotating torque N×m (kg-cm, in-lb) 1.0 - 4.9 (10 - 50, 8.7 - 43.4)
Axial endplay limit mm (in) 1.6 (0.063)
LOWER BALL JOINT
Swinging force at cotter pin hole
N (kg, lb)0 - 67.7 (0 - 6.9, 0 - 15.2)
Rotating torque N×m (kg-cm, in-lb) 0 - 4.9 (0 - 50, 0 - 43)
Axial end play limit mm (in) 0.5 (0.020)
WHEEL RUNOUT
Wheel type Steel
(15² )
Radial runout limit mm (in) 0.5 (0.02)
Lateral runout limit mm (in) 0.8 (0.031)
SERVICE DATA AND SPECIFICATIONS (SDS)
FA-39
http://vnx.su/