coolant reservoir NISSAN TIIDA 2007 Service Owner's Manual
[x] Cancel search | Manufacturer: NISSAN, Model Year: 2007, Model line: TIIDA, Model: NISSAN TIIDA 2007Pages: 5883, PDF Size: 78.95 MB
Page 539 of 5883
CO-58
< ON-VEHICLE MAINTENANCE >[K9K]
ENGINE COOLANT
ON-VEHICLE MAINTENANCE
ENGINE COOLANT
InspectionINFOID:0000000001381585
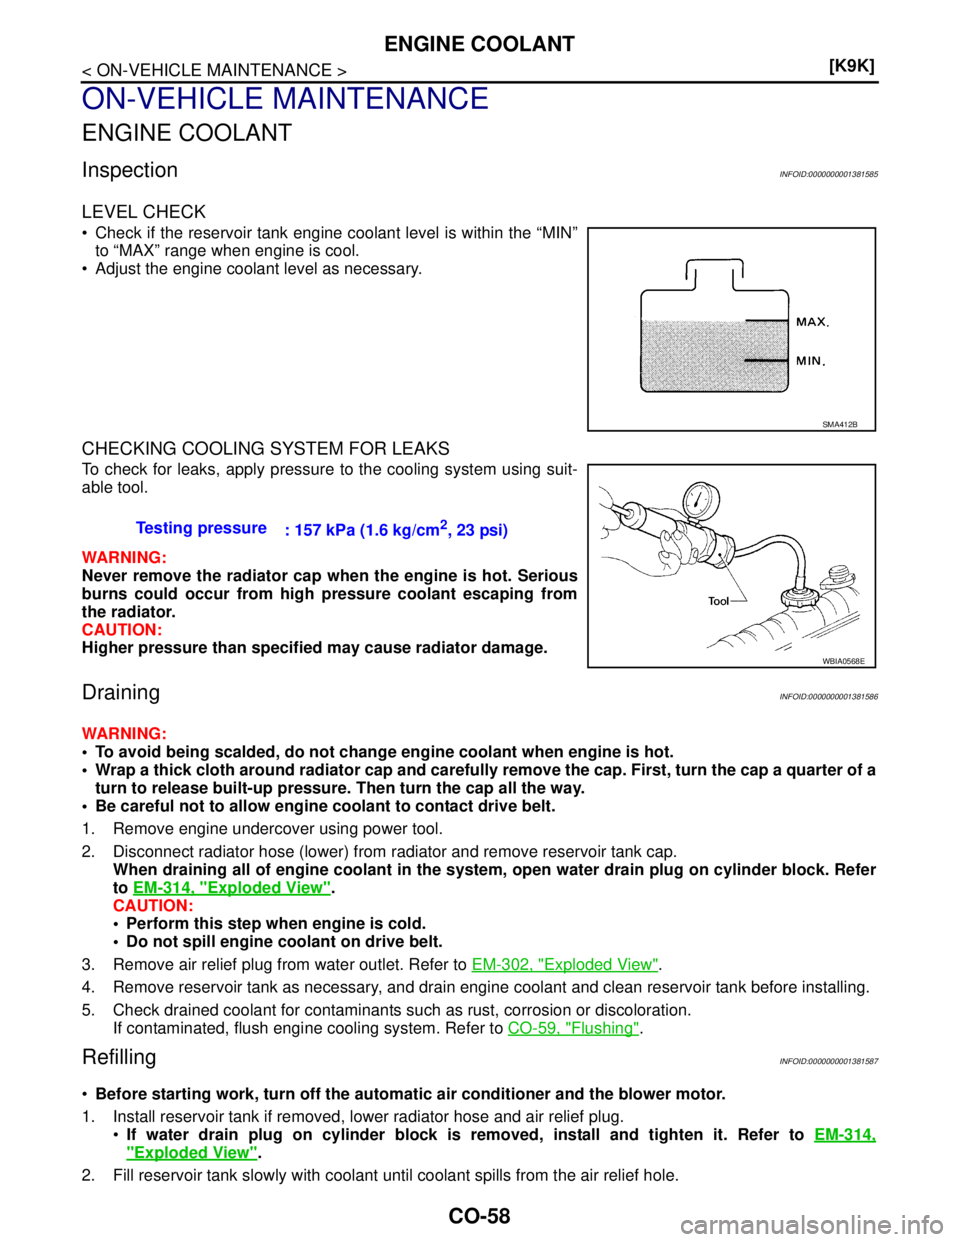
LEVEL CHECK
Check if the reservoir tank engine coolant level is within the “MIN”
to “MAX” range when engine is cool.
Adjust the engine coolant level as necessary.
CHECKING COOLING SYSTEM FOR LEAKS
To check for leaks, apply pressure to the cooling system using suit-
able tool.
WARNING:
Never remove the radiator cap when the engine is hot. Serious
burns could occur from high pressure coolant escaping from
the radiator.
CAUTION:
Higher pressure than specified may cause radiator damage.
DrainingINFOID:0000000001381586
WARNING:
To avoid being scalded, do not change engine coolant when engine is hot.
Wrap a thick cloth around radiator cap and carefully remove the cap. First, turn the cap a quarter of a
turn to release built-up pressure. Then turn the cap all the way.
Be careful not to allow engine coolant to contact drive belt.
1. Remove engine undercover using power tool.
2. Disconnect radiator hose (lower) from radiator and remove reservoir tank cap.
When draining all of engine coolant in the system, open water drain plug on cylinder block. Refer
to EM-314, "
Exploded View".
CAUTION:
Perform this step when engine is cold.
Do not spill engine coolant on drive belt.
3. Remove air relief plug from water outlet. Refer to EM-302, "
Exploded View".
4. Remove reservoir tank as necessary, and drain engine coolant and clean reservoir tank before installing.
5. Check drained coolant for contaminants such as rust, corrosion or discoloration.
If contaminated, flush engine cooling system. Refer to CO-59, "
Flushing".
RefillingINFOID:0000000001381587
Before starting work, turn off the automatic air conditioner and the blower motor.
1. Install reservoir tank if removed, lower radiator hose and air relief plug.
If water drain plug on cylinder block is removed, install and tighten it. Refer to EM-314,
"Exploded View".
2. Fill reservoir tank slowly with coolant until coolant spills from the air relief hole.
SMA412B
Testing pressure
: 157 kPa (1.6 kg/cm2, 23 psi)
WBIA0568E
Page 540 of 5883
ENGINE COOLANT
CO-59
< ON-VEHICLE MAINTENANCE >[K9K]
C
D
E
F
G
H
I
J
K
L
MA
CO
N
P O
Put a cloth under the air relief plug to prevent engine coolant from dampening the crankshaft
position sensor.
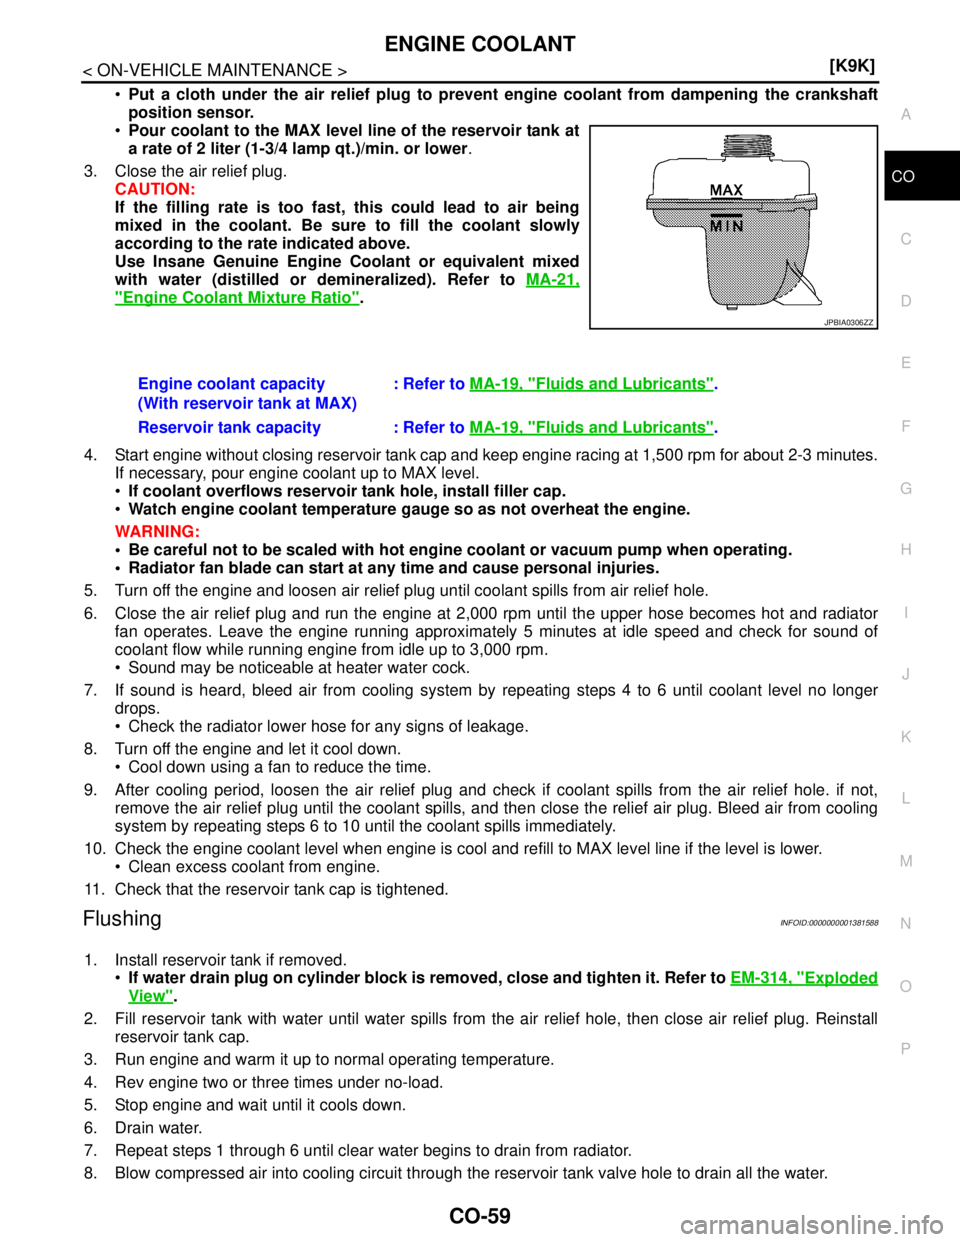
Pour coolant to the MAX level line of the reservoir tank at
a rate of 2 liter (1-3/4 lamp qt.)/min. or lower.
3. Close the air relief plug.
CAUTION:
If the filling rate is too fast, this could lead to air being
mixed in the coolant. Be sure to fill the coolant slowly
according to the rate indicated above.
Use Insane Genuine Engine Coolant or equivalent mixed
with water (distilled or demineralized). Refer to MA-21,
"Engine Coolant Mixture Ratio".
4. Start engine without closing reservoir tank cap and keep engine racing at 1,500 rpm for about 2-3 minutes.
If necessary, pour engine coolant up to MAX level.
If coolant overflows reservoir tank hole, install filler cap.
Watch engine coolant temperature gauge so as not overheat the engine.
WARNING:
Be careful not to be scaled with hot engine coolant or vacuum pump when operating.
Radiator fan blade can start at any time and cause personal injuries.
5. Turn off the engine and loosen air relief plug until coolant spills from air relief hole.
6. Close the air relief plug and run the engine at 2,000 rpm until the upper hose becomes hot and radiator
fan operates. Leave the engine running approximately 5 minutes at idle speed and check for sound of
coolant flow while running engine from idle up to 3,000 rpm.
Sound may be noticeable at heater water cock.
7. If sound is heard, bleed air from cooling system by repeating steps 4 to 6 until coolant level no longer
drops.
Check the radiator lower hose for any signs of leakage.
8. Turn off the engine and let it cool down.
Cool down using a fan to reduce the time.
9. After cooling period, loosen the air relief plug and check if coolant spills from the air relief hole. if not,
remove the air relief plug until the coolant spills, and then close the relief air plug. Bleed air from cooling
system by repeating steps 6 to 10 until the coolant spills immediately.
10. Check the engine coolant level when engine is cool and refill to MAX level line if the level is lower.
Clean excess coolant from engine.
11. Check that the reservoir tank cap is tightened.
FlushingINFOID:0000000001381588
1. Install reservoir tank if removed.
If water drain plug on cylinder block is removed, close and tighten it. Refer to EM-314, "
Exploded
View".
2. Fill reservoir tank with water until water spills from the air relief hole, then close air relief plug. Reinstall
reservoir tank cap.
3. Run engine and warm it up to normal operating temperature.
4. Rev engine two or three times under no-load.
5. Stop engine and wait until it cools down.
6. Drain water.
7. Repeat steps 1 through 6 until clear water begins to drain from radiator.
8. Blow compressed air into cooling circuit through the reservoir tank valve hole to drain all the water.
JPBIA0306ZZ
Engine coolant capacity
(With reservoir tank at MAX): Refer to MA-19, "Fluids and Lubricants".
Reservoir tank capacity : Refer to MA-19, "
Fluids and Lubricants".
Page 543 of 5883
CO-62
< ON-VEHICLE REPAIR >[K9K]
RADIATOR
ON-VEHICLE REPAIR
RADIATOR
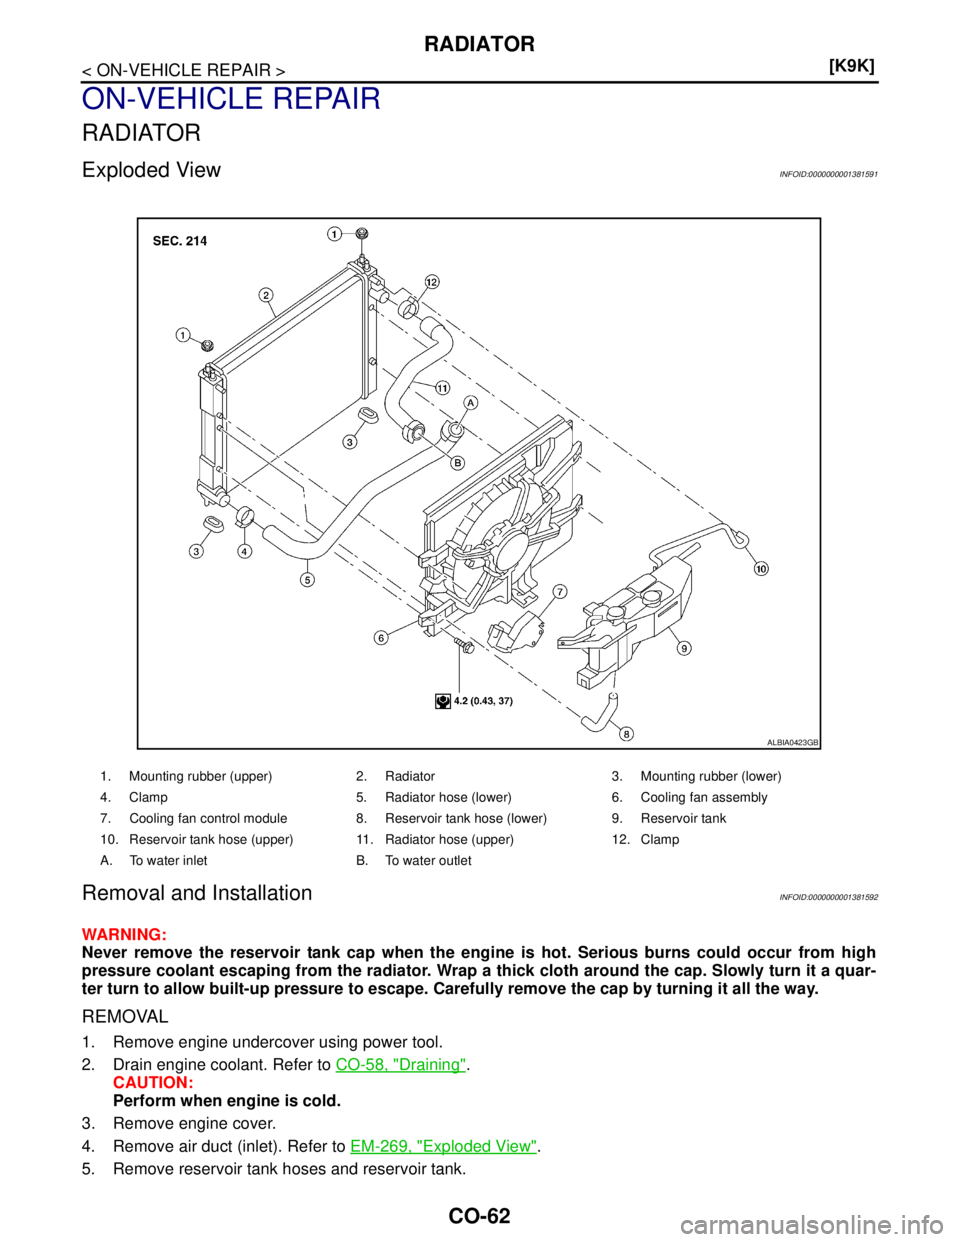
Exploded ViewINFOID:0000000001381591
Removal and InstallationINFOID:0000000001381592
WARNING:
Never remove the reservoir tank cap when the engine is hot. Serious burns could occur from high
pressure coolant escaping from the radiator. Wrap a thick cloth around the cap. Slowly turn it a quar-
ter turn to allow built-up pressure to escape. Carefully remove the cap by turning it all the way.
REMOVAL
1. Remove engine undercover using power tool.
2. Drain engine coolant. Refer to CO-58, "
Draining".
CAUTION:
Perform when engine is cold.
3. Remove engine cover.
4. Remove air duct (inlet). Refer to EM-269, "
Exploded View".
5. Remove reservoir tank hoses and reservoir tank.
1. Mounting rubber (upper) 2. Radiator 3. Mounting rubber (lower)
4. Clamp 5. Radiator hose (lower) 6. Cooling fan assembly
7. Cooling fan control module 8. Reservoir tank hose (lower) 9. Reservoir tank
10. Reservoir tank hose (upper) 11. Radiator hose (upper) 12. Clamp
A. To water inlet B. To water outlet
ALBIA0423GB
Page 544 of 5883
RADIATOR
CO-63
< ON-VEHICLE REPAIR >[K9K]
C
D
E
F
G
H
I
J
K
L
MA
CO
N
P O
6. Disconnect radiator upper hose, reservoir tank hose and mounting bracket.
7. Disconnect radiator fan motor harness connectors.
8. Remove radiator core support cover.
9. Remove hood latch.
10. Disconnect horn and ambient temperature sensor harness connectors.
11. Remove radiator core support (upper).
12. Remove cooling fan and shroud assembly.
13. Release charge air cooler from the radiator. Refer to EM-270, "
Exploded View".
14. Remove A/C condenser to radiator bolts.
15. Remove radiator.
CAUTION:
Do not damage or scratch radiator core when removing.
INSTALLATION
Installation is in the reverse order of removal.
Check for engine coolant leaks. Refer to CO-58, "
Inspection".
InspectionINFOID:0000000001381593
INSPECTION AFTER INSTALLATION
Check for engine coolant leaks using rsuitable tools. Refer to CO-58, "Inspection".
Page 545 of 5883
CO-64
< ON-VEHICLE REPAIR >[K9K]
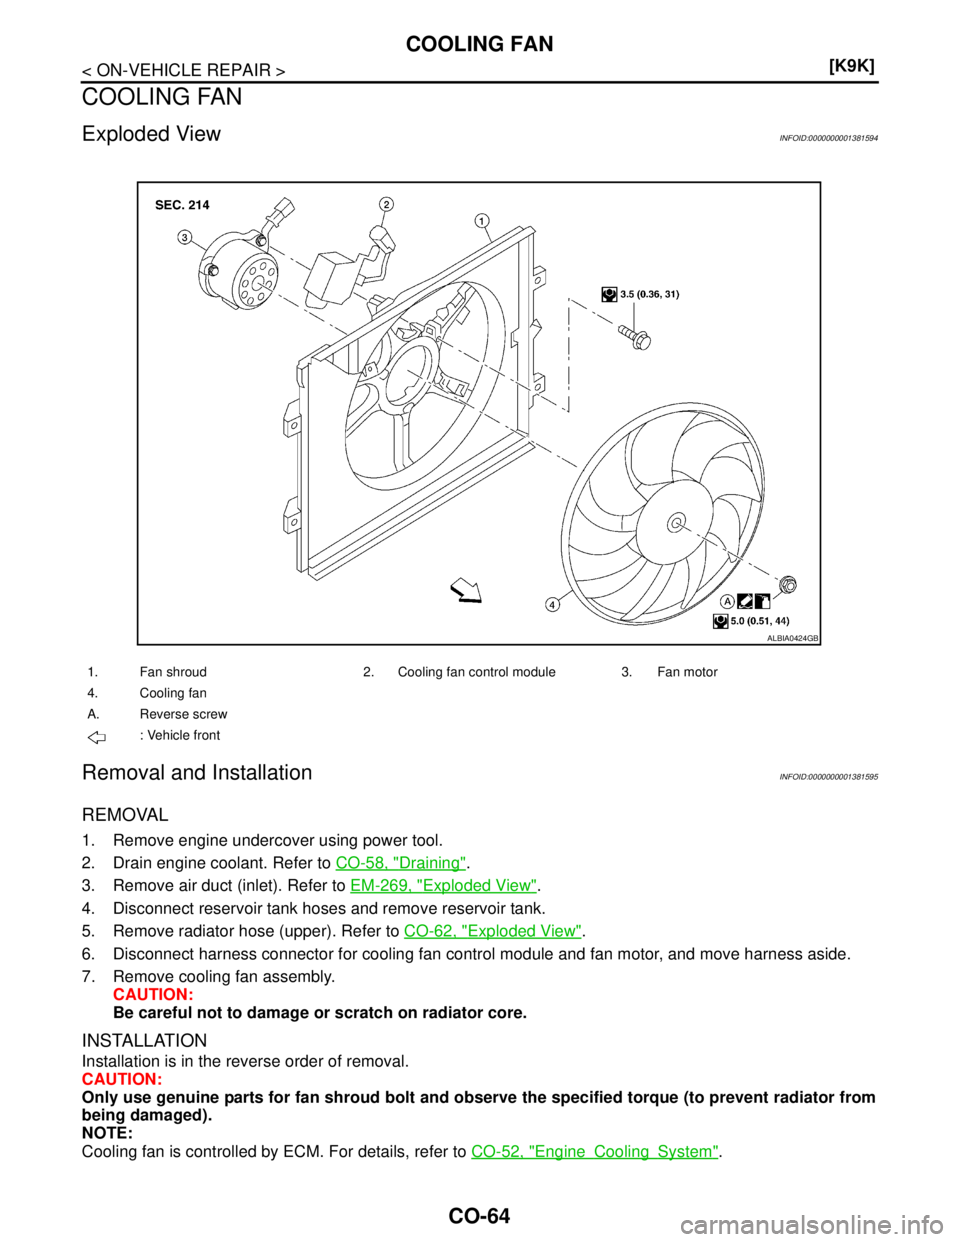
COOLING FAN
COOLING FAN
Exploded ViewINFOID:0000000001381594
Removal and InstallationINFOID:0000000001381595
REMOVAL
1. Remove engine undercover using power tool.
2. Drain engine coolant. Refer to CO-58, "
Draining".
3. Remove air duct (inlet). Refer to EM-269, "
Exploded View".
4. Disconnect reservoir tank hoses and remove reservoir tank.
5. Remove radiator hose (upper). Refer to CO-62, "
Exploded View".
6. Disconnect harness connector for cooling fan control module and fan motor, and move harness aside.
7. Remove cooling fan assembly.
CAUTION:
Be careful not to damage or scratch on radiator core.
INSTALLATION
Installation is in the reverse order of removal.
CAUTION:
Only use genuine parts for fan shroud bolt and observe the specified torque (to prevent radiator from
being damaged).
NOTE:
Cooling fan is controlled by ECM. For details, refer to CO-52, "
EngineCoolingSystem".
1. Fan shroud 2. Cooling fan control module 3. Fan motor
4. Cooling fan
A. Reverse screw
: Vehicle front
ALBIA0424GB
Page 549 of 5883
CO-68
< ON-VEHICLE REPAIR >[K9K]
WATER OUTLET AND THERMOSTAT ASSEMBLY
WATER OUTLET AND THERMOSTAT ASSEMBLY
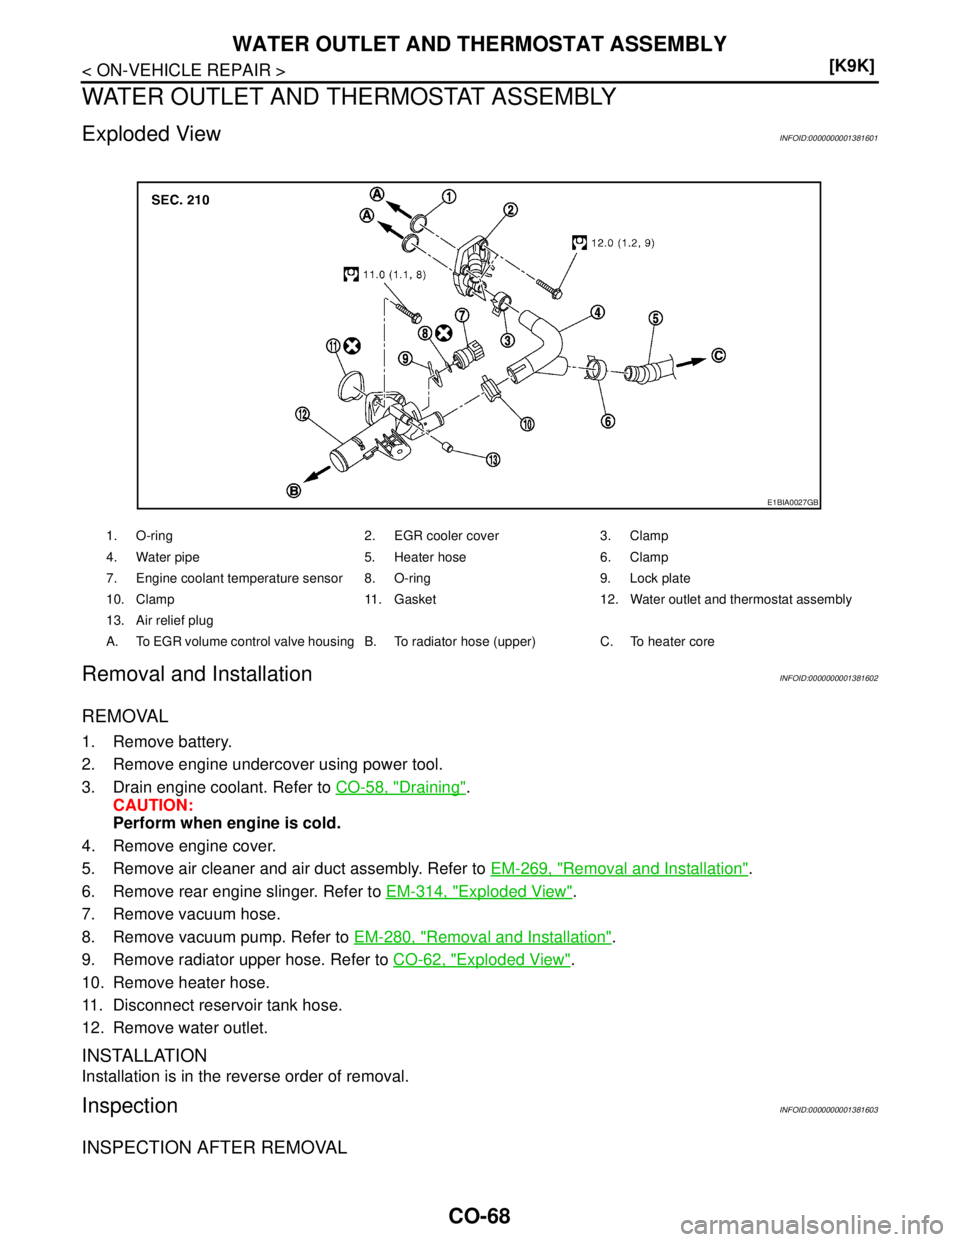
Exploded ViewINFOID:0000000001381601
Removal and InstallationINFOID:0000000001381602
REMOVAL
1. Remove battery.
2. Remove engine undercover using power tool.
3. Drain engine coolant. Refer to CO-58, "
Draining".
CAUTION:
Perform when engine is cold.
4. Remove engine cover.
5. Remove air cleaner and air duct assembly. Refer to EM-269, "
Removal and Installation".
6. Remove rear engine slinger. Refer to EM-314, "
Exploded View".
7. Remove vacuum hose.
8. Remove vacuum pump. Refer to EM-280, "
Removal and Installation".
9. Remove radiator upper hose. Refer to CO-62, "
Exploded View".
10. Remove heater hose.
11. Disconnect reservoir tank hose.
12. Remove water outlet.
INSTALLATION
Installation is in the reverse order of removal.
InspectionINFOID:0000000001381603
INSPECTION AFTER REMOVAL
1. O-ring 2. EGR cooler cover 3. Clamp
4. Water pipe 5. Heater hose 6. Clamp
7. Engine coolant temperature sensor 8. O-ring 9. Lock plate
10. Clamp 11. Gasket 12. Water outlet and thermostat assembly
13. Air relief plug
A. To EGR volume control valve housing B. To radiator hose (upper) C. To heater core
E1BIA0027GB
Page 551 of 5883
CO-70
< SERVICE DATA AND SPECIFICATIONS (SDS) [K9K]
SERVICE DATA AND SPECIFICATIONS (SDS)
SERVICE DATA AND SPECIFICATIONS (SDS)
SERVICE DATA AND SPECIFICATIONS (SDS)
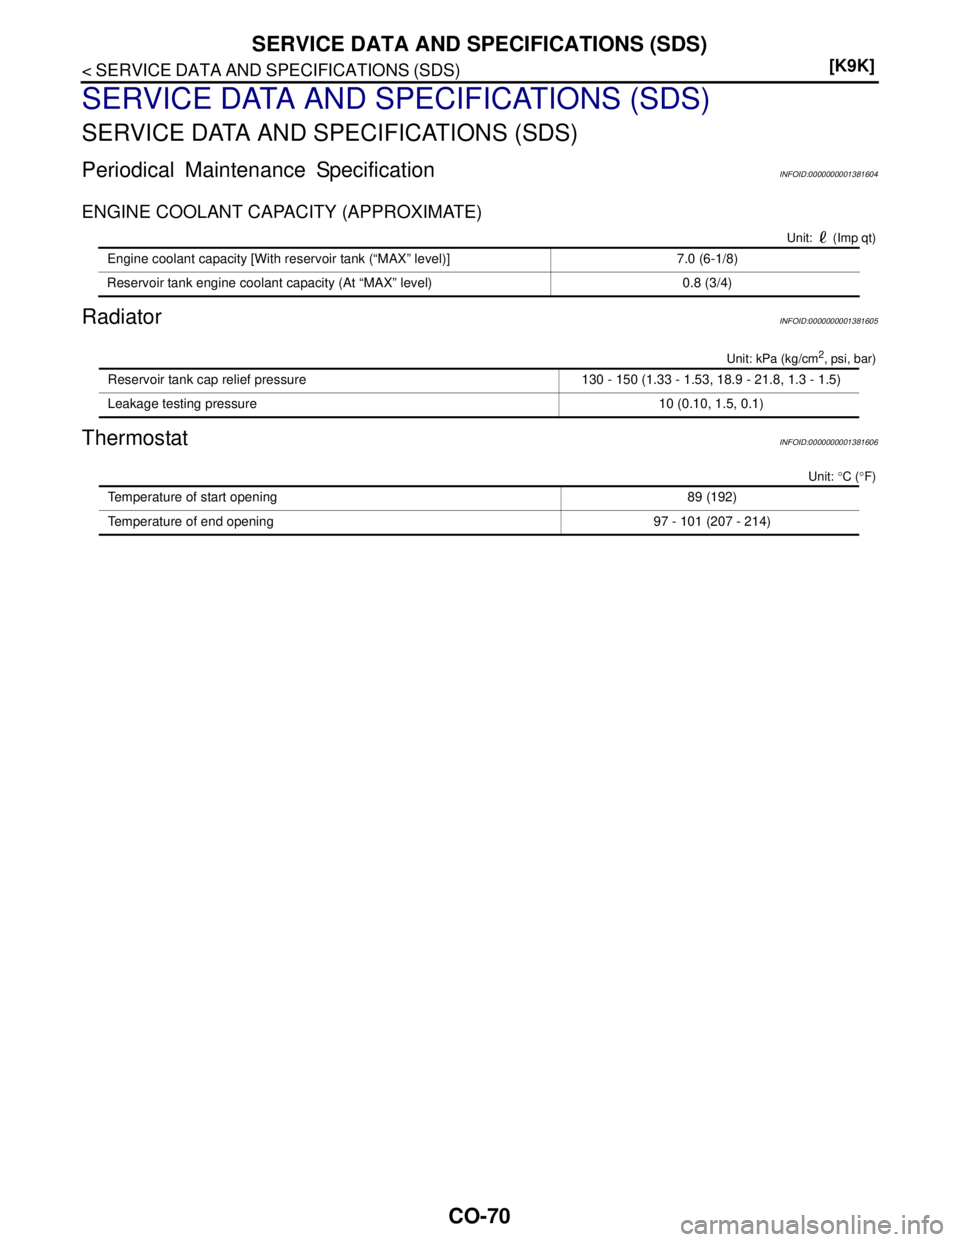
Periodical Maintenance SpecificationINFOID:0000000001381604
ENGINE COOLANT CAPACITY (APPROXIMATE)
Unit: (Imp qt)
RadiatorINFOID:0000000001381605
Unit: kPa (kg/cm2, psi, bar)
ThermostatINFOID:0000000001381606
Unit: °C (°F)
Engine coolant capacity [With reservoir tank (“MAX” level)] 7.0 (6-1/8)
Reservoir tank engine coolant capacity (At “MAX” level) 0.8 (3/4)
Reservoir tank cap relief pressure 130 - 150 (1.33 - 1.53, 18.9 - 21.8, 1.3 - 1.5)
Leakage testing pressure 10 (0.10, 1.5, 0.1)
Temperature of start opening 89 (192)
Temperature of end opening 97 - 101 (207 - 214)
Page 1606 of 5883
P1217 ENGINE OVER TEMPERATURE
EC-257
< COMPONENT DIAGNOSIS >[HR16DE (WITH EURO-OBD)]
C
D
E
F
G
H
I
J
K
L
MA
EC
N
P O
P1217 ENGINE OVER TEMPERATURE
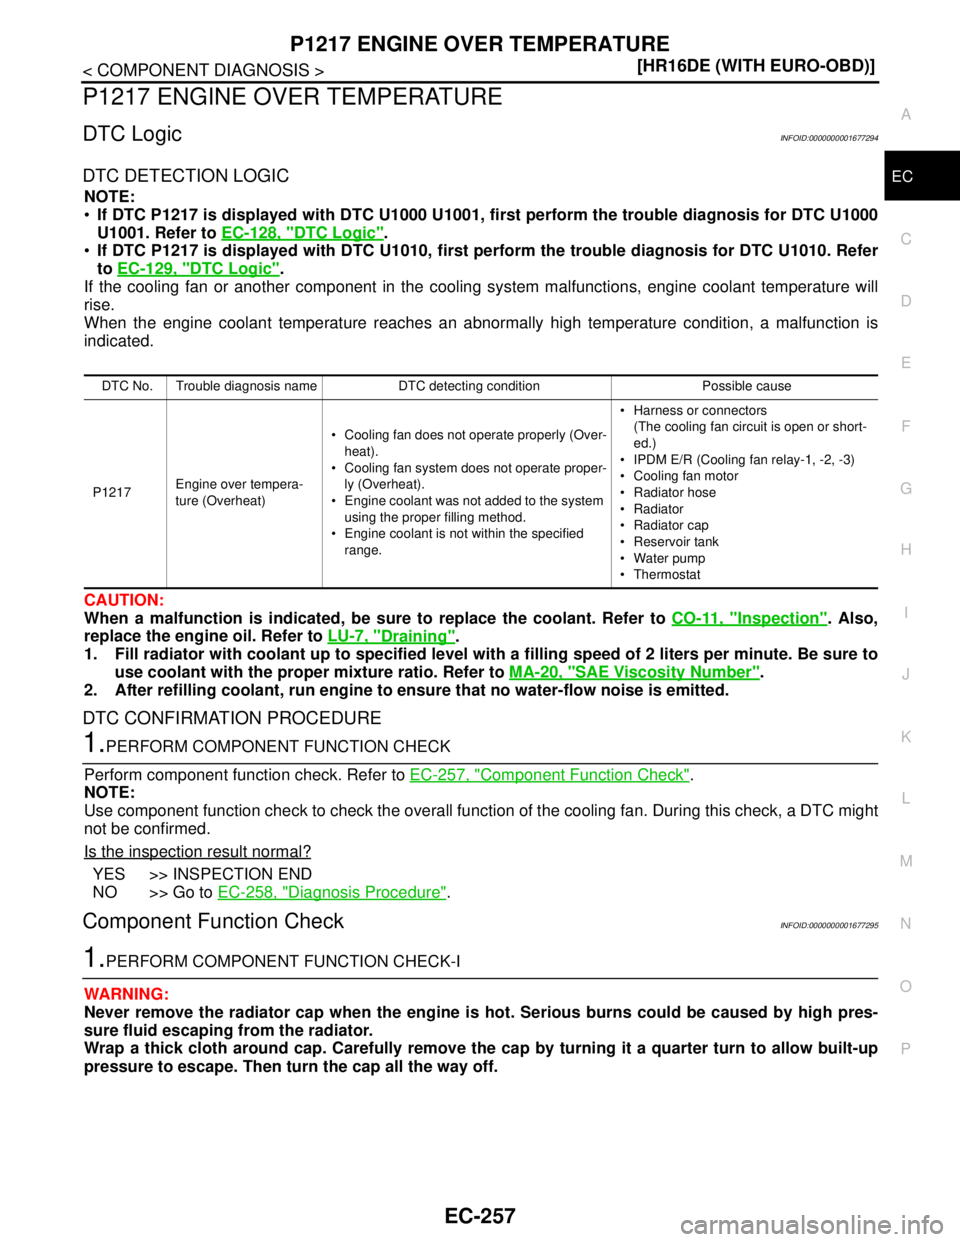
DTC LogicINFOID:0000000001677294
DTC DETECTION LOGIC
NOTE:
If DTC P1217 is displayed with DTC U1000 U1001, first perform the trouble diagnosis for DTC U1000
U1001. Refer to EC-128, "
DTC Logic".
If DTC P1217 is displayed with DTC U1010, first perform the trouble diagnosis for DTC U1010. Refer
to EC-129, "
DTC Logic".
If the cooling fan or another component in the cooling system malfunctions, engine coolant temperature will
rise.
When the engine coolant temperature reaches an abnormally high temperature condition, a malfunction is
indicated.
CAUTION:
When a malfunction is indicated, be sure to replace the coolant. Refer to CO-11, "
Inspection". Also,
replace the engine oil. Refer to LU-7, "
Draining".
1. Fill radiator with coolant up to specified level with a filling speed of 2 liters per minute. Be sure to
use coolant with the proper mixture ratio. Refer to MA-20, "
SAE Viscosity Number".
2. After refilling coolant, run engine to ensure that no water-flow noise is emitted.
DTC CONFIRMATION PROCEDURE
1.PERFORM COMPONENT FUNCTION CHECK
Perform component function check. Refer to EC-257, "
Component Function Check".
NOTE:
Use component function check to check the overall function of the cooling fan. During this check, a DTC might
not be confirmed.
Is the inspection result normal?
YES >> INSPECTION END
NO >> Go to EC-258, "
Diagnosis Procedure".
Component Function CheckINFOID:0000000001677295
1.PERFORM COMPONENT FUNCTION CHECK-I
WARNING:
Never remove the radiator cap when the engine is hot. Serious burns could be caused by high pres-
sure fluid escaping from the radiator.
Wrap a thick cloth around cap. Carefully remove the cap by turning it a quarter turn to allow built-up
pressure to escape. Then turn the cap all the way off.
DTC No. Trouble diagnosis name DTC detecting condition Possible cause
P1217Engine over tempera-
ture (Overheat) Cooling fan does not operate properly (Over-
heat).
Cooling fan system does not operate proper-
ly (Overheat).
Engine coolant was not added to the system
using the proper filling method.
Engine coolant is not within the specified
range. Harness or connectors
(The cooling fan circuit is open or short-
ed.)
IPDM E/R (Cooling fan relay-1, -2, -3)
Cooling fan motor
Radiator hose
Radiator
Radiator cap
Reservoir tank
Water pump
Thermostat
Page 1607 of 5883
EC-258
< COMPONENT DIAGNOSIS >[HR16DE (WITH EURO-OBD)]
P1217 ENGINE OVER TEMPERATURE
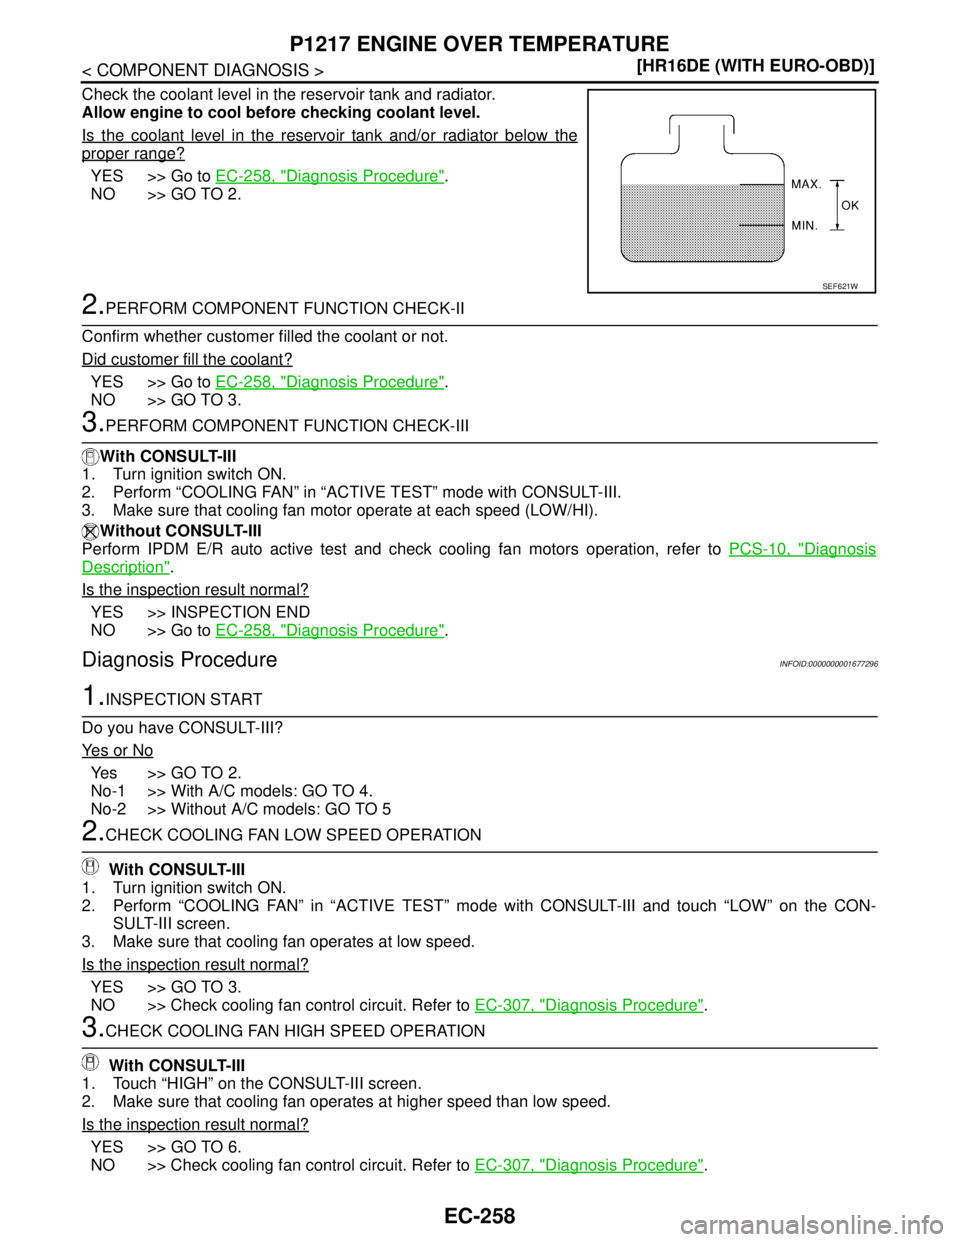
Check the coolant level in the reservoir tank and radiator.
Allow engine to cool before checking coolant level.
Is the coolant level in the reservoir tank and/or radiator below the
proper range?
YES >> Go to EC-258, "Diagnosis Procedure".
NO >> GO TO 2.
2.PERFORM COMPONENT FUNCTION CHECK-II
Confirm whether customer filled the coolant or not.
Did customer fill the coolant?
YES >> Go to EC-258, "Diagnosis Procedure".
NO >> GO TO 3.
3.PERFORM COMPONENT FUNCTION CHECK-III
With CONSULT-III
1. Turn ignition switch ON.
2. Perform “COOLING FAN” in “ACTIVE TEST” mode with CONSULT-III.
3. Make sure that cooling fan motor operate at each speed (LOW/HI).
Without CONSULT-III
Perform IPDM E/R auto active test and check cooling fan motors operation, refer to PCS-10, "
Diagnosis
Description".
Is the inspection result normal?
YES >> INSPECTION END
NO >> Go to EC-258, "
Diagnosis Procedure".
Diagnosis ProcedureINFOID:0000000001677296
1.INSPECTION START
Do you have CONSULT-III?
Ye s o r N o
Ye s > > G O T O 2 .
No-1 >> With A/C models: GO TO 4.
No-2 >> Without A/C models: GO TO 5
2.CHECK COOLING FAN LOW SPEED OPERATION
With CONSULT-III
1. Turn ignition switch ON.
2. Perform “COOLING FAN” in “ACTIVE TEST” mode with CONSULT-III and touch “LOW” on the CON-
SULT-III screen.
3. Make sure that cooling fan operates at low speed.
Is the inspection result normal?
YES >> GO TO 3.
NO >> Check cooling fan control circuit. Refer to EC-307, "
Diagnosis Procedure".
3.CHECK COOLING FAN HIGH SPEED OPERATION
With CONSULT-III
1. Touch “HIGH” on the CONSULT-III screen.
2. Make sure that cooling fan operates at higher speed than low speed.
Is the inspection result normal?
YES >> GO TO 6.
NO >> Check cooling fan control circuit. Refer to EC-307, "
Diagnosis Procedure".
SEF621W
Page 1608 of 5883
P1217 ENGINE OVER TEMPERATURE
EC-259
< COMPONENT DIAGNOSIS >[HR16DE (WITH EURO-OBD)]
C
D
E
F
G
H
I
J
K
L
MA
EC
N
P O
4.CHECK COOLING FAN LOW SPEED OPERATION
Without CONSULT-III
1. Start engine and let it idle.
2. Turn air conditioner switch ON.
3. Turn blower fan switch ON.
4. Make sure that cooling fan operates at low speed.
Is the inspection result normal?
YES >> GO TO 6.
NO >> Check cooling fan speed control circuit. Refer to EC-307, "
Diagnosis Procedure".
5.CHECK COOLING FAN LOW SPEED OPERATION
Without CONSULT-III
1. Perfom IPDM E/R auto active test and check cooling fan motor operation. Refer to PCS-10, "
Diagnosis
Description".
2. Make sure that cooling fan operates at low speed.
Is the inspection result normal?
YES >> GO TO 6.
NO >> Check cooling fan speed control circuit. Refer to EC-307, "
Diagnosis Procedure"
6.CHECK COOLING FAN HIGH SPEED OPERATION.
Without CONSULT-III
1. Turn ignition switch OFF.
2. Turn air conditioner switch and blower fan switch OFF.
3. Disconnect engine coolant temperature sensor harness connector.
4. Connect 150Ω resistor to engine coolant temperature sensor harness connector.
5. Restart engine and make sure that cooling fan operates at higher speed than low speed.
Is the inspection result normal?
YES >> GO TO 7.
NO >> Check cooling fan speed control circuit. Refer to EC-307, "
Diagnosis Procedure".
7.CHECK COOLING SYSTEM FOR LEAK
Check cooling system for leak. Refer to CO-11, "
Inspection".
Is leakage detected?
YES >> GO TO 9.
NO >> GO TO 8.
8.DETECT MALFUNCTIONING PART
Check the following for leak. Refer to CO-11, "
Inspection".
Hose
Radiator
Water pump
Reservoir tank
>> Repair or replace.
9.CHECK RESERVOIR TANK CAP
Check radiator cap. Refer to CO-14, "
Checking Radiator Cap".
Is the inspection result normal?
YES >> GO TO 10.
NO >> Replace radiator cap.
10.CHECK THERMOSTAT
Check thermostat.
Is the inspection result normal?
YES >> GO TO 11.
NO >> Replace thermostat.