dimensions NISSAN TIIDA 2007 Service Owner's Manual
[x] Cancel search | Manufacturer: NISSAN, Model Year: 2007, Model line: TIIDA, Model: NISSAN TIIDA 2007Pages: 5883, PDF Size: 78.95 MB
Page 2852 of 5883

CYLINDER HEAD
EM-205
< ON-VEHICLE REPAIR >[MR18DE]
C
D
E
F
G
H
I
J
K
L
MA
EM
N
P O
2. Ream cylinder head (1) recess diameter for service valve seat.
Be sure to ream in circles concentric to the valve guide center.
This will enable valve seat to fit correctly.
3. Heat cylinder head to 110° to 130°C (230° to 266°F) by soaking
in heated oil (A).
4. Provide valve seats cooled well with dry ice. Press-fit valve seat into cylinder head.
CAUTION:
Never touch cold valve seats directly.
Cylinder head contains heat, when working, wear protective equipment to avoid getting burned.
5. Using valve seat cutter set or valve seat grinder, finish valve
seat to the specified dimensions. For dimensions, refer to EM-
238, "Standard and Limit".
CAUTION:
When using valve seat cutter, firmly grip the cutter handle
with both hands. Then, press on the contacting surface all
around the circumference to cut in a single drive. Improper
pressure on with the cutter or cutting many different times
may result in stage valve seat.
6. Using compound, grind to adjust valve fitting.
7. Check again for normal contact.
VALVE SPRING SQUARENESS
Set try square along the side of valve spring and rotate the spring.
Measure the maximum clearance between the top of valve spring
and try square.
CAUTION:
Never remove valve spring seat from valve spring.
If it exceeds the limit, replace valve spring (with valve spring seat).
VALVE SPRING DIMENSIONS AND VALVE SPRING PRESSURE LOAD
2 : Valve seat
Oversize [0.5 mm (0.020 in)]
Intake : 35.200 - 35.227 mm (1.3858 - 1.3869 in)
Exhaust : 29.200 - 29.227 mm (1.1496 - 1.1507 in)
PBIC3218J
PBIC3214J
SEM934C
Limit: 1.9 mm (0.075 in)
PBIC0080E
Page 2872 of 5883

ENGINE UNIT
EM-225
< DISASSEMBLY AND ASSEMBLY >[MR18DE]
C
D
E
F
G
H
I
J
K
L
MA
EM
N
P O
Measure the outer diameter of crankshaft main journals with a
micrometer (A).
If out of the standard, measure the main bearing oil clearance.
Then use undersize bearing. Refer to "MAIN BEARING OIL
CLEARANCE".
CRANKSHAFT PIN JOURNAL DIAMETER
Measure the outer diameter of crankshaft pin journal with a micrometer.
If out of the standard, measure the connecting rod bearing oil clearance. Then use undersize bearing. Refer
to "CONNECTING ROD BEARING OIL CLEARANCE".
OUT-OF-ROUND AND TAPER OF CRANKSHAFT
Measure the dimensions at four different points as shown on each
main journal and pin journal with a micrometer.
Out-of-round is indicated by the difference in dimensions between
“X” and “Y” at “A” and “B”.
Taper is indicated by the difference in dimension between “A” and
“B” at “X” and “Y”.
If the measured value exceeds the limit, correct or replace crankshaft.
If corrected, measure the bearing oil clearance of the corrected main journal and/or pin journal. Then select
main bearing and/or connecting rod bearing. Refer to "MAIN BEARING OIL CLEARANCE" and/or "CON-
NECTING ROD BEARING OIL CLEARANCE".
CRANKSHAFT RUNOUT
Place a V-block on a precise flat table to support the journals on
the both end of the crankshaft.
Place a dial indicator (A) straight up on the No. 3 journal.
While rotating crankshaft, read the movement of the pointer on the
dial indicator. (Total indicator reading)
If it exceeds the limit, replace crankshaft.
CONNECTING ROD BEARING OIL CLEARANCE
Method by Calculation
Standard: 51.959 - 51.979 mm (2.0456 - 2.0464 in) dia.
PBIC3457J
Standard: 43.953 - 43.971 mm (1.7304-1.7311 in) dia.
Limit:
Out-of-round (Difference between “X” and “Y”)
: 0.0035 mm (0.0001 in)
Taper (Difference between “A” and “B”)
: 0.0035 mm (0.0001 in)
PBIC3459J
Standard : 0.05 mm (0.0020 in)
Limit : 0.10 mm (0.0040 in)
PBIC3458J
Page 2875 of 5883

EM-228
< DISASSEMBLY AND ASSEMBLY >[MR18DE]
ENGINE UNIT
Measure the outer diameters (“d1”, “d2”) at two positions as shown.
If reduction appears in places other than “B” range, regard it as
“d
2”.
If it exceeds the limit (a large difference in dimensions), replace
main bearing cap bolt with a new one.
CONNECTING ROD BOLT OUTER DIAMETER
Measure the outer diameter “d” at position as shown.
If reduction appears in a position other than “d”, regard it as “d”.
When “d” exceeds the limit (when it becomes thinner), replace
connecting rod bolt with a new one.
CLOGGED OR DAMAGED OIL FILTER (FOR INTAKE VALVE TIMING CONTROL)
Make sure that there is no foreign material on the oil filter and
check it for clogging.
- Clean it if necessary.
Check the oil filter for damage.
- Replace it if necessary.
FLYWHEEL DEFLECTION (M/T MODELS)
Measure the deflection of flywheel contact surface to clutch with a
dial indicator (A).
Measure the deflection at 210 mm (8.27 in) diameter.
If measured value is out of the standard, replace flywheel.
If a trace of burn or discoloration is found on the surface, repair it
with sandpaper.
CAUTION:
When measuring, keep magnetic fields (such as dial indicator
stand) away from signal plate of the rear end of crankshaft.
MOVEMENT AMOUNT OF FLYWHEEL (M/T MODELS)
CAUTION:
Never disassemble double mass flywheel.
Movement Amount of Thrust (Fore-and-Aft) Direction
Measure the movement amount of thrust (fore-and-aft) direction when 100 N (10.2 kg, 22 lb) force is added
at the portion of 125 mm (4.92 in) radius from the center of flywheel.
A : “d1” measuring position
B : “d2” measuring position
Limit (“d1” – “d2”): 0.15 mm (0.0059 in)
PBIC4015E
Limit: 7.75 mm (0.3051 in)
PBIC4016E
PBIC3273J
Limit : 0.45 mm (0.0177 in) or less.
PBIC4006E
Standard : 1.8 mm (0.071 in) or less
Page 2876 of 5883

ENGINE UNIT
EM-229
< DISASSEMBLY AND ASSEMBLY >[MR18DE]
C
D
E
F
G
H
I
J
K
L
MA
EM
N
P O
If measured value is out of the standard, replace flywheel.
Movement Amount in Radial (Rotation) Direction
Check the movement amount of radial (rotation) direction with the following procedure:
1. Install clutch cover bolt (1) to clutch cover mating hole, and
place a torque wrench (A) on the extended line of the flywheel
(2) center line.
Tighten bolt at a force of 9.8 N·m (1.0 kg-m, 87 in-lb) to keep it
from loosening.
2. Put a mating mark on circumferences of the two flywheel
masses without applying any load (Measurement standard
points).
3. Apply a force of 9.8 N·m (1.0 kg-m, 87 in-lb) in each direction,
and mark the movement amount on the mass on the transaxle
side.
4. Measure the dimensions of movement amounts “A” and “B” on
circumference of the flywheel on the transaxle side.
If measured value is out of the standard, replace flywheel.Limit: 33.2 mm (1.307 in) or less.
PBIC4007E
Page 2878 of 5883

HOW TO SELECT PISTON AND BEARING
EM-231
< DISASSEMBLY AND ASSEMBLY >[MR18DE]
C
D
E
F
G
H
I
J
K
L
MA
EM
N
P O
3. Select piston of the same grade.
Piston Selection Table
Unit: mm (in)
NOTE:
Piston is available together with piston pin as an assembly.
There is no piston pin (piston pin hole) grade.
HOW TO SELECT CONNECTING ROD BEARING
When New Connecting Rod and Crankshaft are Used
1. Apply connecting rod big end diameter grade stamped (C) on
connecting rod side face to the row in the “Connecting Rod
Bearing Selection Table”.
2. Apply crankshaft pin journal diameter grade stamped on crank-
shaft front side to the column in the “Connecting Rod Bearing
Selection Table”.
3. Read the symbol at the cross point of selected row and column in the “Connecting Rod Bearing Selection
Table”.
4. Apply the symbol obtained to the “Connecting Rod Bearing Grade Table” to select connecting rod bearing.
When Crankshaft and Connecting Rod are Reused
1. Measure the dimensions of the connecting rod big end diameter and crankshaft pin journal diameter indi-
vidually. Refer to EM-219, "
Inspection After Disassembly" and EM-219, "Inspection After Disassembly".
A : Identification code
B : Front mark
C : Piston grade number
D : Sub grade number
PBIC3589J
Grade number (Mark) 1 2 [or no mark (piston only)]
Cylinder bore Inner diameter 84.000 - 84.010 (3.3071 - 3.3075) 84.010 - 84.020 (3.3075 - 3.3079)
Piston skirt diameter 83.970 - 83.980 (3.3059 - 3.3063) 83.980 - 83.990 (3.3063 - 3.3067)
A : Oil hole
B : Cylinder number
D : Small end diameter grade
E : Front mark
PBIC3262J
A : No. 1 pin journal diameter grade
B : No. 2 pin journal diameter grade
C : No. 3 pin journal diameter grade
D : No. 4 pin journal diameter grade
E : No. 1 main journal diameter grade
F : No. 2 main journal diameter grade
G : No. 3 main journal diameter grade
H : No. 4 main journal diameter grade
I : No. 5 main journal diameter grade
PBIC3261J
Page 2881 of 5883

EM-234
< DISASSEMBLY AND ASSEMBLY >[MR18DE]
HOW TO SELECT PISTON AND BEARING
1. “Main Bearing Selection Table” rows correspond to main bearing
housing grade on rear left side of cylinder block (L).
If there is a correction stamp mark on cylinder block, use it as
a correct reference.
2. Apply main journal diameter grade stamped on crankshaft front
side to column in the “Main Bearing Selection Table”.
3. Read the symbol at the cross point of selected row and column in the “Main Bearing Selection Table”.
CAUTION:
There are two main bearing selection tables. One is for No. 1, 4 and 5 journals and the other is for
No. 2 and 3 journals. Make certain to use the appropriate table. This is due to differences in the
specified clearances.
4. Apply the symbol obtained to the “Main Bearing Grade Table” to select main bearing.
NOTE:
Service part is available as a set of both upper and lower.
When Cylinder Block and Crankshaft are Reused
1. Measure the dimensions of the cylinder block main bearing housing inner diameter and crankshaft main
journal diameter individually. Refer to EM-219, "
Inspection After Disassembly" and EM-219, "Inspection
After Disassembly".
2. Apply the measured dimension to the “Main Bearing Selection Table”.
3. Read the symbol at the cross point of selected row and column in the “Main Bearing Selection Table”.
CAUTION:
There are two main bearing selection tables. One is for No. 1, 4 and 5 journals and the other is for
No. 2 and 3 journals. Make certain to use the appropriate table. This is due to differences in the
specified clearances.
4. Apply the symbol obtained to the “Main Bearing Grade Table” to select main bearing.
NOTE:
A : Correction stamp
B : Standard stamp
C : Cylinder No. 1 bore grade
D : Cylinder No. 2 bore grade
E : Cylinder No. 3 bore grade
F : Cylinder No. 4 bore grade
G : No. 1 main bearing housing grade
H : No. 2 main bearing housing grade
I : No. 3 main bearing housing grade
J : No. 4 main bearing housing grade
K : No. 5 main bearing housing grade
: Engine front
PBIC3264J
A : No. 1 pin journal diameter grade
B : No. 2 pin journal diameter grade
C : No. 3 pin journal diameter grade
D : No. 4 pin journal diameter grade
E : No. 1 main journal diameter grade
F : No. 2 main journal diameter grade
G : No. 3 main journal diameter grade
H : No. 4 main journal diameter grade
I : No. 5 main journal diameter grade
PBIC3261J
Page 2886 of 5883

SERVICE DATA AND SPECIFICATIONS (SDS)
EM-239
< SERVICE DATA AND SPECIFICATIONS (SDS) [MR18DE]
C
D
E
F
G
H
I
J
K
L
MA
EM
N
P O
Unit: mm (in)
VA LV E
Va l v e Ti m i n g
Unit: degree
( ): Valve timing control “ON”
Valve Dimensions
Unit: mm (in)
Items Standard Limit
Head surface distortion — 0.1 (0.004)
Normal cylinder head height “H” 130.9 (5.15) —
PBIC0924E
Position a b c d e f
Valve timing 212 2248 (-32)
AT D C52 (12)
ABDC725
PBIC5304E
Valve head diameter “D”Intake 33.8 - 34.1 (1.331 - 1.343)
Exhaust 27.6 - 27.9 (1.087 - 1.098)
Valve length “L”Intake 106.27 (4.184)
Exhaust 105.26 (4.144)
SEM188A
Page 2900 of 5883

PRECAUTIONS
EM-253
< PRECAUTION >[K9K]
C
D
E
F
G
H
I
J
K
L
MA
EM
N
P O
Precaution for Liquid GasketINFOID:0000000001381456
REMOVAL OF LIQUID GASKET
After removing the mounting bolts and nuts, separate the mating
surface using a seal cutter and remove the liquid gasket.
CAUTION:
Be careful not to damage the mating surfaces.
In areas where the cutter is difficult to use, use a plastic hammer to
lightly tap the liquid gasket applied area.
CAUTION:
If for some unavoidable reason a tool such as a flat-bladed
screwdriver is used, be careful not to damage the mating sur-
faces.
LIQUID GASKET APPLICATION PROCEDURE
1. Using a scraper, remove the old liquid gasket adhering to the
gasket application surface and the mating surface.
Remove the liquid gasket completely from the groove of the
gasket application surface, mounting bolts and bolt holes.
2. Wipe the gasket application surface and the mating surface with
white gasoline (lighting and heating use) to remove adhering
moisture, grease and foreign materials.
3. Attach the liquid gasket to the tube presser.
Use Genuine Liquid Gasket or equivalent.
4. Apply the liquid gasket without breaks to the specified location
with the specified dimensions.
If there is a groove for the liquid gasket application, apply the
gasket to the groove.
As for the bolt holes, normally apply the gasket inside the
holes. If specified, it should be applied outside the holes. Make
sure to read the instruction in this manual.
Within five minutes of gasket application, install the mating
component.
If the liquid gasket protrudes, wipe it off immediately.
Do not retighten after the installation.
After 30 minutes or more have passed from the installation, fill
the engine oil and coolant.
CAUTION:
If there are instructions in this manual, observe them.
Precaution for Diesel EquipmentINFOID:0000000001381457
CLEANLINESS
CLEANLINESS INSTRUCTIONS WHICH MUST BE FOLLOWED WHEN WORKING ON THE HIGH PRES-
SURE DIRECT INJECTION SYSTEM
Risks relating to contamination
PBIC0275E
PBIC0003E
EMA0622D
SEM159F
Page 2982 of 5883

SERVICE DATA AND SPECIFICATIONS (SDS)
EM-335
< SERVICE DATA AND SPECIFICATIONS (SDS) [K9K]
C
D
E
F
G
H
I
J
K
L
MA
EM
N
P O
Cylinder HeadINFOID:0000000001381519
CYLINDER HEAD
Unit: mm (in)
VALVE DIMENSIONS
13229BN718 8.000 (0.3150)
13229BN719 8.025 (0.3159)
13229BN720 8.050 (0.3169)
13229BN721 8.075 (0.3179)
13229BN722 8.100 (0.3189)
13229BN723 8.125 (0.3199)
13229BN724 8.150 (0.3209)Part number Thickness
Items Standard
Cylinder head gasket thickness 0.68 - 0.74 (0.0269 - 0.0291)
Head surface distortion Less than 0.05 (0.002)
Normal cylinder head height “H” 127 (5.000)
E1BIA0063ZZ
Items Standard
Valve head diameter “D” mm (in)Intake 33.38 - 33.62 (1.314 - 1.324)
Exhaust 28.88 - 29.12 (1.137 - 1.146)
Valve length “L” mm (in)Intake 100.74 - 101.16 (3.9661 - 3.9827)
Exhaust 100.54 - 100.96 (3.9583 - 3.9748)
Valve stem diameter “d” mm (in)Intake5.969 - 5.985 (0.2350 - 0.2356)
Measuring point (X1) is 41 (1.61)
Exhaust5.955 - 5.971 (0.2344 - 0.2351)
Measuring point (X1) is 41 (1.61)
Valve seat angle “α”degree 45°00′ (45.00°)
Valve margin “T” mm (in) 1.0 (0.039)
Page 3083 of 5883
EXL-82
< ON-VEHICLE MAINTENANCE >
HEADLAMP
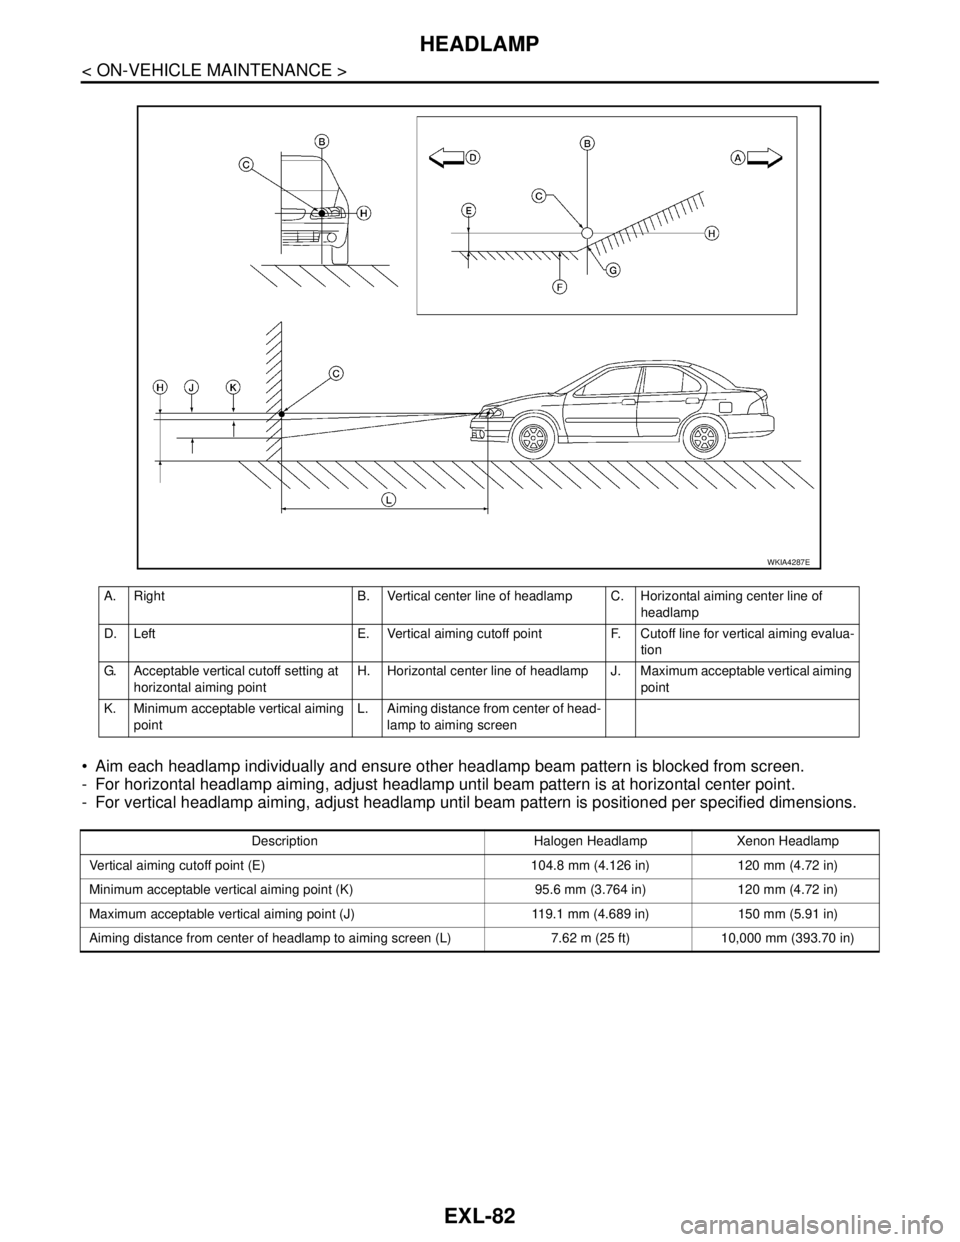
Aim each headlamp individually and ensure other headlamp beam pattern is blocked from screen.
- For horizontal headlamp aiming, adjust headlamp until beam pattern is at horizontal center point.
- For vertical headlamp aiming, adjust headlamp until beam pattern is positioned per specified dimensions.
A. Right B. Vertical center line of headlamp C. Horizontal aiming center line of
headlamp
D. Left E. Vertical aiming cutoff point F. Cutoff line for vertical aiming evalua-
tion
G. Acceptable vertical cutoff setting at
horizontal aiming pointH. Horizontal center line of headlamp J. Maximum acceptable vertical aiming
point
K. Minimum acceptable vertical aiming
pointL. Aiming distance from center of head-
lamp to aiming screen
WKIA4287E
Description Halogen Headlamp Xenon Headlamp
Vertical aiming cutoff point (E) 104.8 mm (4.126 in) 120 mm (4.72 in)
Minimum acceptable vertical aiming point (K) 95.6 mm (3.764 in) 120 mm (4.72 in)
Maximum acceptable vertical aiming point (J) 119.1 mm (4.689 in) 150 mm (5.91 in)
Aiming distance from center of headlamp to aiming screen (L) 7.62 m (25 ft) 10,000 mm (393.70 in)