fuses NISSAN TIIDA 2007 Service Owner's Manual
[x] Cancel search | Manufacturer: NISSAN, Model Year: 2007, Model line: TIIDA, Model: NISSAN TIIDA 2007Pages: 5883, PDF Size: 78.95 MB
Page 3567 of 5883

HAC-234
< COMPONENT DIAGNOSIS >[AUTO AIR CONDITIONER (W/NAVI)]
BLOWER MOTOR CONTROL SYSTEM
7. CHECK SUNLOAD SENSOR CIRCUIT
Perform diagnostic procedure for the sunload sensor circuit. Refer to HAC-250, "
Sunload Sensor Diagnosis
Procedure".
YES or NO
YES >> GO TO 8.
NO >> Repair as necessary.
8. CHECK INTAKE SENSOR CIRCUIT
Perform diagnostic procedure for the intake sensor circuit. Refer to HAC-253, "
Intake Sensor Diagnosis Pro-
cedure".
YES or NO
YES >> GO TO 9.
NO >> Repair as necessary.
9. RECHECK FOR SYMPTOMS
Perform a complete operational check and check for any symptoms. Refer to HAC-202, "
Operational Check".
Does another symptom exist?
YES >> Repair as necessary.
NO >> Replace front air control. Refer to XXXX.
Front Blower Motor Diagnosis ProcedureINFOID:0000000001547341
SYMPTOM: Front blower motor operation is malfunctioning.
DIAGNOSTIC PROCEDURE FOR BLOWER MOTOR
SYMPTOM: Front blower motor operation is malfunctioning.
1.CHECK POWER SUPPLY FOR FRONT BLOWER MOTOR
1. Disconnect front blower motor connector.
2. Turn ignition switch ON.
3. Rotate blower control dial to maximum speed.
4. Check voltage between front blower motor harness connector
M62 terminal 1 and ground.
Is the inspection result normal
YES >> GO TO 2.
NO >> Check power supply circuit and 15A fuses (Nos. 15 and 17), located in the fuse block.
If fuses are OK, check harness for open circuit. Repair or replace if necessary.
If fuses are NG, replace fuse and check harness for short circuit. Repair or replace if necessary.
2.CHECK CIRCUIT POWER SUPPLY FOR VARIABLE BLOWER CONTROL
AWIIA0344GB
Te r m i n a l s
Voltag e
(Approx.) (+) (−)
Connector Terminal
Ground
Front blower mo-
tor: M621 Battery voltage
SJIA0794E
Page 3591 of 5883

HAC-258
< COMPONENT DIAGNOSIS >[AUTO AIR CONDITIONER (W/NAVI)]
PTC HEATER CONTROL SYSTEM
The ambient sensor is attached on the radiator core support upper. It
detects ambient temperature and converts it into a resistance value
which is then input into the front air control.
PTC HEATER (300 WATT) : PTC Heater (300 Watt) Diagnosis ProcedureINFOID:0000000001548107
DIAGNOSTIC PROCEDURE FOR PTC SYSTEM
SYMPTOM: PTC heater system operation is malfunction.
1.CHECK POWER SUPPLY FOR PTC RELAY-1
1. Turn ignition switch ON.
2. Check voltage between PTC relay-1 harness connector E61 ter-
minals 2, 3, and ground.
Is the inspection result normal
YES >> GO TO 2.
NO >> Check power supply circuit and 10A fuse (No. 2) and 40A fusible link (No. I), located in the fuse
and fusible link box.
If fuses are OK, check harness for open circuit. Repair or replace if necessary.
If fuses are NG, replace fuse and check harness for short circuit. Repair or replace if necessary.
2.CHECK PTC RELAY-1
1. Turn ignition switch OFF.
2. Check PTC relay-1. Refer to HAC-265, "
PTC HEATER (300 WATT) : PTC Heater (300 Watt) Component
Inspection".
Is the inspection result normal
YES >> GO TO 3.
NO >> Replace PTC relay-1. Refer to XX.
3.CHECK PTC RELAY-1 OUTPUT CIRCUIT
1. Disconnect ambient sensor, PTC heater and water temperature
sensor connectors.
2. Turn temperature control dial clockwise until full hot position.
3. Turn mode control dial to foot position.
4. Start the engine.
5. Turn blower control dial to maximum speed.
6. Check continuity between PTC relay-1 harness connector E61
terminal 1 and ground.
Is the inspection result normal
YES >> GO TO 5.
AWIIA0600ZZ
Te r m i n a l s
Voltag e
(Approx.)
(+) (−)
Connector Terminal
Ground Battery voltage
PTC relay-1: E612
3
SJIA0913E
Connector Terminal
GroundContinuity
PTC relay-1: E61 1 Yes
AWIIA0455ZZ
Page 3603 of 5883

HAC-270
< COMPONENT DIAGNOSIS >[AUTO AIR CONDITIONER (W/NAVI)]
PTC HEATER CONTROL SYSTEM
2.CHECK BLOWER RELAY GROUND CIRCUIT
1. Turn ignition switch OFF.
2. Check continuity between blower relay harness connector J-1
terminal 2 and ground.
Is the inspection result normal
YES >> GO TO 3.
NO >> Repair harness or connector.
3.CHECK BLOWER RELAY
1. Turn ignition switch OFF.
2. Check blower relay. Refer to XX-XX, "*****"
.
Is the inspection result normal
YES >> GO TO 4.
NO >> Replace blower relay.
4.CHECK POWER SUPPLY FOR PTC RELAY-1
1. Turn ignition switch OFF.
2. Reconnect blower relay.
3. Turn ignition switch ON.
4. Check voltage between PTC relay-1 harness connector E61 ter-
minals 2, 3, and ground.
Is the inspection result normal
YES >> GO TO 5.
NO >> Check power supply circuit and 10A and 40A fuse (No. 16 and I, located in the fuse block).
Refer to XX.
If fuses are OK, check harness for open circuit. Repair or replace if necessary.
If fuses are NG, replace fuse and check harness for short circuit. Repair or replace if necessary.
5.CHECK POWER SUPPLY FOR PTC RELAY-2
Check voltage between PTC relay-2 harness connector E62 termi-
nals 2, 3, and ground.
Is the inspection result normal
YES >> GO TO 6.
NO >> Check power supply circuit and 80A fuse (N, located in the fuse block). Refer to XX.
If fuses are OK, check harness for open circuit. Repair or replace if necessary.
If fuses are NG, replace fuse and check harness for short circuit. Repair or replace if necessary.
Connector Terminal
GroundContinuity
Blower relay: J-1 2 Yes
WJIA2264E
Te r m i n a l s
Voltag e
(Approx.)
(+) (−)
Connector Terminal
Ground Battery voltage
PTC relay-2: E612
3
AWIIA0466ZZ
Te r m i n a l s
Voltag e
(Approx.)
(+) (−)
Connector Terminal
Ground Battery voltage
PTC relay-2: E622
3
AWIIA0466ZZ
Page 3604 of 5883

PTC HEATER CONTROL SYSTEM
HAC-271
< COMPONENT DIAGNOSIS >[AUTO AIR CONDITIONER (W/NAVI)]
C
D
E
F
G
H
J
K
L
MA
B
HAC
N
O
P
6.CHECK POWER SUPPLY FOR PTC RELAY-3
Check voltage between PTC relay-3 harness connector E61 termi-
nals 2, 3, and ground.
Is the inspection result normal
YES >> GO TO 5.
NO >> Check power supply circuit and 80A fuse (P, located in the fuse block). Refer to XX-XX.
If fuses are OK, check harness for open circuit. Repair or replace if necessary.
If fuses are NG, replace fuse and check harness for short circuit. Repair or replace if necessary.
7.CHECK PTC RELAYS
1. Turn ignition switch OFF.
2. Check PTC relay. Refer to XX-XX, "*****"
.
Is the inspection result normal
YES >> GO TO 6.
NO >> Replace inoperative PTC relay.
8.CHECK PTC RELAY-1 GROUND CIRCUIT
1. Disconnect ambient sensor, and PTC heater connectors.
2. Turn temperature control dial clockwise until full hot position.
3. Turn mode control dial to foot position.
4. Start the engine (1,000 RPM minimum).
5. Turn blower control dial to low speed.
6. Check continuity between PTC relay-1 harness connector E61
terminal 1 and ground.
Is the inspection result normal
YES >> GO TO 10.
NO >> GO TO 9.
9.CHECK CIRCUIT CONTINUITY BETWEEN PTC RELAY-1 AND BCM
1. Turn ignition switch OFF.
2. Disconnect BCM connector.
3. Check continuity between PTC relay-1 harness connector E61
(A) terminal 1 and BCM harness connector M19 (B) terminal 64.
Is the inspection result normal
YES >> Replace BCM. Refer to XXXX.
NO >> Repair harness or connector.
10.CHECK PTC RELAY-2 GROUND CIRCUIT
Te r m i n a l s
Vo l ta g e
(Approx.)
(+) (−)
Connector Terminal
Ground Battery voltage
PTC relay-3: E632
3
AWIIA0466ZZ
Connector Terminal
GroundContinuity
PTC relay-1: E61 1 Yes
AWIIA0455ZZ
AB
Continuity
Connector Terminal Connector Terminal
PTC relay-1: E61 1 BCM: M19 64 Yes
AWIIA0467ZZ
Page 3611 of 5883

HAC-278
< COMPONENT DIAGNOSIS >[AUTO AIR CONDITIONER (W/NAVI)]
POWER SUPPLY AND GROUND CIRCUIT FOR CONTROLLER
A/C Auto Amp Power and Ground Diagnosis Procedure
INFOID:0000000001547370
DIAGNOSTIC PROCEDURE FOR A/C SYSTEM
SYMPTOM: A/C system does not come on.
1.CHECK POWER SUPPLY CIRCUIT FOR FRONT AIR CONTROL.
1. Turn ignition switch OFF.
2. Disconnect front air control connector.
3. Check voltage between front air control harness connector and
ground.
OK or NG
OK >> GO TO 2.
NG >> Check 10A fuses Nos. 2, 13 and 16, located in the fuse block (J/B).
If fuses are OK, check harness for open circuit. Repair or replace if necessary.
If fuses are NG, replace fuse and check harness for short circuit. Repair or replace if necessary.
2.CHECK GROUND CIRCUIT FOR FRONT AIR CONTROL
1. Turn ignition switch OFF.
2. Check continuity between front air control harness connector
and ground.
OK or NG
OK >> Replace front air control Refer to XX.
NG >> Repair or replace harness.
SJIA0877E
Terminals Ignition switch position
(+) (-)
OFF ACC ON
Connector Terminal
Ground
front air control:
M8519Battery
voltageBattery
voltageBattery
voltage
11Approx.
0VApprox.
0VBattery
voltage
18Approx.
0VApprox.
0VBattery
voltage
SJIA0878E
Connector Terminal
GroundContinuity
front air control:
M8520 Yes
SJIA0879E
Page 4333 of 5883
MWI-26
< COMPONENT DIAGNOSIS >
POWER SUPPLY AND GROUND CIRCUIT
POWER SUPPLY AND GROUND CIRCUIT
COMBINATION METER
COMBINATION METER : Diagnosis ProcedureINFOID:0000000001374688
1.CHECK FUSES
Check for blown combination meter fuses.
Is the inspection result normal?
YES >> GO TO 2
NO >> If fuse is blown, be sure to eliminate cause of malfunction before installing new fuse.
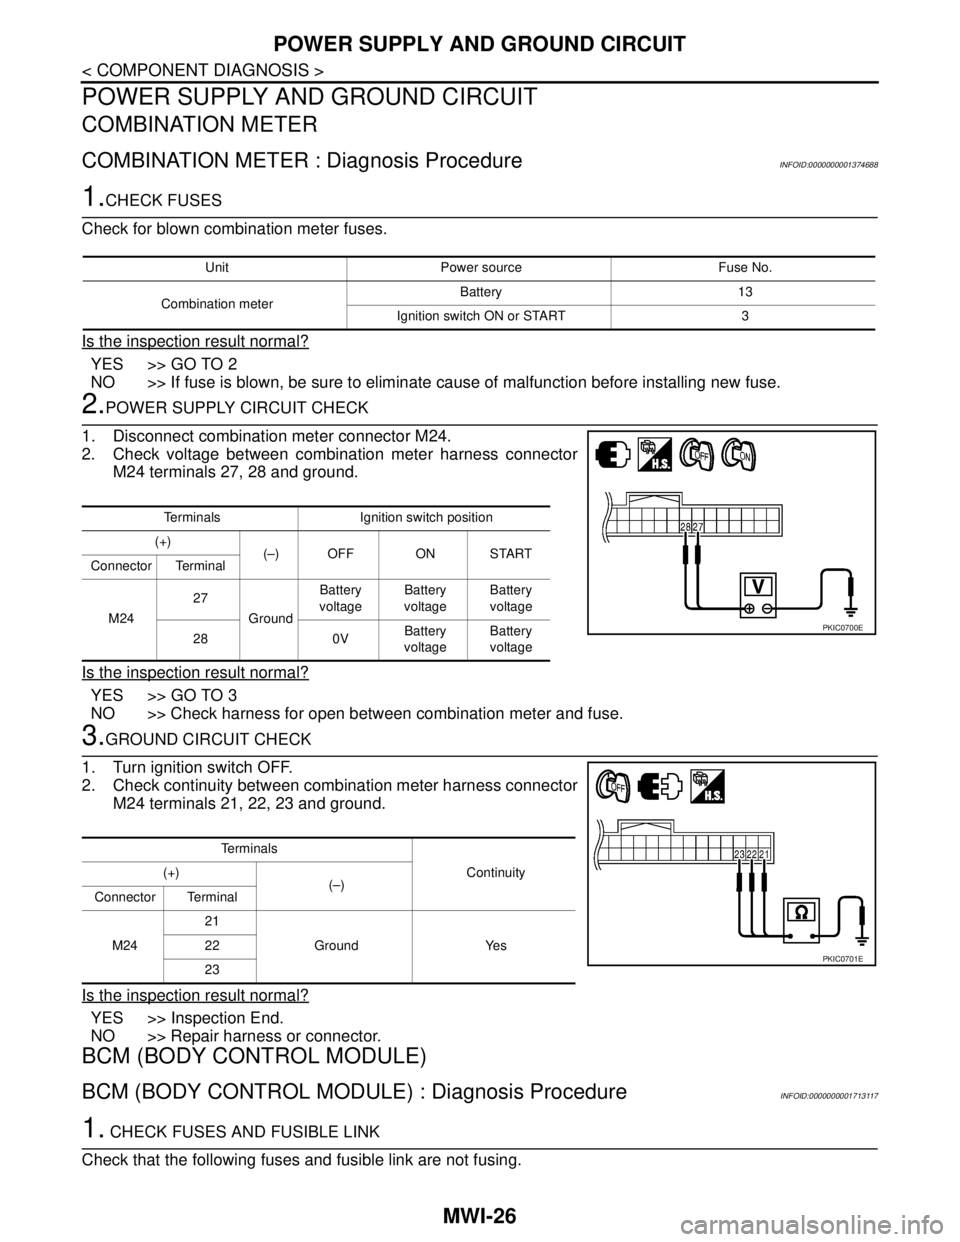
2.POWER SUPPLY CIRCUIT CHECK
1. Disconnect combination meter connector M24.
2. Check voltage between combination meter harness connector
M24 terminals 27, 28 and ground.
Is the inspection result normal?
YES >> GO TO 3
NO >> Check harness for open between combination meter and fuse.
3.GROUND CIRCUIT CHECK
1. Turn ignition switch OFF.
2. Check continuity between combination meter harness connector
M24 terminals 21, 22, 23 and ground.
Is the inspection result normal?
YES >> Inspection End.
NO >> Repair harness or connector.
BCM (BODY CONTROL MODULE)
BCM (BODY CONTROL MODULE) : Diagnosis ProcedureINFOID:0000000001713117
1. CHECK FUSES AND FUSIBLE LINK
Check that the following fuses and fusible link are not fusing.
Unit Power source Fuse No.
Combination meterBattery 13
Ignition switch ON or START 3
Terminals Ignition switch position
(+)
(–) OFF ON START
Connector Terminal
M2427
GroundBattery
voltageBattery
voltageBattery
voltage
28 0VBattery
voltageBattery
voltage
PKIC0700E
Te r m i n a l s
Continuity (+)
(–)
Connector Terminal
M2421
Ground Yes 22
23
PKIC0701E
Page 4334 of 5883
MWI
POWER SUPPLY AND GROUND CIRCUIT
MWI-27
< COMPONENT DIAGNOSIS >
C
D
E
F
G
H
I
J
K
L
MB A
O
P
Is the fuse fusing?
YES >> Replace the blown fuse or fusible link after repairing the affected circuit if a fuse or fusible link is
blown.
NO >> GO TO 2.
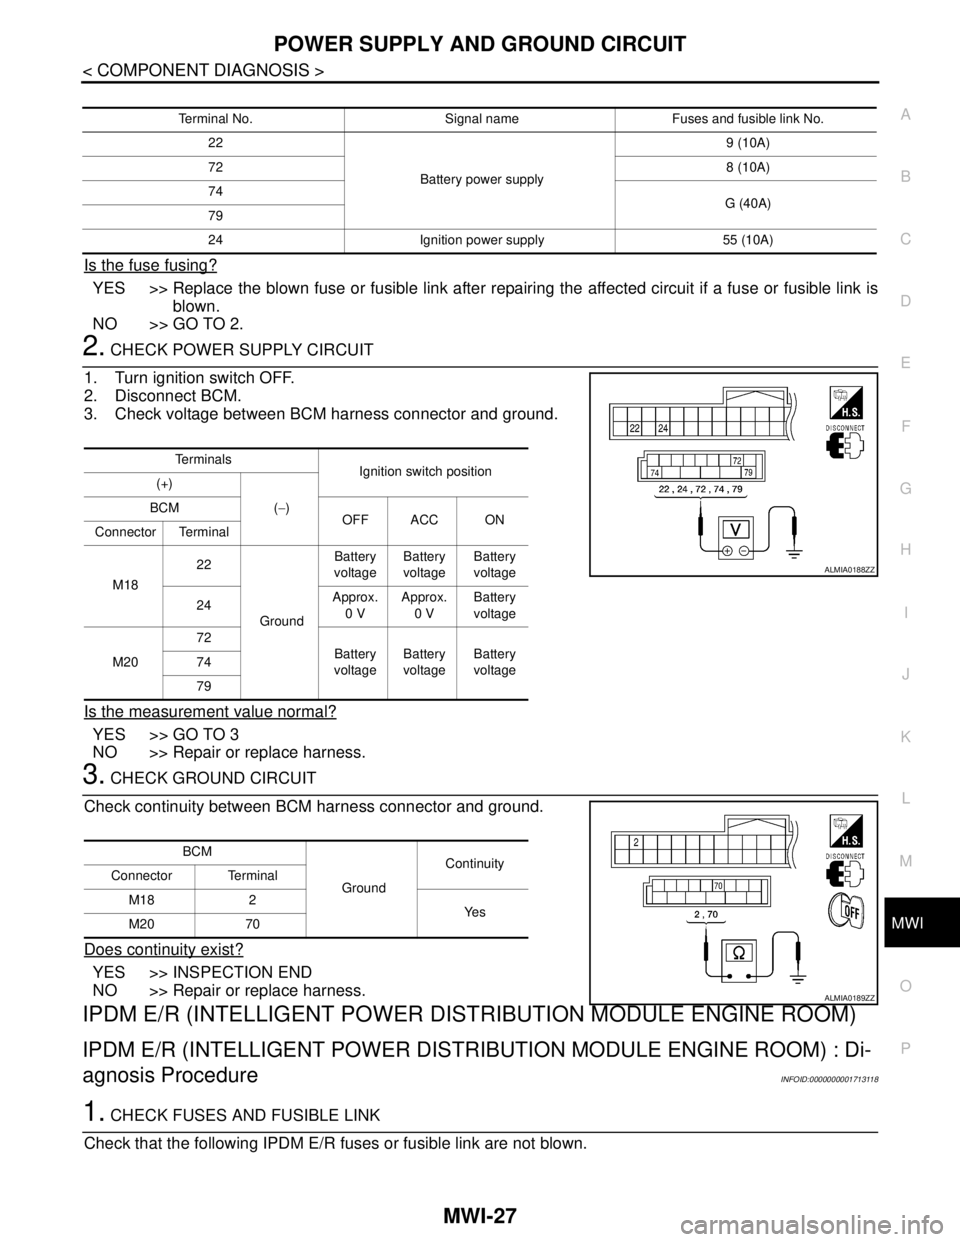
2. CHECK POWER SUPPLY CIRCUIT
1. Turn ignition switch OFF.
2. Disconnect BCM.
3. Check voltage between BCM harness connector and ground.
Is the measurement value normal?
YES >> GO TO 3
NO >> Repair or replace harness.
3. CHECK GROUND CIRCUIT
Check continuity between BCM harness connector and ground.
Does continuity exist?
YES >> INSPECTION END
NO >> Repair or replace harness.
IPDM E/R (INTELLIGENT POWER DISTRIBUTION MODULE ENGINE ROOM)
IPDM E/R (INTELLIGENT POWER DISTRIBUTION MODULE ENGINE ROOM) : Di-
agnosis Procedure
INFOID:0000000001713118
1. CHECK FUSES AND FUSIBLE LINK
Check that the following IPDM E/R fuses or fusible link are not blown.
Terminal No. Signal name Fuses and fusible link No.
22
Battery power supply9 (10A)
728 (10A)
74
G (40A)
79
24 Ignition power supply 55 (10A)
Te r m i n a l s
Ignition switch position
(+)
(−) BCM
OFF ACC ON
Connector Terminal
M1822
GroundBattery
voltageBattery
voltageBattery
voltage
24Approx.
0 VApprox.
0 VBattery
voltage
M2072
Battery
voltageBattery
voltageBattery
voltage 74
79
ALMIA0188ZZ
BCM
GroundContinuity
Connector Terminal
M18 2
Ye s
M20 70
ALMIA0189ZZ
Page 4430 of 5883

PCS-16
< COMPONENT DIAGNOSIS >[IPDM E/R]
POWER SUPPLY AND GROUND CIRCUIT
POWER SUPPLY AND GROUND CIRCUIT
Diagnosis ProcedureINFOID:0000000001697594
1. CHECK FUSES AND FUSIBLE LINK
Check that the following IPDM E/R fuses or fusible link are not blown.
Is the fuse blown?
YES >> Replace the blown fuse or fusible link after repairing the affected circuit.
NO >> GO TO 2
2. CHECK BATTERY POWER SUPPLY CIRCUIT
1. Turn ignition switch OFF.
2. Disconnect IPDM E/R.
3. Check voltage between IPDM E/R harness connectors and
ground.
Is the measurement value normal?
YES >> GO TO 3
NO >> Repair or replace harness.
3. CHECK GROUND CIRCUIT
1. Turn ignition switch OFF.
2. Check continuity between IPDM E/R harness connectors and
ground.
Does continuity exist?
YES >> Inspection End.
NO >> Repair or replace harness.
Terminal No. Signal name Fusible link No.
1 Battery A, D
2 Battery C
12 Ignition switch ON or START H
Terminals Ignition switch position
(+)
(−) OFF ON START
Connector Terminal
E42 (A)1
GroundBattery
voltageBattery
voltageBattery
voltage
2Battery
voltageBattery
voltageBattery
voltage
E43 (B) 12 0VBattery
voltageBattery
voltage
AWMIA0023ZZ
IPDM E/R
GroundContinuity
Connector Terminal
E46 (A) 38
Ye s
E48 (B) 59
AWMIA0024ZZ
Page 4662 of 5883

POWER SUPPLY AND GROUND CIRCUIT
SEC-37
< COMPONENT DIAGNOSIS >[WITH INTELLIGENT KEY SYSTEM]
C
D
E
F
G
H
I
J
L
MA
B
SEC
N
O
P
POWER SUPPLY AND GROUND CIRCUIT
INTELLIGENT KEY UNIT
INTELLIGENT KEY UNIT : Diagnosis ProcedureINFOID:0000000001532053
1.CHECK FUSES
Check that the following fuses are not blown.
Are the fuses blown?
YES >> Replace the blown fuse after repairing the affected circuit if a fuse is blown.
NO >> GO TO 2.
2.CHECK POWER SUPPLY CIRCUIT
1. Turn ignition switch OFF.
2. Disconnect Intelligent Key unit connector.
3. Check voltage between Intelligent Key unit harness connector
M52 terminals 6, 10, 11 and ground.
Is the inspection result normal?
YES >> GO TO 3.
NO >> Repair harness or connector.
3.CHECK GROUND CIRCUIT
Terminal No. Signal name Fuse No.
11 Battery power supply 31 (10A)
10 Ignition power supply (ACC/ON) 6 (10A)
6 Ignition power supply (ON/START) 2 (10A)
ALKIA0736ZZ
Te r m i n a lIgnition switch position
(+) (−)
OFF ACC ON Intelligent Key unit
Ground Connector Terminal
M5211 Battery voltage Battery voltage Battery voltage
10 0V Battery voltage Battery voltage
6 0V Battery voltage Battery voltage
Page 4725 of 5883

SEC-100
< COMPONENT DIAGNOSIS >[WITHOUT INTELLIGENT KEY SYSTEM]
POWER SUPPLY AND GROUND CIRCUIT
POWER SUPPLY AND GROUND CIRCUIT
BCM
BCM : Diagnosis ProcedureINFOID:0000000001404197
1.CHECK FUSES AND FUSIBLE LINK
Check that the following fuses and fusible link are not blown.
Are the fuses or fusible link blown?
YES >> Replace the blown fuse or fusible link after repairing the affected circuit if a fuse or fusible link is
blown.
NO >> GO TO 2.
2.CHECK POWER SUPPLY CIRCUIT
1. Turn ignition switch OFF.
2. Disconnect BCM connectors.
3. Check voltage between BCM harness connector and ground.
Is the measurement value normal?
YES >> GO TO 3.
NO >> Repair harness or connector.
3.CHECK GROUND CIRCUIT
Check continuity between BCM harness connector and ground.
Does continuity exist?
YES >> INSPECTION END
NO >> Repair harness or connector.
Terminal No. Signal name Fuses and fusible link No.
22
Battery power supply9 (10A)
74, 79G (40A)
24 Ignition power supply 55 (10A)
Te r m i n a l s
Ignition switch position
(+)
(−) BCM
OFF ACC ON
Connector Terminal
M1824
GroundApprox. 0 V Approx. 0 V Battery voltage
22
Battery voltage Battery voltage Battery voltage
M20 74, 79
BCM
GroundContinuity
Connector Terminal
M18 2
Ye s
M20 70