NISSAN TIIDA 2007 Service Repair Manual
TIIDA 2007
NISSAN
NISSAN
https://www.carmanualsonline.info/img/5/57395/w960_57395-0.png
NISSAN TIIDA 2007 Service Repair Manual
Trending: torque, reversing, air vents, radiator, IAC System, towing, relay
Page 4591 of 5883
FRONT SEAT BELT
SB-7
< ON-VEHICLE REPAIR >
C
D
E
F
G
I
J
K
L
MA
B
SB
N
O
P
2. Remove the adjuster cover and D-ring anchor bolt.
3. Remove both the center pillar upper and lower garnish. Refer to INT-20, "
Removal and Installation".
WARNING:
Do not reuse center pillar upper garnish if removed.
4. Pull the floor trim away from center pillar.
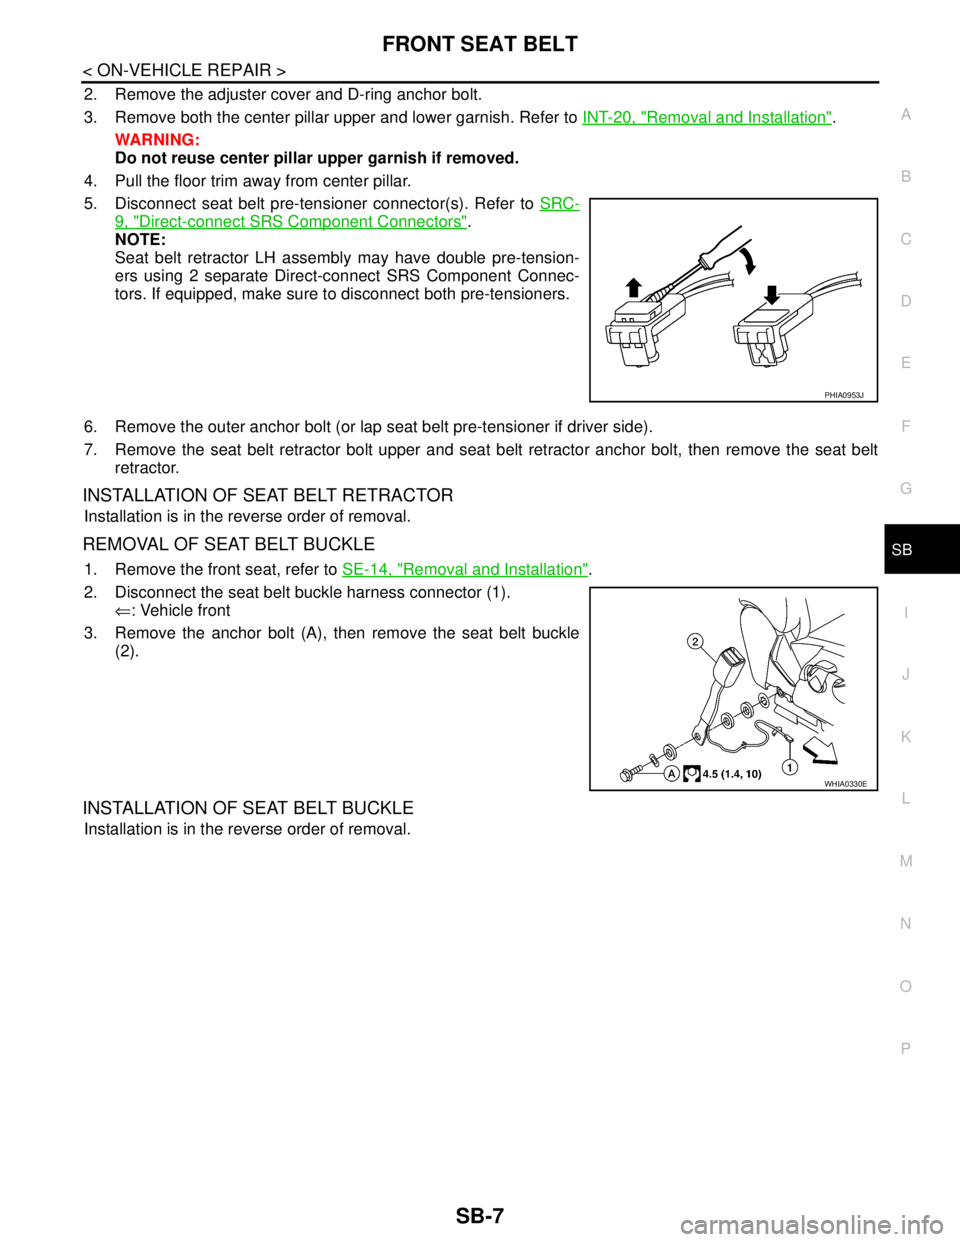
5. Disconnect seat belt pre-tensioner connector(s). Refer to SRC-
9, "Direct-connect SRS Component Connectors".
NOTE:
Seat belt retractor LH assembly may have double pre-tension-
ers using 2 separate Direct-connect SRS Component Connec-
tors. If equipped, make sure to disconnect both pre-tensioners.
6. Remove the outer anchor bolt (or lap seat belt pre-tensioner if driver side).
7. Remove the seat belt retractor bolt upper and seat belt retractor anchor bolt, then remove the seat belt
retractor.
INSTALLATION OF SEAT BELT RETRACTOR
Installation is in the reverse order of removal.
REMOVAL OF SEAT BELT BUCKLE
1. Remove the front seat, refer to SE-14, "Removal and Installation".
2. Disconnect the seat belt buckle harness connector (1).
⇐: Vehicle front
3. Remove the anchor bolt (A), then remove the seat belt buckle
(2).
INSTALLATION OF SEAT BELT BUCKLE
Installation is in the reverse order of removal.
PHIA0953J
WHIA0330E
Page 4592 of 5883
SB-8
< ON-VEHICLE REPAIR >
REAR SEAT BELT
REAR SEAT BELT
Removal and Installation of Rear Seat BeltINFOID:0000000001366761
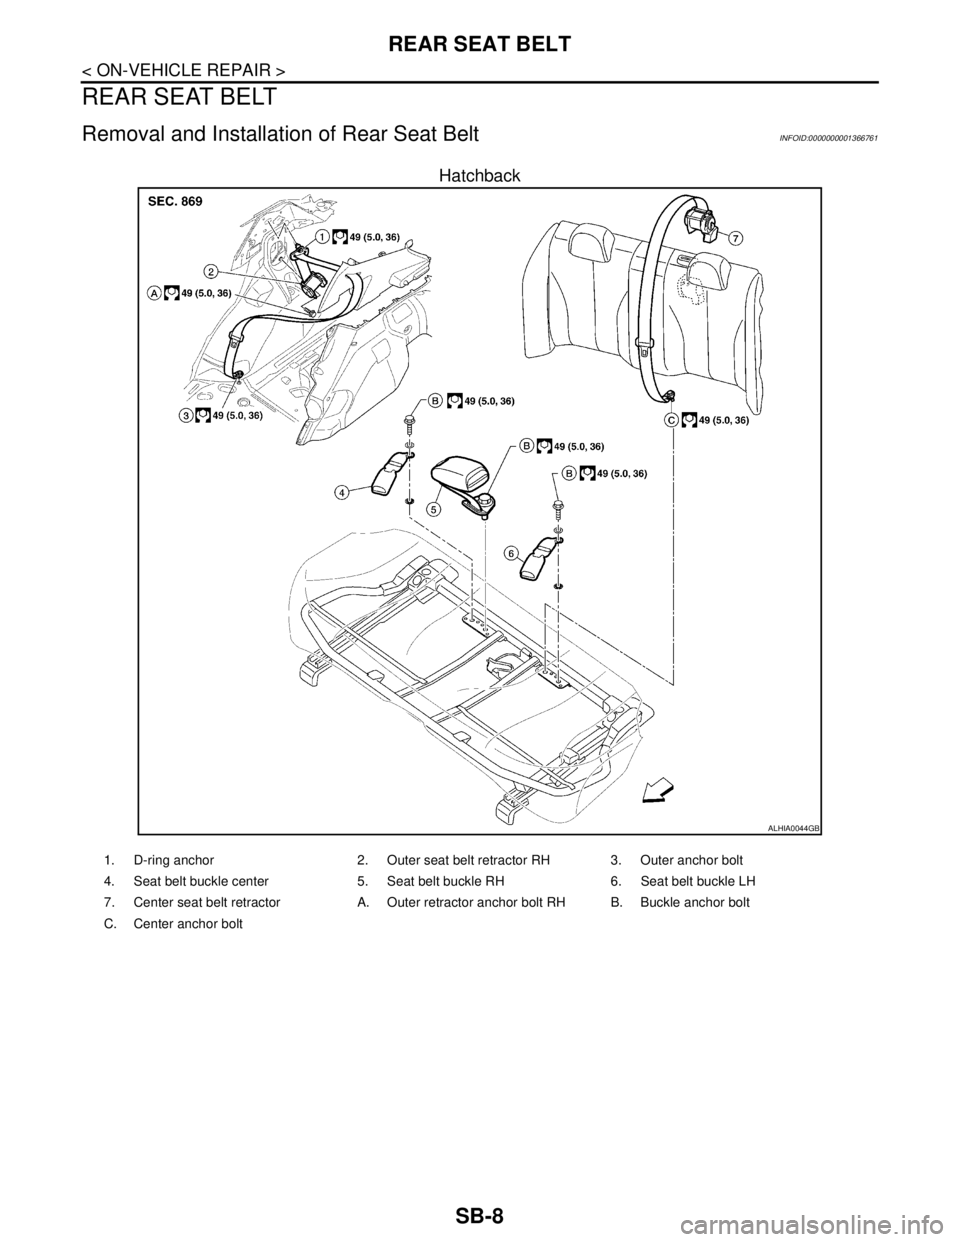
Hatchback
ALHIA0044GB
1. D-ring anchor 2. Outer seat belt retractor RH 3. Outer anchor bolt
4. Seat belt buckle center 5. Seat belt buckle RH 6. Seat belt buckle LH
7. Center seat belt retractor A. Outer retractor anchor bolt RH B. Buckle anchor bolt
C. Center anchor bolt
Page 4593 of 5883
REAR SEAT BELT
SB-9
< ON-VEHICLE REPAIR >
C
D
E
F
G
I
J
K
L
MA
B
SB
N
O
P
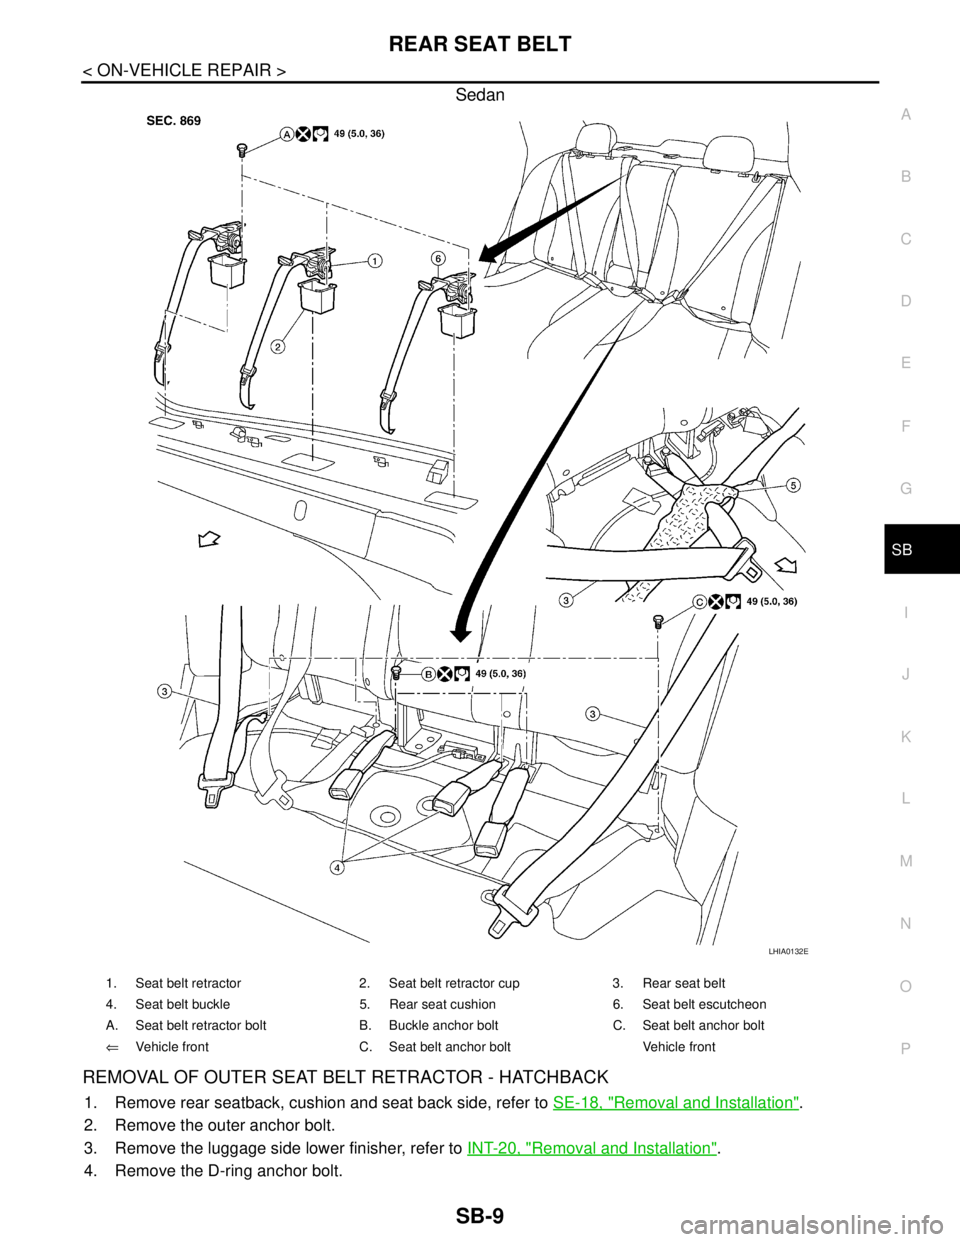
Sedan
REMOVAL OF OUTER SEAT BELT RETRACTOR - HATCHBACK
1. Remove rear seatback, cushion and seat back side, refer to SE-18, "Removal and Installation".
2. Remove the outer anchor bolt.
3. Remove the luggage side lower finisher, refer to INT-20, "
Removal and Installation".
4. Remove the D-ring anchor bolt.
LHIA0132E
1. Seat belt retractor 2. Seat belt retractor cup 3. Rear seat belt
4. Seat belt buckle 5. Rear seat cushion 6. Seat belt escutcheon
A. Seat belt retractor bolt B. Buckle anchor bolt C. Seat belt anchor bolt
⇐Vehicle front C. Seat belt anchor bolt Vehicle front
Page 4594 of 5883

SB-10
< ON-VEHICLE REPAIR >
REAR SEAT BELT
5. Remove the outer retractor anchor bolt, then remove outer seat belt retractor.
INSTALLATION OF OUTER SEAT BELT RETRACTOR - HATCHBACK
Installation is in the reverse order of removal.
REMOVAL OF OUTER SEAT BELT RETRACTOR - SEDAN
1. Remove rear seat cushion, refer to SE-18, "Removal and Installation".
2. Remove outer seat belt anchor bolt.
3. Release the seat belt escutcheon, then remove from belt.
4. Remove rear parcel shelf finisher, refer to INT-26, "
Removal and Installation".
5. Remove outer seat belt retractor bolt, then remove outer seat belt retractor.
INSTALLATION OF OUTER SEAT BELT RETRACTOR - SEDAN
Installation is in the reverse order of removal.
REMOVAL OF CENTER SEAT BELT RETRACTOR - HATCHBACK
1. Remove and disassemble the rear seat cushion, refer to SE-18, "Removal and Installation".
2. Remove the center seat belt retractor.
INSTALLATION OF CENTER SEAT BELT RETRACTOR - HATCHBACK
Installation is in the reverse order of removal.
REMOVAL OF CENTER SEAT BELT RETRACTOR - SEDAN
1. Lift front edge of rear seat cushion and slide forward.
2. Remove center seat belt anchor bolt (A), then pull center seat
belt through rear seat cushion (1).
⇐ Vehicle front
3. Release the seat belt escutcheon, then remove from belt.
4. Remove rear parcel shelf finisher, refer to INT-26, "
Removal and
Installation".
5. Remove the bolt, then remove center seat belt retractor.
INSTALLATION OF CENTER SEAT BELT RETRACTOR - SEDAN
Installation is in the reverse order of removal.
REMOVAL OF SEAT BELT BUCKLE
1. Remove rear seat cushion, refer to SE-18, "Removal and Installation".
2. Remove buckle anchor bolt, then remove seat belt buckle.
INSTALLATION OF SEAT BELT BUCKLE
Installation is in the reverse order of removal.
WIIA1380E
Page 4595 of 5883
LATCH SYSTEM FOR CHILDREN
SB-11
< ON-VEHICLE REPAIR >
C
D
E
F
G
I
J
K
L
MA
B
SB
N
O
P
LATCH SYSTEM FOR CHILDREN
Removal and InstallationINFOID:0000000001366762
NOTE:
The LATCH (Lower Anchors and Tether for Children) system is not serviceable.
Page 4596 of 5883
SB-12
< ON-VEHICLE REPAIR >
TOP TETHER STRAP CHILD RESTRAINT
TOP TETHER STRAP CHILD RESTRAINT
Removal and InstallationINFOID:0000000001366763
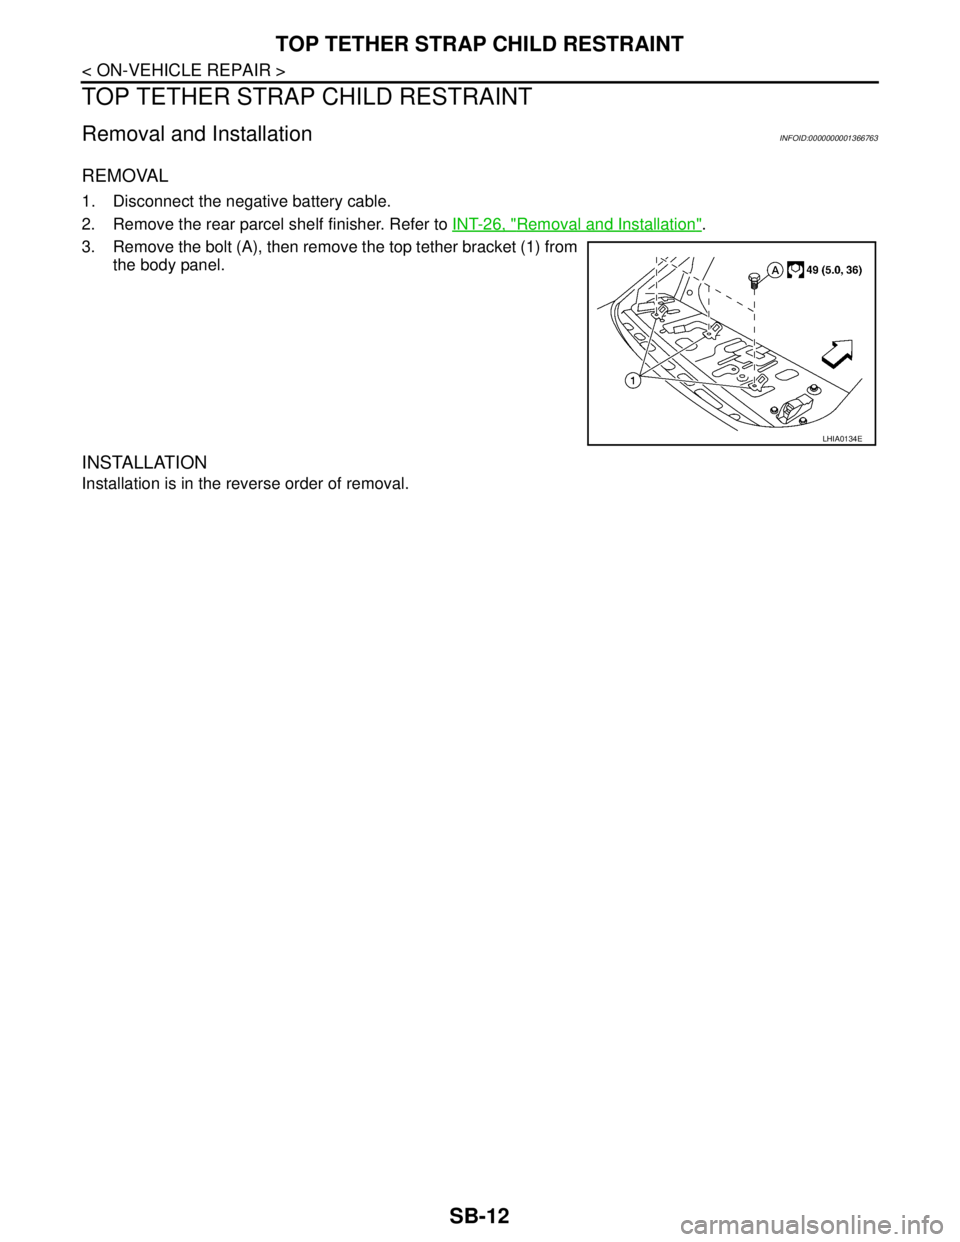
REMOVAL
1. Disconnect the negative battery cable.
2. Remove the rear parcel shelf finisher. Refer to INT-26, "
Removal and Installation".
3. Remove the bolt (A), then remove the top tether bracket (1) from
the body panel.
INSTALLATION
Installation is in the reverse order of removal.
LHIA0134E
Page 4597 of 5883

SE-1
BODY INTERIOR
C
D
E
F
G
H
I
K
L
M
SECTION SE
A
B
SE
N
O
P
CONTENTS
SEAT
COMPONENT DIAGNOSIS ..........................2
HEATED SEAT ....................................................2
Wiring Diagram .........................................................2
SYMPTOM DIAGNOSIS ...............................5
SQUEAK AND RATTLE TROUBLE DIAG-
NOSES ................................................................
5
Work Flow .................................................................5
Generic Squeak and Rattle Troubleshooting ............7
Diagnostic Worksheet ...............................................9
PRECAUTION ..............................................11
PRECAUTIONS ..................................................11
Precaution for Supplemental Restraint System
(SRS) "AIR BAG" and "SEAT BELT PRE-TEN-
SIONER" .................................................................
11
PREPARATION ...........................................12
PREPARATION ..................................................12
Special Service Tool ...............................................12
Commercial Service Tool ........................................12
REMOVAL AND INSTALLATION ...............13
FRONT SEAT ....................................................13
Exploded View .........................................................13
Removal and Installation .........................................14
REAR SEAT ......................................................16
Exploded View .........................................................16
Removal and Installation .........................................18
Removal and Installation .........................................20
ON-VEHICLE REPAIR .................................21
FRONT SEAT ....................................................21
Exploded View .........................................................21
Disassembly and Assembly .....................................22
REAR SEAT ......................................................24
Exploded View .........................................................24
Disassembly and Assembly .....................................26
Disassembly and Assembly .....................................27
Page 4598 of 5883
SE-2
< COMPONENT DIAGNOSIS >
HEATED SEAT
COMPONENT DIAGNOSIS
HEATED SEAT
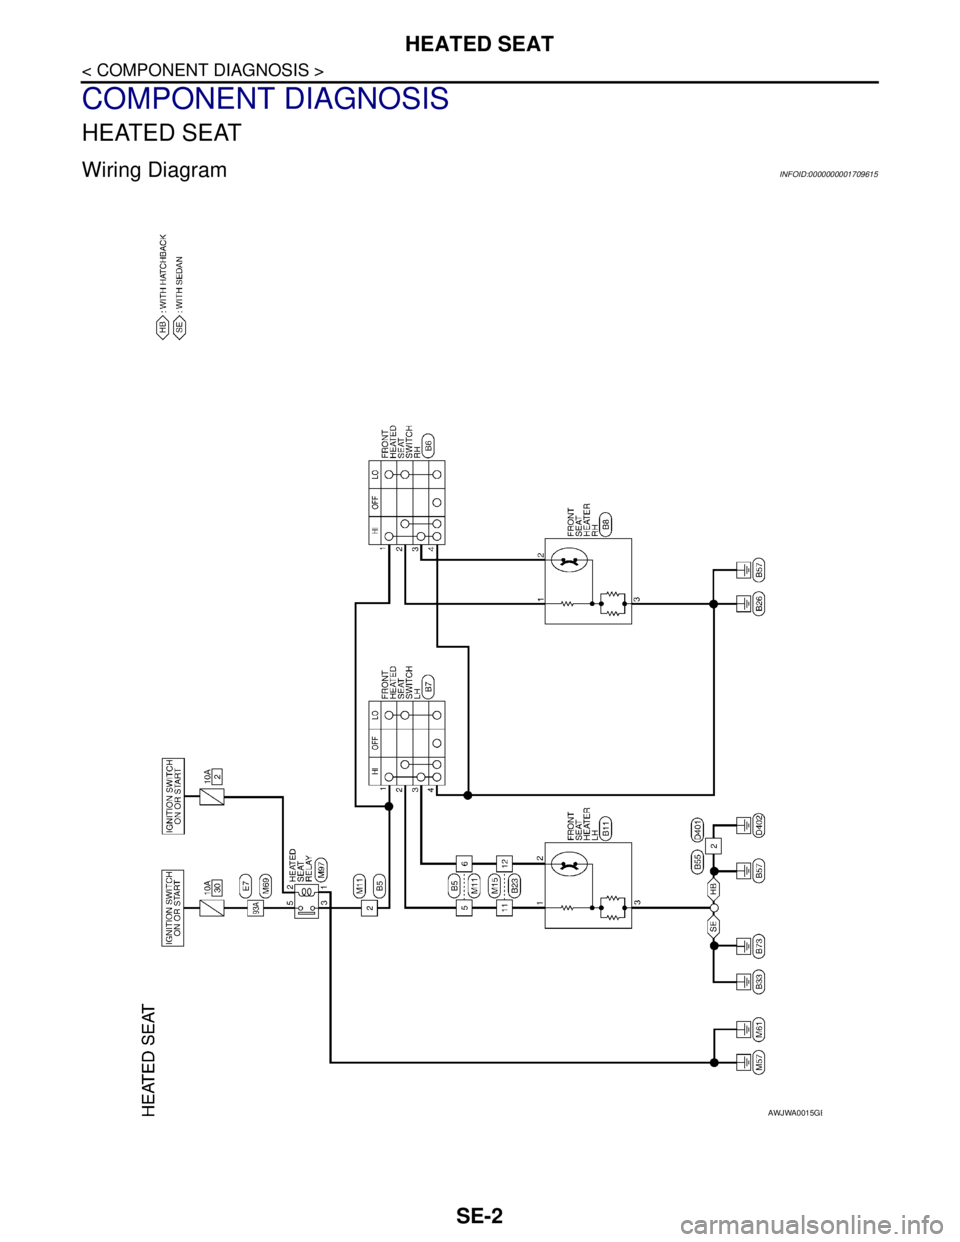
Wiring DiagramINFOID:0000000001709615
AWJWA0015GB
Page 4599 of 5883
HEATED SEAT
SE-3
< COMPONENT DIAGNOSIS >
C
D
E
F
G
H
I
K
L
MA
B
SE
N
O
P
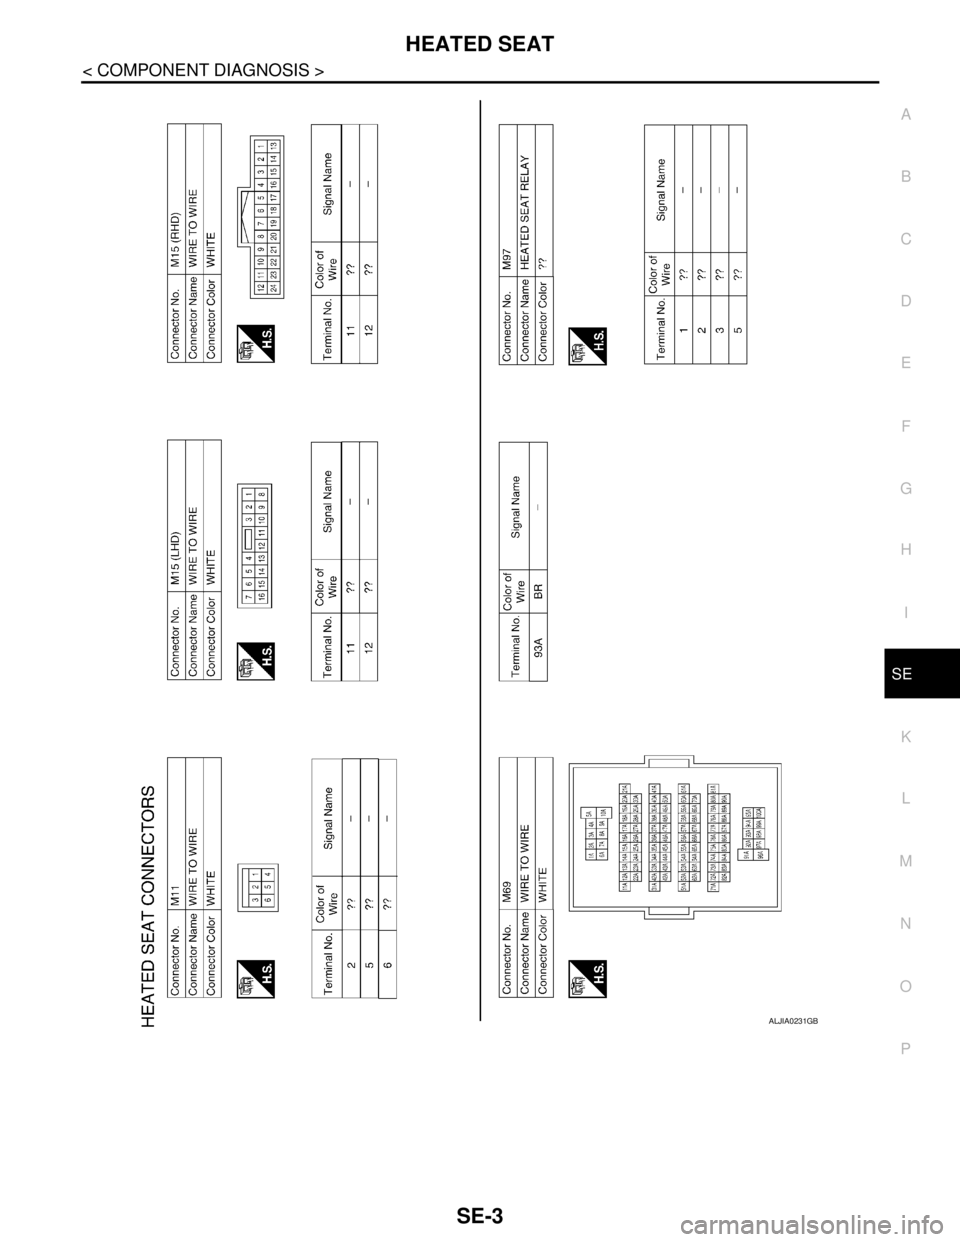
ALJIA0231GB
Page 4600 of 5883
SE-4
< COMPONENT DIAGNOSIS >
HEATED SEAT
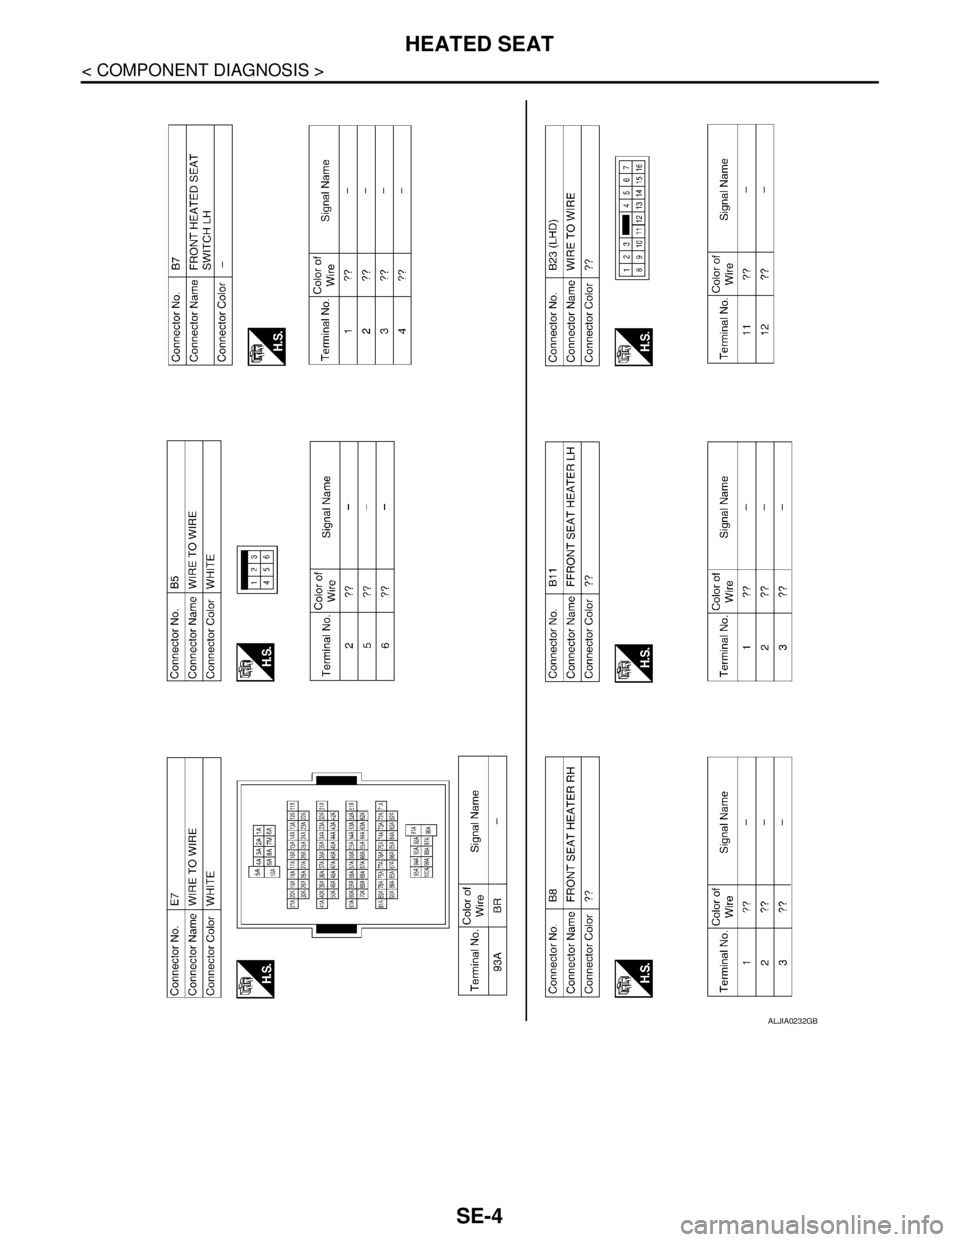
ALJIA0232GB
Trending: maintenance schedule, brake pads replacement, oil temperature, Fuse box, dead battery, center console, traction control

