hatch NISSAN TIIDA 2007 Service Manual PDF
[x] Cancel search | Manufacturer: NISSAN, Model Year: 2007, Model line: TIIDA, Model: NISSAN TIIDA 2007Pages: 5883, PDF Size: 78.95 MB
Page 3051 of 5883
EXL-50
< COMPONENT DIAGNOSIS >
PARKING LAMP CIRCUIT
3. Check continuity between the IPDM E/R harness connector (A) and the front combination lamp harness
connector (B).
4. Check continuity between the IPDM E/R harness connector (A) and the license plate lamp harness con-
nector (B)(hatchback) or (C)(sedan).
5. Check continuity between the IPDM E/R harness connector (A) and the rear combination lamp harness
connector (B).
Does continuity exist?
YES >> GO TO 4
NO >> Repair the daytime light relay, harness or connectors.
4.CHECK PARKING LAMP GROUND CIRCUIT
1. Turn ignition switch OFF.
2. Disconnect the front combination lamp connectors, rear combination lamp connectors or license plate
lamp connectors.
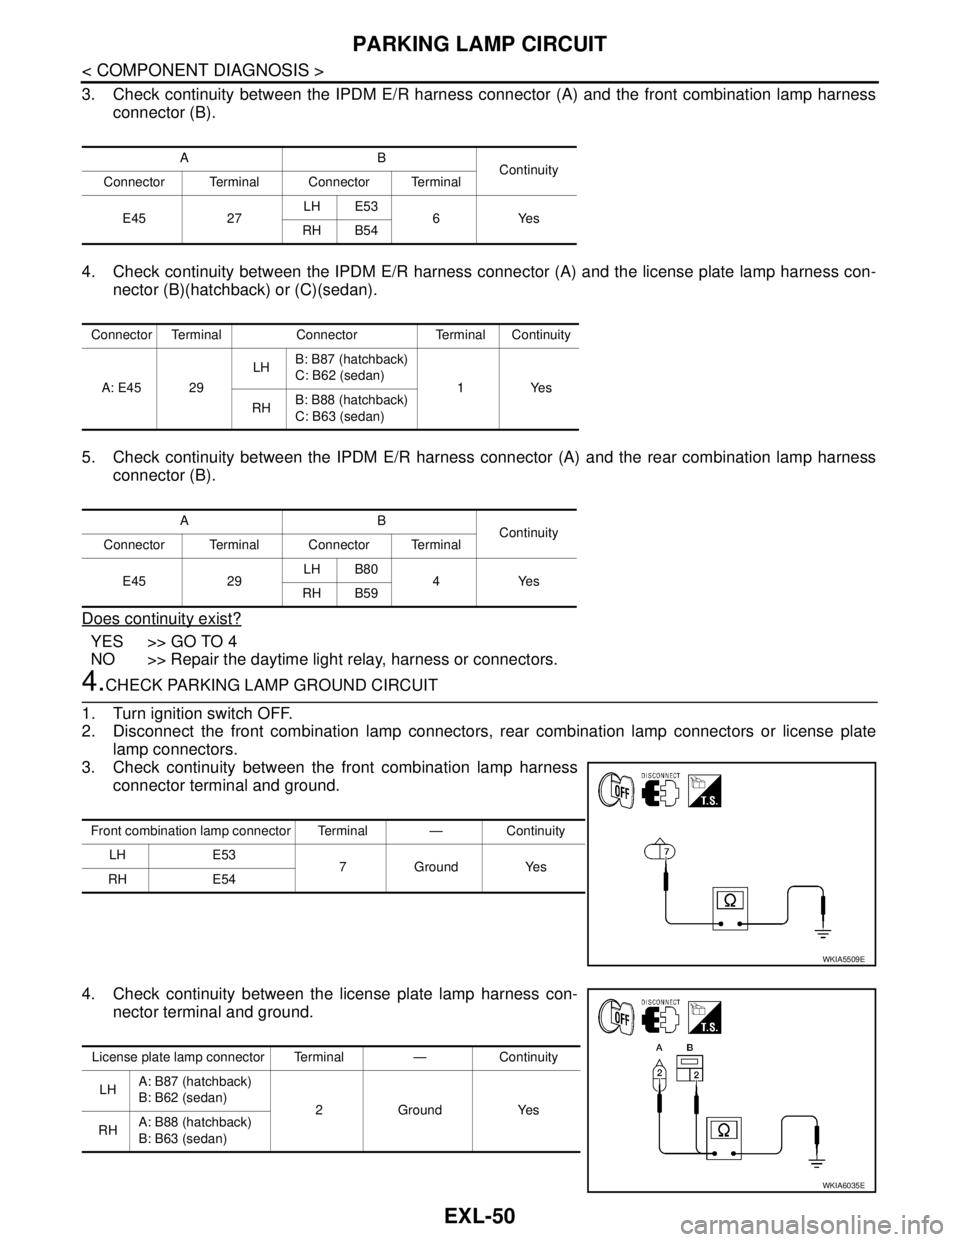
3. Check continuity between the front combination lamp harness
connector terminal and ground.
4. Check continuity between the license plate lamp harness con-
nector terminal and ground.
AB
Continuity
Connector Terminal Connector Terminal
E45 27LH E53
6Yes
RH B54
Connector Terminal Connector Terminal Continuity
A: E45 29LHB: B87 (hatchback)
C: B62 (sedan)
1Yes
RHB: B88 (hatchback)
C: B63 (sedan)
AB
Continuity
Connector Terminal Connector Terminal
E45 29LH B80
4Yes
RH B59
Front combination lamp connector Terminal — Continuity
LH E53
7GroundYes
RH E54
WKIA5509E
License plate lamp connector Terminal — Continuity
LHA: B87 (hatchback)
B: B62 (sedan)
2GroundYes
RHA: B88 (hatchback)
B: B63 (sedan)
WKIA6035E
Page 3094 of 5883
REAR COMBINATION LAMP
EXL-93
< ON-VEHICLE REPAIR >
C
D
E
F
G
H
I
J
K
MA
B
EXL
N
O
P
REAR COMBINATION LAMP
Bulb ReplacementINFOID:0000000001530525
HATCHBACK
1. Remove the rear combination lamp. Refer to EXL-93, "Removal and Installation".
2. Turn the bulb socket counterclockwise to unlock it.
3. Remove the bulb.
4. Installation is in the reverse order of removal.
SEDAN
1. Remove the trunk side finisher. Refer to INT-35, "Removal and Installation".
2. Turn the bulb socket counterclockwise to unlock it.
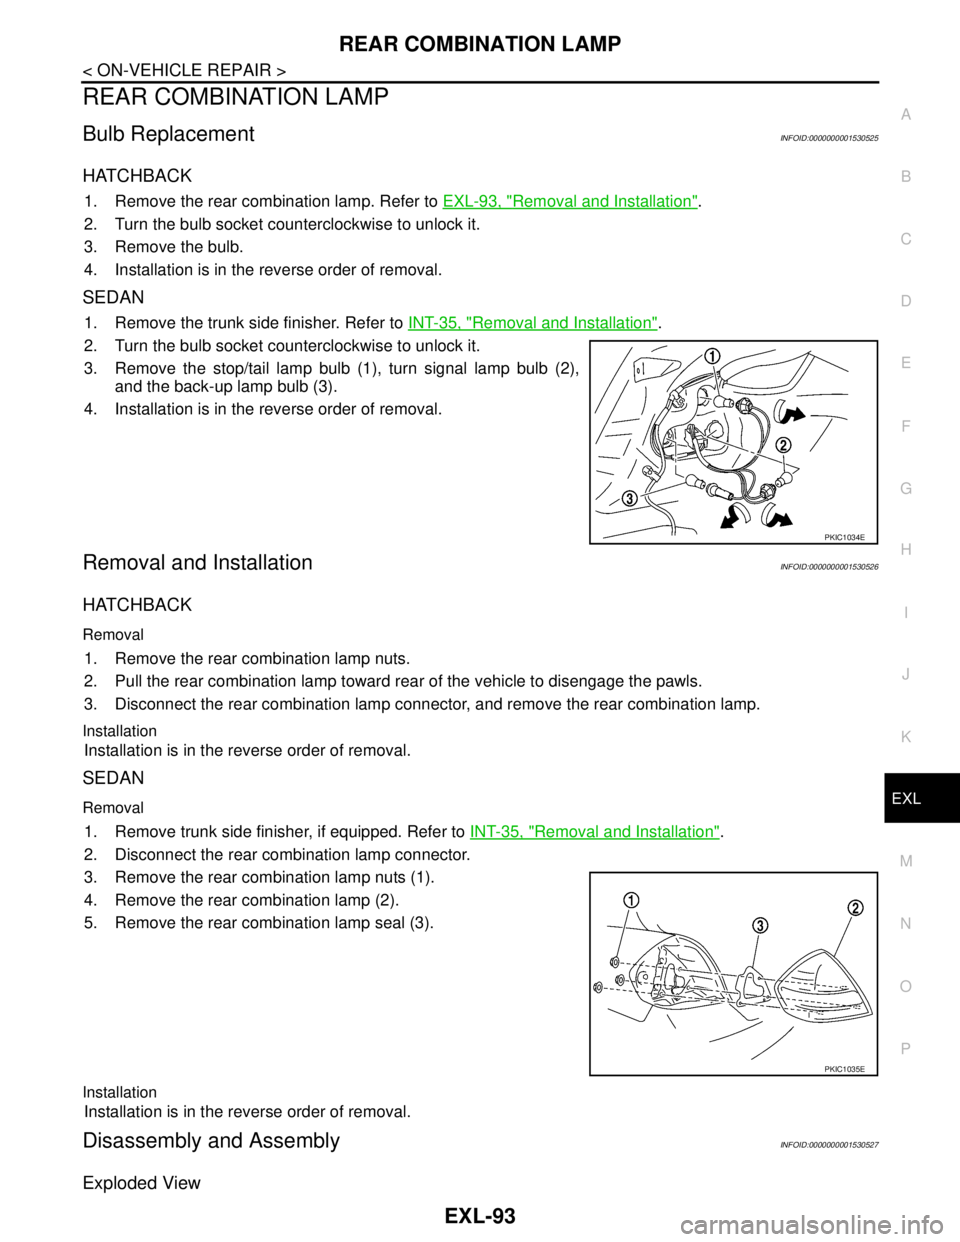
3. Remove the stop/tail lamp bulb (1), turn signal lamp bulb (2),
and the back-up lamp bulb (3).
4. Installation is in the reverse order of removal.
Removal and InstallationINFOID:0000000001530526
HATCHBACK
Removal
1. Remove the rear combination lamp nuts.
2. Pull the rear combination lamp toward rear of the vehicle to disengage the pawls.
3. Disconnect the rear combination lamp connector, and remove the rear combination lamp.
Installation
Installation is in the reverse order of removal.
SEDAN
Removal
1. Remove trunk side finisher, if equipped. Refer to INT-35, "Removal and Installation".
2. Disconnect the rear combination lamp connector.
3. Remove the rear combination lamp nuts (1).
4. Remove the rear combination lamp (2).
5. Remove the rear combination lamp seal (3).
Installation
Installation is in the reverse order of removal.
Disassembly and AssemblyINFOID:0000000001530527
Exploded View
PKIC1034E
PKIC1035E
Page 3095 of 5883
EXL-94
< ON-VEHICLE REPAIR >
REAR COMBINATION LAMP
Hatchback
LKIA0760E
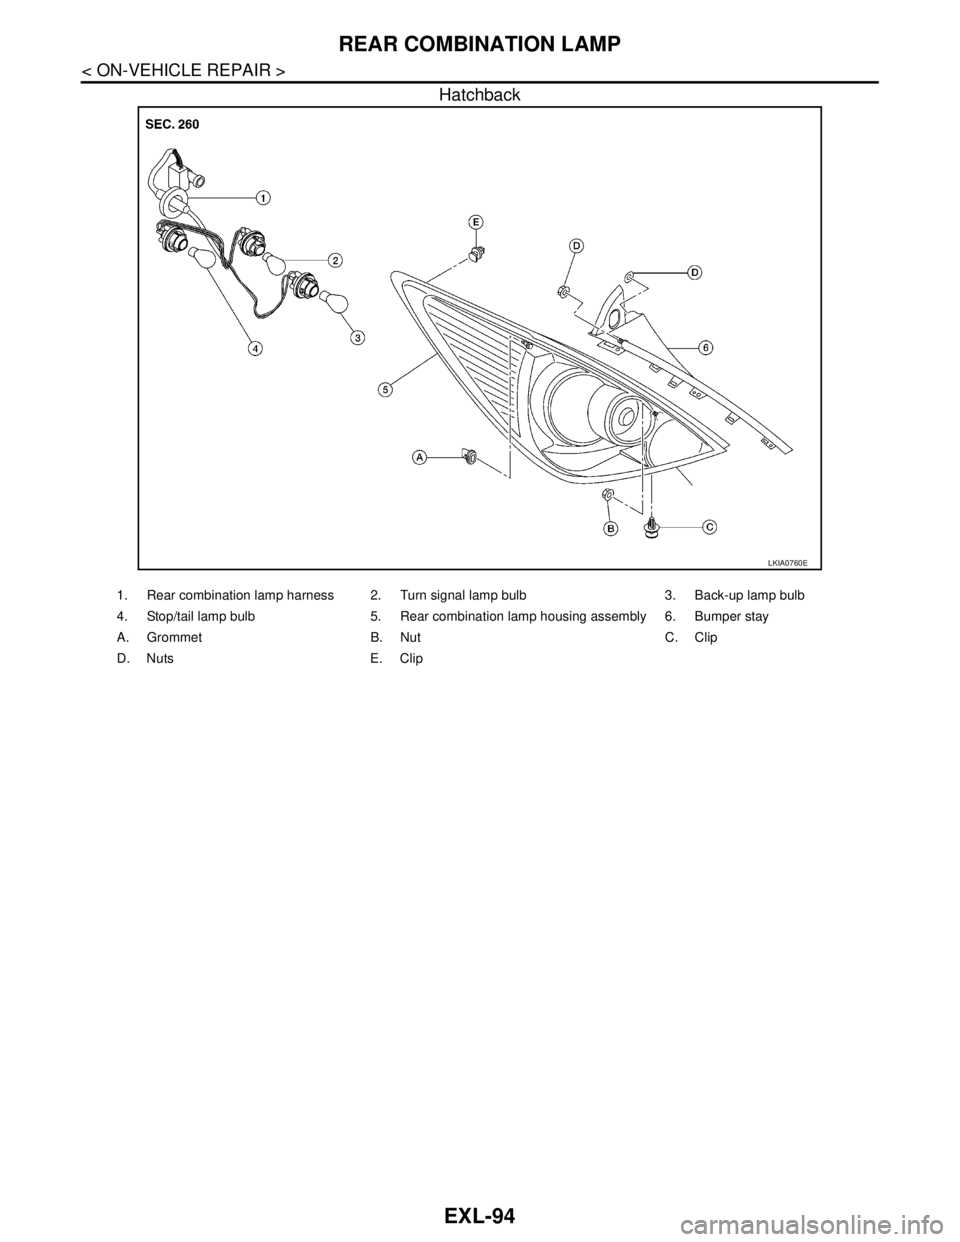
1. Rear combination lamp harness 2. Turn signal lamp bulb 3. Back-up lamp bulb
4. Stop/tail lamp bulb 5. Rear combination lamp housing assembly 6. Bumper stay
A. Grommet B. Nut C. Clip
D. Nuts E. Clip
Page 3096 of 5883
REAR COMBINATION LAMP
EXL-95
< ON-VEHICLE REPAIR >
C
D
E
F
G
H
I
J
K
MA
B
EXL
N
O
P
Sedan
DISSASEMBLY
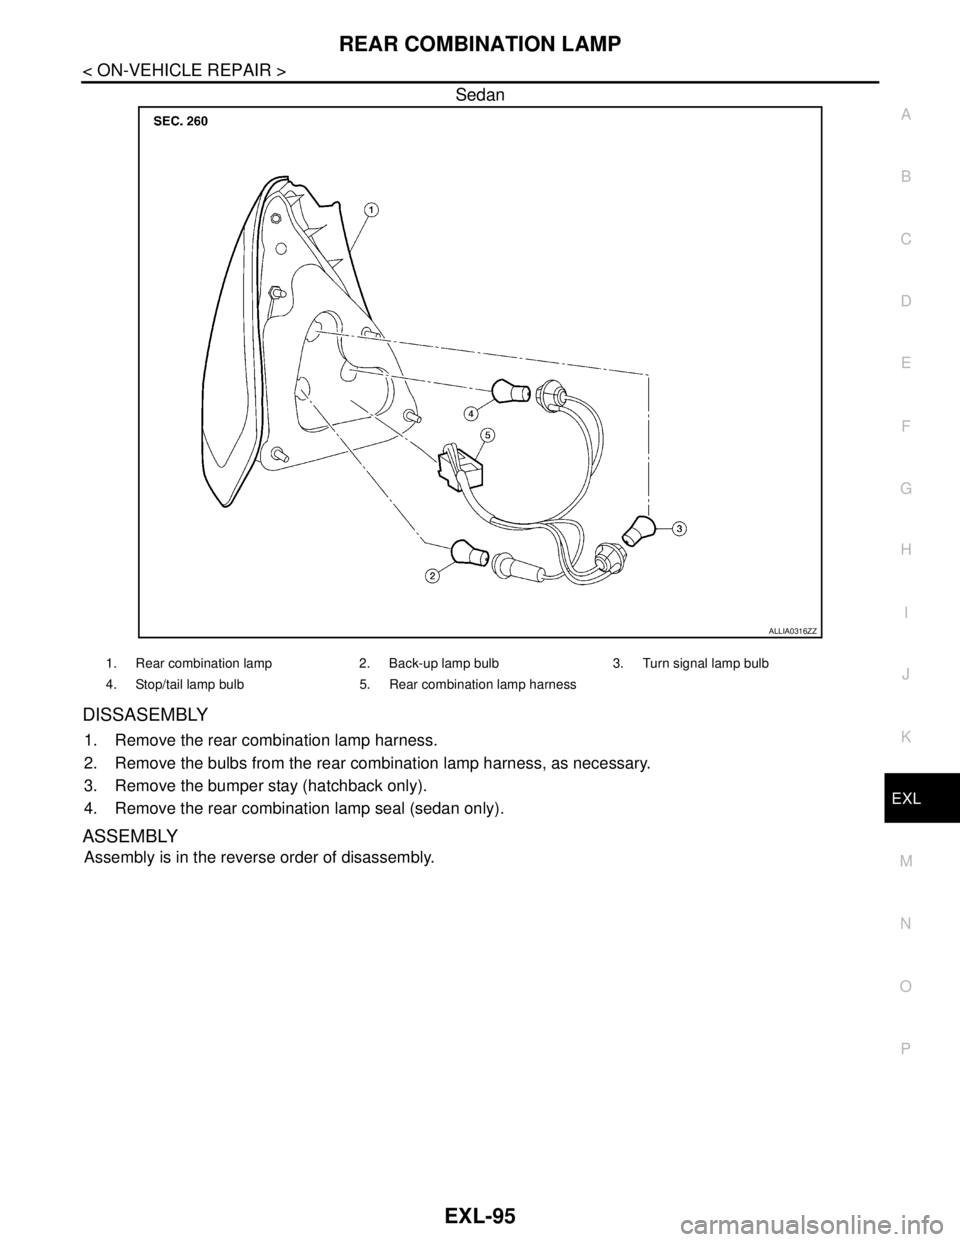
1. Remove the rear combination lamp harness.
2. Remove the bulbs from the rear combination lamp harness, as necessary.
3. Remove the bumper stay (hatchback only).
4. Remove the rear combination lamp seal (sedan only).
ASSEMBLY
Assembly is in the reverse order of disassembly.
ALLIA0316ZZ
1. Rear combination lamp 2. Back-up lamp bulb 3. Turn signal lamp bulb
4. Stop/tail lamp bulb 5. Rear combination lamp harness
Page 3097 of 5883
EXL-96
< ON-VEHICLE REPAIR >
HIGH-MOUNTED STOP LAMP
HIGH-MOUNTED STOP LAMP
Bulb ReplacementINFOID:0000000001530528
HATCHBACK
The LED element is not serviced separately, the high-mounted stop lamp must be replaced as an assembly.
SEDAN
1. Open the luggage compartment lid to access the high-mounted stop lamp.
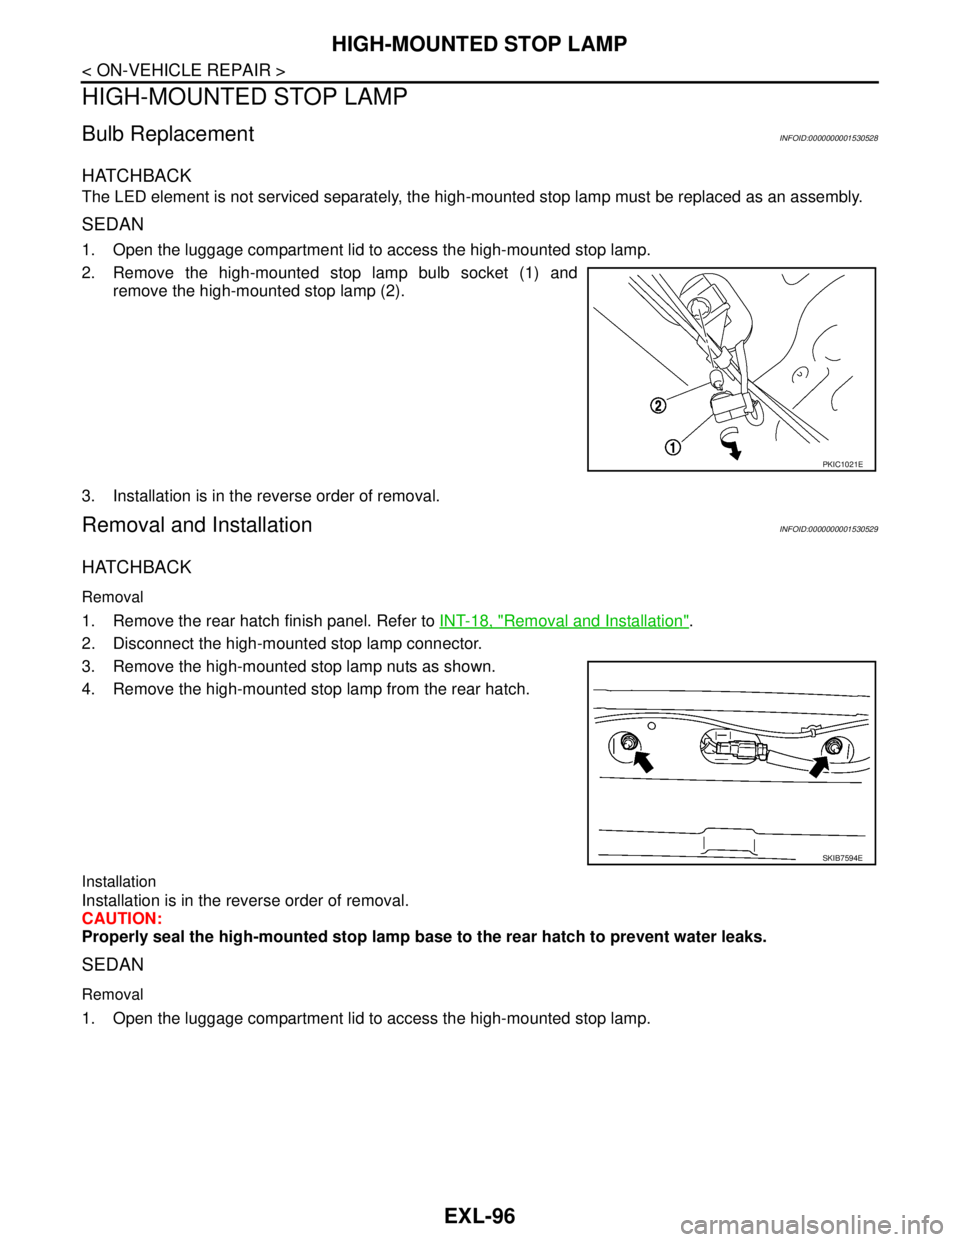
2. Remove the high-mounted stop lamp bulb socket (1) and
remove the high-mounted stop lamp (2).
3. Installation is in the reverse order of removal.
Removal and InstallationINFOID:0000000001530529
HATCHBACK
Removal
1. Remove the rear hatch finish panel. Refer to INT-18, "Removal and Installation".
2. Disconnect the high-mounted stop lamp connector.
3. Remove the high-mounted stop lamp nuts as shown.
4. Remove the high-mounted stop lamp from the rear hatch.
Installation
Installation is in the reverse order of removal.
CAUTION:
Properly seal the high-mounted stop lamp base to the rear hatch to prevent water leaks.
SEDAN
Removal
1. Open the luggage compartment lid to access the high-mounted stop lamp.
PKIC1021E
SKIB7594E
Page 3099 of 5883
EXL-98
< ON-VEHICLE REPAIR >
LICENSE PLATE LAMP
LICENSE PLATE LAMP
Bulb ReplacementINFOID:0000000001530532
HATCHBACK
1. Remove the license plate lamp. Refer to INT-35, "Removal and Installation".
2. Turn the bulb socket counterclockwise to unlock it.
3. Remove the bulb from the socket.
4. Installation is in the reverse order of removal.
SEDAN
1. Remove the trunk lid finisher. Refer to INT-35, "Removal and Installation".
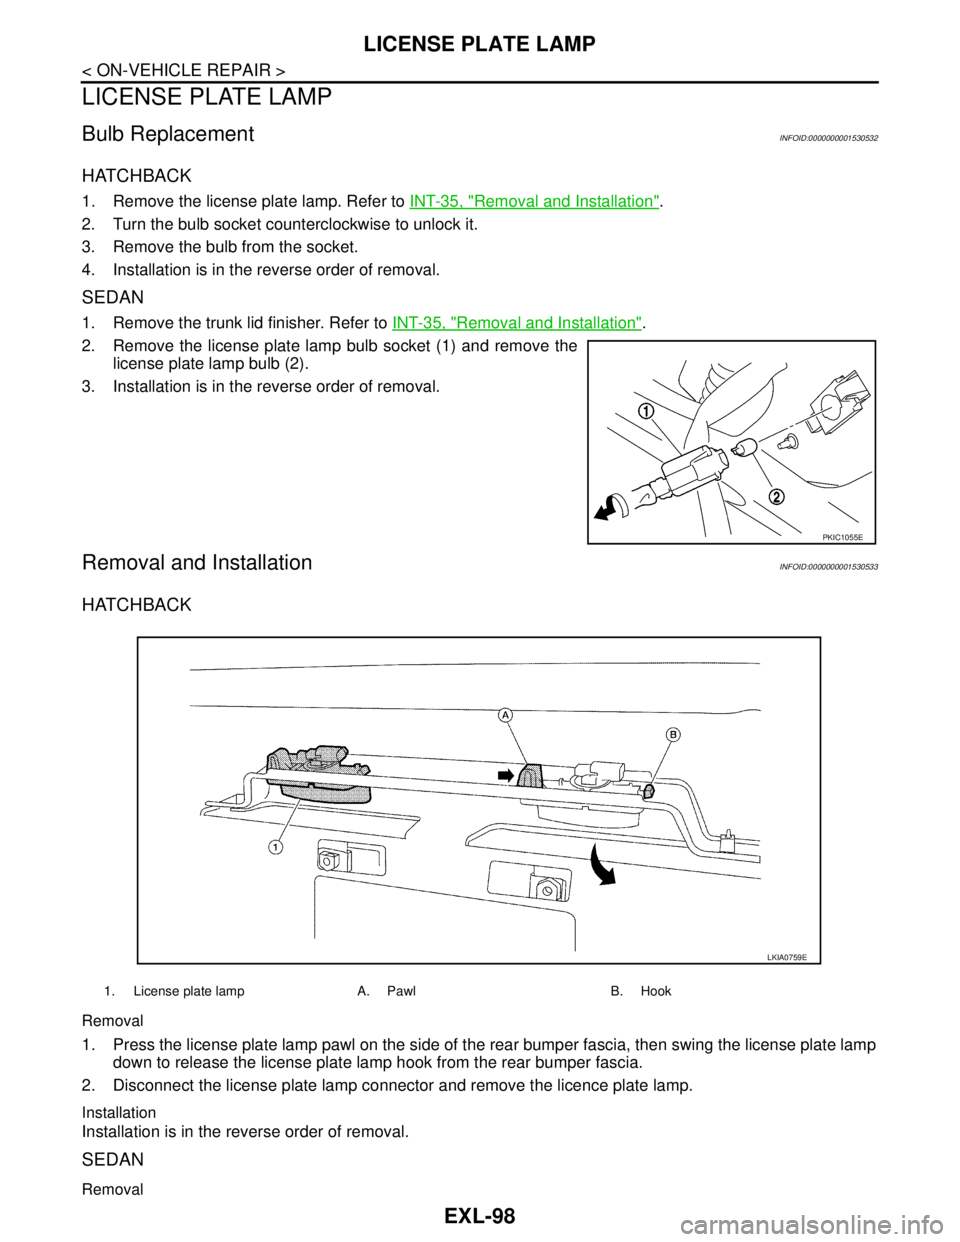
2. Remove the license plate lamp bulb socket (1) and remove the
license plate lamp bulb (2).
3. Installation is in the reverse order of removal.
Removal and InstallationINFOID:0000000001530533
HATCHBACK
Removal
1. Press the license plate lamp pawl on the side of the rear bumper fascia, then swing the license plate lamp
down to release the license plate lamp hook from the rear bumper fascia.
2. Disconnect the license plate lamp connector and remove the licence plate lamp.
Installation
Installation is in the reverse order of removal.
SEDAN
Removal
PKIC1055E
1. License plate lamp A. Pawl B. Hook
LKIA0759E
Page 3104 of 5883
BULB SPECIFICATIONS
EXL-103
< SERVICE DATA AND SPECIFICATIONS (SDS)
C
D
E
F
G
H
I
J
K
MA
B
EXL
N
O
P
SERVICE DATA AND SPECIFICATIONS (SDS)
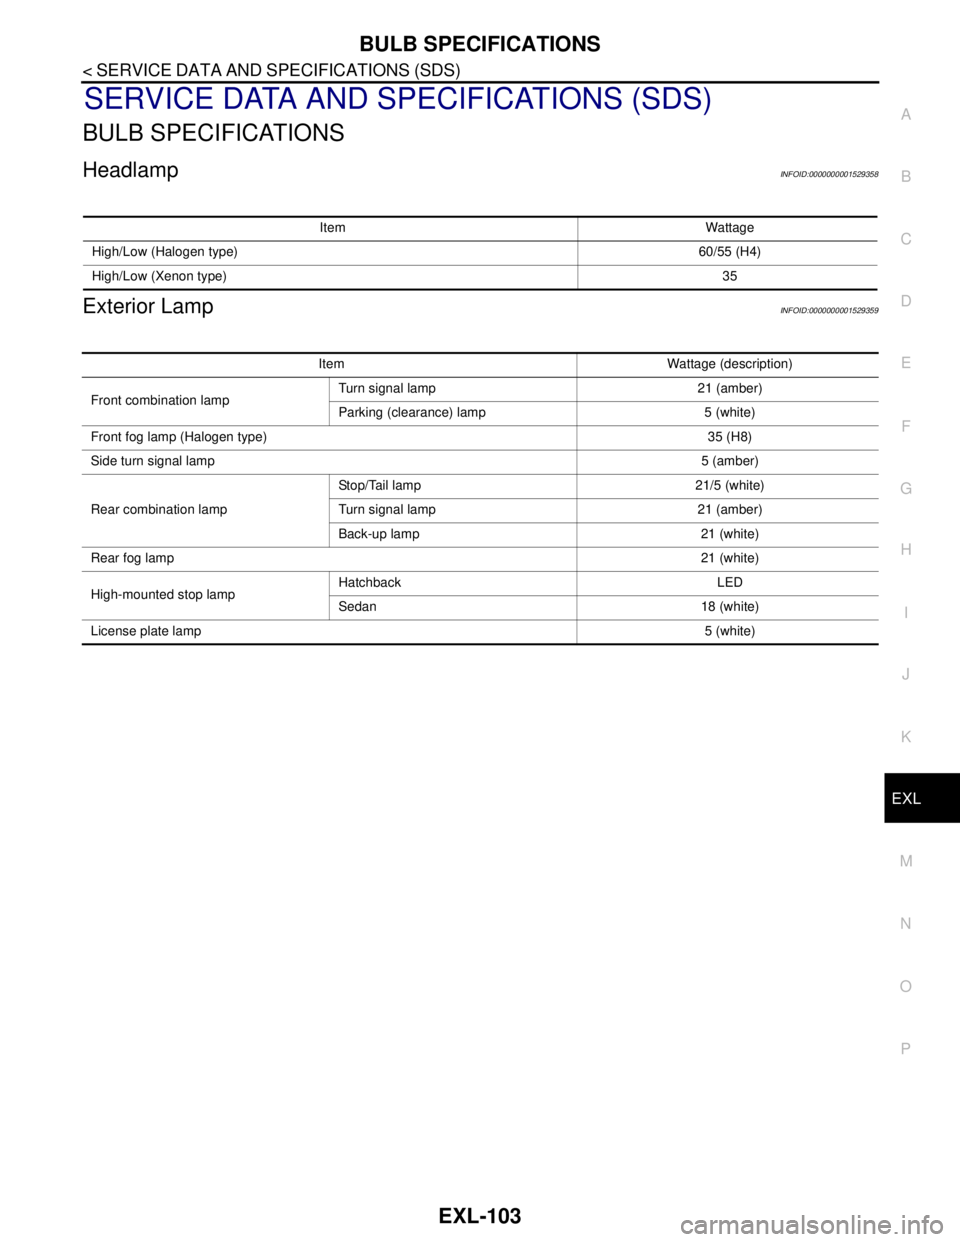
BULB SPECIFICATIONS
HeadlampINFOID:0000000001529358
Exterior LampINFOID:0000000001529359
Item Wattage
High/Low (Halogen type)60/55 (H4)
High/Low (Xenon type)35
Item Wattage (description)
Front combination lampTurn signal lamp 21 (amber)
Parking (clearance) lamp 5 (white)
Front fog lamp (Halogen type)35 (H8)
Side turn signal lamp5 (amber)
Rear combination lampStop/Tail lamp 21/5 (white)
Turn signal lamp 21 (amber)
Back-up lamp 21 (white)
Rear fog lamp21 (white)
High-mounted stop lampHatchback LED
Sedan 18 (white)
License plate lamp5 (white)
Page 3105 of 5883

EXT-1
BODY EXTERIOR, DOORS, ROOF & VEHICLE SECURITY
C
D
E
F
G
H
I
J
L
M
SECTION EXT
A
B
EXT
N
O
P
CONTENTS
EXTERIOR
PRECAUTION ...............................................2
PRECAUTIONS ...................................................2
Precaution for Supplemental Restraint System
(SRS) "AIR BAG" and "SEAT BELT PRE-TEN-
SIONER" ...................................................................
2
Precaution .................................................................2
PREPARATION ............................................3
PREPARATION ...................................................3
Special Service Tool .................................................3
Commercial Service Tool ..........................................3
ON-VEHICLE MAINTENANCE .....................4
SQUEAK AND RATTLE TROUBLE DIAGNO-
SIS .......................................................................
4
Work Flow .................................................................4
Generic Squeak and Rattle Troubleshooting ............6
Diagnostic Worksheet ...............................................8
ON-VEHICLE REPAIR .................................10
CLIP AND FASTENER .......................................10
Description ..............................................................10
FRONT BUMPER ...............................................13
Removal and Installation .........................................13
REAR BUMPER ................................................15
Component ..............................................................15
Removal and Installation - Hatchback .....................15
Removal and Installation - Sedan ............................17
FRONT GRILLE ................................................19
Removal and Installation .........................................19
COWL TOP .......................................................20
Removal and Installation .........................................20
FENDER PROTECTOR ....................................22
Component ..............................................................22
Removal and Installation .........................................22
ROOF SIDE MOLDING .....................................23
Component ..............................................................23
Removal and Installation .........................................23
DOOR OUTSIDE MOLDING .............................25
Component ..............................................................25
Removal and Installation .........................................26
CENTER MUD GUARD .....................................28
Removal and Installation .........................................28
TRUNK LID FINISHER ......................................29
Removal and Installation .........................................29
REAR AIR SPOILER .........................................30
Removal and Installation .........................................30
Page 3119 of 5883
REAR BUMPER
EXT-15
< ON-VEHICLE REPAIR >
C
D
E
F
G
H
I
J
L
MA
B
EXT
N
O
P
REAR BUMPER
ComponentINFOID:0000000001568926
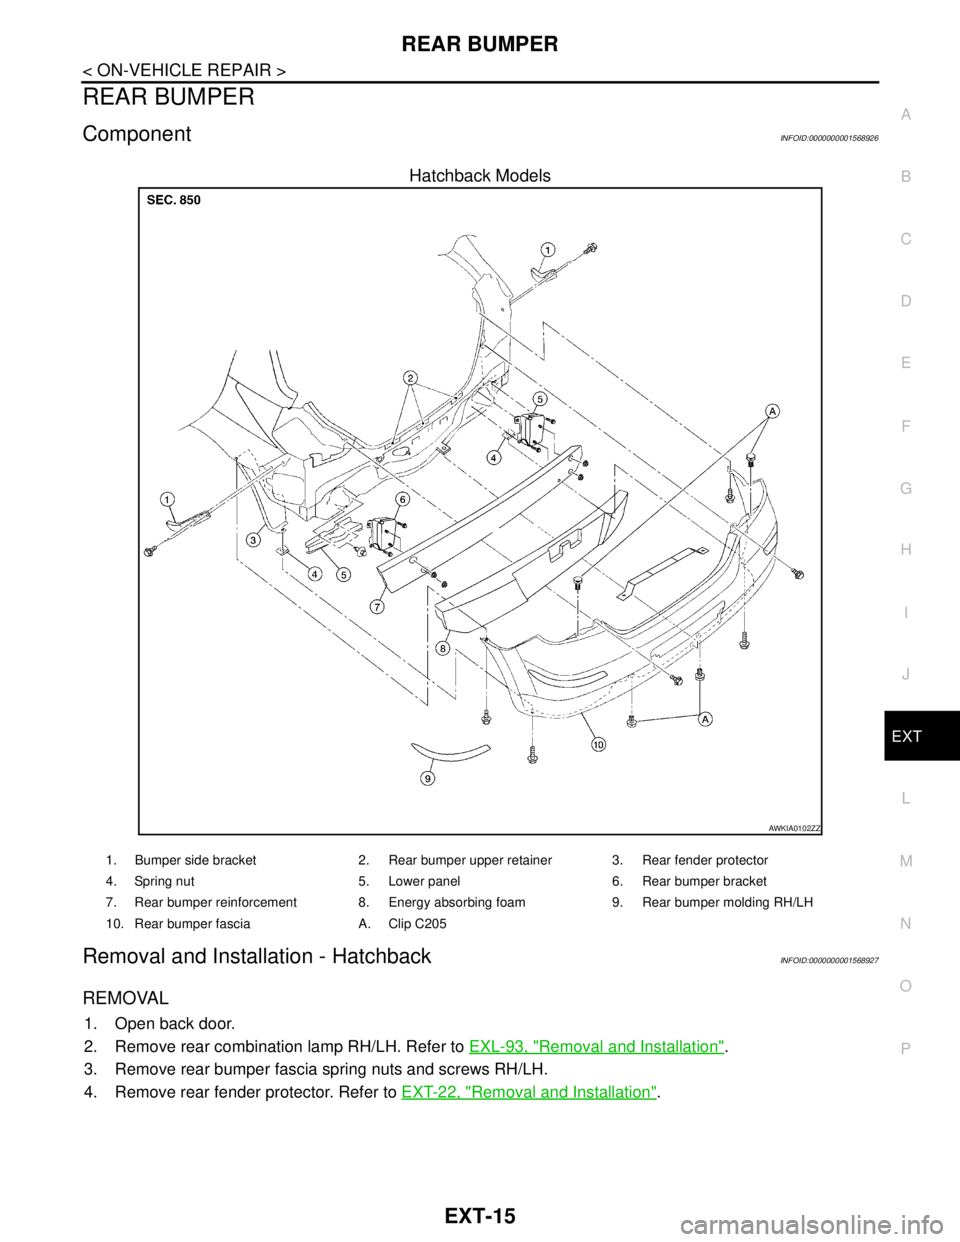
Hatchback Models
Removal and Installation - HatchbackINFOID:0000000001568927
REMOVAL
1. Open back door.
2. Remove rear combination lamp RH/LH. Refer to EXL-93, "
Removal and Installation".
3. Remove rear bumper fascia spring nuts and screws RH/LH.
4. Remove rear fender protector. Refer to EXT-22, "
Removal and Installation".
AWKIA0102ZZ
1. Bumper side bracket 2. Rear bumper upper retainer 3. Rear fender protector
4. Spring nut 5. Lower panel 6. Rear bumper bracket
7. Rear bumper reinforcement 8. Energy absorbing foam 9. Rear bumper molding RH/LH
10. Rear bumper fascia A. Clip C205
Page 3127 of 5883
ROOF SIDE MOLDING
EXT-23
< ON-VEHICLE REPAIR >
C
D
E
F
G
H
I
J
L
MA
B
EXT
N
O
P
ROOF SIDE MOLDING
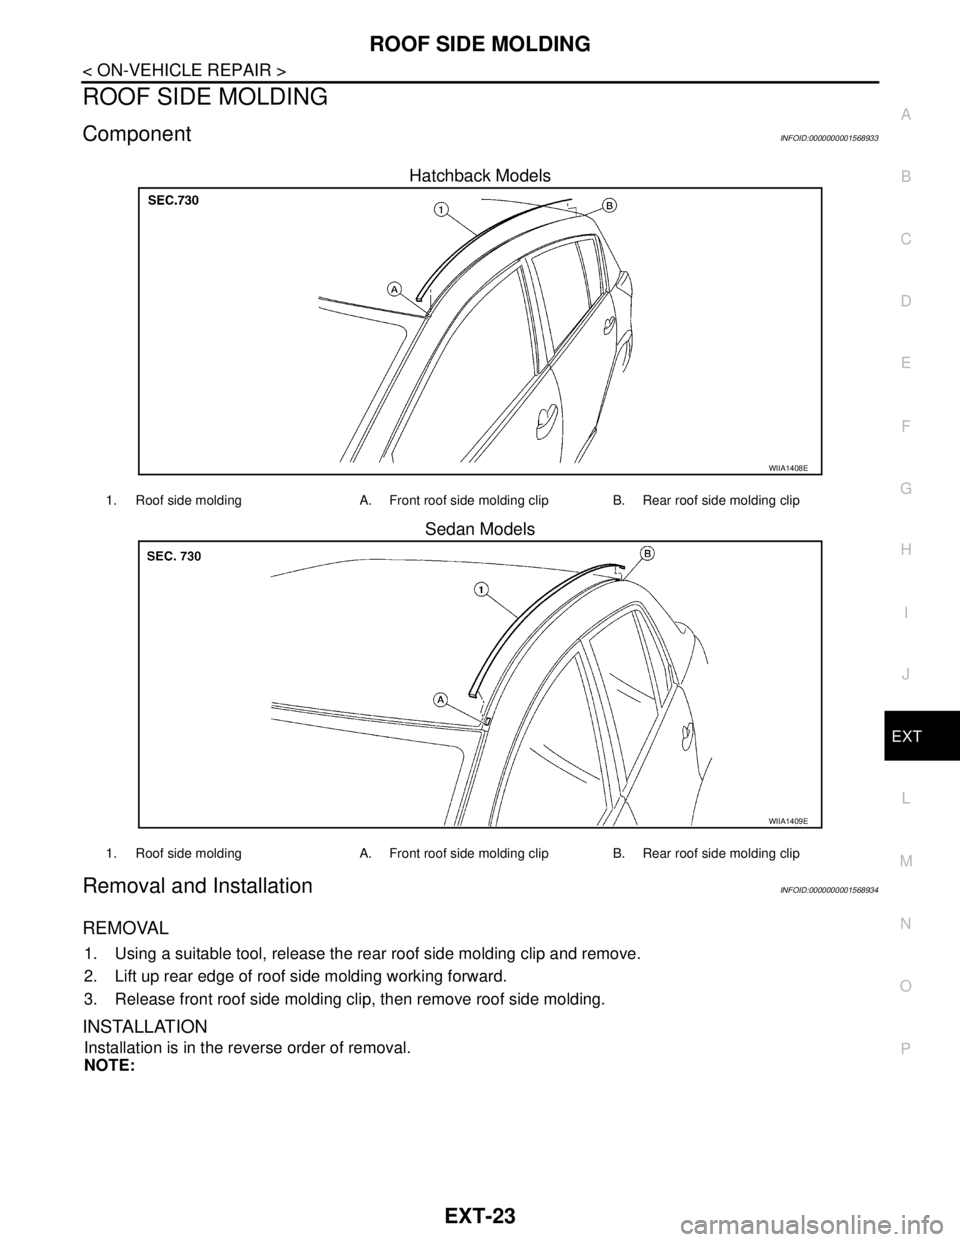
ComponentINFOID:0000000001568933
Hatchback Models
Sedan Models
Removal and InstallationINFOID:0000000001568934
REMOVAL
1. Using a suitable tool, release the rear roof side molding clip and remove.
2. Lift up rear edge of roof side molding working forward.
3. Release front roof side molding clip, then remove roof side molding.
INSTALLATION
Installation is in the reverse order of removal.
NOTE:
WIIA1408E
1. Roof side molding A. Front roof side molding clip B. Rear roof side molding clip
WIIA1409E
1. Roof side molding A. Front roof side molding clip B. Rear roof side molding clip