NISSAN TIIDA 2009 Service Repair Manual
TIIDA 2009
NISSAN
NISSAN
https://www.carmanualsonline.info/img/5/57398/w960_57398-0.png
NISSAN TIIDA 2009 Service Repair Manual
Trending: coolant reservoir, mileage, weight, tire pressure, vin, Top tether child restraint, engine overheat
Page 101 of 4331
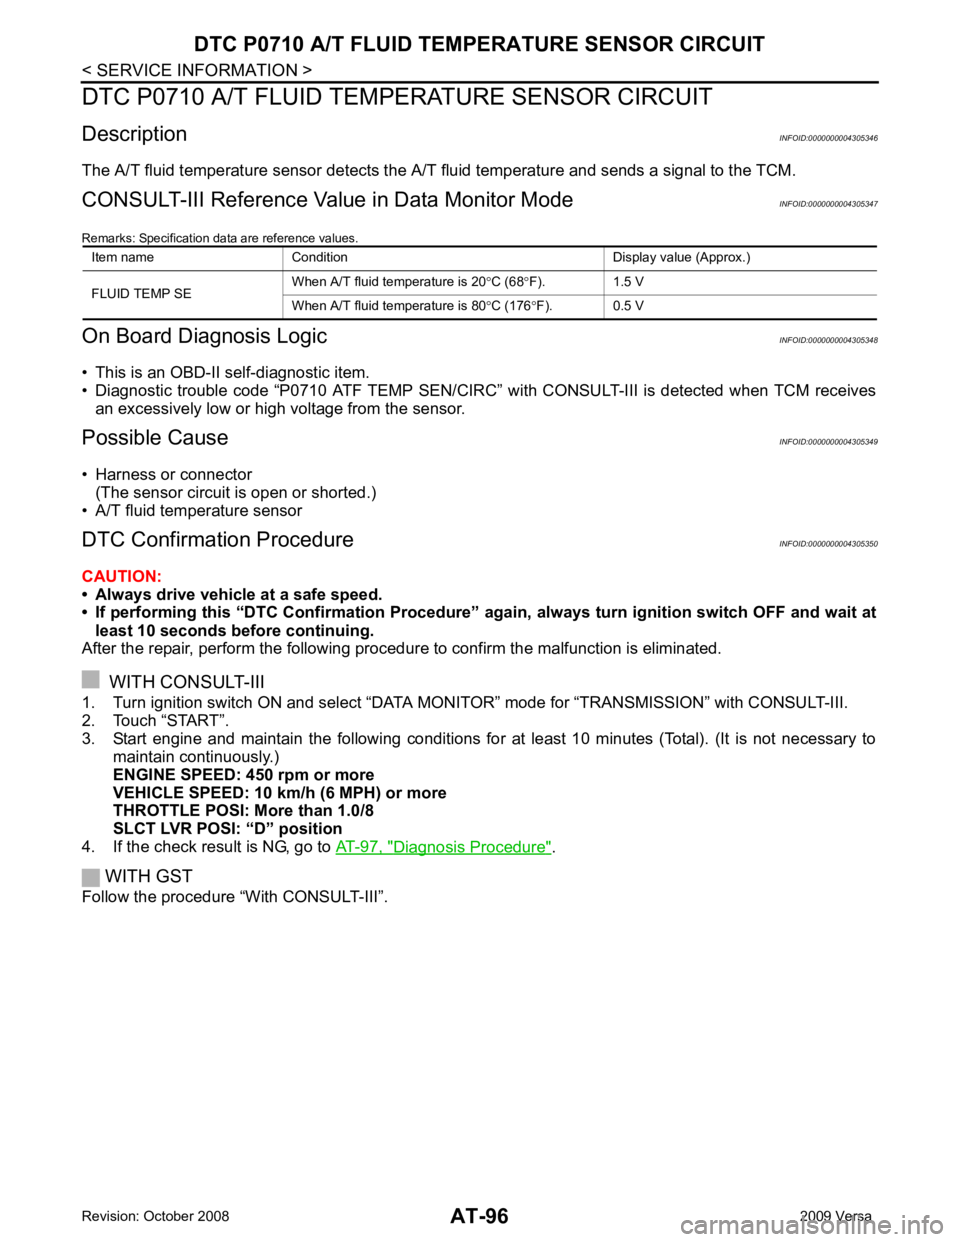
Diagnosis Procedure " .
WITH GST
Follow the procedure “With CONSULT-III”. Item name Condition Display value (Approx.)
FLUID TEMP SE When A/T fluid temperature is 20
°C (68 °F). 1.5 V
When A/T fluid temperature is 80 °C (176 °F). 0.5 V
Page 102 of 4331
AT
N
O P
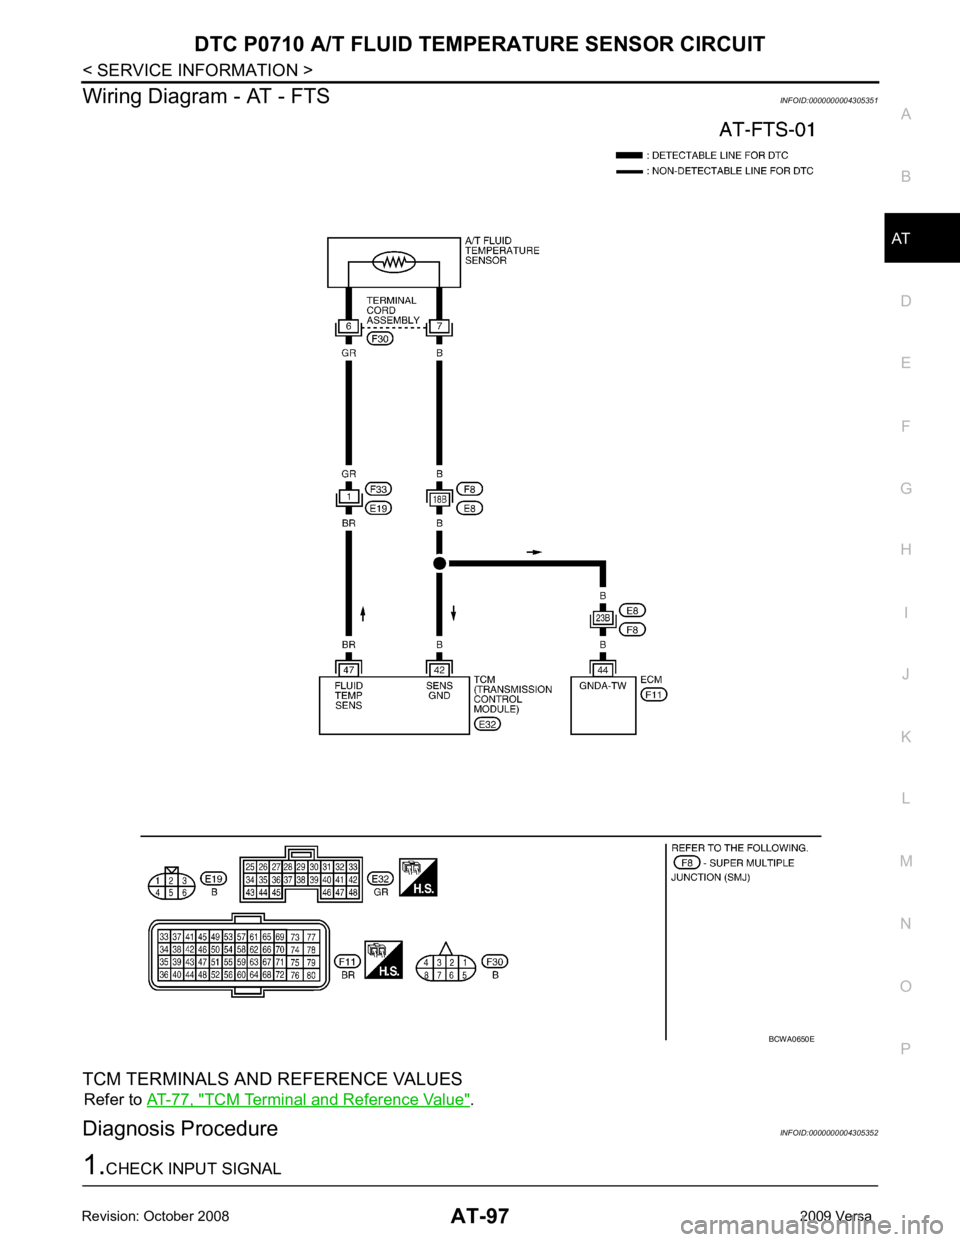
Wiring Diagram - AT - FTS
INFOID:0000000004305351
TCM TERMINALS AND REFERENCE VALUES Refer to AT-77, " TCM Terminal and Reference Value " .
Diagnosis Procedure INFOID:0000000004305352
Page 103 of 4331
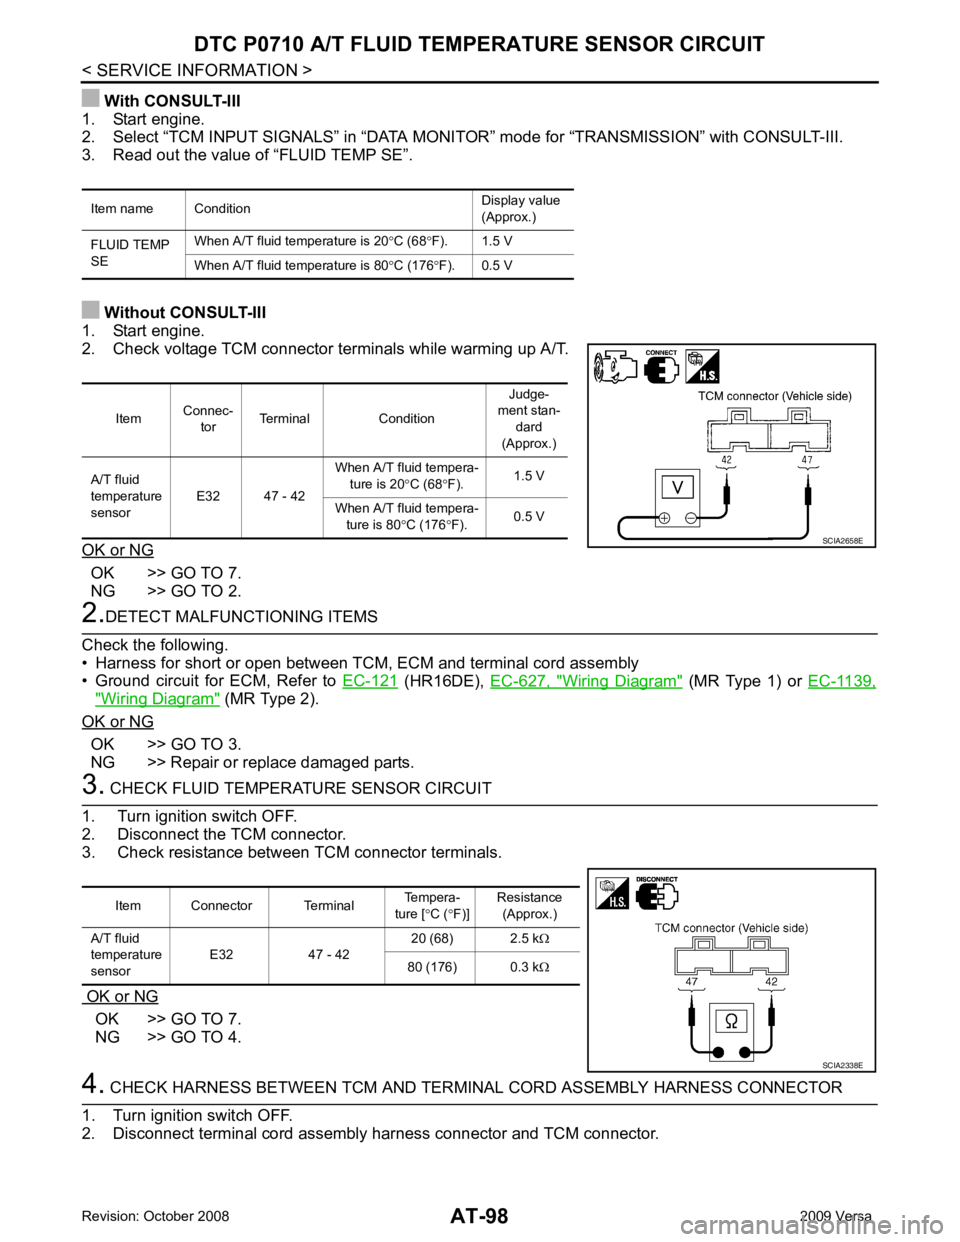
OK >> GO TO 7.
NG >> GO TO 2. (HR16DE),
EC-627, " Wiring Diagram " (MR Type 1) or
EC-1139," Wiring Diagram " (MR Type 2).
OK or NG OK >> GO TO 3.
NG >> Repair or replace damaged parts. OK >> GO TO 7.
NG >> GO TO 4. Item
Connec-
tor Terminal Condition Judge-
ment stan- dard
(Approx.)
A/T fluid
temperature
sensor E32 47 - 42 When A/T fluid tempera-
ture is 20 °C (68 °F). 1.5 V
When A/T fluid tempera- ture is 80 °C (176 °F). 0.5 V
Page 104 of 4331
AT
N
O P
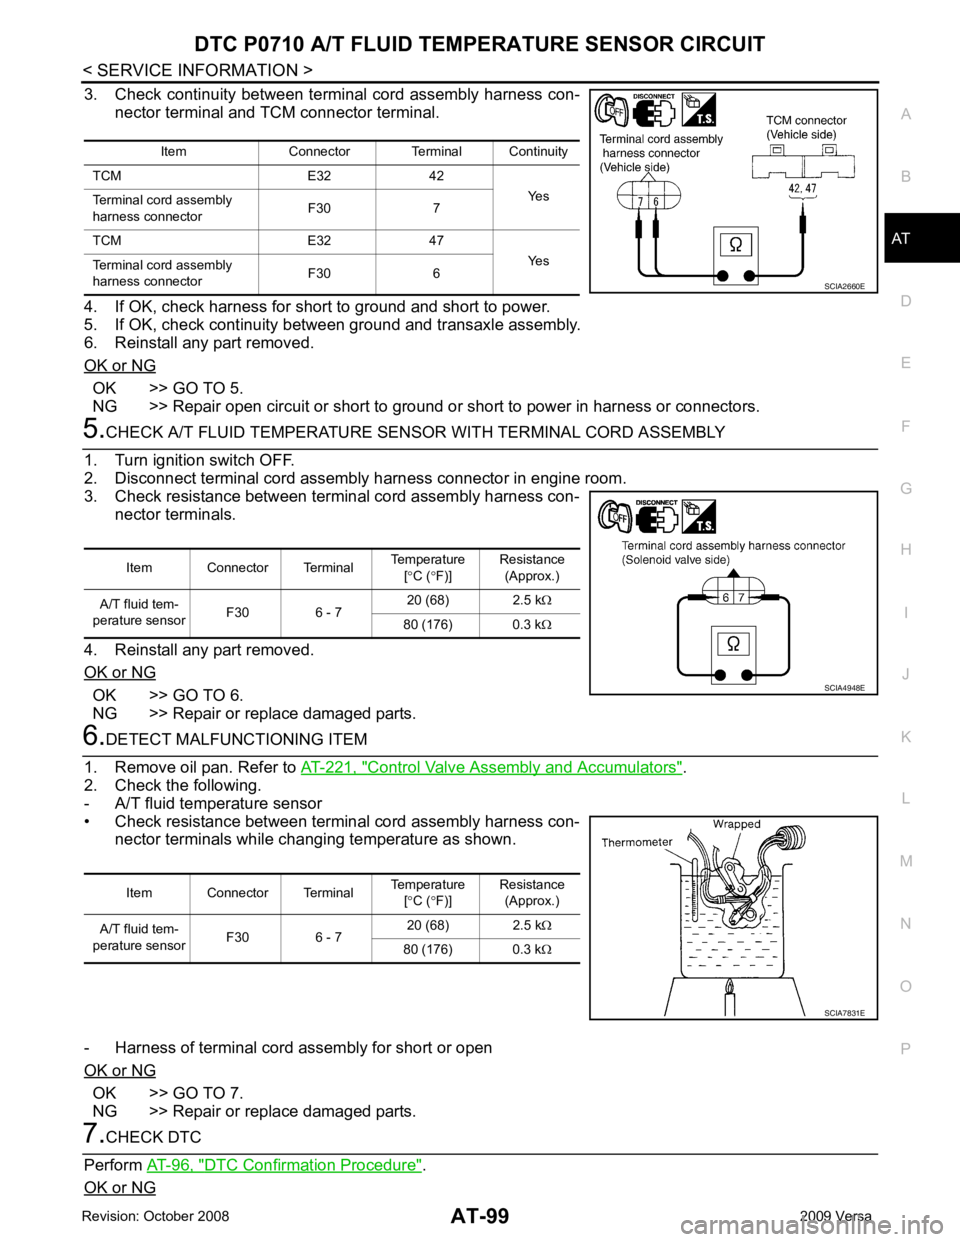
3. Check continuity between terminal cord assembly harness con-
nector terminal and TCM connector terminal.
4. If OK, check harness for short to ground and short to power.
5. If OK, check continuity between ground and transaxle assembly.
6. Reinstall any part removed.
OK or NG OK >> GO TO 5.
NG >> Repair open circuit or short to ground or short to power in harness or connectors. OK >> GO TO 6.
NG >> Repair or replace damaged parts. Control Valve Assembly and Accumulators " .
2. Check the following.
- A/T fluid temperature sensor
• Check resistance between terminal cord assembly harness con- nector terminals while changing temperature as shown.
- Harness of terminal cord assembly for short or open
OK or NG OK >> GO TO 7.
NG >> Repair or replace damaged parts. DTC Confirmation Procedure " .
OK or NG
Page 105 of 4331
AT-100< SERVICE INFORMATION >
DTC P0710 A/T FLUID TEMP
ERATURE SENSOR CIRCUIT
OK >> INSPECTION END
NG >> GO TO 8. 8.
CHECK TCM
1. Check TCM input/output signal. Refer to AT-77, " TCM Terminal and Reference Value " .
2. If NG, recheck TCM pin terminals for damage or loose connection with harness connector.
OK or NG OK >>
INSPECTION END
NG >> Repair or replace damaged parts.
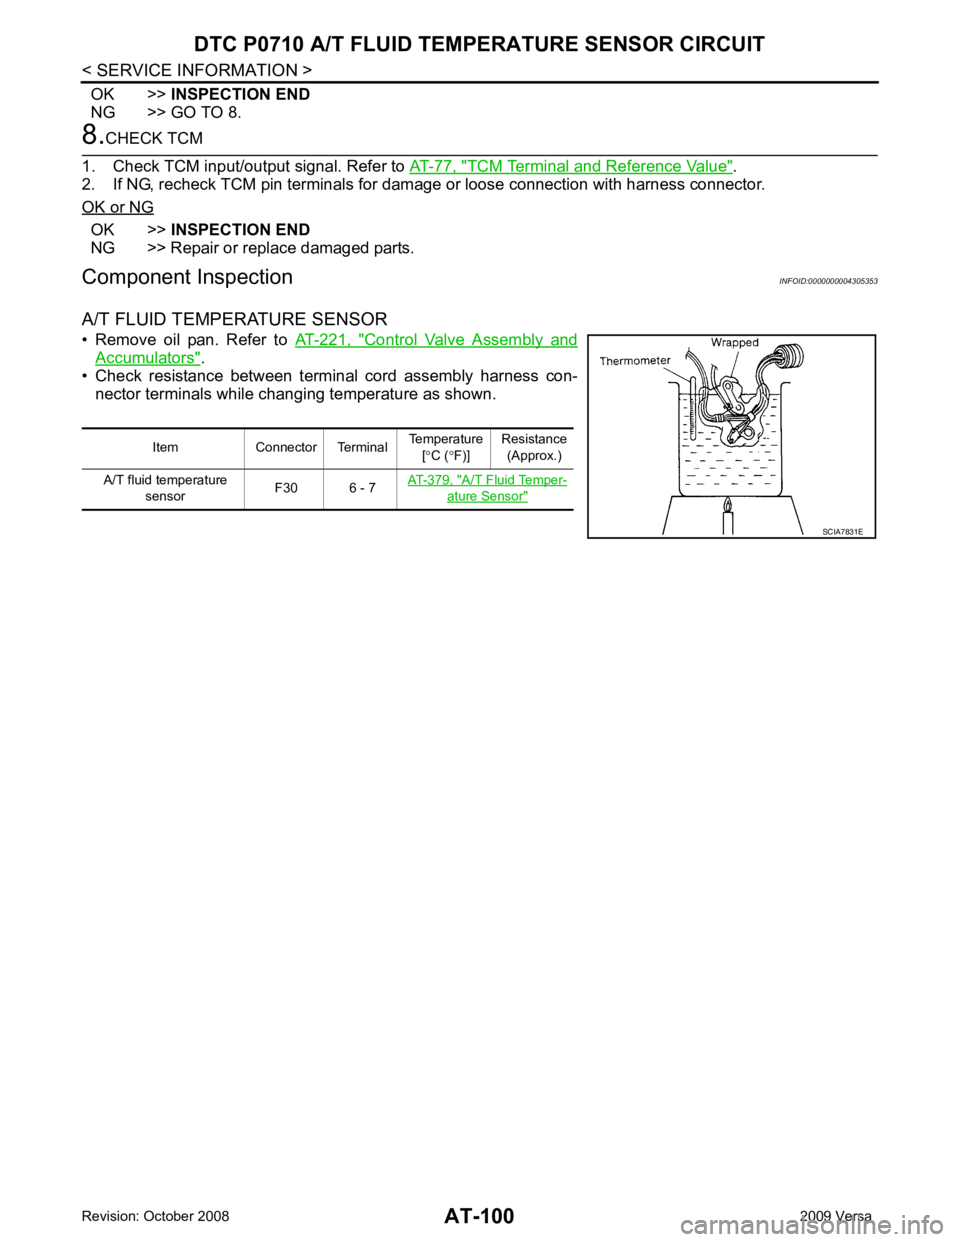
Component Inspection INFOID:0000000004305353
A/T FLUID TEMPERATURE SENSOR
• Remove oil pan. Refer to AT-221, " Control Valve Assembly and
Accumulators " .
• Check resistance between terminal cord assembly harness con-
nector terminals while changing temperature as shown.
Item Connector Terminal Temperature
[° C ( °F)] Resistance
(Approx.)
A/T fluid temperature sensor F30 6 - 7
AT-379, " A/T Fluid Temper-
ature Sensor "
SCIA7831E
Page 106 of 4331
AT
N
O P
DTC P0720 VEHICLE SPEED SENS
OR A/T (REVOLUTION SENSOR)
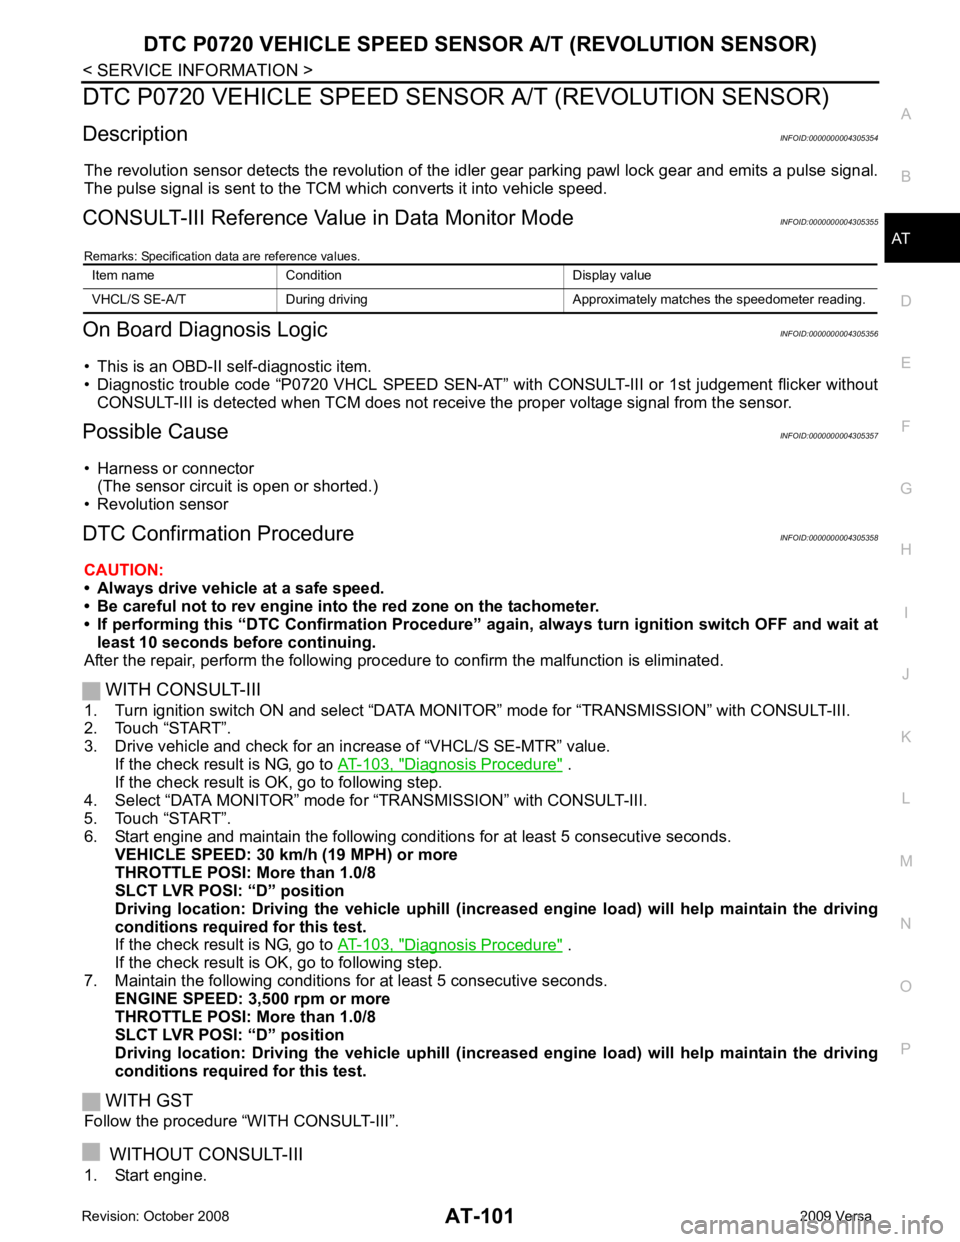
Description INFOID:0000000004305354
The revolution sensor detects the revolution of the id ler gear parking pawl lock gear and emits a pulse signal.
The pulse signal is sent to the TCM which converts it into vehicle speed.
CONSULT-III Reference Val ue in Data Monitor Mode INFOID:0000000004305355
Remarks: Specification data are reference values.
On Board Diagnosis Logic INFOID:0000000004305356
• This is an OBD-II self-diagnostic item.
• Diagnostic trouble code “P0720 VHCL SPEED SEN-AT” with CONSULT-III or 1st judgement flicker without
CONSULT-III is detected when TCM does not rece ive the proper voltage signal from the sensor.
Possible Cause INFOID:0000000004305357
• Harness or connector (The sensor circuit is open or shorted.)
• Revolution sensor
DTC Confirmation Procedure INFOID:0000000004305358
CAUTION:
• Always drive vehicle at a safe speed.
• Be careful not to rev engine into the red zone on the tachometer.
• If performing this “DTC Confirmation Procedure” again, always turn ignition switch OFF and wait at
least 10 seconds before continuing.
After the repair, perform the following procedure to confirm the malfunction is eliminated.
WITH CONSULT-III
1. Turn ignition switch ON and select “DATA MO NITOR” mode for “TRANSMISSION” with CONSULT-III.
2. Touch “START”.
3. Drive vehicle and check for an in crease of “VHCL/S SE-MTR” value.
If the check result is NG, go to AT-103, " Diagnosis Procedure " .
If the check result is OK, go to following step.
4. Select “DATA MONITOR” mode for “TRANSMISSION” with CONSULT-III.
5. Touch “START”.
6. Start engine and maintain the following conditions for at least 5 consecutive seconds. VEHICLE SPEED: 30 km/h (19 MPH) or more
THROTTLE POSI: More than 1.0/8
SLCT LVR POSI: “D” position
Driving location: Driving the vehic le uphill (increased engine load) will help maintain the driving
conditions required for this test.
If the check result is NG, go to AT-103, " Diagnosis Procedure " .
If the check result is OK, go to following step.
7. Maintain the following conditions for at least 5 consecutive seconds. ENGINE SPEED: 3,500 rpm or more
THROTTLE POSI: More than 1.0/8
SLCT LVR POSI: “D” position
Driving location: Driving the vehic le uphill (increased engine load) will help maintain the driving
conditions required for this test.
WITH GST
Follow the procedure “WITH CONSULT-III”.
WITHOUT CONSULT-III
1. Start engine. Item name Condition Display value
VHCL/S SE-A/T During driving Approxima tely matches the speedometer reading.
Page 107 of 4331
Diagnosis Procedure without CONSULT-III " .
4. If the check result is NG, go to AT-103, " Diagnosis Procedure " .
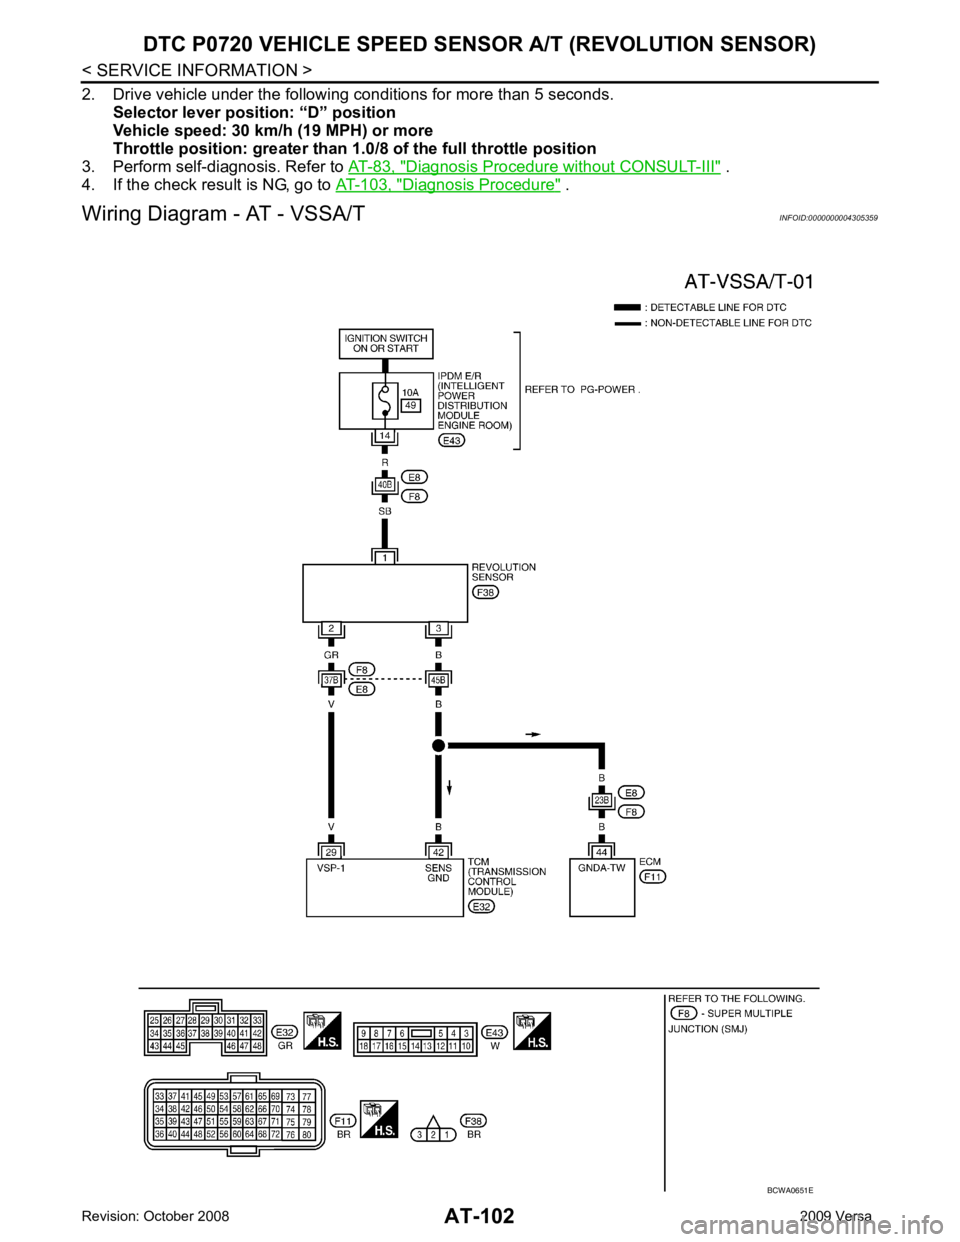
Wiring Diagram - AT - VSSA/T INFOID:0000000004305359
Page 108 of 4331
AT
N
O P
TCM TERMINALS AND REFERENCE VALUES
Refer to AT-77, " TCM Terminal and Reference Value " .
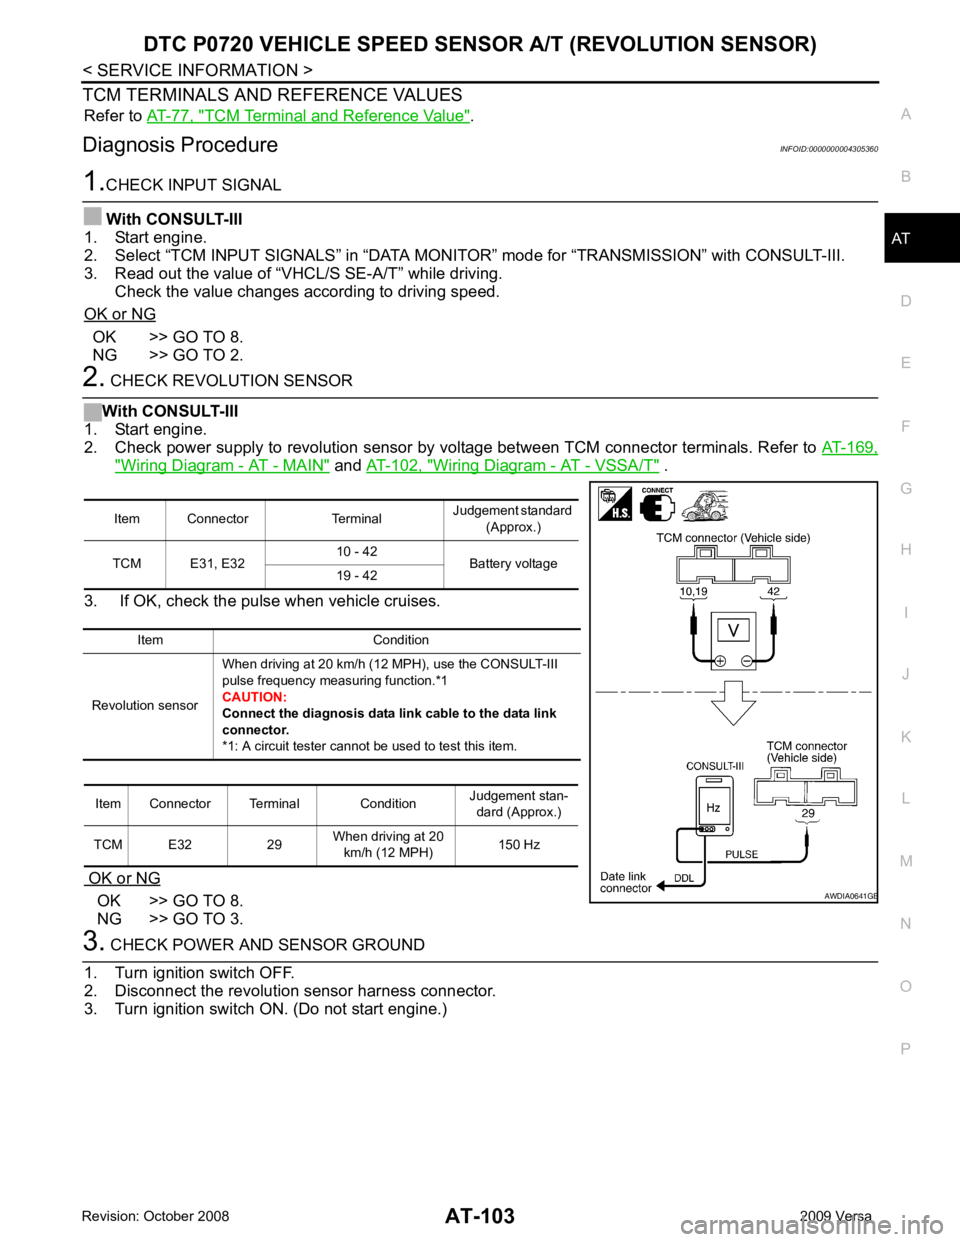
Diagnosis Procedure INFOID:0000000004305360OK >> GO TO 8.
NG >> GO TO 2. " Wiring Diagram - AT - MAIN " and
AT-102, " Wiring Diagram - AT - VSSA/T " .
3. If OK, check the pulse when vehicle cruises.
OK or NG OK >> GO TO 8.
NG >> GO TO 3. B
Page 109 of 4331
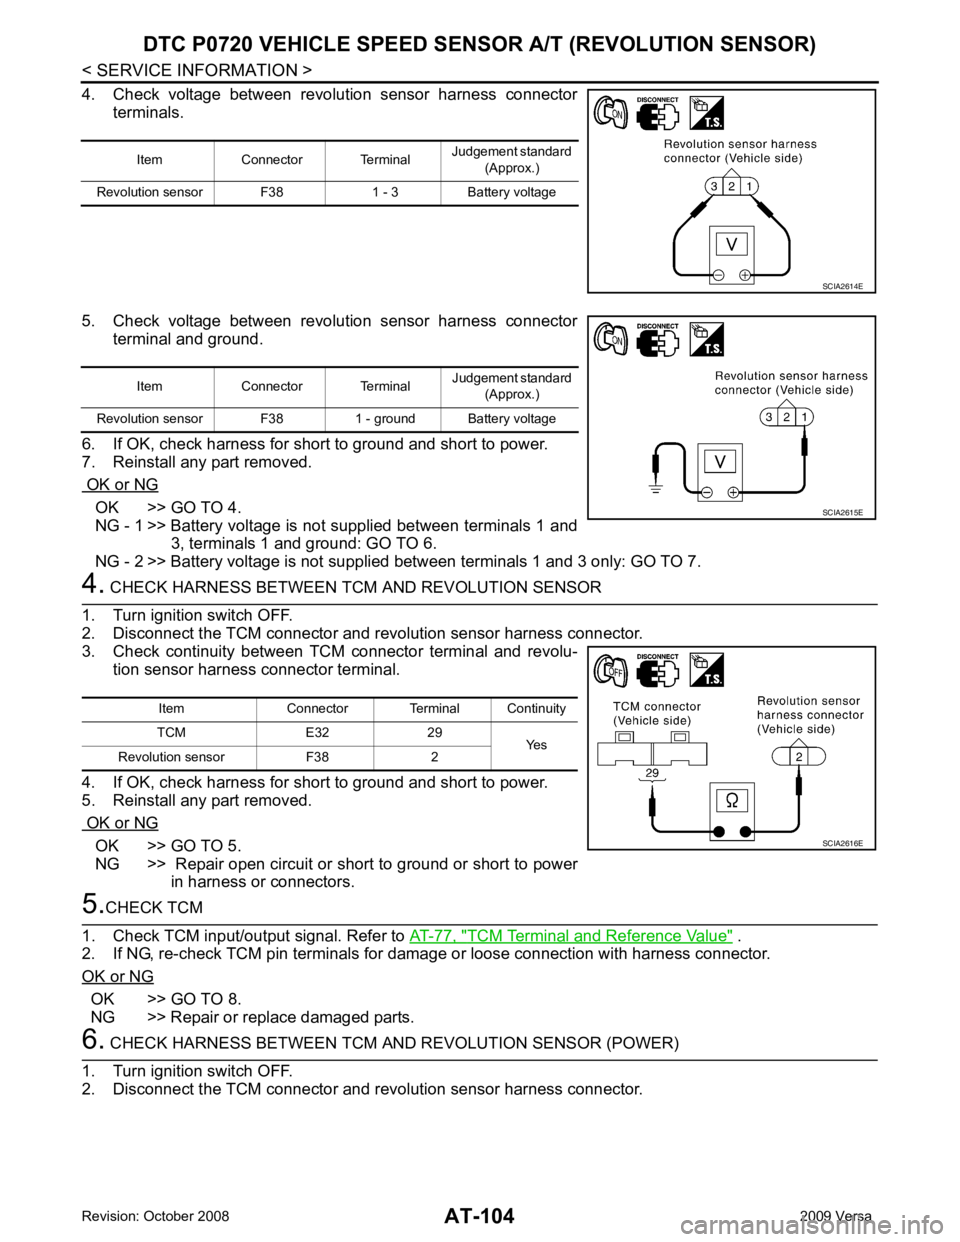
OK >> GO TO 4.
NG - 1 >> Battery voltage is not supplied between terminals 1 and 3, terminals 1 and ground: GO TO 6.
NG - 2 >> Battery voltage is not supp lied between terminals 1 and 3 only: GO TO 7. OK >> GO TO 5.
NG >> Repair open circuit or short to ground or short to power
in harness or connectors. TCM Terminal and Reference Value " .
2. If NG, re-check TCM pin terminals for damage or loose connection with harness connector.
OK or NG OK >> GO TO 8.
NG >> Repair or replace damaged parts.
Page 110 of 4331
AT
N
O P
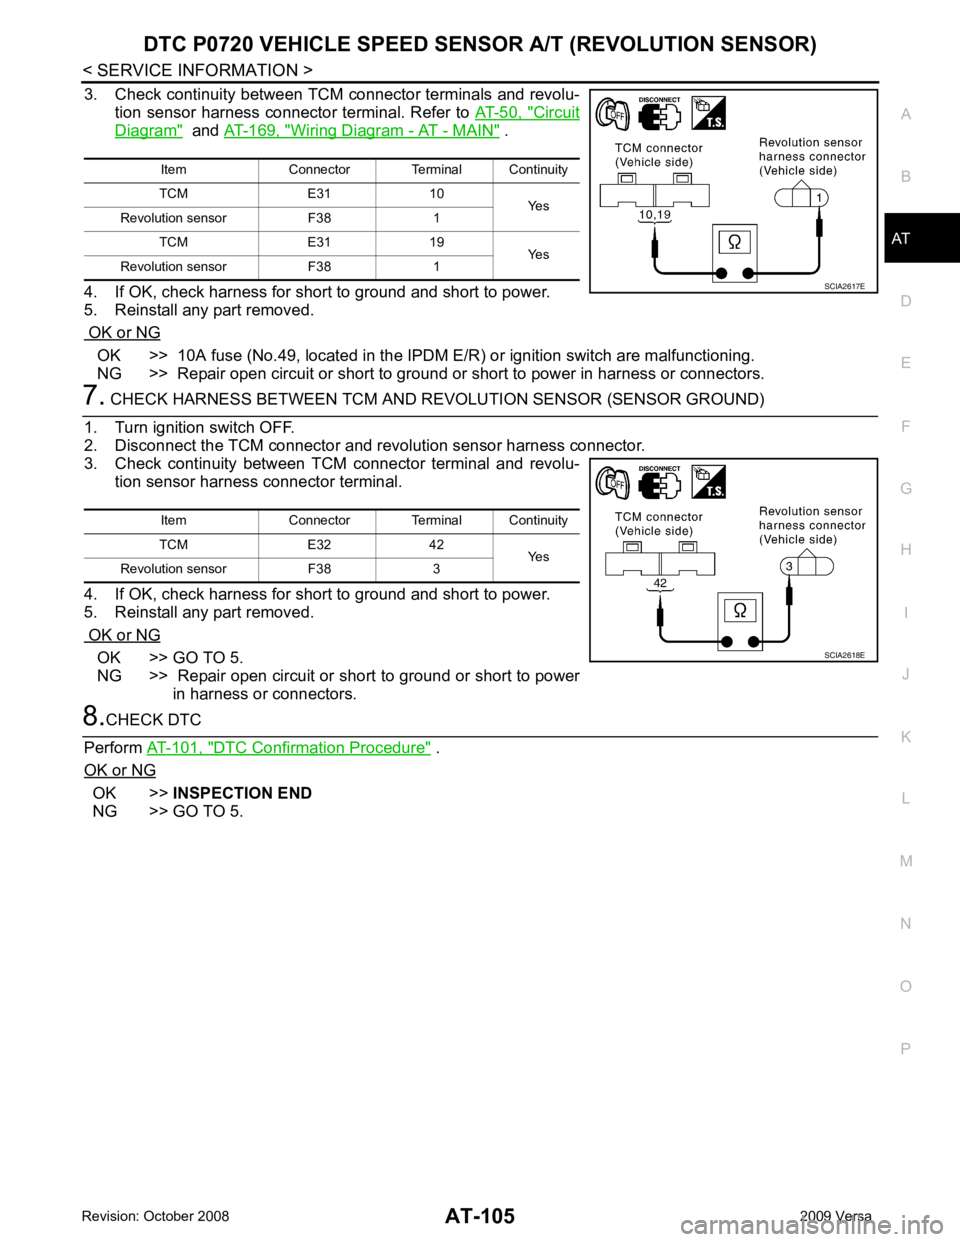
3. Check continuity between TCM connector terminals and revolu-
tion sensor harness connector terminal. Refer to AT-50, " Circuit
Diagram " and
AT-169, " Wiring Diagram - AT - MAIN " .
4. If OK, check harness for short to ground and short to power.
5. Reinstall any part removed.
OK or NG OK >> 10A fuse (No.49, located in the IPDM
E/R) or ignition switch are malfunctioning.
NG >> Repair open circuit or short to ground or short to power in harness or connectors. OK >> GO TO 5.
NG >> Repair open circuit or short to ground or short to power
in harness or connectors. DTC Confirmation Procedure " .
OK or NG OK >>
INSPECTION END
NG >> GO TO 5. Item Connector Terminal Continuity
TCM E31 10 Yes
Revolution sensor F38 1
TCM E31 19 Yes
Revolution sensor F38 1
Trending: break, Battery size, dashboard, Antifreeze, length, belt, recommended oil
