NISSAN TIIDA 2010 Service Repair Manual
TIIDA 2010
NISSAN
NISSAN
https://www.carmanualsonline.info/img/5/57397/w960_57397-0.png
NISSAN TIIDA 2010 Service Repair Manual
Trending: jacking points, Lt-6, length, Anchor point, tow bar, horn, transmission oil
Page 271 of 3745
AT-254
< SERVICE INFORMATION >
OVERHAUL
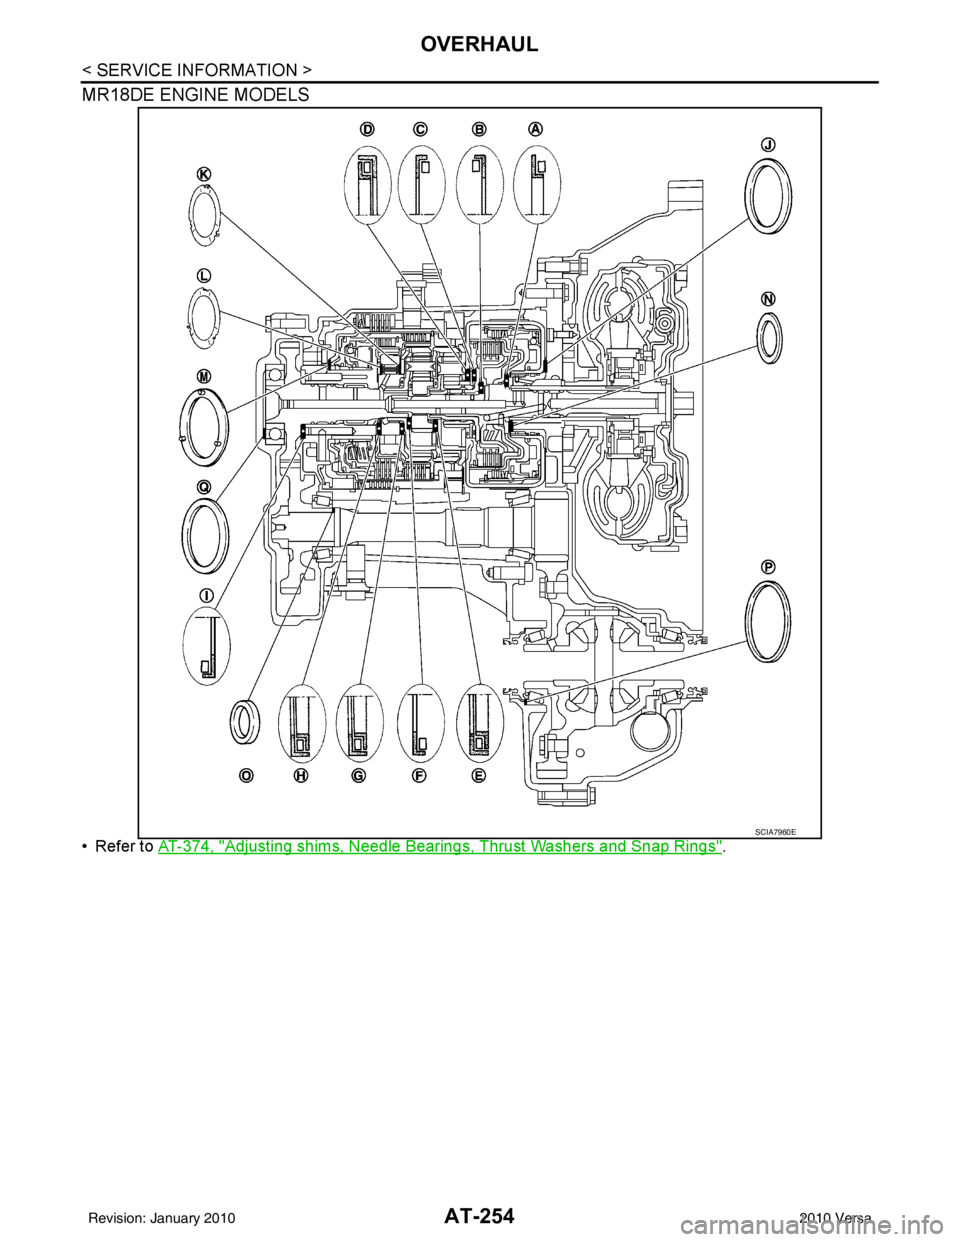
MR18DE ENGINE MODELS
• Refer to AT-374, "Adjusting shims, Needle Bearings, Thrust Washers and Snap Rings".
SCIA7960E
Revision: January 20102010 Versa
Page 272 of 3745
OVERHAULAT-255
< SERVICE INFORMATION >
DE
F
G H
I
J
K L
M A
B
AT
N
O P
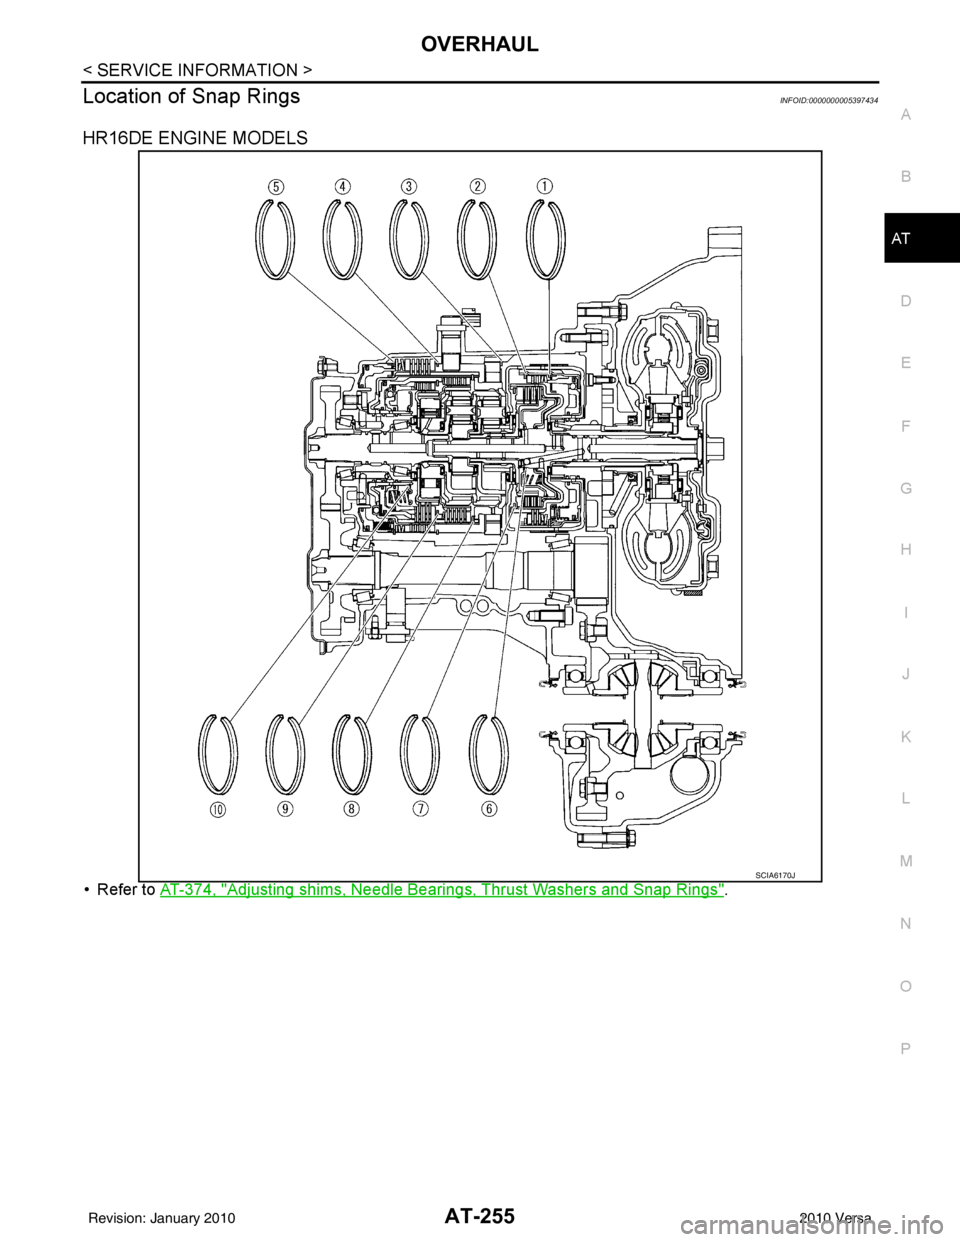
Location of Snap RingsINFOID:0000000005397434
HR16DE ENGINE MODELS
• Refer to AT-374, "Adjusting shims, Needle Bearings, Thrust Washers and Snap Rings".
SCIA6170J
Revision: January 20102010 Versa
Page 273 of 3745
AT-256
< SERVICE INFORMATION >
OVERHAUL
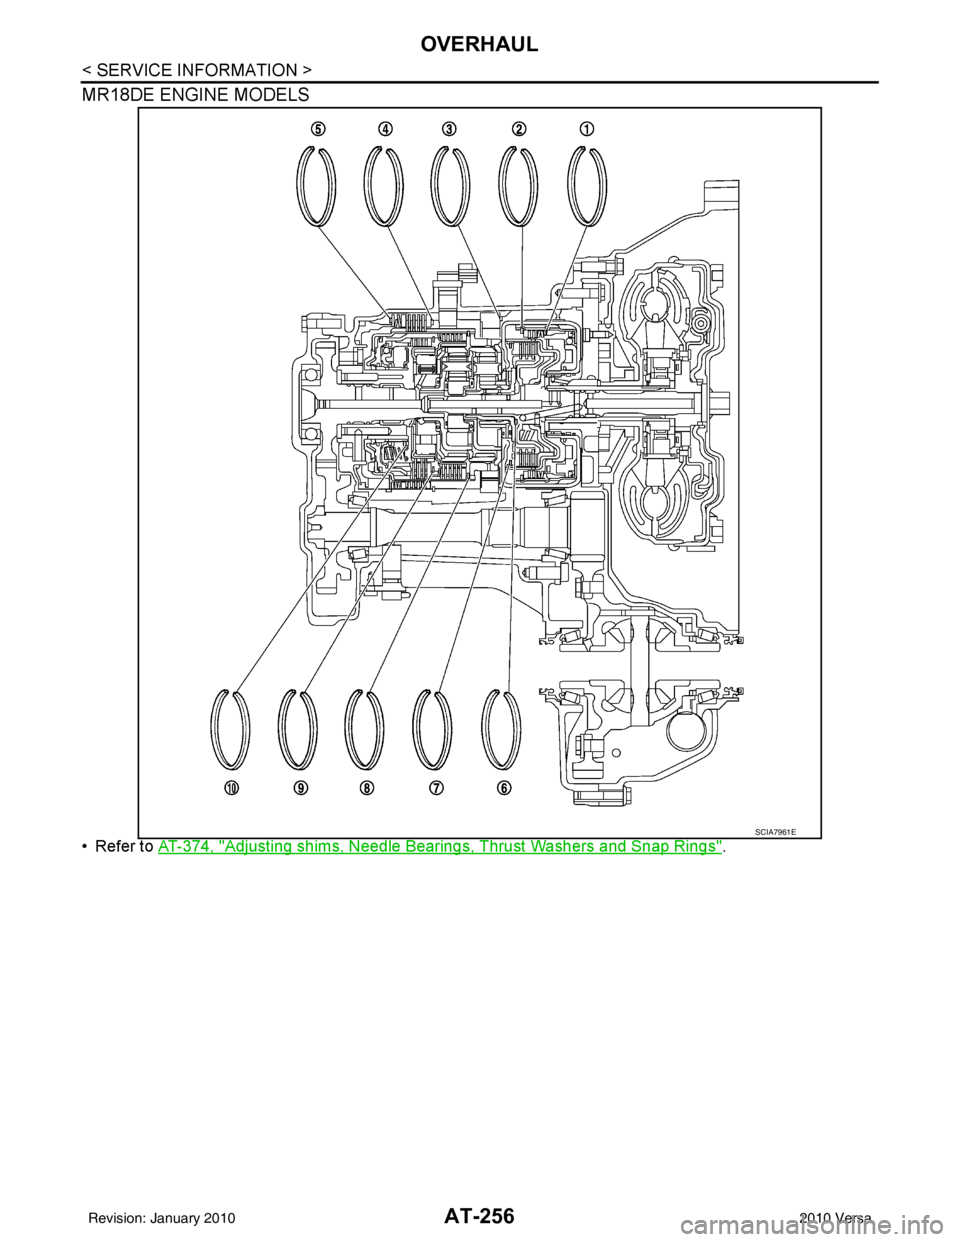
MR18DE ENGINE MODELS
• Refer to AT-374, "Adjusting shims, Needle Bearings, Thrust Washers and Snap Rings".
SCIA7961E
Revision: January 20102010 Versa
Page 274 of 3745
DISASSEMBLYAT-257
< SERVICE INFORMATION >
DE
F
G H
I
J
K L
M A
B
AT
N
O P
DISASSEMBLY
DisassemblyINFOID:0000000005397435
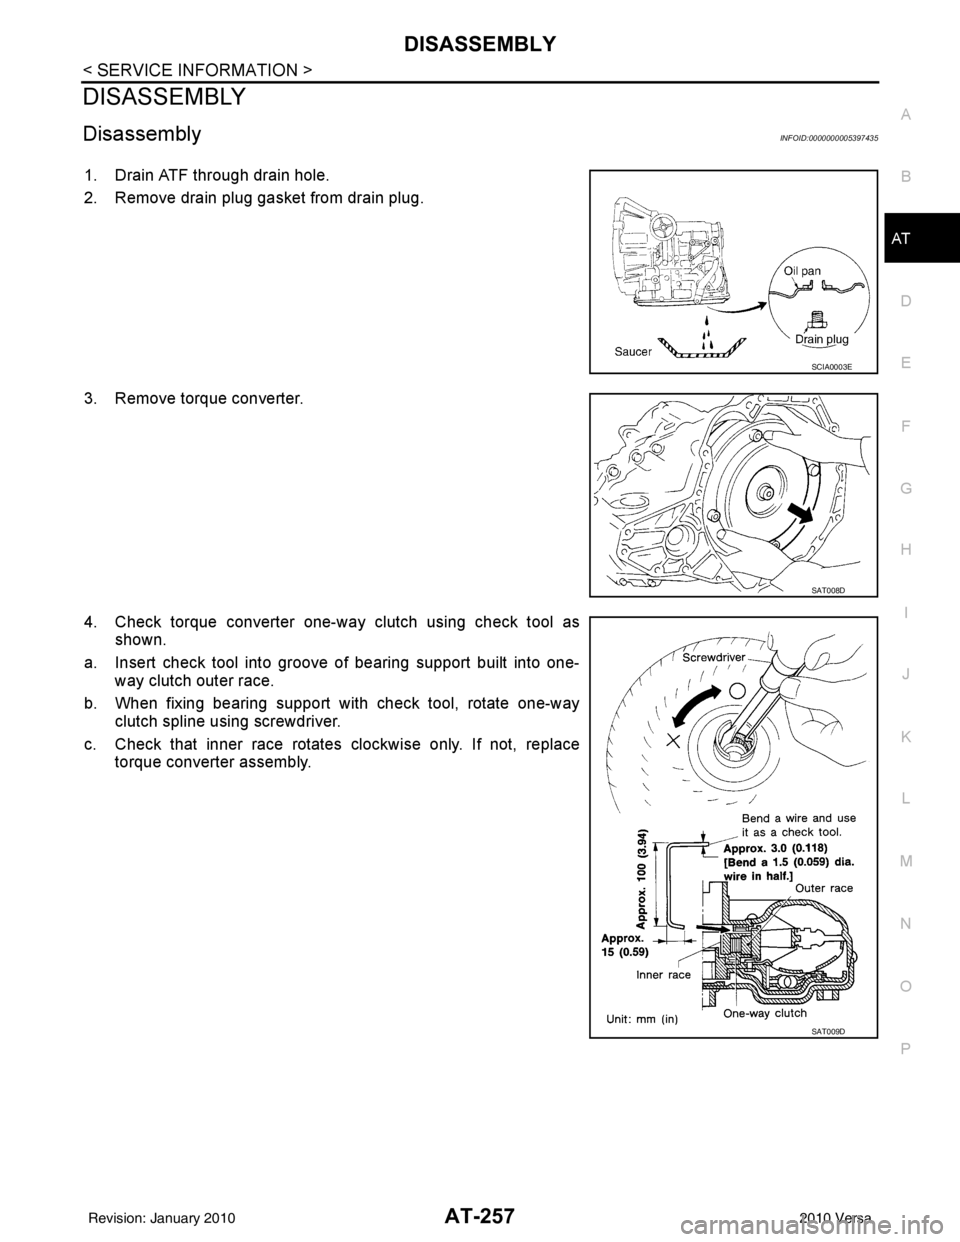
1. Drain ATF through drain hole.
2. Remove drain plug gasket from drain plug.
3. Remove torque converter.
4. Check torque converter one-way clutch using check tool as shown.
a. Insert check tool into groove of bearing support built into one- way clutch outer race.
b. When fixing bearing support with check tool, rotate one-way clutch spline using screwdriver.
c. Check that inner race rotates clockwise only. If not, replace torque converter assembly.
SCIA0003E
SAT008D
SAT009D
Revision: January 20102010 Versa
Page 275 of 3745
AT-258
< SERVICE INFORMATION >
DISASSEMBLY
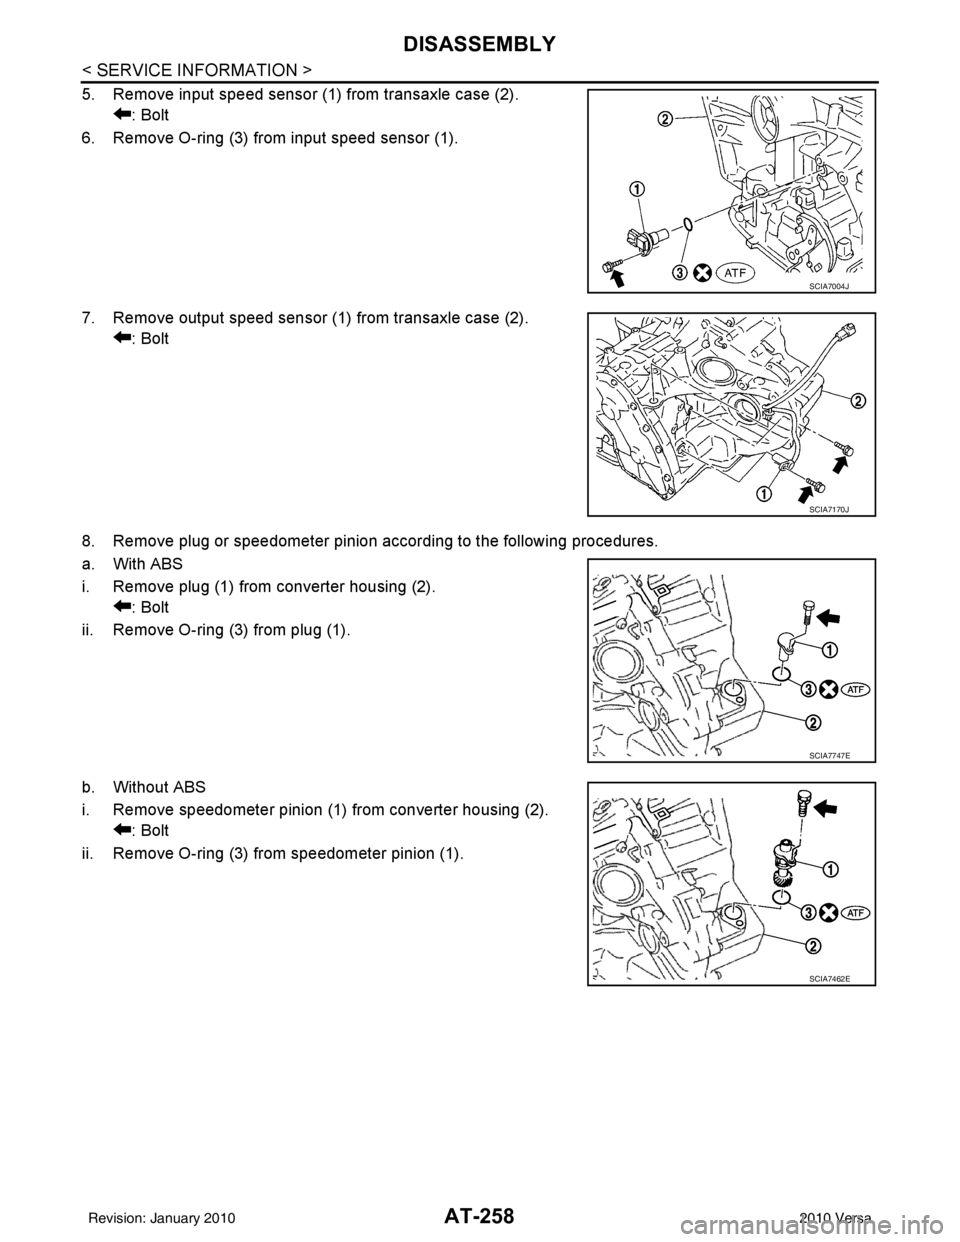
5. Remove input speed sensor (1) from transaxle case (2).: Bolt
6. Remove O-ring (3) from input speed sensor (1).
7. Remove output speed sensor (1) from transaxle case (2). : Bolt
8. Remove plug or speedometer pinion according to the following procedures.
a. With ABS
i. Remove plug (1) from converter housing (2). : Bolt
ii. Remove O-ring (3) from plug (1).
b. Without ABS
i. Remove speedometer pinion (1) from converter housing (2). : Bolt
ii. Remove O-ring (3) from speedometer pinion (1).
SCIA7004J
SCIA7170J
SCIA7747E
SCIA7462E
Revision: January 20102010 Versa
Page 276 of 3745
DISASSEMBLYAT-259
< SERVICE INFORMATION >
DE
F
G H
I
J
K L
M A
B
AT
N
O P
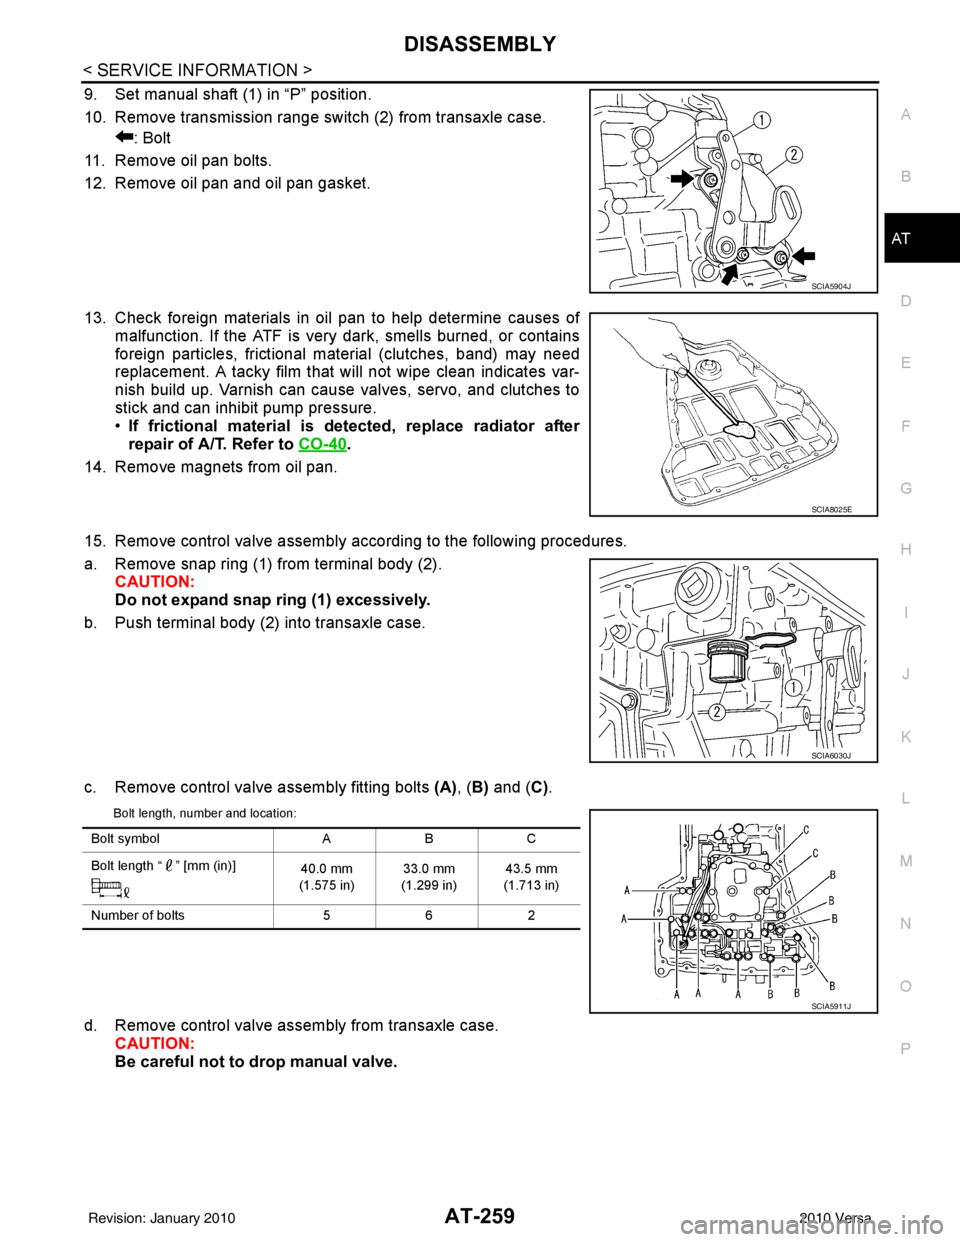
9. Set manual shaft (1) in “P” position.
10. Remove transmission range switch (2) from transaxle case. : Bolt
11. Remove oil pan bolts.
12. Remove oil pan and oil pan gasket.
13. Check foreign materials in oil pan to help determine causes of malfunction. If the ATF is very dark, smells burned, or contains
foreign particles, frictional material (clutches, band) may need
replacement. A tacky film that will not wipe clean indicates var-
nish build up. Varnish can cause valves, servo, and clutches to
stick and can inhibit pump pressure.
•If frictional material is detected, replace radiator after
repair of A/T. Refer to CO-40
.
14. Remove magnets from oil pan.
15. Remove control valve assembly according to the following procedures.
a. Remove snap ring (1) from terminal body (2). CAUTION:
Do not expand snap ring (1) excessively.
b. Push terminal body (2) into transaxle case.
c. Remove control valve assembly fitting bolts (A), (B) and ( C).
Bolt length, number and location:
d. Remove control valve assembly from transaxle case.
CAUTION:
Be careful not to drop manual valve.
SCIA5904J
SCIA8025E
SCIA6030J
Bolt symbol ABC
Bolt length “ ” [mm (in)] 40.0 mm
(1.575 in) 33.0 mm
(1.299 in) 43.5 mm
(1.713 in)
Number of bolts 562
SCIA5911J
Revision: January 20102010 Versa
Page 277 of 3745
AT-260
< SERVICE INFORMATION >
DISASSEMBLY
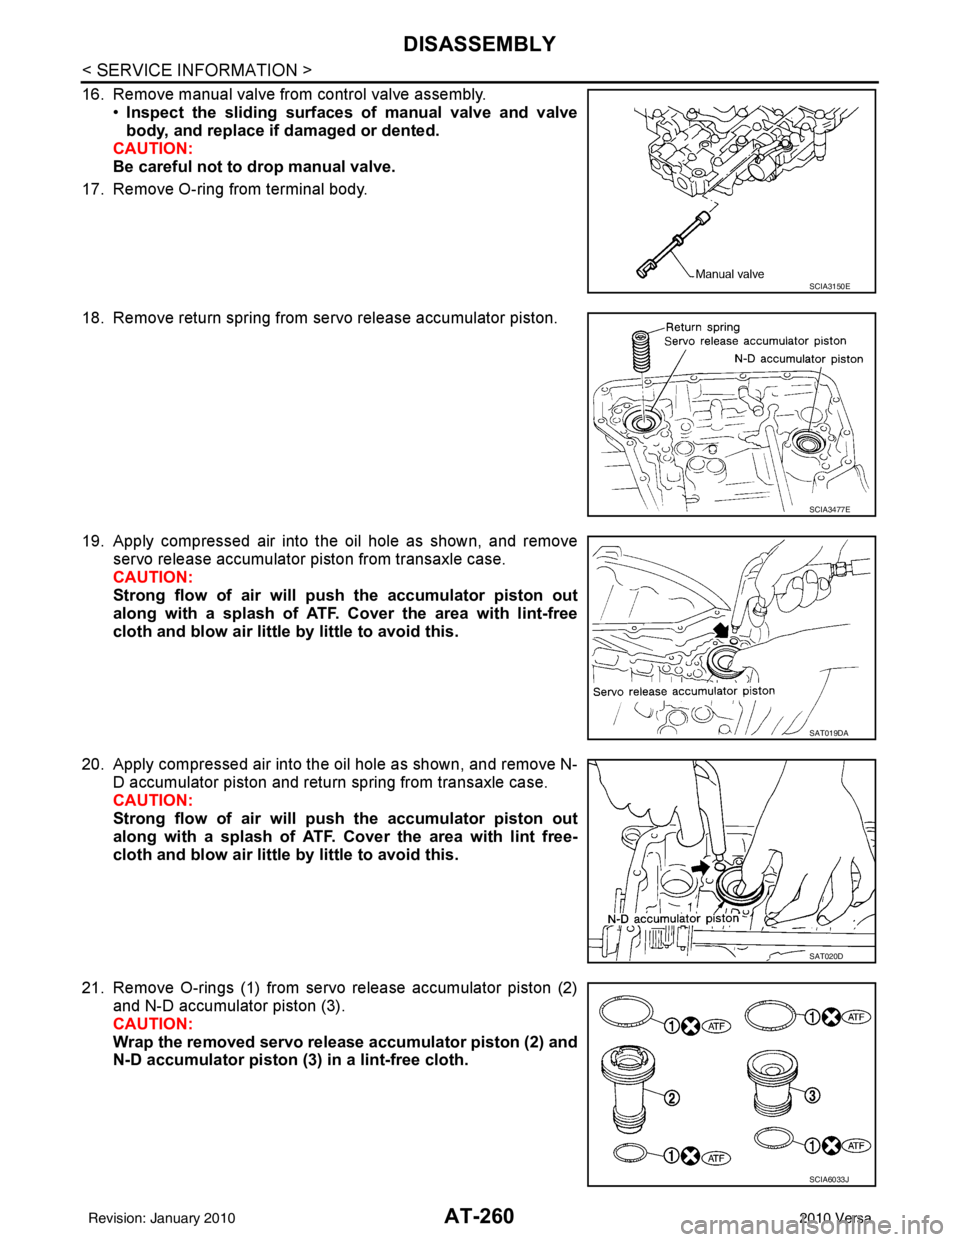
16. Remove manual valve from control valve assembly.•Inspect the sliding surfaces of manual valve and valve
body, and replace if damaged or dented.
CAUTION:
Be careful not to drop manual valve.
17. Remove O-ring from terminal body.
18. Remove return spring from servo release accumulator piston.
19. Apply compressed air into the oil hole as shown, and remove servo release accumulator piston from transaxle case.
CAUTION:
Strong flow of air will push the accumulator piston out
along with a splash of ATF. Cover the area with lint-free
cloth and blow air little by little to avoid this.
20. Apply compressed air into the oil hole as shown, and remove N- D accumulator piston and return spring from transaxle case.
CAUTION:
Strong flow of air will push the accumulator piston out
along with a splash of ATF. Cover the area with lint free-
cloth and blow air little by little to avoid this.
21. Remove O-rings (1) from servo release accumulator piston (2) and N-D accumulator piston (3).
CAUTION:
Wrap the removed servo release accumulator piston (2) and
N-D accumulator piston (3) in a lint-free cloth.
SCIA3150E
SCIA3477E
SAT019DA
SAT020D
SCIA6033J
Revision: January 20102010 Versa
Page 278 of 3745
DISASSEMBLYAT-261
< SERVICE INFORMATION >
DE
F
G H
I
J
K L
M A
B
AT
N
O P
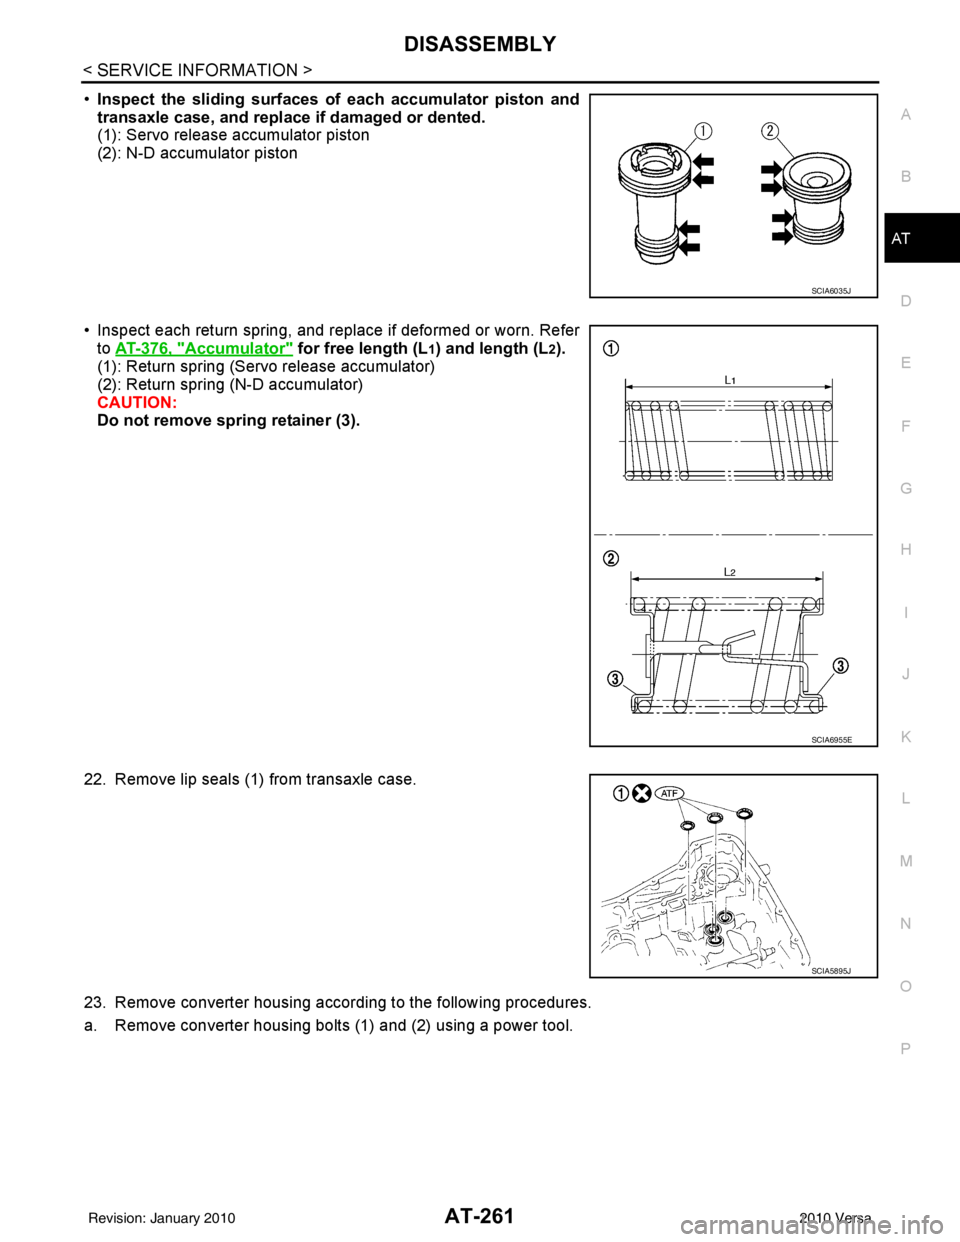
• Inspect the sliding surfaces of each accumulator piston and
transaxle case, and replace if damaged or dented.
(1): Servo release accumulator piston
(2): N-D accumulator piston
• Inspect each return spring, and replace if deformed or worn. Refer to AT-376, "
Accumulator" for free length (L1) and length (L2).
(1): Return spring (Servo release accumulator)
(2): Return spring (N-D accumulator)
CAUTION:
Do not remove spring retainer (3).
22. Remove lip seals (1) from transaxle case.
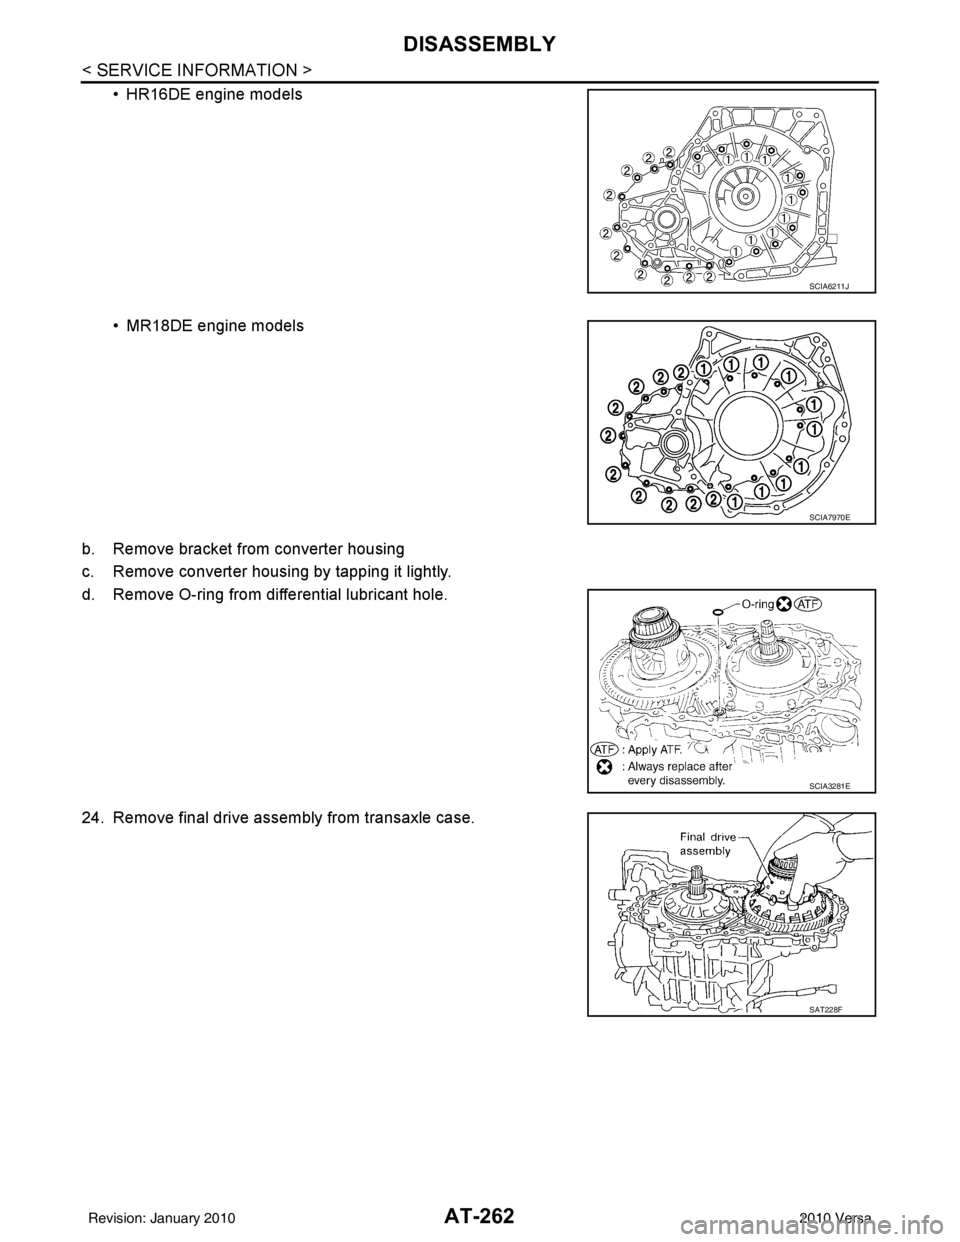
23. Remove converter housing according to the following procedures.
a. Remove converter housing bolts (1) and (2) using a power tool.
SCIA6035J
SCIA6955E
SCIA5895J
Revision: January 20102010 Versa
Page 279 of 3745
AT-262
< SERVICE INFORMATION >
DISASSEMBLY
• HR16DE engine models
• MR18DE engine models
b. Remove bracket from converter housing
c. Remove converter housing by tapping it lightly.
d. Remove O-ring from differential lubricant hole.
24. Remove final drive assembly from transaxle case.
SCIA6211J
SCIA7970E
SCIA3281E
SAT228F
Revision: January 20102010 Versa
Page 280 of 3745
DISASSEMBLYAT-263
< SERVICE INFORMATION >
DE
F
G H
I
J
K L
M A
B
AT
N
O P
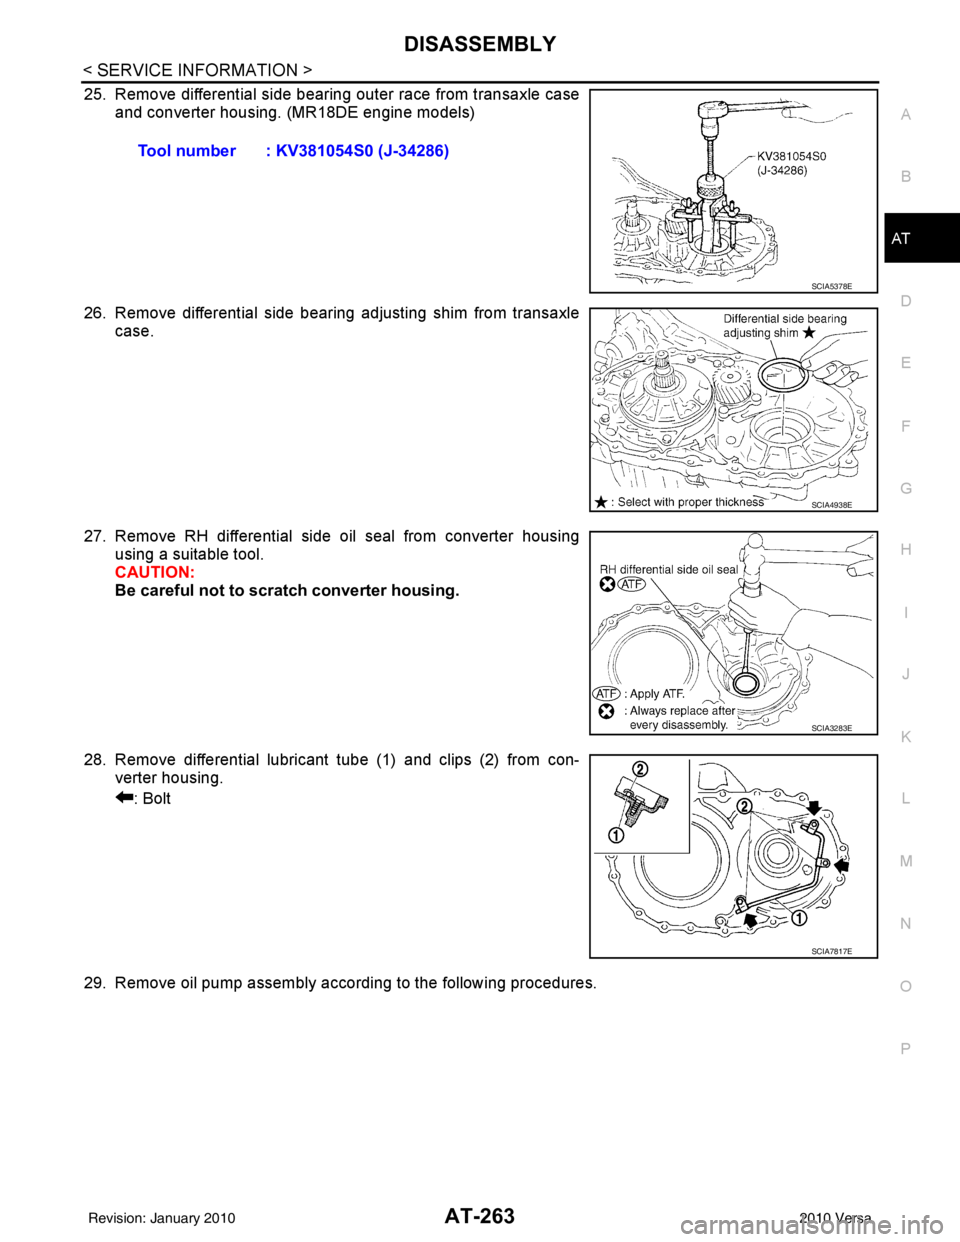
25. Remove differential side bearing outer race from transaxle case and converter housing. (MR18DE engine models)
26. Remove differential side bearing adjusting shim from transaxle case.
27. Remove RH differential side oil seal from converter housing using a suitable tool.
CAUTION:
Be careful not to scratch converter housing.
28. Remove differential lubricant tube (1) and clips (2) from con- verter housing.
: Bolt
29. Remove oil pump assembly according to the following procedures. Tool number : KV381054S0 (J-34286)
SCIA5378E
SCIA4938E
SCIA3283E
SCIA7817E
Revision: January 20102010 Versa
Trending: engine, Oil viscosity, air suspension, Park light, open hood, PS-9, check oil
