NISSAN X-TRAIL 2003 Service Repair Manual
X-TRAIL 2003
NISSAN
NISSAN
https://www.carmanualsonline.info/img/5/57404/w960_57404-0.png
NISSAN X-TRAIL 2003 Service Repair Manual
Trending: wheel alignment, jump start terminals, airbag, fuel pump, Oil cooler, light, CANISTER
Page 3761 of 4179
HEADLAMP WASHER
WW-21
C
D
E
F
G
H
I
J
L
MA
B
WW
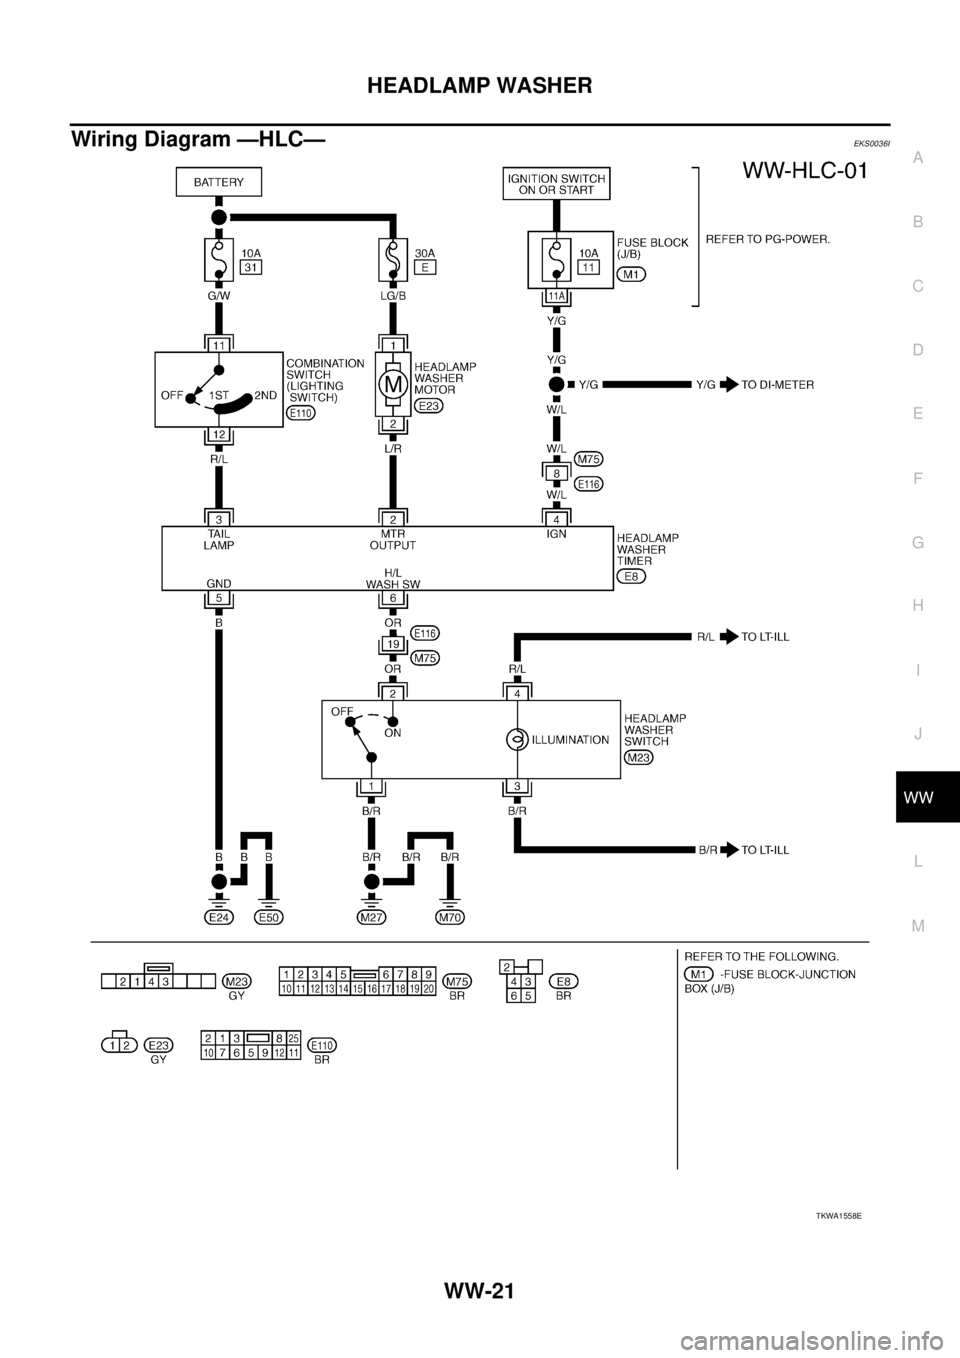
Wiring Diagram —HLC—EKS0036I
TKWA1558E
Page 3762 of 4179
WW-22
HEADLAMP WASHER
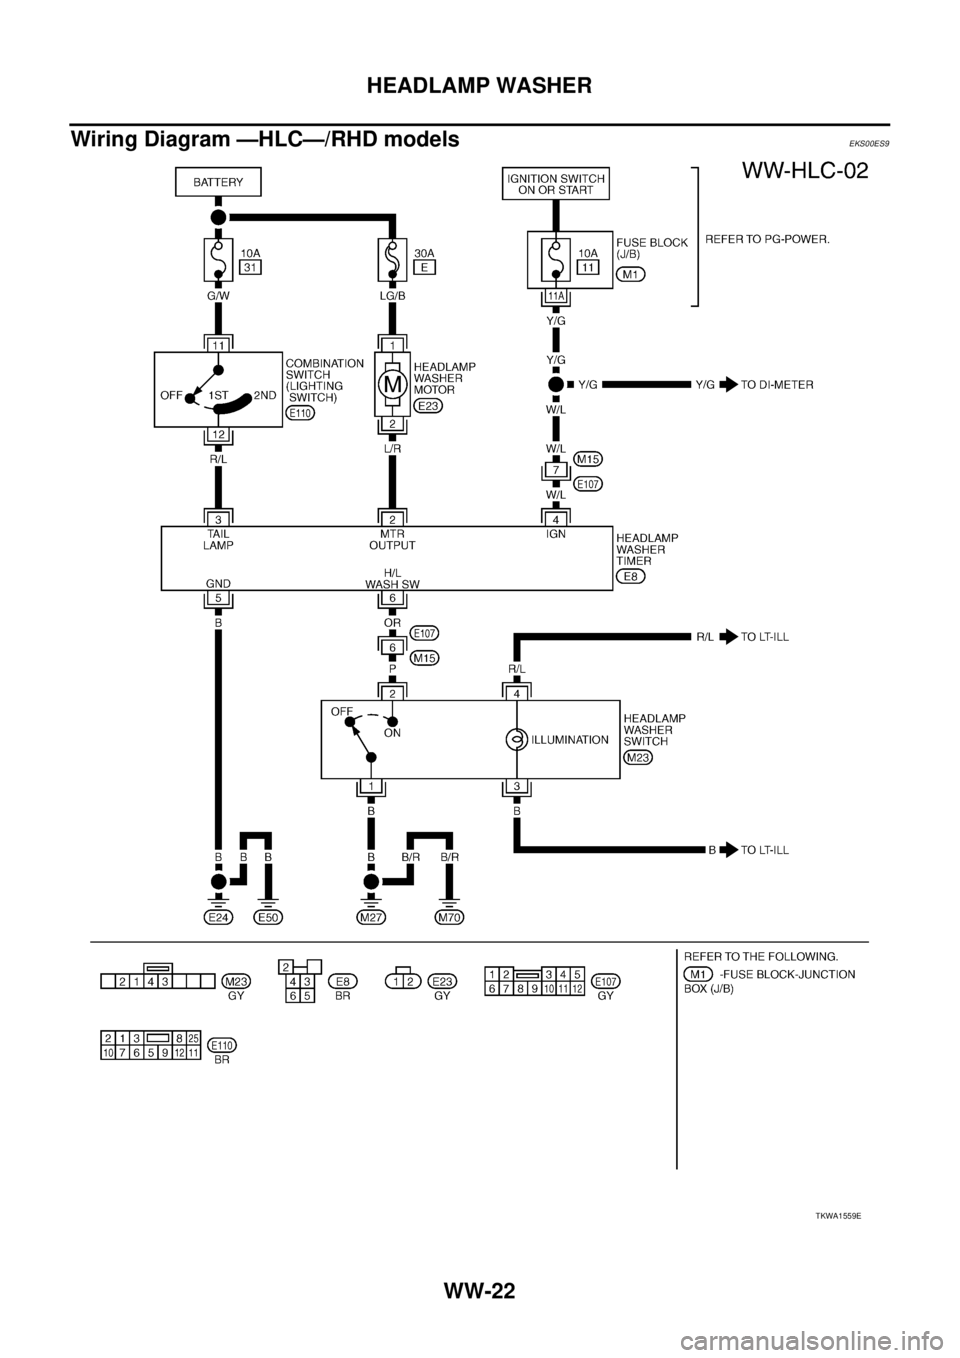
Wiring Diagram —HLC—/RHD modelsEKS00ES9
TKWA1559E
Page 3763 of 4179
HEADLAMP WASHER
WW-23
C
D
E
F
G
H
I
J
L
MA
B
WW
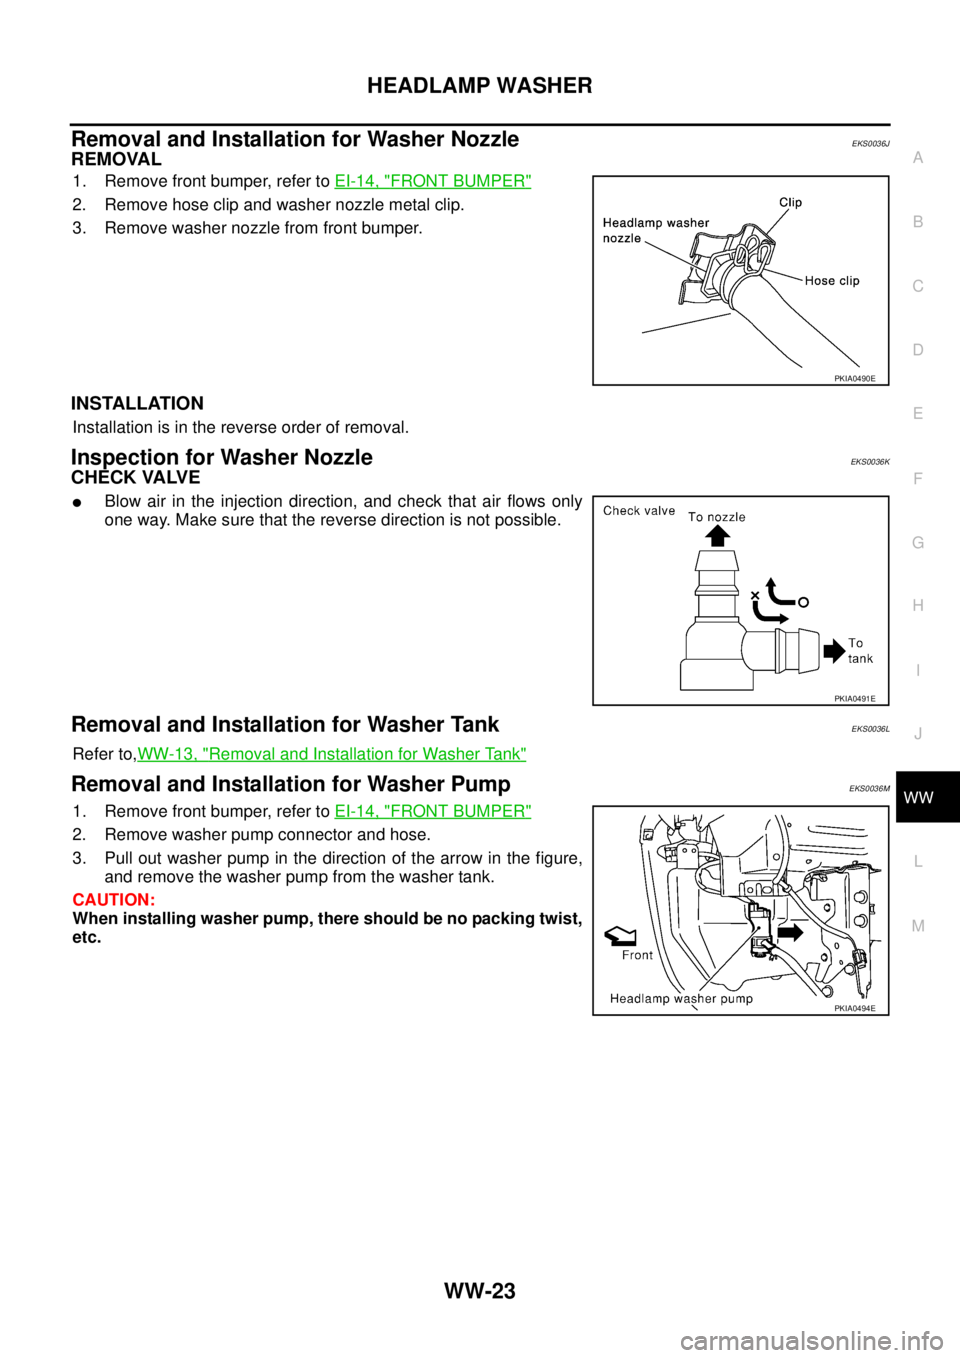
Removal and Installation for Washer NozzleEKS0036J
REMOVAL
1. Remove front bumper, refer to EI-14, "FRONT BUMPER"
2. Remove hose clip and washer nozzle metal clip.
3. Remove washer nozzle from front bumper.
INSTALLATION
Installation is in the reverse order of removal.
Inspection for Washer NozzleEKS0036K
CHECK VALVE
�Blow air in the injection direction, and check that air flows only
one way. Make sure that the reverse direction is not possible.
Removal and Installation for Washer TankEKS0036L
Refer to,WW-13, "Removal and Installation for Washer Tank"
Removal and Installation for Washer PumpEKS0036M
1. Remove front bumper, refer to EI-14, "FRONT BUMPER"
2. Remove washer pump connector and hose.
3. Pull out washer pump in the direction of the arrow in the figure,
and remove the washer pump from the washer tank.
CAUTION:
When installing washer pump, there should be no packing twist,
etc.
PKIA0490E
PKIA0491E
PKIA0494E
Page 3764 of 4179
WW-24
HEADLAMP WASHER
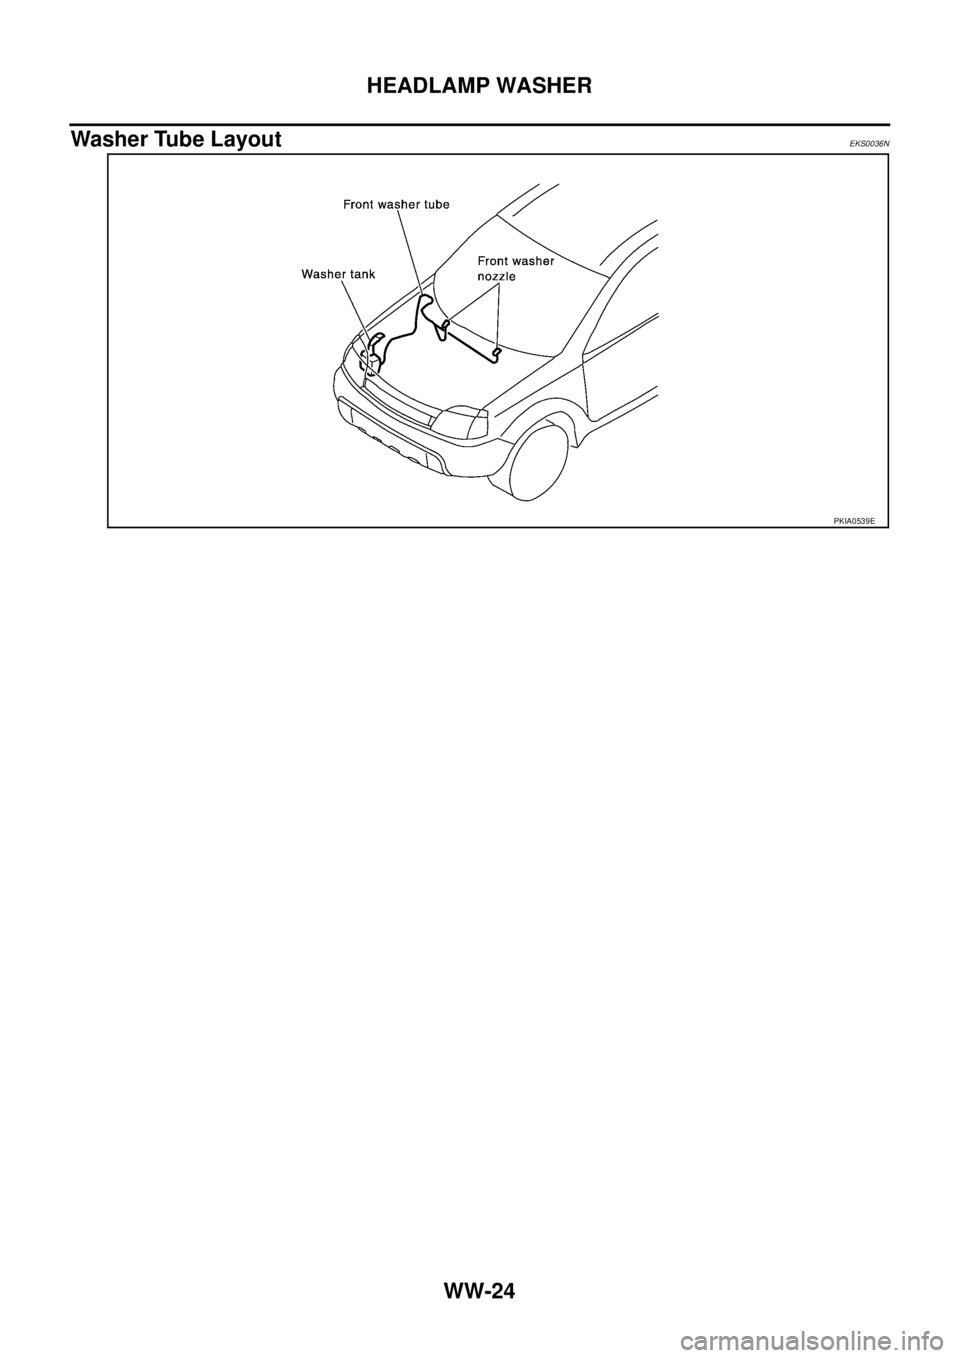
Washer Tube LayoutEKS0036N
PKIA0539E
Page 3765 of 4179
HORN
WW-25
C
D
E
F
G
H
I
J
L
MA
B
WW
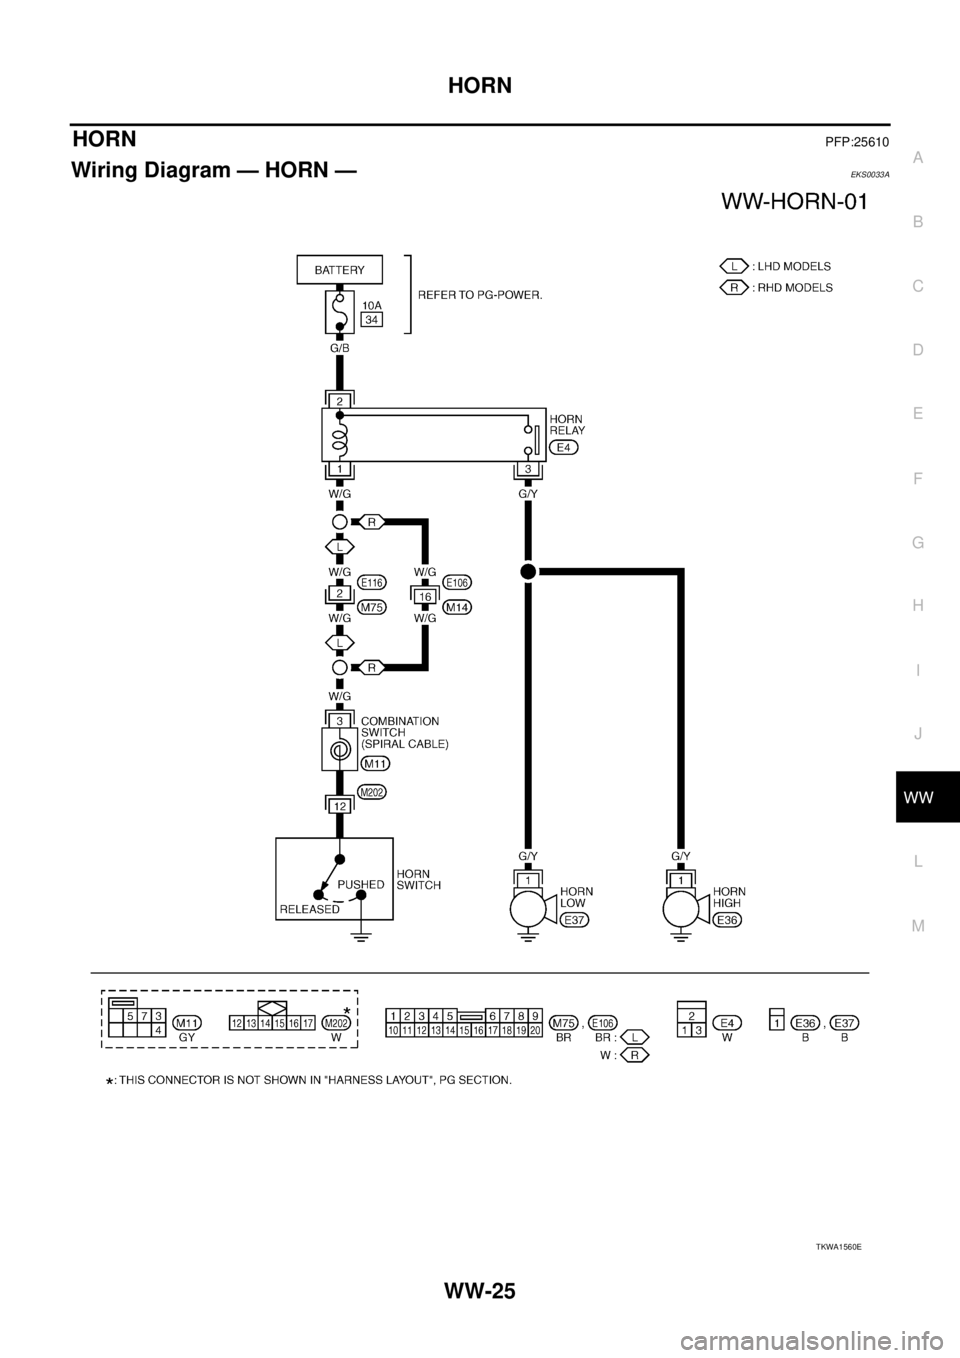
HORNPFP:25610
Wiring Diagram — HORN —EKS0033A
TKWA1560E
Page 3766 of 4179
WW-26
HORN
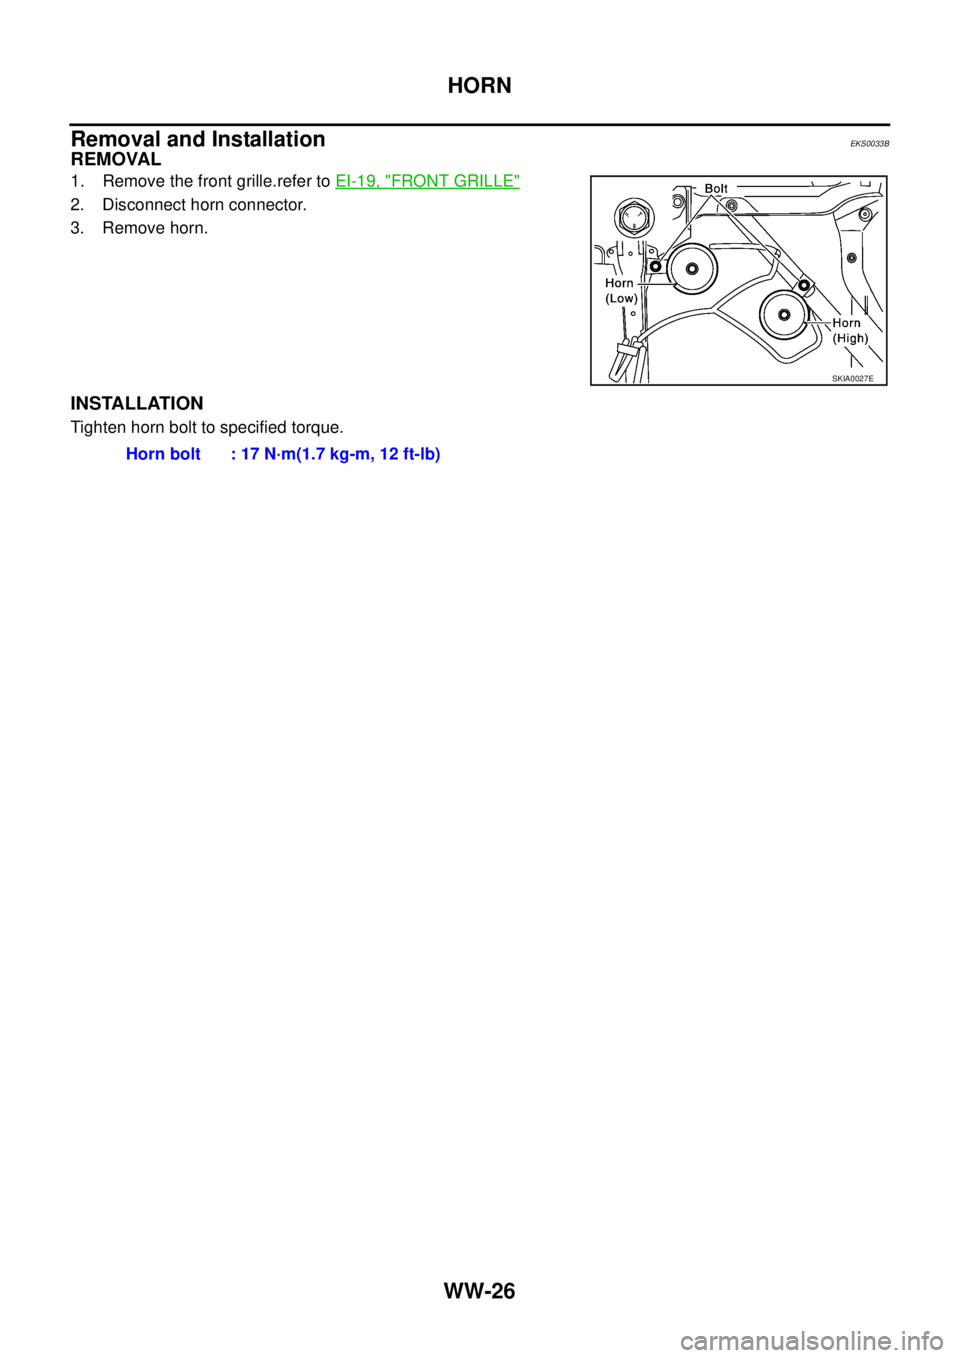
Removal and InstallationEKS0033B
REMOVAL
1. Remove the front grille.refer to EI-19, "FRONT GRILLE"
2. Disconnect horn connector.
3. Remove horn.
INSTALLATION
Tighten horn bolt to specified torque.
SKIA0027E
Horn bolt : 17 N·m(1.7 kg-m, 12 ft-lb)
Page 3767 of 4179
CIGARETTE LIGHTER
WW-27
C
D
E
F
G
H
I
J
L
MA
B
WW
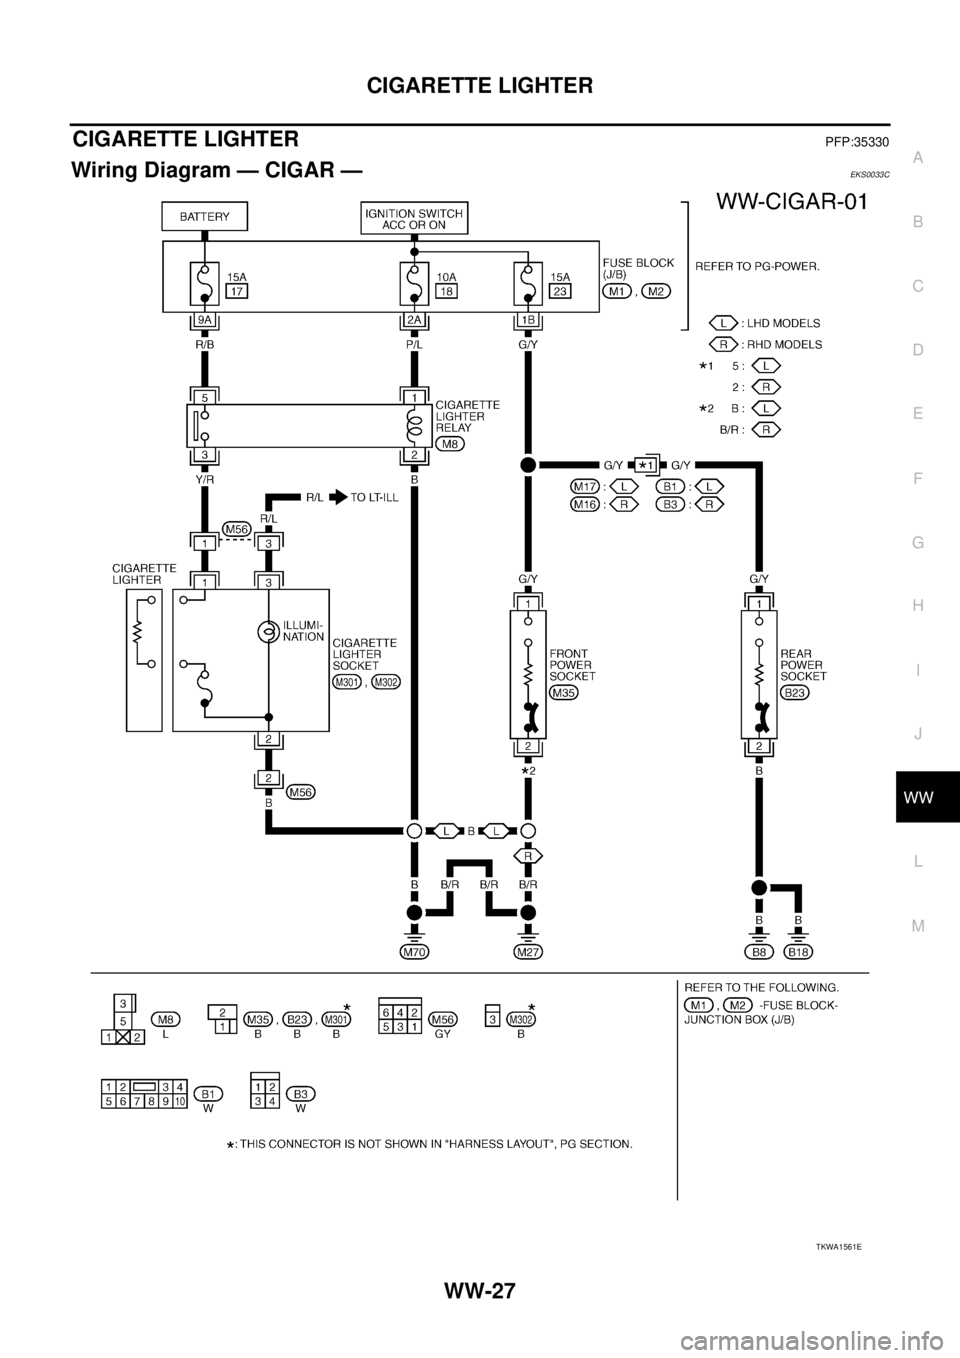
CIGARETTE LIGHTERPFP:35330
Wiring Diagram — CIGAR —EKS0033C
TKWA1561E
Page 3768 of 4179
WW-28
CIGARETTE LIGHTER
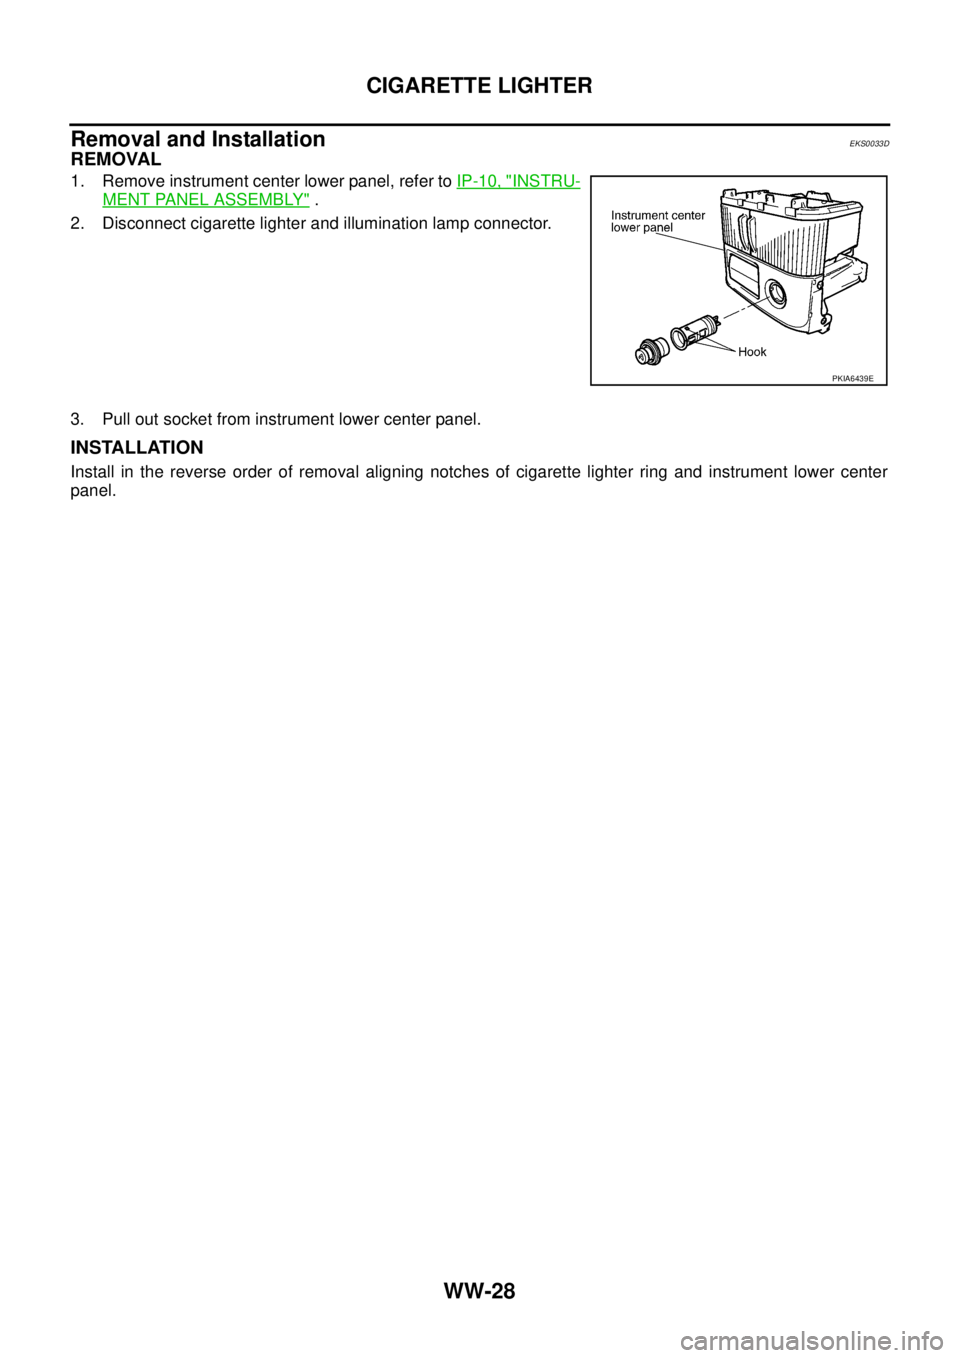
Removal and InstallationEKS0033D
REMOVAL
1. Remove instrument center lower panel, refer to IP-10, "INSTRU-
MENT PANEL ASSEMBLY" .
2. Disconnect cigarette lighter and illumination lamp connector.
3. Pull out socket from instrument lower center panel.
INSTALLATION
Install in the reverse order of removal aligning notches of cigarette lighter ring and instrument lower center
panel.
PKIA6439E
Page 3769 of 4179
POWER SOCKET
WW-29
C
D
E
F
G
H
I
J
L
MA
B
WW
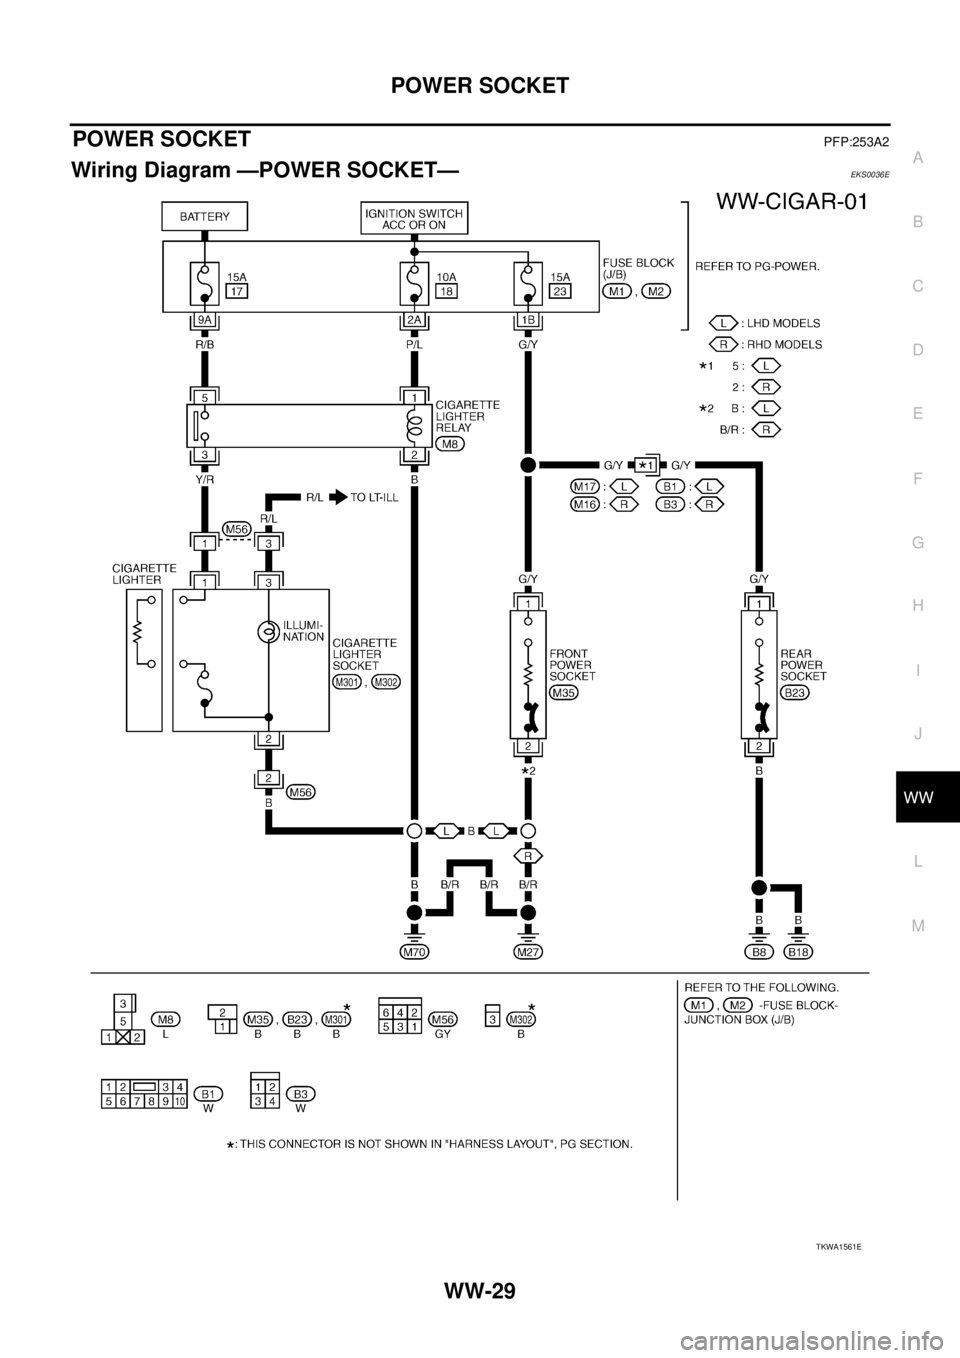
POWER SOCKETPFP:253A2
Wiring Diagram —POWER SOCKET—EKS0036E
TKWA1561E
Page 3770 of 4179
WW-30
POWER SOCKET
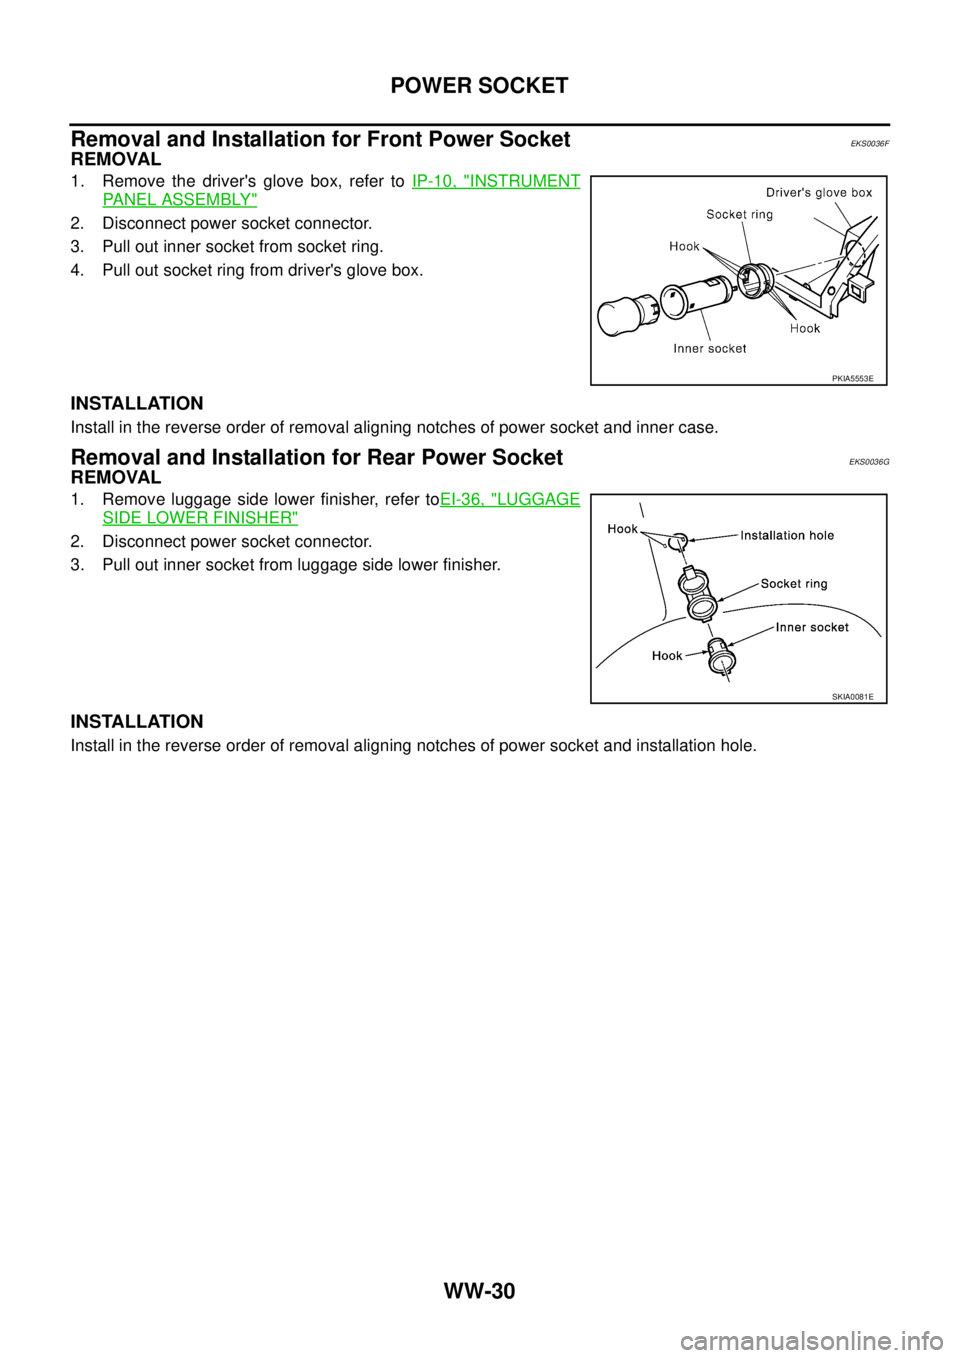
Removal and Installation for Front Power SocketEKS0036F
REMOVAL
1. Remove the driver's glove box, refer to IP-10, "INSTRUMENT
PANEL ASSEMBLY"
2. Disconnect power socket connector.
3. Pull out inner socket from socket ring.
4. Pull out socket ring from driver's glove box.
INSTALLATION
Install in the reverse order of removal aligning notches of power socket and inner case.
Removal and Installation for Rear Power SocketEKS0036G
REMOVAL
1. Remove luggage side lower finisher, refer toEI-36, "LUGGAGE
SIDE LOWER FINISHER"
2. Disconnect power socket connector.
3. Pull out inner socket from luggage side lower finisher.
INSTALLATION
Install in the reverse order of removal aligning notches of power socket and installation hole.
PKIA5553E
SKIA0081E
Trending: bulb, oil pressure, power steering fluid, window, gas mileage, fuel filter location, radiator
