light OLDSMOBILE SILHOUETTE 1997 Owners Manual
[x] Cancel search | Manufacturer: OLDSMOBILE, Model Year: 1997, Model line: SILHOUETTE, Model: OLDSMOBILE SILHOUETTE 1997Pages: 436, PDF Size: 21.87 MB
Page 7 of 436

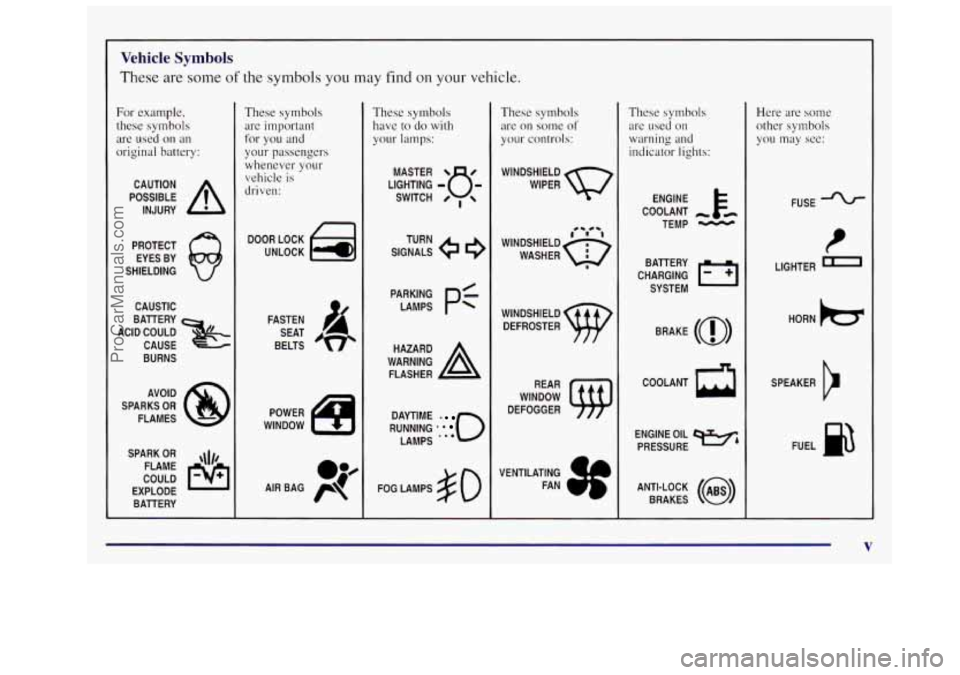
Vehicle Symbols
These are some of the symbols you may find on your vehicle.
For example,
these symbols
are used
on an
original battery:
POSSIBLE A
CAUTION
INJURY
PROTECT EYES BY
SHIELDING
CAUSTIC
ACID COULD
&
BATTERY
CAUSE
BURNS
AVOID
SPARKS
OR
FLAMES
SPARK
OR ,\I/,
COULD FLAME
EXPLODE BATTERY
These symbols are important
for you and
your passengers whenever your
vehicle is
driven:
DOOR LOCK
UNLOCK
FASTEN SEAT
BELTS
These symbols have
to do with
your lamps:
SIGNALS e
TURN
RUNNING
* ' 0
DAYTIME .
LAMPS .**
FOG LAMPS $0
These symbols
are
on some of
your controls:
WINDSHIELD
WIPER
WINDSHIELD DEFROSTER
WINDOW
DEFOGGER
VENTILATING FAN
These symbols are used
on
warning and
indicator lights:
COOLANT -
TEMP -
CHARGING 1'1
BATTERY
SYSTEM
BRAKE
(a)
COOLANT a
ENGINE OIL
PRESSURE
Wb
ANTI-LOCK (@)
BRAKES
Here are some
other symbols
you may see:
FUSE
P
LIGHTER -
HORN )tr
SPEAKER
b
FUEL B
ProCarManuals.com
Page 18 of 436

5. Remove the seat by
rocking it slightly
towards the rear of
the vehicle and then
pulling it out. This
should be done in
one motion. 1. Place the front hooks of
the bench seat onto the
front two floor pins.
To
do this, the seat will
need to be angled
so that
the front hooks clear
the
floor pins.
Replacing the Second Row Solid Bench Seat
2. With the seat still folded forward, roll down the gray
handle underneath the seat to lock the front latches.
Don’t put the bench seat in
so it faces backward because
it won’t latch that way.
The solid benches have seat position labels, located on
the back of the seat, showing where the seat
must go.
Follow that diagram. Use the
A, C and E sets of floor
cups. See “Seat Controls” in the beginning of this
section for more details. The seat must be placed in the
proper location for the legs to attach correctly.
1-10
ProCarManuals.com
Page 23 of 436

5. Unhook the front latches by rolling up the gray
handle under the seat until the handle locks. 6. Remove the seat by
rocking
it slightly
towards the rear
of the
vehicle and then
pulling
it out. This should be
done
in one motion.
ProCarManuals.com
Page 30 of 436

6. Kemove the seat by
rocking
it slightly
towards the rear
of
the vehicle and then
pulling
it out.
Repeat Steps 1 through 5 for the other section of the
split bench
seat.
Replacing the Split Bench Sections
Don‘t put the sections of the bench seat in so they face
backward because they won’t latch that
way. If you want
more storage room behind the seat, adjust each section
by sliding
it forward.
The split benches have seat position labels, located
on
the back of each seat, showing where the seat must go.
Follow that diagram.
The left (40) section of the 40/60 split bench uses the
A and B sets of floor cups.
0 The right (60) section of the 40/60 split bench uses
0 The left section of the 50/50 split bench uses the G
the C and D sets of floor cups.
and
H sets of floor cups.
The right section of the 50/50 split bench uses the I
See “Seat Controls” in the beginning of this section
for more details. The seat must be placed in the proper
location for the legs to attach correctly.
Make sure the seat is
in the full rear position before
beginning this procedure. and
J sets of floor cups.
ProCarManuals.com
Page 37 of 436

It is extremely dangerous to ride in a cargo area,
inside or outside
of a vehicle. In a collision,
people riding in these areas are more likely to be
seriously injured or killed.
Do not allow people to
ride in any area
of your vehicle that is not
equipped with seats and safety belts. Be sure
everyone in your vehicle is in a seat and using a
safety belt properly.
1
Your vehicle has a light that
comes on
as a reminder to
buckle up. (See “Safety Belt
Reminder Light”
in
the Index.)
I In most states and Canadian provinces, the law says to
wear safety belts. Here’s why:
They work.
You never know if you’ll be in a crash. If you do have a
crash, you don’t know if it will be a bad one.
A few crashes are mild, and some crashes can be so
serious that even buckled up a person wouldn’t survive.
But most crashes are
in between. In many of them,
people who buckle up can survive and sometimes walk
away. Without belts they could have been badly hurt
or killed.
After more than
25 years of safety belts in vehicles, the
facts are clear. In most crashes buckling up does
matter
... a lot!
1-29
ProCarManuals.com
Page 42 of 436

How to Wear Safety Belts Properly
Adults
This part is only for people of adult size.
Be aware
that there are special things to know about safety
belts and children. And there are different rules for smaller
children and babies. If a child will be riding
in your
Oldsmobile, see the part
of this manual called “Children.”
Follow those rules for everyone’s protection.
First, you’ll want
to know which restraint systems your
vehicle has.
We’ll start with the driver position.
Driver Position
This part describes the driver’s restraint system.
Lap-Shoulder Belt
The driver has a lap-shoulder belt. Here’s how to wear
it properly.
1. Close and lock the door.
2. Adjust the seat (to see how, see “Seats” in the Index)
so you can sit up straight.
3. Pick up the latch plate and pull the belt across you.
Don’t let
it get twisted.
The shoulder belt may lock
if you puli the belt across
you very quickly.
If this happens, let the belt go back
slightly to unlock
it. Then pull the belt across you
more slowly.
1-34
ProCarManuals.com
Page 52 of 436

/I CAUTION:
Air bags inflate with great force, faster than the
blink of an eye.
If you’re too close to an inflating
air bag, it could seriously injure you. Safety belts
help keep you in position before and during a
crash. Always wear your safety belt, even with air
bags. The driver should sit
as far back as possible
while still maintaining control of the vehicle.
A CAUTION:
An inflating air bag can seriously injure small
children. Always secure children properly in your
vehicle.
To read how, see the part of this manual
called “Children” and the caution label on the
right front passenger’s safety belt.
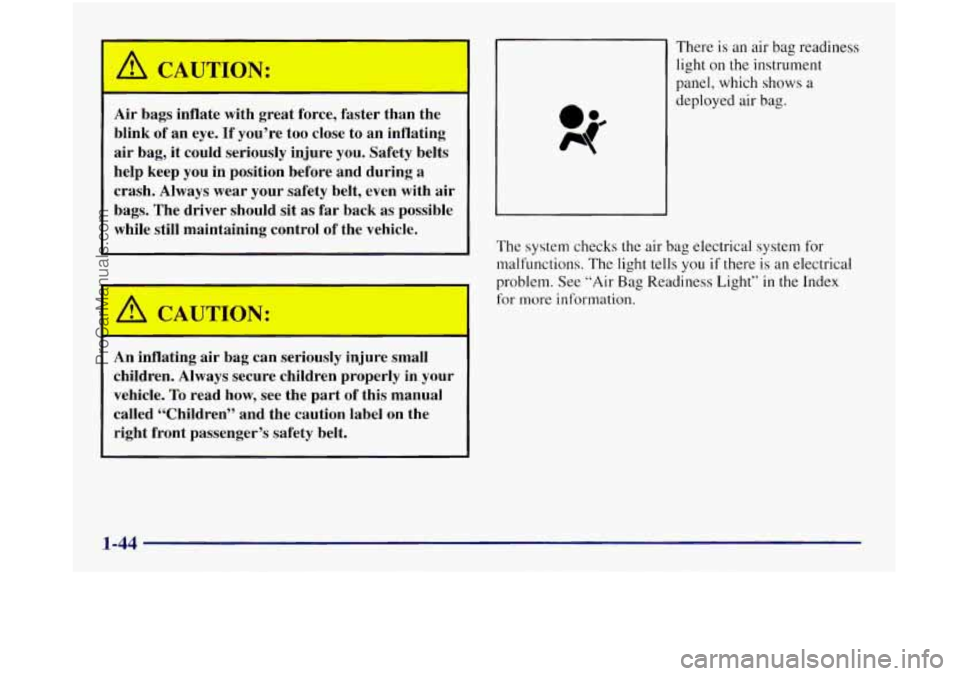
There is an air bag readiness
light on the instrument
panel, which shows
a
The system checks the air bag electrical system for
malfunctions.
The light tells you if there is an electrical
problem. See “Air
Bag Readiness Light” in the Index
for
more information.
1-44
ProCarManuals.com
Page 58 of 436

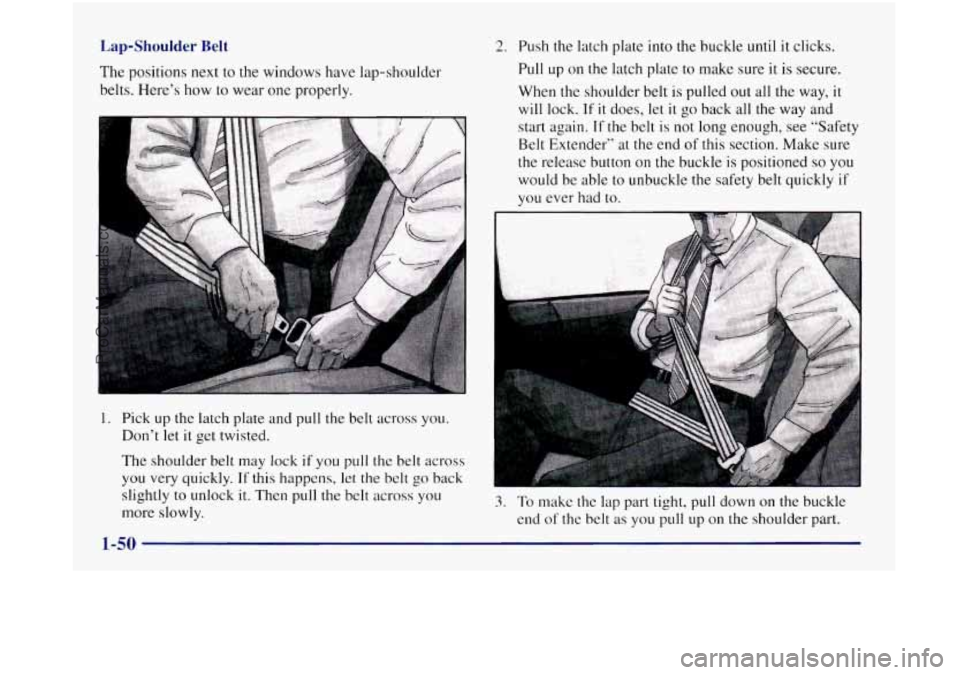
Lap-Shoulder Belt
The positions next to the windows have lap-shoulder
belts. Here’s how to wear one properly.
1. Pick up the latch plate and pull the belt across you.
Don’t let it get twisted.
The shoulder belt may lock
if you pull the belt across
you very quickly.
If this happens, let the belt go back
slightly to unlock
it. Then pull the belt across you
more slowly.
2. Push the latch plate into the buckle until it clicks.
Pull
up on the latch plate to make sure it is secure.
When the shoulder belt
is pulled out all the way, it
will lock. If it does, let it go back all the way and
start again.
If the belt is not long enough, see “Safety
Belt Extender” at
the end of this section. Make sure
the release button
on the buckle is positioned so you
would be able to unbuckle the safety belt quickly if
you ever had to.
3. To make the lap part tight, pull down on the buckle
end of the belt as you pull up on the shoulder part.
1-50
ProCarManuals.com
Page 78 of 436

Securing a Child Restraint in a Rear
Outside Seat Position
n
There’s a vinyl sleeve there; to get to the bracket, push
this vinyl sleeve aside slightly. Anchor the top strap to
the bracket.
If you need to have an anchor bracket
installed for the right-hand side of a
60/40 bench seat,
you can ask your Oldsmobile retailer to
put it in for you.
If you want to install an anchor bracket yourself, your
retailer can
tell you how to do it.
Once you have the top strap anchored, you’ll be ready to
secure
the child restraint itself. You’ll be
using the lap-shoulder belt. See the earlier part
about the top strap
if the child restraint has one.
1. Put the restraint on the seat. Follow the instructions
for the child restraint.
2. Secure the child in the child restraint as the
instructions say.
1-70
ProCarManuals.com
Page 88 of 436

Safety Belt Extender
If the vehicle’s safety belt will fasten around you, you
should use it.
But
if a safety belt isn’t long enough to fasten, your
retailer will order you an extender.
It’s free. When you
go
in to order it, take the heaviest coat you will wear, so
the extender will be long enough for you. The extender
will be just for you, and just for the seat
in your vehicle
that you choose. Don’t
let someone else use it, and use it
only for the seat it is made to fit. To wear it, just attach it
to the regular safety belt.
Checking Your Restraint Systems
Now and then, make sure the safety belt reminder light
and all your belts, buckles, latch plates, retractors and
anchorages are working properly. If your vehicle has
a
built-in child restraint, also periodically make sure the
harness straps, latch plates, buckle, clip, child head
restraint and anchorages are working properly. Look for
any other loose or damaged safety belt and built-in child
restraint system parts.
If you see anything that might
keep a safety belt or built-in child restraint system from
doing its job, have
it repaired.
Torn or frayed safety belts may not protect you
in a
crash. They can rip apart under impact forces.
If a belt is
torn or frayed, get a new one right away.
If your vehicle has the built-in child restraint, torn or
frayed harness straps can
rip apart under impact forces
just like torn or frayed safety belts can. They may
not
protect a child in a crash. If a harness strap is torn or
frayed, get
a new harness right away.
Also look for any opened or broken air bag covers, and
have them repaired or replaced. (The air bag system
does not need regular maintenance.)
Replacing Restraint System Parts
After a Crash
If you’ve had a crash, do you need new safety belts or
built-in child restraint parts?
After a very minor collision, nothing may be necessary. But
if
the safety belts or built-in child restraint harness straps wer\
e
stretched, as they would be
if worn during a more severe
crash, then you need new safety belts or harness straps.
If safety belts or built-in child restraint harness straps are cut
or damaged, replace them. Collision damage also may mean
you
will need to have safety belt, built-in child restraint or
seat parts repaired or replaced. New parts and repairs may be
necessary even
if the safety belt or built-in child restraint
wasn’t being used at the time of the collision.
If an air bag inflates, you’ll need to replace air bag system
parts. See
the part on the air bag system earlier in this section.
1-80
ProCarManuals.com