check engine OPEL FRONTERA 1998 Owner's Guide
[x] Cancel search | Manufacturer: OPEL, Model Year: 1998, Model line: FRONTERA, Model: OPEL FRONTERA 1998Pages: 6000, PDF Size: 97 MB
Page 972 of 6000
6A–16
ENGINE MECHANICAL
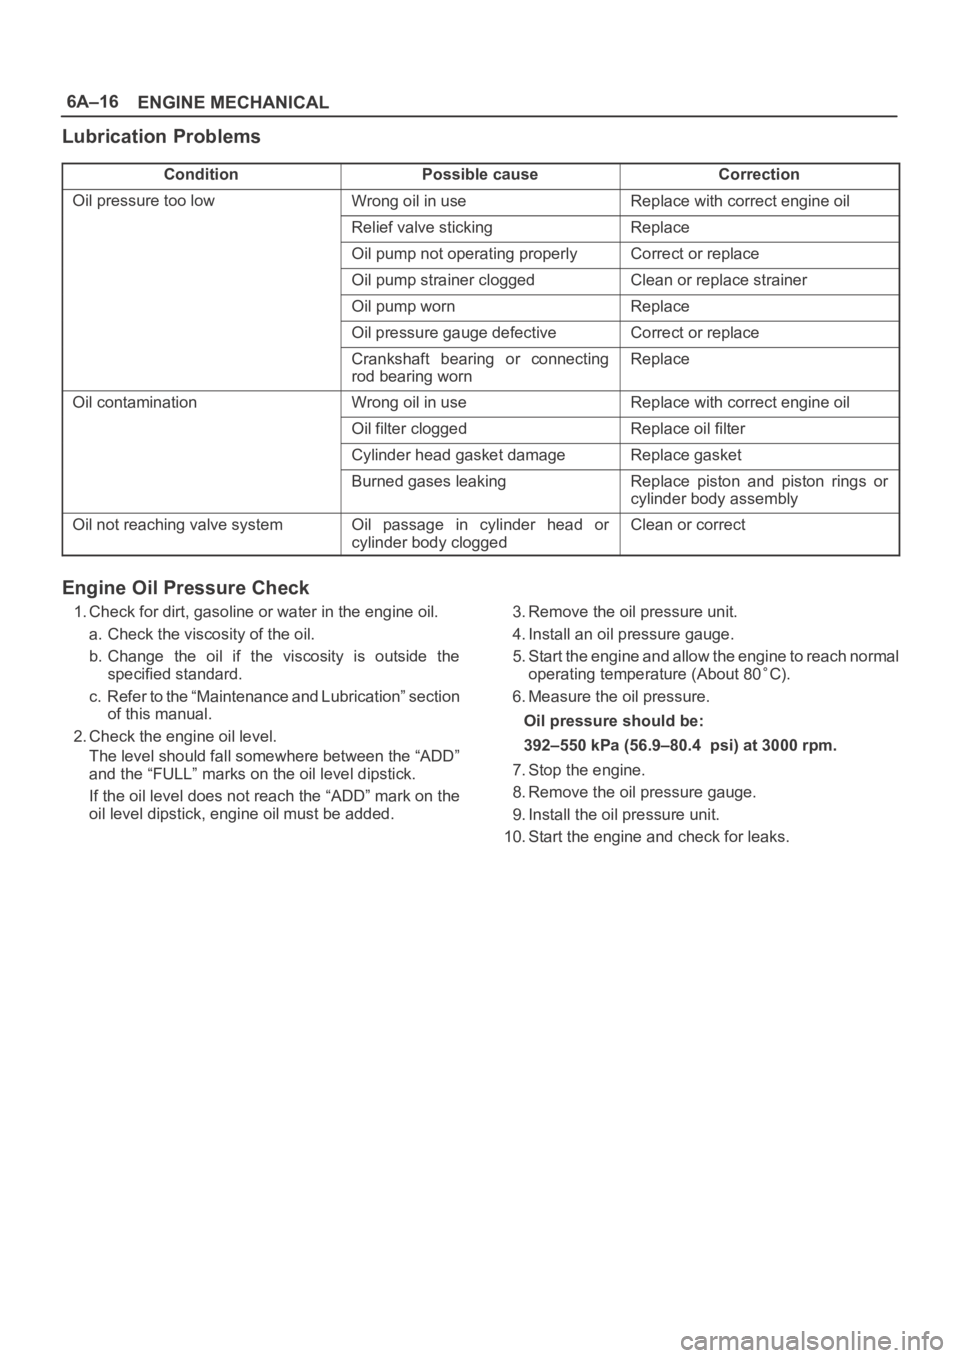
Lubrication Problems
ConditionPossible causeCorrection
Oil pressure too lowWrong oil in useReplace with correct engine oil
Relief valve stickingReplace
Oil pump not operating properlyCorrect or replace
Oil pump strainer cloggedClean or replace strainer
Oil pump wornReplace
Oil pressure gauge defectiveCorrect or replace
Crankshaft bearing or connecting
rod bearing wornReplace
Oil contaminationWrong oil in useReplace with correct engine oil
Oil filter cloggedReplace oil filter
Cylinder head gasket damageReplace gasket
Burned gases leakingReplace piston and piston rings or
cylinder body assembly
Oil not reaching valve systemOil passage in cylinder head or
cylinder body cloggedClean or correct
Engine Oil Pressure Check
1. Check for dirt, gasoline or water in the engine oil.
a. Check the viscosity of the oil.
b. Change the oil if the viscosity is outside the
specified standard.
c. Refer to the “Maintenance and Lubrication” section
of this manual.
2. Check the engine oil level.
The level should fall somewhere between the “ADD”
and the “FULL” marks on the oil level dipstick.
If the oil level does not reach the “ADD” mark on the
oil level dipstick, engine oil must be added.3. Remove the oil pressure unit.
4. Install an oil pressure gauge.
5. Start the engine and allow the engine to reach normal
operating temperature (About 80
C).
6. Measure the oil pressure.
Oil pressure should be:
392–550 kPa (56.9–80.4 psi) at 3000 rpm.
7. Stop the engine.
8. Remove the oil pressure gauge.
9. Install the oil pressure unit.
10. Start the engine and check for leaks.
Page 973 of 6000
6A–17
ENGINE MECHANICAL
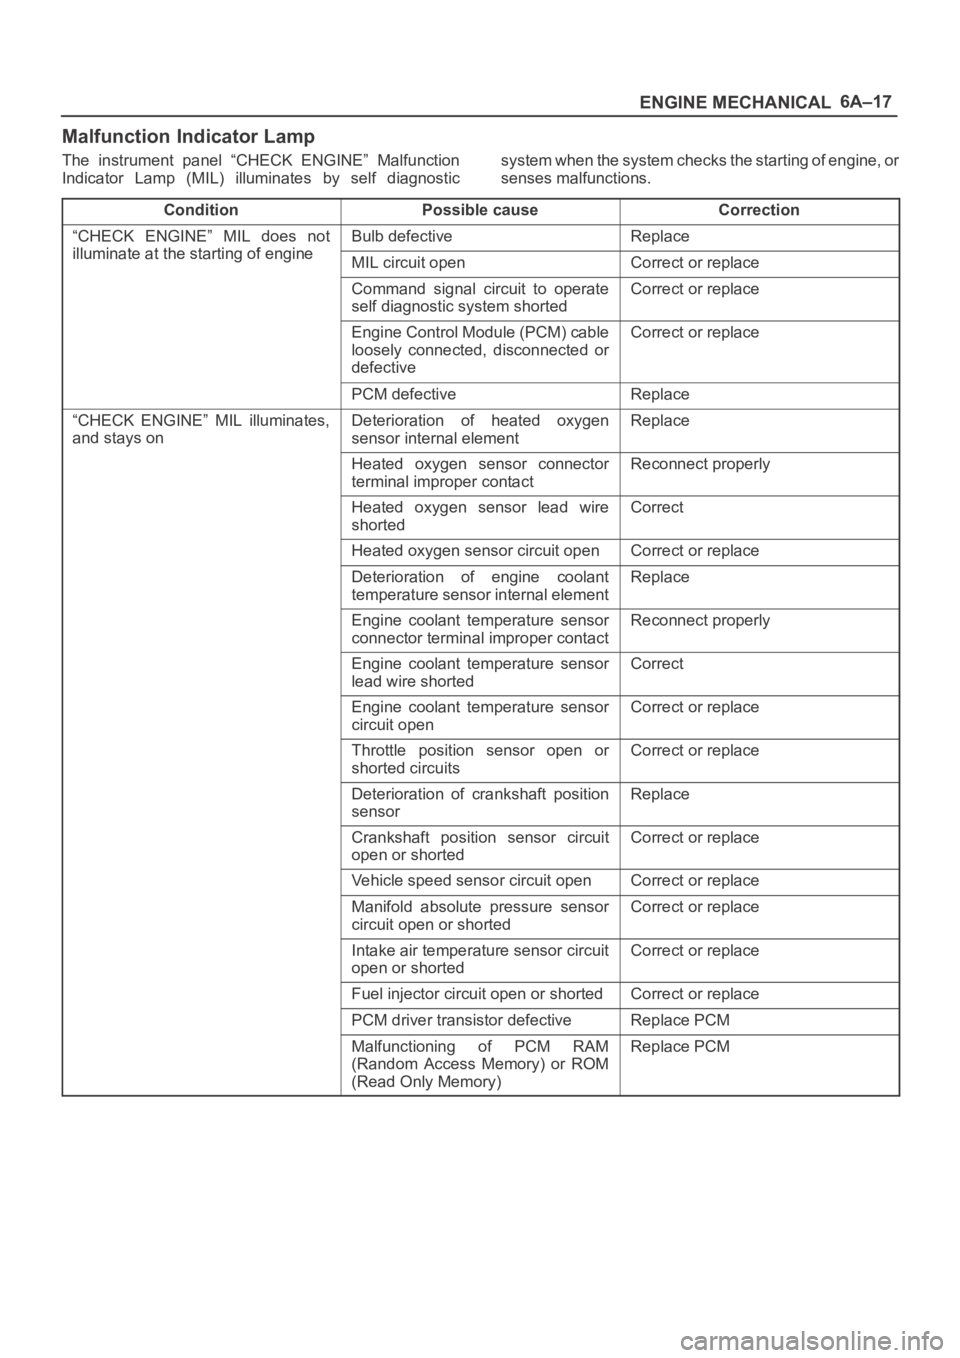
Malfunction Indicator Lamp
The instrument panel “CHECK ENGINE” Malfunction
Indicator Lamp (MIL) illuminates by self diagnosticsystem when the system checks the starting of engine, or
senses malfunctions.
Condition
Possible causeCorrection
“CHECK ENGINE” MIL does not
illuminate at the starting of engine
Bulb defectiveReplace
illuminate at the starting of engineMIL circuit openCorrect or replace
Command signal circuit to operate
self diagnostic system shortedCorrect or replace
Engine Control Module (PCM) cable
loosely connected, disconnected or
defectiveCorrect or replace
PCM defectiveReplace
“CHECK ENGINE” MIL illuminates,
and stays onDeterioration of heated oxygen
sensor internal elementReplace
Heated oxygen sensor connector
terminal improper contactReconnect properly
Heated oxygen sensor lead wire
shortedCorrect
Heated oxygen sensor circuit openCorrect or replace
Deterioration of engine coolant
temperature sensor internal elementReplace
Engine coolant temperature sensor
connector terminal improper contactReconnect properly
Engine coolant temperature sensor
lead wire shortedCorrect
Engine coolant temperature sensor
circuit openCorrect or replace
Throttle position sensor open or
shorted circuitsCorrect or replace
Deterioration of crankshaft position
sensorReplace
Crankshaft position sensor circuit
open or shortedCorrect or replace
Vehicle speed sensor circuit openCorrect or replace
Manifold absolute pressure sensor
circuit open or shortedCorrect or replace
Intake air temperature sensor circuit
open or shortedCorrect or replace
Fuel injector circuit open or shortedCorrect or replace
PCM driver transistor defectiveReplace PCM
Malfunctioning of PCM RAM
(Random Access Memory) or ROM
(Read Only Memory)Replace PCM
Page 1014 of 6000
6A–58
ENGINE MECHANICAL
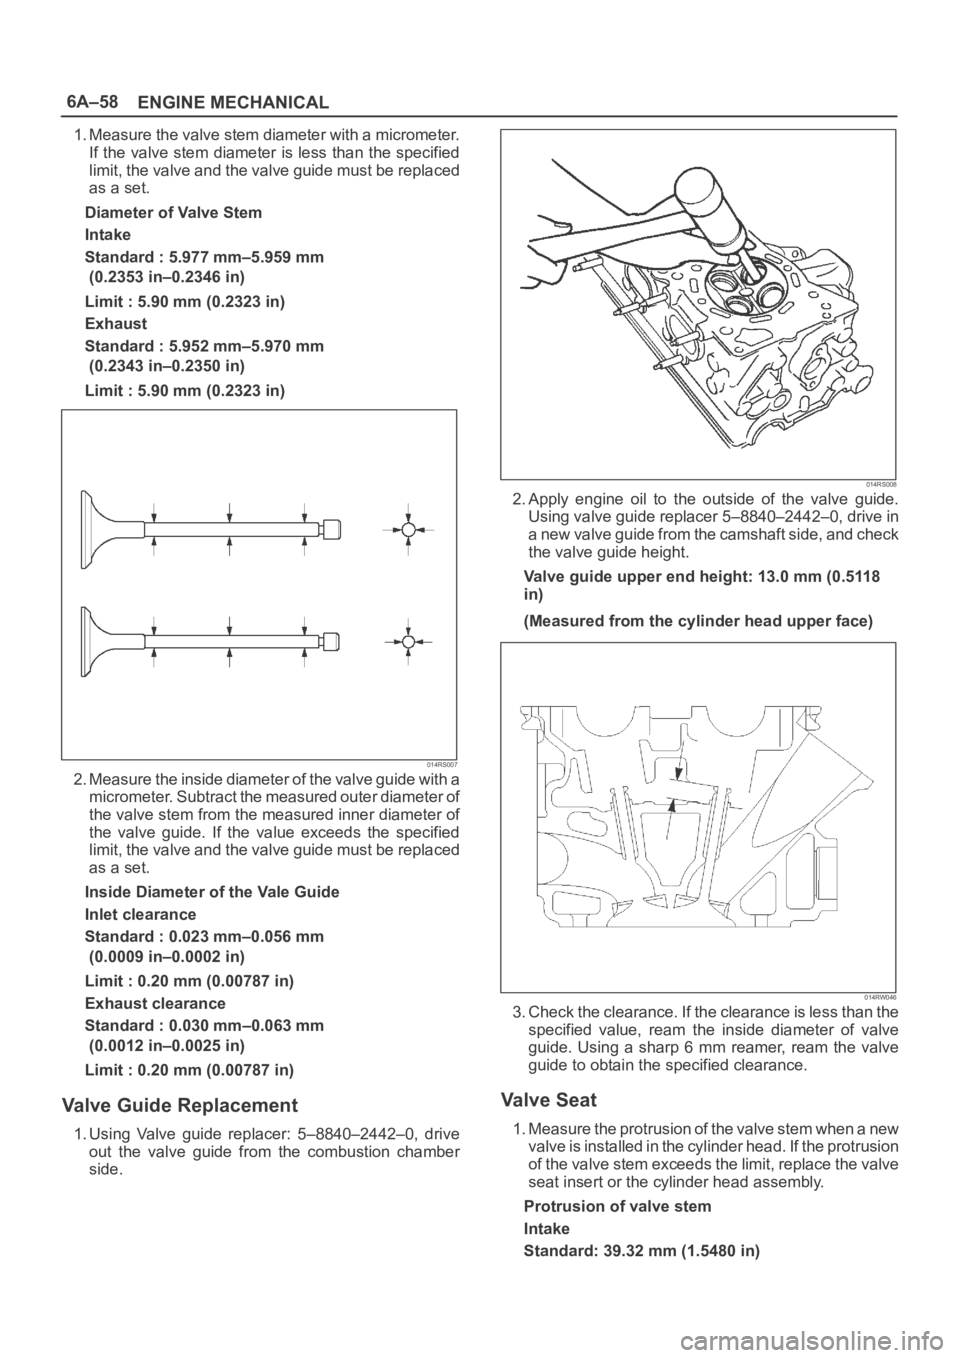
1. Measure the valve stem diameter with a micrometer.
If the valve stem diameter is less than the specified
limit, the valve and the valve guide must be replaced
as a set.
Diameter of Valve Stem
Intake
Standard : 5.977 mm–5.959 mm
(0.2353 in–0.2346 in)
Limit : 5.90 mm (0.2323 in)
Exhaust
Standard : 5.952 mm–5.970 mm
(0.2343 in–0.2350 in)
Limit : 5.90 mm (0.2323 in)
014RS007
2. Measure the inside diameter of the valve guide with a
micrometer. Subtract the measured outer diameter of
the valve stem from the measured inner diameter of
the valve guide. If the value exceeds the specified
limit, the valve and the valve guide must be replaced
as a set.
Inside Diameter of the Vale Guide
Inlet clearance
Standard : 0.023 mm–0.056 mm
(0.0009 in–0.0002 in)
Limit : 0.20 mm (0.00787 in)
Exhaust clearance
Standard : 0.030 mm–0.063 mm
(0.0012 in–0.0025 in)
Limit : 0.20 mm (0.00787 in)
Valve Guide Replacement
1. Using Valve guide replacer: 5–8840–2442–0, drive
out the valve guide from the combustion chamber
side.
014RS008
2. Apply engine oil to the outside of the valve guide.
Using valve guide replacer 5–8840–2442–0, drive in
a new valve guide from the camshaft side, and check
the valve guide height.
Valve guide upper end height: 13.0 mm (0.5118
in)
(Measured from the cylinder head upper face)
014RW046
3. Check the clearance. If the clearance is less than the
specified value, ream the inside diameter of valve
guide. Using a sharp 6 mm reamer, ream the valve
guide to obtain the specified clearance.
Va l v e S e a t
1. Measure the protrusion of the valve stem when a new
valve is installed in the cylinder head. If the protrusion
of the valve stem exceeds the limit, replace the valve
seat insert or the cylinder head assembly.
Protrusion of valve stem
Intake
Standard: 39.32 mm (1.5480 in)
Page 1016 of 6000
6A–60
ENGINE MECHANICAL
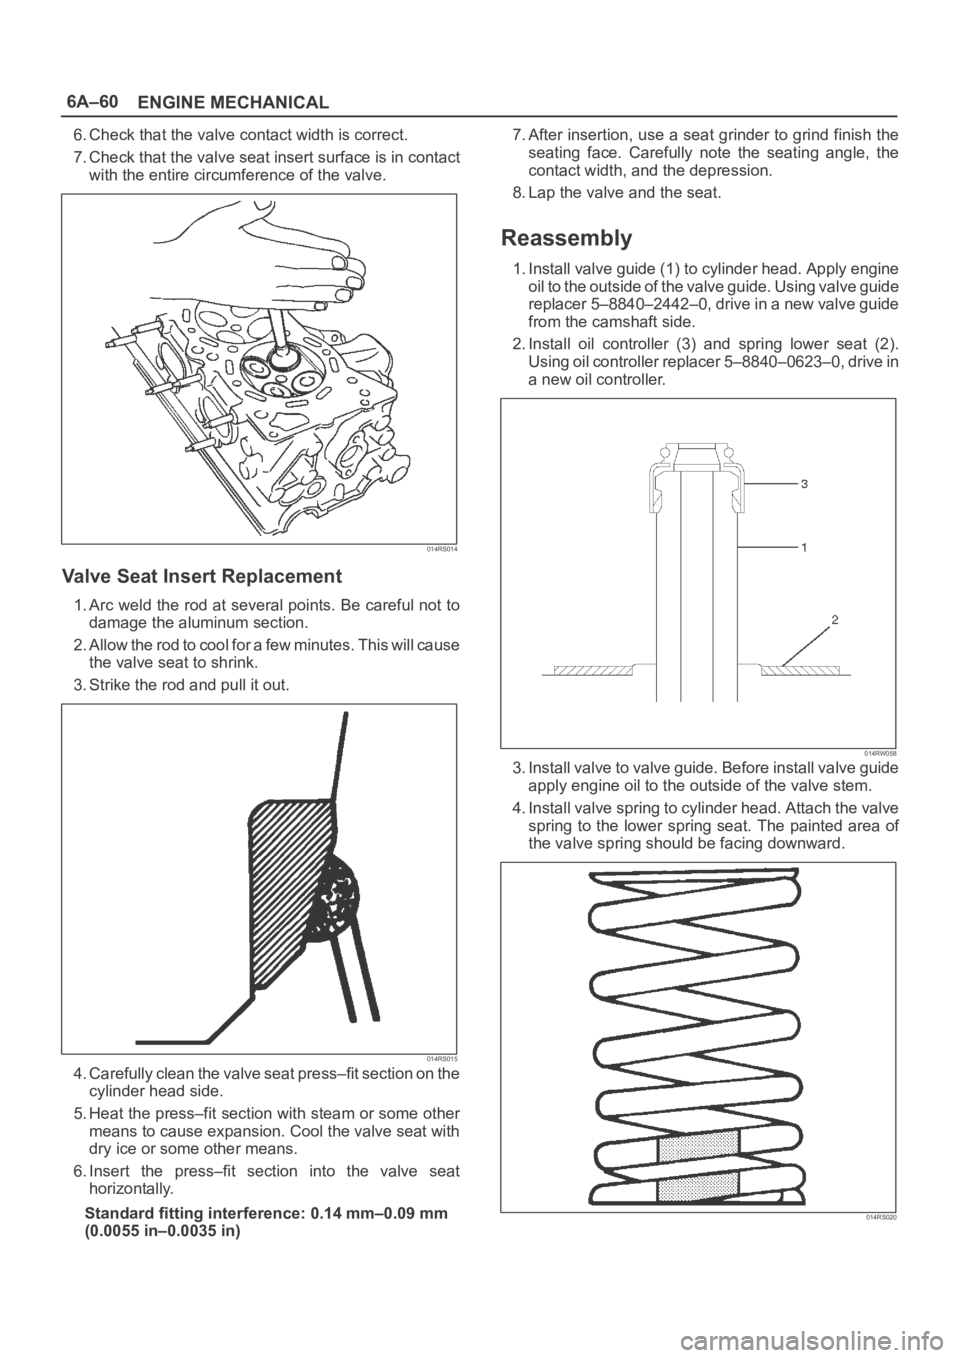
6. Check that the valve contact width is correct.
7. Check that the valve seat insert surface is in contact
with the entire circumference of the valve.
014RS014
Valve Seat Insert Replacement
1. Arc weld the rod at several points. Be careful not to
damage the aluminum section.
2. Allow the rod to cool for a few minutes. This will cause
the valve seat to shrink.
3. Strike the rod and pull it out.
014RS015
4. Carefully clean the valve seat press–fit section on the
cylinder head side.
5. Heat the press–fit section with steam or some other
means to cause expansion. Cool the valve seat with
dry ice or some other means.
6. Insert the press–fit section into the valve seat
horizontally.
Standard fitting interference: 0.14 mm–0.09 mm
(0.0055 in–0.0035 in)7. After insertion, use a seat grinder to grind finish the
seating face. Carefully note the seating angle, the
contact width, and the depression.
8. Lap the valve and the seat.
Reassembly
1. Install valve guide (1) to cylinder head. Apply engine
oil to the outside of the valve guide. Using valve guide
replacer 5–8840–2442–0, drive in a new valve guide
from the camshaft side.
2. Install oil controller (3) and spring lower seat (2).
Using oil controller replacer 5–8840–0623–0, drive in
a new oil controller.
014RW058
3. Install valve to valve guide. Before install valve guide
apply engine oil to the outside of the valve stem.
4. Install valve spring to cylinder head. Attach the valve
spring to the lower spring seat. The painted area of
the valve spring should be facing downward.
014RS020
Page 1017 of 6000
6A–61
ENGINE MECHANICAL
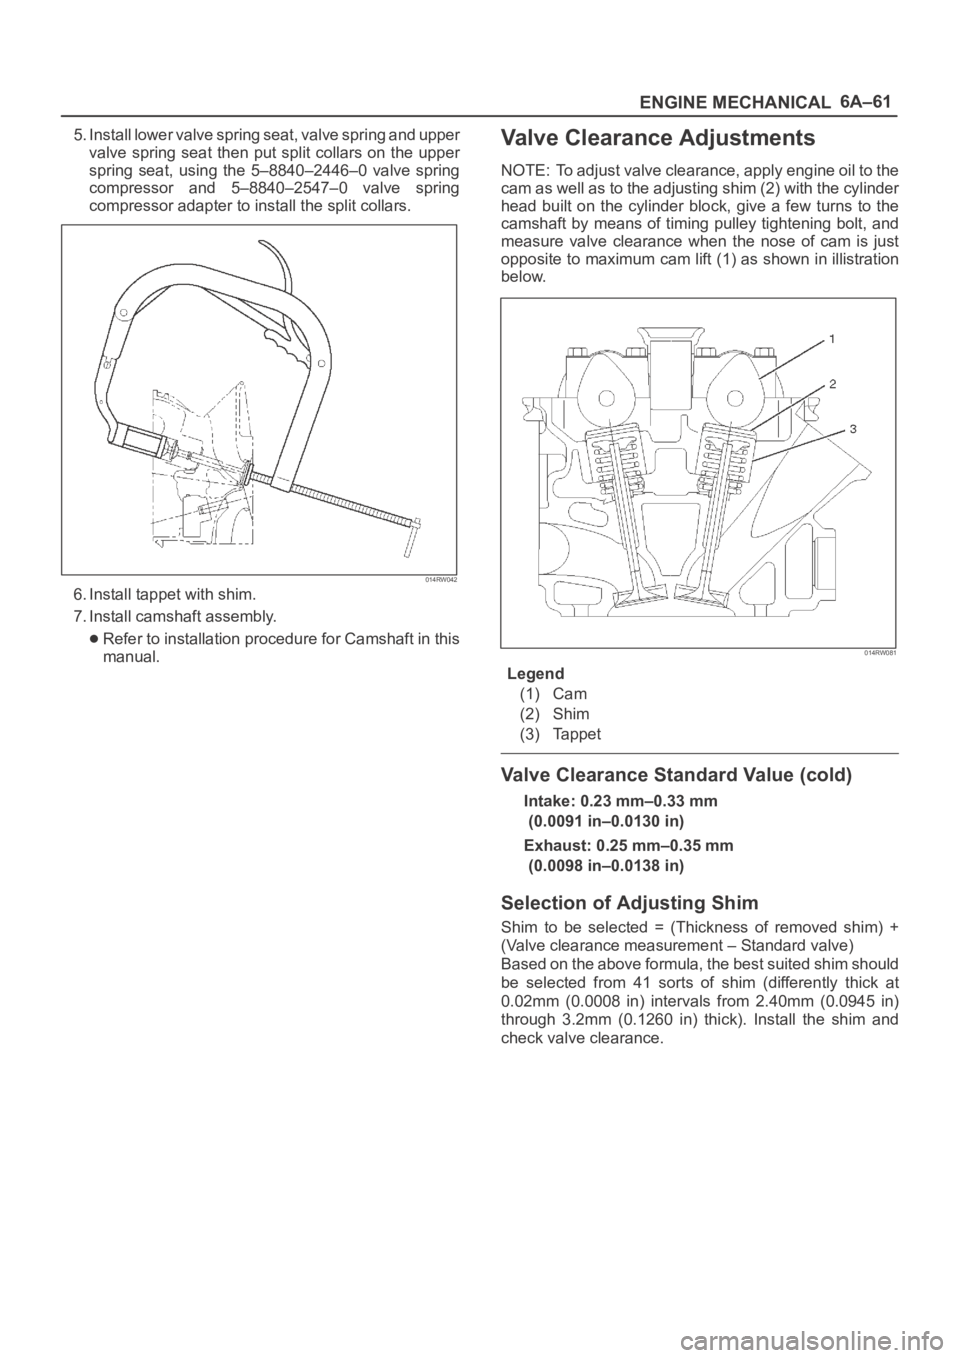
5. Install lower valve spring seat, valve spring and upper
valve spring seat then put split collars on the upper
spring seat, using the 5–8840–2446–0 valve spring
compressor and 5–8840–2547–0 valve spring
compressor adapter to install the split collars.
014RW042
6. Install tappet with shim.
7. Install camshaft assembly.
Refer to installation procedure for Camshaft in this
manual.
Valve Clearance Adjustments
NOTE: To adjust valve clearance, apply engine oil to the
cam as well as to the adjusting shim (2) with the cylinder
head built on the cylinder block, give a few turns to the
camshaft by means of timing pulley tightening bolt, and
measure valve clearance when the nose of cam is just
opposite to maximum cam lift (1) as shown in illistration
below.
014RW081
Legend
(1) Cam
(2) Shim
(3) Tappet
Valve Clearance Standard Value (cold)
Intake: 0.23 mm–0.33 mm
(0.0091 in–0.0130 in)
Exhaust: 0.25 mm–0.35 mm
(0.0098 in–0.0138 in)
Selection of Adjusting Shim
Shim to be selected = (Thickness of removed shim) +
(Valve clearance measurement – Standard valve)
Based on the above formula, the best suited shim should
be selected from 41 sorts of shim (differently thick at
0.02mm (0.0008 in) intervals from 2.40mm (0.0945 in)
through 3.2mm (0.1260 in) thick). Install the shim and
check valve clearance.
Page 1026 of 6000
6A–70
ENGINE MECHANICAL
7. Remove oil gallery (7).
8. Remove piston and connecting rod assembly (8).
Refer to “Piston, Piston Ring and Connecting Rod” in
this manual.
9. Remove flywheel (9).
10. Remove rear oil seal retainer (10).
11. Remove main bearing cap (11).
12. Remove crankshaft (12).
Inspection and Repair
1. Crankshaft
Set the dial indicator as shown in the illustration and
measure the crankshaft thrust clearance. If the thrust
clearance exceeds the specified limit, replace the
thrust bearings as a set.
Thrust Clearance
Standard : 0.06 mm–0.24 mm
(0.0024 in–0.0094 in)
Limit : 0.30 mm (0.0118 in)
015RS003
Main Bearing Clearance
1. Remove the bearing caps and measure the oil
clearance.
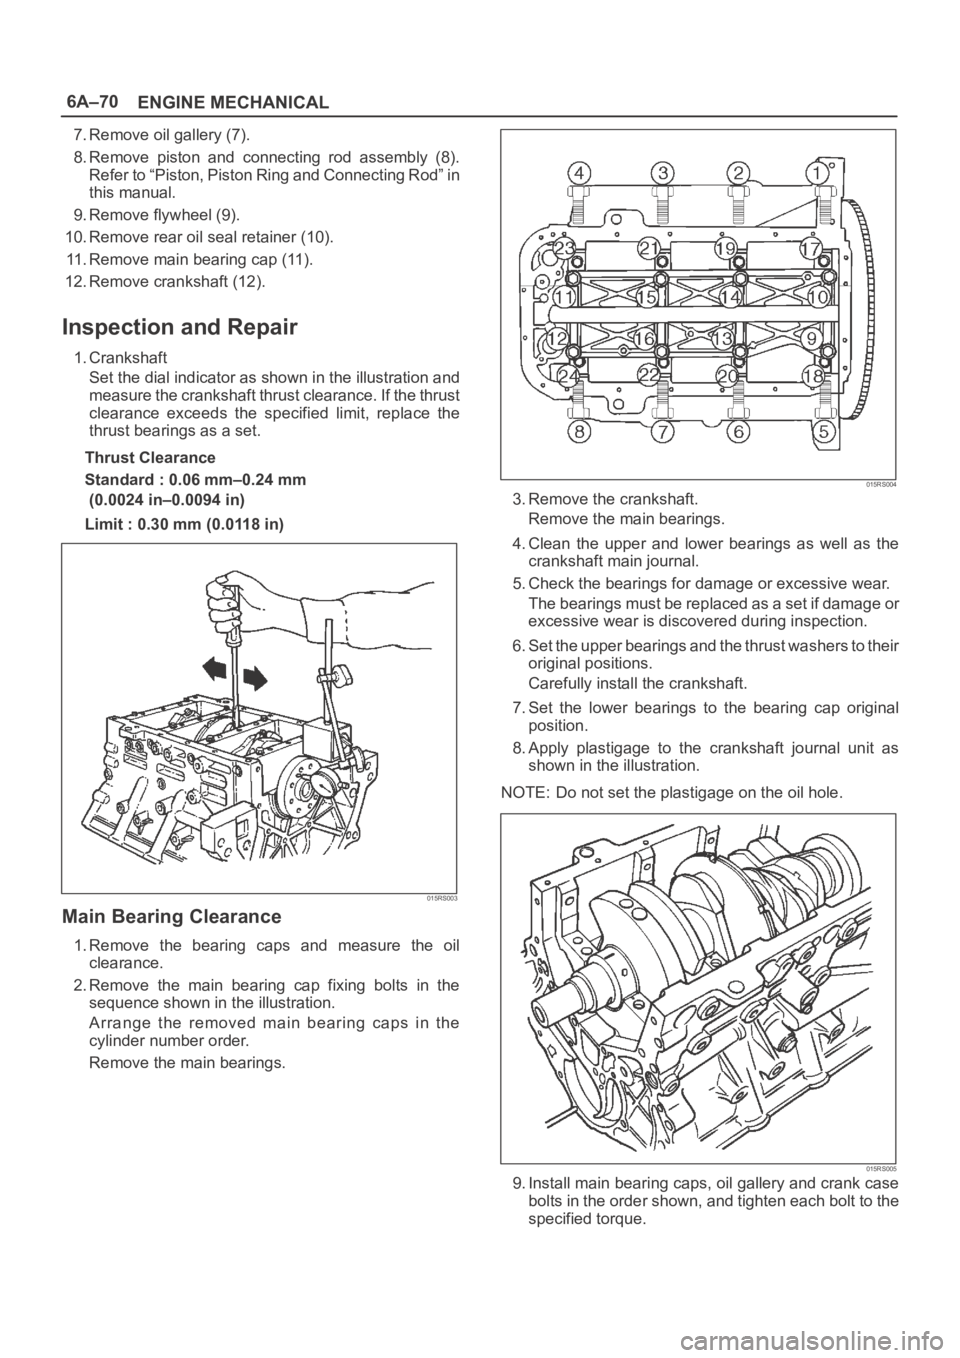
2. Remove the main bearing cap fixing bolts in the
sequence shown in the illustration.
Arrange the removed main bearing caps in the
cylinder number order.
Remove the main bearings.
015RS004
3. Remove the crankshaft.
Remove the main bearings.
4. Clean the upper and lower bearings as well as the
crankshaft main journal.
5. Check the bearings for damage or excessive wear.
The bearings must be replaced as a set if damage or
excessive wear is discovered during inspection.
6. Set the upper bearings and the thrust washers to their
original positions.
Carefully install the crankshaft.
7. Set the lower bearings to the bearing cap original
position.
8. Apply plastigage to the crankshaft journal unit as
shown in the illustration.
NOTE: Do not set the plastigage on the oil hole.
015RS005
9. Install main bearing caps, oil gallery and crank case
bolts in the order shown, and tighten each bolt to the
specified torque.
Page 1031 of 6000
6A–75
ENGINE MECHANICAL
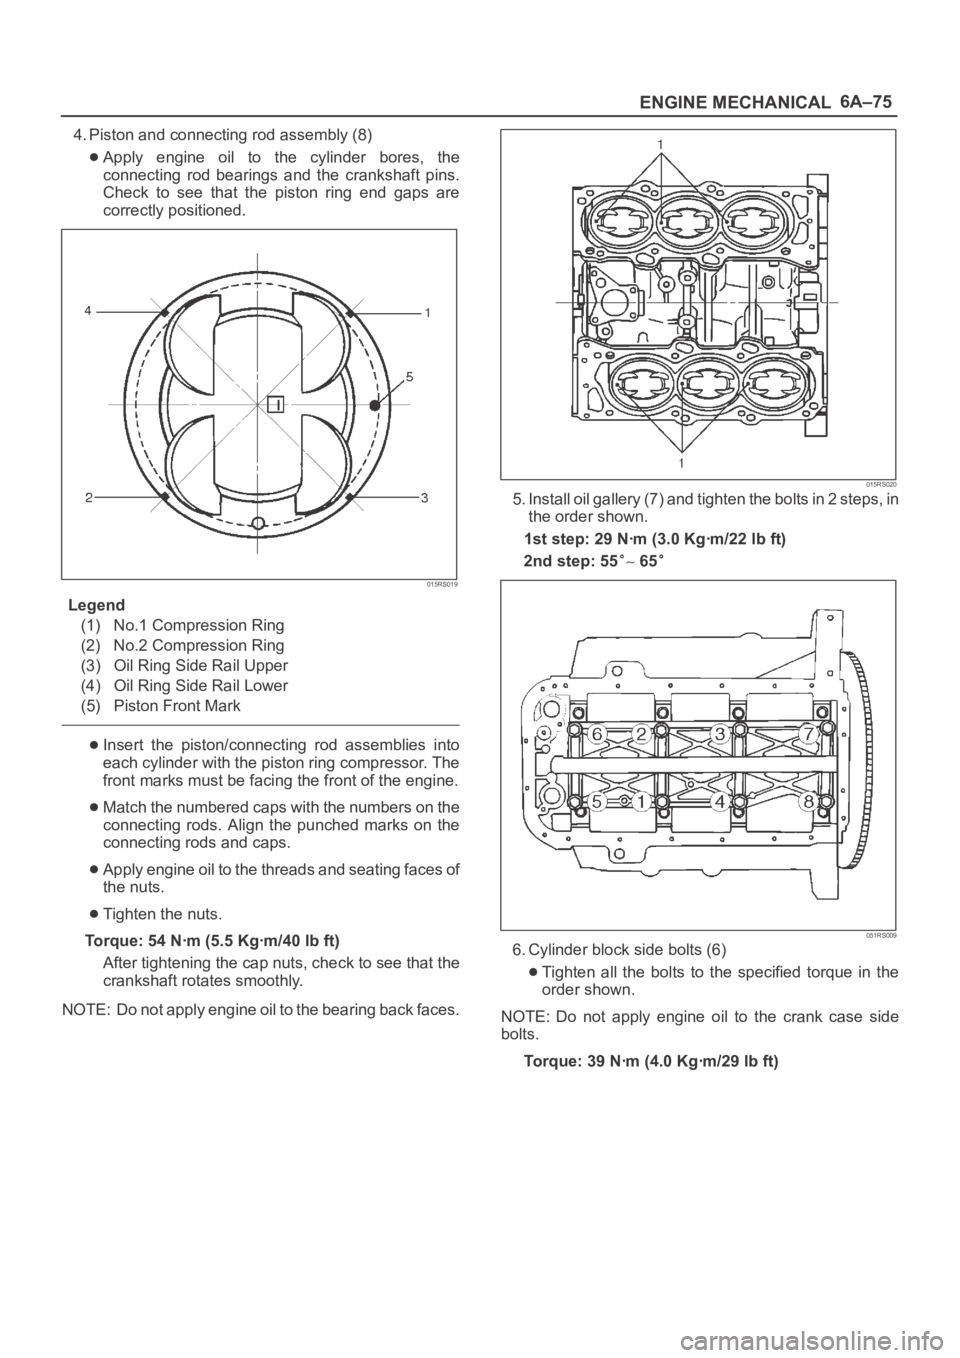
4. Piston and connecting rod assembly (8)
Apply engine oil to the cylinder bores, the
connecting rod bearings and the crankshaft pins.
Check to see that the piston ring end gaps are
correctly positioned.
015RS019
Legend
(1) No.1 Compression Ring
(2) No.2 Compression Ring
(3) Oil Ring Side Rail Upper
(4) Oil Ring Side Rail Lower
(5) Piston Front Mark
Insert the piston/connecting rod assemblies into
each cylinder with the piston ring compressor. The
front marks must be facing the front of the engine.
Match the numbered caps with the numbers on the
connecting rods. Align the punched marks on the
connecting rods and caps.
Apply engine oil to the threads and seating faces of
the nuts.
Tighten the nuts.
Torque: 54 Nꞏm (5.5 Kgꞏm/40 lb ft)
After tightening the cap nuts, check to see that the
crankshaft rotates smoothly.
NOTE: Do not apply engine oil to the bearing back faces.
015RS020
5. Install oil gallery (7) and tighten the bolts in 2 steps, in
the order shown.
1st step: 29 Nꞏm (3.0 Kgꞏm/22 lb ft)
2nd step: 55
65
051RS009
6. Cylinder block side bolts (6)
Tighten all the bolts to the specified torque in the
order shown.
NOTE: Do not apply engine oil to the crank case side
bolts.
Torque: 39 Nꞏm (4.0 Kgꞏm/29 lb ft)
Page 1034 of 6000
6A–78
ENGINE MECHANICAL
015RS031
Remove any ridge or carbon build up from the top
end of the cylinder.
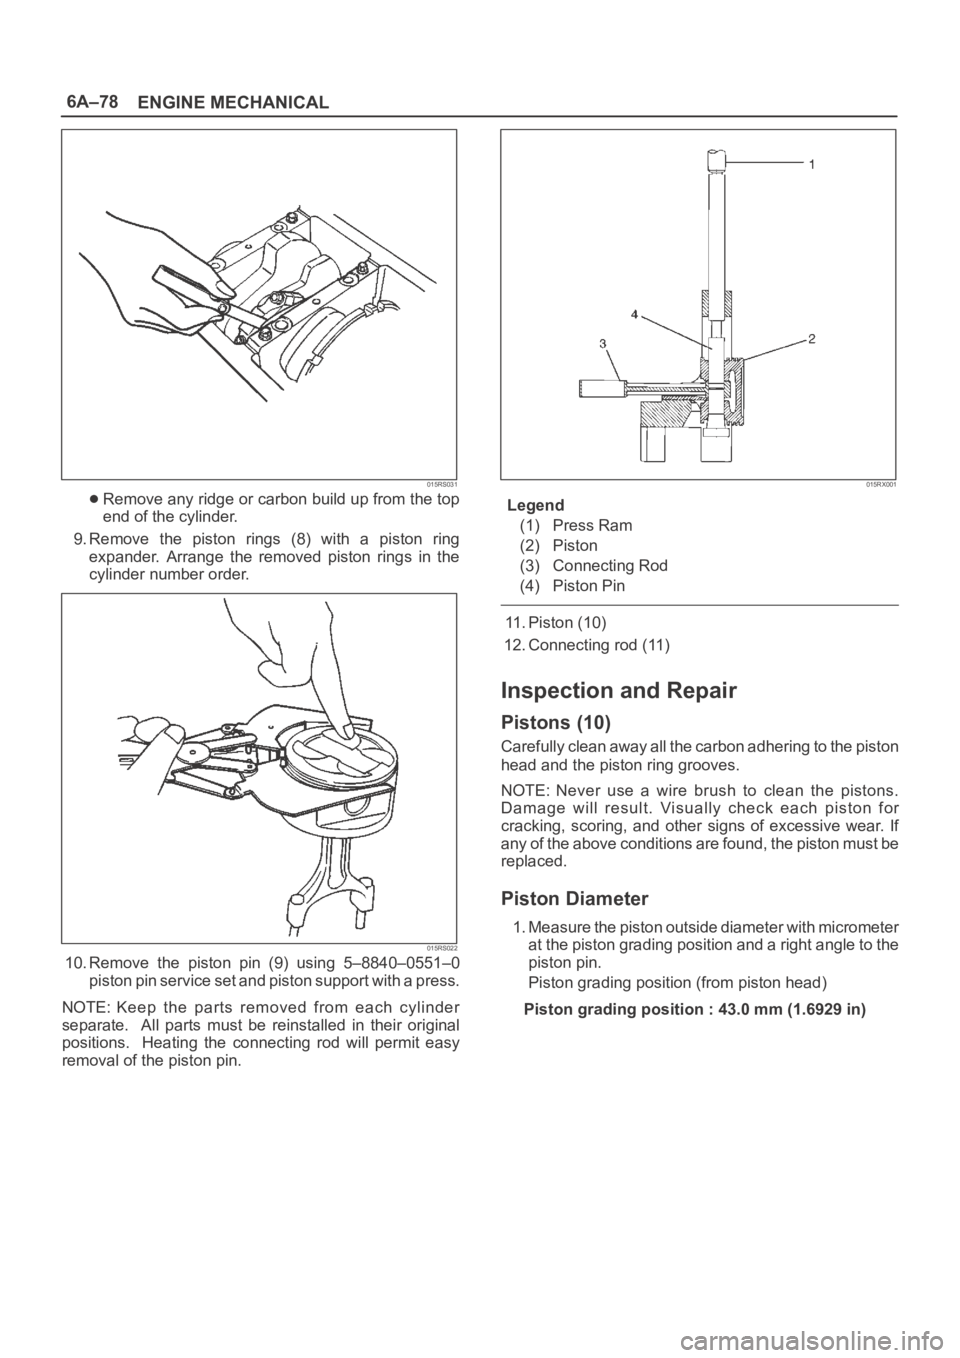
9. Remove the piston rings (8) with a piston ring
expander. Arrange the removed piston rings in the
cylinder number order.
015RS022
10. Remove the piston pin (9) using 5–8840–0551–0
piston pin service set and piston support with a press.
NOTE: Keep the parts removed from each cylinder
separate. All parts must be reinstalled in their original
positions. Heating the connecting rod will permit easy
removal of the piston pin.
015RX001
Legend
(1) Press Ram
(2) Piston
(3) Connecting Rod
(4) Piston Pin
11. Piston (10)
12. Connecting rod (11)
Inspection and Repair
Pistons (10)
Carefully clean away all the carbon adhering to the piston
head and the piston ring grooves.
NOTE: Never use a wire brush to clean the pistons.
Damage will result. Visually check each piston for
cracking, scoring, and other signs of excessive wear. If
any of the above conditions are found, the piston must be
replaced.
Piston Diameter
1. Measure the piston outside diameter with micrometer
at the piston grading position and a right angle to the
piston pin.
Piston grading position (from piston head)
Piston grading position : 43.0 mm (1.6929 in)
Page 1037 of 6000
6A–81
ENGINE MECHANICAL
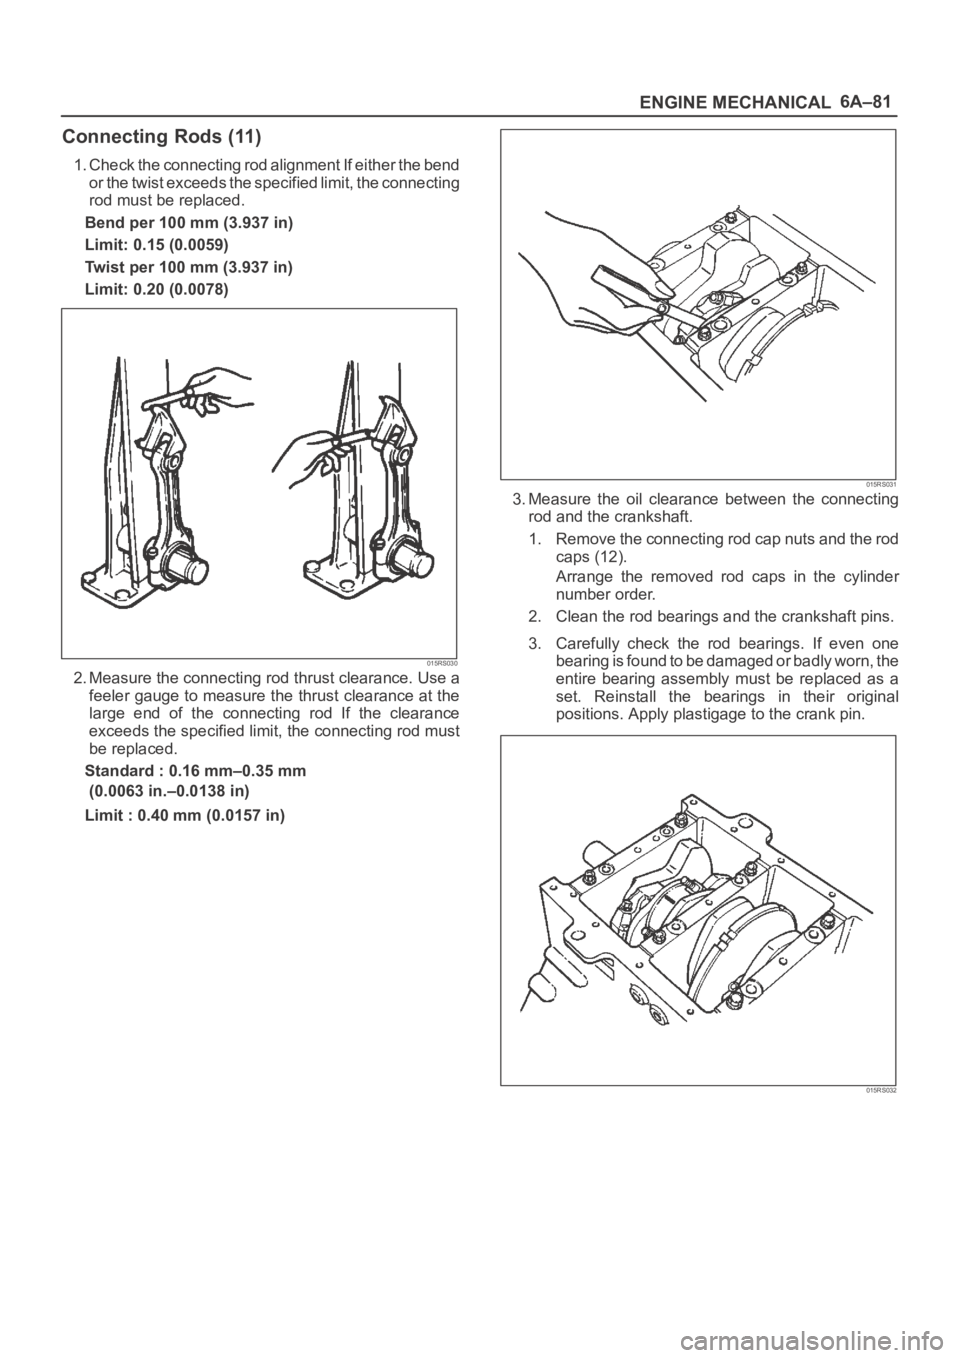
Connecting Rods (11)
1. Check the connecting rod alignment If either the bend
or the twist exceeds the specified limit, the connecting
rod must be replaced.
Bend per 100 mm (3.937 in)
Limit: 0.15 (0.0059)
Twist per 100 mm (3.937 in)
Limit: 0.20 (0.0078)
015RS030
2. Measure the connecting rod thrust clearance. Use a
feeler gauge to measure the thrust clearance at the
large end of the connecting rod If the clearance
exceeds the specified limit, the connecting rod must
be replaced.
Standard : 0.16 mm–0.35 mm
(0.0063 in.–0.0138 in)
Limit : 0.40 mm (0.0157 in)
015RS031
3. Measure the oil clearance between the connecting
rod and the crankshaft.
1. Remove the connecting rod cap nuts and the rod
caps (12).
Arrange the removed rod caps in the cylinder
number order.
2. Clean the rod bearings and the crankshaft pins.
3. Carefully check the rod bearings. If even one
bearing is found to be damaged or badly worn, the
entire bearing assembly must be replaced as a
set. Reinstall the bearings in their original
positions. Apply plastigage to the crank pin.
015RS032
Page 1039 of 6000
6A–83
ENGINE MECHANICAL
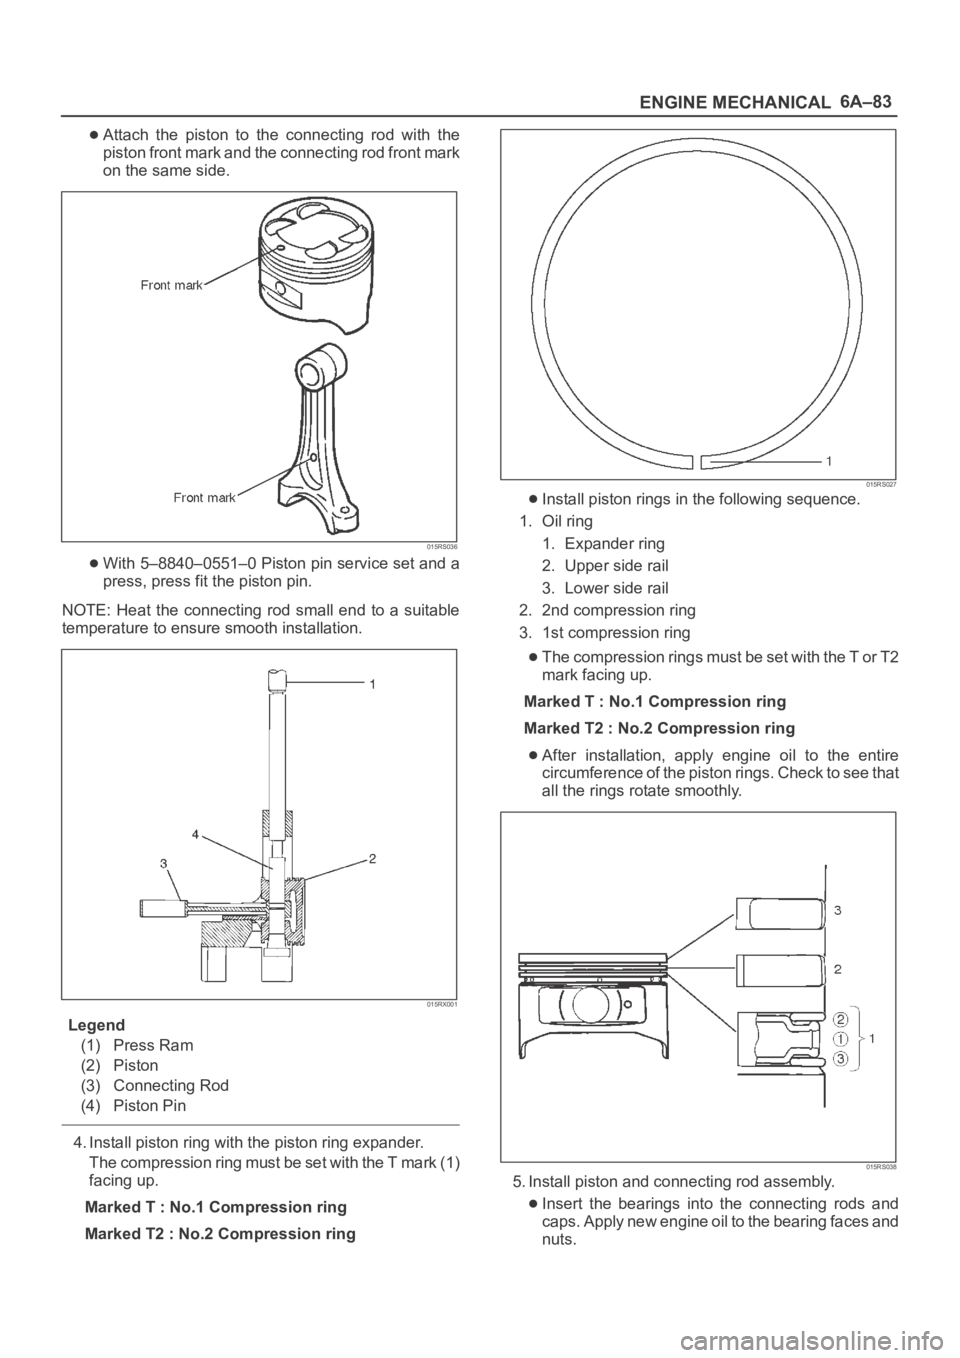
Attach the piston to the connecting rod with the
piston front mark and the connecting rod front mark
on the same side.
015RS036
With 5–8840–0551–0 Piston pin service set and a
press, press fit the piston pin.
NOTE: Heat the connecting rod small end to a suitable
temperature to ensure smooth installation.
015RX001
Legend
(1) Press Ram
(2) Piston
(3) Connecting Rod
(4) Piston Pin
4. Install piston ring with the piston ring expander.
The compression ring must be set with the T mark (1)
facing up.
Marked T : No.1 Compression ring
Marked T2 : No.2 Compression ring
015RS027
Install piston rings in the following sequence.
1. Oil ring
1. Expander ring
2. Upper side rail
3. Lower side rail
2. 2nd compression ring
3. 1st compression ring
The compression rings must be set with the T or T2
mark facing up.
Marked T : No.1 Compression ring
Marked T2 : No.2 Compression ring
After installation, apply engine oil to the entire
circumference of the piston rings. Check to see that
all the rings rotate smoothly.
015RS038
5. Install piston and connecting rod assembly.
Insert the bearings into the connecting rods and
caps. Apply new engine oil to the bearing faces and
nuts.