torque OPEL FRONTERA 1998 Workshop Manual
[x] Cancel search | Manufacturer: OPEL, Model Year: 1998, Model line: FRONTERA, Model: OPEL FRONTERA 1998Pages: 6000, PDF Size: 97 MB
Page 15 of 6000
Service Precaution
WARNING: THIS VEHICLE HAS A SUPPLEMENTAL
RESTRAINT SYSTEM (SRS). REFER TO THE SRS
COMPONENT AND WIRING LOCATION VIEW IN
ORDER TO DETERMINE WHETHER YOU ARE
PERFORMING SERVICE ON OR NEAR THE SRS
COMPONENTS OR THE SRS WIRING. WHEN YOU
ARE PERFORMING SERVICE ON OR NEAR THE
SRS COMPONENTS OR THE SRS WIRING, REFER
TO THE SRS SERVICE INFORMATION. FAILURE
TO FOLLOW WARNINGS COULD RESULT IN
POSSIBLE AIR BAG DEPLOYMENT, PERSONAL
INJURY, OR OTHERWISE UNNEEDED SRS
SYSTEM REPAIRS.CAUTION: Always use the correct fastener in the
proper location. When you replace a fastener, use
ONLY the exact part number for that application.
ISUZU will call out those fasteners that require a
replacement after removal. ISUZU will also call out
the fasteners that require thread lockers or thread
sealant. UNLESS OTHERWISE SPECIFIED, do not
use supplemental coatings (Paints, greases, or
other corrosion inhibitors) on threaded fasteners
or fasteners joint interfaces. Generally, such
coatings adversely affect the fastener torque and
the joint clamping force, and may damage the
fastener. When you install fasteners, use the
correct tightening sequence and specification.
Following these instructions can help you avoid
damage to parts and systems.
Page 28 of 6000

Service Precaution
WARNING: THIS VEHICLE HAS A SUPPLEMENTAL
RESTRAINT SYSTEM (SRS). REFER TO THE SRS
COMPONENT AND WIRING LOCATION VIEW IN
ORDER TO DETERMINE WHETHER YOU ARE
PERFORMING SERVICE ON OR NEAR THE SRS
COMPONENTS OR THE SRS WIRING. WHEN YOU
ARE PERFORMING SERVICE ON OR NEAR THE
SRS COMPONENTS OR THE SRS WIRING, REFER
TO THE SRS SERVICE INFORMATION. FAILURE
TO FOLLOW WARNINGS COULD RESULT IN
POSSIBLE AIR BAG DEPLOYMENT, PERSONAL
INJURY, OR OTHERWISE UNNEEDED SRS
SYSTEM REPAIRS.CAUTION: Always use the correct fastener in the
proper location. When you replace a fastener, use
ONLY the exact part number for that application.
ISUZU will call out those fasteners that require a
replacement after removal. ISUZU will also call out
the fasteners that require thread lockers or thread
sealant. UNLESS OTHERWISE SPECIFIED, do not
use supplemental coatings (Paints, greases, or
other corrosion inhibitors) on threaded fasteners
or fasteners joint interfaces. Generally, such
coatings adversely affect the fastener torque and
the joint clamping force, and may damage the
fastener. When you install fasteners, use the
correct tightening sequence and specification.
Following these instructions can help you avoid
damage to parts and systems.
Page 264 of 6000
Inspection and Repair
Drive Plate
If the frictional surface shows signs of damage due to
excessive heat, the drive plate and pulley should be
replaced.
Pulley Assembly
Check the appearance of the pulley assembly. If the
frictional surface of the pulley shows signs of excessive
grooving due to slippage, both the pulley and drive
plate should be replaced. The frictional surfaces of the
pulley assembly should be cleaned with a suitable
solvent before reinstallation.
Coil
Check coil for loose connector or cracked insulation.
Installation
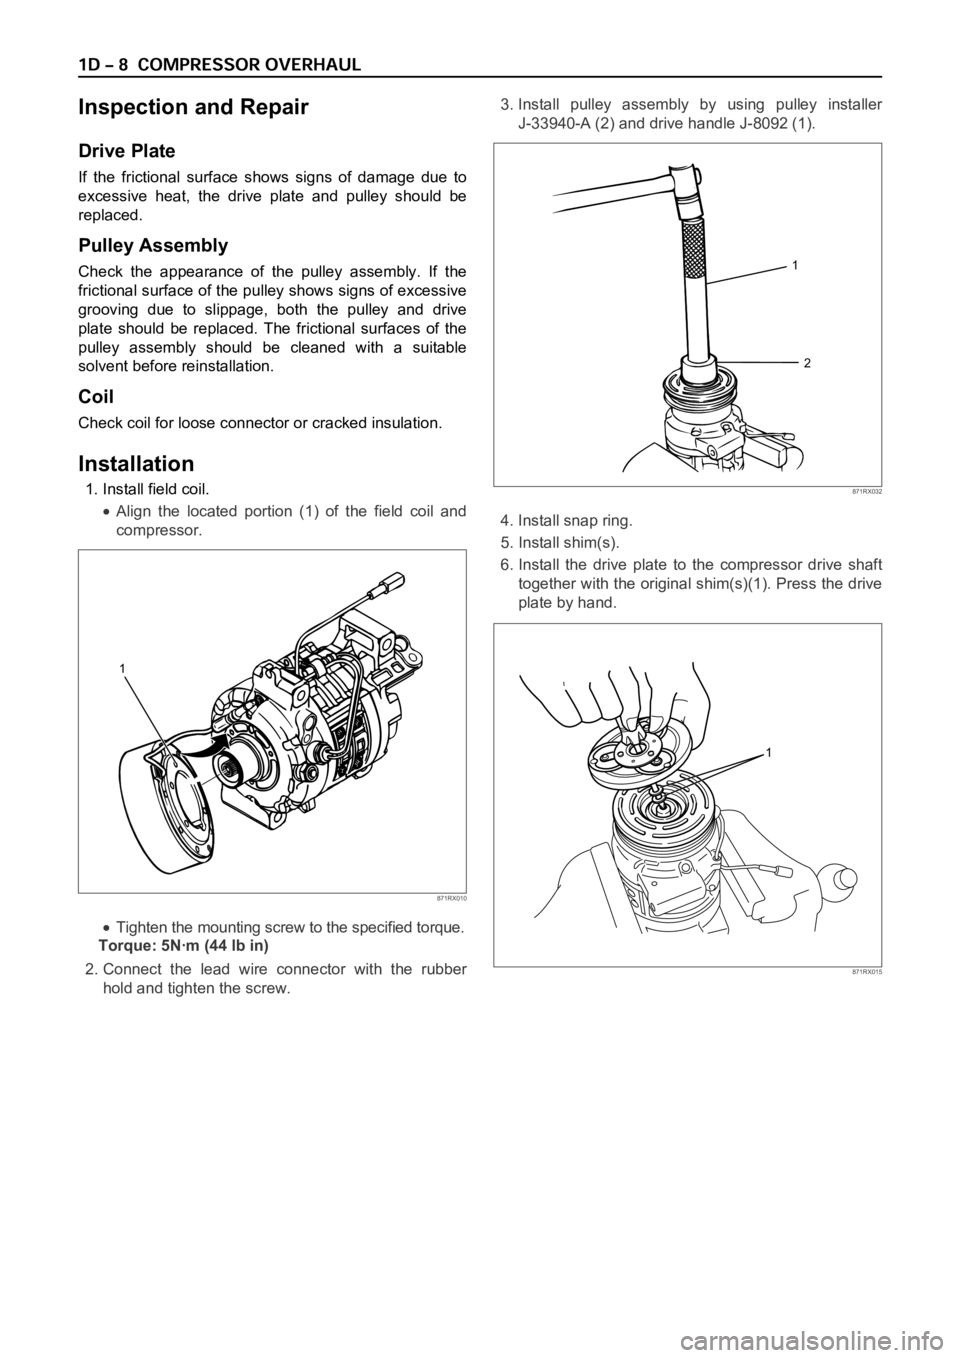
1. Install field coil.
Align the located portion (1) of the field coil and
compressor.
Tighten the mounting screw to the specified torque.
Torque: 5Nꞏm (44 lb in)
2. Connect the lead wire connector with the rubber
hold and tighten the screw.3. Install pulley assembly by using pulley installer
J-33940-A (2) and drive handle J-8092 (1).
4. Install snap ring.
5. Install shim(s).
6. Install the drive plate to the compressor drive shaft
together with the original shim(s)(1). Press the drive
plate by hand.
1
2
871RX032
1
871RX010
1
871RX015
Page 265 of 6000
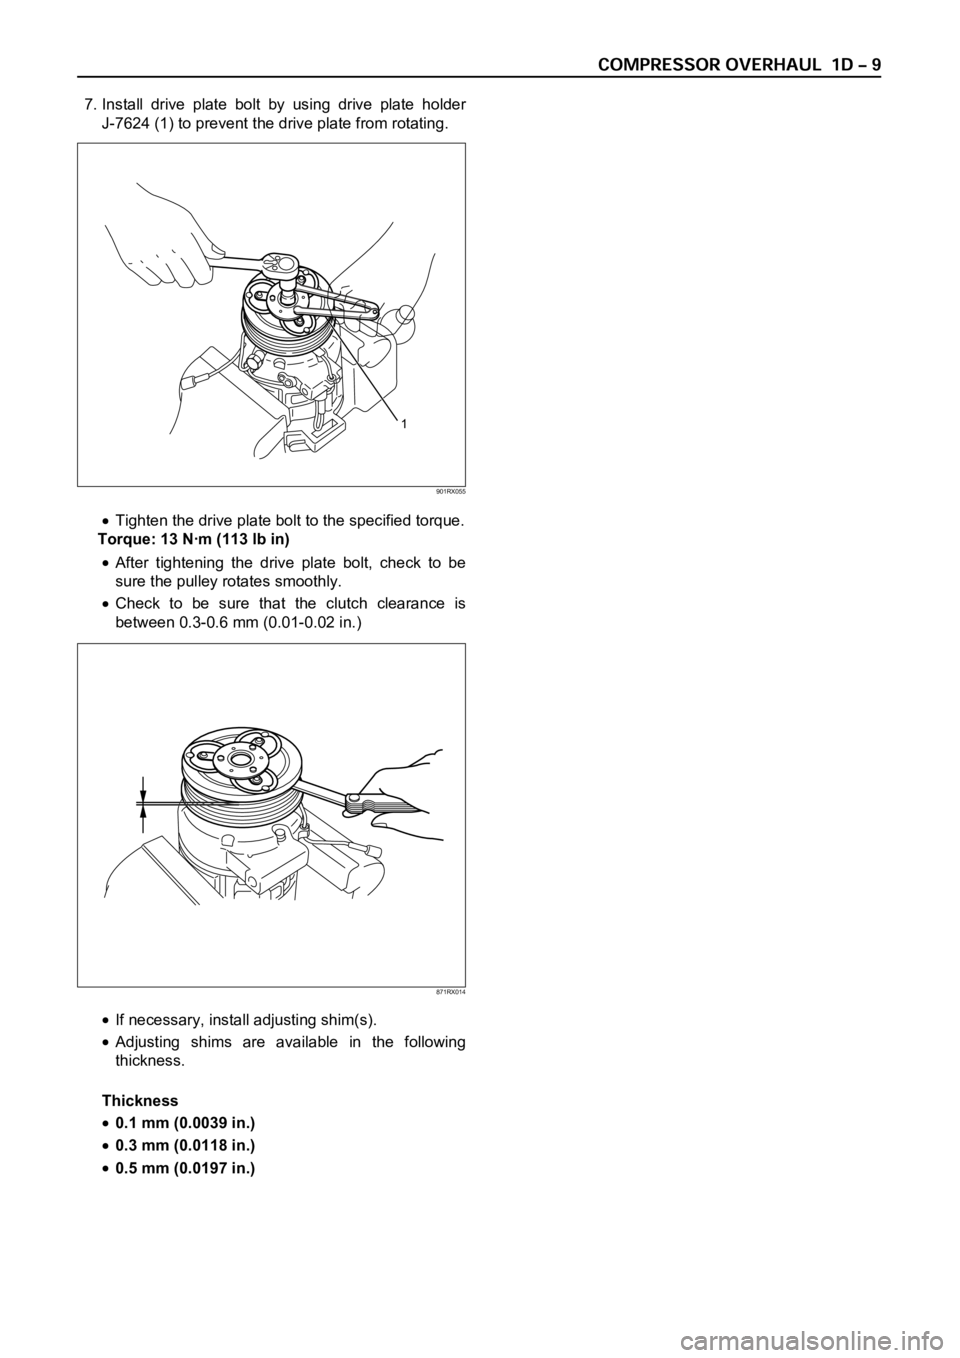
7. Install drive plate bolt by using drive plate holder
J-7624 (1) to prevent the drive plate from rotating.
Tighten the drive plate bolt to the specified torque.
Torque: 13 Nꞏm (113 lb in)
After tightening the drive plate bolt, check to be
sure the pulley rotates smoothly.
Check to be sure that the clutch clearance is
between 0.3-0.6 mm (0.01-0.02 in.)
If necessary, install adjusting shim(s).
Adjusting shims are available in the following
thickness.
Thickness
0.1 mm (0.0039 in.)
0.3 mm (0.0118 in.)
0.5 mm (0.0197 in.)
1
901RX055
871RX014
Page 271 of 6000
8. Install front valve plate.
Apply a coat of new compressor oil to the new
valve plate.
Install the valve plate to the suction valve by
aligning it with the spring pin.
NOTE
Do not mix up the front and rear valve plates.
9. Install gasket
Apply new compressor oil to the new gasket.
Install the gasket to the valve plate by a aligning it
with the spring pin.
10. Install o-ring.
11. Install front cylinder head.
Apply a coat of new compressor oil to the new O-
ring.
Install the O-ring to the front cylinder head.
Install the front cylinder head.
Tap the front cylinder head into place with a
plastic hammer.
NOTE
When installing the cylinder head, be careful
that the end of the drive shaft does not
damage the shaft seal assembly surface in the
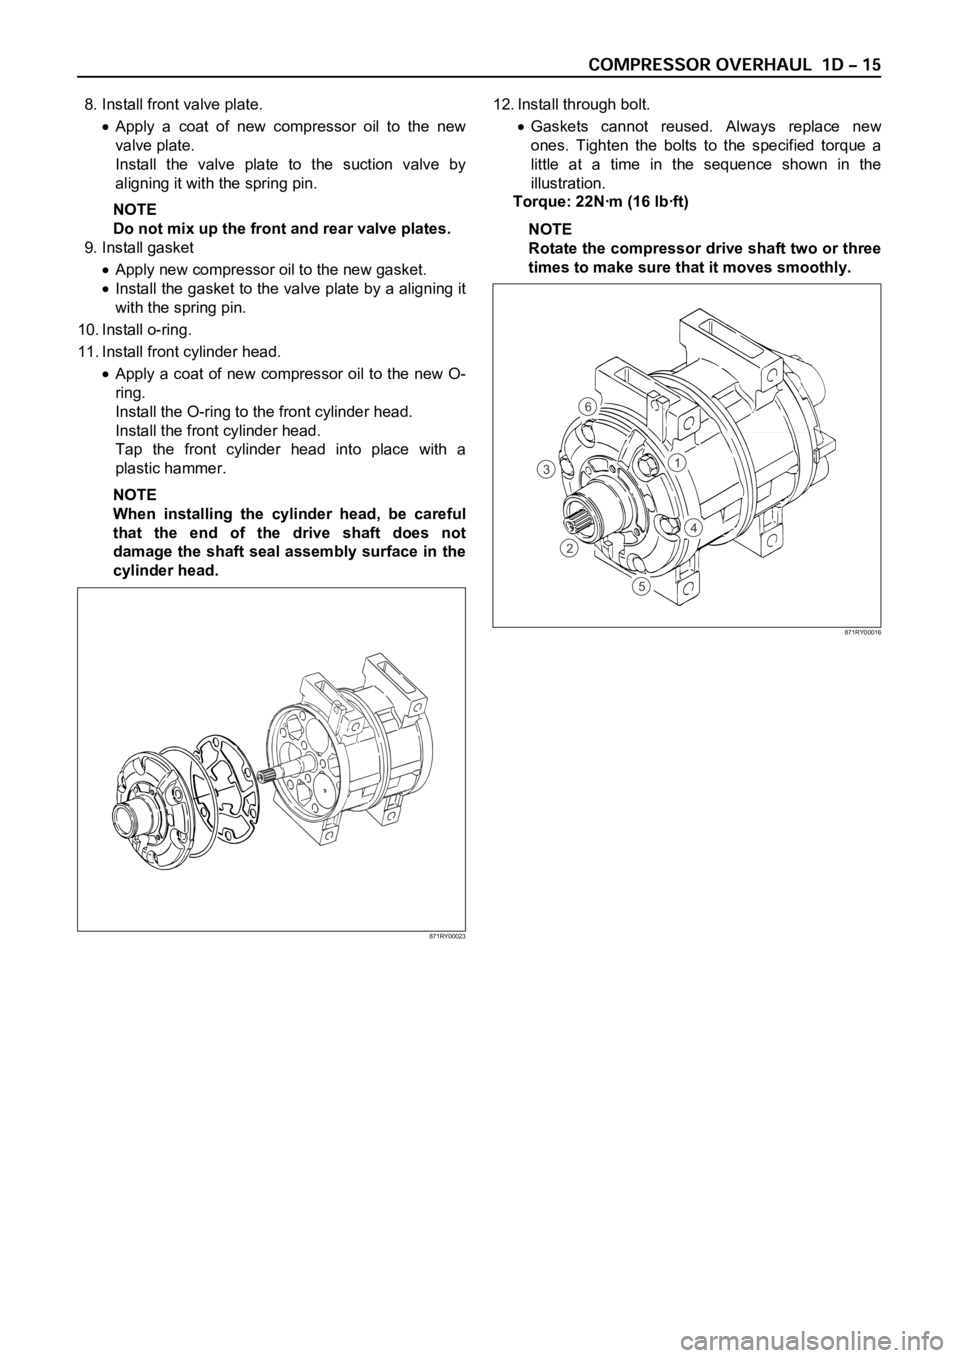
cylinder head.12. Install through bolt.
Gaskets cannot reused. Always replace new
ones. Tighten the bolts to the specified torque a
little at a time in the sequence shown in the
illustration.
Torque: 22Nꞏm (16 lbꞏft)
NOTE
Rotate the compressor drive shaft two or three
times to make sure that it moves smoothly.
1
4
5
2
3
6
871RY00016
871RY00023
Page 272 of 6000
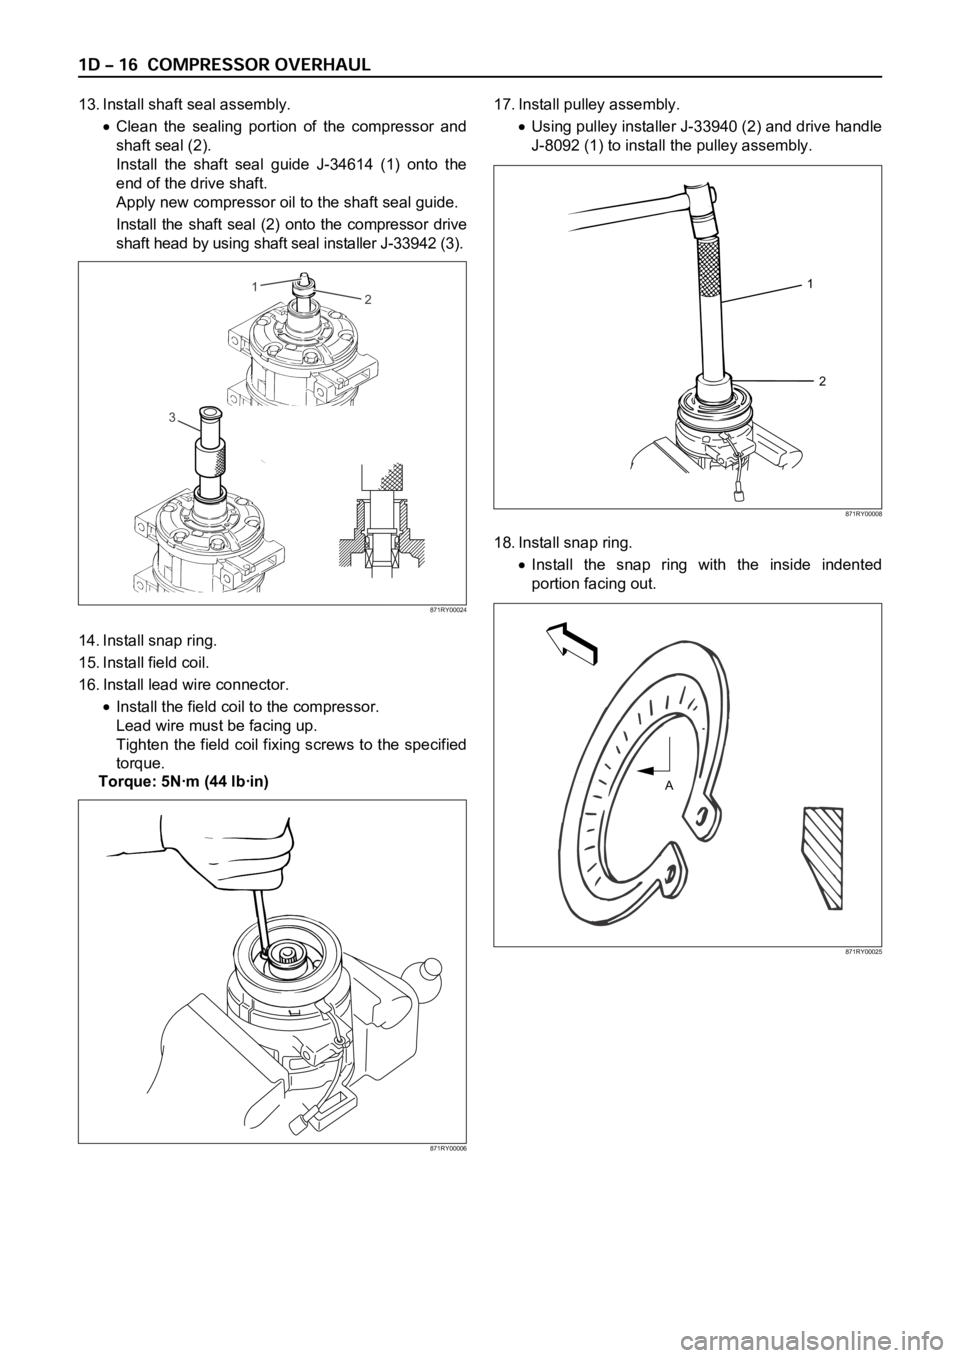
13. Install shaft seal assembly.
Clean the sealing portion of the compressor and
shaft seal (2).
Install the shaft seal guide J-34614 (1) onto the
end of the drive shaft.
Apply new compressor oil to the shaft seal guide.
Install the shaft seal (2) onto the compressor drive
shaft head by using shaft seal installer J-33942 (3).
14. Install snap ring.
15. Install field coil.
16. Install lead wire connector.
Install the field coil to the compressor.
Lead wire must be facing up.
Tighten the field coil fixing screws to the specified
torque.
Torque: 5Nꞏm (44 lbꞏin)17. Install pulley assembly.
Using pulley installer J-33940 (2) and drive handle
J-8092 (1) to install the pulley assembly.
18. Install snap ring.
Install the snap ring with the inside indented
portion facing out.
871RY00006
32 1
871RY00024
A
871RY00025
1
2
871RY00008
Page 273 of 6000
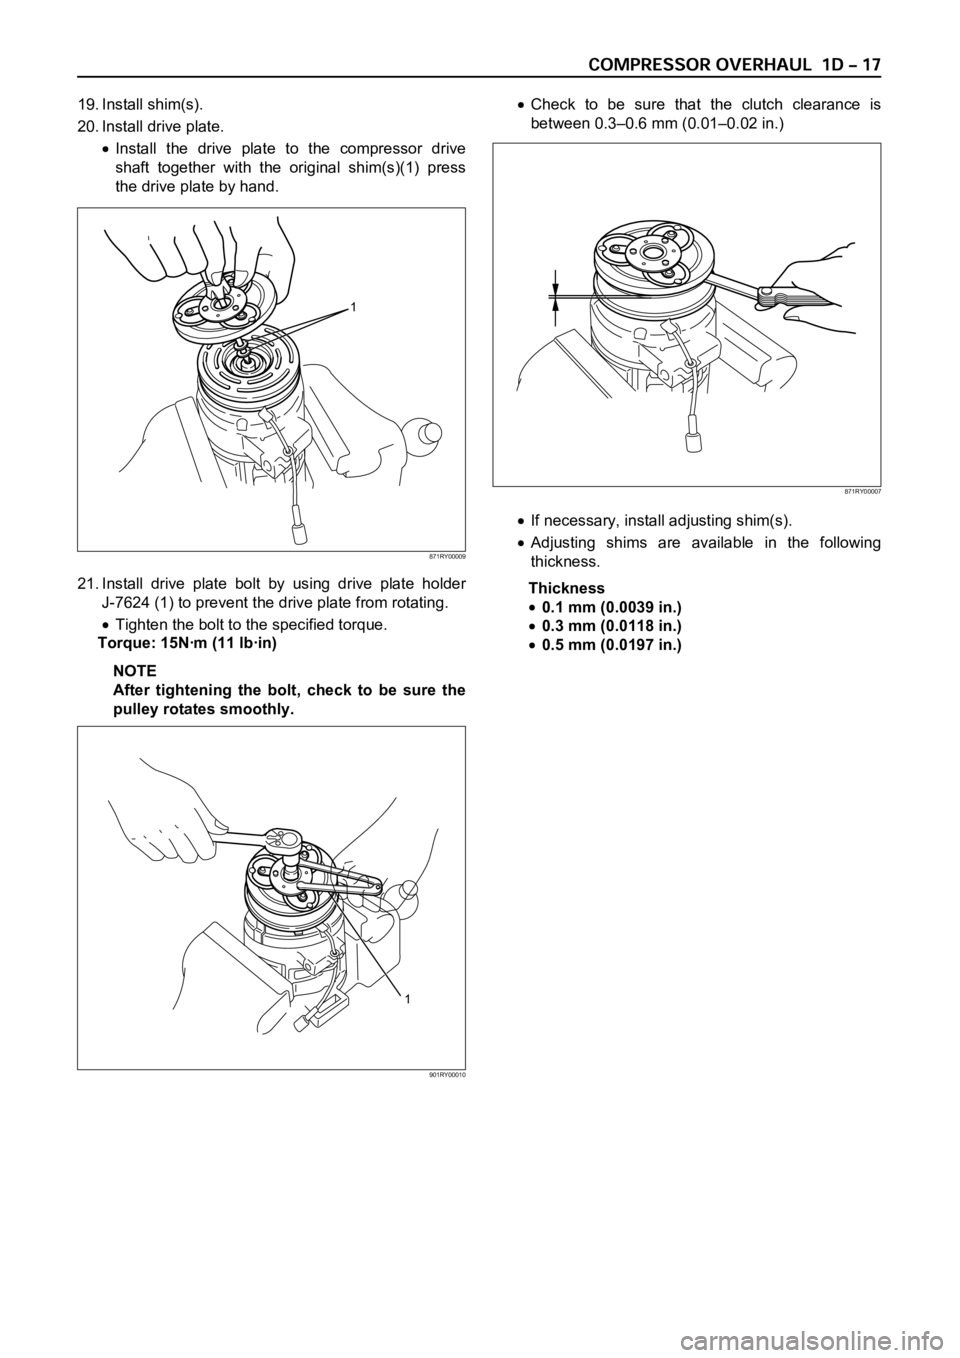
19. Install shim(s).
20. Install drive plate.
Install the drive plate to the compressor drive
shaft together with the original shim(s)(1) press
the drive plate by hand.
21. Install drive plate bolt by using drive plate holder
J-7624 (1) to prevent the drive plate from rotating.
Tighten the bolt to the specified torque.
Torque: 15Nꞏm (11 lbꞏin)
NOTE
After tightening the bolt, check to be sure the
pulley rotates smoothly.
Check to be sure that the clutch clearance is
between 0.3–0.6 mm (0.01–0.02 in.)
If necessary, install adjusting shim(s).
Adjusting shims are available in the following
thickness.
Thickness
0.1 mm (0.0039 in.)
0.3 mm (0.0118 in.)
0.5 mm (0.0197 in.)
1
871RY00009
871RY00007
1
901RY00010
Page 280 of 6000

6. Remove any excess oil resulting from installing the
new seal parts from the shaft and inside the
compressor neck.
7. Install the clutch plate and hub assembly as
described previously.8. Reinstall compressor belt and tighten bracket.
9. Evacuate and charge the refrigerant system.
COMPRESSOR PRESSURE RELIEF VALVE
Removal
1. Recover the refrigerant using Refrigerant Recovery
System.
2. Remove old pressure relief valve.
Installation
1. Clean valve seat area on rear head.2. Lubricate O-ring of new pressure relief valve and
O-ring assembly with new 525 viscosity refrigerant
oil. Install new valve and torque in place, 9.0 Nꞏm
(6.1 ft lbs)
3. Evacuate and recharge the system.
4. Leak test system.
COMPRESSOR OIL
Compressor Oil Check
The oil used to lubricate the compressor is circulating
with the refrigerant.
Whenever replacing any component of the system or a
large amount of gas leakage occurs, add oil to maintain
the original amount of oil.
Checking and Adjusting Oil Quantity for
Used Compressor
1. Perform oil return operation. Refer to Oil Return
Operation in this section.
2. Discharge and recover refrigerant and remove the
compressor.
3. Drain the compressor oil and measure the extracted
oil with a measuring cylinder.
4. If the amount of oil drained is much less than 90 cc
(3.0 fl. oz.), some refrigerant may have leaked out.
Conduct a leak tests on the connections of each
system, and if necessary, repair or replace faulty
parts.
5. Check the compressor oil contamination. (Refer to
Contamination of Compressor Oil in this section.)
6. Adjust the oil level following the next procedure
below.7. Install the compressor, then evacuate, charge and
perform the oil return operation.
8. Check system operation.
When it is impossible to preform oil return
operation, the compressor oil should be checked in
the following order:
1. Discharge and recover refrigerant and remove the
compressor.
2. Drain the compressor oil and measure the extracted
oil with a measuring cylinder.
3. Check the oil for contamination.
4. If more than 90 cc (3.0 fl. oz.) of oil is extracted from
the compressor, supply the same amount of oil to
the compressor to be installed. If the amount of oil
extracted is less than 90 cc (3.0 fl. oz.), recheck the
compressor oil in the following order:
5. Supply 90 cc (3.0 fl. oz.) of oil to the compressor
and install it onto the vehicle.
6. Evacuate and recharge with the proper amount of
refrigerant.
7. Perform the oil return operation.
8. Remove the compressor and recheck the amount of
oil.
9. Adjust the compressor oil, if necessary.
Checking and Adjusting for Compressor
Replacement
The oil is not charged in compressor (service parts). So
it is necessary to charge the proper amount of oil to the
new compressor. (Oil Capacity)
Capacity total in system 150 cc (5.0 fl.oz)
Compressor (Service 150 cc (5.0 fl.oz)
parts) charging amount
(Collected Amount) (Charging Amount)
more than 90 cc same as collected
(3.0 fl.oz) amount
less than 90 cc (3.0 fl.oz) 90 cc (3.0 fl.oz)
(Collected Amount) (Charging Amount)
more than 90 cc same as collected
(3.0 fl.oz) amount
less than 90 cc (3.0 fl.oz) 90 cc (3.0 fl.oz)
Page 438 of 6000
4A1–1 DIFFERENTIAL (FRONT)
DRIVELINE/AXLE
CONTENTS
Differential (Front) 4A1. . . . . . . . . . . . . . . . . . . . . . .
Differential (Rear/220mm) 4A2A. . . . . . . . . . . . . . . .
Differential (Rear/244mm) 4A2B. . . . . . . . . . . . . . . .
Driveline Control System (Shift on the Fly) 4B1. . Driveline Control System (TOD) 4B2. . . . . . . . . . .
Driveshaft System 4C. . . . . . . . . . . . . . . . . . . . . . .
Transfer Case (Standard Type) 4D1. . . . . . . . . . .
Transfer Case (TOD) 4D2. . . . . . . . . . . . . . . . . . . .
DIFFERENTIAL (FRONT)
CONTENTS
Service Precaution 4A1–1. . . . . . . . . . . . . . . . . . . . . .
Front Drive Axle 4A1–2. . . . . . . . . . . . . . . . . . . . . . . . .
Diagnosis 4A1–2. . . . . . . . . . . . . . . . . . . . . . . . . . . . .
Pinion Shaft Oil Seal 4A1–3. . . . . . . . . . . . . . . . . . . . .
Pinion Shaft Oil Seal and Associated Parts 4A1–3
Removal 4A1–3. . . . . . . . . . . . . . . . . . . . . . . . . . . . .
Inspection and Repair 4A1–4. . . . . . . . . . . . . . . . . .
Installation 4A1–4. . . . . . . . . . . . . . . . . . . . . . . . . . . .
Front Drive Axle Assembly 4A1–5. . . . . . . . . . . . . . .
Front Drive Axle Assembly and
Associated Parts 4A1–5. . . . . . . . . . . . . . . . . . . . . .
Removal 4A1–5. . . . . . . . . . . . . . . . . . . . . . . . . . . . . Installation 4A1–7. . . . . . . . . . . . . . . . . . . . . . . . . . . .
Differential Assembly 4A1–9. . . . . . . . . . . . . . . . . . . .
Disassembled View 4A1–9. . . . . . . . . . . . . . . . . . . .
Disassembly 4A1–9. . . . . . . . . . . . . . . . . . . . . . . . . .
Reassembly 4A1–12. . . . . . . . . . . . . . . . . . . . . . . . . .
Differential Cage Assembly 4A1–21. . . . . . . . . . . . . . .
Disassembled View 4A1–21. . . . . . . . . . . . . . . . . . . .
Disassembly 4A1–21. . . . . . . . . . . . . . . . . . . . . . . . . .
Inspection and Repair 4A1–22. . . . . . . . . . . . . . . . . .
Reassembly 4A1–23. . . . . . . . . . . . . . . . . . . . . . . . . .
Main Data and Specifications 4A1–25. . . . . . . . . . .
Special Tools 4A1–28. . . . . . . . . . . . . . . . . . . . . . . . . .
Service Precaution
WARNING: IF SO EQUIPPED WITH A
SUPPLEMENTAL RESTRAINT SYSTEM (SRS),
REFER TO THE SRS COMPONENT AND WIRING
LOCATION VIEW IN ORDER TO DETERMINE
WHETHER YOU ARE PERFORMING SERVICE ON OR
NEAR THE SRS COMPONENTS OR THE SRS
WIRING. WHEN YOU ARE REFORMING SERVICE ON
OR NEAR THE SRS COMPONENTS OR THE SRS
WIRING, REFER TO THE SRS SERVICE
INFORMATION. FAILURE TO FOLLOW WARNINGS
COULD RESULT IN POSSIBLE AIR BAG
DEPLOYMENT, PERSONAL INJURY, OR
OTHERWISE UNNEEDED SRS SYSTEM REPAIRS.CAUTION: Always use the correct fastener in the
proper location. When you replace a fastener, use
ONLY the exact part number for that application.
ISUZU will call out those fasteners that require a
replacement after removal. ISUZU will also call out
the fasteners that require thread lockers or thread
sealant. UNLESS OTHERWISE SPECIFIED , do not
use supplemental coatings (Paints, greases, or other
corrosion inhibitors) on threaded fasteners or
fastener joint interfaces. Generally,such coatings
adversely affect the fastener torque and the joint
clamping force, and may damage the fastener. When
you install fasteners, use the correct tightening
sequence and specification. Following these
instructions can help you avoid damage to parts and
systems.
Page 444 of 6000
4A1–7 DIFFERENTIAL (FRONT)
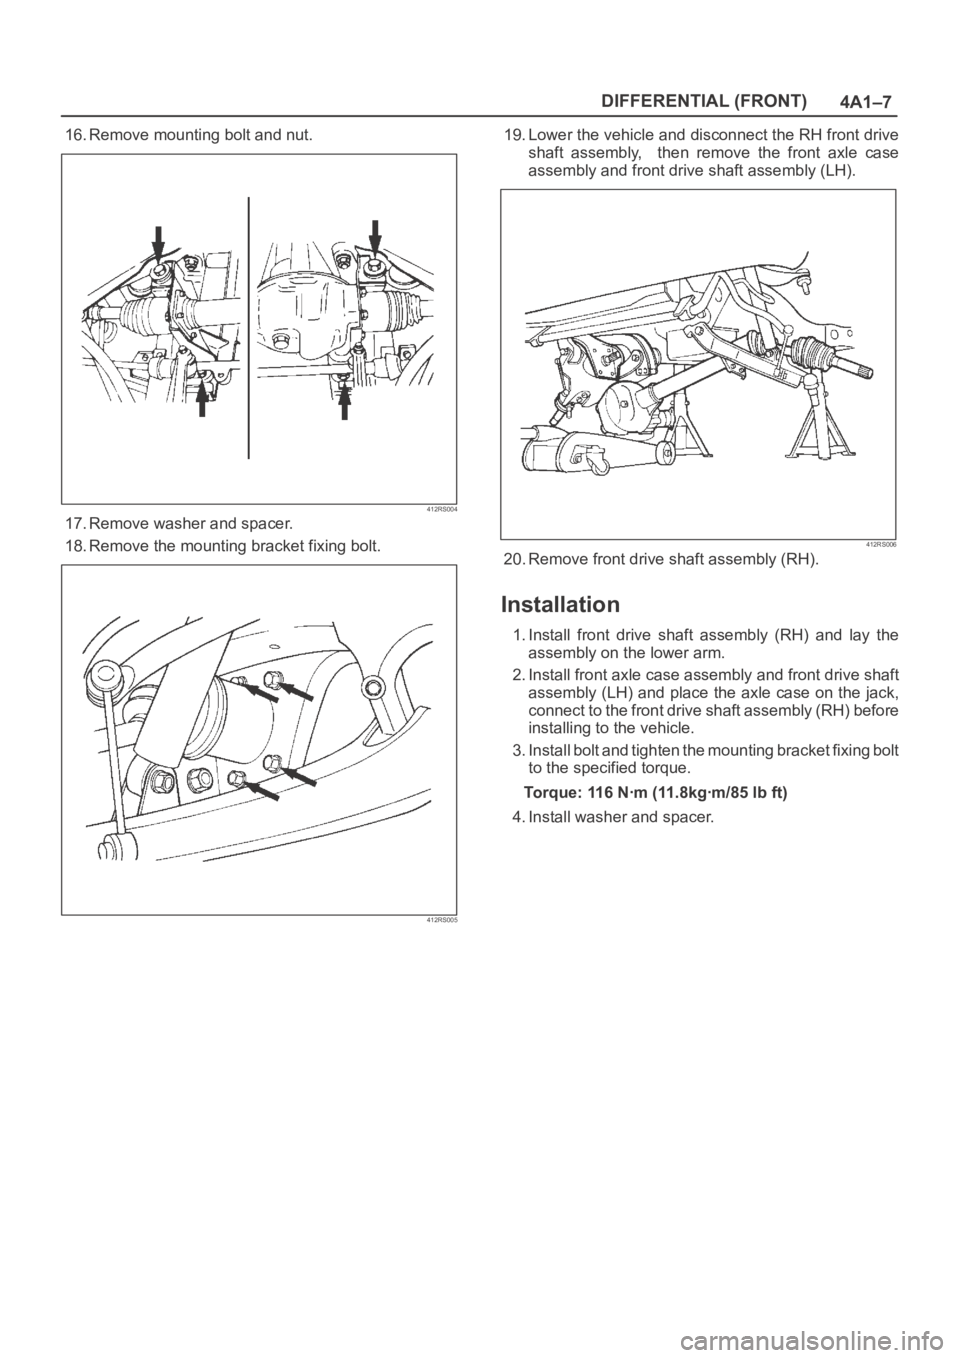
16. Remove mounting bolt and nut.
412RS004
17. Remove washer and spacer.
18. Remove the mounting bracket fixing bolt.
412RS005
19. Lower the vehicle and disconnect the RH front drive
shaft assembly, then remove the front axle case
assembly and front drive shaft assembly (LH).
412RS006
20. Remove front drive shaft assembly (RH).
Installation
1. Install front drive shaft assembly (RH) and lay the
assembly on the lower arm.
2. Install front axle case assembly and front drive shaft
assembly (LH) and place the axle case on the jack,
connect to the front drive shaft assembly (RH) before
installing to the vehicle.
3. Install bolt and tighten the mounting bracket fixing bolt
to the specified torque.
Torque: 116 Nꞏm (11.8kgꞏm/85 lb ft)
4. Install washer and spacer.