ad blue OPEL FRONTERA 1998 Workshop Manual
[x] Cancel search | Manufacturer: OPEL, Model Year: 1998, Model line: FRONTERA, Model: OPEL FRONTERA 1998Pages: 6000, PDF Size: 97 MB
Page 207 of 6000
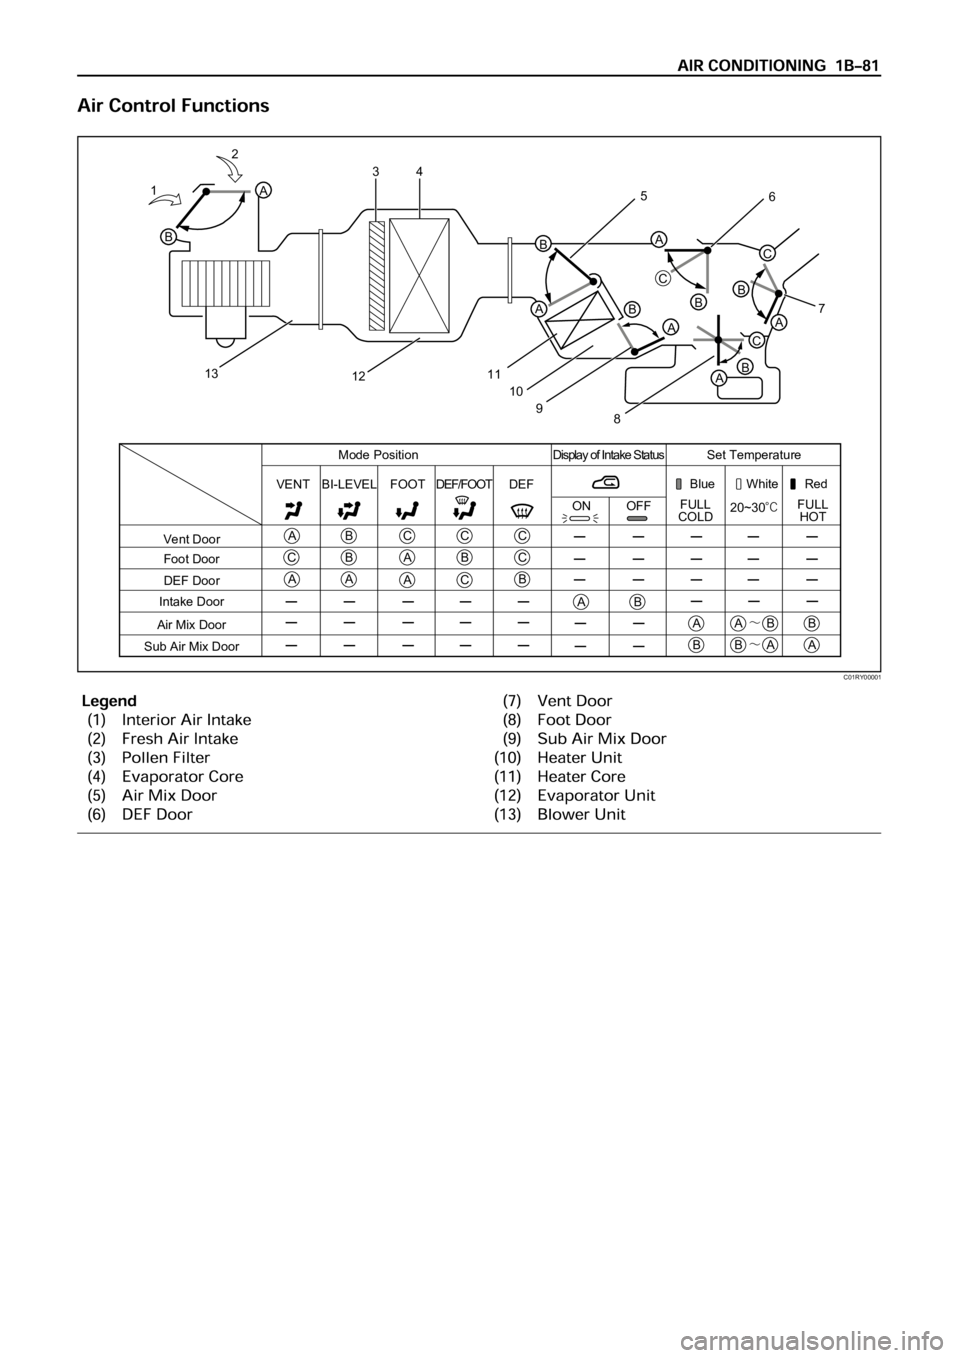
C01RY00001
2
1
123
4
10
96 5
87
11
13
B
B
A
C
B
C
A
ABB
A
A
B
A
A
B
B
A
C
A
A
C
CC
B
AB
AABB
Vent DoorM o d e P o s i t i o n Display of Intake Status S e t T e m p e r a t u r e
ONFULL
COLDFULL
HOT 20~30
℃
〜
BBAA〜
Blue
VENT BI-LEVEL FOOT DEFRed
OFF
Foot Door
DEF Door
Intake Door
Air Mix Door
Sub Air Mix DoorWhite
C
C
B
DEF/FOOT
C
A
Page 456 of 6000
4A1–19 DIFFERENTIAL (FRONT)
17. Tighten the cap bolt to the specified torque.
To r q u e : 9 8 N ꞏm ( 1 0 k g ꞏm / 7 2 l b f t )
425RS036
1. Measure the amount of run–out of the ring gear at
its rear face.
Standard: 0.02 mm ( 0.001 in)
Limit: 0.05 mm ( 0.002 in)
425RS037
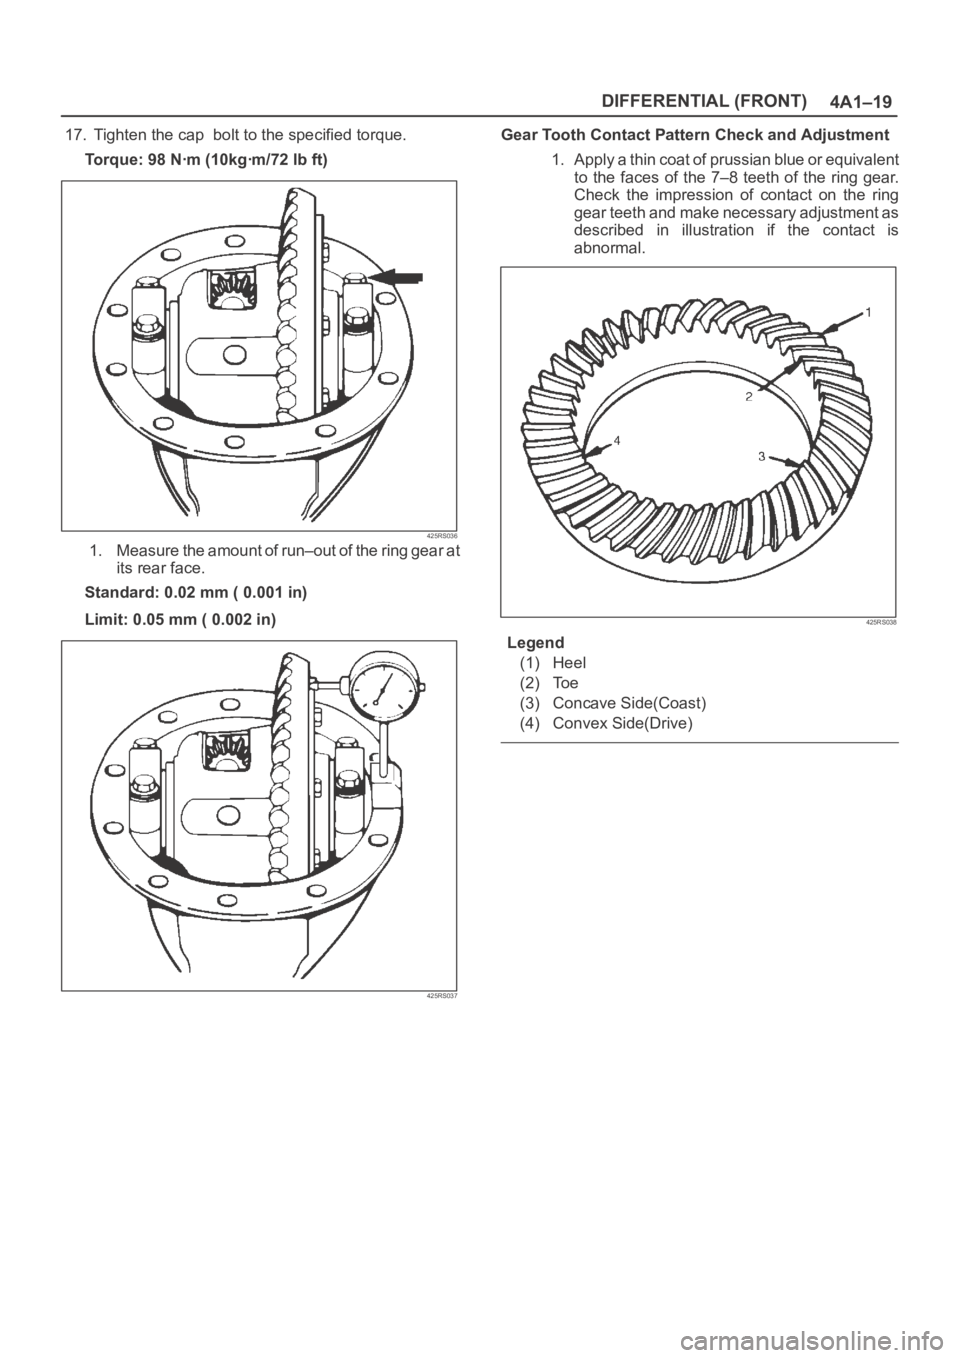
Gear Tooth Contact Pattern Check and Adjustment
1. Apply a thin coat of prussian blue or equivalent
to the faces of the 7–8 teeth of the ring gear.
Check the impression of contact on the ring
gear teeth and make necessary adjustment as
described in illustration if the contact is
abnormal.
425RS038
Legend
(1) Heel
(2) Toe
(3) Concave Side(Coast)
(4) Convex Side(Drive)
Page 486 of 6000
DIFFERENTIAL (REAR 220mm)
4A2A–19
17. Tighten the cap bolt to the specified torque.
Torque: 108 Nꞏm (11.0kgꞏm/80 lb ft)
425RS036
1. Measure the amount of run–out of the ring gear at
its rear face.
Standard: 0.02 mm ( 0.001 in)
Limit: 0.05 mm ( 0.002 in)
425RS037
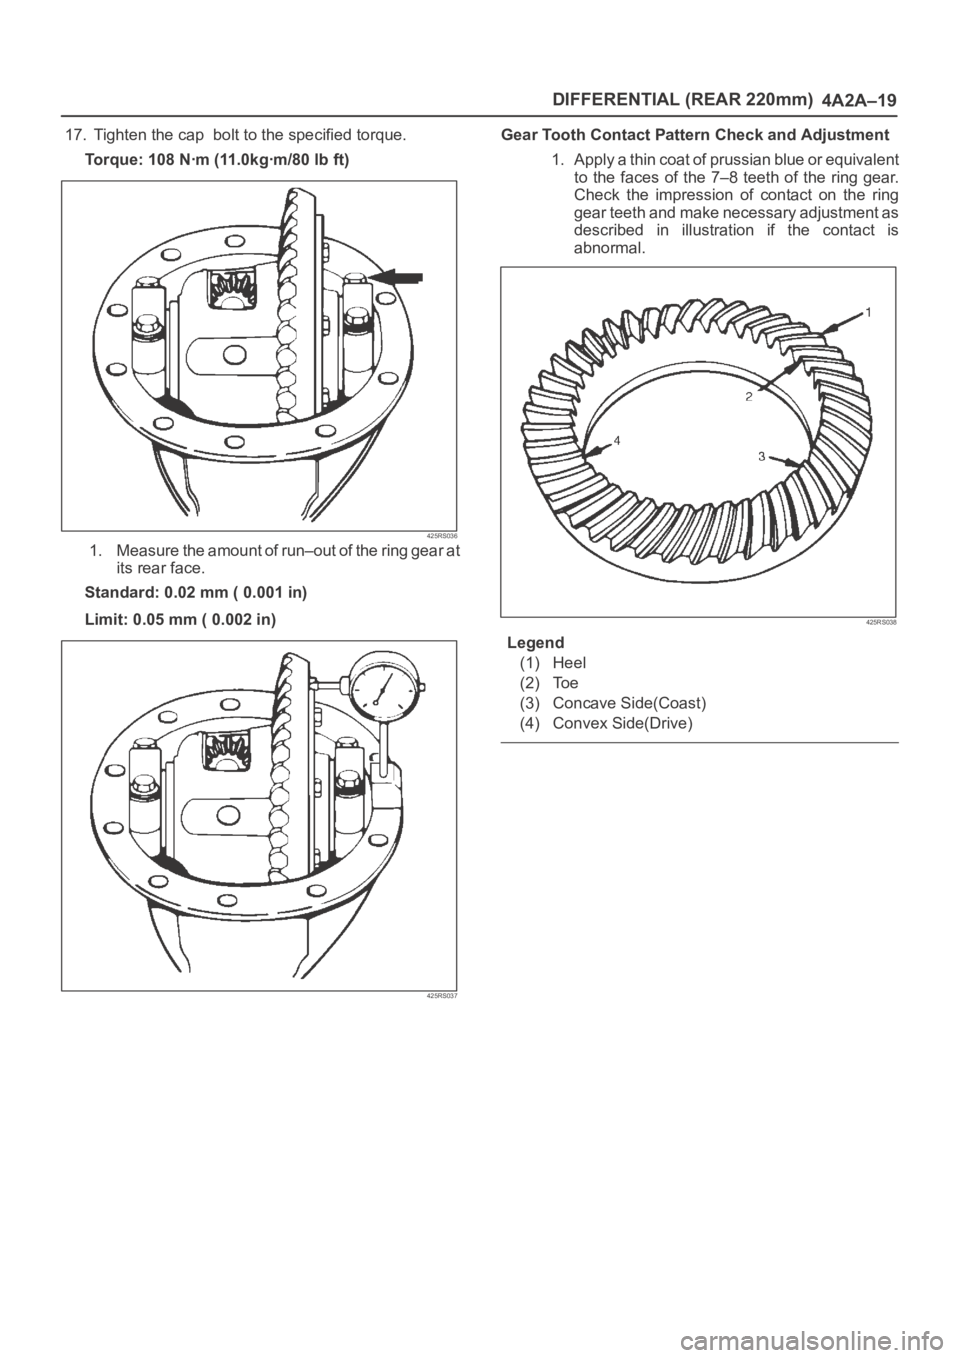
Gear Tooth Contact Pattern Check and Adjustment
1. Apply a thin coat of prussian blue or equivalent
to the faces of the 7–8 teeth of the ring gear.
Check the impression of contact on the ring
gear teeth and make necessary adjustment as
described in illustration if the contact is
abnormal.
425RS038
Legend
(1) Heel
(2) Toe
(3) Concave Side(Coast)
(4) Convex Side(Drive)
Page 522 of 6000
DIFFERENTIAL (REAR 244mm)
4A2B–19
16. Tighten the bolt to the specified torque.
Torque:108Nꞏm (11.0kgꞏm/80 lb ft)
425RS036
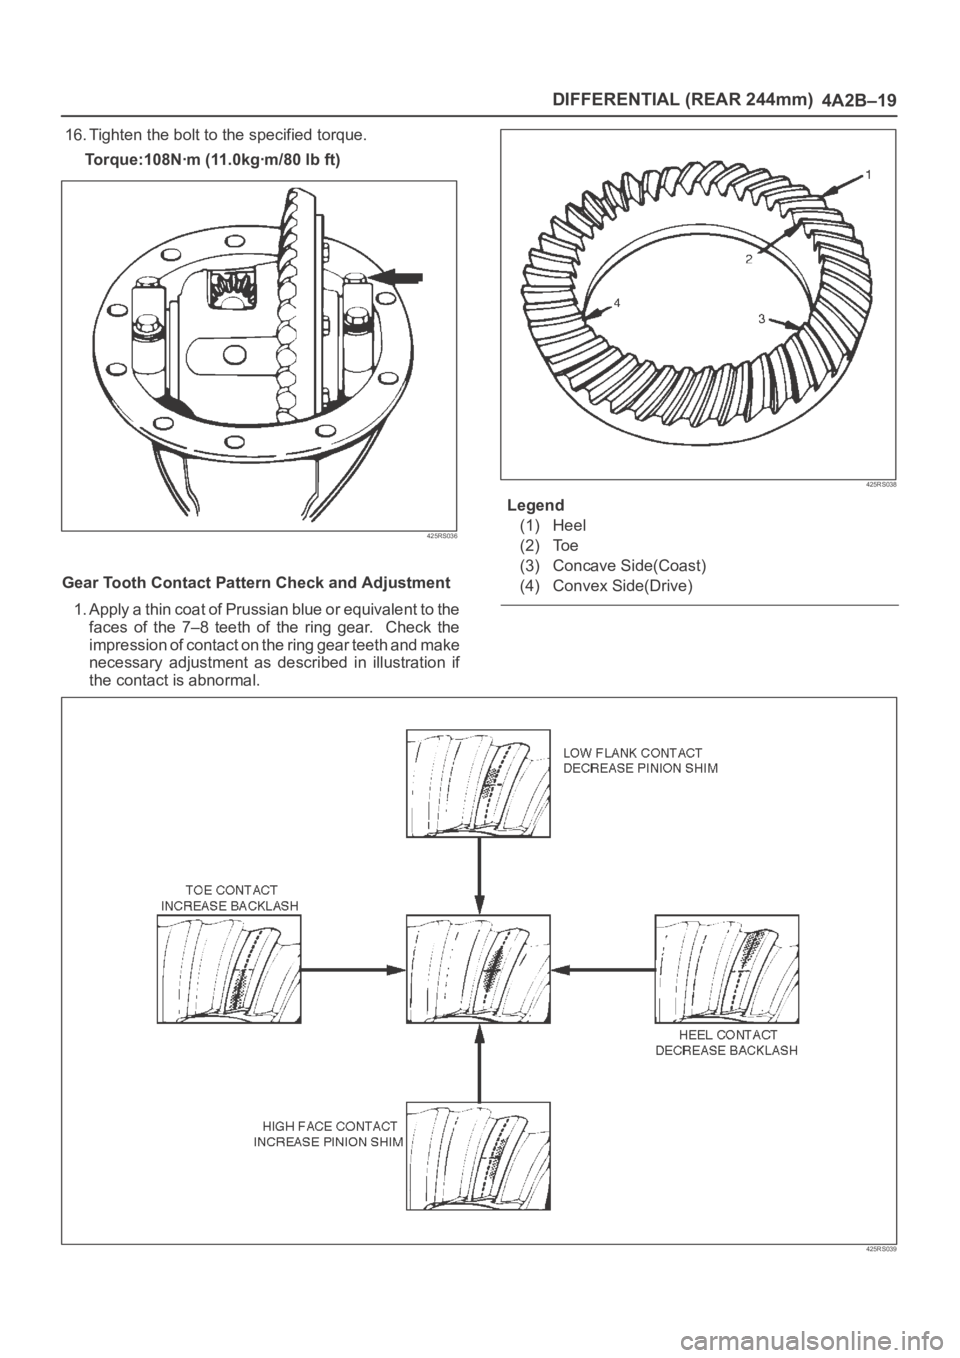
Gear Tooth Contact Pattern Check and Adjustment
1. Apply a thin coat of Prussian blue or equivalent to the
faces of the 7–8 teeth of the ring gear. Check the
impression of contact on the ring gear teeth and make
necessary adjustment as described in illustration if
the contact is abnormal.
425RS038
Legend
(1) Heel
(2) Toe
(3) Concave Side(Coast)
(4) Convex Side(Drive)
425RS039
Page 538 of 6000
4B1–5 DRIVE LINE CONTROL SYSTEM (SHIFT ON THE FLY)
4. If vacuum is not applicable as much as –400mmHg,
and if there is resistance on the intake side, replace
with a new check valve.
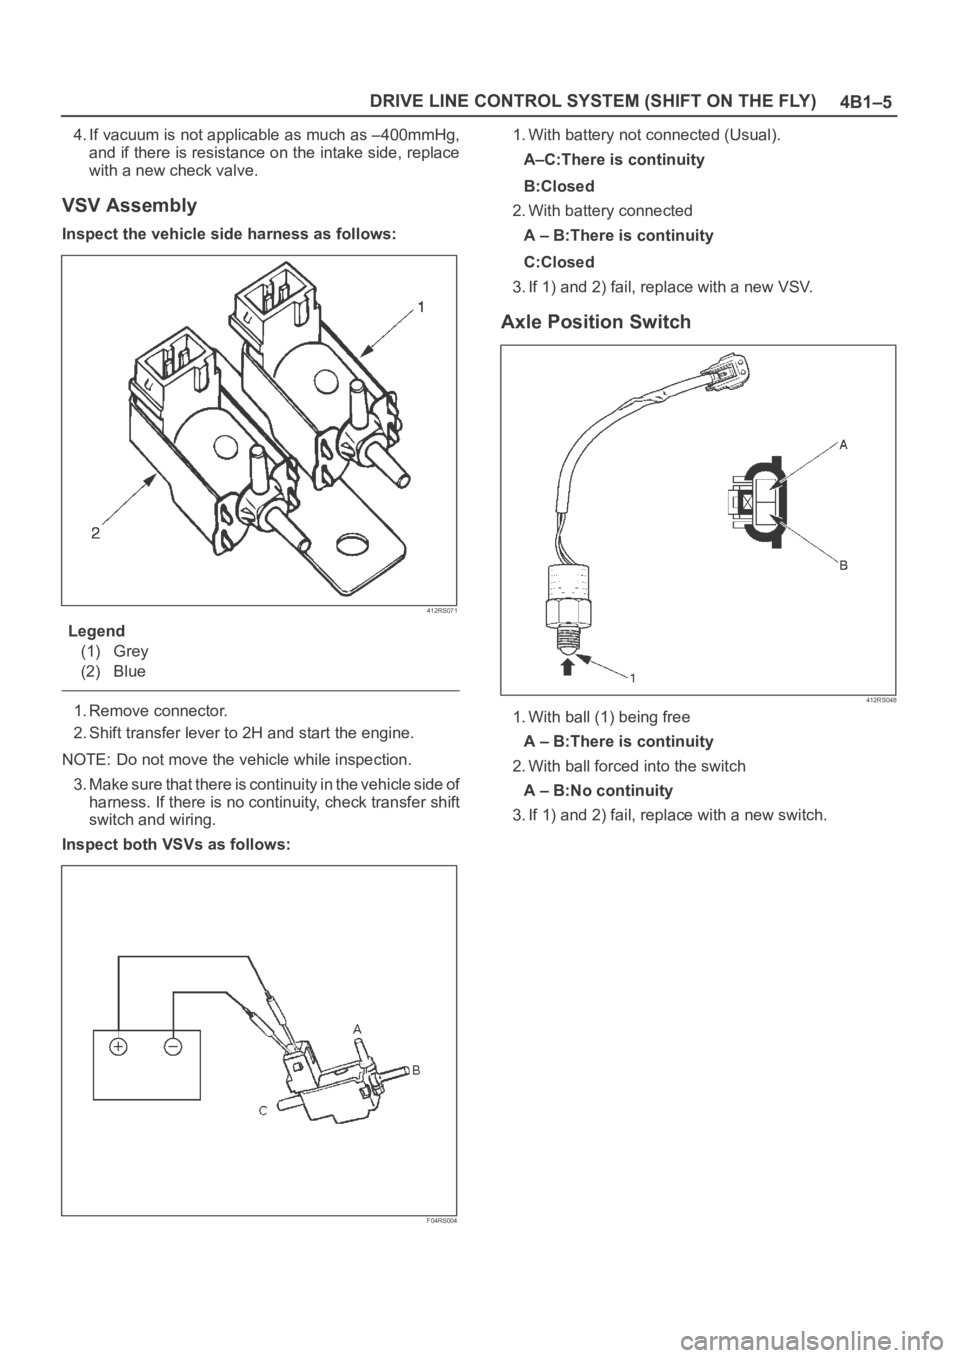
VSV Assembly
Inspect the vehicle side harness as follows:
412RS071
Legend
(1) Grey
(2) Blue
1. Remove connector.
2. Shift transfer lever to 2H and start the engine.
NOTE: Do not move the vehicle while inspection.
3. Make sure that there is continuity in the vehicle side of
harness. If there is no continuity, check transfer shift
switch and wiring.
Inspect both VSVs as follows:
F04RS004
1. With battery not connected (Usual).
A–C:There is continuity
B:Closed
2. With battery connected
A – B:There is continuity
C:Closed
3. If 1) and 2) fail, replace with a new VSV.
Axle Position Switch
412RS048
1. With ball (1) being free
A – B:There is continuity
2. With ball forced into the switch
A – B:No continuity
3. If 1) and 2) fail, replace with a new switch.
Page 567 of 6000
4B1–34
DRIVE LINE CONTROL SYSTEM (SHIFT ON THE FLY)
4. If vacuum is not applicable as much as –400mmHg,
and if there is resistance on the intake side, replace
with a new check valve.
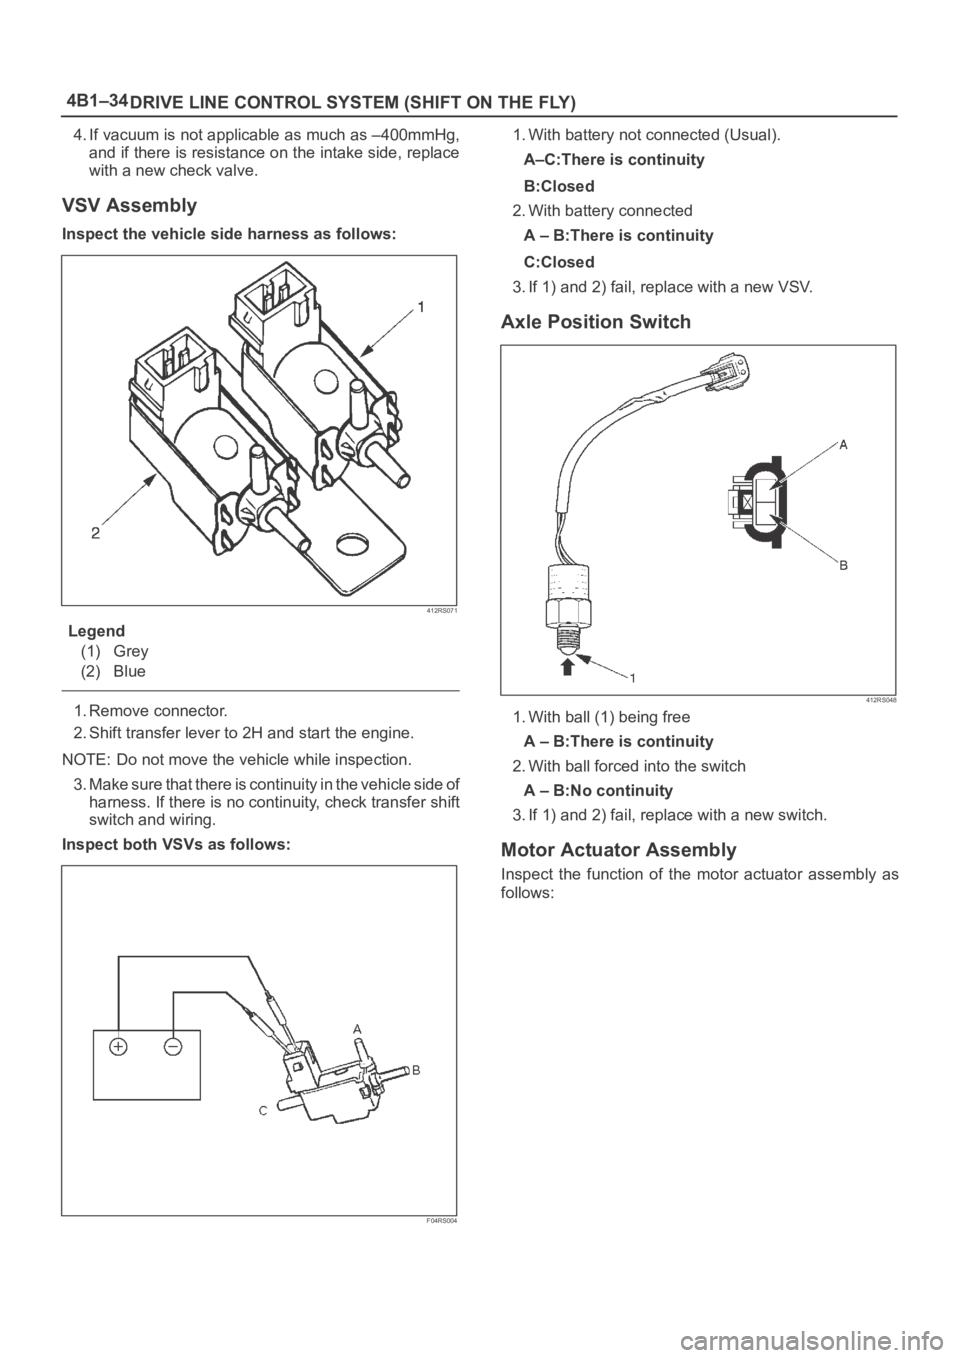
VSV Assembly
Inspect the vehicle side harness as follows:
412RS071
Legend
(1) Grey
(2) Blue
1. Remove connector.
2. Shift transfer lever to 2H and start the engine.
NOTE: Do not move the vehicle while inspection.
3. Make sure that there is continuity in the vehicle side of
harness. If there is no continuity, check transfer shift
switch and wiring.
Inspect both VSVs as follows:
F04RS004
1. With battery not connected (Usual).
A–C:There is continuity
B:Closed
2. With battery connected
A – B:There is continuity
C:Closed
3. If 1) and 2) fail, replace with a new VSV.
Axle Position Switch
412RS048
1. With ball (1) being free
A – B:There is continuity
2. With ball forced into the switch
A – B:No continuity
3. If 1) and 2) fail, replace with a new switch.
Motor Actuator Assembly
Inspect the function of the motor actuator assembly as
follows:
Page 711 of 6000
4C–45 DRIVE SHAFT SYSTEM
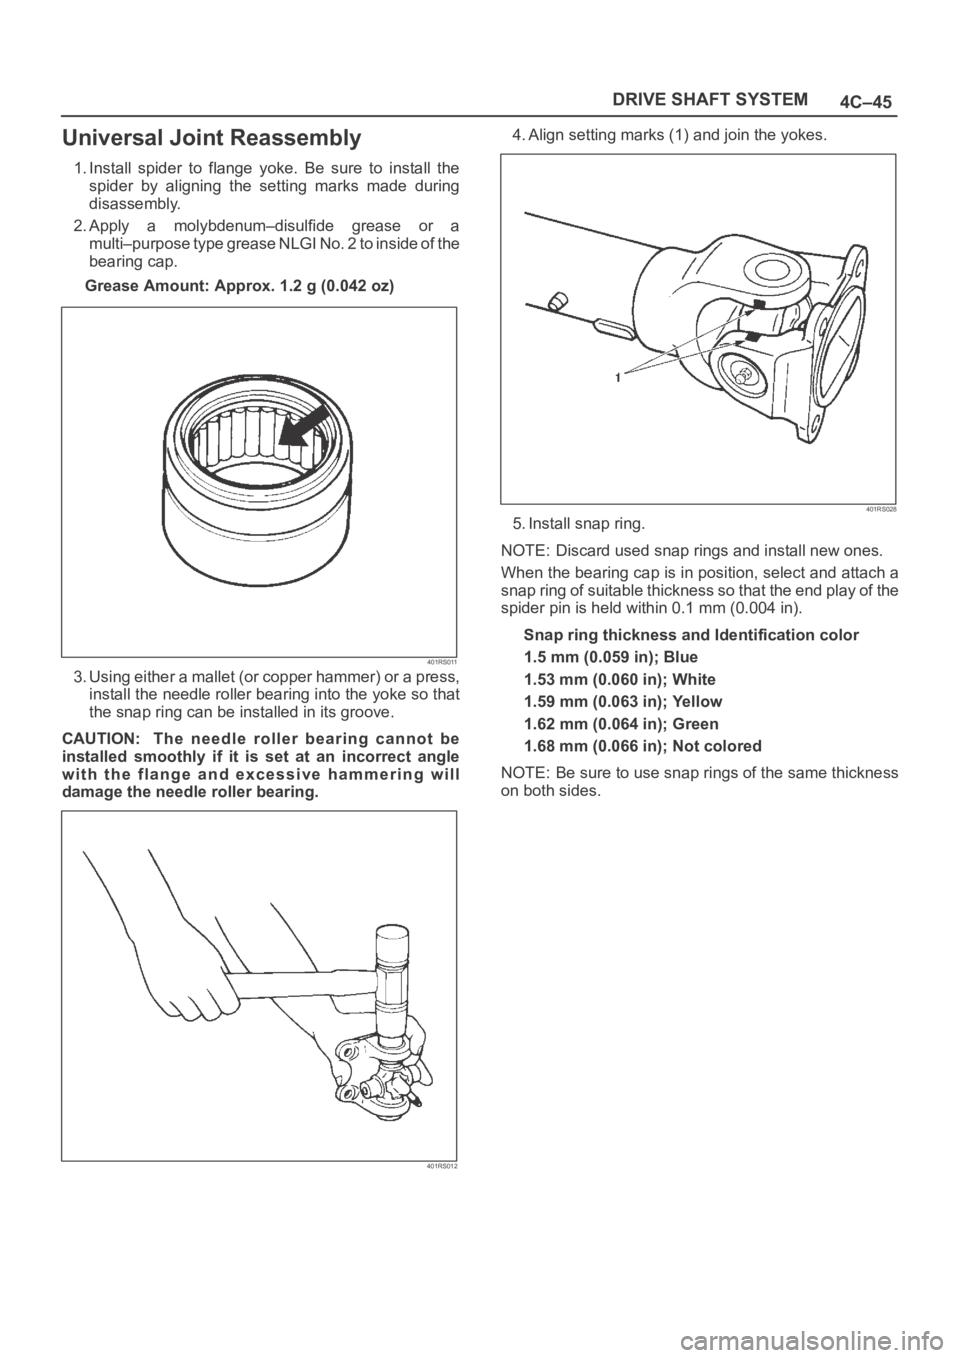
Universal Joint Reassembly
1. Install spider to flange yoke. Be sure to install the
spider by aligning the setting marks made during
disassembly.
2. Apply a molybdenum–disulfide grease or a
multi–purpose type grease NLGI No. 2 to inside of the
bearing cap.
Grease Amount: Approx. 1.2 g (0.042 oz)
401RS011
3. Using either a mallet (or copper hammer) or a press,
install the needle roller bearing into the yoke so that
the snap ring can be installed in its groove.
CAUTION: The needle roller bearing cannot be
installed smoothly if it is set at an incorrect angle
with the flange and excessive hammering will
damage the needle roller bearing.
401RS012
4. Align setting marks (1) and join the yokes.
401RS028
5. Install snap ring.
NOTE: Discard used snap rings and install new ones.
When the bearing cap is in position, select and attach a
snap ring of suitable thickness so that the end play of the
spider pin is held within 0.1 mm (0.004 in).
Snap ring thickness and Identification color
1.5 mm (0.059 in); Blue
1.53 mm (0.060 in); White
1.59 mm (0.063 in); Yellow
1.62 mm (0.064 in); Green
1.68 mm (0.066 in); Not colored
NOTE: Be sure to use snap rings of the same thickness
on both sides.
Page 719 of 6000
4C–53 DRIVE SHAFT SYSTEM
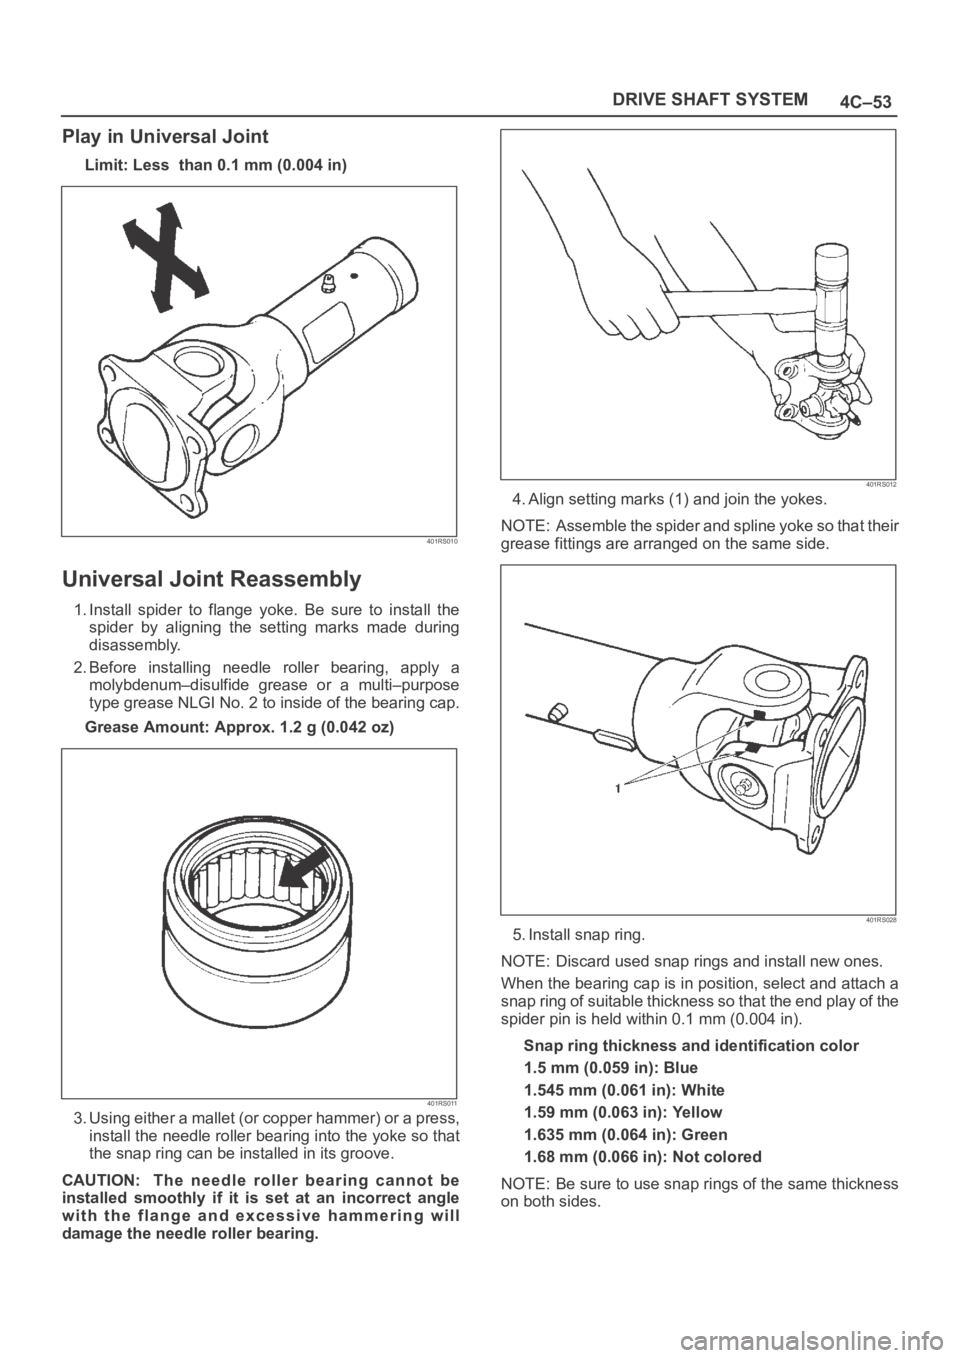
Play in Universal Joint
Limit: Less than 0.1 mm (0.004 in)
401RS010
Universal Joint Reassembly
1. Install spider to flange yoke. Be sure to install the
spider by aligning the setting marks made during
disassembly.
2. Before installing needle roller bearing, apply a
molybdenum–disulfide grease or a multi–purpose
type grease NLGI No. 2 to inside of the bearing cap.
Grease Amount: Approx. 1.2 g (0.042 oz)
401RS011
3. Using either a mallet (or copper hammer) or a press,
install the needle roller bearing into the yoke so that
the snap ring can be installed in its groove.
CAUTION: The needle roller bearing cannot be
installed smoothly if it is set at an incorrect angle
with the flange and excessive hammering will
damage the needle roller bearing.
401RS012
4. Align setting marks (1) and join the yokes.
NOTE: Assemble the spider and spline yoke so that their
grease fittings are arranged on the same side.
401RS028
5. Install snap ring.
NOTE: Discard used snap rings and install new ones.
When the bearing cap is in position, select and attach a
snap ring of suitable thickness so that the end play of the
spider pin is held within 0.1 mm (0.004 in).
Snap ring thickness and identification color
1.5 mm (0.059 in): Blue
1.545 mm (0.061 in): White
1.59 mm (0.063 in): Yellow
1.635 mm (0.064 in): Green
1.68 mm (0.066 in): Not colored
NOTE: Be sure to use snap rings of the same thickness
on both sides.
Page 759 of 6000
4D1–38
TRANSFER CASE (STANDARD TYPE)
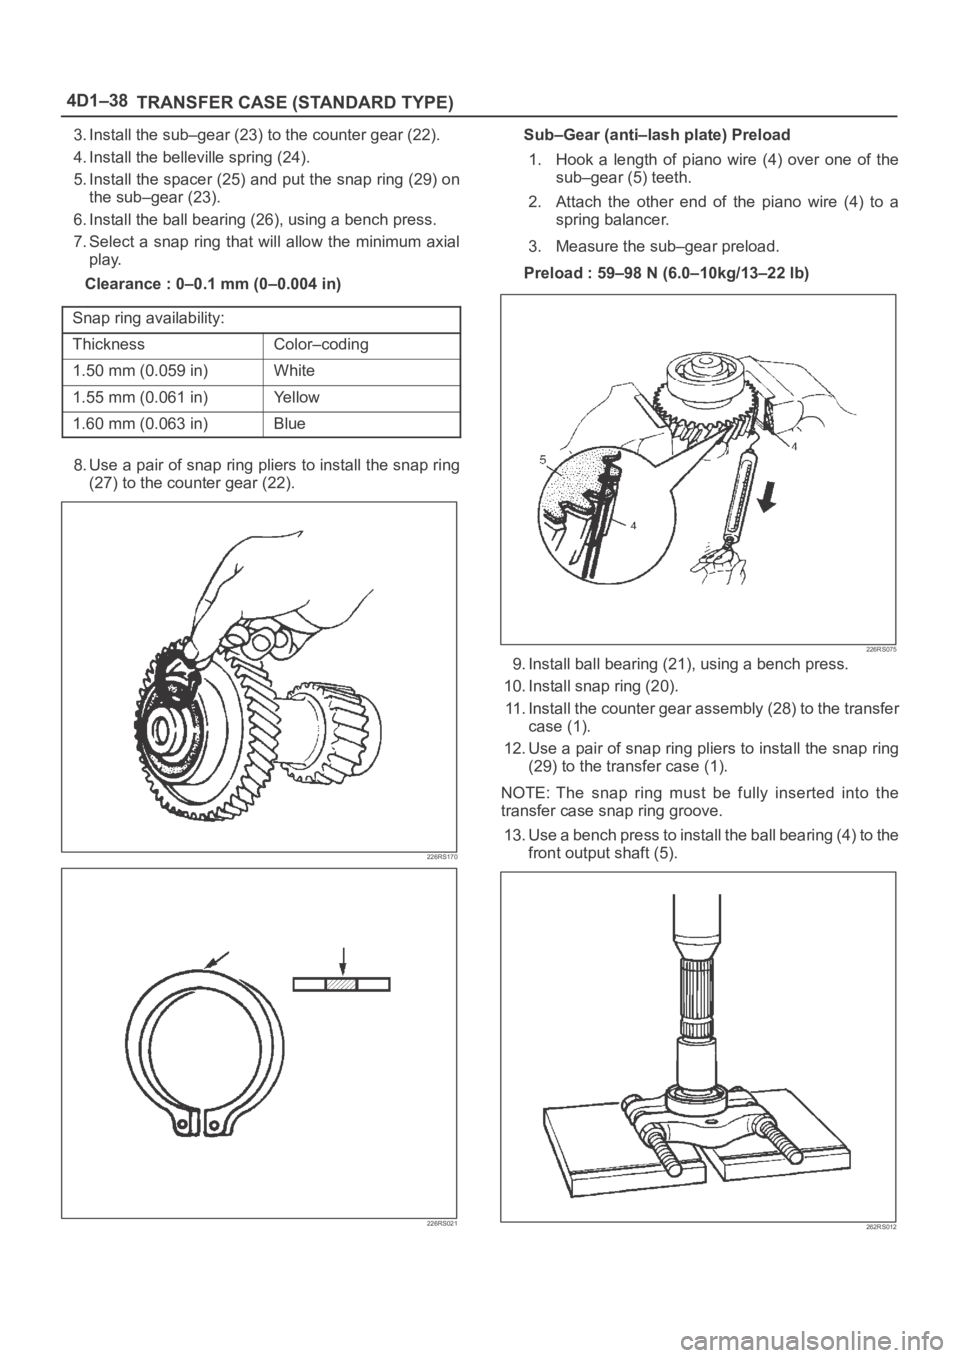
3. Install the sub–gear (23) to the counter gear (22).
4. Install the belleville spring (24).
5. Install the spacer (25) and put the snap ring (29) on
the sub–gear (23).
6. Install the ball bearing (26), using a bench press.
7. Select a snap ring that will allow the minimum axial
play.
Clearance : 0–0.1 mm (0–0.004 in)
Snap ring availability:
ThicknessColor–coding
1.50 mm (0.059 in)White
1.55 mm (0.061 in)Yellow
1.60 mm (0.063 in)Blue
8. Use a pair of snap ring pliers to install the snap ring
(27) to the counter gear (22).
226RS170
226RS021
Sub–Gear (anti–lash plate) Preload
1. Hook a length of piano wire (4) over one of the
sub–gear (5) teeth.
2. Attach the other end of the piano wire (4) to a
spring balancer.
3. Measure the sub–gear preload.
Preload : 59–98 N (6.0–10kg/13–22 lb)
226RS075
9. Install ball bearing (21), using a bench press.
10. Install snap ring (20).
11. Install the counter gear assembly (28) to the transfer
case (1).
12. Use a pair of snap ring pliers to install the snap ring
(29) to the transfer case (1).
NOTE: The snap ring must be fully inserted into the
transfer case snap ring groove.
13. Use a bench press to install the ball bearing (4) to the
front output shaft (5).
262RS012
Page 761 of 6000
4D1–40
TRANSFER CASE (STANDARD TYPE)
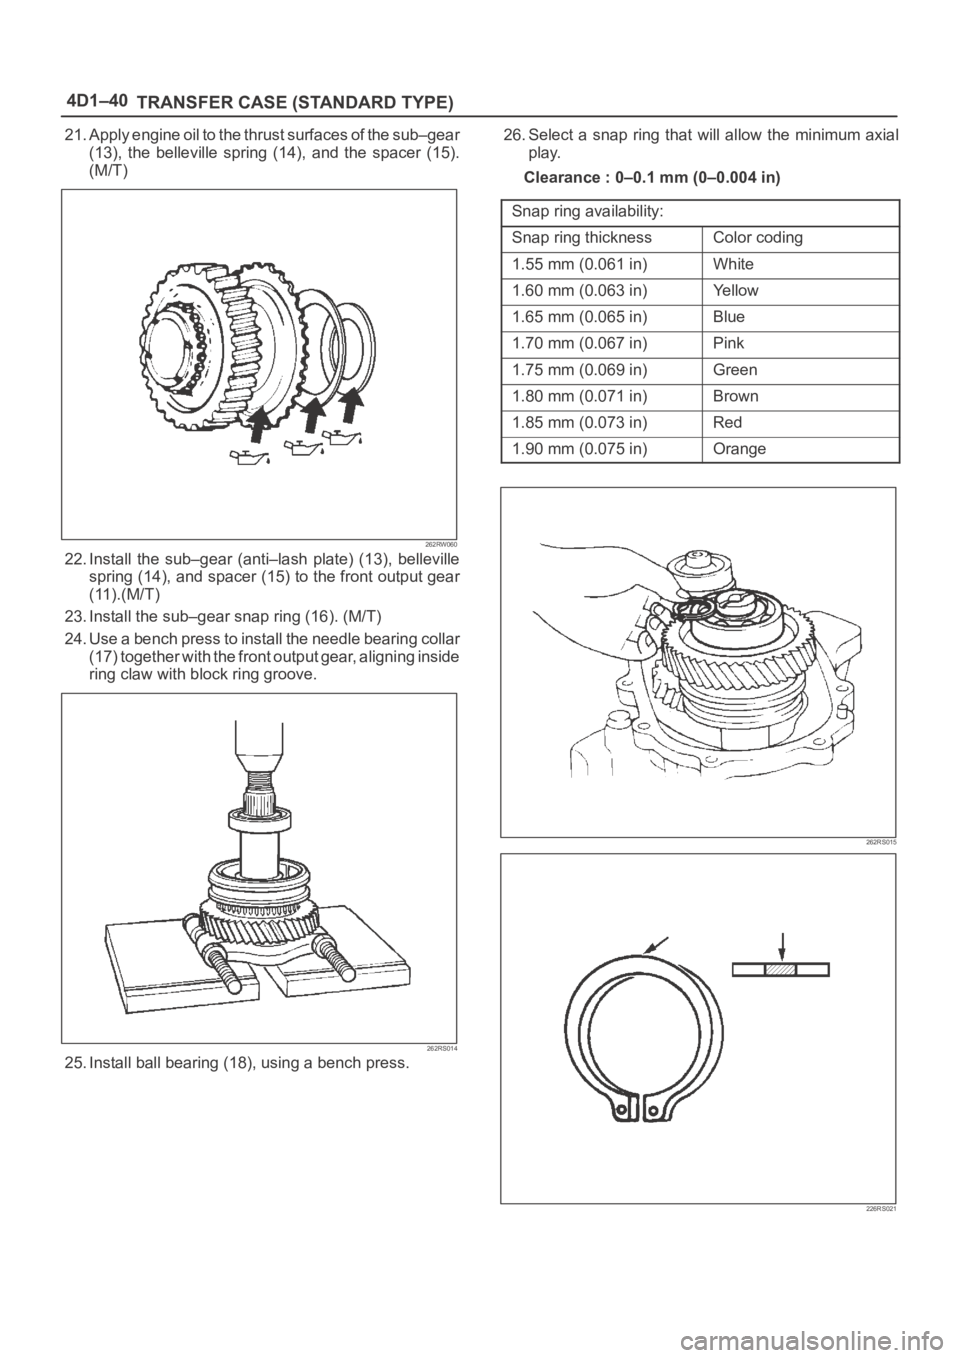
21. Apply engine oil to the thrust surfaces of the sub–gear
(13), the belleville spring (14), and the spacer (15).
(M/T)
262RW060
22. Install the sub–gear (anti–lash plate) (13), belleville
spring (14), and spacer (15) to the front output gear
(11).(M/T)
23. Install the sub–gear snap ring (16). (M/T)
24. Use a bench press to install the needle bearing collar
(17) together with the front output gear, aligning inside
ring claw with block ring groove.
262RS014
25. Install ball bearing (18), using a bench press.26. Select a snap ring that will allow the minimum axial
play.
Clearance : 0–0.1 mm (0–0.004 in)
Snap ring availability:
Snap ring thicknessColor coding
1.55 mm (0.061 in)White
1.60 mm (0.063 in)Ye l l o w
1.65 mm (0.065 in)Blue
1.70 mm (0.067 in)Pink
1.75 mm (0.069 in)Green
1.80 mm (0.071 in)Brown
1.85 mm (0.073 in)Red
1.90 mm (0.075 in)Orange
262RS015
226RS021