engine OPEL GT-R 1973 Service Manual
[x] Cancel search | Manufacturer: OPEL, Model Year: 1973, Model line: GT-R, Model: OPEL GT-R 1973Pages: 625, PDF Size: 17.22 MB
Page 362 of 625
CLUTCH7A. 1
CLUTCH
CONTENTS
Subject
DESCRIPTION AND OPERATION: Clutch andClutch
PedalMechanisms
. . . . . . . . . . . . . . . . . . . . . .
DIAGNOSIS:
Clutch
. . . . . . . . . . . . . . . . . . . . . . . . . . . . . . . . . . . . \
. . . . . . . . . . . . . . . . . . . . . . . . . . . . . . . . . . . . \
. . . . . . .
MAINTENANCE AND ADJUSTMENTS: Clutch LashAdjustment (GTOnly)
. . . . . . . . . . . . . . . . . . . . . . . . . . . . . .
Clutch Adjustment (All 1.9 Engines Except GT). . . .
Control CableAdjustment. . . . . . . . . . . . . . . . . . . . . . . . . . . . . . . . . . . . \
. . . . . . . . . .
MAJOR REPAIR:
Clutch Removal and Installation
. . . . . . . . . . . . . . . . . . . . . . . . . . . . . . . . .
Clutch Control Cable. . . . . . . . . . . . . . . . . . . . . . . . . . . . . . . . . . . . \
. . . . . . . . . . . . . . . . . . . .
SPECIFICATIONS:
Specifications
. . . . . . . . . . . . . . . . . . . . . . . . . . . . . . . . . . . . . . . . \
. . . . . . . . . . . . . . . . . . . . . . . . . . . . .
Page No.
7A-
1
7A-2
7A-4
7A-4
7A-4
IA-5
7A- 7
7A-7
DESCRIPTION AND OPERATION
CLUTCH PEDAL MECHANISM GT Only
The pedal lever pivots on a tubular steel shaft and
operates the clutch release yoke thru a sheathed ca-
ble attached directly to the upper end of the pedallever. Pedal return is accomplished thru the cable by
the clutch yoke return spring at the transmission.
The pedal return stop
is a nonadjustable rubber
bumper inserted through the upper end of the pedal leverjust below the cable attaching point. The clutch
cable is sheathed in woven steel and weather pro-
tected by a plastic and fabric covering. An eyelet is
wedged on the upper end and fits over a formed
hook on the upper end of the pedal. The lower end
is provided with a
wedged ball stud arrangement
that slips into a slot in the clutch release lever. See
Figure
7A-6.
Opel 1900 and Manta
The pedal lever pivots on a tubular steel shaft and
operates the clutch release yoke through a sheathed
cable attached directly to the upper end of the pedal
lever. Pedal return is accomplished through a spring
attached to the pedal below the pivot shaft and to the
pedal assembly mounting bracket at the bulkhead. Clutch actuation works without pedal-free travel and
a warning device is provided which actuates an in-
dicator lamp in the instrument panel indicating
necessity of clutch adjustment. The clutch cable is
sheathed in
woven steel and weather protected by a
plastic fabric covering. An eyelet is wedged on the
upper end and fits over a formed hook on the upper
end of the pedal. The lower end is provided with a
wedged ball stud arrangement that slips into a slot in the clutch release lever. See Figure
7A-7.
Clutch Mechanism
The clutch assembly is enclosed in the bell housing.
The clutch release bearing and release fork are of
conventional design, with the fork pivoting on a ball
stud located opposite the control cable attaching
point. The bearing flange tits over two vertical pins
which are riveted to and extend into the eye of the
yoke.
The clutch pressure plate is similar in design to the
Buick Century pressure plate. A radially slotted dia-
phragm pivoting on two steel wire rings is retained
to the clutch cover by eight rivets. The clutch driven
member is a
6-3/4 inches diameter single plate dry
disc with torsional damper springs and spring leaves
between facings to cushion application. Dampener
springs in clutch disc assembly are
preloaded.
Page 363 of 625
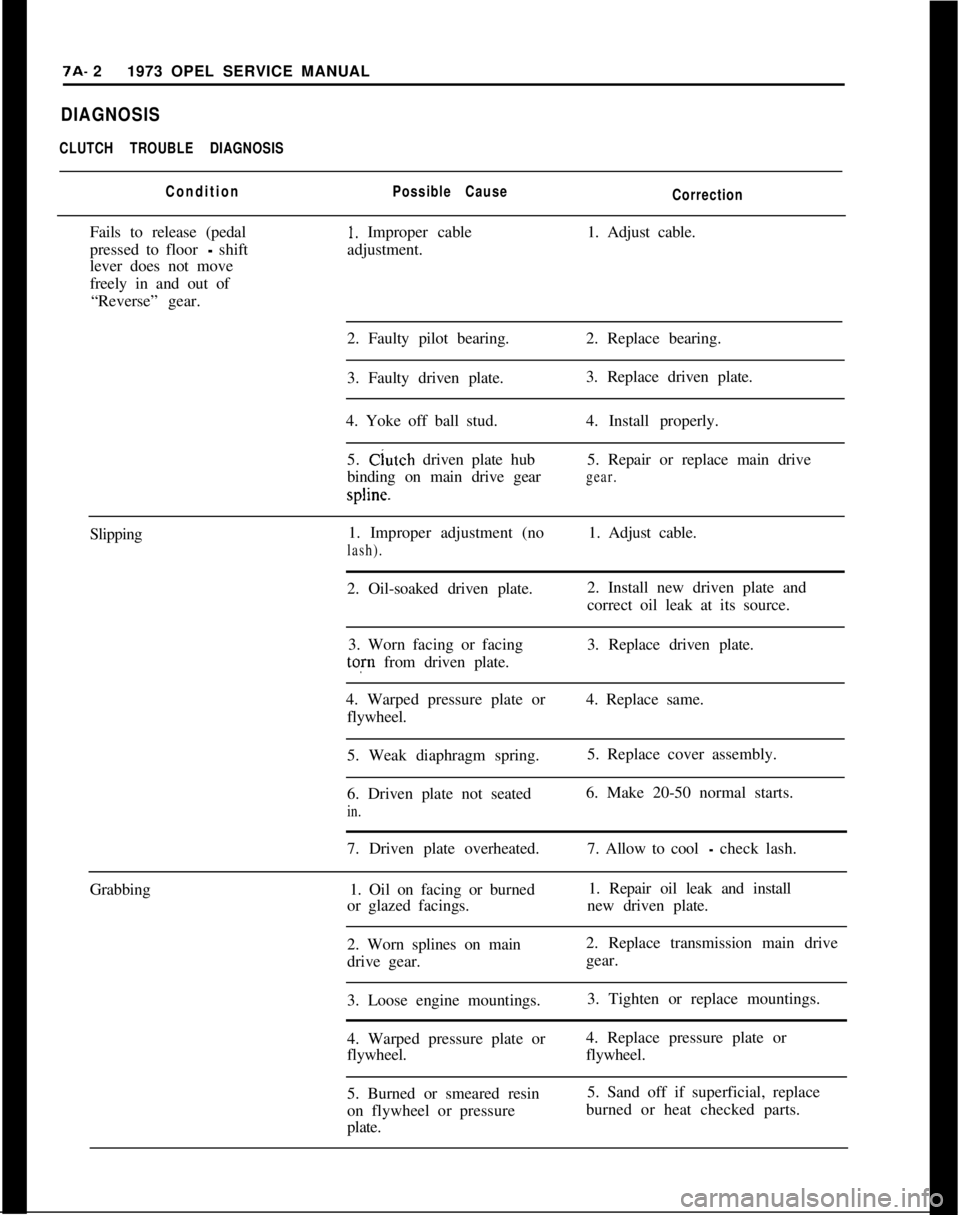
7A- 21973 OPEL SERVICE MANUALDIAGNOSIS
CLUTCH TROUBLE DIAGNOSIS
ConditionPossible Cause
CorrectionFails to release (pedal
1. Improper cable1. Adjust cable.
pressed to floor
- shiftadjustment.
lever does not move
freely in and out of
“Reverse” gear.
2. Faulty pilot bearing.2. Replace bearing.
3. Faulty driven plate.3. Replace driven plate.
4. Yoke off ball stud.4. Install properly.
5. Clutch driven plate hub5. Repair or replace main drive
binding on main drive gear
gear.spline.
Slipping1. Improper adjustment (no1. Adjust cable.
lash).2. Oil-soaked driven plate.2. Install new driven plate and
correct oil leak at its source.
3. Worn facing or facing3. Replace driven plate.tofn from driven plate.
4. Warped pressure plate or4. Replace same.
flywheel.
5. Weak diaphragm spring.5. Replace cover assembly.
6. Driven plate not seated6. Make 20-50 normal starts.
in.7. Driven plate overheated.7. Allow to cool
- check lash.
Grabbing1. Oil on facing or burned1. Repair oil leak and install
or glazed facings.new driven plate.
2. Worn splines on main2. Replace transmission main drive
drive gear.gear.
3. Loose engine mountings.3. Tighten or replace mountings.
4. Warped pressure plate or4. Replace pressure plate or
flywheel.flywheel.
5. Burned or smeared resin5. Sand off if superficial, replace
on flywheel or pressureburned or heat checked parts.
plate.
Page 366 of 625
CLUTCH?A- 5MAJOR REPAIR
CLUTCH REMOVAL AND INSTALLATION
Remove Clutch1. Remove transmission. Refer to Manual Transmis-
sion for removal procedure.
2. Remove bolts from engine support brackets, both
sides. Let brackets hang by front bolts.
3. Remove flywheel cover pan.
4. Remove flywheel housing to engine attaching
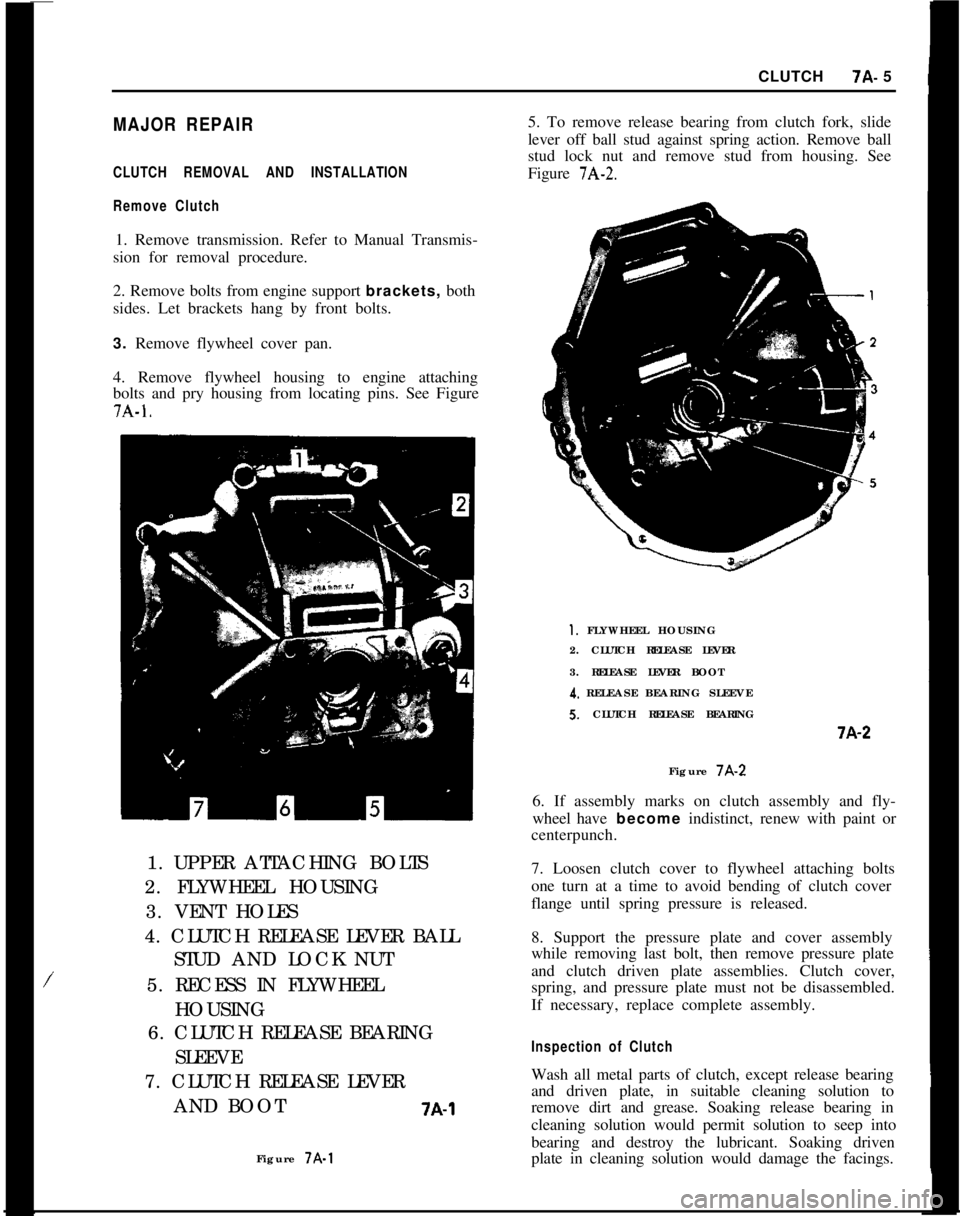
bolts and pry housing from locating pins. See Figure7A-1.
/1. UPPER ATTACHING BOLTS
2. FLYWHEEL HOUSING
3. VENT HOLES
4. CLUTCH RELEASE LEVER BALL
STUD AND LOCK NUT
5. RECESS IN FLYWHEEL
HOUSING
6. CLUTCH RELEASE BEARING
SLEEVE
7. CLUTCH RELEASE LEVER
AND BOOT
7A-1Figure 7A-15. To remove release bearing from clutch fork, slide
lever off ball stud against spring action. Remove ball
stud lock nut and remove stud from housing. See
Figure
7A-2.
1. FLYWHEEL HOUSING
2. CLUTCH RELEASE LEVER
3. RELEASE LEVER BOOT
4. RELEASE BEARING SLEEVES. CLUTCH RELEASE BEARINGi-A-2
Figure 7A-2
6. If assembly marks on clutch assembly and fly-
wheel have become indistinct, renew with paint or
centerpunch.
7. Loosen clutch cover to flywheel attaching bolts
one turn at a time to avoid bending of clutch cover
flange until spring pressure is released.
8. Support the pressure plate and cover assembly
while removing last bolt, then remove pressure plate
and clutch driven plate assemblies. Clutch cover,
spring, and pressure plate must not be disassembled.
If necessary, replace complete assembly.
Inspection of ClutchWash all metal parts of clutch, except release bearing
and driven plate, in suitable cleaning solution to
remove dirt and grease. Soaking release bearing in
cleaning solution would permit solution to seep into
bearing and destroy the lubricant. Soaking driven
plate in cleaning solution would damage the facings.
Page 367 of 625
7A- 61973 OPEL SERVICE MANUAL1. FIywheeI and Pressure PlateExamine friction surfaces of flywheel and pressure
plate for scoring or roughness. Slight roughness may
be smoothed with fine emery cloth, but if surface is
deeply scored or grooved the part should be re-
placed.
2.
CJutch Driven Plate
Inspect driven plate for condition of facings, loose
rivets, broken or very loose torsional springs.
If facings are worn down near rivets or are oily, the
plate assembly should be replaced. A very slight
amount of oil on clutch facings will cause clutch grab
and chatter. A large amount of oil on facings will
cause slippage. Removal of oil by solvents or by buff-
ing is not practical since oil will continue to bleed
from facing material when hot.
When oil is found on driven plate facings, examine
transmission drainback hole, pilot bushing, engine
rear main bearing and other points of possible oil
leakage.
Test the fit of driven plate hub on transmission main
drive gear for an easy sliding fit.
Regardless of whether the old plate or a new one is
to be installed, the plate should be checked for run-
out. Lateral run-out measured at disc circumference
should not exceed
.016 inch.
Inspect clutch release bearing for scoring or exces-
sive wear on front contact face. Test for roughness of
balls and races by pressing and turning front race
slowly. Inspect main drive gear pilot bushing in
crankshaft. If bushing is rough or worn it should be
Figure JA-3replaced. If replacement is necessary, remove bear-
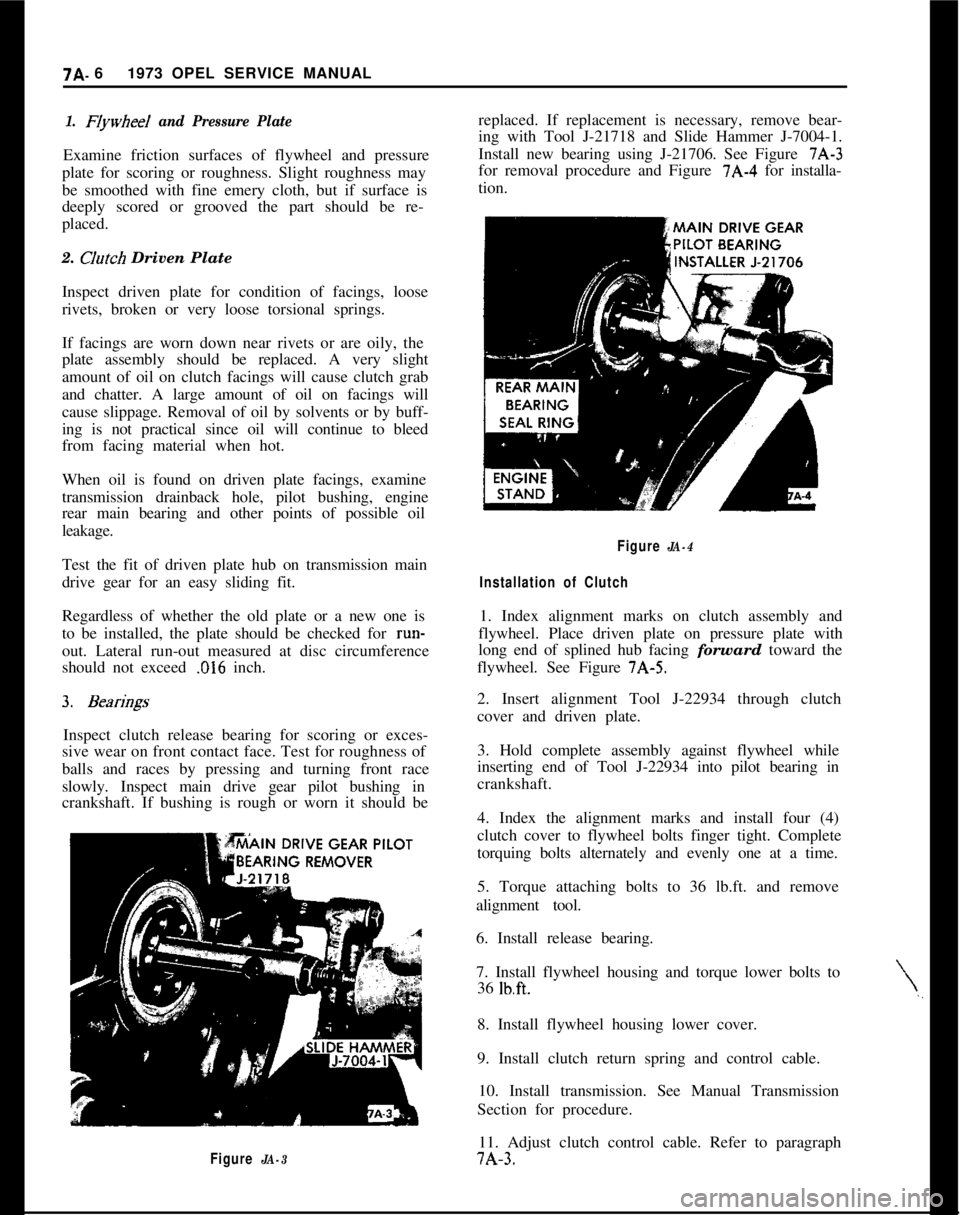
ing with Tool J-21718 and Slide Hammer J-7004-1.
Install new bearing using J-21706. See Figure 7A-3
for removal procedure and Figure 7A-4 for installa-
tion.
\,,
Figure JA-4
Installation of Clutch1. Index alignment marks on clutch assembly and
flywheel. Place driven plate on pressure plate with
long end of splined hub facing forward toward the
flywheel. See Figure 7A-5.
2. Insert alignment Tool J-22934 through clutch
cover and driven plate.
3. Hold complete assembly against flywheel while
inserting end of Tool J-22934 into pilot bearing in
crankshaft.
4. Index the alignment marks and install four (4)
clutch cover to flywheel bolts finger tight. Complete
torquing bolts alternately and evenly one at a time.
5. Torque attaching bolts to 36 lb.ft. and remove
alignment tool.
6. Install release bearing.
7. Install flywheel housing and torque lower bolts to
36
lb.ft.8. Install flywheel housing lower cover.
9. Install clutch return spring and control cable.
10. Install transmission. See Manual Transmission
Section for procedure.
11. Adjust clutch control cable. Refer to paragraph7A-3.
Page 383 of 625
78.221973 OPEL SERVICE MANUAL
3. Install new bellows. Adhere to distance A
- 8.07”.
See Figure 7B-I 1.
4. Heat up new gearshift lever knob in boiling water
to 176 degrees F. and push it onto gearshift lever
tube. Adhere to distance A .3”, see Figure
7B-15.The gearshift lever tube end is provided with trans-
verse grooves for which reason the old button cannot
be reused. Install gearshift lever.
REPLACING RUBBER DAMPENING PARTS IN
GEARSHIFT LEVER1. Remove gearshift lever.
2. Knock off gearshift lever button and loosen
threaded pin for Bowden control wire attachment.
3. Remove lower snap ring from gearshift lever tube
and pull tube off shift finger.
4. Take off and replace rubber dampening parts.
5. After installation of tube, tighten Bowden control
wire with threaded pin. Prior to tightening, pull ring
must rest on gearshift lever tube and clamping block
on pull ring. See Figure
7B-15.6. Heat up new gearshift lever knob in boiling water
to 176 degrees F. and push it onto gearshift lever
tube. Adhere to distance A
- .3”, see Figure 7B-15.The gearshift lever tube end is provided with trans-
verse grooves for which reason the old button cannot
be reused.
7. Install gearshift lever.
MAJOR REPAIR
TRANSMISSION REMOVAL1. Remove air cleaner. Remove throttle rod from
carburetor and rear support and disconnect battery.
2. Remove screws from fan shroud.
3. Remove gearshift lever (refer to paragraph on ser-
vicing gearshift lever).
4. Support car with frame or wheel stands in the
front or frame stands in the rear.
5. Loosen front exhaust pipe to manifold flange.
6. Remove clutch cable from fork by pushing fork to
disengage the clutch and unsnap cable from slot.
7. Disconnect both wires from backup lamp switch.8. Disconnect speedometer cable from transmission
case extension housing.
9. Unhook parking brake cable return spring and
remove cable adjusting nut, equalizer, and spacer.
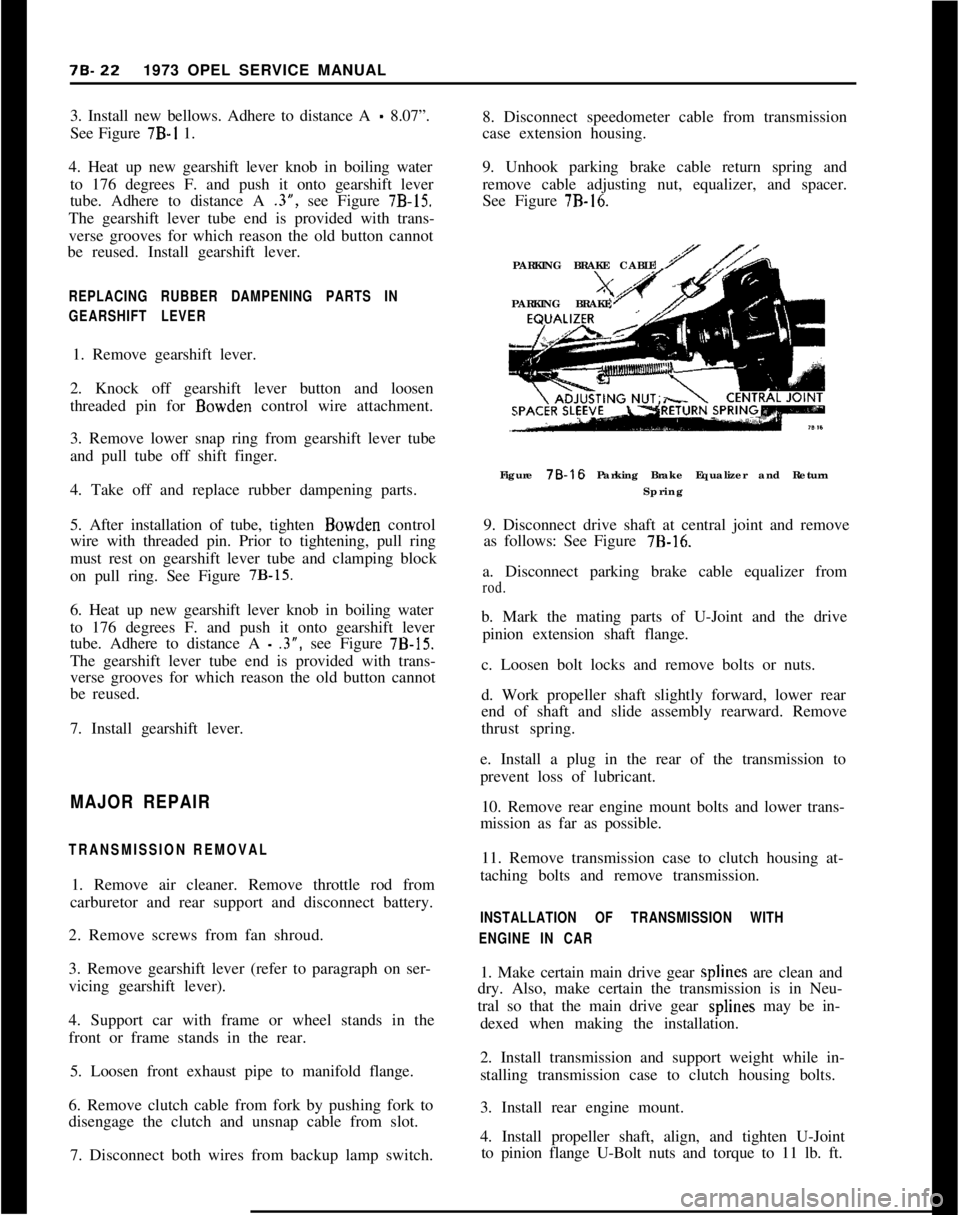
See Figure
7B-16.PARKING BRAKE CABLE
PARKING BRAKE
Figure 78-16 Parking Brake Equalizer and Return
Spring
9. Disconnect drive shaft at central joint and remove
as follows: See Figure
7B-16.a. Disconnect parking brake cable equalizer from
rod.b. Mark the mating parts of U-Joint and the drive
pinion extension shaft flange.
c. Loosen bolt locks and remove bolts or nuts.
d. Work propeller shaft slightly forward, lower rear
end of shaft and slide assembly rearward. Remove
thrust spring.
e. Install a plug in the rear of the transmission to
prevent loss of lubricant.
10. Remove rear engine mount bolts and lower trans-
mission as far as possible.
11. Remove transmission case to clutch housing at-
taching bolts and remove transmission.
INSTALLATION OF TRANSMISSION WITH
ENGINE IN CAR1. Make certain main drive gear splines are clean and
dry. Also, make certain the transmission is in Neu-
tral so that the main drive gear splines may be in-
dexed when making the installation.
2. Install transmission and support weight while in-
stalling transmission case to clutch housing bolts.
3. Install rear engine mount.
4. Install propeller shaft, align, and tighten U-Joint
to pinion flange U-Bolt nuts and torque to 11 lb. ft.
Page 394 of 625
MANUAL TRANSMISSION70-33
Installing Gearshift Interlock Ball and Gearshift
Thrust Spring1. Install gearshift interlock ball into top transmis-
sion bore and then install gearshift thrust spring.
Installing Transmission Case Cover1. Install case cover gasket, cover, and tighten
screws.
Installing Gearshift Linkages1. Install selector ring and lock nut onto selector
shaft.2. Holding selector lever and support in place, torque
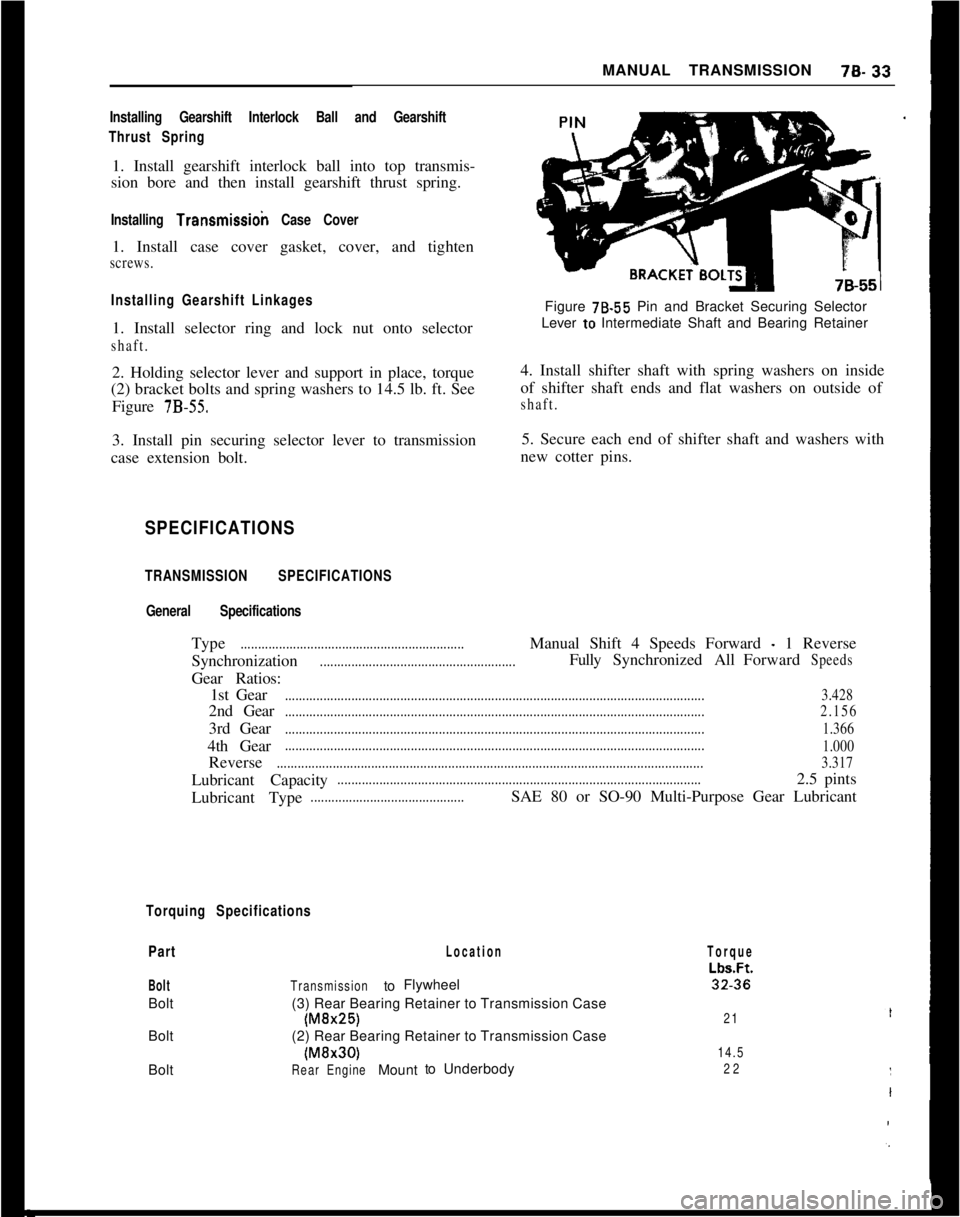
(2) bracket bolts and spring washers to 14.5 lb. ft. See
Figure
7B-55.3. Install pin securing selector lever to transmission
case extension bolt.Figure 78.55 Pin and Bracket Securing Selector
Lever to Intermediate Shaft and Bearing Retainer
4. Install shifter shaft with spring washers on inside
of shifter shaft ends and flat washers on outside ofshaft.5. Secure each end of shifter shaft and washers with
new cotter pins.
SPECIFICATIONS
TRANSMISSION SPECIFICATIONS
General SpecificationsType
................................................................Manual Shift 4 Speeds Forward - 1 Reverse
Synchronization
........................................................FullySynchronizedAllForwardSpeedsGear Ratios:
1st Gear
........................................................................................................................3.4282nd Gear
........................................................................................................................2.1563rd Gear
........................................................................................................................1.3664th Gear
........................................................................................................................
1.000Reverse
..........................................................................................................................3.317Lubricant Capacity
........................................................................................................2.5 pints
Lubricant Type
............................................SAE 80 or SO-90 Multi-Purpose Gear Lubricant
Torquing Specifications
Part
BoltBolt
Bolt
Bolt
Location
TransmissiontoFlywheel
(3) Rear Bearing Retainer to Transmission Case
(M&25)(2) Rear Bearing Retainer to Transmission Case(MBr30)
RearEngineMounttoUnderbody
Torque
Lbs.Ft.32.36
21
14.5
22
Page 395 of 625
79.341973 OPEL SERVICE MANUAL
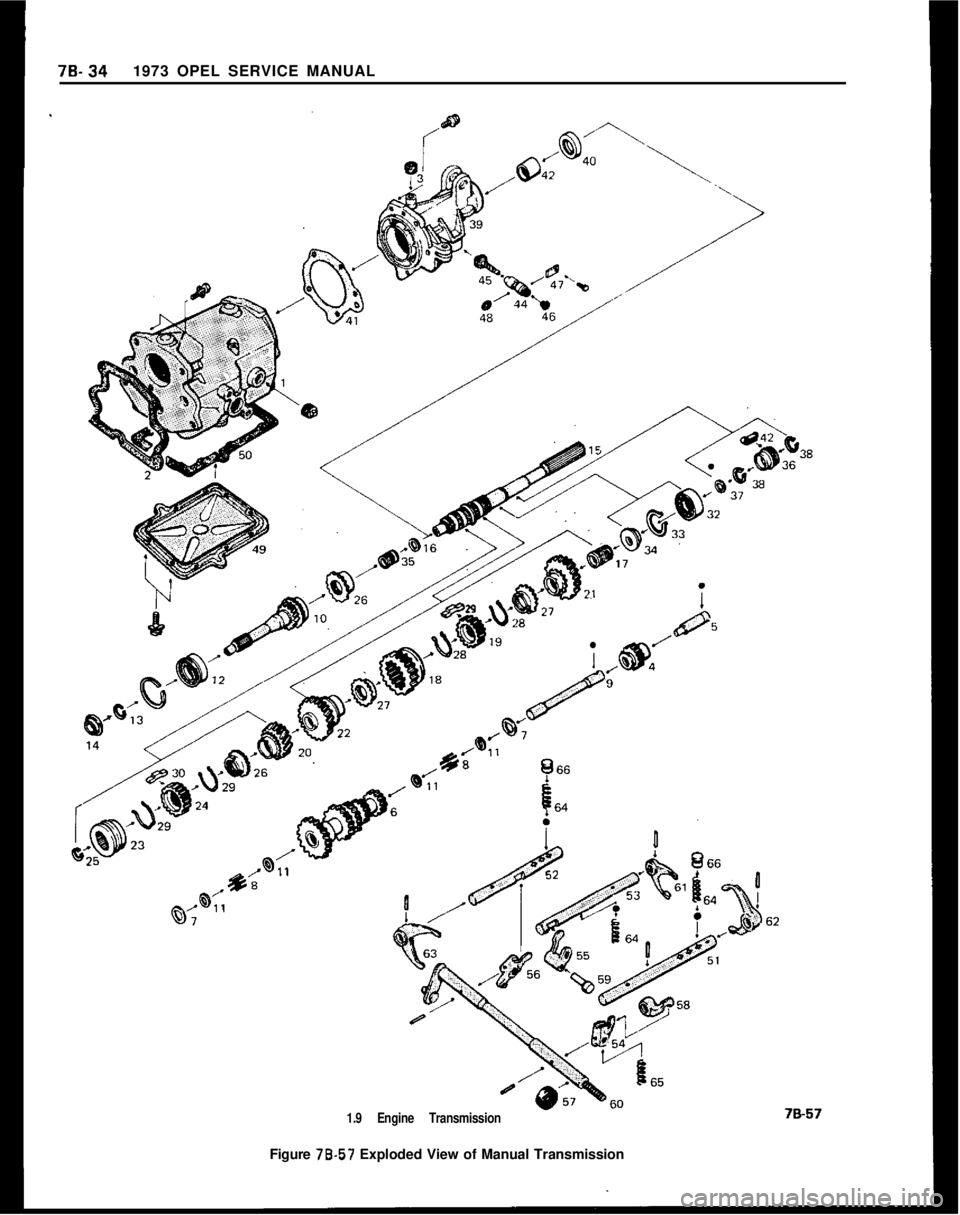
1.9 Engine TransmissionFigure 78-57 Exploded View of Manual Transmission
Page 398 of 625
AUTOMATIC TRANSMISSION7c- 37
Disassembly, Inspection and Reassembly of
ReactionSunGearandDrum....................................
Disassembly, Inspection and Reassembly of
Governor Body................................................................
Disassembly, Inspection and Reassembly of
GovernorHub..................................................................
Disassembly, Inspection and Reassembly of
ExtensionHousing........................................................
Disassembly, Inspection and Reassembly of
Servo Piston....................................................................
Disassembly, Inspection and Reassembly of
ValveBody........................................................................
Disassembly, Inspection and Reassembly of
Case....................................................................................
InspectingandTestingConverter................................
InstallationofSelectorLeverandShaft....................
InstallationofLowBand................................................
Installation of Reaction Sun Gear and Drum..........
Installation of Output Shaft and Planetary
Carrier................................................................................
Installation of Second and Third Clutch Assemblies
IntoCase..........................................................................
InstallationofReverseClutch......................................
DeterminingSelectiveWasherSize............................
Installation of Converter Housing, Oil Pump and
Clutch Assembly............................................................
Installation of Governor Assembly..............................
InstallationofExtensionHousing................................
InstallationofSpeedometerDrivenGear..................
Installation of Detent Valve, Modulator Valve
and Modulator Assembly............................................
Installation and Adjustment of Servo........................
InstallationofValveBody..............................................
InstallationofOilPanandGasket..............................
Torque Converter..............................................................
SPECIFICATIONS:
GeneralSpecifications......................................................
7c.
7c-
,l
‘118
197c-1207c-1207c-1207C-121
7C-124
7C-125
7C-125
7C-125
7C-127
7C-127
7C-127
7C-128
7C-129
7C-129
7C-129
7c-130
7c-131
7c-131
7c-131
7C-132
7c-133
7c-134
7c-134DESCRIPTION AND OPERATION
DESCRIPTIONThe Opel Three-Speed Automatic is a fully auto-matic unit utilizing a torque converter and a Ravig-neaux planetary gear set, with three multiple disc
clutches and a single band to provide three forward
speeds and reverse. See Figure 7C-71. Automatic
upshifts and downshifts are controlled by road speed,
engine vacuum and an accelerator pedal connection
to the transmission.
Page 399 of 625
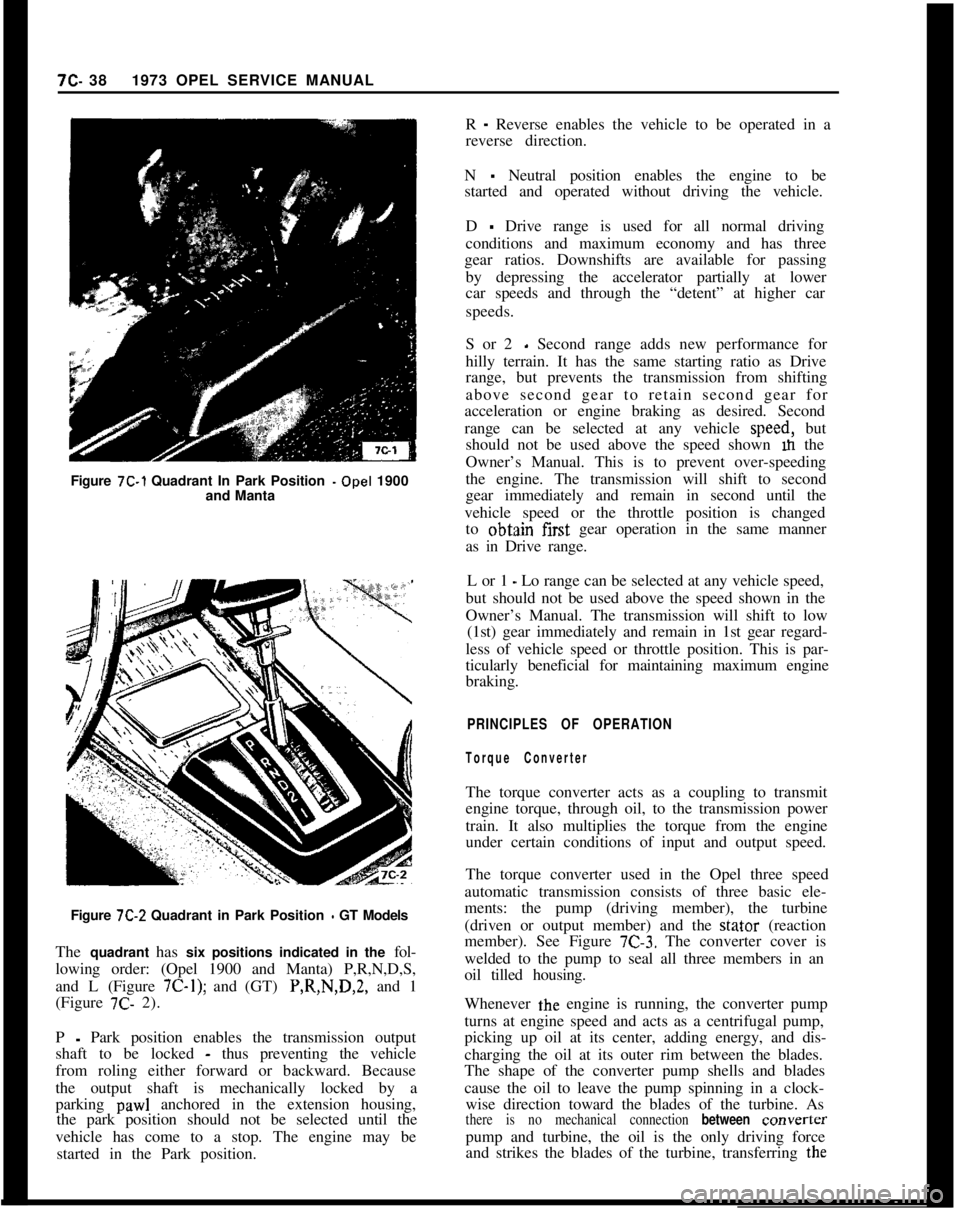
Figure 7C-1 Quadrant In Park Position -Opel 1900
and Manta7C- 381973 OPEL SERVICE MANUAL
R
- Reverse enables the vehicle to be operated in a
reverse direction.
N
- Neutral position enables the engine to be
started and operated without driving the vehicle.
D
- Drive range is used for all normal driving
conditions and maximum economy and has three
gear ratios. Downshifts are available for passing
by depressing the accelerator partially at lower
car speeds and through the “detent” at higher car
speeds.
S or 2
- Second range adds new performance for
hilly terrain. It has the same starting ratio as Drive
range, but prevents the transmission from shifting
above second gear to retain second gear for
acceleration or engine braking as desired. Second
range can be selected at any vehicle speed, but
should not be used above the speed shown m the
Owner’s Manual. This is to prevent over-speeding
the engine. The transmission will shift to second
gear immediately and remain in second until the
vehicle speed or the throttle position is changed
to obtajn first gear operation in the same manner
as in Drive range.
L or 1
- Lo range can be selected at any vehicle speed,
but should not be used above the speed shown in the
Owner’s Manual. The transmission will shift to low
(1st) gear immediately and remain in 1st gear regard-
less of vehicle speed or throttle position. This is par-
ticularly beneficial for maintaining maximum engine
braking.
PRINCIPLES OF OPERATION
Torque ConverterThe torque converter acts as a coupling to transmit
engine torque, through oil, to the transmission power
train. It also multiplies the torque from the engine
under certain conditions of input and output speed.
Figure
7C-2 Quadrant in Park Position - GT Models
The quadrant has six positions indicated in the fol-
lowing order: (Opel 1900 and Manta) P,R,N,D,S,
and L (Figure
7C-1); and (GT) P,R,N,D,2, and 1
(Figure 7C- 2).The torque converter used in the Opel three speed
automatic transmission consists of three basic ele-
ments: the pump (driving member), the turbine
(driven or output member) and the stator (reaction
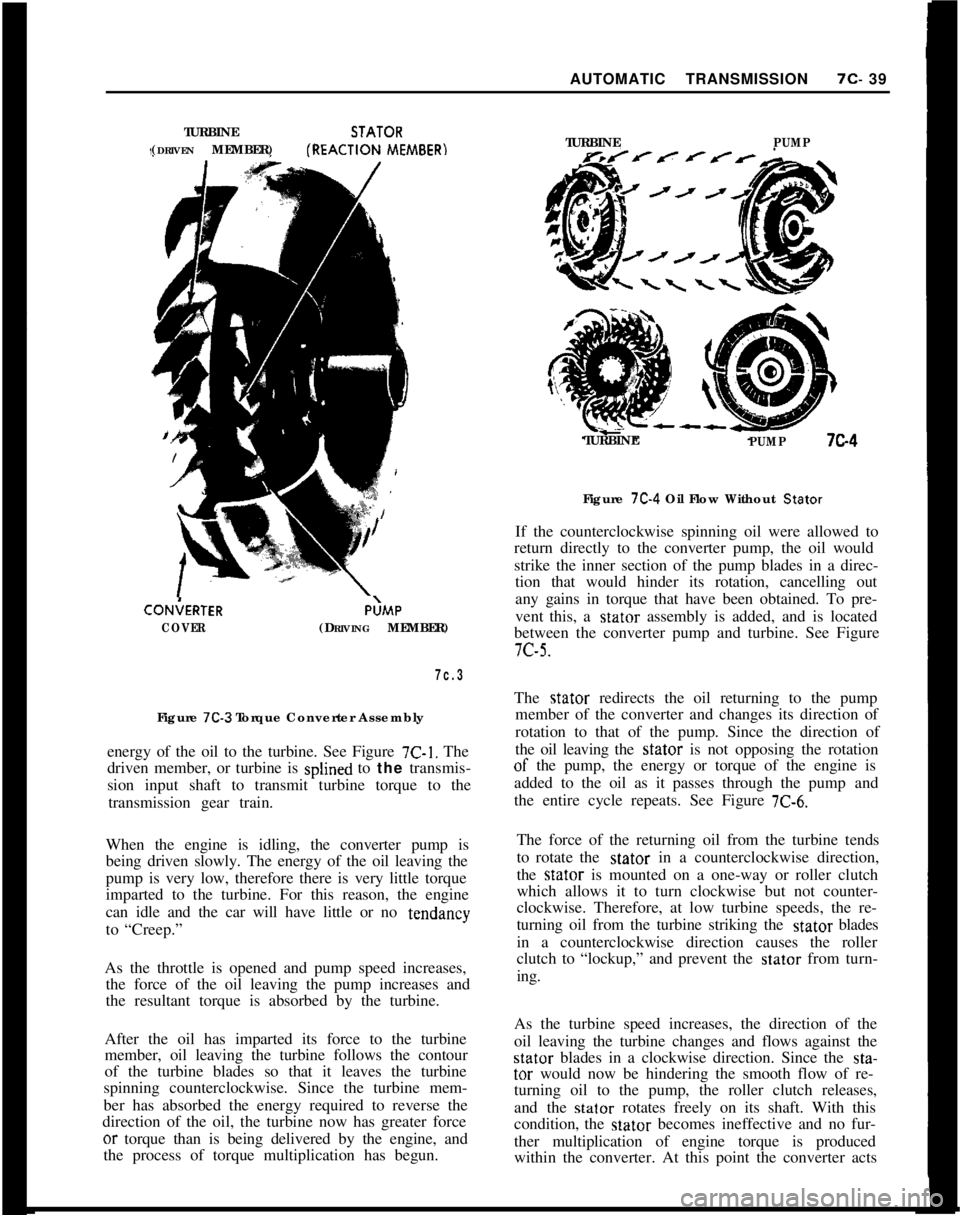
member). See Figure
7C-3. The converter cover is
welded to the pump to seal all three members in an
oil tilled housing.
P
- Park position enables the transmission output
shaft to be locked
- thus preventing the vehicle
from roling either forward or backward. Because
the output shaft is mechanically locked by a
parking
paw1 anchored in the extension housing,
the park position should not be selected until the
vehicle has come to a stop. The engine may be
started in the Park position.Whenever the engine is running, the converter pump
turns at engine speed and acts as a centrifugal pump,
picking up oil at its center, adding energy, and dis-
charging the oil at its outer rim between the blades.
The shape of the converter pump shells and blades
cause the oil to leave the pump spinning in a clock-
wise direction toward the blades of the turbine. Asthere is no mechanical connection between converterpump and turbine, the oil is the only driving force
and strikes the blades of the turbine, transferring the
Page 400 of 625
AUTOMATIC TRANSMISSION7c- 39
TURBINESTATOR
(DRIVEN MEMBER)fREACTION
MEMBER)CON;ERTER
COVERP;MP
(DRIVING MEMBER)
7c.3Figure
7C-3 Torque Converter Assembly
energy of the oil to the turbine. See Figure
7C-1. The
driven member, or turbine is splined to the transmis-
sion input shaft to transmit turbine torque to the
transmission gear train.
When the engine is idling, the converter pump is
being driven slowly. The energy of the oil leaving the
pump is very low, therefore there is very little torque
imparted to the turbine. For this reason, the engine
can idle and the car will have little or no tendancy
to “Creep.”
As the throttle is opened and pump speed increases,
the force of the oil leaving the pump increases and
the resultant torque is absorbed by the turbine.
After the oil has imparted its force to the turbine
member, oil leaving the turbine follows the contour
of the turbine blades so that it leaves the turbine
spinning counterclockwise. Since the turbine mem-
ber has absorbed the energy required to reverse the
direction of the oil, the turbine now has greater forceor torque than is being delivered by the engine, and
the process of torque multiplication has begun.TURBINE
PUMPTURBINE
PUMP7c4Figure
7C-4 Oil Flow Without Stator
If the counterclockwise spinning oil were allowed to
return directly to the converter pump, the oil would
strike the inner section of the pump blades in a direc-
tion that would hinder its rotation, cancelling out
any gains in torque that have been obtained. To pre-
vent this, a stator assembly is added, and is located
between the converter pump and turbine. See Figure7c-5.
The stator redirects the oil returning to the pump
member of the converter and changes its direction of
rotation to that of the pump. Since the direction of
the oil leaving the stator is not opposing the rotationof the pump, the energy or torque of the engine is
added to the oil as it passes through the
the entire cycle repeats. See Figure
7C-6.pump and
The force of the returning oil from the turbine tends
to rotate the stator in a counterclockwise direction,
the stator is mounted on a one-way or roller clutch
which allows it to turn clockwise but not counter-
clockwise. Therefore, at low turbine speeds, the re-
turning oil from the turbine striking the stator blades
in a counterclockwise direction causes the roller
clutch to “lockup,” and prevent the stator from turn-
ing.
As the turbine speed increases, the direction of the
oil leaving the turbine changes and flows against thestator blades in a clockwise direction. Since the sta-tar would now be hindering the smooth flow of re-
turning oil to the pump, the roller clutch releases,
and the stator rotates freely on its shaft. With this
condition, the stator becomes ineffective and no fur-
ther multiplication of engine torque is produced
within the converter. At this point the converter acts