ignition OPEL GT-R 1973 User Guide
[x] Cancel search | Manufacturer: OPEL, Model Year: 1973, Model line: GT-R, Model: OPEL GT-R 1973Pages: 625, PDF Size: 17.22 MB
Page 43 of 625
lC- 22 1973 OPEL SERVICE MANUAL j
3. Start engine and disconnect a wire from a spark
plug. Read output voltage of disconnected spark
plug circuit. Reading should exceed 20 KV
(20,poO
volts).I
CHECK DISTRIBUTOR
!1. Clean distributor cap and inspect it for cracks or
tracking. Inspect inner segments for erosion and
outer sockets for corrosion.
2. Clean and inspect ignition wires. Make sure resist-
ance of each wire is less than 10,000 ohms. Replace
any defective spark plug boots or distributor
capnipples. See paragraph lC-12.
3. Inspect breaker points and replace if necessary.
Adjust breaker point gap to
,016 inch with rubbing
block on peak of cam lobe or check dwell and adjust
if not 50 degrees plus or minus 3 degrees. 4. Check
dwell variation by reading dwell at idle and at 3000
RPM. Dwell must not vary more than 3 degrees.
Excessive variation means distributor shaft, cam or
breaker plate are worn or damaged--overhaul dis-
tributor and replace defective parts.
5. Check distributor condenser for a minimum series
resistance and insulation leakage. Check for a
capacity between
.15 and .20 microfarads.
6. Check total advance (centrifugal and vacuum) at
2500 engine RPM using a timing light having a dial
for reading advance.
(a) The timing marks are aligned with both the
vacuum advance and the vacuum retard hoses dis-
connected and plugged.
Engine idle should be 900 RPM.
(b) Reconnect vacuum hoses. Run engine at
3600RPM and adjust knob until timing marks are
aligned. Read advance on dial. Maximum centrifugal
advance should be between 28-32 degrees.
7. If total advance is out of specifications, check
centrifugal advance only, at
2500 RPM. Discon+ectand plug all vacuum hoses. Maximum vacuum ad-
vance should be l-5 degrees at 4.5-5.0 in. hg.
8. Replace centrifugal or vacuum advance parts as
required to bring distributor total advance within
specifications.
9. Check operation of vacuum retard unit (rear unit)
by first making sure timing marks are aligned with
vacuum hoses disconnected and at slow idle (700
RPM). Then connect vacuum hose to vacuum retard
unit (rear unit). Timing ball should move in a retard
direction (upward).
CHEICK SPARK PLUGS1. Remove spark plugs. If electrodes are badly worn,
discard plugs. If inner or outer porcelain is cracked
or broken, discard plugs.
2. Note color and general appearance of inner end of
spark plug. Brown to grayish
- tan deposits and slight
electrode wear indicate correct spark plug heat
range. Plugs having this appearance may be cleaned,
regapped, tested and reinstalled.
3. Clean spark plugs in a sand blast type cleaner.
Clean only enough to remove deposits, not enough to
wear away porcelain. If deposits are too hard to
remove or if porcelain is glazed, discard plugs.
4. After cleaning spark plugs, clean tiring surfaces of
electrodes with a line file.
5. Test cleaned spark plugs on a pressure tester by
comparing spark of the used plugs with that of a new
plug. Install tested plugs, using new gaskets.
6. If removed spark plugs have excessive carbon foul-
ing and if the car will be driven mostly at low speeds
in city driving, it is advisable to replace plugs with
a hotter plug, AC43FS.
7. If removed plugs show rapid electrode wear or
inner porcelain breakage at low mileage. Check for
a vacuum leak such as a poor manifold to head fit.
8.
Clap spark plugs carefully (new or cleaned) using
a
,030 round wire feeler gage.IC6
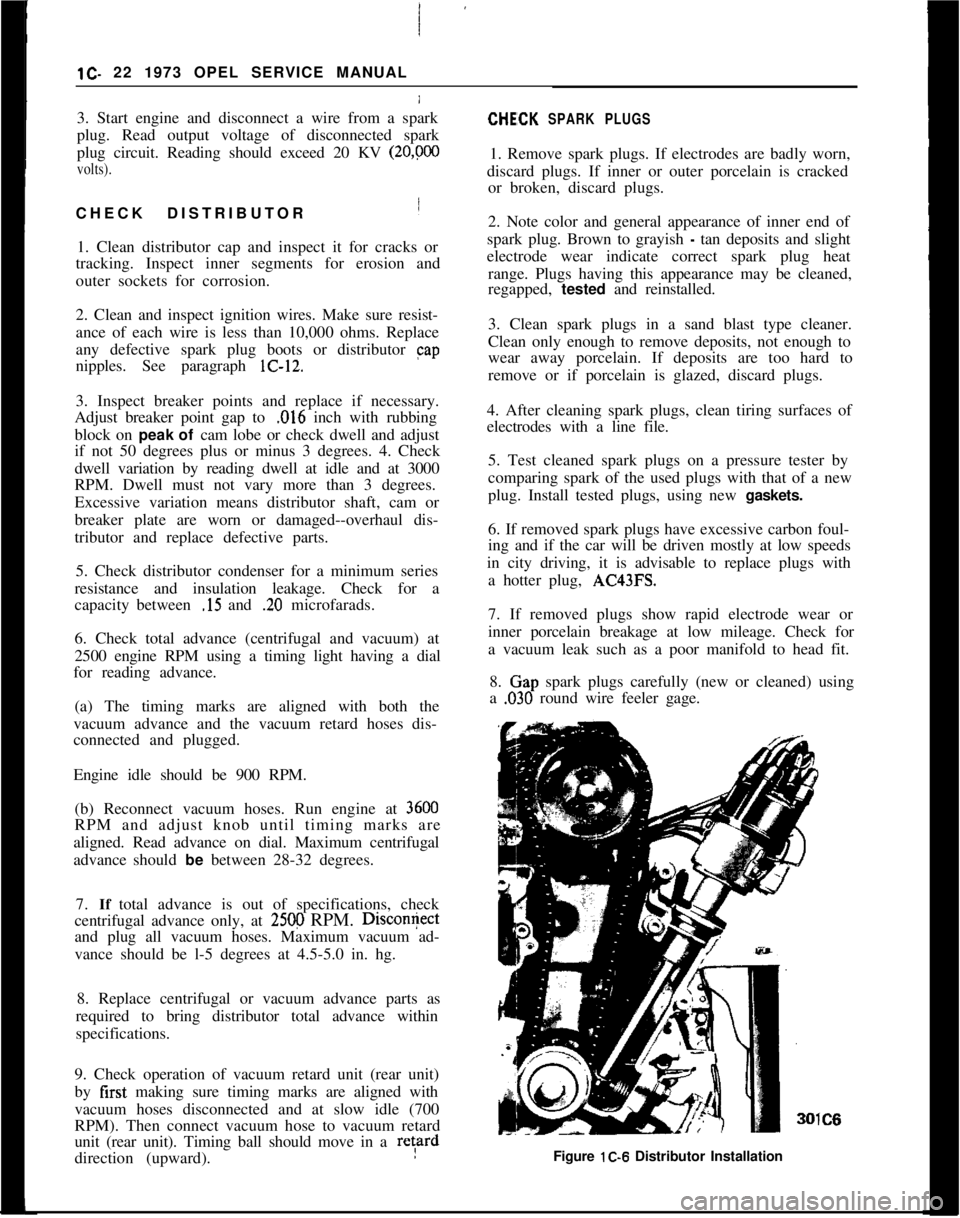
Figure lC-6 Distributor Installation
Page 44 of 625
IGNITION SYSTEMlC- 23
9. Install:spark plugs using a 13/16 deep socket, an
extension and a torque wrench. Tighten to 22-29Ib.ft. 1
MAJOR REPAIRDlSTRlBtiTOR OVERHAULDistributbr Removal
1. Remove fuel pump. This is necessary because the
fuel
punp will block the distributor drive gear,
thereby preventing removal of the distributor. See
Figure lC-6.
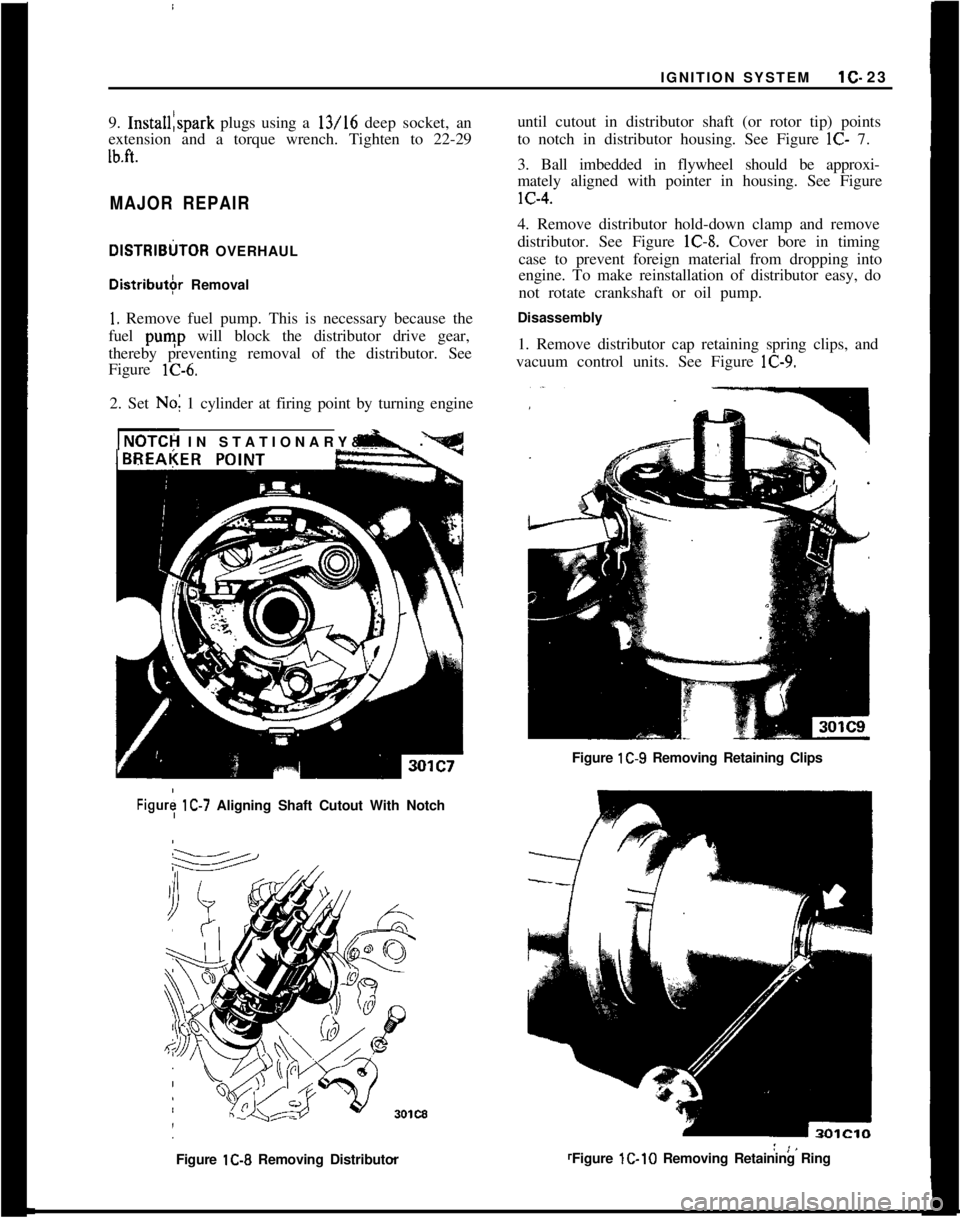
2. Set No; 1 cylinder at firing point by turning engine
INOTCH IN STATIONARY& -.until cutout in distributor shaft (or rotor tip) points
to notch in distributor housing. See Figure
lC- 7.
3. Ball imbedded in flywheel should be approxi-
mately aligned with pointer in housing. See FigurelC-4.
4. Remove distributor hold-down clamp and remove
distributor. See Figure lC-8. Cover bore in timing
case to prevent foreign material from dropping into
engine. To make reinstallation of distributor easy, do
not rotate crankshaft or oil pump.
Disassembly
1. Remove distributor cap retaining spring clips, and
vacuum control units. See Figure lC-9.
Figure lC-9 Removing Retaining Clips
Figury lC-7 Aligning Shaft Cutout With Notch
Figure lC-8 Removing DistributorFigure lC-10 Removing Retaining Ring
Page 45 of 625
1 C- 241973 OPEL SERVliTE MANUAL
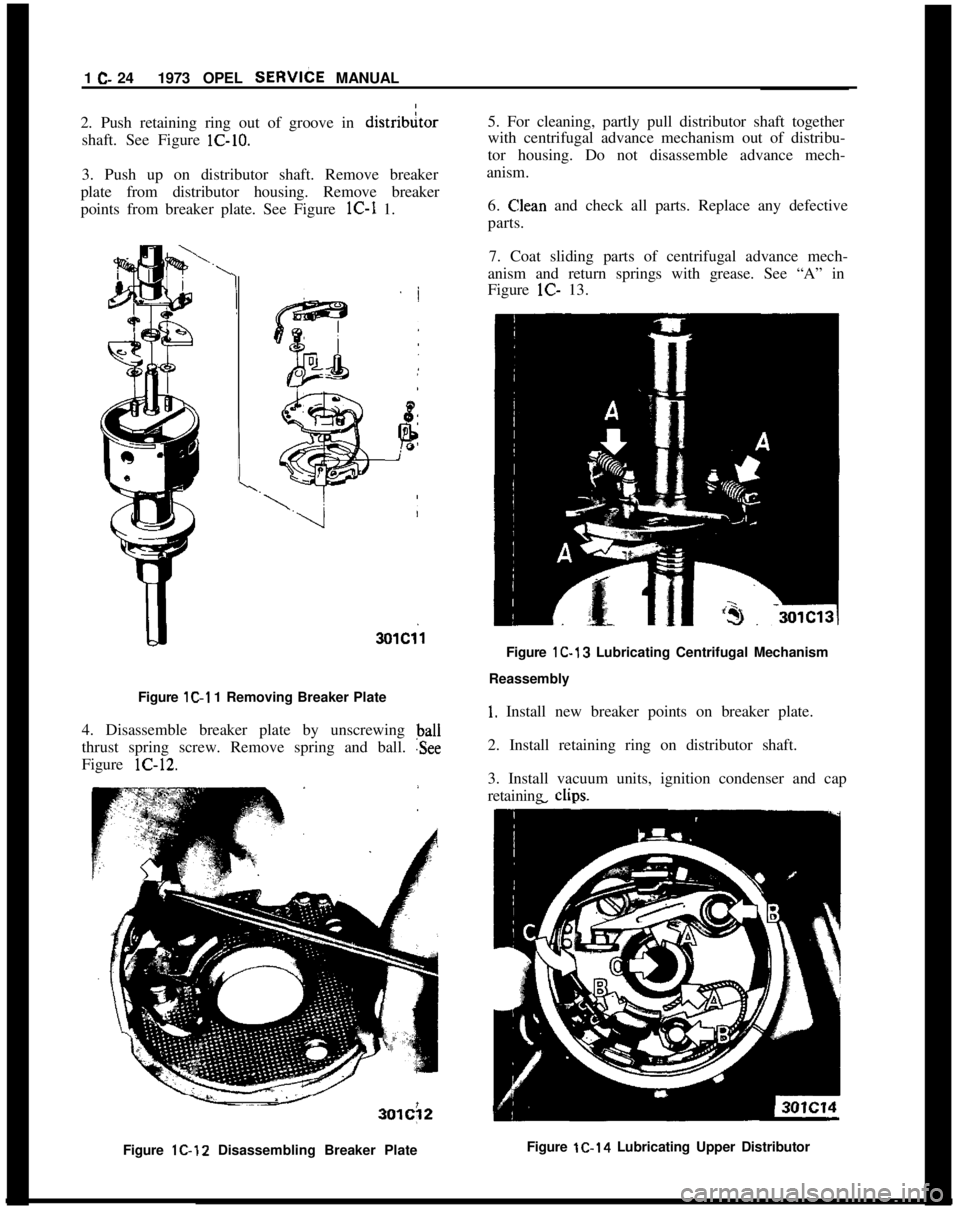
2. Push retaining ring out of groove in
distribitorshaft. See Figure lC-10.I
3. Push up on distributor shaft. Remove breaker
plate from distributor housing. Remove breaker
points from breaker plate. See Figure lC-I 1.’
I
1
I3OlCl’l
Figure lC-1 1 Removing Breaker Plate:
4. Disassemble breaker plate by unscrewing Pall
thrust spring screw. Remove spring and ball.
.SeeFigure lC-12.3OlCi25. For cleaning, partly pull distributor shaft together
with centrifugal advance mechanism out of distribu-
tor housing. Do not disassemble advance mech-
anism.
6.
C!lean and check all parts. Replace any defective
parts.
7. Coat sliding parts of centrifugal advance mech-
anism and return springs with grease. See “A” in
Figure
lC- 13.
Figure lC-13 Lubricating Centrifugal Mechanism
Reassembly
1. Install new breaker points on breaker plate.
2. Install retaining ring on distributor shaft.
3. Install vacuum units, ignition condenser and cap
retaining
clios.Figure lC-12 Disassembling Breaker PlateFigure lC-14 Lubricating Upper Distributor
Page 46 of 625
IGNITION SYSTEM1C. 25
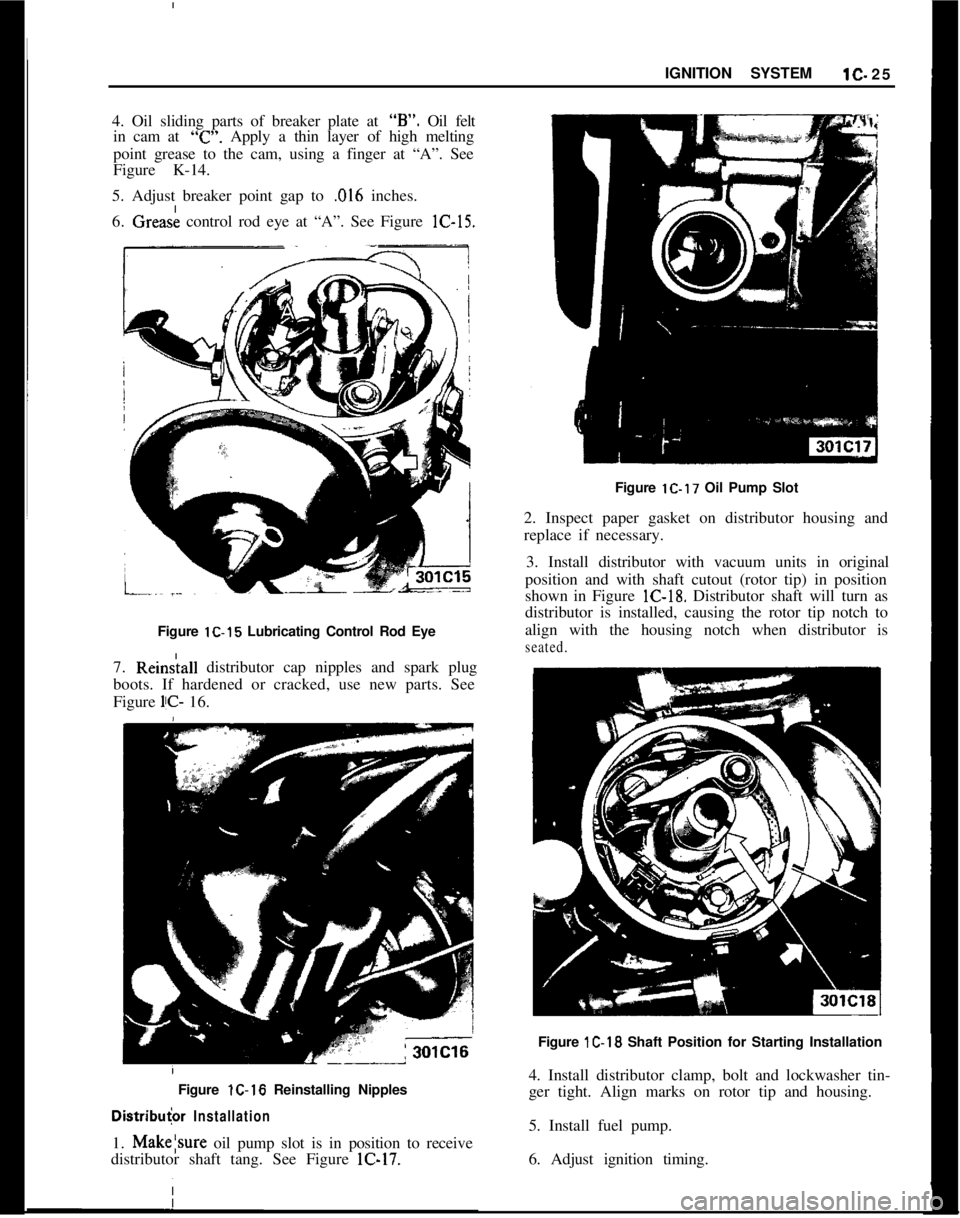
4. Oil sliding parts of breaker plate at “B”. Oil felt
in cam at
“c”. Apply a thin layer of high melting
point grease to the cam, using a finger at “A”. See
Figure K-14.
/
5. Adjust breaker point gap to
,016 inches.
6. Grease control rod eye at “A”. See Figure lC-15.
Figure lC-15 Lubricating Control Rod Eye
7. Rein&all distributor cap nipples and spark plug
boots. If hardened or cracked, use new parts. See
Figure
l!C- 16.
/ Figure lC-16 Reinstalling Nipples
Distribu
2. Inspect paper gasket on distributor housing and
replace if necessary.
3. Install distributor with vacuum units in original
position and with shaft cutout (rotor tip) in position
shown in Figure lC-18. Distributor shaft will turn as
distributor is installed, causing the rotor tip notch to
align with the housing notch when distributor is
seated.Figure
1C-18 Shaft Position for Starting Installation
4. Install distributor clamp, bolt and lockwasher tin-
ger tight. Align marks on rotor tip and housing.
5. Install fuel pump.
6. Adjust ignition timing.
Page 47 of 625
lC- 261973 OPEL SERVICE MANUAL /
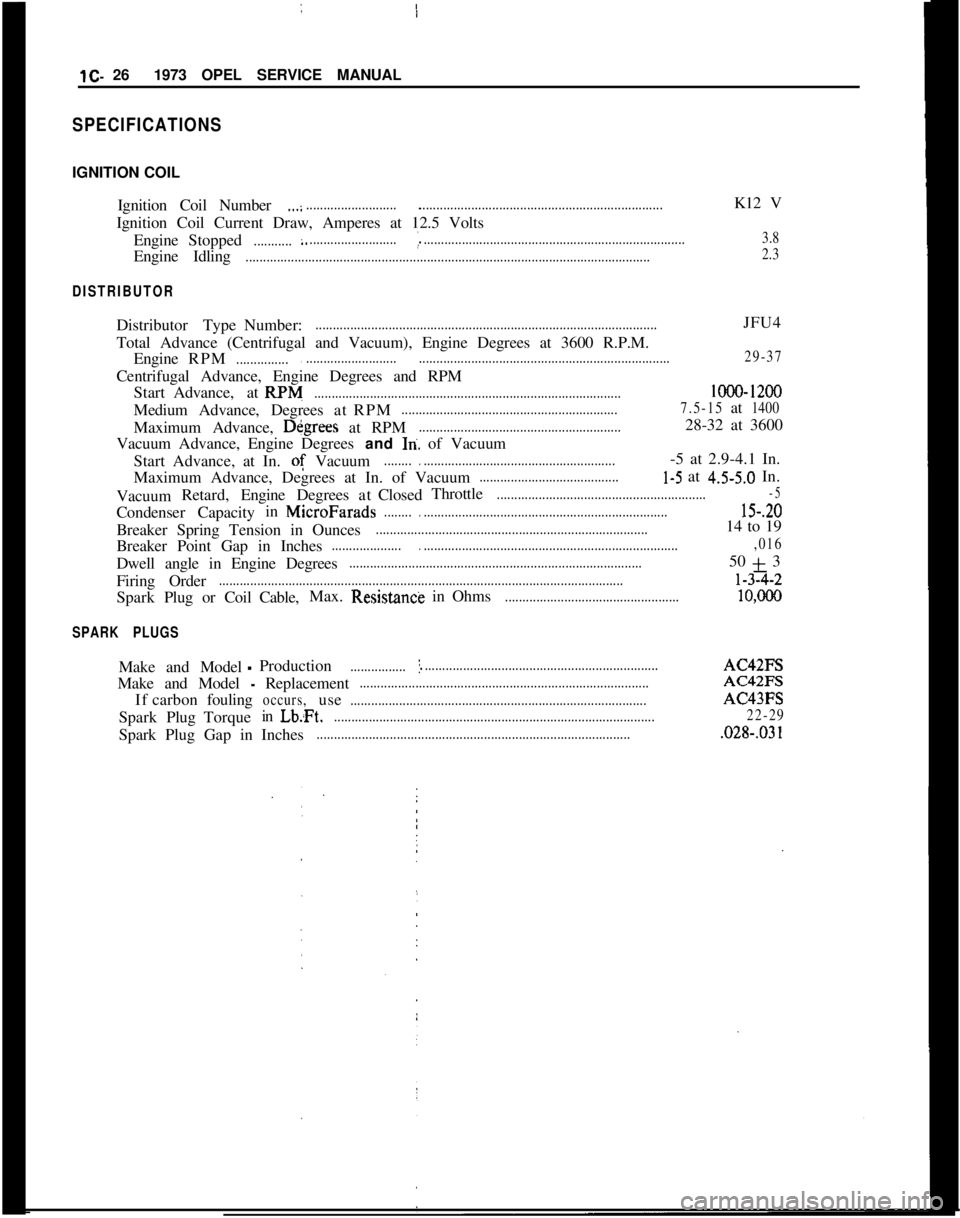
SPECIFICATIONSIGNITION COIL
Ignition Coil Number
.,.:.................................................................................................K12 V
Ignition Coil Current Draw, Amperes at 12.5 Volts
EngineStopped
...........:.........................._............................................................................3.8Engine Idling
....................................................................................................................2.3
DISTRIBUTORDistributor TypeNumber:
..................................................................................................JFU4
Total Advance (Centrifugal and Vacuum), Engine Degrees at 3600 R.P.M.
EngineRPM
..................................................................................................................29-37Centrifugal Advance, Engine Degrees and RPM
StartAdvance,atRPM
........................................................................................lOOO-1200MediumAdvance,DegreesatRPM
..............................................................7.5-15at1400Maximum Advance, Dkgrees at RPM
..........................................................28-32 at 3600
Vacuum Advance, Engine Degrees and
In. of Vacuum
Start Advance, at In. of Vacuum
................................................................-5 at 2.9-4.1 In.
Maximum Advance, Degrees at In. of Vacuum
........................................l-5 at 4.5-5.0 In.
VacuumRetard,EngineDegreesatClosedThrottle
............................................................-5CondenserCapacityinMicroFarads
...............................................................................15-.20Breaker Spring Tension in Ounces
..............................................................................14 to 19
Breaker Point Gap in Inches
..............................................................................................,016Dwell angle in Engine Degrees
....................................................................................50 + 3
Firing Order
....................................................................................................................l-32-2
SparkPlug or CoilCable,Max.Resistancti in Ohms
..................................................10,ooO
SPARK PLUGSMake and Model
-Production................I....................................................................AC42FS
Make and Model
- Replacement...................................................................................AC42FS
Ifcarbonfouling
occurs,use.....................................................................................AC43FS
SparkPlugTorqueinLb:Ft.
............................................................................................22-29Spark Plug Gap in Inches
...........................................................................................028-.03 1
Page 48 of 625
IGNITION SYSTEMlC- 27
93OlC19
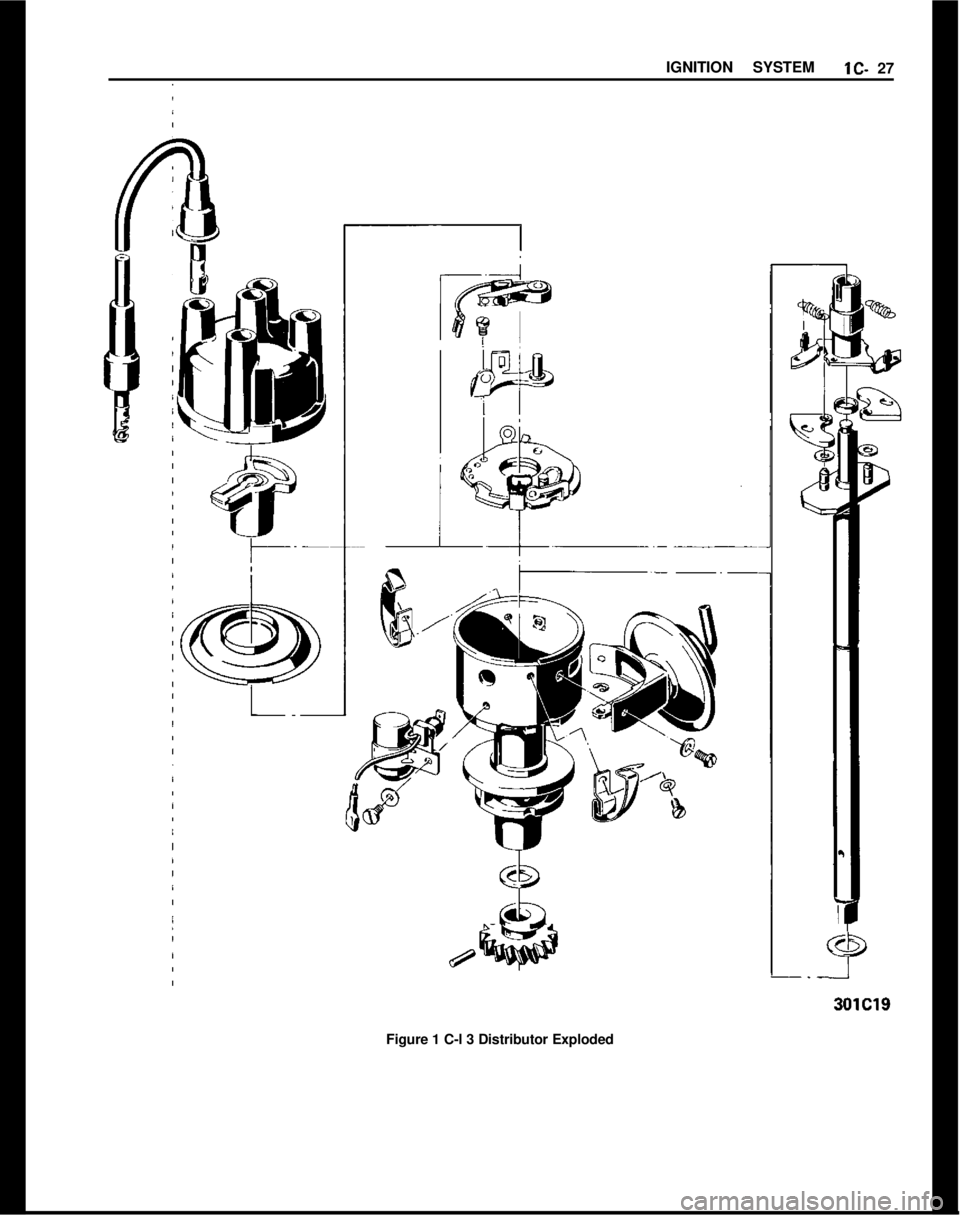
Figure 1 C-l 3 Distributor Exploded
Page 50 of 625
CHARGING SYSTEMlD- 29
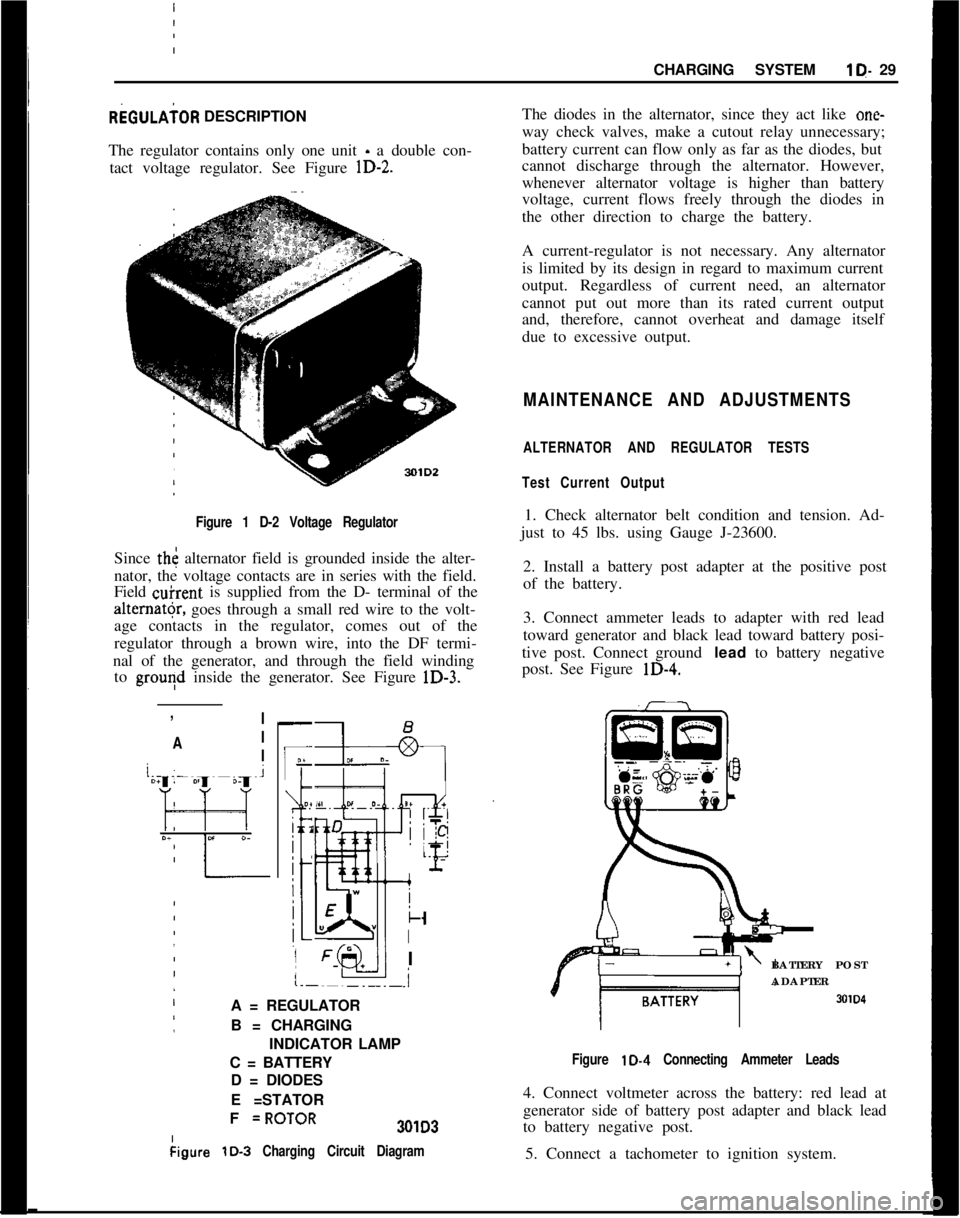
REGULAiOR DESCRIPTION
The regulator contains only one unit - a double con-
tact voltage regulator. See Figure
lD-2.
I Figure 1 D-2 Voltage Regulator
Since th< alternator field is grounded inside the alter-
nator, the voltage contacts are in series with the field.
Field
&rent is supplied from the D- terminal of the
alter”@, goes through a small red wire to the volt-
age contacts in the regulator, comes out of the
regulator through a brown wire, into the DF termi-
nal of the generator, and through the field winding to
grouqd inside the generator. See Figure lD-3.
:
,
!
/ I
’ A I
j
/ I
-
IF
O?
i 2
j
:
:
k
I
I
.i
A = REGULATOR
B = CHARGING
INDICATOR LAMP
C = BATTERY D = DIODES
E =STATOR
I
I F
=ROTOR301D3
kigure
lD-3 Charging Circuit Diagram
The diodes in the alternator, since they act like one-
way check valves, make a cutout relay unnecessary;
battery current can flow only as far as the diodes, but
cannot discharge through the alternator. However,
whenever alternator voltage is higher than battery
voltage, current flows freely through the diodes in
the other direction to charge the battery.
A current-regulator is not necessary. Any alternator
is limited by its design in regard to maximum current
output. Regardless of current need, an alternator
cannot put out more than its rated current output
and, therefore, cannot overheat and damage itself
due to excessive output.
MAINTENANCE AND ADJUSTMENTS
ALTERNATOR AND REGULATOR TESTS
Test Current Output
1. Check alternator belt condition and tension. Ad-
just to 45 lbs. using Gauge J-23600.
2. Install a battery post adapter at the positive post
of the battery.
3. Connect ammeter leads to adapter with red lead
toward generator and black lead toward battery posi-
tive post. Connect ground
lead to battery negative
post. See Figure
lD-4.
BATTERY POST
ADAPTER
SOID
Figure lD-4 Connecting Ammeter Leads
4. Connect voltmeter across the battery: red lead at
generator side of battery post adapter and black lead
to battery negative post.
5. Connect a tachometer to ignition system.
Page 58 of 625
WINDSHIELD WIPERSlE- 37WINDSHEILD WIPERS
ALL MODELS
CONTENTS
Subject
DESCRIPTION AND OPERATION:
Windshield Wiper Motor. . . . . . . . . . . . . . . . . . . . . . . . . . . . . . . . . . . . . . . . . . . . . . .DIAGNOSIS:
Windshield Wiper
. . . . . . . . . . . . . . . . . . . , , . . . . . . . . . . . . . . . . . . . . . . . . . . . . . . . . . . . . . . . . .MAINTENANCE AND ADJUSTMENTS: (Not
Applicable)
MAJOR REPAIR:Wiper Transmission
- 1900 and Manta. . . . . . . . . . . . . . . . . . . .W/per Transmission
- GT. . . . . a.* . . . . . . . . . . . . . . . . . . . . . . . . . . . . . . . . . . . . . . . .Disassembly of Wiper Motor
. . . . . . . . . . . . . . . . . . . . . . . . . . . . . . . . . . . . . . . .Cleaning and Inspection of Parts
. . . . . . . . . . . . . . . . . . . . . . . . . . . . . . .Assembly of Wiper Motor
. . . . . . . . . . . . . . . . . . . . . . . . . . . . . . . . . . . . . . . . . . . . . .Installation
. . . . . . . . . . . . . . . . . . . . . . . . . . . . . . . . . . . . . . . . . . . . . . . . . . . . . . . . . . . . . . . . . . . . . . . . . . . .SPECIFICATIONS:
GeneralSpecifications
. . . . . . . . . . . . . . . . . . . . . . . . . . . . . . . . . . . . . . . . . . . . . . . . . . . . . .Torque Specifications
. . . . . . . a.. . . . . . . . . . . . . . . . . . . . . . . . . . . . . . . . . . . . . . . . . . . . .
DESCRIPTIOfV AND OPERATION
GENERAL;DESCRlPTlDNThe two-sbeed wiper consists of a round shaped per-
manent magnet type motor and speed reduction gear
box. IOPERATldN
=The wipei motor is controlled through a dash
mounted &itch on all cars. The Rallye and GT, in
addition tb the dash mounted switch, also have a
switch moimted in conjunction with the windshield
washer fodt pump. Depressing the washer pump will
allow the bipers to operate while the pump is de-
pressed. i
DIAGNO;SIS
PRELIMINj9RY INSPECTION
1. Make
c&in of firm wire connections at wiper
motor fuse block and wiper switch.
Page No.
1 E-37
1 E-37E-38
E-38
E-40
E-41
E-4 1E-42
1 E-43
1 E-432. Check to see that the fuse is not blown.
3. Be sure wiper motor is not loose on fire wall.
4. With the yellow wire disconnected from terminal
No. 53 on the
wi@er motor, turn the ignition switch
and wiper switch to the on position and check volt-
age available to the wiper motor. There should be 12
volts available at the durple wire with a properly
charged battery.
Checking Wiper Operation1. Turn ignition switch on and engage wiper switch
to see if wiper motor will operate.
2. If wiper action is slow or inoperative, turn swit-
ches off and detach wiper control
inn from crank
arm.3. Operate wiper manually checking for excessive
bind in linkage. Correct if necessary.
Page 67 of 625
1F. 46 1973 OPEL SERVICE MANUAL
’
/
Headlight High-Low Beam Control and Passing:
SignalI
When the headlights have been switched on, high
and low beam selection is made by raising the direc-
tional signal lever toward steering wheel. Each
ti&the lever is raised, beam position, will change.
When the headlights are not on, a flashing headlight
signal may be given by raising and lotiering the di-
rectional signal lever. With the headlights on and
inlow beam position, raising and lowering the direc-
tional signal lever will also cause the headlights to
flash.
Fog Light SwitchAll Rallye models are equipped with two white f?g
lights mounted below the front bumper.
The fog light toggle switch is located on the
insty-ment cluster to the left of the temperature and
fuelgauge cluster.
/
The fog lights can be turned off at any time by the
toggle switch, but can only be tyrned on when: :
1. The ignition switch on or the
?gine running.!
2. The fog light toggle switch lower half is pushed
in.3. The parking lights and/or low beam headlights
are
OKThe fog lights are automatically turned off if the
ignition switch is on and the headlights are switched
to high beam position.
Courtesy LightThe courtesy light illuminates the interior of the Car
when any door is opened. The courtesy light can also
be turned on with all doors closed by tilting the l&s.
GT Headlamp MechanismThe concealed headlamps are moved mechanically.
Pushing actuating lever on left side of console opens
headlamps and pulling lever closes headlamps. Two
(2) meshing gear segments convert the movement, of
the lever to a rotation of 180 degrees. The pivots of
the headlamps lie below the centerline so that with
headlamps in closed position, the headlamp housing
is flush with front sheet metal. Refer to Group 110,
Section “F”, for service procedures on the GT head-
lamp mechanism.
A white indicator lamp in the instrument panel lights
if the headlamps are not completely opened lorclosed The switches of the headlamp electrical sys-
tem are located behind the left headlamp operating,
mechanism.
MAINTENANCE AND ADJUSTMENTSHEADLAMP AIMING
The headlamps must be properly aimed in order to
obtain maximum road illumination and safety that
has been built into the headlighting equipment. With
the Guide T-3 type sealed beam units, proper aiming
is even more important because the increased range
and power of this lamp make even slight variations
from recommended aiming hazardous to approach-
ing motorists. The headlamps must be checked for
proper aim whenever a sealed beam unit is replaced
and after an adjustment or repairs of the front end
sheet metal assembly.
Regardless of method used for checking headlamp
aim, car must be at normal weight, that is, with gas,
oil, water, and spare tire. Tires must be uniformly
inflated to specified pressure. If car will regularly
carry an unusual load in rear compartment, or a
trailer, these loads should be on car when headlamps
are checked. Some States have special requirements
for headlamp aiming adjustment, and these require-
ments should be known and observed.
Horizontal and vertical aiming of each seal beam
unit is provided by two adjusting screws which move
the mounting ring in the body against the tension of
the coil spring. There is no adjustment for focus,
since the sealed beam unit is set for proper focus
during manufacturing assembly.
MAJOR REPAIRHEADLIGHT SWITCH
- OPEL 1900. MANTA
Removal1. Remove instrument cluster cover panel. See Sec-
tion H.
2. Compress retaining springs and pull switch out.
See Figure 1 F-
1.3. Pull multiple socket off switch.
Installation
1: Plug multiple socket in switch and push switch in
panel until clips lock in place.
2. Replace instrument cover and secure with two (2)
screws.
Page 75 of 625

lG- 54 1973 OPEL SERVICE’ MANtiAL/SIGNAL SYSTEMSCdNTENTS
9Subject
DESCRIPTION AND OPERAT!ON:
Directional Signal Lever
. . . . . . . . . . . . . . . . . . . . . . . . . . . . . . . . . . . . . . . . . . . . . . . . . .
Horn. . . . . . . . . . . . . . . . . . . . . . . . . . . . . . . . . . . . . . . . . . . . . . . . . . . . . . . . . . . . . . . . . . . . . . . . . . . . . . . . . . . . . . . .HazardWarning
Flasher. . . . . . . . . . . . . . . . . . . . . . . . . . . . . . . . . . . . . . . . . . . . . . . .BrakeSystemWarningLight
. . . . . . . . . . . . . . . . . . . . . . . . . . . . . . . . . . . . . . . .DIAGNOSIS:
SignalSystem,.......................
i . . . . . . . . . . . . . . . . . . . . . . . . . . . . . . . . . . . . . . . . . . . . .MAINTENANCE AND ADJUS,TMENTS:
MAJOR REPAIR:
Directional Signal Switch
:. . . . . . . . . . . . . . . . . . . . . . . . . . . . . . . . . . . . . . . . . . . . .
HornRemoval. . . . . . . . . . . . . . . . . . . . . . . . . . . . . . . . . . . . . . . . . . . . . . . . . . . . . . . . . . . . . . . . . . . . . .Removing Horn Contact
. . . . :.............................................
SPECIFICATIONS:
FuseChart. . . . . . I . . . . . . . . . . . . . . . . . . . . . . . . . . . . . . . . . . . . . . . . . . . . . . . . . . . . . . . . . . . . . . . . . . . . .Page No.
1 G-54
1 G-54
1 G-55
lG-55 _1 G-55
1 G-55
16-551 G-55
1 G-56
DESCRIPTION AND OPERATION
DIRECTIONAL SIGNAL LEVERThe direction signal switch lever is a multi- purpose
lever controlling direction signals, passing signal,
and high and low beams. See Figure
lG-1.301Gl
Figure lG-1 Directional Signal Position for Headlamp
OperationThe direction signal lever is provided with a
two-step mechanism for operation of headlight high and
low beams, and passing signal (not in New Jersey).
With headlights off, moving the lever repeatedly to-
wards steering wheel flashes headlights as a passing
signal. With headlights on, moving the lever repeat-
edly towards steering wheel up to first stop also
flashes passing signal regardless whether or not the
direcl:ion signals are switched on. When the lever is
moved up to the second stop, the headlights are
changed from high to low beam
dr vice versa. On all
Rallye cars, when switching from low to high beam
position, with the fog lamp instrument panel switch
“ON” and ignition switch in “RUN” position, the
fog lights are automatically
switChed off. Direction
signals work in the normal manner; pushing the lever
up for right turn signal and pulling the lever down
for left turn signal.
The horn button is located in the center part of the
steering wheel. The horn is actuated by pushing
down on the ends of both spokes on Opel 1900 andManta’s or on the center horn button on the Rallye.
The button is provided with a spring-loaded plunger.See Figure
lG-2.