charging OPEL GT-R 1973 Owner's Guide
[x] Cancel search | Manufacturer: OPEL, Model Year: 1973, Model line: GT-R, Model: OPEL GT-R 1973Pages: 625, PDF Size: 17.22 MB
Page 558 of 625

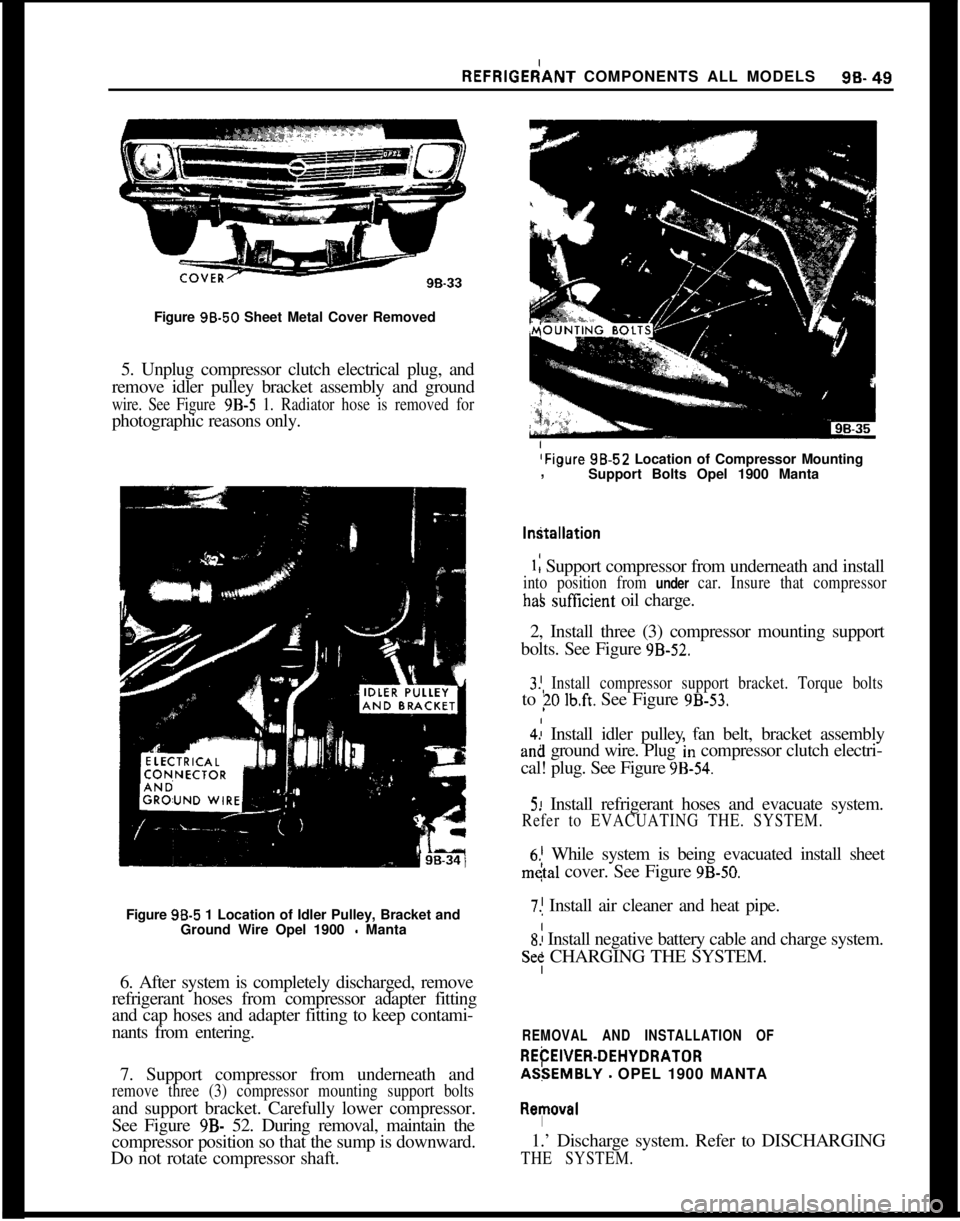
REFRlGEdANT COMPONENTS ALL MODELS96-49Figure 96.50 Sheet Metal Cover Removed
5. Unplug compressor clutch electrical plug, and
remove idler pulley bracket assembly and ground
wire. See Figure 9B-5 1. Radiator hose is removed forphotographic reasons only.
(Figure 98.52 Location of Compressor Mounting
,
Support Bolts Opel 1900 Manta
I
Figure 98-5 1 Location of Idler Pulley, Bracket and
Ground Wire Opel 1900
- Manta
6. After system is completely discharged, remove
refrigerant hoses from compressor adapter fitting
and cap hoses and adapter fitting to keep contami-
nants from entering.
7. Support compressor from underneath and
remove three (3) compressor mounting support boltsand support bracket. Carefully lower compressor.
See Figure
9B- 52. During removal, maintain the
compressor position so that the sump is downward.
Do not rotate compressor shaft.
1: Support compressor from underneath and install
into position from under car. Insure that compressor
haS sutXcient oil charge.
2, Install three (3) compressor mounting support
bolts. See Figure
9B-52.I
3! Install compressor support bracket. Torque boltsto
?O lb.ft. See Figure 9B-53.
4.: Install idler pulley fan belt, bracket assemblyan8 ground wire. Plug
‘In compressor clutch electri-
cal! plug. See Figure
9B-54.
5! Install refrigerant hoses and evacuate system.
Refer to EVACUATING THE. SYSTEM.
6.’ While system is being evacuated install sheet
m&l cover. See Figure 9B-50.
7.1 Install air cleaner and heat pipe.
S! Install negative battery cable and charge system.
Se: CHARGING THE SYSTEM.
REMOVAL AND INSTALLATION OF
REtiEWEFt-DEHYDRATORAS:EMBLY
- OPEL 1900 MANTA
I
R~l!lOV~lI1.’ Discharge system. Refer to DISCHARGING
THE SYSTEM.
Page 560 of 625

REFRIGERANT COMPONENTS ALL MODELSSB- 51
3. Remove two (2) screws securing receiver-dehy-
drator within support bracket and lift out receiver-
dehydrator.
InstallationIf the receiver-dehydrator has been exposed to the
atmosphere for any amount of time, (more than five
(5) minutes), the receiver-dehydrator should be re-
placed, since the life of the dessicant is probably
expended.
1. Install receiver-dehydrator. Using new o-rings
during installation. Lubricate o-rings prior to instal-
lation using No. 525 viscosity oil.
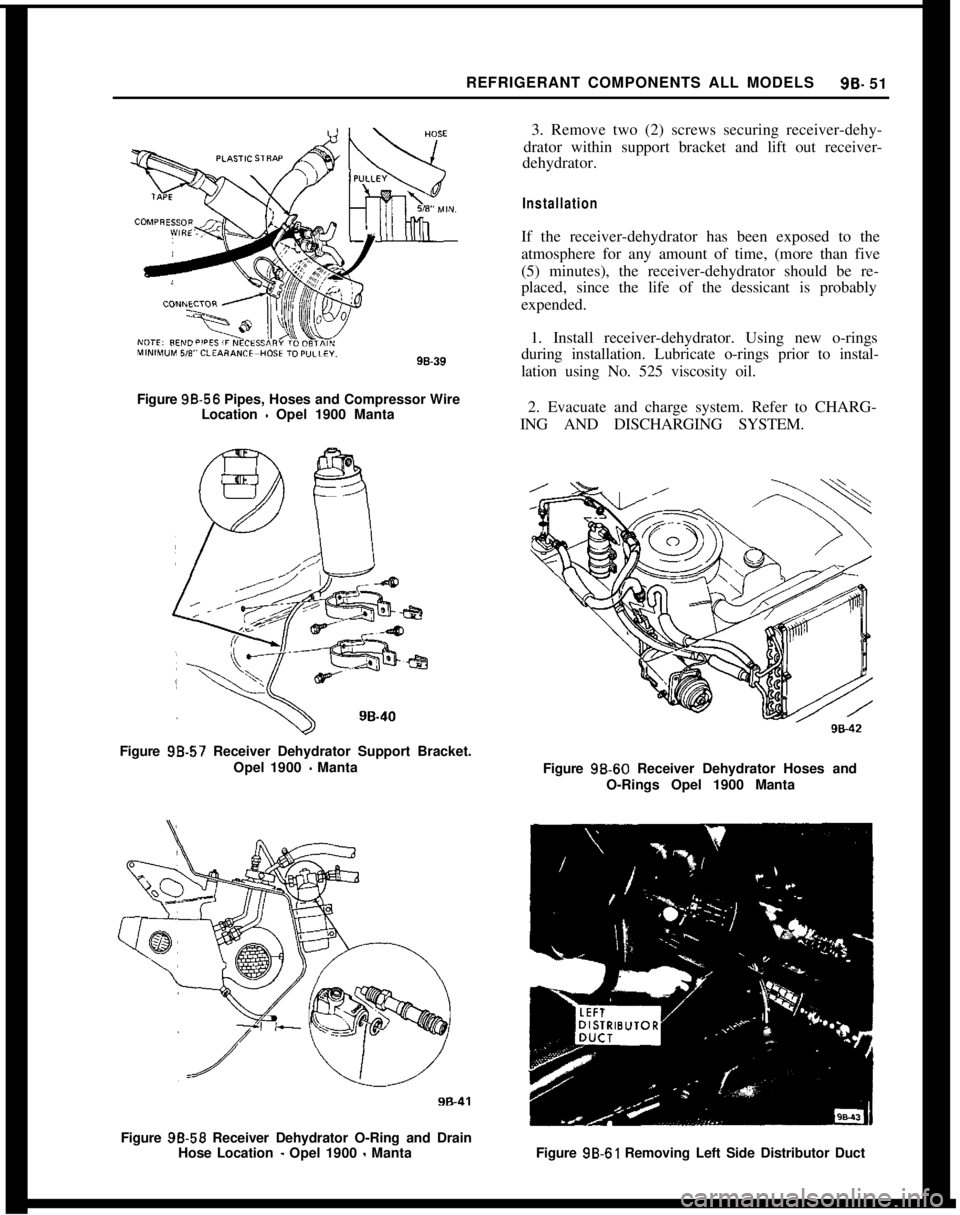
Figure 98.56 Pipes, Hoses and Compressor Wire
Location
- Opel 1900 Manta2. Evacuate and charge system. Refer to CHARG-
ING AND DISCHARGING SYSTEM.
Figure 98.57 Receiver Dehydrator Support Bracket.
Opel 1900
- Manta
Figure 98-59 Receiver Dehydrator O-Ring and Drain
Hose Location
- Opel 1900 - MantaFigure 9B-60 Receiver Dehydrator Hoses and
O-Rings Opel 1900 Manta
Figure 9B-61 Removing Left Side Distributor Duct
Page 561 of 625

96-52 1973 OPEL SERVICE MANUAL
REMOVAL AND INSTALLATION OF EVAPORATOR
AND EXPANSION VALVE. OPEL 1900 - MANTA
Removal
1. Remove negative battery cable from battery.
2. Remove left side of distributor duct, and in line
fuse. See Figure
9B-61.3. Remove glove box. See Figure
9B-62.Figure 96-64 Delay Restrictor
and Check Valve Hose
Assembly Location
5. Disconnect the delay restrictor and check valve
hose assembly from the vacuum cut-off switch and
disconnect the electrical wiring. See Figures 9B-63
and 64.
6. Remove evaporator inlet and outlet pipes re-
tainer and rubber grommet. See Figure
9B-65.Figure
98.62 Glove Box Removed
4. Discharge refrigerant from system. (Refer to
DISCHARGING SYSTEM) and disconnect refrig-
erant hose from evaporator outlet and pipe from
evaporator inlet and tape the open ends of the refrig-
erant lines and evaporator pipes. See Figure
9B-63.Figure
98.65 Inlet and Outlet Pipes retainer and
Rubber Grommet-Opel 1900 - Manta
Figure
98.63 Location of Refrigerant Hoses, Pipes,
Vacuum Cut Off Switch and Evaporator Attaching Bolt
(Left Side) - Opel 1900
- Manta
Page 563 of 625

96-54 1973 OPEL SERVICE MANUAL
valve. The filter screen at the inlet port may be re-
placed. Remove screen by threading a lo-32 NF
screw into old filter screen. With a washer and a nut
on the screw arranged to work as a puller screw, hold
the body of the screw and turn the nut. Insert the
new filter screen into the inlet port and lightly tap
screen only enough to seat.
1. Install expansion valve using new o-rings during
installation. Lubricate o-rings prior to installation
using No. 525 viscosity oil.
2. Install evaporator assembly and case attaching
screws. See Figure 9B-70.3. Install blower motor assembly into case and se-
cure with attaching screws. See Figure
9B-69.4. Install finger guard shields and fan housing case.
See Figure
9B-69.5. Install resistor assembly and electrical connector.
Install blower motor connector. See Figure
9B-69.6. Install assembly into car carefully guiding
evaporator pipes up through cowl opening. See Fig-
ure
9B-71.Figure 93-7 1 Inlet and Outlet Pipes and O-Rings
-Opel 1900 Manta
7. Install two (2) upper attaching evaporator at-
taching nuts. See Figures 9B-66 and
9B-67.8. Install two (2) attaching case mounting bracket
to instrument panel screws. See Figure
9B-67.9. Connect two (2) drain hoses underneath evapora-
tor.10. Install evaporator inlet and outlet pipes retainer
and rubber grommet. See Figure
9B-65.11. Connect vacuum cut-off switch and electrical
wiring, making sure the delay restrictor and checkvalve hoses are installed correctly. See Figures
9B-63and 64.
.gB-72 Delay Restrictor and Check Valve Hose.Assembly
12. Install refrigerant hoses and pipes using new
o-rings on line fittings and evacuate system. Refer to
EVACUATING SYSTEM.
13. While system is being evacuated, install in-line
fuse and left side of distributor duct. See Figure 9B-
61.14. Install glove box.
15. Install negative battery cable and charge system.
Refer to CHARGING SYSTEM.
REMOVAL AND INSTALLATION OF CONDENSER
ASSEMBLY -OPEL 1900. MANTA
Removal
1. Remove negative battery cable from battery.
2. Remove air cleaner.
3. Discharge system. Refer to DISCHARGING
SYSTEM.
4. While system is discharging, remove lower radia-
tor hose from radiator and drain coolant into a suita-
ble container.
5. Remove fan shroud.
6. On vehicles with automatic transmission, un-
screw oil lines from connectors on lower radiator
tank and plug lines. It is essential that no dirt enters
the oil lines. When unscrewing oil lines, hold connec-
tors on lower radiator tank with pliers to avoid leak-
ages. Ensure that no dirt enters oil cooler.
7. Remove upper radiator hose from radiator.
8. Remove lower attaching nut and slide radiator
upward and out of engine compartment.
9. Remove inlet and outlet hoses from condenser
Page 565 of 625

98-56 1973 OPEL SERVICE MANUAL
oil cooler lines to lower radiator tank. It is essential
that no dirt enters the oil lines. When tightening oil
lines hold connectors on lower radiator tank with
pliers to avoid leakages. Ensure that no dirt enters oil
cooler. Torque to 11-15 Ibs. ft.
7. Install fan shroud.
8. Install upper radiator hose.
9. Install lower radiator hose and add collected coo-
lant.
All Opel
1900’s and Manta’s are provided with a
radiator initial fill of an anti-freeze solution contain-
ing corrosion inhibitor. The anti-freeze has either a
glycol or glycerin base and protects the engine
against freezing, down to minus 22 degrees F. (minus
30 degrees C.). Before the start of the cold season,
coolant must be checked with a hydrometer and if
necessary, brought to the necessary specific gravity
by adding anti-freeze. Anti-freeze added, must have
a glycol or glycerin base. As the specific gravities of
all anti-freeze solutions having a glycol or glycerin
base are practically the same, the hydrometer can be
used for all these types. Because of the tolerances of
the hydrometer, or slight differences in specific
gravity, variations of plus or minus 5 degrees can be
expected. Coolant must be checked at a temperature
of plus 68 degrees F. (plus 20 degrees C.).
IO. Install negative battery cable and air cleaner.
11. Charge system. Refer to CHARGING SYS-
TEM.
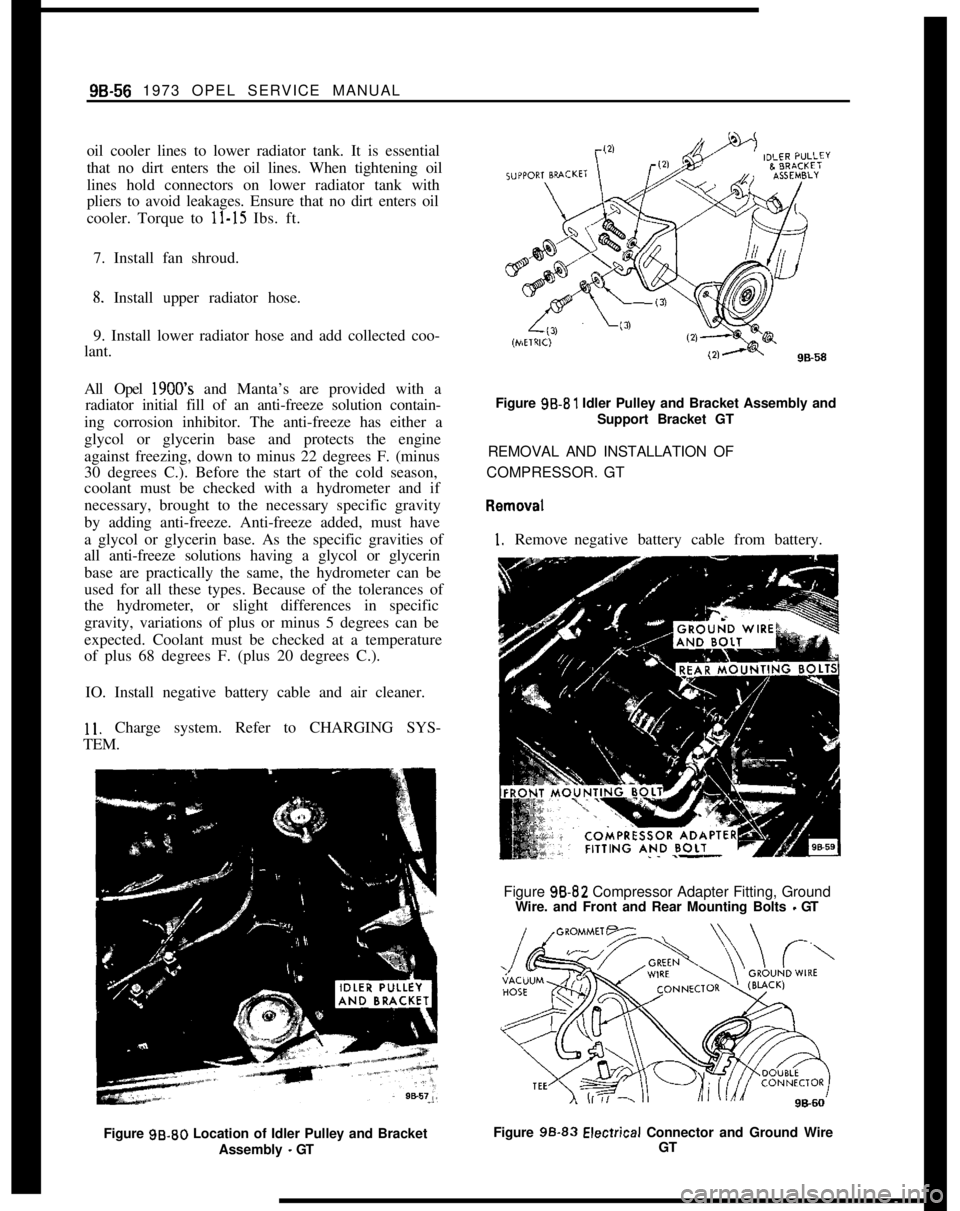
Figure 99.80 Location of Idler Pulley and Bracket
Assembly
- GTFigure 99.81 Idler Pulley and Bracket Assembly and
Support Bracket GT
REMOVAL AND INSTALLATION OF
COMPRESSOR. GT
I. Removenegative battery cable from battery.
Figure 98-82 Compressor Adapter Fitting, Ground
Wire. and Front and Rear Mounting Bolts
- GT
Figure 99.83
Elecirical Connector and Ground Wire
GT
Page 567 of 625

98-58 1973 OPEL SERVICE MANUAL
2. Discharge system. Refer to DISCHARGING
SYSTEM.
3. While system is discharging remove air cleaner
and loosen idler pulley and bracket assembly. See
Figure 98-80.
4. Remove bolt holding compressor adapter fitting
into rear head. Disengage from compressor and tape
closed openings in both lines and ports in rear head.
It is important to seal compressor ports to avoid a
loss of refrigeration oil and also to prevent foreign
material and moisture from entering compressor. See
Figure 9B-82.
5. Remove bolt and ground wire, unplug electrical
connector, and remove 2 rear compressor mounting
bolts. See Figure 98-82.
6. Remove 2 front compressor mounting bolts,
clutch drive belt, and lift out compressor. During
removal, maintain the compressor position so that
the sump is downward. Do not’rotate compressor
shaft. See Figure 9B-84.
Installation1. Install compressor into mounting brackets and
secure with 4 mounting bolts. See Figure
9B-84.2. Untape lines and ports, and install compressor
adapter fitting and bolt using new o-rings. See Figure
9B-82.3. Evacuate system. Refer to, EVACUATING
SYSTEM.
4. While system is being evacuated, install drive belt
and tighten idler pulley. See Figure
9B-80.5. Install bolt and ground wire and plug in electrical
connector. See Figure
9B-83.6. Install air cleaner and negative battery cable.
7. Charge system. Refer to, CHARGING SYS-
TEM.
REMOVAL AND INSTALLATION OF
RECEIVER.DEHYDRATOR
ASSEMBLY. GT
Removal1. Discharge system. Refer to DISCHARGING
SYSTEM.
2. Disconnect refrigerant lines to both ends of re-
ceiver-dehydrator and tape closed open ends of
re-
9862Figure 98.85 Refrigeration Hose Clamps Installation
GT
frigerant lines, and also the open
e:nds of the inlet and
outlet pipes of the receiver-dehydrator. See Figure
9B-86.Figure 98.86 Receiver-Dehydrator GT
3. Remove 2 screws securing receiver-dehydrator
and clamps to support bracket and lift out receiver
dehydrator. See Figure
9B-86.
Installation1. Install receiver-dehydrator using new o-rings
during installation. Lubricate o-rings prior to instal-
lation using No. 525 viscosity oil.
.
Page 568 of 625

REFRIGERANT COMPONENTS ALL MODELS9s. 59
2. If the receiver-dehydrator has been exposed to
the atmosphere for any amount of time, (more than
5 minutes), the receiver-dehydrator should be re-
placed, since the life of the dessicant is probably
expended.
3. Evacuate and charge system. Refer to CHARG-ING AND DISCHARGING SYSTEM.
REMOVAL AND INSTALLATION OF EVAPORATOR
AND EXPANSION VALVE. GTRemoval
1. Disconnect negative battery cable.
2. Discharge system. Refer to, DISCHARGING
SYSTEM.3. While system is discharging, remove attaching
screws and lift out luggage tray. See Figure
9B-87.Figure 98.88 Evaporator Cover Assembly and
Attaching Screws GT
Figure 98.87 Luggage Tray
4. Remove all evaporator cover screws and removecover. See Figure
9B-88.
5. Remove electrical plug connector from the resis-tor assembly and unplug blower motor connection
and remove ground wire. See Figure
9B-90.6. From underneath evaporator housing, discon-
nect two (2) drain hoses. See Figure
9B-91.
7. From under car remove 4 nuts securing
evapora-Figure 96.90 Electrical Connections, Ground Wire
GTtar mounting bracket to floor. See Figures
9B- 92
and
9B-93.8. Remove inlet and outlet pipes from evaporator
and tape closed the refrigerant lines and also the
open ends of the inlet and outlet pipes of the evapora-tor. See Figure
9B-94.
Page 571 of 625

98-62 1973 OPEL SERVICE MANUAL
Figure 98.99 Refrigerant Hoses Retainer Grommet
-Under Car - GT
8. From under car install four (4) nuts securing
evaporator mounting bracket to floor. See Figures9B- 92 and
9B-93.Figure 98.100 Refrigerant Hoses
- Under Car GT
9. Evacuate system. Refer to EVACUATING SYS-
TEM.
10. While system is being evacuated, connect drain
hoses underneath evaporator housing.
11. Plug in the resistor assembly electrical connector
plug and connect the blower motor connection and
install ground wire and 2 mounting brackets to case
screws using the rearward holes. See Figure
9B-90.12. Install the evaporator cover and all cover screws.
See Figure
9B-88.13. Install luggage tray and attaching screws. See
Figure
9B-87.14. Connect the negative battery cable.
15. Charge system. Refer to CHARGING SYS-
TEM.
REMOVAL AND INSTALLATION OF CONDENSERRECIWER- DEHYDRATOR ASSEMBLY
- GT
Removal
1. Disconnect negative battery cable.
2. Discharge system. Refer to DISCHARGING
SYSTEM.
3. While the system is discharging, remove the
charcoal cannister, washer jar, battery and battery
tray. Battery needs only to be set up out of the way
and not removed from the car.
4. Disconnect inlet and outlet pipes of condenser
receiver-dehydrator and tape closed the open ends of
refrigerant lines, and also the open ends of the inlet
and outlet pipes of the condenser. See Figure 9B-101.
5. Disconnect discharge line from condenser and
tape closed open ends of discharge pipe and con-
denser inlet.
6. Remove 4 condenser attaching screws and lift out
condenser. See Figure 9B-101.
7. Remove 2 screws retaining receiver-dehydrator
to condenser and remove.
Figure
9B-101 Receiver - Dehydrator. Condenser
Attaching Screws and Brackets
- GT
Installation
If refrigerant circuit or condenser has been exposed
to the atmosphere and moisture may be present in
the circuit, the system and/or component must be
flushed prior to installation. Refer to FLUSHING
THE SYSTEM.
1. Install receiver-dehydrator to condenser and fas-
ten with 2 clamps and 2 screws.
Page 572 of 625

REFRIGERANT COMPONENTS ALL MODELSSB-632. Install condenser into car and secure with 4 at-
taching screws. See Figure
9B-101.3. Untape discharge line and pipe and install using
new o-rings lubricated with No. 525 viscosity oil.
Figure
99.102 Condenser - Receiver - Dehydrator
O-Rings. GT
4. Untape and install inlet and outlet pipes into the
receiver-dehydrator using new o-rings lubricated
with No. 525 viscosity oil.
Figure
98-103 Condenser Assembly - GT
5. Evacuate system. Refer to EVACUATING SYS-
TEM.
6. While system is being evacuated, install the char-
coal cannistor, washer jar, battery tray and battery
and connect negative battery cable.
7. Charge system. Refer to CHARGING SYS-
TEM.
DISASSEMBLY AND REASSEMBLY OF CLUTCH
DRIVE PLATE AND SHAFT SEALIt is not necessary to remove the compressor or dis-connect refrigerant lines to remove or install clutch
parts on the GT, however, the compressor must be
removed from the Opel 1900
- Manta.
Disassembly
1. Firmly clamp holding fixture (J-9396) in a vise
and attach compressor assembly to fixture (see Figwe
9B-104).
-_ .s -Figure SE-104 Removing or Installing Shaft Nut
2. Hold hub of clutch drive plate with wrench
(J-9403). Using special thin wall 9/16 inch socket
(J-9399) and 3/g inch drive, remove shaft nut.
3. Install threaded hub puller (J-9401) onto hub of
clutch drive plate (see Figure
9B-105). Hold body of
hub puller with wrench, tighten center screw of hub
puller, and lift off clutch drive plate and woodruff
key.Figure SE-105 Removing Clutch Drive Plate
Page 591 of 625

r98-82 1973 OPEL SERVICE MANUAL
SPECIFICATIONS
Tightening Specifications
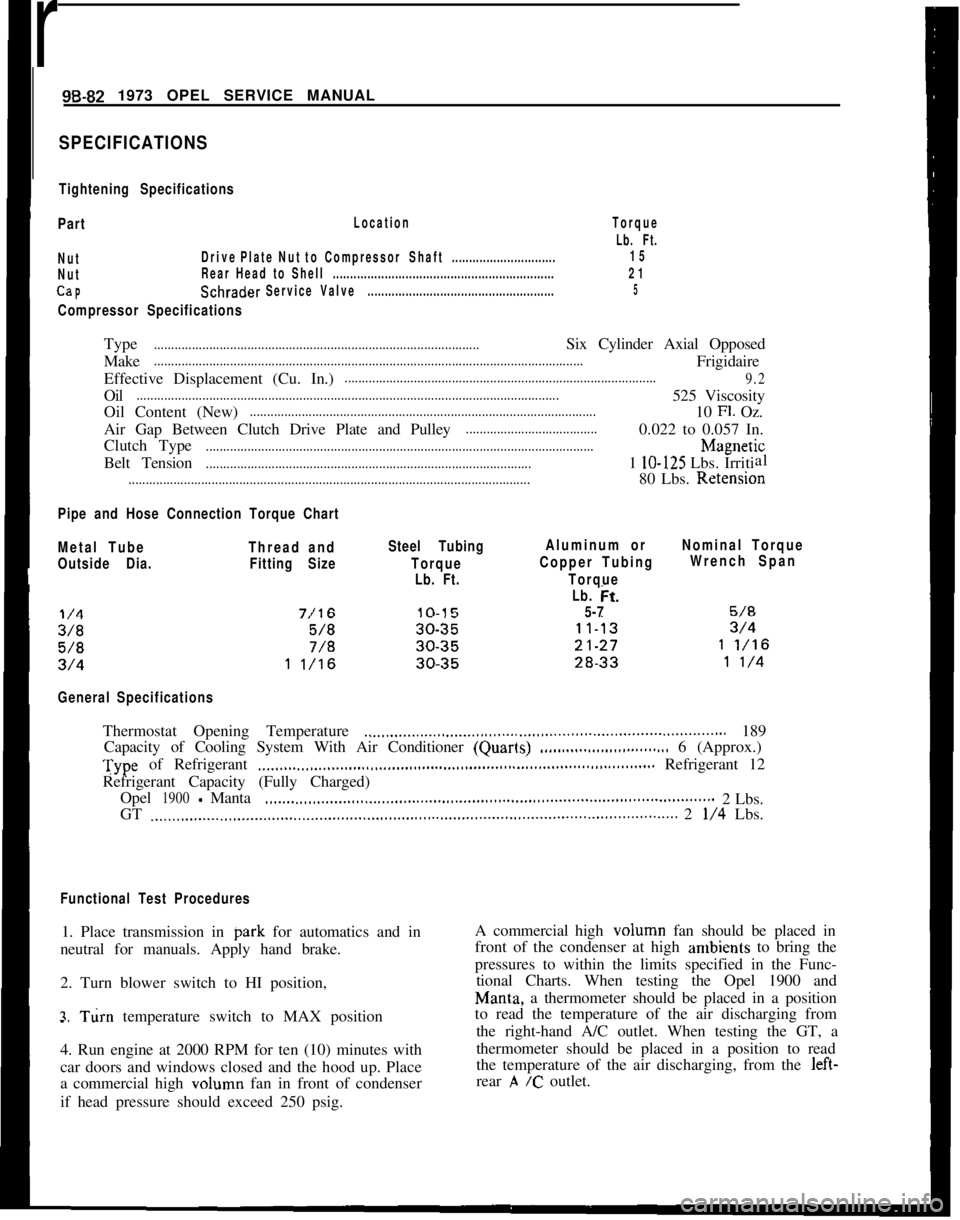
Part
Location
NutDrivePlateNut toCompressorShaft..............................
NutRear Head to Shell................................................................
CaPSchraderServiceValve......................................................
Compressor Specifications
Torque
Lb. Ft.
15
21
5Type
..............................................................................................Six Cylinder Axial Opposed
Make
............................................................................................................................Frigidaire
Effective Displacement (Cu. In.)
..........................................................................................
9.2Oil
..........................................................................................................................525 Viscosity
Oil Content (New)
....................................................................................................10 Fl. Oz.
Air Gap Between Clutch Drive Plate and Pulley
......................................0.022 to 0.057 In.
Clutch Type
................................................................................................................h4agnetic
Belt Tension
..............................................................................................1 lo-125 Lbs. Irritial
....................................................................................................................80 Lbs. Retension
Pipe and Hose Connection Torque Chart
Metal TubeThread andSteel TubingAluminum orNominal Torque
I
Outside Dia.Fitting SizeTorqueCopper TubingWrench Span
Lb. Ft.Torque
Lb. tit.
5-7
General SpecificationsThermostat Opening Temperature
.._.....,,,...__....,,.............................................................. 189
Capacity of Cooling System With Air Conditioner (Quarls)
.,,..___....___............... 6 (Approx.)Type of Refrigerant
.___,,,._...,.,,,.__.....,,,.......,,,,.......,,,...................,,,......,,,............ Refrigerant 12
Refrigerant Capacity (Fully Charged)
Opel
1900-Manta,,._....,,,,._...._.,,,,.......,,,........,,............................................................2 Lbs.
GT
,..__..,..,..__..,,,.......,,,,.......,,,........,,,.,......,,,,,......,,.,,........,,.......,,..........,,............... 2 l/4 Lbs.
Functional Test Procedures1. Place transmission in park for automatics and in
neutral for manuals. Apply hand brake.
2. Turn blower switch to HI position,
3. Turn temperature switch to MAX position-.
4. Run engine at 2000 RPM for ten (10) minutes with
car doors and windows closed and the hood up. Place
a commercial high volumn fan in front of condenser
if head pressure should exceed 250 psig.A commercial high volumn fan should be placed in
front of the condenser at high ambients to bring the
pressures to within the limits specified in the Func-
tional Charts. When testing the Opel 1900 and
Man& a thermometer should be placed in a position
to read the temperature of the air discharging from
the right-hand A/C outlet. When testing the GT, a
thermometer should be placed in a position to read
the temperature of the air discharging, from the left-
rear
,A /c outlet.