bonnet Peugeot 206 CC 2002.5 Owner's Manual
[x] Cancel search | Manufacturer: PEUGEOT, Model Year: 2002.5, Model line: 206 CC, Model: Peugeot 206 CC 2002.5Pages: 128, PDF Size: 1.73 MB
Page 2 of 128

1Side windows demisting vents
2 Adjustable side vent
3 Passenger air bag
4 Windscreen demisting vents
5 Multifunction display
6 Central locking control*
7 Hazard warning lights switch
8 Instrument panel lightingrheostat
9 Lights and direction indica-tors stalk
10 Steering wheel height adjust-ment control
11 Steering lock 12
Windscreen wash/wipe / trip computer stalk
13 Driver's air bag
Horn
14 Radio steering column stalk
15 Headlamp height adjustment
16 Passenger air bag disarmingswitch*
17 Alarm button*
18 Dynamic stability control(ESP/ASR) button
19 Storage compartment
20 Fuse box
21 Gear lever
22 Lighter
23 Electric retractable roof control 24
Electric window switches
25 Electric mirror switches
26 Handbrake
27 Front ashtray
28 Heating / ventilation / air con- ditioning controls Rear screen and mirrors demisting
29 Audio RD3
30 Adjustable central vents
31 Glove box
32 Bonnet opening control
* According to destination. 3
YOUR AT
A GLANCE
07-10-2002
Page 8 of 128

9
YOUR AT A GLANCE
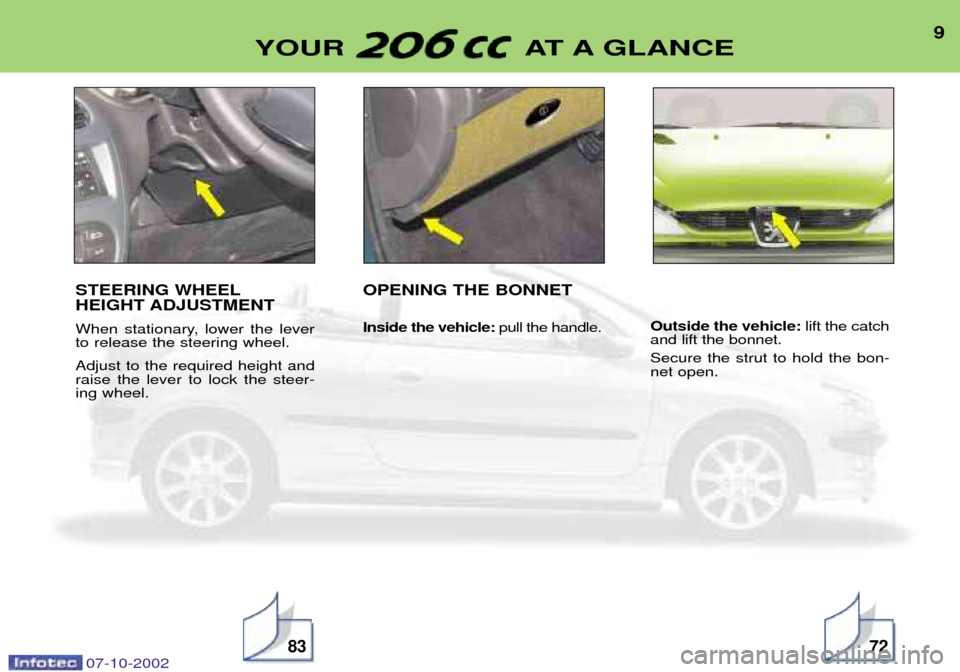
STEERING WHEEL HEIGHT ADJUSTMENT
When stationary, lower the lever to release the steering wheel. Adjust to the required height and raise the lever to lock the steer-ing wheel. OPENING THE BONNET Inside the vehicle:
pull the handle. Outside the vehicle:
lift the catch
and lift the bonnet. Secure the strut to hold the bon- net open.
07-10-20028372
Page 54 of 128

YOUR 206 CC IN DETAIL55
VENTILATION 1 . Windscreen de-icing or demisting vents.
2 . Front window de-icing or demisting vents.
3 . Side vents.
4 . Centre vents.
5 . Air outlet to front footwells.
6 . Air outlet to rear footwells.
Advice on operation
Ð Place the air flow control at a level sufficient to ensure correct renewal of air in the passenger compartment. The ' 'OFF''posi-
tion cuts off all the air circulation in the passenger compartment.
Note: only use the ''OFF''position occasionally (risk of condensation).
Ð Select the air distribution most suited to your requirements and the climatic conditions.
Ð Gradually adjust the temperature setting for your comfort.
Ð Position the outside air control to the left; the "Outside Air" position.
Ð For perfectly even air distribution, take care not to obstruct the exterior air intake grille on the bonnet, the vents and the air ducts under the front seats. Check that the pollen filter is in good condition.
07-10-2002
Page 73 of 128

07-10-2002
The alarm Setting and deactivating the alarm system Switching off the siren. The alarm completes the security
equipment for your vehicle. It offerstwo types of protection. Ðexternal protection: when it is set,
the alarm sounds if one of the
doors, the boot lid or the bonnet is opened;
Ð internal protection: when it is set,
the alarm sounds if the sensors
detect air movement in the pas-senger compartment (a brokenwindow) or movement within the
car.
Note: the internal protection does not
operate when the vehicle roof is openor is not closed properly (e.g. catchesunlocked). The alarm also has an anti-tamper function. If there is an attempt to tamper with the wires to the siren, control unit or
the battery, the siren sounds and thedirection indicators light. Setting the alarm (external and internal protection)
Switch the ignition off and get out of the vehicle. Deadlock the vehicle.The doors lock.The direction indicators light for two seconds. The red light on the switch flashes once a second.
5 seconds later, internal protection is set.
45 seconds later, external protection is set. Note:
when the alarm is triggered, the
siren sounds for thirty seconds. After the thirty seconds it stops, but thealarm remains set.
Warning:
When the alarm is triggered, if a door, the boot lid, roof or bonnet are not clo-
sed correctly, the siren sounds for amoment. If the vehicle is closed cor-rectly in the following 45 seconds, thealarm is activated and the directionindicators remain on for two seconds.In all cases, the alarm is activatedafter 45 seconds. Disarming the alarm(internal and external protection) Press the release button of the remo-
te control key. The doors unlock.The direction indicators flash for two seconds. The red light on the switch goes out. Note:
if the warning light continues to
flash after de-activation of the alarm, it is a sign that the alarm has been trig-
gered. The flashing will stop when theignition is switched on.
* According to specification.
SPECIAL FEATURES
124
Page 76 of 128

YOUR 206 CC IN DETAIL
72
BONNET STRUT Secure the strut to hold the bonnet open. Before closing the bonnet, replace the strut in its housing.
To close Lower the bonnet and release it at the end of its travel. Check that the bonnetis locked.
OPENING THE BONNET Inside the vehicle:
pull the handle on
the left-hand side, under the fascia. Outside the vehicle: lift the catch and
raise the bonnet. FILLING THE FUEL TANK The tank must be filled with fuel with the engine switched off
.
Insert the key then turn it to the left. Remove the cap.
A label indicates which type of fuel to use. If you fill your tank, do not continue
after the third cut-off of the pump noz-
zle. This could result in vehicle mal-functions. The capacity of the tank is approxi- mately 10.3 gallons (47 litres).
07-10-2002
Page 128 of 128

07-10-2002
TECHNICAL DATA121
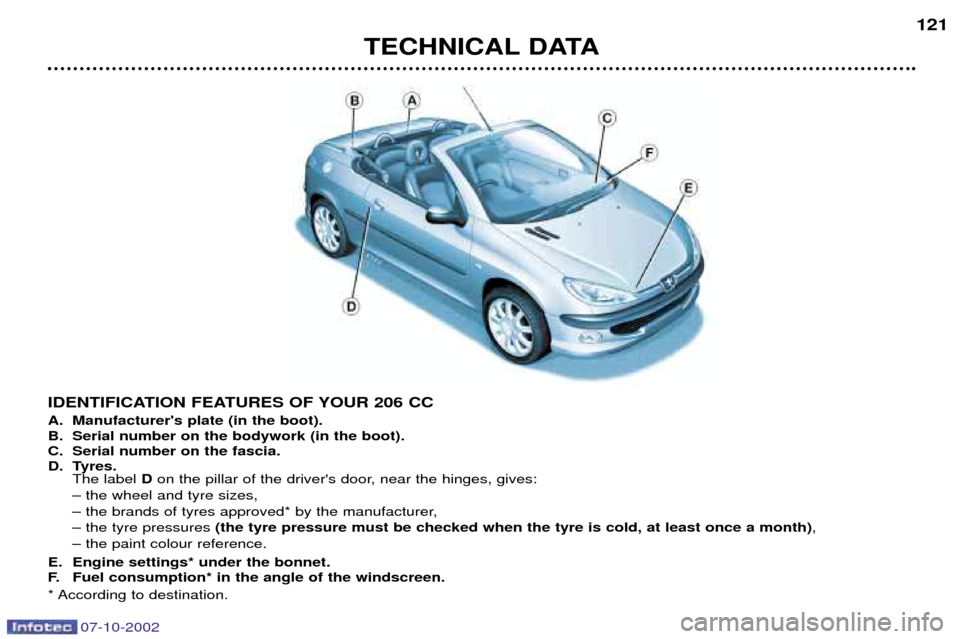
IDENTIFICATION FEATURES OF YOUR 206 CC
A. Manufacturer's plate (in the boot).
B. Serial number on the bodywork (in the boot).
C. Serial number on the fascia.
D. Tyres.
The label Don the pillar of the driver's door, near the hinges, gives:
Ð the wheel and tyre sizes,
Ð the brands of tyres approved* by the manufacturer,Ð the tyre pressures (the tyre pressure must be checked when the tyre is cold, at least once a month) ,
Ð the paint colour reference.
E. Engine settings* under the bonnet.
F. Fuel consumption* in the angle of the windscreen.
* According to destination.