window Peugeot 206 SW 2003 Owner's Manual
[x] Cancel search | Manufacturer: PEUGEOT, Model Year: 2003, Model line: 206 SW, Model: Peugeot 206 SW 2003Pages: 171, PDF Size: 2.12 MB
Page 3 of 171
26-05-2003
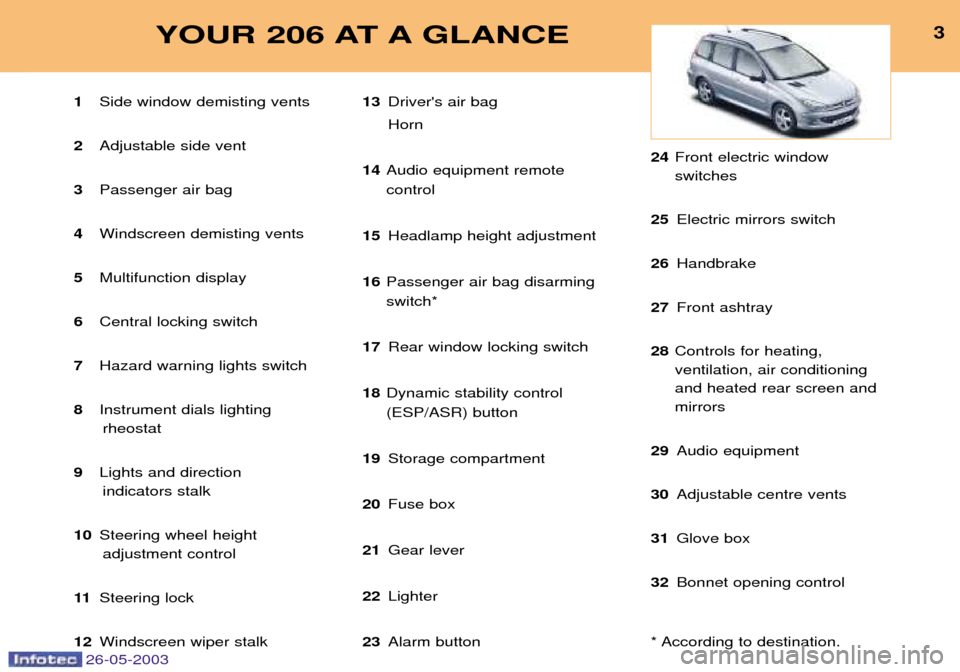
3YOUR 206 AT A GLANCE
1Side window demisting vents
2 Adjustable side vent
3 Passenger air bag
4 Windscreen demisting vents
5 Multifunction display
6 Central locking switch
7 Hazard warning lights switch
8 Instrument dials lighting
rheostat
9 Lights and direction
indicators stalk
10 Steering wheel height
adjustment control
11 Steering lock
12 Windscreen wiper stalk 13
Driver's air bag Horn
14 Audio equipment remote control
15 Headlamp height adjustment
16 Passenger air bag disarmingswitch*
17 Rear window locking switch
18 Dynamic stability control(ESP/ASR) button
19 Storage compartment
20 Fuse box
21 Gear lever
22 Lighter
23 Alarm button 24
Front electric window switches
25 Electric mirrors switch
26 Handbrake
27 Front ashtray
28 Controls for heating,ventilation, air conditioningand heated rear screen andmirrors
29 Audio equipment
30 Adjustable centre vents
31 Glove box
32 Bonnet opening control
* According to destination.
Page 11 of 171
26-05-2003
99100
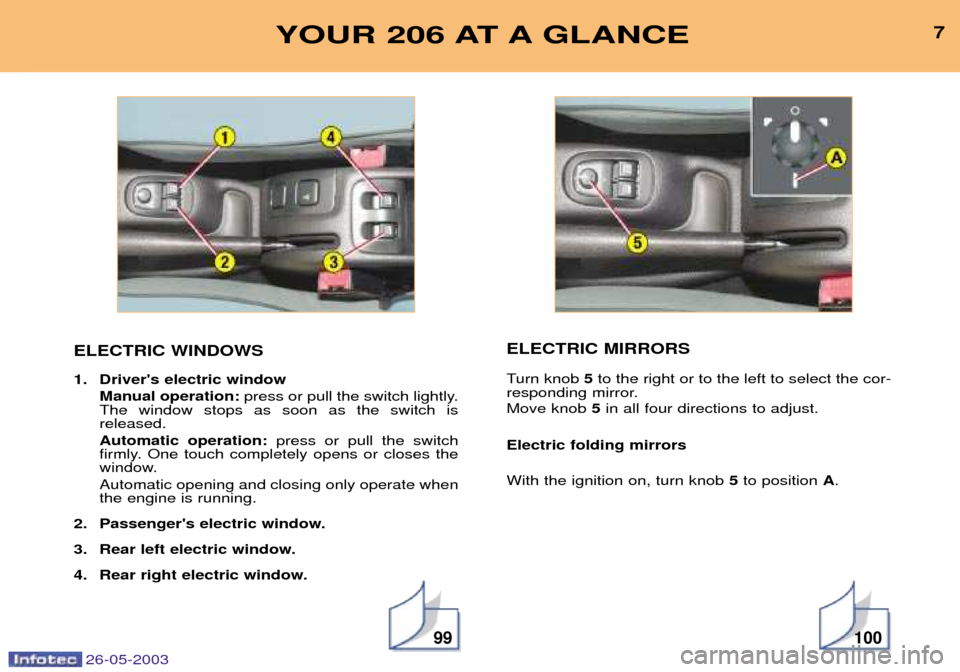
ELECTRIC WINDOWS
1. Driver's electric windowManual operation: press or pull the switch lightly.
The window stops as soon as the switch is released. Automatic operation: press or pull the switch
firmly. One touch completely opens or closes the
window. Automatic opening and closing only operate when the engine is running.
2. Passenger's electric window.
3. Rear left electric window.
4. Rear right electric window. ELECTRIC MIRRORS
Turn knob
5to the right or to the left to select the cor-
responding mirror. Move knob 5in all four directions to adjust.
Electric folding mirrors With the ignition on, turn knob 5to position A. 7
YOUR 206 AT A GLANCE
Page 12 of 171
26-05-2003
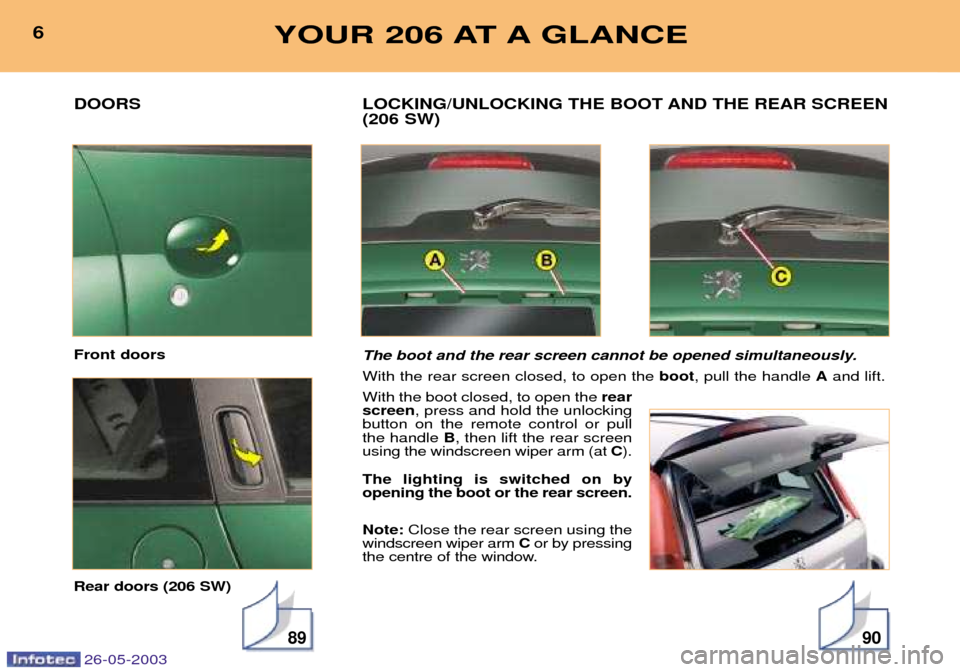
DOORS Front doors Rear doors (206 SW)
89
LOCKING/UNLOCKING THE BOOT AND THE REAR SCREEN (206 SW)
The boot and the rear screen cannot be opened simultaneously. With the rear screen closed, to open the boot, pull the handle Aand lift.
With the boot closed, to open the rear
screen , press and hold the unlocking
button on the remote control or pull the handle B, then lift the rear screen
using the windscreen wiper arm (at C).
The lighting is switched on byopening the boot or the rear screen. Note: Close the rear screen using the
windscreen wiper arm Cor by pressing
the centre of the window.
6
YOUR 206 AT A GLANCE
90
Page 68 of 171

26-05-2003
VENTILATION
1. Windscreen de-icing or demisting vents.
2. Front door windows de-icing or demisting vents.
3. Side vents.
4. Centre vents.
5. Air outlet to front footwells.
6. Air outlet to rear footwells.
Advice on operation
Ð Place the air flow control at a level sufficient to ensure correct renewal of air in the passenger compartment. The ''OFF''
position cuts off all the air circulation in the passenger compartment. Note: only use the ''OFF''position occasionally (risk of condensation).
Ð Select the air distribution most suited to your requirements and the climatic conditions.
Ð Gradually adjust the temperature setting for your comfort.
Ð Position the outside air control to the left; the "Outside Air" position.
Ð For perfectly even air distribution, take care not to obstruct the exterior air intake grille on the bonnet, the vents and the air ducts under the front seats. Check that the passenger compartment filter is in good condition.
YOUR 206 IN DETAIL 67
Page 69 of 171
26-05-2003
YOUR 206 IN DETAIL
68
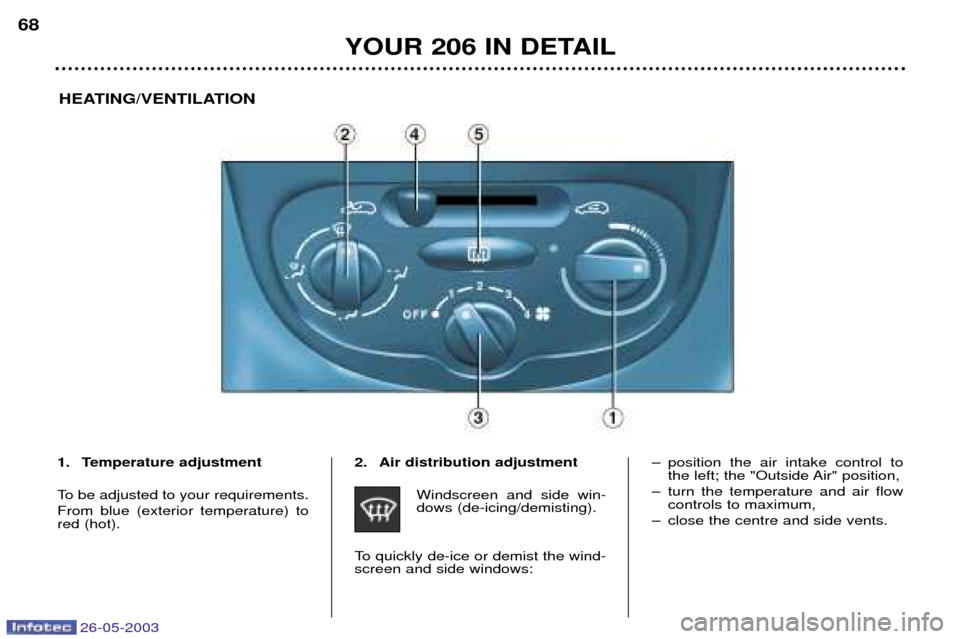
1. Temperature adjustment
To be adjusted to your requirements. From blue (exterior temperature) to red (hot). 2. Air distribution adjustment
Windscreen and side win-dows (de-icing/demisting).
To quickly de-ice or demist the wind-screen and side windows: Ð position the air intake control to
the left; the "Outside Air" position,
Ð turn the temperature and air flow controls to maximum,
Ð close the centre and side vents.
HEATING/VENTILATION
Page 70 of 171
26-05-2003
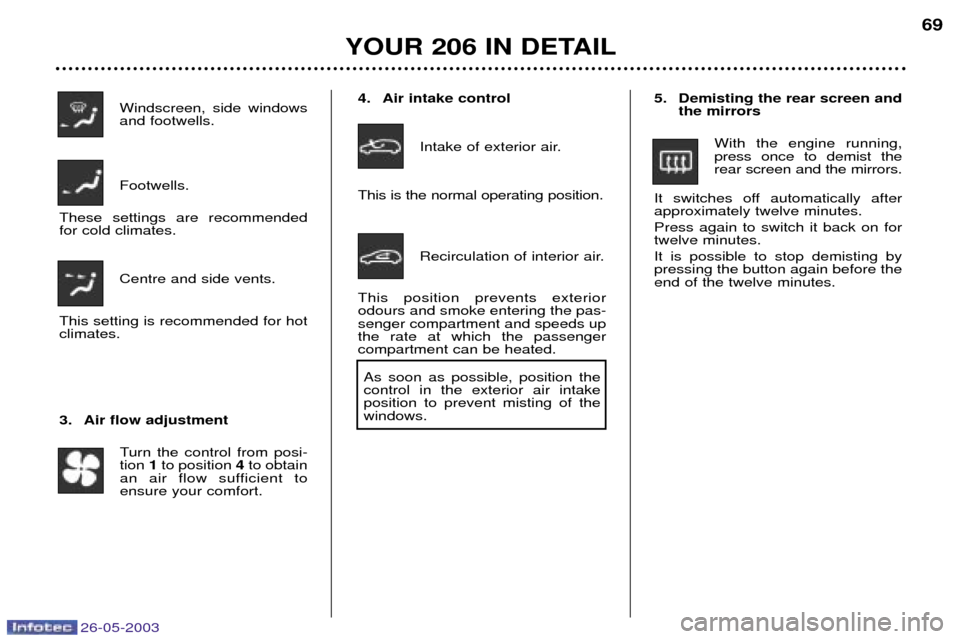
4. Air intake controlIntake of exterior air.
This is the normal operating position.
Recirculation of interior air.
This position prevents exterior odours and smoke entering the pas-senger compartment and speeds upthe rate at which the passengercompartment can be heated. As soon as possible, position thecontrol in the exterior air intakeposition to prevent misting of thewindows.
YOUR 206 IN DETAIL 69
Windscreen, side windows and footwells. Footwells.
These settings are recommended for cold climates.
Centre and side vents.
This setting is recommended for hotclimates.
3. Air flow adjustment Turn the control from posi- tion 1to position 4to obtain
an air flow sufficient toensure your comfort.
5. Demisting the rear screen and the mirrors
With the engine running, press once to demist therear screen and the mirrors.
It switches off automatically afterapproximately twelve minutes. Press again to switch it back on for twelve minutes. It is possible to stop demisting by pressing the button again before theend of the twelve minutes.
Page 72 of 171

26-05-2003
YOUR 206 IN DETAIL71
3. Air distribution adjustment
Windscreen and side win- dows (de-icing/demisting).
To quickly de-ice or demist the wind-screen and side windows:
Ð turn the temperature and air flow controls to maximum,
Ð close the centre vents,
Ð position the air intake control to the left; the "Outside Air" position,
Ð start the air conditioning.
Windscreen, side windows and footwells. Footwells.
These settings are recommended for cold climates.
Centre and side vents.
This setting is recommended for hotclimates. 5. Air intake control
Intake of exterior air.
This is the normal operating position.
Recirculation of interior air.
This position prevents exteriorodours and smoke entering the pas-senger compartment. Used simultaneously with the air con- ditioning, recirculation enables bothheating and cooling performance tobe improved. Used without the air conditioning, recirculation may result in misting ofthe windows. As soon as possible, position the
control in the exterior air intakeposition. Important precaution Operate the air conditioning system for 5 to 10 minutes, once or twice amonth, to keep it in perfect working
order. If the system does not produce
cold air, do not use it and contact a
PEUGEOT dealer.
4. Air flow adjustment
Turn the control from posi-tion 1to position 4to obtain
an air flow sufficient toensure your comfort. 6. Demisting the rear screen and
the mirrors
With the engine running,press once to demist the rear screen and themirrors.
It switches off automatically afterapproximately twelve minutes. Press again to switch it back on for twelve minutes. It is possible to stop demisting by pressing the button again before theend of the twelve minutes.
Page 73 of 171

26-05-2003
YOUR 206 IN DETAIL
72
Automatic operation
1. Temperature adjustment
The chosen temperature is displayed. Press the up anddown arrows to change it.
A setting around 21 ¡Cenables a comfortable tem-perature to be obtained. 2. Automatic comfort programme
Press the
AUTObutton. The sys-
tem automatically adjusts theatmosphere inside the vehicle inaccordance with the temperature
that you have chosen. To do this, it controls the
temperature, the flow, the distribution and theintake of air as well as the air conditioning.Note: for your comfort, the settings are retained
between two start-ups of your vehicle if the tem-perature in the passenger compartment has notchanged significantly; otherwise, operationresumes in automatic mode.
3. Automatic visibility programme
In some cases, the auto-matic comfort programme
may not be sufficient for de-icing or demisting of the
windows (humidity, several passen-gers, ice etc.). In this case, select theautomatic visibility programme to
clear the windows quickly.
To exit this programme and return to the automatic comfort programme,press the AUTObutton.
AUTOMATIC AIR CONDITIONING
Page 85 of 171
26-05-2003
YOUR 206 IN DETAIL83
Never leave one or more children alone and unsu-pervised in a vehicle. Never leave a child or an
animal in a vehicle which is exposed to the sun and has thewindows closed.
To protect your young children fromthe sun, fit blinds on the rear windows.
Never leave the keys within reachof children inside the vehicle. Disarm the passenger air bag when installing a "rearwardsfacing" child seat on the frontpassenger seat. Otherwise, thechild would risk being killed orseriously injured were the airbag to inflate. Observe strictly the recommenda- tions for assembling and securingthe child seat as shown in thechild seat instructions.
To prevent the doors from opening
accidentally, use the child lock*. Also, do not open the rear win- dows more than a third*.
* According to model.
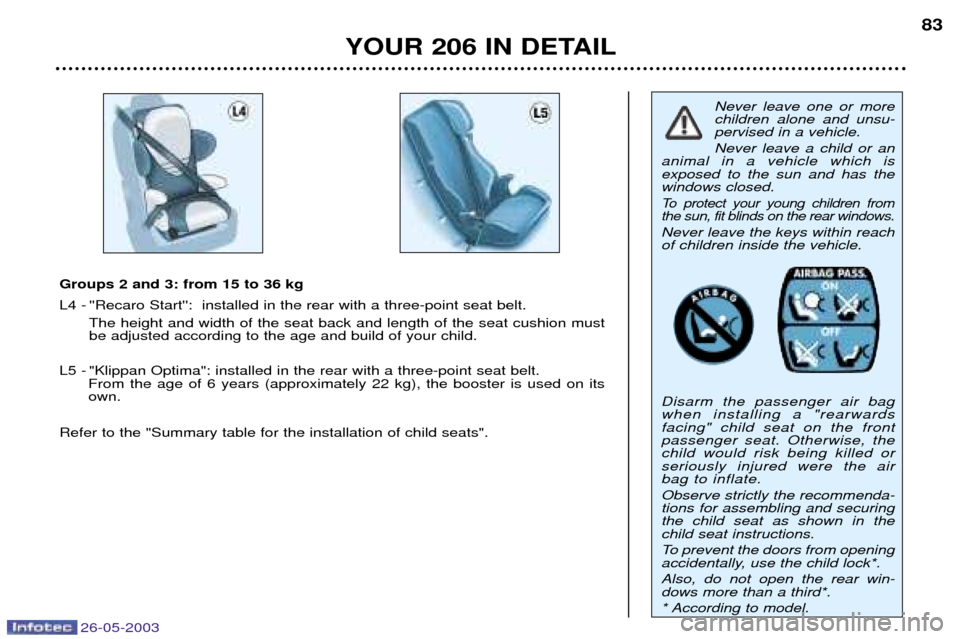
Groups 2 and 3: from 15 to 36 kg
L4 - ''Recaro Start'': installed in the rear with a three-point seat belt.
The height and width of the seat back and length of the seat cushion mustbe adjusted according to the age and build of your child.
L5 - "Klippan Optima": installed in the rear with a three-point seat belt. From the age of 6 years (approximately 22 kg), the booster is used on its own.
Refer to the "Summary table for the installation of child seats".
Page 93 of 171

26-05-2003
SPECIAL FEATURES
158
THE ALARM* Setting and deactivating the alarm system Switching off the siren The alarm completes the security
equipment for your vehicle. It offerstwo types of protection. Ð
external protection: when it is set,
the alarm sounds if one of the doors, the boot or the bonnet is opened;
Ð internal protection: when it is set,
the alarm sounds if the sensorsdetect air movement in the passen-ger compartment (a broken window)
or movement within the car.
The alarm also has an anti-tamperfunction. If there is an attempt to tamper with the wires to the siren, control unit or
the battery, the siren sounds and thedirection indicators light.
* According to destination. Setting the alarm (external and internal protection)
Switch the ignition off and get out of the vehicle. Deadlock the vehicle.The doors lock.The direction indicators light for two seconds. The red light on the switch flashes once a second.
5 seconds later, internal protection is set.
45 seconds later, external protection is set. Note:
when the alarm is triggered, the
siren sounds for thirty seconds. After the thirty seconds it stops, but thealarm remains set.
Warning
When the alarm is set, if a door, the tailgate or bonnet are not closed cor-
rectly, the siren sounds for a moment.If the vehicle is closed correctly in thefollowing 45 seconds, the alarm isactivated and the direction indicatorsremain on for two seconds. In all
cases, the alarm is activated after45 seconds. Disarming the alarm(internal and external protection) Press the release button of the remote
control key. The doors unlock.The direction indicators flash for two seconds. The red light on the switch goes out. Note:
if the warning light continues to
flash after de-activation of the alarm, it is a sign that the alarm has been
triggered. The flashing will stop whenthe ignition is switched ON.