Peugeot 207 Dag 2007.5 Repair Manual
Manufacturer: PEUGEOT, Model Year: 2007.5, Model line: 207 Dag, Model: Peugeot 207 Dag 2007.5Pages: 223, PDF Size: 9.01 MB
Page 61 of 223
58
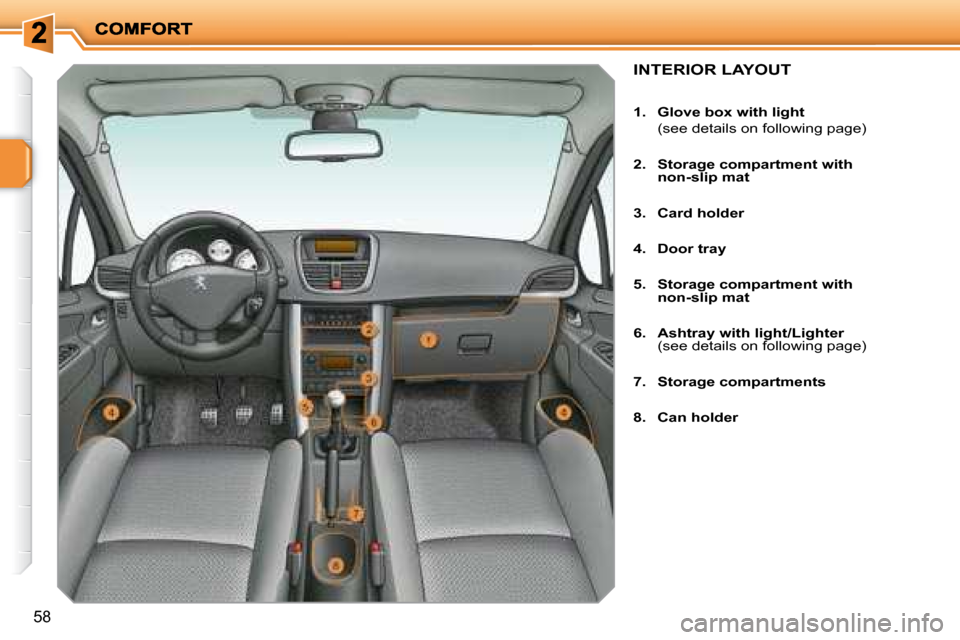
INTERIOR LAYOUT
1. Glove box with light
(see details on following page)
2. Storage compartment with
non-slip mat
3. Card holder
4. Door tray
5. Storage compartment with
non-slip mat
6. Ashtray with light/Lighter
(see details on following page)
7. Storage compartments
8. Can holder
Page 62 of 223
59
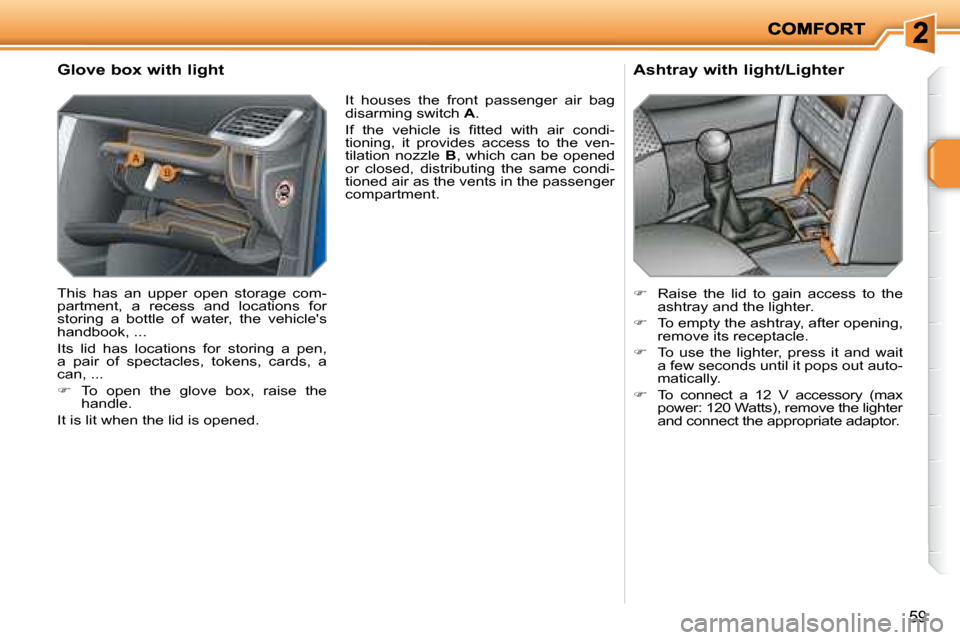
Glove box with light
This has an upper open storage com-
partment, a recess and locations for
storing a bottle of water, the vehicle's
handbook, ...
Its lid has locations for storing a pen,
a pair of spectacles, tokens, cards, a
can, ...
� To open the glove box, raise the
handle.
It is lit when the lid is opened.
� Raise the lid to gain access to the
ashtray and the lighter.
� To empty the ashtray, after opening,
remove its receptacle.
� To use the lighter, press it and wait
a few seconds until it pops out auto-
matically.
� To connect a 12 V accessory (max
power: 120 Watts), remove the lighter
and connect the appropriate adaptor.
It houses the front passenger air bag
disarming switch
A .
� �I�f� �t�h�e� �v�e�h�i�c�l�e� �i�s� �i� �t�t�e�d� �w�i�t�h� �a�i�r� �c�o�n�d�i�-
tioning, it provides access to the ven-
tilation nozzle B , which can be opened
or closed, distributing the same condi-
tioned air as the vents in the passenger
compartment. Ashtray with light/Lighter
Page 63 of 223
60
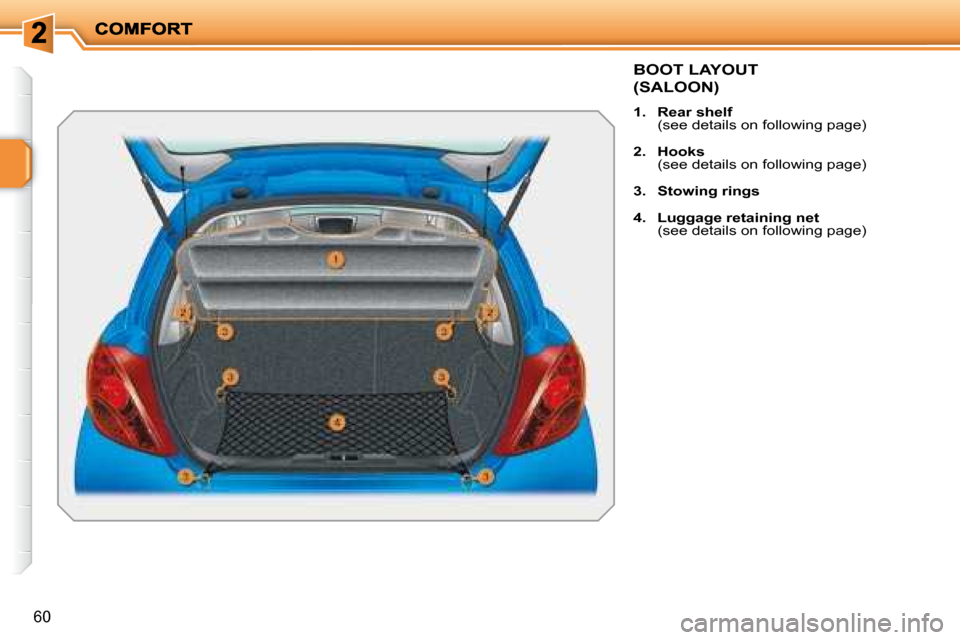
BOOT LAYOUT
(SALOON)
1. Rear shelf
(see details on following page)
2. Hooks
(see details on following page)
3. Stowing rings
4. Luggage retaining net
(see details on following page)
Page 64 of 223
i
61
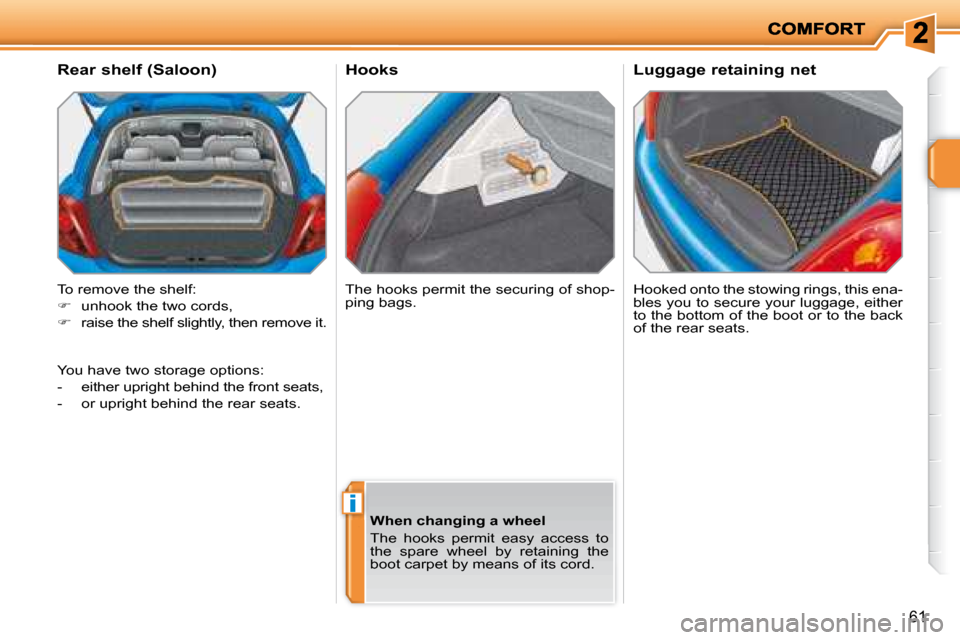
Hooks Hooked onto the stowing rings, this ena-
bles you to secure your luggage, either
to the bottom of the boot or to the back
of the rear seats.
Rear shelf (Saloon)
To remove the shelf:
� unhook the two cords,
� raise the shelf slightly, then remove it. The hooks permit the securing of shop-
ping bags. Luggage retaining net
When changing a wheel
The hooks permit easy access to
the spare wheel by retaining the
boot carpet by means of its cord.
You have two storage options:
- either upright behind the front seats,
- or upright behind the rear seats.
Page 65 of 223
62
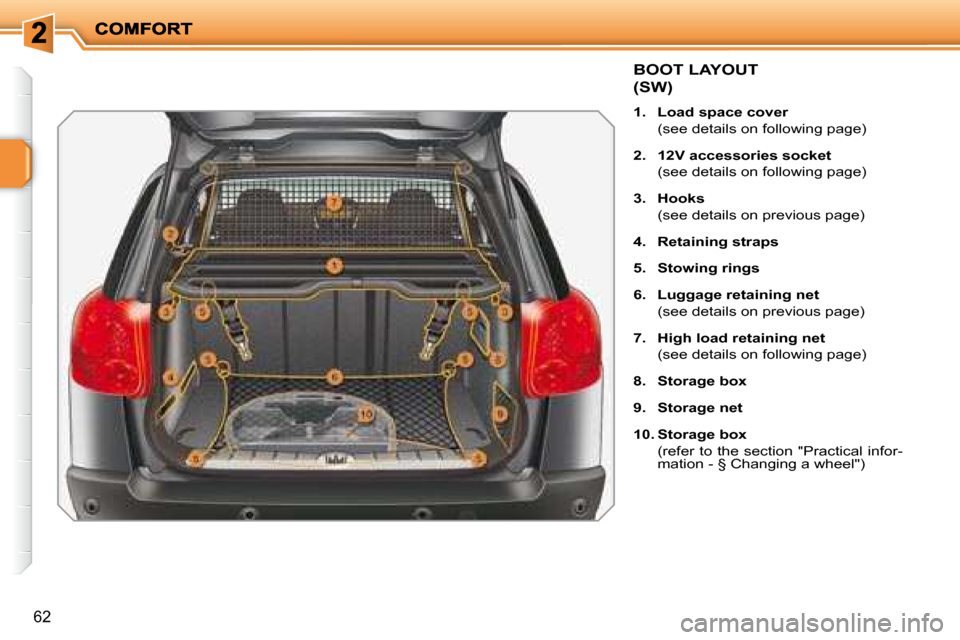
BOOT LAYOUT
(SW)
1. Load space cover
(see details on following page)
2. 12V accessories socket
(see details on following page)
3. Hooks
(see details on previous page)
4. Retaining straps
5. Stowing rings
6. Luggage retaining net
(see details on previous page)
7. High load retaining net
(see details on following page)
8. Storage box
9. Storage net
10. Storage box
� �(�r�e�f�e�r� �t�o� �t�h�e� �s�e�c�t�i�o�n� �"�P�r�a�c�t�i�c�a�l� �i�n�f�o�r�- �m�a�t�i�o�n� �-� �§� �C�h�a�n�g�i�n�g� �a� �w�h�e�e�l�"�)� �
Page 66 of 223
i
63
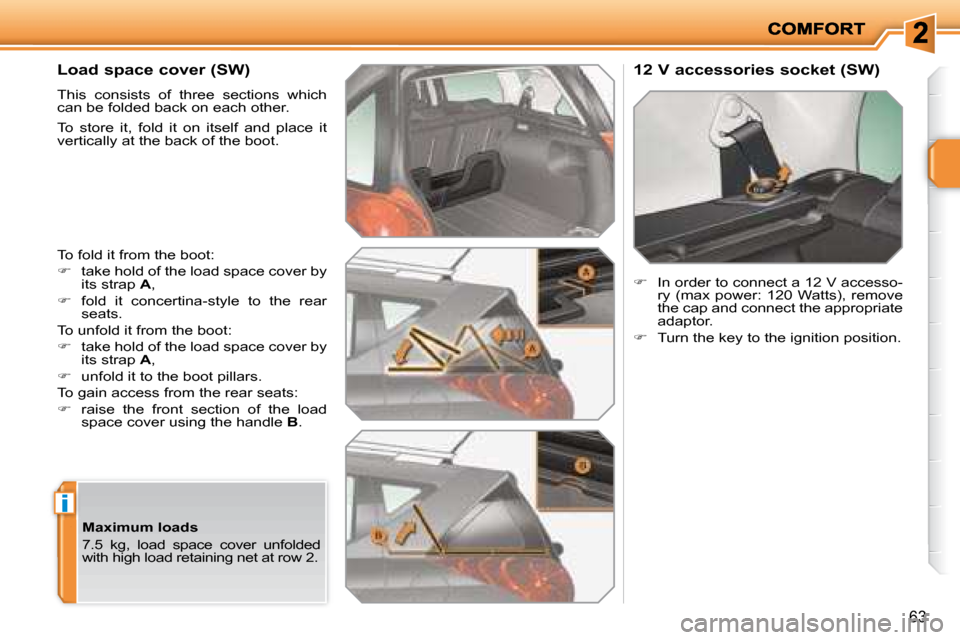
Load space cover (SW)
This consists of three sections which
can be folded back on each other.
To store it, fold it on itself and place it
vertically at the back of the boot.
To fold it from the boot:
� take hold of the load space cover by
its strap A ,
� fold it concertina-style to the rear
seats.
To unfold it from the boot:
� take hold of the load space cover by
its strap A ,
� unfold it to the boot pillars.
To gain access from the rear seats:
� raise the front section of the load
space cover using the handle B . 12 V accessories socket (SW)
� In order to connect a 12 V accesso-
ry (max power: 120 Watts), remove
the cap and connect the appropriate
adaptor.
� Turn the key to the ignition position.
Maximum loads
7.5 kg, load space cover unfolded
with high load retaining net at row 2.
Page 67 of 223
i
64
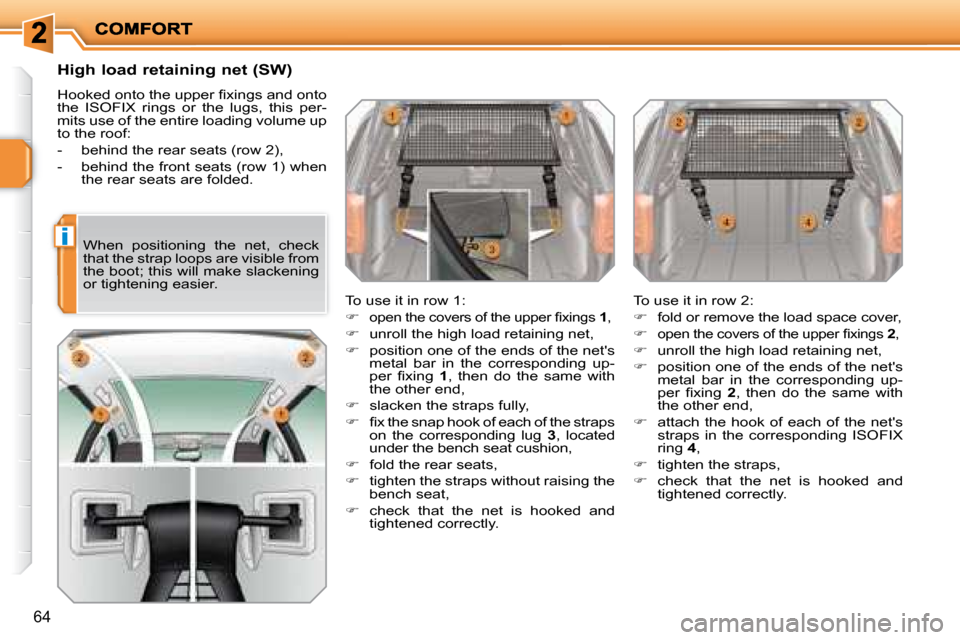
High load retaining net (SW)
� �H�o�o�k�e�d� �o�n�t�o� �t�h�e� �u�p�p�e�r� �i� �x�i�n�g�s� �a�n�d� �o�n�t�o�
the ISOFIX rings or the lugs, this per-
mits use of the entire loading volume up
to the roof:
- behind the rear seats (row 2),
- behind the front seats (row 1) when the rear seats are folded.
To use it in row 1:
�
�o�p�e�n� �t�h�e� �c�o�v�e�r�s� �o�f� �t�h�e� �u�p�p�e�r� �i� �x�i�n�g�s� � 1 ,
� unroll the high load retaining net,
� position one of the ends of the net's
metal bar in the corresponding up-
�p�e�r� �i� �x�i�n�g� � 1 , then do the same with
the other end,
� slacken the straps fully,
� � � �i� �x� �t�h�e� �s�n�a�p� �h�o�o�k� �o�f� �e�a�c�h� �o�f� �t�h�e� �s�t�r�a�p�s�
on the corresponding lug 3 , located
under the bench seat cushion,
� fold the rear seats,
� tighten the straps without raising the
bench seat,
� check that the net is hooked and
tightened correctly. To use it in row 2:
� fold or remove the load space cover,
� �o�p�e�n� �t�h�e� �c�o�v�e�r�s� �o�f� �t�h�e� �u�p�p�e�r� �i� �x�i�n�g�s� � 2 ,
� unroll the high load retaining net,
� position one of the ends of the net's
metal bar in the corresponding up-
�p�e�r� �i� �x�i�n�g� � 2 , then do the same with
the other end,
� attach the hook of each of the net's
straps in the corresponding ISOFIX
ring 4 ,
� tighten the straps,
� check that the net is hooked and
tightened correctly.
When positioning the net, check
that the strap loops are visible from
the boot; this will make slackening
or tightening easier.
Page 68 of 223
!
i
65
Deadlocking renders the exterior
and interior door controls inopera-
tive.
It also deactivates the manual cen-
tralised control button.
Therefore, do not leave anyone
inside the vehicle when it is dead-
locked.
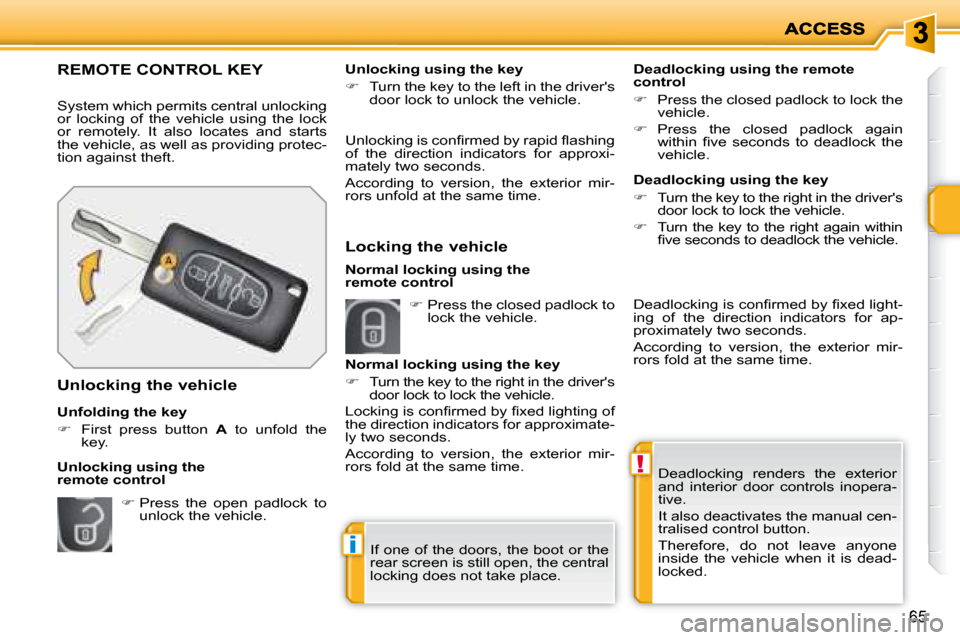
REMOTE CONTROL KEY
System which permits central unlocking
or locking of the vehicle using the lock
or remotely. It also locates and starts
the vehicle, as well as providing protec-
tion against theft.
Unfolding the key
� First press button A to unfold the
key.
Unlocking the vehicle � �U�n�l�o�c�k�i�n�g� �i�s� �c�o�n�i� �r�m�e�d� �b�y� �r�a�p�i�d� �l� �a�s�h�i�n�g�
of the direction indicators for approxi-
mately two seconds.
According to version, the exterior mir-
rors unfold at the same time.
Locking the vehicle
Deadlocking using the remote
control
� Press the closed padlock to lock the
vehicle.
� Press the closed padlock again
�w�i�t�h�i�n� �i� �v�e� �s�e�c�o�n�d�s� �t�o� �d�e�a�d�l�o�c�k� �t�h�e�
vehicle.
� Press the open padlock to
unlock the vehicle. Unlocking using the key
� Turn the key to the left in the driver's
door lock to unlock the vehicle.
Normal locking using the key
� Turn the key to the right in the driver's
door lock to lock the vehicle.
� �L�o�c�k�i�n�g� �i�s� �c�o�n�i� �r�m�e�d� �b�y� �i� �x�e�d� �l�i�g�h�t�i�n�g� �o�f�
the direction indicators for approximate-
ly two seconds.
According to version, the exterior mir-
rors fold at the same time.
Unlocking using the
remote control Deadlocking using the key
� Turn the key to the right in the driver's
door lock to lock the vehicle.
� Turn the key to the right again within
�i� �v�e� �s�e�c�o�n�d�s� �t�o� �d�e�a�d�l�o�c�k� �t�h�e� �v�e�h�i�c�l�e�.� �
� Press the closed padlock to
lock the vehicle.
If one of the doors, the boot or the
rear screen is still open, the central
locking does not take place.
Normal locking using the
remote control
� �D�e�a�d�l�o�c�k�i�n�g� �i�s� �c�o�n�i� �r�m�e�d� �b�y� �i� �x�e�d� �l�i�g�h�t�-
ing of the direction indicators for ap-
proximately two seconds.
According to version, the exterior mir-
rors fold at the same time.
Page 69 of 223
!i
i
ACCESS
66
Keep this card in a safe place,
never in the vehicle.
Carry this card with you, in the same
way as your personal papers.
The vehicle will relock automati-
cally after thirty seconds unless a
door is opened. This system pre-
vents unintentional unlocking.
The folding and unfolding of the ex-
terior mirrors can be deactivated by
a PEUGEOT dealer.
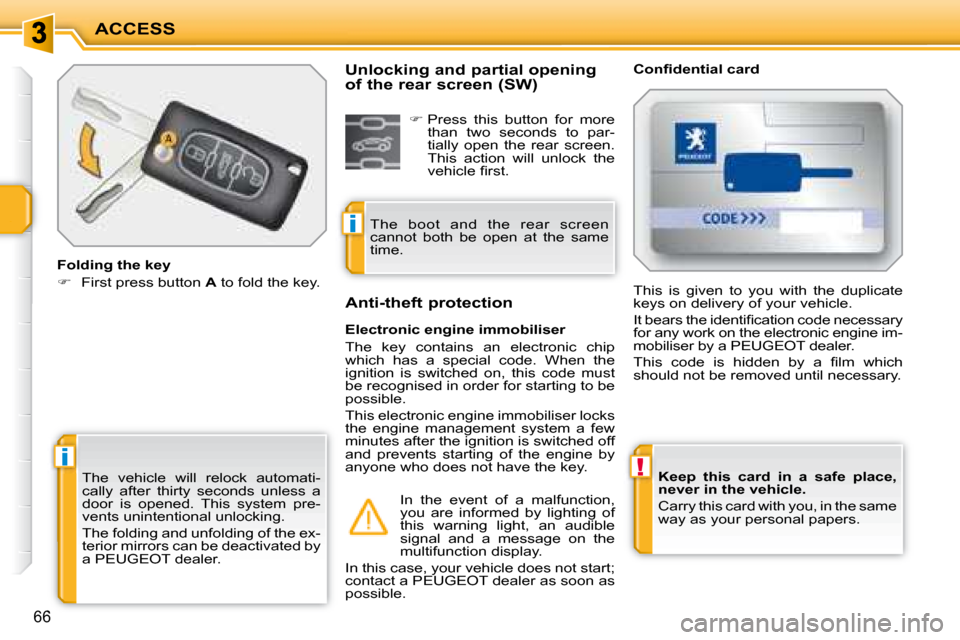
Folding the key
� First press button A to fold the key. � � �C�o�n�i� �d�e�n�t�i�a�l� �c�a�r�d�
Electronic engine immobiliser
The key contains an electronic chip
which has a special code. When the
ignition is switched on, this code must
be recognised in order for starting to be
possible.
This electronic engine immobiliser locks
the engine management system a few
minutes after the ignition is switched off
and prevents starting of the engine by
anyone who does not have the key.
Anti-theft protection
This is given to you with the duplicate
keys on delivery of your vehicle.
� �I�t� �b�e�a�r�s� �t�h�e� �i�d�e�n�t�i�i� �c�a�t�i�o�n� �c�o�d�e� �n�e�c�e�s�s�a�r�y�
for any work on the electronic engine im-
mobiliser by a PEUGEOT dealer.
� �T�h�i�s� �c�o�d�e� �i�s� �h�i�d�d�e�n� �b�y� �a� �i� �l�m� �w�h�i�c�h�
should not be removed until necessary.
In the event of a malfunction,
you are informed by lighting of
this warning light, an audible
signal and a message on the
multifunction display.
In this case, your vehicle does not start;
contact a PEUGEOT dealer as soon as
possible.
Unlocking and partial opening
of the rear screen (SW)
� Press this button for more
than two seconds to par-
tially open the rear screen.
This action will unlock the
�v�e�h�i�c�l�e� �i� �r�s�t�.� � �
The boot and the rear screen
cannot both be open at the same
time.
Page 70 of 223
i
67
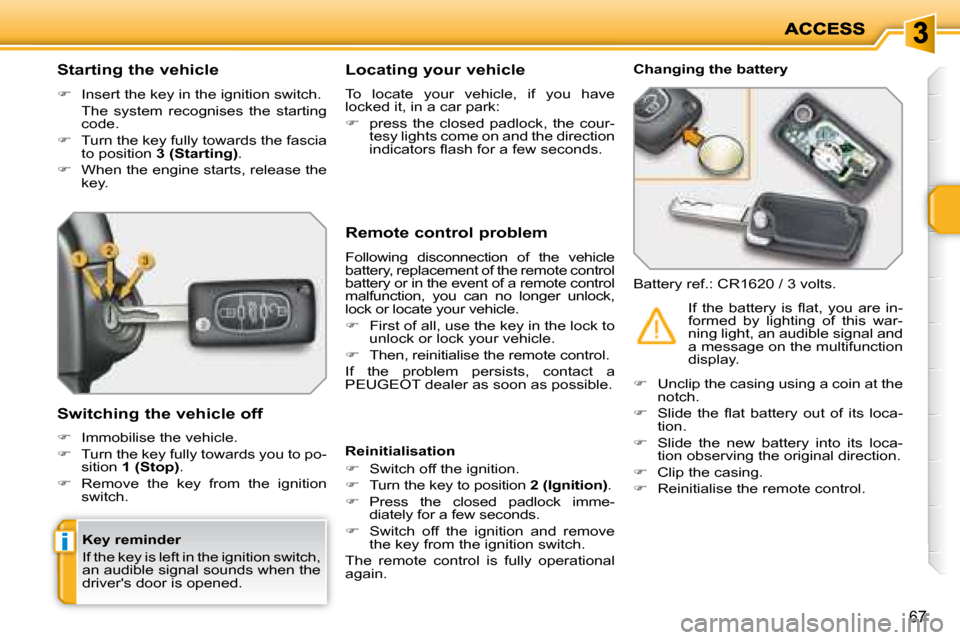
Starting the vehicle
� Insert the key in the ignition switch.
The system recognises the starting code.
� Turn the key fully towards the fascia
to position 3 (Starting) .
� When the engine starts, release the
key.
Switching the vehicle off
� Immobilise the vehicle.
� Turn the key fully towards you to po-
sition 1 (Stop) .
� Remove the key from the ignition
switch. Remote control problem
Following disconnection of the vehicle
battery, replacement of the remote control
battery or in the event of a remote control
malfunction, you can no longer unlock,
lock or locate your vehicle.
� First of all, use the key in the lock to
unlock or lock your vehicle.
� Then, reinitialise the remote control.
If the problem persists, contact a
PEUGEOT dealer as soon as possible. Changing the battery
Battery ref.: CR1620 / 3 volts.
Reinitialisation
� Switch off the ignition.
� Turn the key to position 2 (Ignition) .
� Press the closed padlock imme-
diately for a few seconds.
� Switch off the ignition and remove
the key from the ignition switch.
The remote control is fully operational
again.
� Unclip the casing using a coin at the
notch.
� � � �S�l�i�d�e� �t�h�e� �l� �a�t� �b�a�t�t�e�r�y� �o�u�t� �o�f� �i�t�s� �l�o�c�a�-
tion.
� Slide the new battery into its loca-
tion observing the original direction.
� Clip the casing.
� Reinitialise the remote control. � �I�f� �t�h�e� �b�a�t�t�e�r�y� �i�s� �l� �a�t�,� �y�o�u� �a�r�e� �i�n�-
formed by lighting of this war-
ning light, an audible signal and
a message on the multifunction
display.
Locating your vehicle
To locate your vehicle, if you have
locked it, in a car park:
� press the closed padlock, the cour-
tesy lights come on and the direction
�i�n�d�i�c�a�t�o�r�s� �l� �a�s�h� �f�o�r� �a� �f�e�w� �s�e�c�o�n�d�s�.� � � �
Key reminder
If the key is left in the ignition switch,
an audible signal sounds when the
driver's door is opened.