ECU Peugeot 3008 Hybrid 4 2014 Owner's Manual
[x] Cancel search | Manufacturer: PEUGEOT, Model Year: 2014, Model line: 3008 Hybrid 4, Model: Peugeot 3008 Hybrid 4 2014Pages: 378, PDF Size: 22.5 MB
Page 88 of 378
Comfort
86
Folding the seat from the
rear
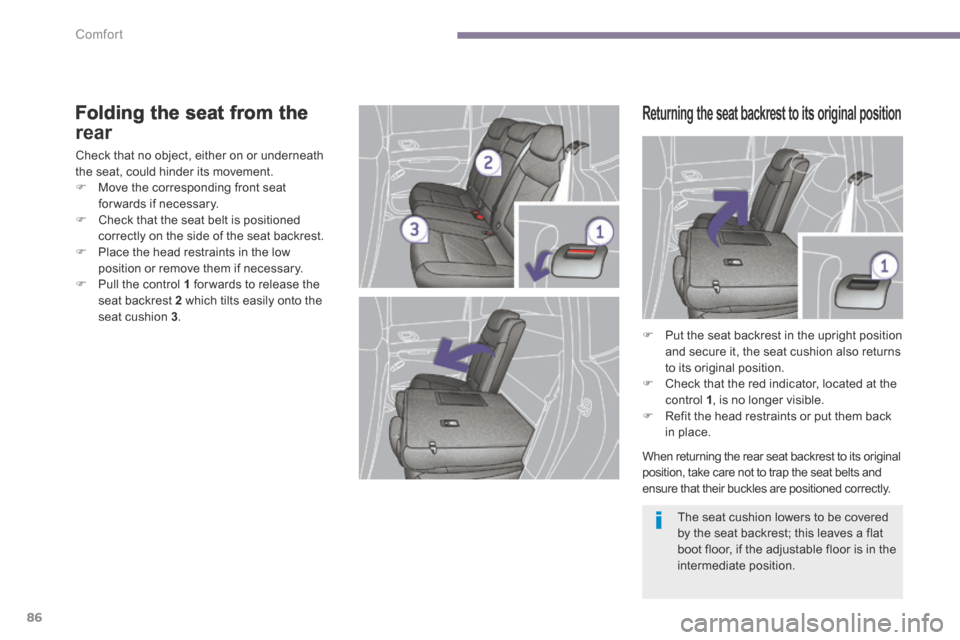
Check that no object, either on or underneath the seat, could hinder its movement. Move the corresponding front seat for wards if necessary. Check that the seat belt is positioned correctly on the side of the seat backrest. Place the head restraints in the low position or remove them if necessary. Pull the control 1 for wards to release the seat backrest 2 which tilts easily onto the seat cushion 3 .
Returning the seat backrest to its original position
When returning the rear seat backrest to its original position, take care not to trap the seat belts and ensure that their buckles are positioned correctly.
The seat cushion lowers to be covered by the seat backrest; this leaves a flat boot floor, if the adjustable floor is in the intermediate position.
Put the seat backrest in the upright position and secure it, the seat cushion also returns to its original position. Check that the red indicator, located at the control 1 , is no longer visible. Refit the head restraints or put them back
in place.
Page 100 of 378
Access
98
Electric windows
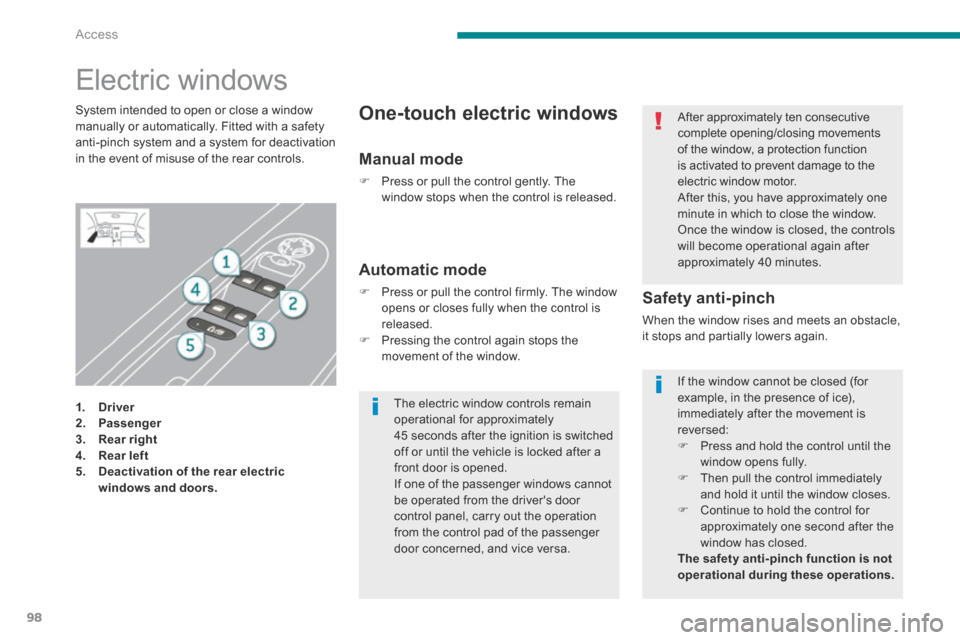
1. Driver2. Passenger3. Rear right4. Rear left5. Deactivation of the rear electric windows and doors.
Safety anti-pinch
When the window rises and meets an obstacle, it stops and partially lowers again.
Automatic mode
Press or pull the control firmly. The window opens or closes fully when the control is released. Pressing the control again stops the movement of the window.
One-touch electric windows System intended to open or close a window manually or automatically. Fitted with a safety anti-pinch system and a system for deactivation in the event of misuse of the rear controls. Manual mode
Press or pull the control gently. The window stops when the control is released.
After approximately ten consecutive complete opening/closing movements of the window, a protection function is activated to prevent damage to the electric window motor. After this, you have approximately one minute in which to close the window. Once the window is closed, the controls will become operational again after approximately 40 minutes.
The electric window controls remain operational for approximately 45 seconds after the ignition is switched off or until the vehicle is locked after a front door is opened. If one of the passenger windows cannot be operated from the driver's door control panel, carry out the operation from the control pad of the passenger
door concerned, and vice versa.
If the window cannot be closed (for example, in the presence of ice), immediately after the movement is reversed: Press and hold the control until the window opens fully. Then pull the control immediately and hold it until the window closes. Continue to hold the control for approximately one second after the window has closed. The safety anti-pinch function is not operational during these operations.
Page 106 of 378
Access
104
Lower tailgate
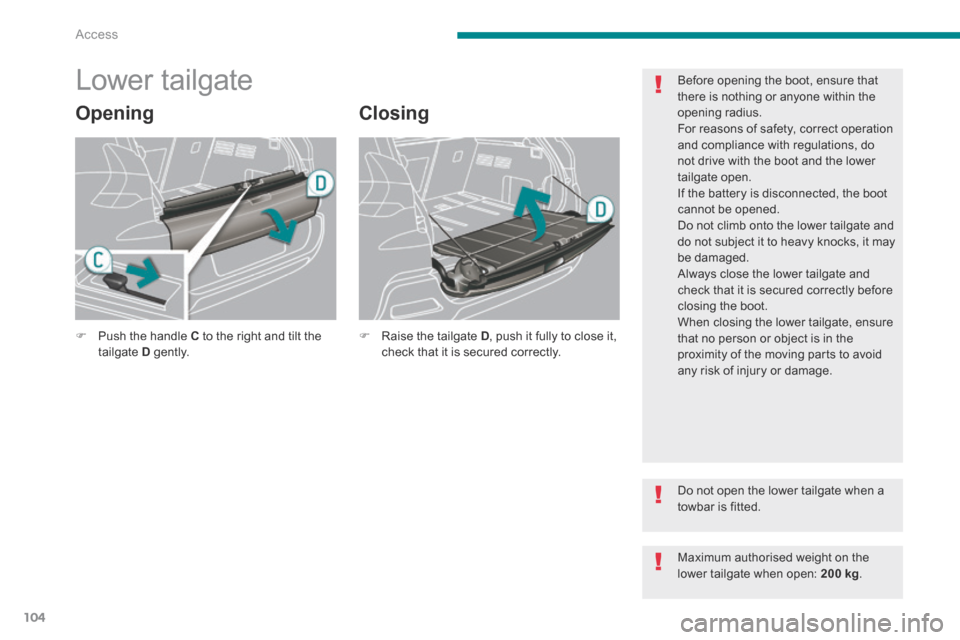
Opening Closing
Push the handle C to the right and tilt the tailgate D g e nt l y. Raise the tailgate D , push it fully to close it, check that it is secured correctly.
Before opening the boot, ensure that there is nothing or anyone within the opening radius. For reasons of safety, correct operation and compliance with regulations, do not drive with the boot and the lower tailgate open. If the battery is disconnected, the boot cannot be opened. Do not climb onto the lower tailgate and do not subject it to heavy knocks, it may be damaged. Always close the lower tailgate and check that it is secured correctly before closing the boot. When closing the lower tailgate, ensure that no person or object is in the proximity of the moving parts to avoid any risk of injury or damage.
Do not open the lower tailgate when a towbar is fitted.
Maximum authorised weight on the lower tailgate when open: 200 kg .
Page 108 of 378
DIESEL
Access
106
To fill the tank safely:
When refuelling is complete: put the cap back in place, turn the key to the right, then remove it from the cap, close the filler flap.
Operating fault
A malfunction of the fuel gauge is indicated by the return to zero of the fuel gauge needle. Have it checked by a PEUGEOT dealer.
off) to avoid an automatic restart of the engine while refuelling, open the fuel filler flap, insert the key in the cap, then turn it to the left,
the engine must be turned off at the ignition switch (the Ready lamp must be
Quality of the fuel used for
Diesel engines
The Diesel engines are per fectly compatible with biofuels which conform to current and future European standards (Diesel fuel which complies with standard EN 590 mixed with a biofuel which complies with standard EN 14214) available at the pumps (containing up to 7 % Fatty Acid Methyl Ester). The B30 biofuel can be used in certain Diesel engines; however, this use is subject to strict application of the special servicing conditions. Contact a PEUGEOT dealer or a qualified workshop. The use of any other type of (bio)fuel (vegetable or animal oils, pure or diluted, domestic fuel...) is strictly prohibited (risk of damage to the engine and fuel system).
remove the cap and secure it on the hook, located on the inside of the flap, fill the tank, but do not continue after the 3rd cut- off of the nozzle ; this could cause malfunctions.
Page 129 of 378
6
Fittings127
Mats
Refitting
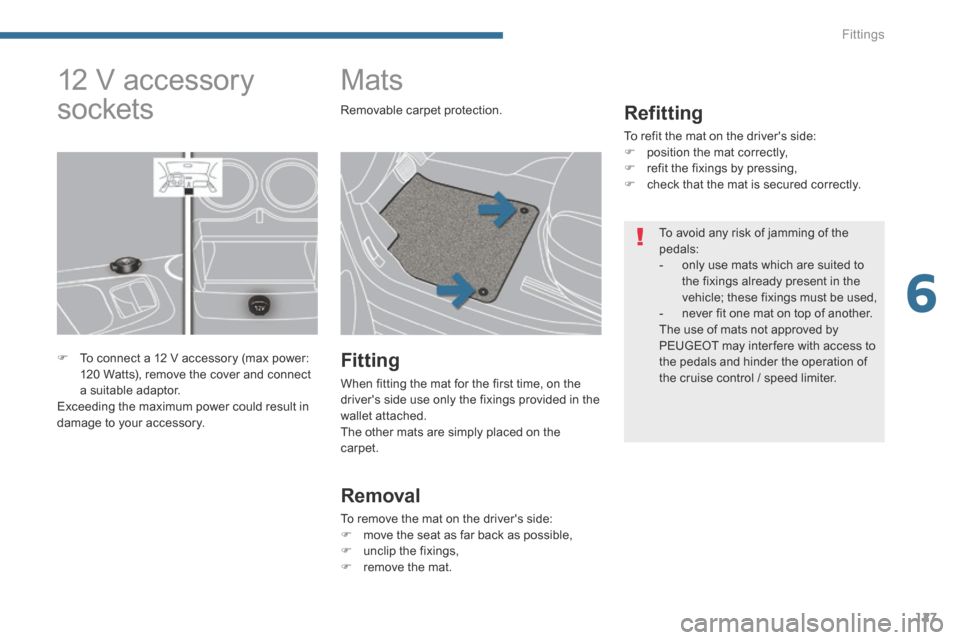
To refit the mat on the driver's side: position the mat correctly, refit the fixings by pressing, check that the mat is secured correctly.
Fitting
When fitting the mat for the first time, on the driver's side use only the fixings provided in the wallet attached. The other mats are simply placed on the carpet.
Removal
To remove the mat on the driver's side: move the seat as far back as possible, unclip the fixings, remove the mat.
12 V accessory
sockets
To connect a 12 V accessory (max power: 120 Watts), remove the cover and connect a suitable adaptor. Exceeding the maximum power could result in damage to your accessory.
To avoid any risk of jamming of the pedals: - only use mats which are suited to the fixings already present in the vehicle; these fixings must be used, - never fit one mat on top of another. The use of mats not approved by PEUGEOT may inter fere with access to the pedals and hinder the operation of the cruise control / speed limiter.
Removable carpet protection.
Page 137 of 378
6
Fittings135
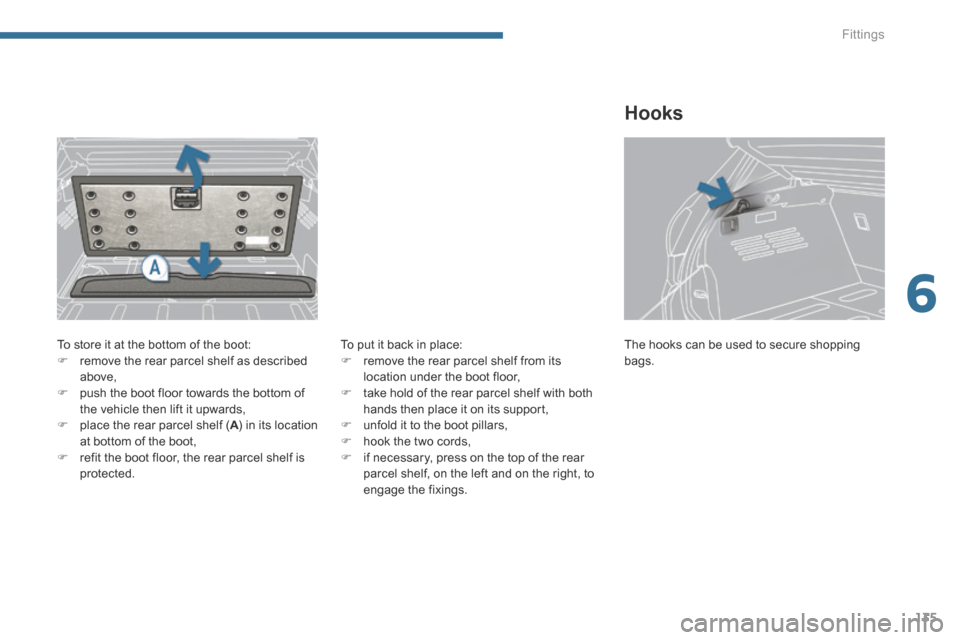
To store it at the bottom of the boot: remove the rear parcel shelf as described above, push the boot floor towards the bottom of the vehicle then lift it upwards, place the rear parcel shelf ( A ) in its location A ) in its location Aat bottom of the boot, refit the boot floor, the rear parcel shelf is protected.
To put it back in place: remove the rear parcel shelf from its location under the boot floor, take hold of the rear parcel shelf with both hands then place it on its support, unfold it to the boot pillars, hook the two cords, if necessary, press on the top of the rear parcel shelf, on the left and on the right, to engage the fixings.
The hooks can be used to secure shopping bags.
Hooks
Page 146 of 378

Child safety
144
Child seats recommended by PEUGEOT
Group 0+: from bir th to 13 kgGroup 1: from 9 to 18 kg
L1 "RÖMER /BRITA X Baby-Safe Plus". Installed in the rearward-facing position.
L2 "RÖMER Duo Plus ISOFIX".
Groups 2 and 3: from 15 to 36 kg
L5 "KLIPPAN Optima". From the age of approximately 6 years
(22 kg), the booster is used on its own.
L6 "RÖMER KIDFIX" Can be secured using the vehicle's ISOFIX mountings. The child is restrained by
the seat belt.
PEUGEOT offers a complete range of recommended child seats which are secured using a three point seat belt .
Page 147 of 378
7
Child safety145
Installing child seats attached using the seat belt
* Child seats with a support leg should be fitted to your vehicle with care. See "Fitting a child seat with a support leg" for more information.
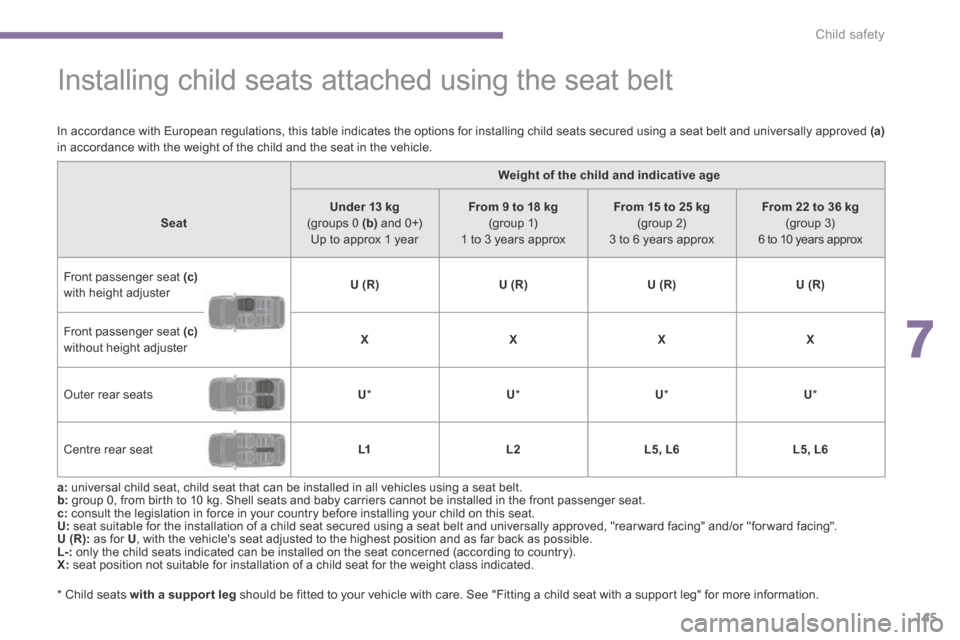
In accordance with European regulations, this table indicates the options for installing child seats secured using a seat belt and universally approved (a)in accordance with the weight of the child and the seat in the vehicle.
Weight of the child and indicative age
SeatUnder 13 kg (groups 0 (b) and 0+) Up to approx 1 year
From 9 to 18 kg (group 1) 1 to 3 years approx
From 15 to 25 kg (group 2) 3 to 6 years approx
From 22 to 36 kg (group 3) 6 to 10 years approx
Front passenger seat (c)with height adjuster U (R)U (R)U (R)U (R)
Front passenger seat (c)without height adjuster XXXX
Outer rear seats U * U * U * U *
Centre rear seat L1L2L5, L6L5, L6
a: universal child seat, child seat that can be installed in all vehicles using a seat belt. b: group 0, from birth to 10 kg. Shell seats and baby carriers cannot be installed in the front passenger seat. c: consult the legislation in force in your country before installing your child on this seat. U: seat suitable for the installation of a child seat secured using a seat belt and universally approved, "rear ward facing" and/or "for ward facing". U (R): as for U , with the vehicle's seat adjusted to the highest position and as far back as possible. L-: only the child seats indicated can be installed on the seat concerned (according to country). X: seat position not suitable for installation of a child seat for the weight class indicated.
Page 148 of 378

Child safety
146
"ISOFIX" mountings
The ISOFIX mountings are three rings for each seat: - two rings A , located between the vehicle seat back and cushion, indicated by a marking,
This ISOFIX mounting system ensures fast, reliable and safe fitting of the child seat in your vehicle.
The ISOFIX child seats are fitted with two latches which are secured easily on the two rings A .
Some also have an upper strap (or top tether) which is attached to ring B .
To secure the child seat to the TOP TETHER : - remove and stow the head restraint before installing the child seat on this seat (refit it after the child seat has been removed), - remove the TOP TETHER cover by pulling
at its cut-out, - pass the child seat strap behind the seat backrest, centred between the holes for the head restraint rods, - secure the upper strap fixing to the ring B , - tighten the upper strap.
Your vehicle has been approved in accordance with the latest ISOFIX regulations . The seats, represented below, are fitted with regulation ISOFIX mountings:
- a ring B , located under a cover on the back of the top of the seat backrest, referred to as the TOP TETHER for fixing the upper strap. Its position is indicated by a marking. Located on the back of the seat backrest, the top tether is used to secure the upper strap of child seats that have one. This device limits for ward tipping of the child seat, in the event of a front impact.
For information on the possibilities for fitting ISOFIX child seats to your vehicle, refer to the table of seating positions.
The incorrect installation of a child seat in a vehicle compromises the child's protection in the event of an accident. Observe strictly the fitting instructions provided with the child seat.
Page 150 of 378

Child safety
148
Locations for installing ISOFIX child seats
* Child seats with a support leg should be fitted to your vehicle with care. Refer to the section on fitting a child seat with a support leg.
In accordance with European Regulations, this table indicates the options for installing ISOFIX child seats on seats in the vehicle fitted with ISOFIX mountings. In the case of universal and semi-universal ISOFIX child seats, the ISOFIX size category, determined by a letter from A to A to AG , is indicated on the child seat next to the ISOFIX logo.
Weight of the child / indicative age
Less than 10 kg (group 0) Up to approx. 6 months
Less than 10 kg (group 0) Less than 13 kg (group 0+) Up to approx. 1 year
From 9 to 18 kg (group 1) From approx. 1 to 3 years
Type of ISOFIX child seatShell"rearward facing""rearward facing""forward facing"
ISOFIX size categor yFGCDECDABB1
Front passenger seat XXXX
Outer rear seats XIL- SU * IL- SU * IUF * IL- SU *
Centre rear seat XXXX
I UF: seat suitable for the installation of an I sofix U niversal seat, " F or ward facing" secured using the upper strap. IL- SU: seat suitable for the installation of an I sofix S emi- U niversal seat either: - "rear ward facing" fitted with an upper strap or a support leg, - "for ward facing" fitted with a support leg, - a shell seat fitted with an upper strap or a support leg. For advice on securing the upper strap refer to the section on "Isofix mountings". X: seat not suitable for the installation of a child seat or shell for the weight group indicated.