Peugeot 306 Break 2002 Owner's Manual
Manufacturer: PEUGEOT, Model Year: 2002, Model line: 306 Break, Model: Peugeot 306 Break 2002Pages: 131, PDF Size: 2.25 MB
Page 111 of 131
MAINTENANCE OF YOUR 306
42
The electrical system of your vehicle is designedto operate with standardor optional equipment.
Before installing other electricalequipment or accessories on yourvehicle, contact a PEUGEOT
dealer. Some electrical accessories or the way in which they are fitted canhave damaging effects on the ope-ration of your vehicle; the electroniccontrol circuits, the audio circuitand the battery charging circuit. PEUGEOT will not accept respon- sibility for the cost incurred in repai-ring your vehicle or for rectifyingthe malfunctions resulting from theinstallation of accessories not sup-plied and not recommended byPEUGEOT and not installed inaccordance with its instructions, inparticular where the equipment inquestion consumes more than 10 milliamperes. ** The maxi-fuses provide addi- tional protection for the electrical
systems. All work must be carried
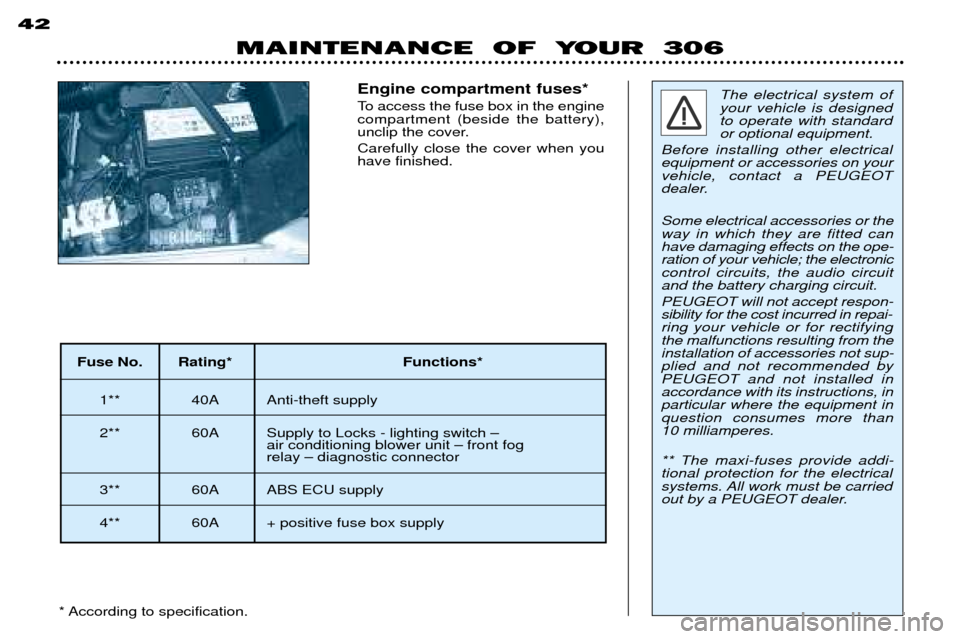
out by a PEUGEOT dealer.Engine compartment fuses*
To access the fuse box in the engine compartment (beside the battery),
unclip the cover. Carefully close the cover when you have finished.
* According to specification.
Fuse No. Rating* Functions* 1** 40A Anti-theft supply
2** 60A Supply to Locks - lighting switch Ð air conditioning blower unit Ð front fog relay Ð diagnostic connector
3** 60A ABS ECU supply
4** 60A + positive fuse box supply
Page 112 of 131
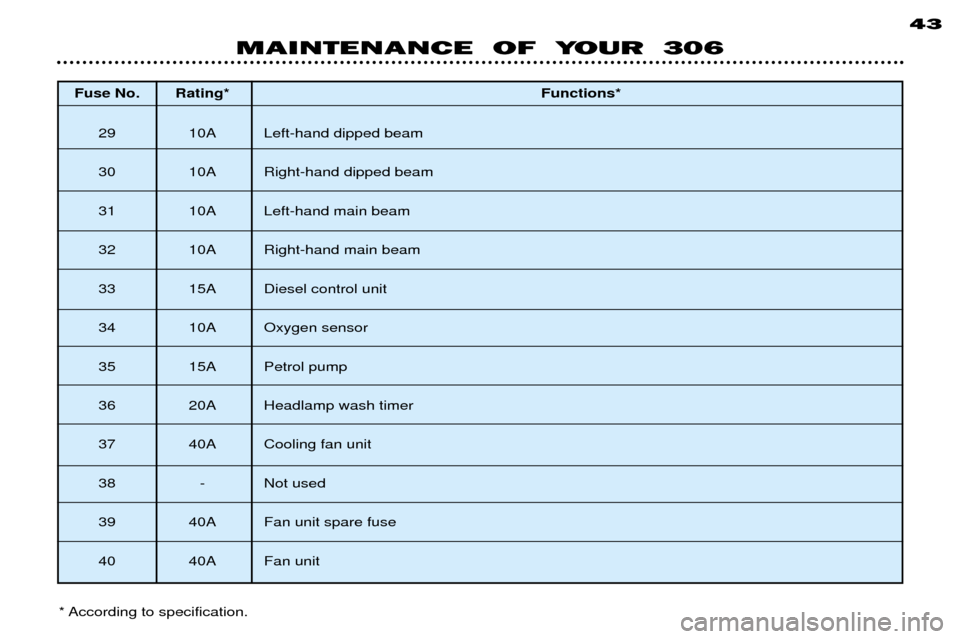
Fuse No. Rating*Functions*
29 10A Left-hand dipped beam
30 10A Right-hand dipped beam
31 10A Left-hand main beam
32 10A Right-hand main beam
33 15A Diesel control unit
34 10A Oxygen sensor
35 15A Petrol pump
36 20A Headlamp wash timer
37 40A Cooling fan unit
38 - Not used
39 40A Fan unit spare fuse
40 40A Fan unit 43
* According to specification.
MAINTENANCE OF YOUR 306
Page 113 of 131
MAINTENANCE OF YOUR 30639
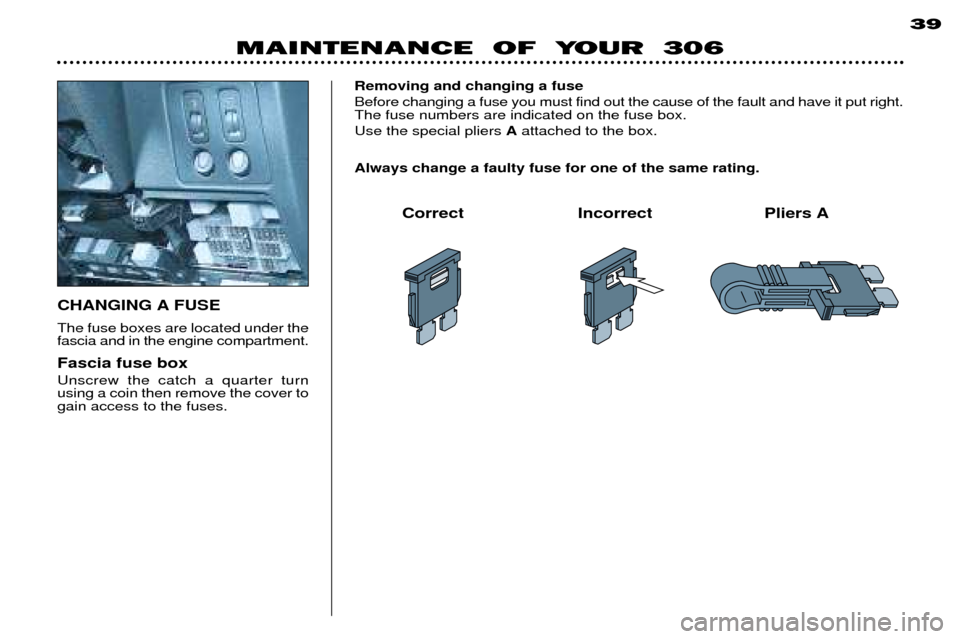
CHANGING A FUSE The fuse boxes are located under the fascia and in the engine compartment. Fascia fuse box Unscrew the catch a quarter turn using a coin then remove the cover togain access to the fuses.
Removing and changing a fuse Before changing a fuse you must find out the cause of the fault and have it put right. The fuse numbers are indicated on the fuse box. Use the special pliers
Aattached to the box.
Always change a faulty fuse for one of the same rating.
Correct Incorrect Pliers A
Page 114 of 131
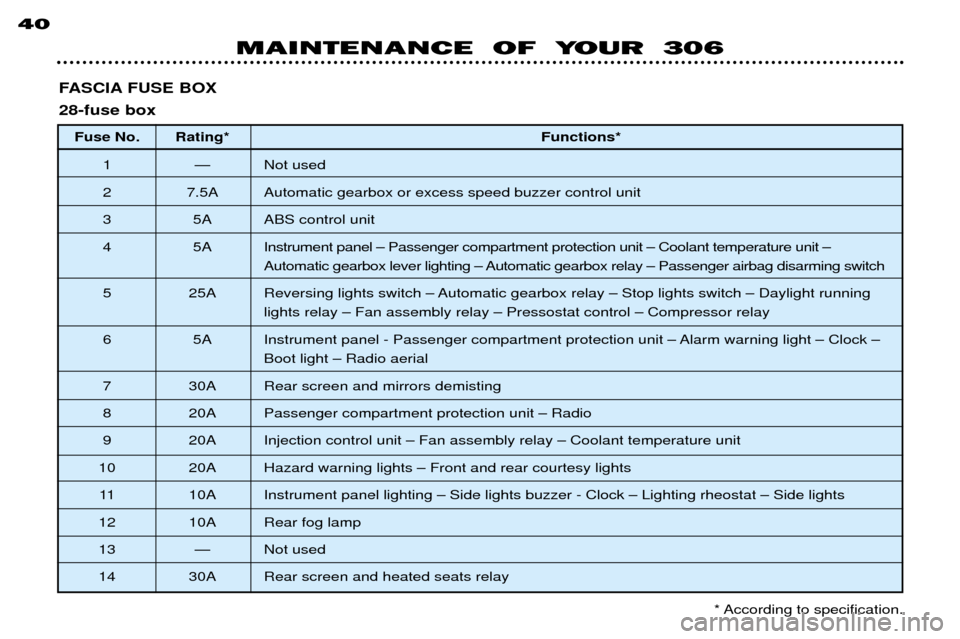
FASCIA FUSE BOX 28-fuse boxFuse No. Rating* Functions*
1 Ñ Not used
2 7.5A Automatic gearbox or excess speed buzzer control unit
3 5A ABS control unit
4 5A Instrument panel Ð Passenger compartment protection unit Ð Coolant temperature unit Ð Automatic gearbox lever lighting Ð Automatic gearbox relay Ð Passenger airbag disarming switch
5 25A Reversing lights switch Ð Automatic gearbox relay Ð Stop lights switch Ð Daylight running lights relay Ð Fan assembly relay Ð Pressostat control Ð Compressor relay
6 5A Instrument panel - Passenger compartment protection unit Ð Alarm warning light Ð Clock Ð Boot light Ð Radio aerial
7 30A Rear screen and mirrors demisting
8 20A Passenger compartment protection unit Ð Radio
9 20A Injection control unit Ð Fan assembly relay Ð Coolant temperature unit
10 20A Hazard warning lights Ð Front and rear courtesy lights
11 10A Instrument panel lighting Ð Side lights buzzer - Clock Ð Lighting rheostat Ð Side lights
12 10A Rear fog lamp
13 Ñ Not used
14 30A Rear screen and heated seats relay
MAINTENANCE OF YOUR 306
40
* According to specification.
Page 115 of 131
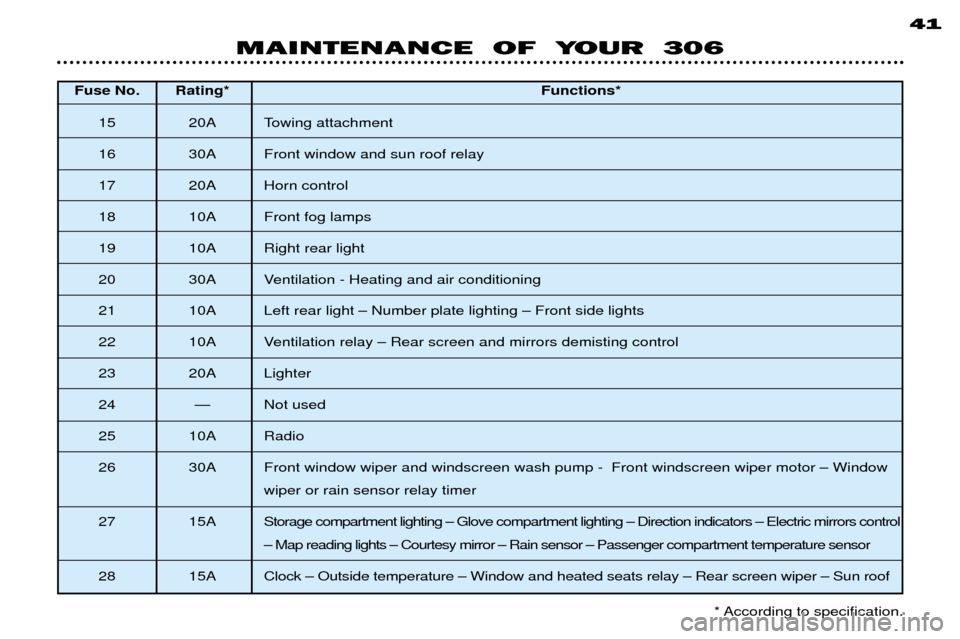
Fuse No. Rating*Functions*
15 20A Towing attachment
16 30A Front window and sun roof relay
17 20A Horn control
18 10A Front fog lamps
19 10A Right rear light
20 30A Ventilation - Heating and air conditioning
21 10A Left rear light Ð Number plate lighting Ð Front side lights
22 10A Ventilation relay Ð Rear screen and mirrors demisting control
23 20A Lighter
24 Ñ Not used
25 10A Radio
26 30A Front window wiper and windscreen wash pump - Front windscreen wiper motor Ð Window wiper or rain sensor relay timer
2 7 1 5 A Storage compartment lighting Ð Glove compartment lighting Ð Direction indicators Ð Electric mirrors control Ð Map reading lights Ð Courtesy mirror Ð Rain sensor Ð Passenger compartment temperature sensor
28 15A Clock Ð Outside temperature Ð Window and heated seats relay Ð Rear screen wiper Ð Sun roof 41
MAINTENANCE OF YOUR 306
* According to specification.
Page 116 of 131
MAINTENANCE OF YOUR 306
44
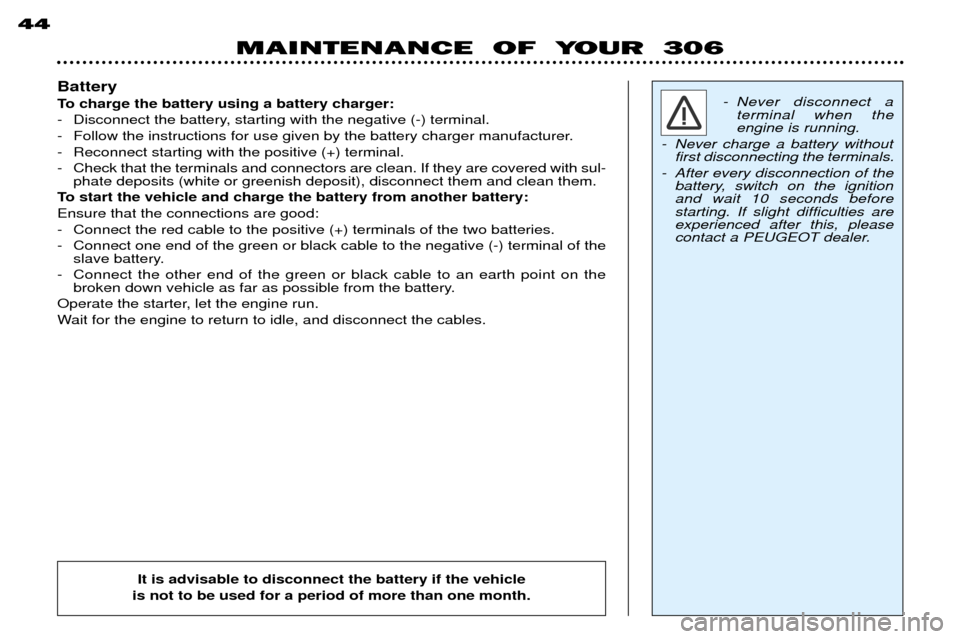
Battery
To charge the battery using a battery charger:
- Disconnect the battery, starting with the negative (-) terminal.
- Follow the instructions for use given by the battery charger manufacturer.
- Reconnect starting with the positive (+) terminal.
- Check that the terminals and connectors are clean. If they are covered with sul-phate deposits (white or greenish deposit), disconnect them and clean them.
To start the vehicle and charge the battery from another battery: Ensure that the connections are good:
- Connect the red cable to the positive (+) terminals of the two batteries.
- Connect one end of the green or black cable to the negative (-) terminal of the slave battery.
- Connect the other end of the green or black cable to an earth point on the broken down vehicle as far as possible from the battery.
Operate the starter, let the engine run.
Wait for the engine to return to idle, and disconnect the cables.
- Never disconnect a terminal when the engine is running.
- Never charge a battery without first disconnecting the terminals.
- After every disconnection of the battery, switch on the ignitionand wait 10 seconds beforestarting. If slight difficulties areexperienced after this, please
contact a PEUGEOT dealer.
It is advisable to disconnect the battery if the vehicle
is not to be used for a period of more than one month.
Page 117 of 131
FITTING AUDIO EQUIPMENT
Your vehicle is factory-fitted with certain audio equipment:
Ð Roof aerial.
Ð Aerial coaxial cable.
Ð Basic interference suppression.
Ð Supply to front speakers.
Ð Supply to rear speakers*.
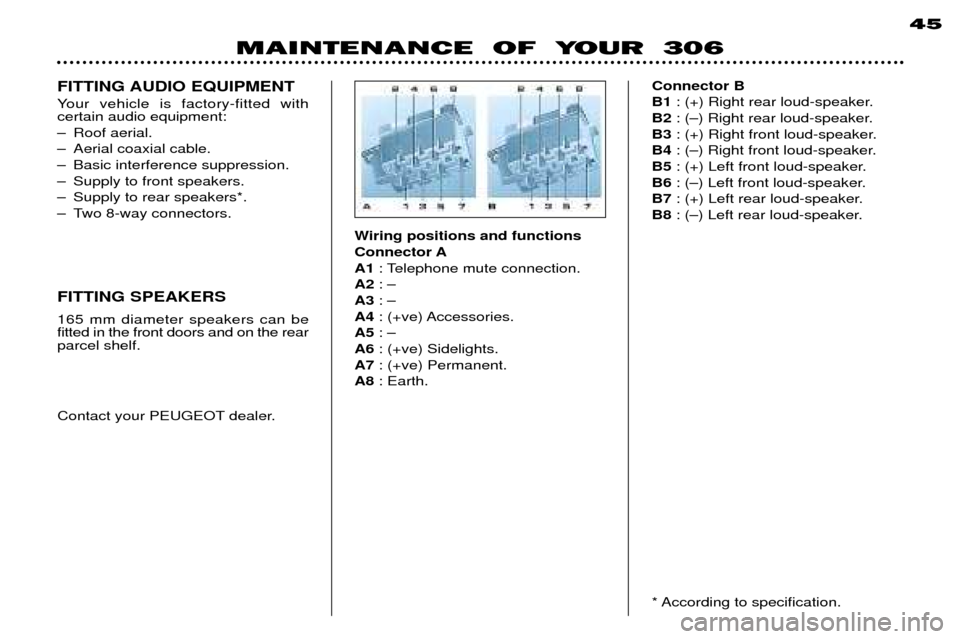
Ð Two 8-way connectors.Wiring positions and functionsConnector AA1: Telephone mute connection.
A2 : Ð
A3 : Ð
A4 : (+ve) Accessories.
A5 : Ð
A6 : (+ve) Sidelights.
A7 : (+ve) Permanent.
A8 : Earth. Connector BB1
: (+) Right rear loud-speaker.
B2 : (Ð) Right rear loud-speaker.
B3 : (+) Right front loud-speaker.
B4 : (Ð) Right front loud-speaker.
B5 : (+) Left front loud-speaker.
B6 : (Ð) Left front loud-speaker.
B7 : (+) Left rear loud-speaker.
B8 : (Ð) Left rear loud-speaker.
* According to specification.
MAINTENANCE OF YOUR 306 45
Contact your PEUGEOT dealer.
FITTING SPEAKERS 165 mm diameter speakers can be fitted in the front doors and on the rearparcel shelf.
Page 118 of 131
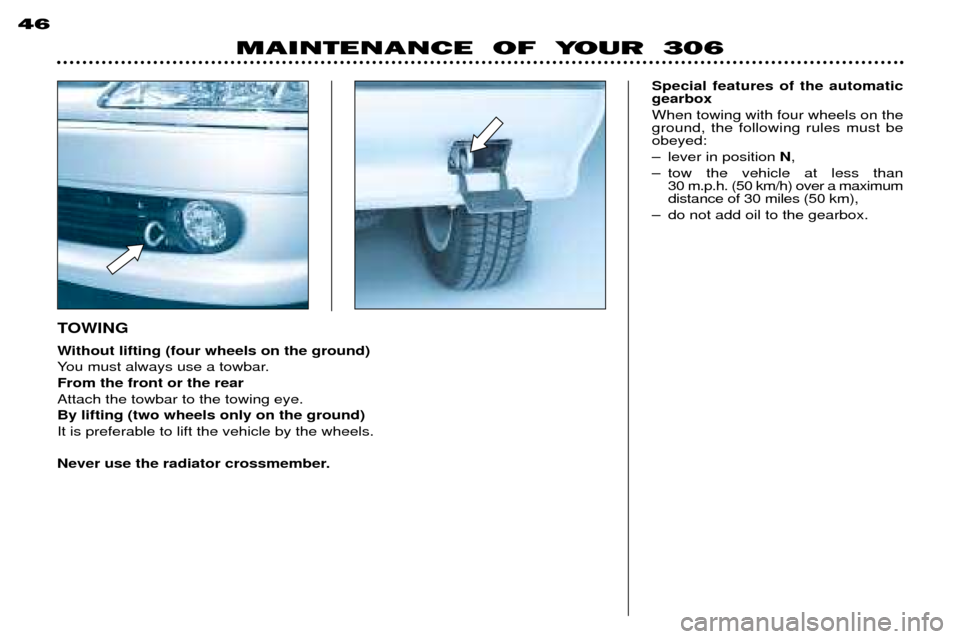
TOWING
Without lifting (four wheels on the ground)
You must always use a towbar.From the front or the rearAttach the towbar to the towing eye.By lifting (two wheels only on the ground)It is preferable to lift the vehicle by the wheels.
Never use the radiator crossmember.
MAINTENANCE OF YOUR 306
46
Special features of the automatic gearbox When towing with four wheels on the ground, the following rules must beobeyed:
Ð lever in position N,
Ð tow the vehicle at less than 30 m.p.h. (50 km/h) over a maximum distance of 30 miles (50 km),
Ð do not add oil to the gearbox.
Page 119 of 131

MAINTENANCE OF YOUR 30647
Driving advice Distribution of loads: distribute the load in the trailer so that the heaviestloads are as close as possible to theaxle and the nose weight is close tothe maximum authorised without,
however, exceeding it. Cooling:
towing a trailer on a slope
increases the coolant temperature. As the fan is electrically controlled, itscooling capacity is not dependent onthe engine speed.
On the contrary, use a high gear to lower the engine speed, and reduceyour speed. The maximum towing load on a long slope depends on the gradient andthe outside temperature. In all cases, pay attention to the coolant temperature. If the warning light comes on, stop the
vehicle and switch off the engine assoon as possible.
TOWING A TRAILER,
CARAVAN, BOAT ETC.
Only use original PEUGEOT towbars which have been tested and approvedfrom the design stage of your vehicle. The towbar must be fitted by a
PEUGEOT dealer.
Your vehicle is mainly designed for transporting people and luggage but it
may also be used to tow a trailer. Driving with a trailer subjects the towing vehicle to more significantforces and requires particular atten-
tion on the part of the driver. Air density decreases with altitude, thus also reducing engine perfor-
mance. Above 1000 metres, reducethe maximum towing load by 10 %and so on for each additional 1000 metres.
For use in arduous conditions(towed load at the limit of the Permis-
sible Gross Train Weight, in Summeron a long hill)
certain engines (1.9 l
Diesel) must be equipped with a
more resistant cooling system.
Consult a PEUGEOT dealer who, depending on your vehicle and what it
is used for, will be able to advise youabout suitable equipment. Pay attention to the coolant tempera- ture at all times. If the alarm warning light comes on,
stop the vehicle and switch off theengine as soon as possible.
Tyres: check the tyre pressures of the
towing vehicle and the trailer, obser- ving the recommended pressures. Brakes: towing increases the braking
distance. Drive at a moderate speed,
change down early, brake graduallyand avoid jerky braking. Lighting: adjust your headlamps so
as not to dazzle other road users. Check the electrical signalling on the
trailer. Side wind: sensitivity to side wind is
increased. Drive smoothly and at a moderate speed.
Page 120 of 131
MAINTENANCE OF YOUR 306
48
BODYWORK MAINTENANCE
To preserve the paintwork and the plastic trim on your vehicle, we rec-ommend that you wash them regu-
larly,
- by hand, there are no specific pre-cautions to take;
- however repeated use of poorly maintained automatic car-washes can lead to the appearance ofmicro-scopic scratches which givethe paintwork a matt appearance(especially visible on dark colours);
- using a high pressure washer, always following the recommen-dations on the equipment (pres-sure and spraying distance). If there are areas of damage on the vehicle (painted bumpers, or head-lamps), it is not recommended todirect the high pressure jet ontothem: wash the areas of damageby hand. Also avoid the entry of water into the locks. Waxing:
the regular use of wax
added to the washing water orapplied separately is strongly recom-mended, it protects the upper coats ofpaintwork against external attack. For all questions relating to the main- tenance of your vehicle, contact anapproved dealer who can advise youon quality products selected by ourdepartments. - Clean off, as soon as
possible, bird droppings,resinous deposits, tarstains and grease
marks ; (as these all containsubstances which can causeserious damage to the paint-work).
- Brake briefly several times to expel any dampness from thebrake pads, when you are set-ting off after washing your vehi-cle.
- Do not use a dry or abrasive cloth, or detergent or solventproducts to clean the doublelens, complex surface head-lamps as they are fitted withpolycarbonate glass covered ina protective finish.
- Do not use petrol, oil or cloth stain removers to clean thebodywork and plastic parts ofyour vehicle.
- To prevent the development of bodywork corrosion as a resultof accidental damage (stonechips, scratches etc.) have them
repaired swiftly.