ECO mode Peugeot 406 Break 2003 Owner's Guide
[x] Cancel search | Manufacturer: PEUGEOT, Model Year: 2003, Model line: 406 Break, Model: Peugeot 406 Break 2003Pages: 177, PDF Size: 2.2 MB
Page 113 of 177
17-02-2003
Rear screen wiper (estate)
Turn ring Ato the first notch,
for intermittent wiping. Rear screen wash (estate)
Turn ring Abeyond the first
notch; the windscreen wash then the windscreen wiperoperate for a fixed period.
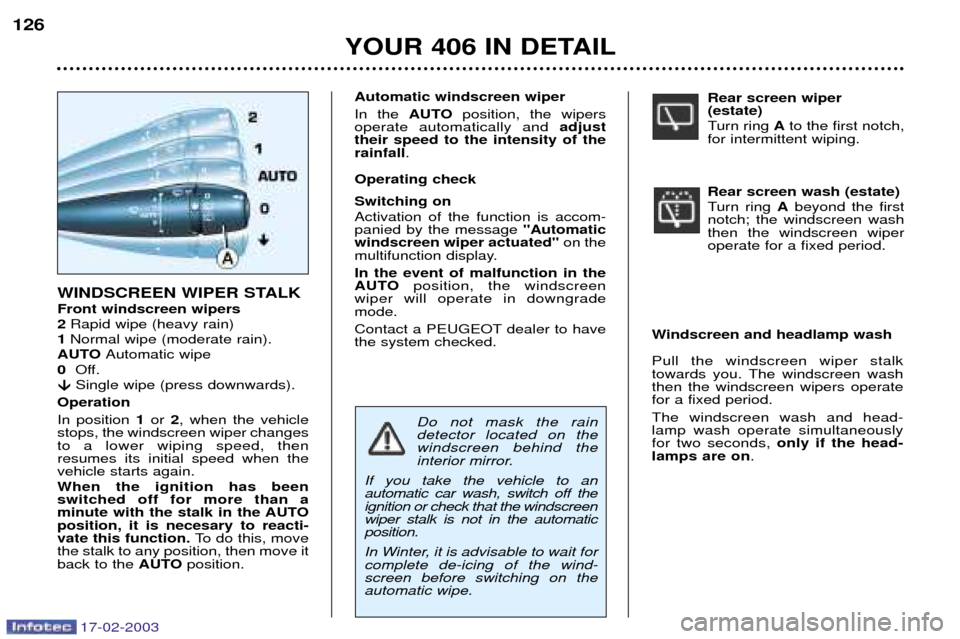
WINDSCREEN WIPER STALK Front windscreen wipers2 Rapid wipe (heavy rain)
1 Normal wipe (moderate rain).
AUTO Automatic wipe
0 Off.
�
� Single wipe (press downwards).
Operation In position 1or 2, when the vehicle
stops, the windscreen wiper changes to a lower wiping speed, thenresumes its initial speed when thevehicle starts again. When the ignition has been switched off for more than a
minute with the stalk in the AUTOposition, it is necesary to reacti-vate this function. To do this, move
the stalk to any position, then move itback to the AUTOposition. Automatic windscreen wiper In the
AUTO position, the wipers
operate automatically and adjust
their speed to the intensity of the rainfall .
Operating check Switching on Activation of the function is accom- panied by the message "Automatic
windscreen wiper actuated" on the
multifunction display. In the event of malfunction in the
AUTO position, the windscreen
wiper will operate in downgrademode.
Contact a PEUGEOT dealer to have the system checked.
YOUR 406 IN DETAIL
126
Do not mask the rain detector located on thewindscreen behind the
interior mirror.
If you take the vehicle to anautomatic car wash, switch off theignition or check that the windscreenwiper stalk is not in the automaticposition.
In Winter, it is advisable to wait for complete de-icing of the wind-screen before switching on theautomatic wipe.
Windscreen and headlamp wash Pull the windscreen wiper stalk
towards you. The windscreen washthen the windscreen wipers operatefor a fixed period. The windscreen wash and head- lamp wash operate simultaneouslyfor two seconds, only if the head-
lamps are on .
Page 116 of 177
17-02-2003
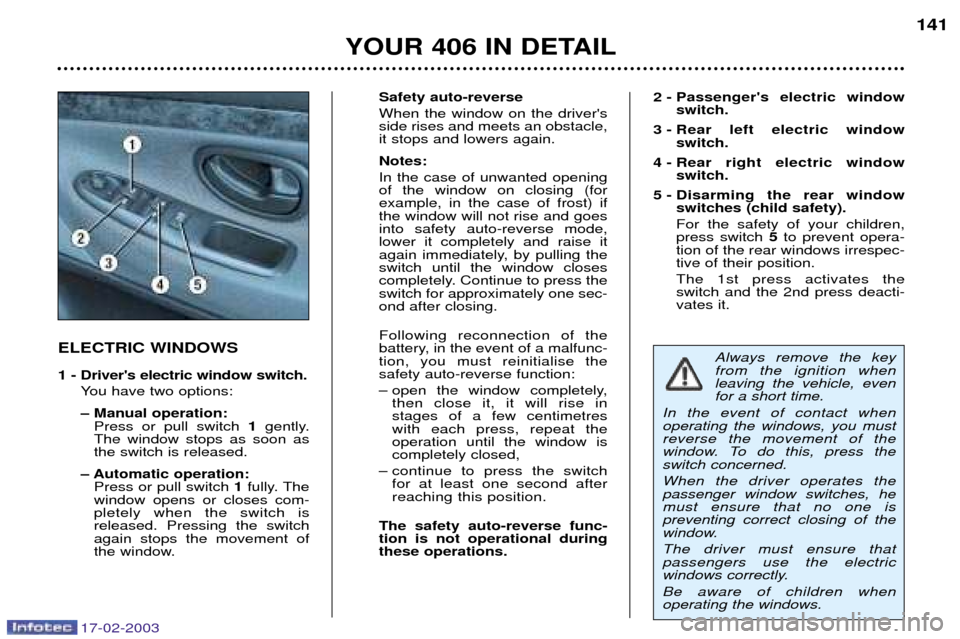
ELECTRIC WINDOWS
1 - Driver's electric window switch.You have two options:
Ð Manual operation:Press or pull switch 1gently.
The window stops as soon as the switch is released.
Ð Automatic operation: Press or pull switch 1fully. The
window opens or closes com-pletely when the switch isreleased. Pressing the switchagain stops the movement of
the window.
YOUR 406 IN DETAIL 141
Safety auto-reverse When the window on the driver's side rises and meets an obstacle,it stops and lowers again. Notes: In the case of unwanted opening of the window on closing (forexample, in the case of frost) ifthe window will not rise and goesinto safety auto-reverse mode,lower it completely and raise it
again immediately, by pulling theswitch until the window closes
completely. Continue to press theswitch for approximately one sec-ond after closing. Following reconnection of the
battery, in the event of a malfunc-tion, you must reinitialise thesafety auto-reverse function:
Ð open the window completely,
then close it, it will rise in stages of a few centimetreswith each press, repeat theoperation until the window iscompletely closed,
Ð continue to press the switch for at least one second afterreaching this position.
The safety auto-reverse func-tion is not operational duringthese operations. 2 - Passenger's electric window
switch.
3 - Rear left electric window switch.
4 - Rear right electric window switch.
5 - Disarming the rear window switches (child safety). For the safety of your children, press switch 5to prevent opera-
tion of the rear windows irrespec-tive of their position. The 1st press activates the switch and the 2nd press deacti-vates it.
Always remove the key from the ignition whenleaving the vehicle, evenfor a short time.
In the event of contact whenoperating the windows, you mustreverse the movement of the
window. To do this, press theswitch concerned. When the driver operates the passenger window switches, hemust ensure that no one ispreventing correct closing of the
window. The driver must ensure that passengers use the electric
windows correctly. Be aware of children when operating the windows.
Page 146 of 177

17-02-2003
PETROL/LPG TWIN FUEL VERSION169
Puncture Insulated storage compartment This is located in the boot and con- tains:
Ð the temporary tyre repair cans 1
(your 406 LPG does not have a spare wheel),
Ð the adaptors 2necessary for filling
the LPG tank in some countries,
Ð the towing eye 3.
Fuses The LPG functions are protected by the two fuses Ain the fuse box
located in the engine compartment.
Using the repair cans (Refer to the directions on the cans also)
Ð if possible, remove the object
which caused the puncture,
Ð rotate the wheel so that the valve is in the same position as the figures 2 or 10 on a clock,
Ð shake the cans vigorously before use. In very cold weather, warmthe cans between your hands forfew minutes,
Ð hold the valve with one hand and with the other press the injectionnozzle on the can firmly onto thevalve, holding it straight,
Ð maintain the pressure firmly for one minute, Ð carry out the same operation with
the second can, then drive imme-
diately, at a moderate speed , to
the nearest garage.
The cans enable you to carry out
a temporary repair. After use, the tyre must be changed. As the cans are pressurized, they must not be exposed to a temper-ature above 50 ¡C. Store them away from heat in the insulated storage compartment.
Page 155 of 177

17-02-2003
PETROL/LPG TWIN FUEL VERSION169
Puncture Insulated storage compartment This is located in the boot and con- tains:
Ð the temporary tyre repair cans 1
(your 406 LPG does not have a spare wheel),
Ð the adaptors 2necessary for filling
the LPG tank in some countries,
Ð the towing eye 3.
Fuses The LPG functions are protected by the two fuses Ain the fuse box
located in the engine compartment.
Using the repair cans (Refer to the directions on the cans also)
Ð if possible, remove the object
which caused the puncture,
Ð rotate the wheel so that the valve is in the same position as the figures 2 or 10 on a clock,
Ð shake the cans vigorously before use. In very cold weather, warmthe cans between your hands forfew minutes,
Ð hold the valve with one hand and with the other press the injectionnozzle on the can firmly onto thevalve, holding it straight,
Ð maintain the pressure firmly for one minute, Ð carry out the same operation with
the second can, then drive imme-
diately, at a moderate speed , to
the nearest garage.
The cans enable you to carry out
a temporary repair. After use, the tyre must be changed. As the cans are pressurized, they must not be exposed to a temper-ature above 50 ¡C. Store them away from heat in the insulated storage compartment.
Page 159 of 177
17-02-2003
BATTERY
To charge the battery using a battery charger:
Ð Disconnect the battery,
Ð Follow the instructions for use given by the battery charger manufacturer,
Ð Reconnect starting with the negative (Ð) terminal,
Ð Check that the terminals and connectors are clean. If they are covered with sul-phate (white or greenish deposit), disconnect them and clean them.
To start the vehicle from another battery:
Ð Connect the red cable to the positive (+) terminals of the two batteries,
Ð Connect one end of the green or black cable to the negative (Ð) terminal of the slave battery,
Ð Connect the other end of the green or black cable to an earth point on the bro- ken down vehicle, as far as possible from the battery,
Operate the starter, let the engine run.
Wait for the engine to return to idle, then disconnect the cables.
Ð Never disconnect a terminal when the engine is running.
Ð Never charge a battery without first disconnecting the terminals.
Ð Close the sunroof before disconnecting the battery. If it does not operate normally following re-connection of the battery, you must
re-initialise it by turning the control to the maximum tilt position and pressing it for a few seconds.
Ð After every reconnection of the battery, switch on the ignition and wait 1 minute before starting to allow the electronic systems to be initialised. Ifslight difficulties are experienced after this, please contact a PEUGEOT deal-
er.
It is advisable to disconnect the battery if the vehicle
is not to be used for a period of more than one month.
Economy mode
With the engine switched off and the ignition key in the "running" or"accessories" position for about half
an hour, certain electrical equipment(displays, instrument panel, warninglights, courtesy lights, electric win-
dows, wipers etc.) will switch offautomatically to avoid draining the
battery. Once the electrical equipment goes into economy mode, it is necessaryto start the engine to enable theequipment to work again.
MAINTENANCE OF YOUR 406
46
Page 170 of 177
17-02-2003
PETROL/LPG TWIN FUEL VERSION
170
MODELS Model codesEngine Cubic capacity (cm
3
)
Bore x stroke Number of valvesMax. power: EU standard (KW)LPG max. power: EU standard (KW)Max. torque: EU standard (Nm)FuelCatalytic converterElectronic injection GEARBOX Petrol/LPG consumption (in litres) Urban driving Inter-urban drivingMixed drivingEmission of CO 2by mass
Weights and towing weights (in kg) Kerb weight Gross vehicle weight (GVW)Gross train weight (GTW)Braked trailer weight (within GTW limit)Recommended nose weight Saloon Estate/Family estate
8B6FZ 8E6FZ/8F6FZ 1.8 litre 16V
1 749
82.7 x 81.4 16
85 to 5 500 rpm80 to 5 500 rpm
160 to 4 000 rpm Unleaded/LPG Ye s
Ye s
Manual
(5-speed)
10.6/14.4 10.8/14.8 6.0/8.1 6.2/8.5
7.7/10.4 7.9/10.8
182/168 187/174
1 472 1 527
1 855 2 015
3 055 3 215
1 200 1 200 80 80
Page 173 of 177
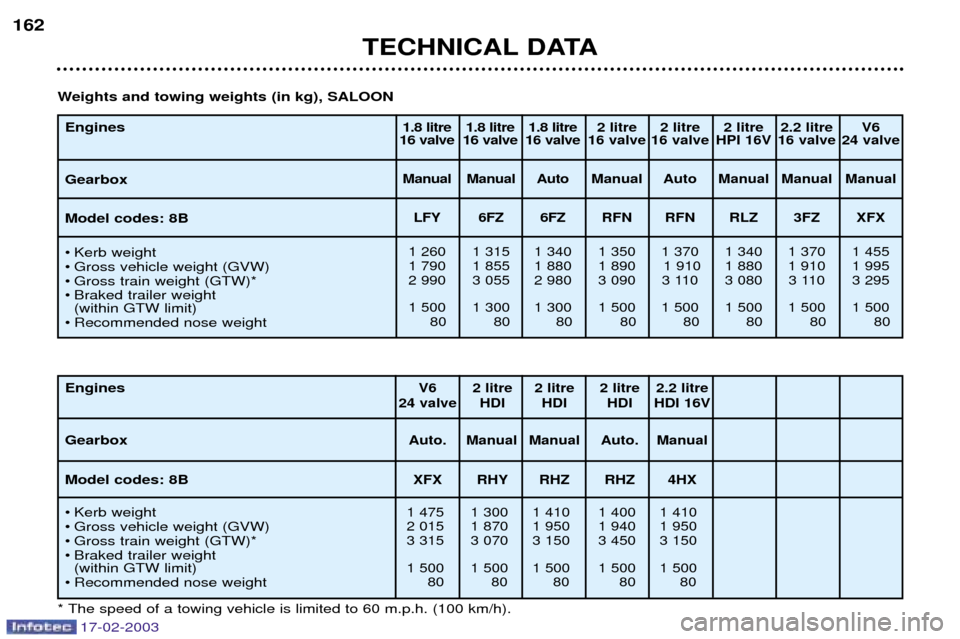
17-02-2003
TECHNICAL DATA
162
Engines Gearbox Model codes: 8B
¥ Kerb weight
¥ Gross vehicle weight (GVW)
¥ Gross train weight (GTW)*
¥ Braked trailer weight
(within GTW limit)
¥ Recommended nose weight1.8 litre 1.8 litre 1.8 litre 2 litre 2 litre 2 litre 2.2 litre V6
16 valve 16 valve 16 valve 16 valve 16 valve HPI 16V 16 valve 24 valve
Manual Manual Auto Manual Auto Manual Manual Manual
LFY 6FZ 6FZ RFN RFN RLZ 3FZ XFX
1 260 1 315 1 340 1 350 1 370 1 340 1 370 1 455
1 790 1 855 1 880 1 890 1 910 1 880 1 910 1 995
2 990 3 055 2 980 3 090 3 110 3 080 3 110 3 295
1 500 1 300 1 300 1 500 1 500 1 500 1 500 1 500 80 80 80 80 80 80 80 80
Engines Gearbox Model codes: 8B
¥ Kerb weight
¥ Gross vehicle weight (GVW)
¥ Gross train weight (GTW)*
¥ Braked trailer weight(within GTW limit)
¥ Recommended nose weightV6 2 litre 2 litre 2 litre 2.2 litre
24 valve HDI HDI HDI HDI 16V
Auto. Manual Manual Auto. Manual
XFX RHY RHZ RHZ 4HX
1 475 1 300 1 410 1 400 1 410
2 015 1 870 1 950 1 940 1 950
3 315 3 070 3 150 3 450 3 150
1 500 1 500 1 500 1 500 1 500 80 80 80 80 80
* The speed of a towing vehicle is limited to 60 m.p.h. (100 km/h).
Weights and towing weights (in kg), SALOON
Page 174 of 177
17-02-2003
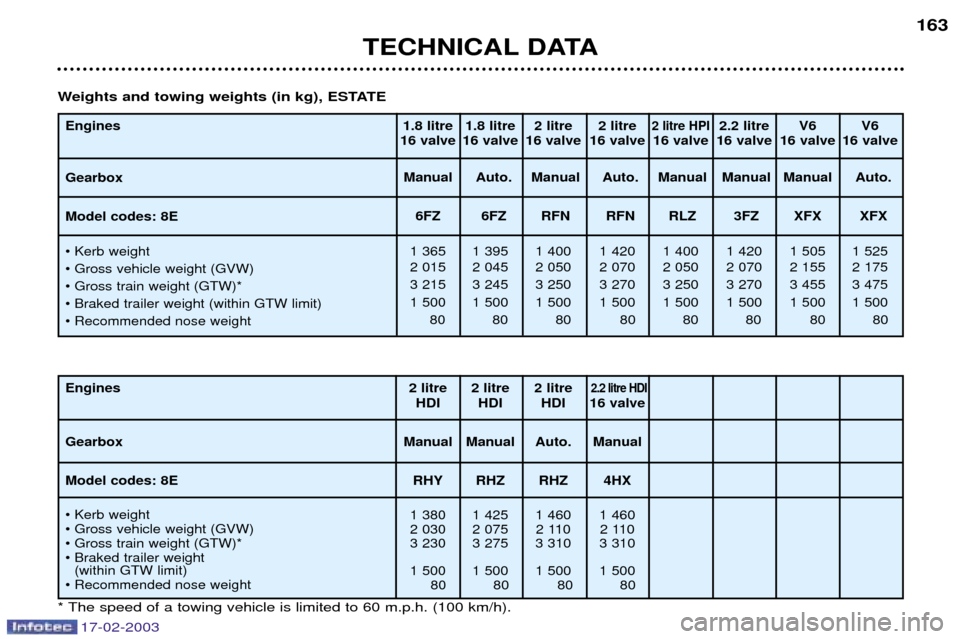
TECHNICAL DATA163
Engines Gearbox Model codes: 8E
¥ Kerb weight
¥ Gross vehicle weight (GVW)
¥ Gross train weight (GTW)*
¥ Braked trailer weight (within GTW limit)
¥ Recommended nose weight1.8 litre 1.8 litre 2 litre 2 litre2 litre HPI2.2 litre V6 V6
16 valve 16 valve 16 valve 16 valve 16 valve 16 valve 16 valve 16 valve
Manual Auto. Manual Auto. Manual Manual Manual Auto.
6FZ 6FZ RFN RFN RLZ 3FZ XFX XFX
1 365 1 395 1 400 1 420 1 400 1 420 1 505 1 525
2 015 2 045 2 050 2 070 2 050 2 070 2 155 2 175
3 215 3 245 3 250 3 270 3 250 3 270 3 455 3 475
1 500 1 500 1 500 1 500 1 500 1 500 1 500 1 500 80 80 80 80 80 80 80 80
Engines Gearbox Model codes: 8E
¥ Kerb weight
¥ Gross vehicle weight (GVW)
¥ Gross train weight (GTW)*
¥ Braked trailer weight(within GTW limit)
¥ Recommended nose weight 2 litre 2 litre 2 litre 2.2 litre HDIHDI HDI HDI 16
valve
Manual Manual Auto. Manual RHY RHZ RHZ 4HX
1 380 1 425 1 460 1 460
2 030 2 075 2 110 2 110
3 230 3 275 3 310 3 310
1 500 1 500 1 500 1 500 80 80 80 80
* The speed of a towing vehicle is limited to 60 m.p.h. (100 km/h).Weights and towing weights (in kg), ESTATE
Page 175 of 177
17-02-2003
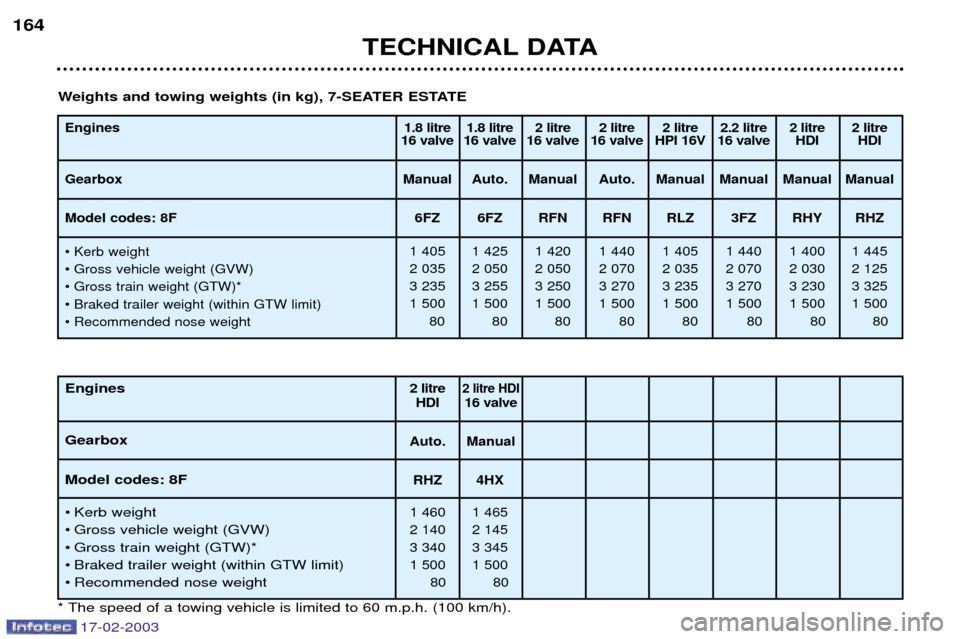
TECHNICAL DATA
164
Engines Gearbox Model codes: 8F
¥ Kerb weight
¥ Gross vehicle weight (GVW)
¥ Gross train weight (GTW)*
¥ Braked trailer weight (within GTW limit)
¥ Recommended nose weight 1.8 litre 1.8 litre 2 litre 2 litre 2 litre 2.2 litre 2 litre 2 litre
16 valve 16 valve 16 valve 16 valve HPI 16V 16 valve HDI HDI
Manual Auto. Manual Auto. Manual Manual Manual Manual 6FZ 6FZ RFN RFN RLZ 3FZ RHY RHZ
1 405 1 425 1 420 1 440 1 405 1 440 1 400 1 445
2 035 2 050 2 050 2 070 2 035 2 070 2 030 2 125
3 235 3 255 3 250 3 270 3 235 3 270 3 230 3 325
1 500 1 500 1 500 1 500 1 500 1 500 1 500 1 500 80 80 80 80 80 80 80 80
Engines Gearbox Model codes: 8F
¥ Kerb weight
¥ Gross vehicle weight (GVW)
¥ Gross train weight (GTW)*
¥ Braked trailer weight (within GTW limit)
¥ Recommended nose weight2 litre 2 litre HDIHDI 16 valve
Auto. Manual
RHZ 4HX
1 460 1 465
2 140 2 145
3 340 3 345
1 500 1 500 80 80
* The speed of a towing vehicle is limited to 60 m.p.h. (100 km/h). Weights and towing weights (in kg), 7-SEATER ESTATE