headlamp PONTIAC PONTIAC 1995 User Guide
[x] Cancel search | Manufacturer: PONTIAC, Model Year: 1995, Model line: PONTIAC, Model: PONTIAC PONTIAC 1995Pages: 354, PDF Size: 17.27 MB
Page 243 of 354
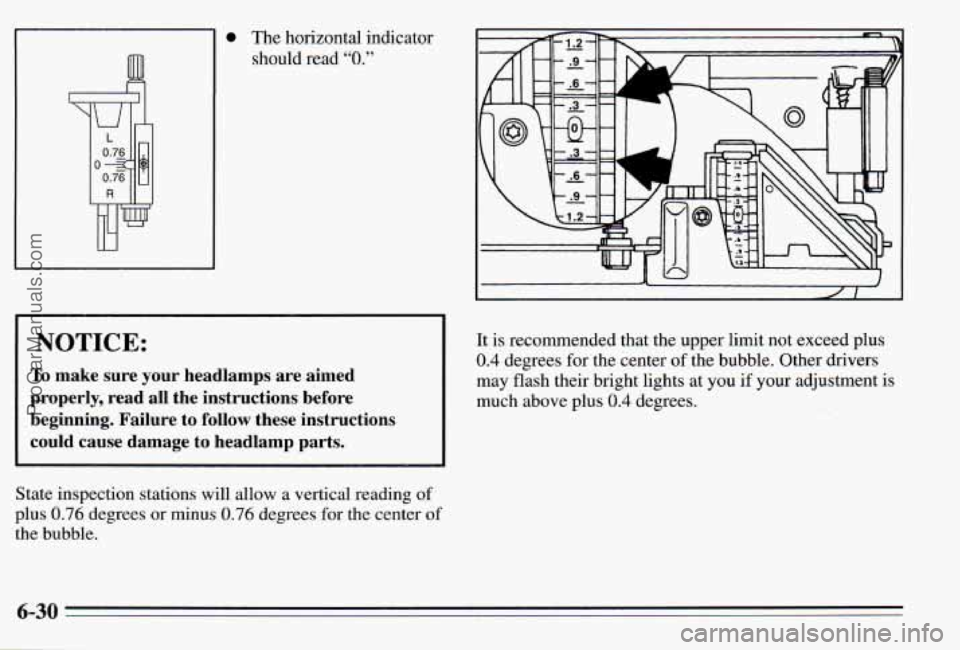
0 The horizontal indcator
should read
“0.”
I NOTICE:
To make sure your headlamps are aimed
properly, read all the instructions before
beginning. Failure to follow these instructions
could cause damage to headlamp parts.
~ ~ ~~
State inspection stations will allow a vertical reading of
plus 0.76 degrees or minus 0.76 degrees for the center of
the bubble.
It is recommended that the upper limit not exceed plus
0.4 degrees for the center of the bubble. Other drivers
may flash their bright lights at you
if your adjustment is
much above plus
0.4 degrees.
6-30
ProCarManuals.com
Page 244 of 354
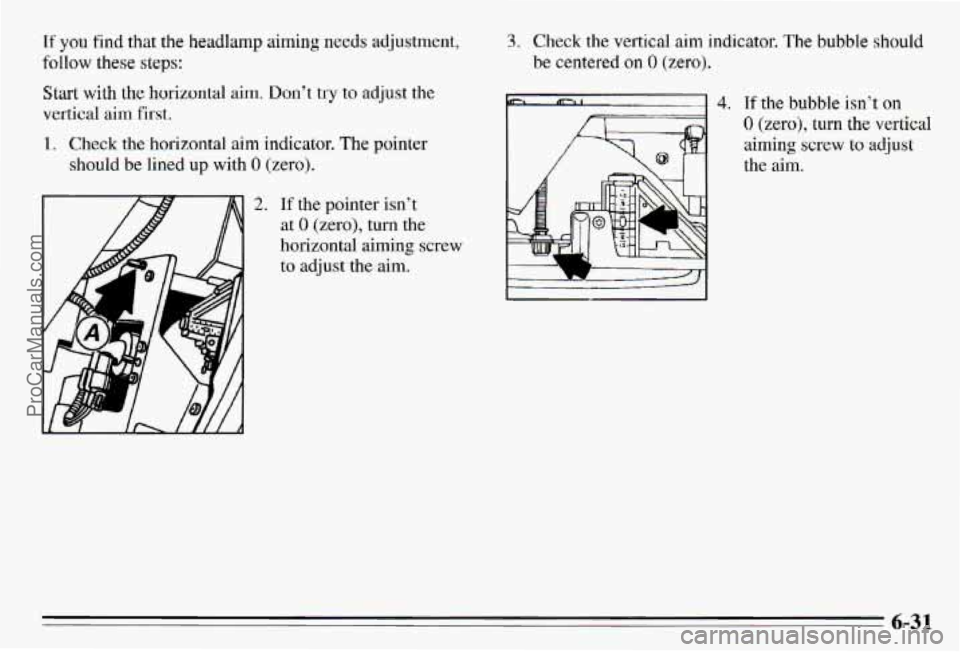
If you find that the headlamp aiming needs adjustment,
Start with
the horizontal ai.m+ Don’t try to adjust the
vertical aim Fkrst.
follow these steps:
1. Check the horizontal aim indicator. The pointer
should be lined up with
0 (zero).
2. If the pointer isn’t
at
0 (zero), turn the
horizontal aiming screw to adjust the aim.
3, Check the vertical aim indicator. The bubble should
be centered on 0 (zero).
7-1 4. If the bubble isn’t on
0 (zero), turn
aiming
screw
the aim. the
vertical
to adjust
6-31
ProCarManuals.com
Page 245 of 354
Bulb Replacement
In this section you’ll find directions for changing the
bulbs
in some of the lamps on your Pontiac. See
“Replacement Bulbs” in the Index to find the type
of bulb you should use.
Headlamps (2-Door Models)
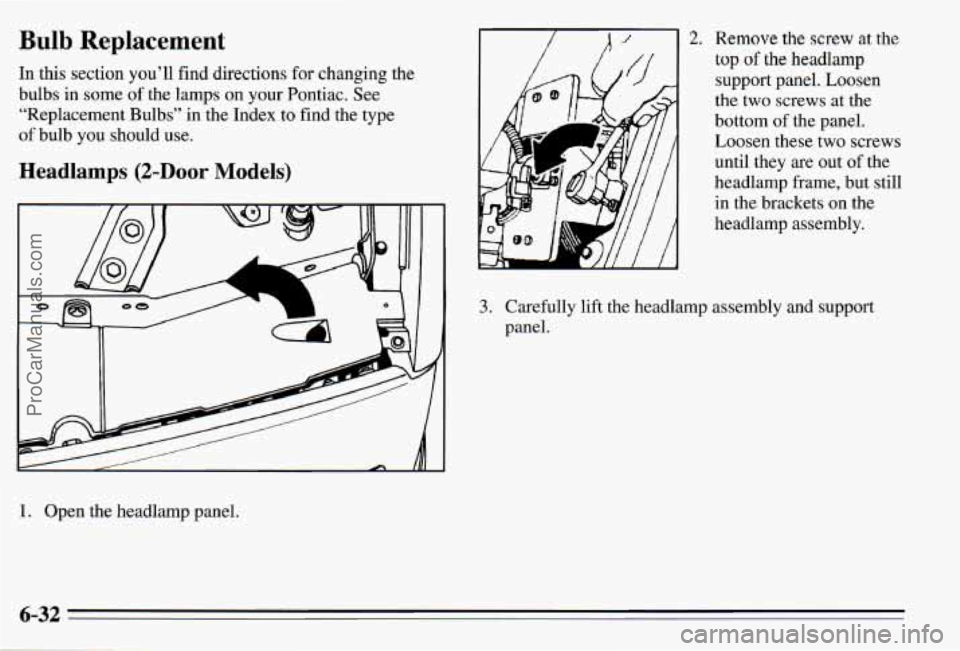
1. Or L the headlamp panel.
7-
A
2. Remove the screw at the
top of the headlamp
support panel. Loosen
the two screws at the
bottom of the panel.
Loosen these two screws
until they are out of the
headlamp frame, but still
in the brackets on the
headlamp assembly.
3. Carefully lift the headlamp assembly and support
panel.
6-32 ..
ProCarManuals.com
Page 246 of 354
6
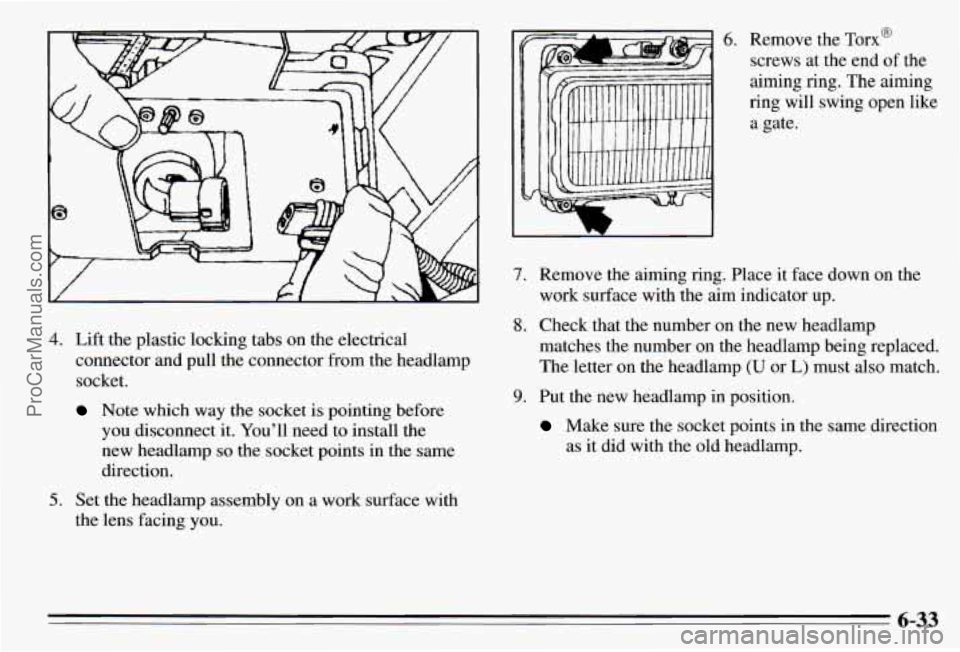
4. Lift the plastic locking tabs on the electrical
connector and pull the connector from the headlamp
socket.
Note which way the socket is pointing before
you disconnect it. You’ll need to install the
new headlamp
so the socket points in the same
direction.
5. Set the headlamp assembly on a work surface with
the lens facing you.
6. Remove the Torx@
screws at the end
of the
aiming ring. The aiming
ring will swing open like
a gate.
7. Remove the aiming ring. Place it face down on the
work surface with the aim indicator
up.
8. Check that the number on the new headlamp
matches the number on the headlamp being replaced.
The letter on the headlamp
(U or L) must also match.
9. Put the new headlamp in position.
Make sure the socket points in the same direction
as
it did with the old headlamp.
6-33
ProCarManuals.com
Page 247 of 354
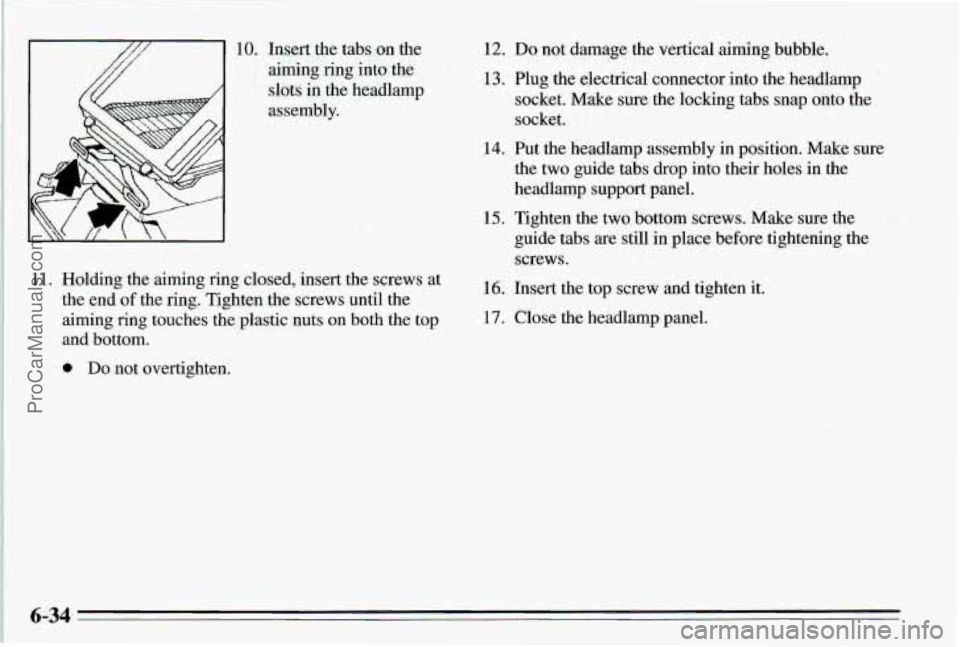
10. Insert the tabs on the
aiming ring into the
11. Holding the
aiming ring closed, insert the screws at
the end of the ring. Tighten -the screws until the
aiming ring touches the plastic nuts on both the top
and bottom.
0 Da not overtighten.
12. Do not damage the vertical aiming bubble.
13. Plug the electrical connector into the headlamp
socket. Make sure the locking tabs snap onto
the
socket.
14. Put the headlamp assembly
in position. Make sure
the two guide tabs drop into their holes in the
headlamp support panel.
guide tabs are still in place before tightening the
screws.
15. Tighten the two bottom
screws. Make sure the
16. Insert the top screw and tighten it.
17. Close the headlamp panel.
6-34
ProCarManuals.com
Page 248 of 354
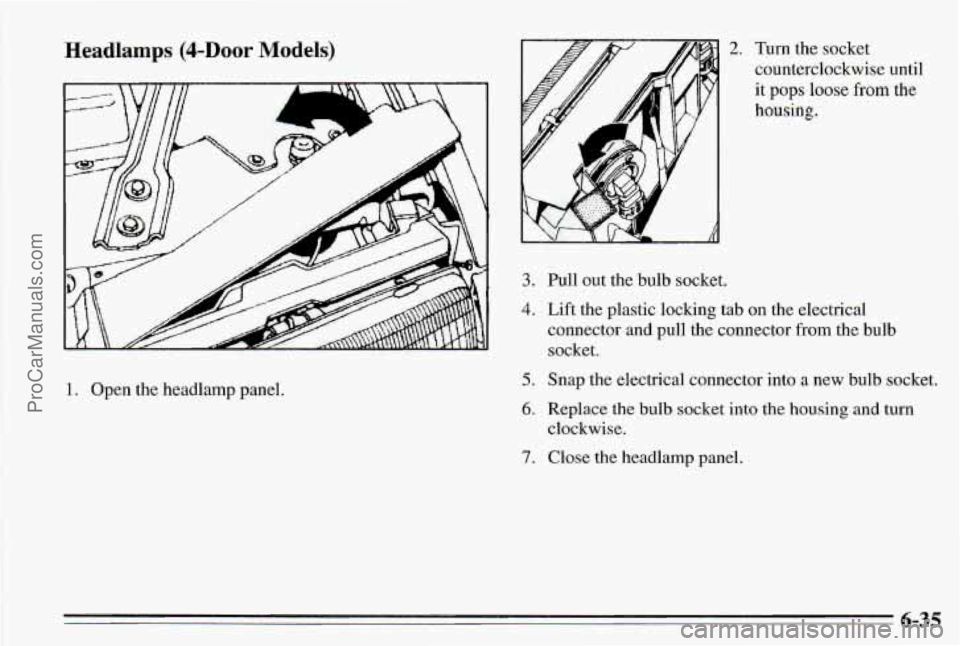
Headlamps @-Door Models)
1. Open the headlamp panel.
2. Turn the socket
counterclockwise until
it pops loose from the
housing.
3.
4.
5.
6.
7.
Pull out the bulb socket.
Lift the plastic locking tab on the electrical
connector and pull the connector
from the bulb
socket.
Snap the electrical connector into
a new bulb socket.
Replace the bulb socket into the housing
and turn
clockwise.
Close the headlamp panel.
6-35
ProCarManuals.com
Page 266 of 354
Used Replacement Wheels
NOTICE:
The wrong wheel can also cause problems with
bearing life, brake cooling, speedometer/odometer
calibration, headlamp aim, bumper height, vehicle ground clearance, and tire or tire chain clearance
to the body and chassis.
6-53
ProCarManuals.com
Page 278 of 354
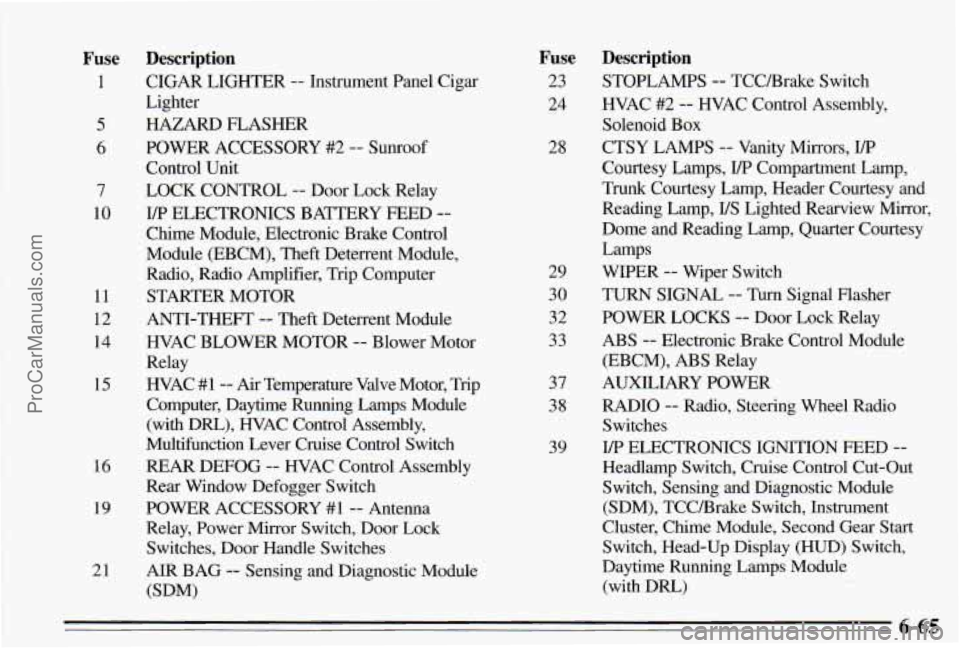
Fuse
1
5
6
7
10
11
12 14
15
16
19
21
Description
CIGAR LIGHTER -- Instrument Panel Cigar
Lighter
HAZARD FLASHER
Control Unit
LOCK CONTROL
-- Door Lock Relay
Chime Module, Electronic Brake Control
Module (EBCM), Theft Deterrent Module,
Radio, Radio Amplifier, Trip Computer
STARTER MOTOR
ANTI-THEFT
-- Theft Deterrent Module
WAC BLOWER MOTOR
-- Blower Motor
Relay
WAC
#1-- Air Temperature Valve Motor, Trip
Computer, Daytime Running Lamps Module
(with Dm), WAC Control Assembly,
Multifunction Lever Cruise Control Switch
REAR DEFOG -- WAC Control Assembly
Rear Window Defogger Switch
POWER ACCESSORY
#1 -- Antenna
Relay, Power Mirror Switch, Door Lock Switches, Door Handle Switches
AIR BAG -- Sensing and Diagnostic Module
@DM)
POWER ACCESSORY
#2 -- SUIKOO~
YP ELECTRONICS
BATTERY FEED --
Fuse
23
24
28
29
30
32
33
37
38
39
Description
STOPLAMPS -- TCCBrake Switch
HVAC #2
-- HVAC Control Assembly,
Solenoid Box
CTSY LAMPS
-- Vanity Mirrors, VP
Courtesy Lamps, I/P Compartment Lamp,
Trunk Courtesy Lamp, Header Courtesy and
Reading Lamp,
US Lighted Rearview Mirror,
Dome and Reading Lamp, Quarter Courtesy
WIPER
-- Wiper Switch
TURN SIGNAL
-- Turn Signal Flasher
POWER LOCKS
-- Door Lock Relay
ABS -- Electronic Brake Control Module
(EBCM),
ABS Relay
AUXILIARY POWER
RADIO
-- Radio, Steering Wheel Radio
Switches
Headlamp Switch, Cruise Control Cut-Out Switch, Sensing and Diagnostic Module
(SDM), TCCBrake Switch, Instrument
Cluster, Chime Module, Second Gear Start
Switch, Head-Up Display
(HUD) Switch,
Daytime Running Lamps Module
(with Dm)
Lamps
I/P ELECTRONICS IGNITION FEED --
6-65 ProCarManuals.com
Page 281 of 354
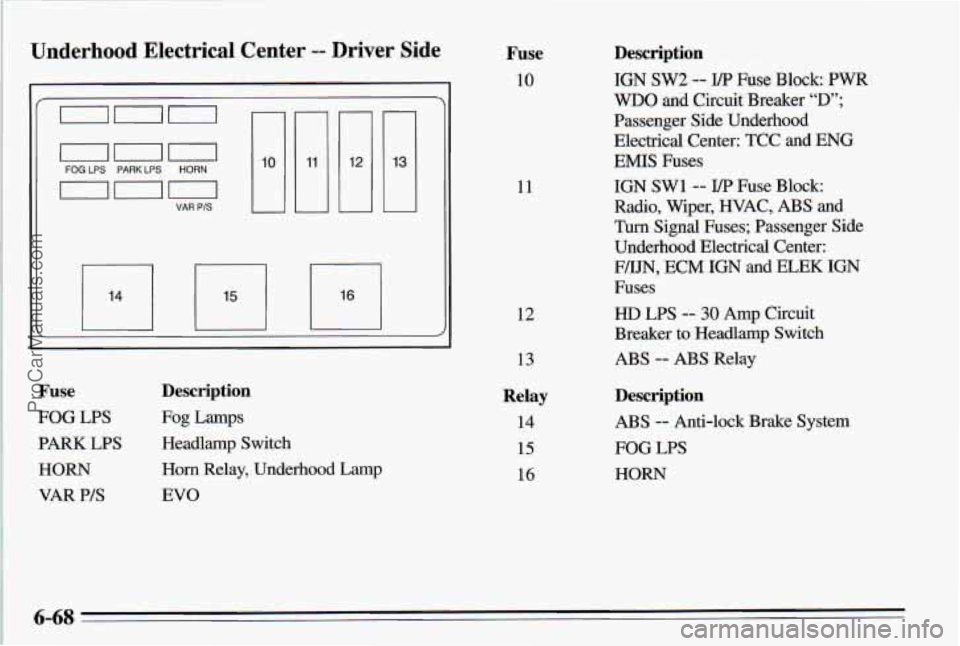
Underhood Electrical Center -- Driver Side
on0
on0
FOG LPS PARKLPS HORN
VAR PIS II
n li ’I
Fuse
10
11
12
Fuse Description
FOG LPS Fog Lamps
PARK LPS Headlamp Switch
HORN Horn Relay, Underhood Lamp
VAR PIS EVO
13
Relay
14
15
16
Description
IGN SW2 -- I/P Fuse Block PWR
WDO and Circuit Breaker “D’;
Passenger Side Underhood
Electrical Center: TCC and ENG
EMIS Fuses
IGN SWl -- I/P Fuse Block:
Radio, Wiper, WAC,
ABS and
Turn Signal Fuses; Passenger Side
Underhood Electrical Center:
F/IJN,
ECM IGN and ELEK IGN
Fuses
HD LPS -- 30 Amp Circuit
Breaker
to Headlamp Switch
ABS -- ABS Relay
Description
ABS -- Anti-lac- Brake Svstem
FOG LPS
HORN
6-68
ProCarManuals.com
Page 282 of 354
Headlamp Wiring
The headlamp wiring is protected by a circuit breaker in
the underhood electrical center.
An electrical overload
will cause the lamps
to go on and off, or in some cases
to remain
off. If this happens, have your headlamp
system checked right away.
Windshield Wipers
The windshield wiper motor is protected by a circuit
breaker and a fuse.
If the motor overheats due to heavy
snow, etc., the wiper will stop until the motor cools.
If
the overload is caused by some electrical problem, have
it fixed.
Power Windows and Other Power Options
Circuit breakers in the fuse panel protect the power
windows and other power accessories. When the current
load is too heavy, the circuit breaker opens and closes,
protecting the circuit until the problem is fixed.
6-69 ProCarManuals.com