PONTIAC VIBE 2010 Manual Online
Manufacturer: PONTIAC, Model Year: 2010, Model line: VIBE, Model: PONTIAC VIBE 2010Pages: 318, PDF Size: 1.7 MB
Page 81 of 318
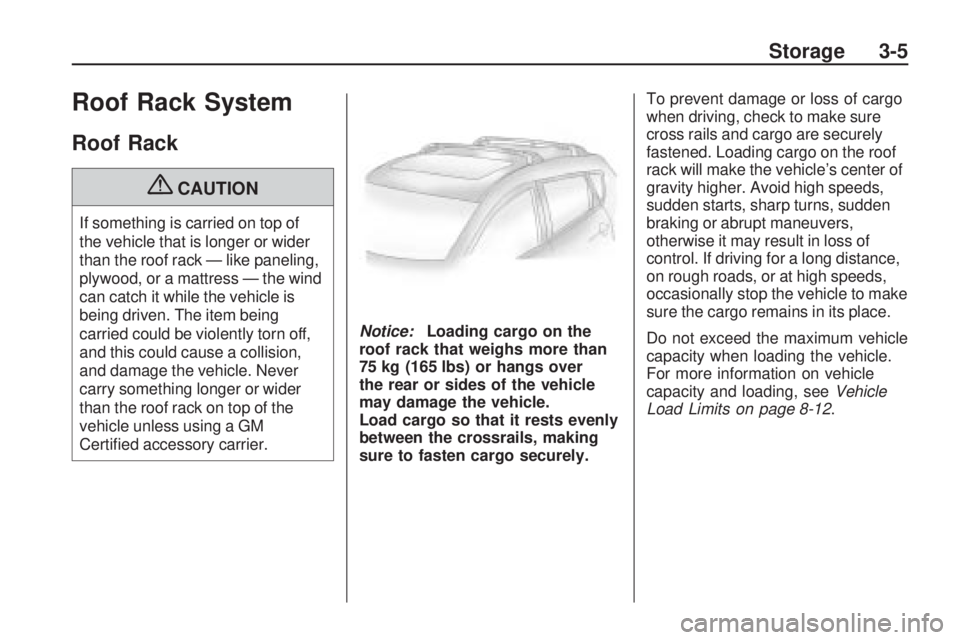
Roof Rack System
Roof Rack
{CAUTION
If something is carried on top of
the vehicle that is longer or wider
than the roof rack — like paneling,
plywood, or a mattress — the wind
can catch it while the vehicle is
being driven. The item being
carried could be violently torn off,
and this could cause a collision,
and damage the vehicle. Never
carry something longer or wider
than the roof rack on top of the
vehicle unless using a GM
Certified accessory carrier.Notice:
Loading cargo on the
roof rack that weighs more than
75 kg (165 lbs) or hangs over
the rear or sides of the vehicle
may damage the vehicle.
Load cargo so that it rests evenly
between the crossrails, making
sure to fasten cargo securely. To prevent damage or loss of cargo
when driving, check to make sure
cross rails and cargo are securely
fastened. Loading cargo on the roof
rack will make the vehicle’s center of
gravity higher. Avoid high speeds,
sudden starts, sharp turns, sudden
braking or abrupt maneuvers,
otherwise it may result in loss of
control. If driving for a long distance,
on rough roads, or at high speeds,
occasionally stop the vehicle to make
sure the cargo remains in its place.
Do not exceed the maximum vehicle
capacity when loading the vehicle.
For more information on vehicle
capacity and loading, see
Vehicle
Load Limits on page 8-12 .
Storage 3-5
Page 82 of 318
✍NOTES
3-6 Storage
Page 83 of 318

Instruments and
Controls
Instrument Panel OverviewInstrument Panel Overview.....4-2
ControlsSteering Wheel Adjustment.....4-4
Steering Wheel Controls .........4-4
Horn ...................................
.4-5
Windshield Wiper/Washer .......4-5
Rear Window Wiper/Washer . . . .4-6
Power Outlets (Accessory Power Outlets) ....................
.4-6
Power Outlets (115 Volt Alternating Current) .............
.4-7
Cigarette Lighter ..................
.4-8
Ashtrays .............................
.4-8
Warning Lights, Gages, and
Indicators
Warning Lights, Gages, and
Indicators ..........................
.4-8
Instrument Cluster ................
.4-9
Speedometer .....................
.4-10
Odometer ..........................
.4-10
Trip Odometer ....................
.4-10
Tachometer .......................
.4-10
Fuel Gage .........................
.4-10
Engine Coolant Temperature Gage .............4-11
Safety Belt Reminders ..........4-11
Airbag Readiness Light .........4-12
Passenger Airbag Status Indicator ..........................
.4-13
Charging System Light .........4-14
Malfunction Indicator Lamp .................
.4-14
Brake System Warning Light ...............................
.4-17
Antilock Brake System (ABS) Warning Light ...........4-17
Service All-Wheel Drive Light ...............................
.4-18Speed Sensitive Power
Steering (SSPS) Warning
Light ...............................
.4-18
StabiliTrak®Indicator Light . . . .4-18
Traction Control System (TCS) Warning Light ...........4-19
Tire Pressure Light .............
.4-19
Engine Oil Pressure Light .....4-19
Low Fuel Warning Light ........4-20
Security Light .....................
.4-20
High-Beam on Light .............4-20
Fog Lamp Light ..................
.4-20
Lamps on Reminder .............4-20
Taillamp Indicator Light .........4-21
Low Washer Fluid Warning Light ...............................
.4-21
Cruise Control Light .............4-21
Door Ajar Light ...................
.4-21
Vehicle PersonalizationVehicle Personalization .........4-21
OnStar SystemOnStar®System.................
.4-23
Instruments and Controls 4-1
Page 84 of 318
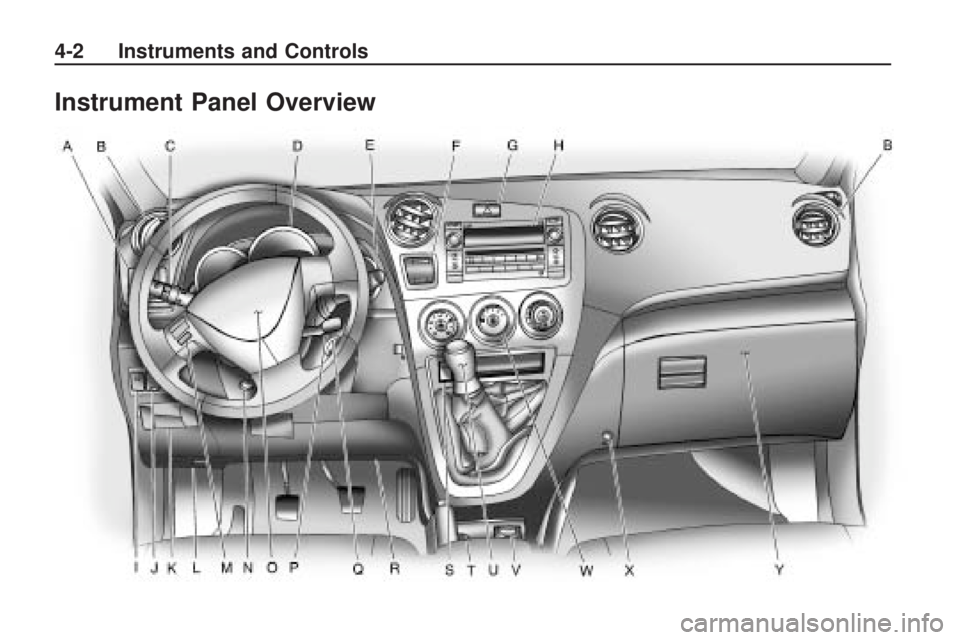
Instrument Panel Overview
4-2 Instruments and Controls
Page 85 of 318
The main components of the
instrument panel are the following:
A.Power Mirrors on page 1-10 .
B. Air Vents on page 7-4.
C. Turn and Lane-Change Signals
on page 5-3.
D. Instrument Cluster on page 4-9 .
E. Windshield Wiper/Washer on
page 4-5.
F. Passenger Airbag Status
Indicator on page 4-13 .
Passenger Sensing System
on page 2-29. Security Light
on page 4-20.
G. Hazard Warning Flashers on
page 5-3.
H. AM-FM Radio on page 6-4 .
I. Traction Control System (TCS) on
page 8-33.
J. Anti-Theft Alarm System on
page 1-7. K.
Front Storage on page 3-2 .
L. Hood on page 9-5.
M. Steering Wheel Controls on
page 4-4.
N. Steering Wheel Adjustment on
page 4-4.
O. Horn on page 4-5.
P. Cruise Control on page 8-36
(If Equipped).
Q. Ignition Positions on page 8-16 .
R. Tire Pressure Reset Button (Out of View). See Tire Pressure
Monitor Operation on page 9-52 .
S. Power Outlet 115 Volt Alternating On/Off Button.
See Power Outlets (Accessory
Power Outlets) on page 4-6 or
Power Outlets (115 Volt
Alternating Current) on page 4-7 .T. Cigarette Lighter (If Equipped)
or Accessory Power Outlet.
Cigarette Lighter on page 4-8 or
Power Outlets (Accessory Power
Outlets) on page 4-6 orPower
Outlets (115 Volt Alternating
Current) on page 4-7.
U. Shift Lever. Automatic
Transmission (Four Speed
Automatic) on page 8-24 or
Automatic Transmission (Five
Speed Automatic) on page 8-27
or Manual Transmission on
page 8-29.
V. Power Outlets (Accessory Power
Outlets) on page 4-6 orPower
Outlets (115 Volt Alternating
Current) on page 4-7 .
W. Climate
Control Systems on
page 7-1.
X. Load Rails and Hooks on
page 3-4.
Y. Glove Box on page 3-1 .
Instruments and Controls 4-3
Page 86 of 318
Controls
Steering Wheel
Adjustment
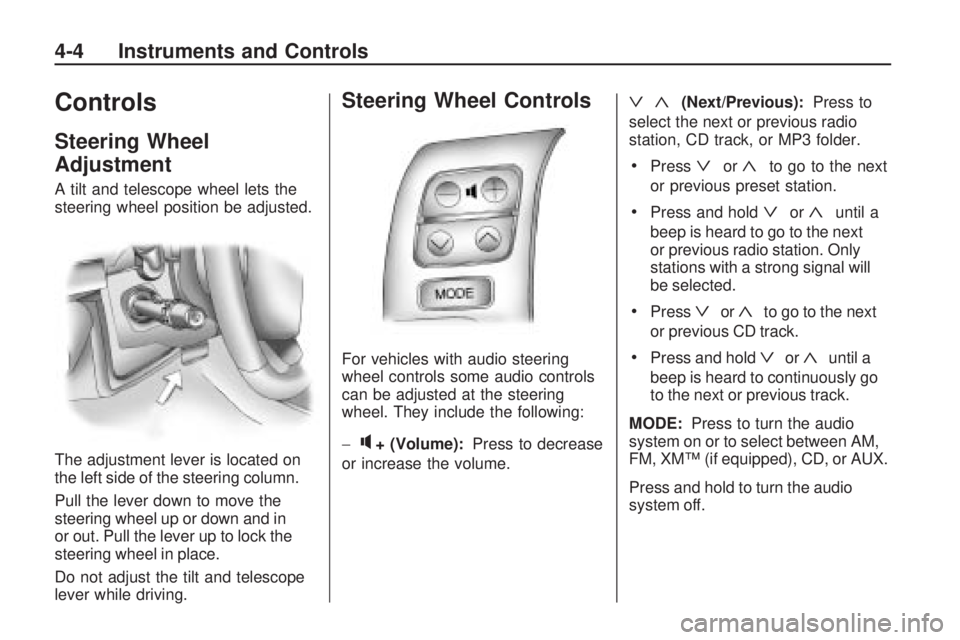
A tilt and telescope wheel lets the
steering wheel position be adjusted.
The adjustment lever is located on
the left side of the steering column.
Pull the lever down to move the
steering wheel up or down and in
or out. Pull the lever up to lock the
steering wheel in place.
Do not adjust the tilt and telescope
lever while driving.
Steering Wheel Controls
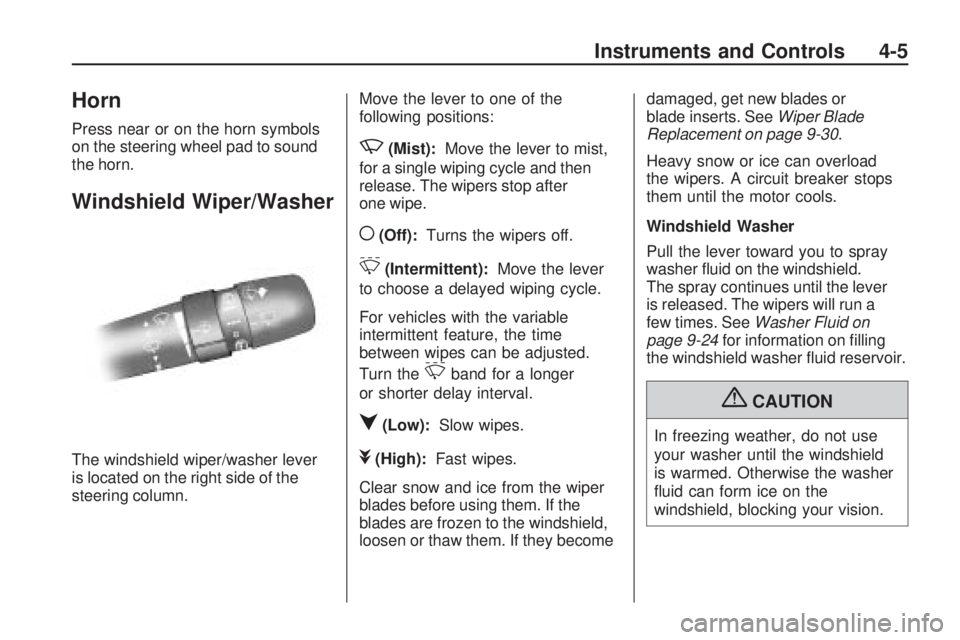
For vehicles with audio steering
wheel controls some audio controls
can be adjusted at the steering
wheel. They include the following:
−
q+ (Volume):Press to decrease
or increase the volume.
ª«(Next/Previous): Press to
select the next or previous radio
station, CD track, or MP3 folder.
•Pressªor«to go to the next
or previous preset station.
•Press and holdªor«until a
beep is heard to go to the next
or previous radio station. Only
stations with a strong signal will
be selected.
•Pressªor«to go to the next
or previous CD track.
•Press and holdªor«until a
beep is heard to continuously go
to the next or previous track.
MODE: Press to turn the audio
system on or to select between AM,
FM, XM™ (if equipped), CD, or AUX.
Press and hold to turn the audio
system off.
4-4 Instruments and Controls
Page 87 of 318
Horn
Press near or on the horn symbols
on the steering wheel pad to sound
the horn.
Windshield Wiper/Washer
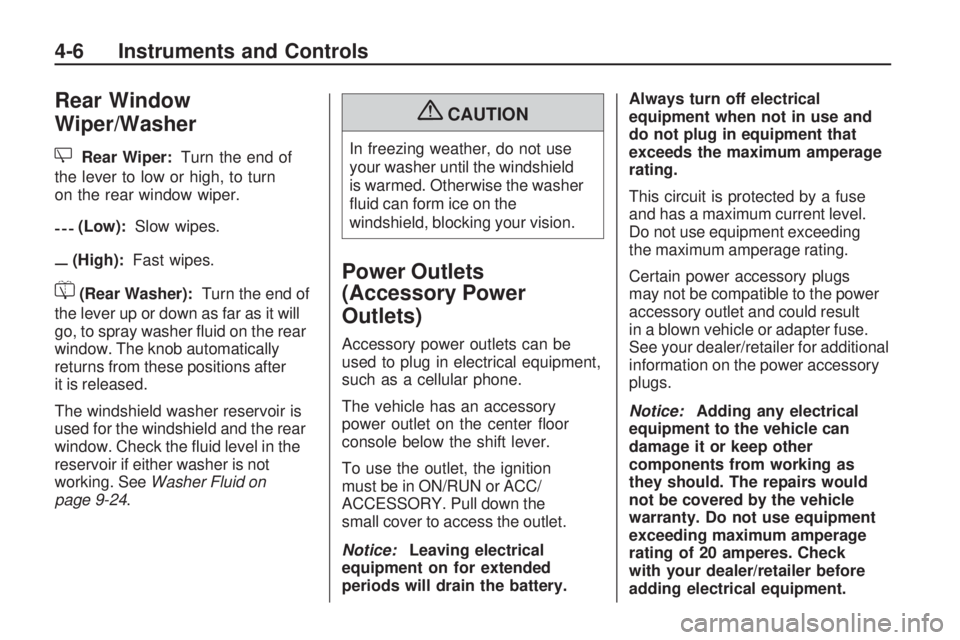
The windshield wiper/washer lever
is located on the right side of the
steering column.Move the lever to one of the
following positions:
z(Mist):
Move the lever to mist,
for a single wiping cycle and then
release. The wipers stop after
one wipe.
((Off): Turns the wipers off.
&(Intermittent): Move the lever
to choose a delayed wiping cycle.
For vehicles with the variable
intermittent feature, the time
between wipes can be adjusted.
Turn the
&band for a longer
or shorter delay interval.
q(Low): Slow wipes.
l(High): Fast wipes.
Clear snow and ice from the wiper
blades before using them. If the
blades are frozen to the windshield,
loosen or thaw them. If they become damaged, get new blades or
blade inserts. See
Wiper Blade
Replacement on page 9-30 .
Heavy snow or ice can overload
the wipers. A circuit breaker stops
them until the motor cools.
Windshield Washer
Pull the lever toward you to spray
washer fluid on the windshield.
The spray continues until the lever
is released. The wipers will run a
few times. See Washer Fluid on
page 9-24 for information on filling
the windshield washer fluid reservoir.
{CAUTION
In freezing weather, do not use
your washer until the windshield
is warmed. Otherwise the washer
fluid can form ice on the
windshield, blocking your vision.
Instruments and Controls 4-5
Page 88 of 318
Rear Window
Wiper/Washer
Z
Rear Wiper:Turn the end of
the lever to low or high, to turn
on the rear window wiper.
y(Low): Slow wipes.
x(High): Fast wipes.
=(Rear Washer): Turn the end of
the lever up or down as far as it will
go, to spray washer fluid on the rear
window. The knob automatically
returns from these positions after
it is released.
The windshield washer reservoir is
used for the windshield and the rear
window. Check the fluid level in the
reservoir if either washer is not
working. See Washer Fluid on
page 9-24.
{CAUTION
In freezing weather, do not use
your washer until the windshield
is warmed. Otherwise the washer
fluid can form ice on the
windshield, blocking your vision.
Power Outlets
(Accessory Power
Outlets)
Accessory power outlets can be
used to plug in electrical equipment,
such as a cellular phone.
The vehicle has an accessory
power outlet on the center floor
console below the shift lever.
To use the outlet, the ignition
must be in ON/RUN or ACC/
ACCESSORY. Pull down the
small cover to access the outlet.
Notice: Leaving electrical
equipment on for extended
periods will drain the battery. Always turn off electrical
equipment when not in use and
do not plug in equipment that
exceeds the maximum amperage
rating.
This circuit is protected by a fuse
and has a maximum current level.
Do not use equipment exceeding
the maximum amperage rating.
Certain power accessory plugs
may not be compatible to the power
accessory outlet and could result
in a blown vehicle or adapter fuse.
See your dealer/retailer for additional
information on the power accessory
plugs.
Notice:
Adding any electrical
equipment to the vehicle can
damage it or keep other
components from working as
they should. The repairs would
not be covered by the vehicle
warranty. Do not use equipment
exceeding maximum amperage
rating of 20 amperes. Check
with your dealer/retailer before
adding electrical equipment.
4-6 Instruments and Controls
Page 89 of 318
When adding electrical equipment,
be sure to follow the proper
installation instructions included
with the equipment.
Notice:Improper use of the
power outlet can cause damage
not covered by the warranty.
Do not hang any type of accessory
or accessory bracket from the
plug because the power outlets
are designed for accessory power
plugs only.
Power Outlets (115 Volt
Alternating Current)
Electrical equipment with a
maximum limit of 115 VAC can
be plugged into this power outlet.
If the equipment used requires
more than the limit, a protection circuit will cut the power supply.
The power automatically restarts
when equipment that operates
within the limit is plugged in.
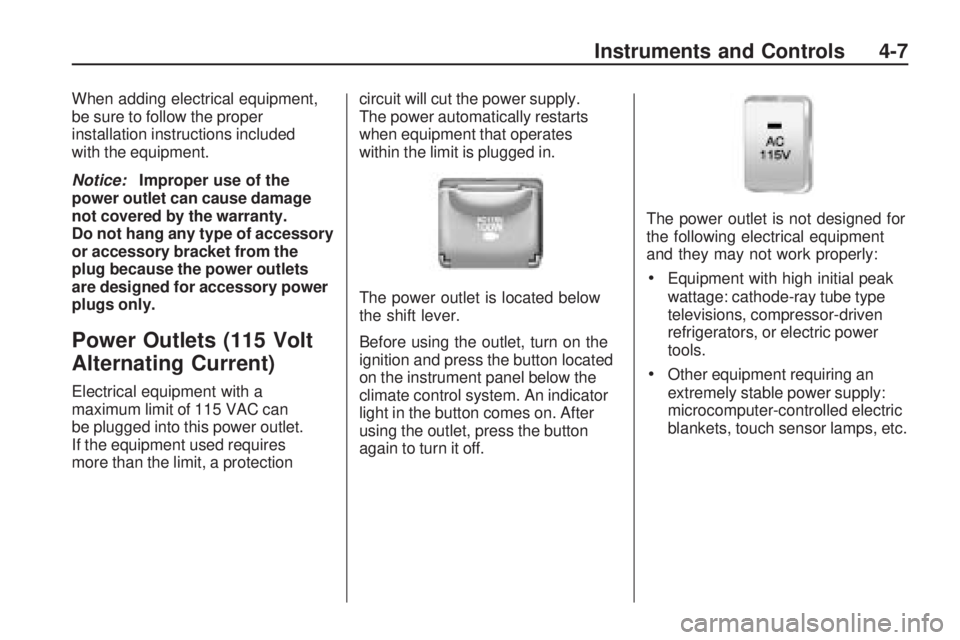
The power outlet is located below
the shift lever.
Before using the outlet, turn on the
ignition and press the button located
on the instrument panel below the
climate control system. An indicator
light in the button comes on. After
using the outlet, press the button
again to turn it off.
The power outlet is not designed for
the following electrical equipment
and they may not work properly:
•Equipment with high initial peak
wattage: cathode-ray tube type
televisions, compressor-driven
refrigerators, or electric power
tools.
•Other equipment requiring an
extremely stable power supply:
microcomputer-controlled electric
blankets, touch sensor lamps, etc.
Instruments and Controls 4-7
Page 90 of 318
Cigarette Lighter
For vehicles with a lighter, push
the lighter down and it will pop up
when it is ready to be used. The
ignition switch must be in the
ACC/ACCESSORY or ON/RUN
position to use the lighter.
Notice:Holding a cigarette
lighter in while it is heating does
not let the lighter back away from
the heating element when it is hot.
Damage from overheating can
occur to the lighter or heating
element, or a fuse could be blown.
Do not hold a cigarette lighter in
while it is heating.
It is not recommended to use the
cigarette lighter to plug in auxiliary
electrical equipment. Use the
accessory power outlet for phones and other electrical equipment. See
Power Outlets (Accessory Power
Outlets) on page 4-6
orPower
Outlets (115 Volt Alternating
Current) on page 4-7 .
Ashtrays
For vehicles with a removable
ashtray, it is located in the front
cupholder in the center console
storage area.
Notice:If papers, pins, or other
�ammable items are put in the
ashtray, hot cigarettes or other
smoking materials could ignite
them and possibly damage the
vehicle. Never put �ammable
items in the ashtray.
Warning Lights,
Gages, and Indicators
Warning lights come on when there
could be a problem with a vehicle
function. Some warning lights come
on briefly when the engine is started
to indicate they are working.
Gages can indicate when there
could be a problem with a vehicle
function. Often gages and warning
lights work together to indicate
a problem with the vehicle.
When one of the warning lights
comes on and stays on while driving,
or when one of the gages shows
there may be a problem, check the
section that explains what to do.
Follow this manual’s advice. Waiting
to do repairs can be costly and even
dangerous.
4-8 Instruments and Controls