PORSCHE CAYMAN 2007 1.G Owners Manual
Manufacturer: PORSCHE, Model Year: 2007, Model line: CAYMAN, Model: PORSCHE CAYMAN 2007 1.GPages: 314, PDF Size: 6.31 MB
Page 251 of 314

Determiningthecombinedweightofoccupants
andcargo:
Addtheweightofalloccupantsandthenaddthetotalluggageweight(gure).
Stepsfordeterminingcorrectloadlimit
1.Locatethestatement"ThecombinedweightofoccupantsandcargoshouldneverexceedXXXpounds"onyourvehicle’splacard(dependingonthedateofmanufacture).
2.Determinethecombinedweightofthedriverandpassengerthatwillberidinginyourvehicle.
3.SubtractthecombinedweightofthedriverandpassengerfromXXXkilogramsorXXXpounds.
4.Theresultingfigureequalstheavailableamountofcargoandluggageloadcapacity.Forexample,ifthe"XXX"amountequals400lbs.andtherewillbetwo-150lbpassengersinyourvehicle,theamountofavailablecargoandluggageloadcapacityis100lbs.(400-300(2x150)=100lbs.).
5.Determinethecombinedweightofluggageandcargobeingloadedonthevehicle.ThatweightmaynotsafelyexceedtheavailablecargoandluggageloadcapacitycalculatedinStep4.
PracticalTips,EmergencyService249
Page 252 of 314
FlatTire
Generalinformation
Warning!
Failuretofollowtheseinstructionsmayresultinseriouspersonalinjuryordeathtoyouortobystanders.
Ifyouhaveaflattire,moveasafedistanceofftheroad.Turntheemergencyflasheronanduseotherwarningdevicestoalertothermotorists.Settheparkingbrake.
Donotparkyourvehiclewhereitmaycontactdrygrass,brushorotherflammablematerials.Thehotpartsoftheexhaustsystemcouldsetsuchmaterialsonfire,therebycausingbothpropertydamageandseriouspersonalinjuryordeath.
Atiresealantandcompressorwithpressuretesterarelocatedinthetoolboxintheluggagecompartment.
PleaseobservethesafetyandoperatinginstructionsonthespecialsealantbottlewithaspecialPorschepartnumberandonthecompressor-theseareessential.
Caution!
Sealingthetirewiththetirerepairkitisonlyanemergencyrepair.Evenwiththetireair-tight,itmaybeusedonlyforshorttripsinanemergency.Themaximumpermittedspeedis50mph(80km/h).
Donotusecommerciallyavailablesealantortireinflatingbottles.Useonlythetiresealantlocatedintheluggagecompartment.
Warning!
Riskofaccidentresultinginseriouspersonalinjuryordeath.
Havetiresreplacedbyaspecialistworkshopassoonaspossible.
Avoidhardaccelerationandhighcorneringspeeds.
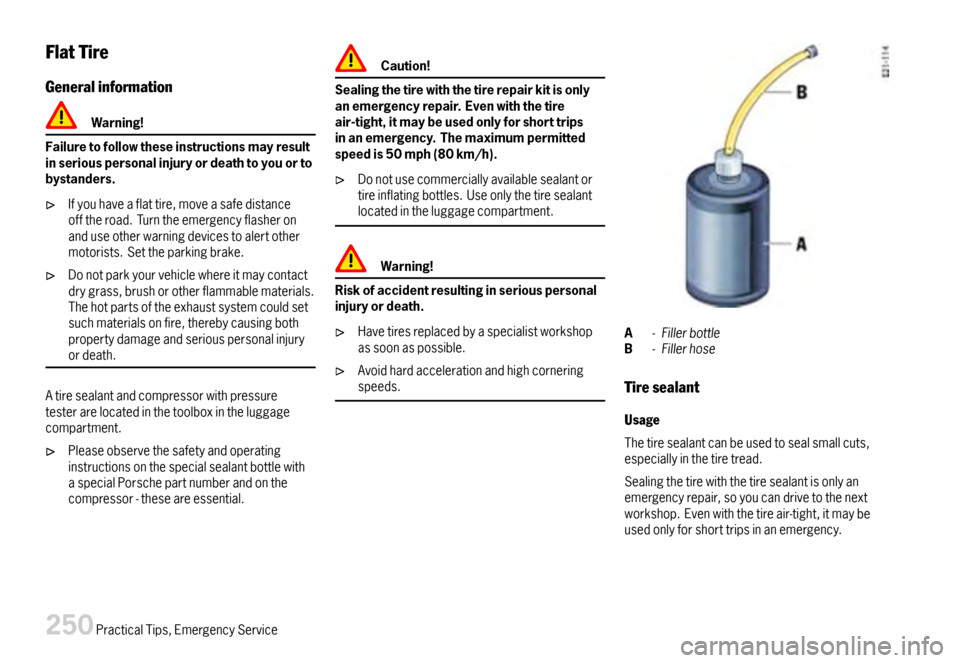
A-FillerbottleB-Fillerhose
Tiresealant
Usage
Thetiresealantcanbeusedtosealsmallcuts,especiallyinthetiretread.
Sealingthetirewiththetiresealantisonlyanemergencyrepair,soyoucandrivetothenextworkshop.Evenwiththetireair-tight,itmaybeusedonlyforshorttripsinanemergency.
250PracticalTips,EmergencyService
Page 253 of 314
Thetiresealantandacompressorwithpressuretestercanbefoundinthetoolboxintheluggagecompartment.
Thetiresealantcomprises:
–Afillerbottle
–Afillerhose
–Avalveturnerand
–Asparevalveinsert
–Astickerdenotingthemaximumpermissiblespeedforthedriver’sfieldofvision.
Danger!
Riskofaccidentresultinginseriouspersonalinjuryordeath.
Usethetiresealantonlyinthecaseofcutsorpuncturesnolargerthan0.15in.(4mm).
Neverusethetiresealantiftherimisdam-aged.
Warning!
Thesealantishighlyammableandharmfultohealth.
Fire,nakedflameandsmokingareprohibitedwhenhandlingtiresealant.
Avoidcontactwithskin,eyesandclothingduetocausticchemicalpropertiesofthetiresealant.
Keeptiresealantawayfromchildren.
Donotinhalevapors,duetoconsequentharmtopersonalhealthresultinginseriouspersonalinjuryordeath.
Incaseofcontactwiththesealant:
Ifsealantgetsontheskinorintheeyes,thoroughlyrinsetheaffectedpartofthebodyoffimmediately.
Changesoiledclothingimmediately.
Getmedicalattentionimmediatelyintheeventofanallergicreaction.
Ifsealantwasswallowed,thoroughlyrinseoutthemouthwithoutdelayanddrinkplentyofwater.Donotinducevomiting.Getmedicalattentionimmediately.
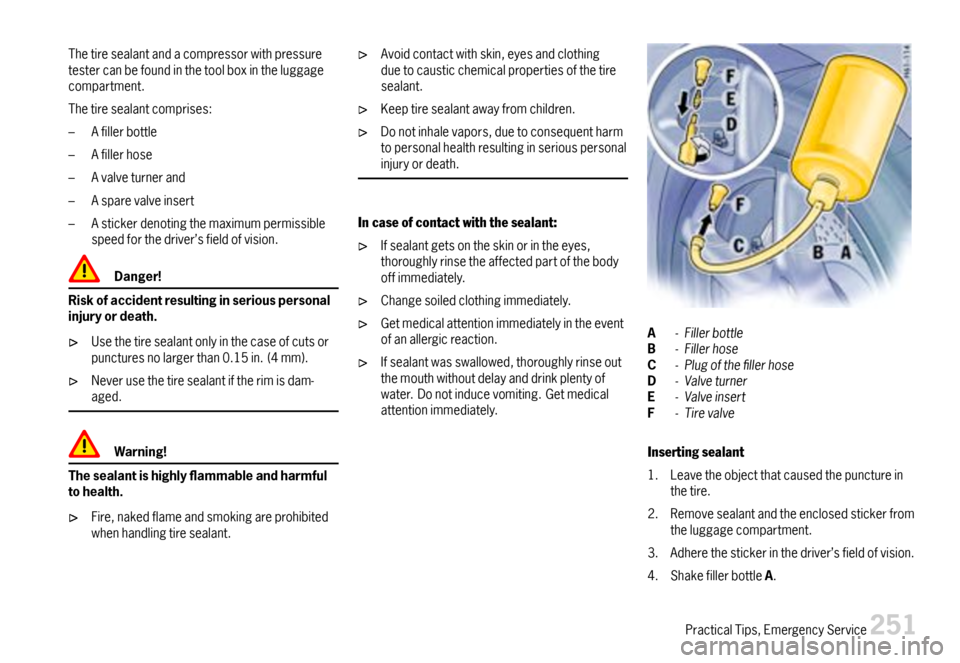
A-FillerbottleB-FillerhoseC-PlugofthellerhoseD-ValveturnerE-ValveinsertF-Tirevalve
Insertingsealant
1.Leavetheobjectthatcausedthepunctureinthetire.
2.Removesealantandtheenclosedstickerfromtheluggagecompartment.
3.Adherethestickerinthedriver’sfieldofvision.
4.ShakefillerbottleA.
PracticalTips,EmergencyService251
Page 254 of 314
5.ScrewfillerhoseBontothefillerbottle.Thefillerbottleisnowopen.
6.UnscrewvalvecapfromtirevalveF.
7.RemovevalveinsertEfromthetirevalvewithvalveturnerD.Keepthevalveinsertinacleananddryplace.
8.RemoveplugCofthefillerhoseB.
9.Pushfillerhoseontothetirevalve.
10.Holdfillerbottlehigherthanthelevelofthetirevalveandpressittogetherforcefullyuntilthebottleiscompletelyemptiedintothetire.
11.Pullfillerhoseoffthetirevalve.
12.Twistthevalveinsertfirmlyintothetirevalveusingthevalveturner.
13.Connectthecompressortothecigarettelighterandinflatethetiretotheprescribedtirepressure.
Pleaseobservethechapter”TIREPRESSUREFORCOLDTIRES”onpage299.
14.Screwvalvecapontothetirevalve.
15.Checkthetirepressureafterdrivingforaround10minutes.Ifthetirepressureislessthan22psi(1.5bar),donotcontinuedriving.Ifavalueofmorethan22psi(1.5bar)isindicated,correctthepressuretotheprescribedvalue.
16.PleaseconsultyourauthorizedPorschedealer.
CareInstructions
Afterdrying,anysealantthatemergescanbepeeledofflikeafilm.
Warning!
Riskofaccidentresultinginseriouspersonalinjuryordeath.
HavethetirereplacedbyanauthorizedPorschedealerimmediately.
Avoidhardaccelerationandhighcorneringspeeds.
Donotexceedmaximumspeedof50mph(80km/h).
Pleasealwaysobservethesafetyandoper-atinginstructions,whichcanbefoundintheseparateoperatinginstructionsforthesealantandonthecompressor.
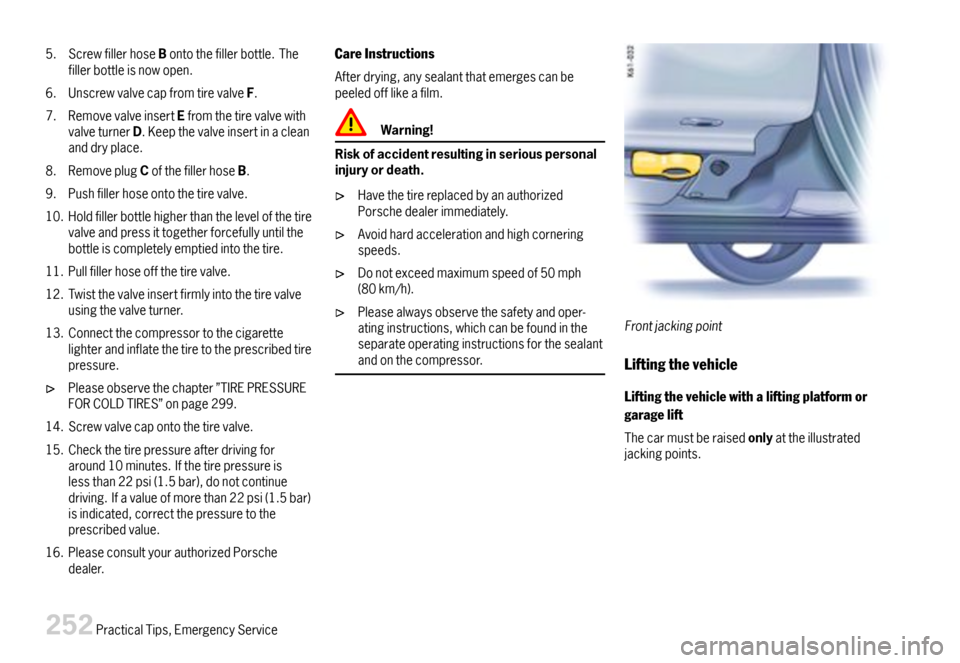
Frontjackingpoint
Liftingthevehicle
Liftingthevehiclewithaliftingplatformor
garagelift
Thecarmustberaisedonlyattheillustratedjackingpoints.
252PracticalTips,EmergencyService
Page 255 of 314
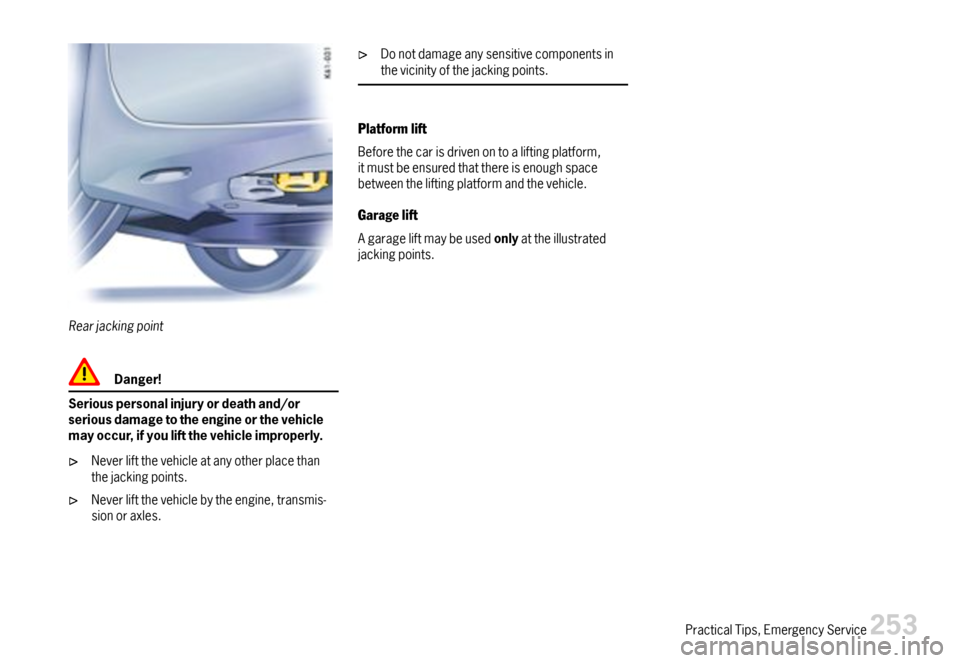
Rearjackingpoint
Danger!
Seriouspersonalinjuryordeathand/orseriousdamagetotheengineorthevehiclemayoccur,ifyouliftthevehicleimproperly.
Neverliftthevehicleatanyotherplacethanthejackingpoints.
Neverliftthevehiclebytheengine,transmis-sionoraxles.
Donotdamageanysensitivecomponentsinthevicinityofthejackingpoints.
Platformlift
Beforethecarisdrivenontoaliftingplatform,itmustbeensuredthatthereisenoughspacebetweentheliftingplatformandthevehicle.
Garagelift
Agarageliftmaybeusedonlyattheillustratedjackingpoints.
PracticalTips,EmergencyService253
Page 256 of 314
WheelBolts
Danger!
Riskofwheelboltbreakageandwheelseparation,resultinginseriouspersonalinjuryordeath.
Followallinstructionsconcerningwheelbolts.
Alwayscleanthewheelboltsbeforefitting.
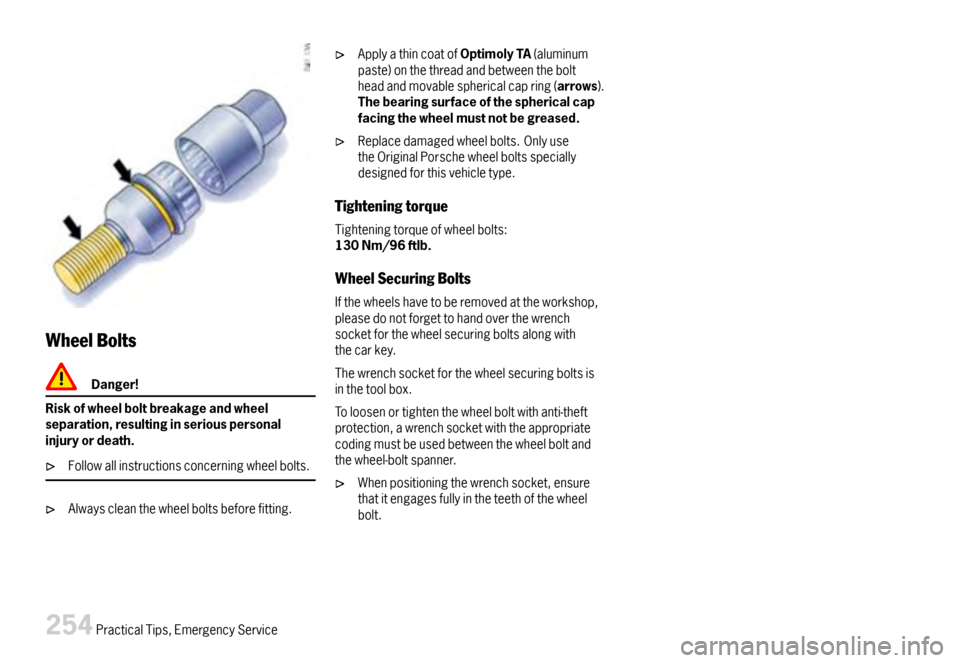
ApplyathincoatofOptimolyTA(aluminumpaste)onthethreadandbetweentheboltheadandmovablesphericalcapring(arrows).Thebearingsurfaceofthesphericalcapfacingthewheelmustnotbegreased.
Replacedamagedwheelbolts.OnlyusetheOriginalPorschewheelboltsspeciallydesignedforthisvehicletype.
Tighteningtorque
Tighteningtorqueofwheelbolts:130Nm/96ftlb.
WheelSecuringBolts
Ifthewheelshavetoberemovedattheworkshop,pleasedonotforgettohandoverthewrenchsocketforthewheelsecuringboltsalongwiththecarkey.
Thewrenchsocketforthewheelsecuringboltsisinthetoolbox.
Toloosenortightenthewheelboltwithanti-theftprotection,awrenchsocketwiththeappropriatecodingmustbeusedbetweenthewheelboltandthewheel-boltspanner.
Whenpositioningthewrenchsocket,ensurethatitengagesfullyintheteethofthewheelbolt.
254PracticalTips,EmergencyService
Page 257 of 314
Changingawheel
Danger!
Riskofseriouspersonalinjuryordeath.Thecarmayslipoffthejack.
Makesurethatnooneisinthevehiclewhenjackingupandchangingawheel.
Alwaysplacethecaronstablesupportsifworkhastobecarriedoutunderthecar.
Warning!
RiskofdamagetothebrakediscsofthePorscheCeramicCompositeBrake(PCCB).
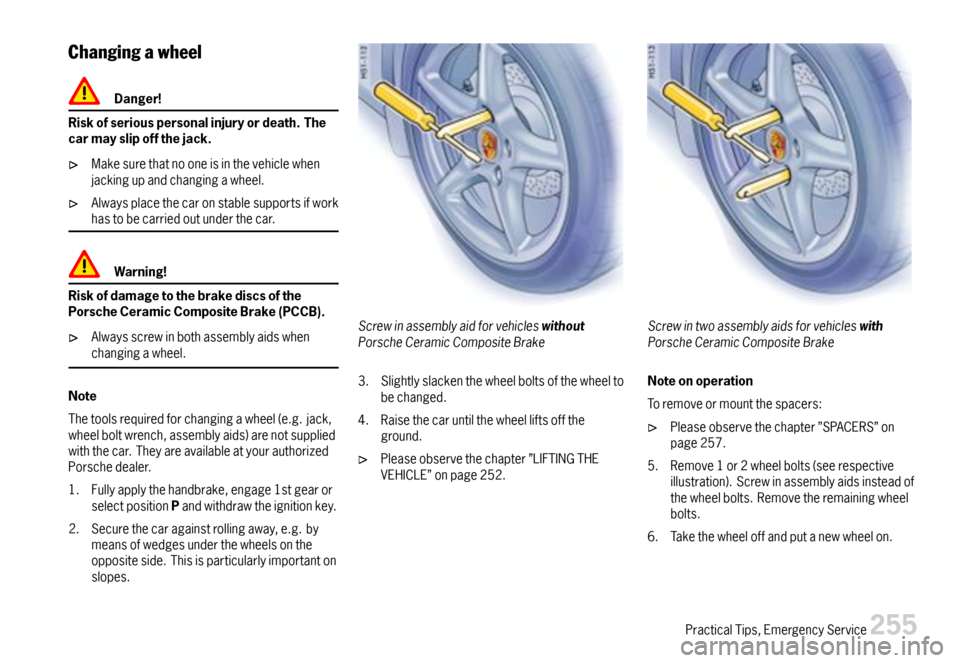
Alwaysscrewinbothassemblyaidswhenchangingawheel.
Note
Thetoolsrequiredforchangingawheel(e.g.jack,wheelboltwrench,assemblyaids)arenotsuppliedwiththecar.TheyareavailableatyourauthorizedPorschedealer.
1.Fullyapplythehandbrake,engage1stgearorselectpositionPandwithdrawtheignitionkey.
2.Securethecaragainstrollingaway,e.g.bymeansofwedgesunderthewheelsontheoppositeside.Thisisparticularlyimportantonslopes.
ScrewinassemblyaidforvehicleswithoutPorscheCeramicCompositeBrake
3.Slightlyslackenthewheelboltsofthewheeltobechanged.
4.Raisethecaruntilthewheelliftsofftheground.
Pleaseobservethechapter”LIFTINGTHEVEHICLE”onpage252.
ScrewintwoassemblyaidsforvehicleswithPorscheCeramicCompositeBrake
Noteonoperation
Toremoveormountthespacers:
Pleaseobservethechapter”SPACERS”onpage257.
5.Remove1or2wheelbolts(seerespectiveillustration).Screwinassemblyaidsinsteadofthewheelbolts.Removetheremainingwheelbolts.
6.Takethewheeloffandputanewwheelon.
PracticalTips,EmergencyService255
Page 258 of 314

7.Screwinwheelbolts;removeassemblyaidsandscrewintheremainingwheelbolts.Initiallytightenboltsindiagonallyoppositesequencesothatthewheeliscentered.
Pleaseobservethechapter”WHEELBOLTS”onpage254.
8.Lowerthecarcompletely.
9.Tightenwheelboltsindiagonallyoppositesequence.
Immediatelyafterchangingawheel,useatorquewrenchtochecktheprescribedtighteningtorque(130Nm/96ftlb.).
Checkingtirepressurewithapressure
gauge
Pleaseobservethechapter”TPCTIREPRESSUREMONITORING”onpage122.
1.Removethevalvestemcapfromthetire.
2.Pressthepressuregaugeontothevalvestem.
Noteonoperation
Donotpresstoohardorforcethevalvestemsideways,orairwillescape.Ifthesoundofairescapingfromthetireisheard,repositionthepressuregauge.
3.Readthetirepressureonthegaugestemandcompareittothepermissibletirepressure.ThisinformationcanbefoundonthetirepressureplateorinthechapterTechnicalData.
Pleaseobservethechapter”TIREPRESSUREFORCOLDTIRES”onpage299.
4.Removethepressuregauge.
256PracticalTips,EmergencyService
Page 259 of 314

Spacers
Generalinformationtotheuseofspacers
UsethespacersonlytogetherwithwheelsandfasteningpartsapprovedbyPorsche.Beforehavingspacersfitted,findoutaboutthecurrentauthorizationstatus.
Mountinganemergencysparewheel
If5mmspacersarefitted,thesemustnotberemovedtomountanemergencysparewheel.
Fittingsnowchains
Theuseofsnowchainsisnotpermittedwhen5mmspacersaremounted.
Caution!
Riskofdamagetowheelhousingsifthe5mmspacersarenotremovedbeforettingsnowchains.
Inordertoenablethefittingofsnowchains,havethe5mmspacersremovedonall4wheels.
Noteonoperation
Tofit/removethespacers:PleaseconsultanauthorizedPorschedealer.
Removing/mountingthespacers
Requiredscopeofpartsifthespacersare
removed
Shortcountersunkscrews(M6x12)PartNo:900.269.047.09
1setofshortwheelboltsPartNo:996.361.203.02
Shortanti-theftprotectiondevicesPartNo:996.361.057.01
PracticalTips,EmergencyService257
Page 260 of 314

Removingthespacers
Pleaseobservethechapter”CHANGINGAWHEEL”onpage255.
1.Unscrewbothcountersunkscrews(M6x16)onthewheelhub.
2.Removethespacer.
3.FastenthebrakediscwiththeshortM6x12countersunkscrews,partNo.900.269.047.09.Tighteningtorque10Nm(7.5ftlb.).
4.Forwheelmountingwithoutaspacer,5mmshorterwheelbolts(partNo:996.361.203.02)mustbeused.Tighten-ingtorque130Nm(96ftlb.).
Mountingthespacers
Pleaseobservethechapter”CHANGINGAWHEEL”onpage255.
1.Removewheel
2.Unscrewbothcountersunkscrews(M6x12)onthebreakdisc.
3.FastenthespacerwiththelongM6x16countersunkscrews.Tighteningtorque10Nm(7.5ftlb.).
4.Fitwheel.Todothisusethelongerwheelboltsforfasteningthewheels.Tighteningtorque130Nm(96ftlb.).
Longwheelbolt,X-boltlengthapprox.50mm,Arrows-marks
Wheelboltidentifyingfeatures
ThelongwheelboltsareidentifiedonthefacesurfaceoftheboltheadwithGTorinred,orthemoveablesphericalcapringisgalvanisedinred.Thelongwheelboltsmustonlybeusedtogetherwith5mmspacersfitted.
Theshortwheelboltsarenotmarkedincolor.Theshortwheelboltsmustonlybeusedwithout5mmspacersfitted.
Tighteningtorqueforbothwheelbolts:130Nm(96ftlb.).
258PracticalTips,EmergencyService