PORSCHE CAYNNE TURBO 2005 1.G Workshop Manual
Manufacturer: PORSCHE, Model Year: 2005, Model line: CAYENNE TURBO, Model: PORSCHE CAYENNE TURBO 2005 1.GPages: 369, PDF Size: 3.17 MB
Page 51 of 369
Controls, Safety, Instruments
51
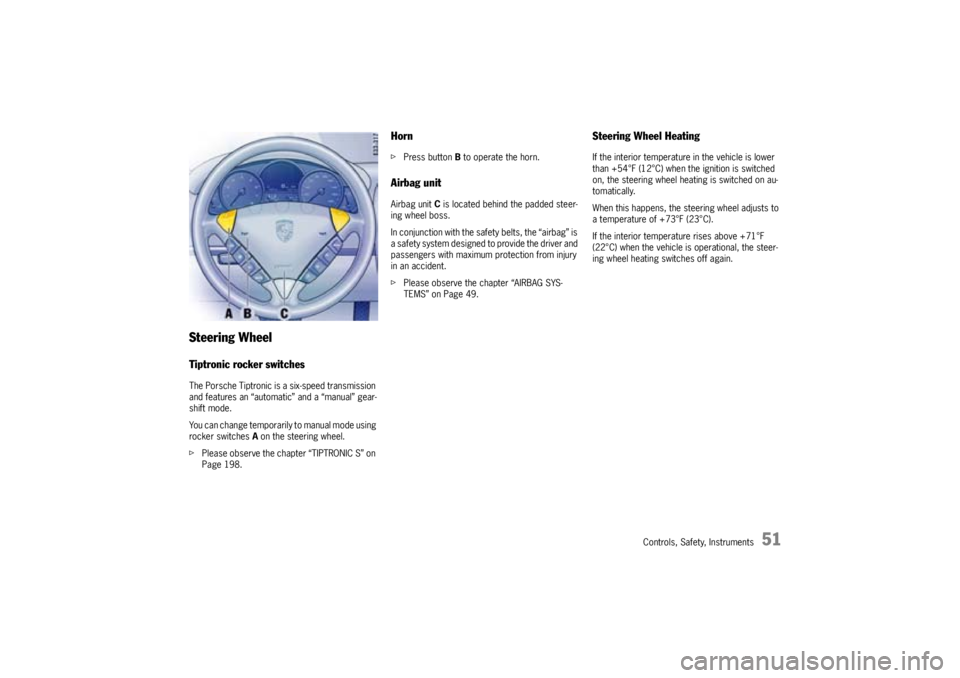
Steering WheelTiptronic rocker switchesThe Porsche Tiptronic is a six-speed transmission
and features an “automatic” and a “manual” gear-
shift mode.
You can change temporarily to manual mode using
rocker switches A on the steering wheel.
fPlease observe the chapter “TIPTRONIC S” on
Page 198.
HornfPress button B to operate the horn.Airbag unitAirbag unit C is located behind the padded steer-
ing wheel boss.
In conjunction with the safety belts, the “airbag” is
a safety system designed to provide the driver and
passengers with maximum protection from injury
in an accident.
fPlease observe the chapter “AIRBAG SYS-
TEMS” on Page 49.
Steering Wheel HeatingIf the interior temperature in the vehicle is lower
than +54°F (12°C) when the ignition is switched
on, the steering wheel heating is switched on au-
tomatically.
When this happens, the steering wheel adjusts to
a temperature of +73°F (23°C).
If the interior temperature rises above +71°F
(22°C) when the vehicle is operational, the steer-
ing wheel heating switches off again.
Page 52 of 369
52
Controls, Safety, Instruments
Steering Wheel Adjustment
Warning!
Risk of accident. The steering wheel may
move further than desired if you attempt to
adjust it when driving.
You can lose control of the vehicle.
fDo not adjust the steering wheel when driving.
Risk of crushing due to uncontrolled recall of
seat memory settings.
fDo not leave children in the car unattended.
Adjusting steering wheel height and
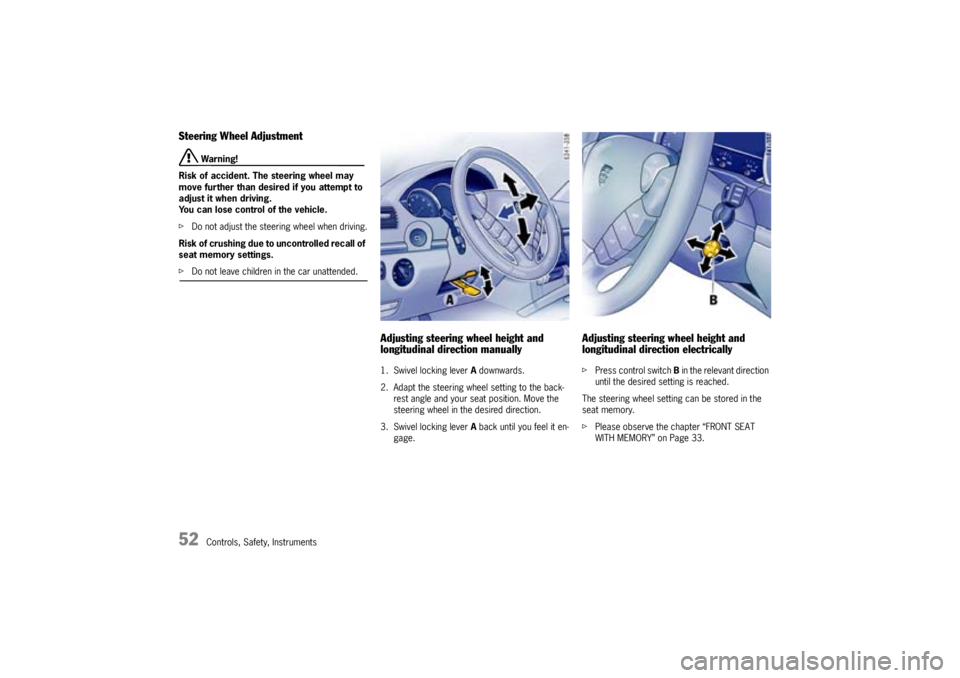
longitudinal direction manually1. Swivel locking lever A downwards.
2. Adapt the steering wheel setting to the back-
rest angle and your seat position. Move the
steering wheel in the desired direction.
3. Swivel locking lever A back until you feel it en-
gage.
Adjusting steering wheel height and
longitudinal direction electricallyfPress control switch Bin the relevant direction
until the desired setting is reached.
The steering wheel setting can be stored in the
seat memory.
fPlease observe the chapter “FRONT SEAT
WITH MEMORY” on Page 33.
Page 53 of 369
Controls, Safety, Instruments
53
Multi-Functional Steering Wheel
Warning!
There is a danger of accident if you set or
operate the on-board computer, radio, navi-
gation system, telephone or other equipment
when driving.
This could distract you from the traffic and
cause you to lose control of the vehicle.
fOperate the components while driving only if
the traffic situation allows you to do so safely.
fCarry out any complicated operating or setting procedures only with the vehicle stationary.
Depending on the equipment in your vehicle, you
can use these function keys to operate the follow-
ing Porsche communication systems:
– Radio with CD drive
–CD changer
– Satelite radio
Readiness for operation of multi-
functional steering wheel– With ignition switched on and
– With Porsche communication systems
switched on.
fPlease observe the operating instructions sup-
plied for the Porsche communication systems
before operating the function keys.
Note on operation
The Porsche communication systems cannot be
switched on and off using the multi-functional
steering wheel.
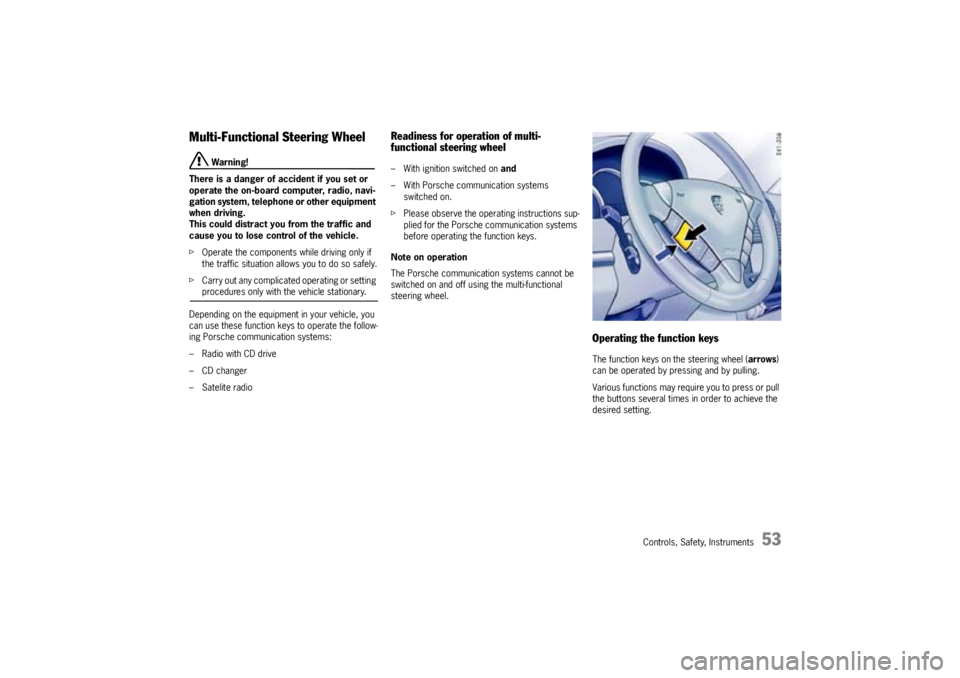
Operating the function keysThe function keys on the steering wheel (arrows)
can be operated by pressing and by pulling.
Various functions may require you to press or pull
the buttons several times in order to achieve the
desired setting.
Page 54 of 369
54
Controls, Safety, Instruments
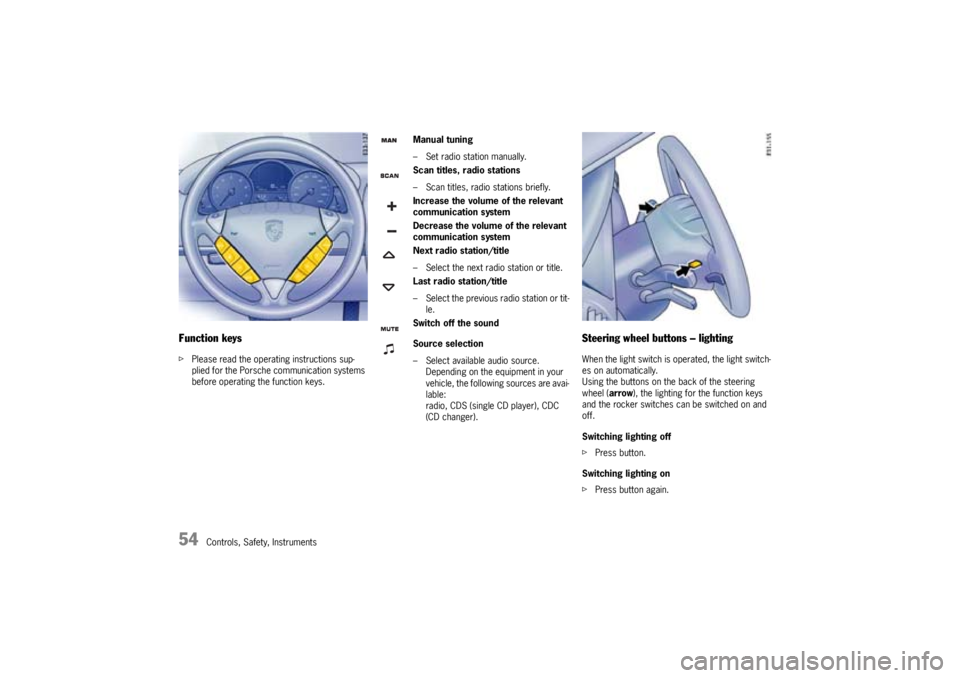
Function keysfPlease read the operating instructions sup-
plied for the Porsche communication systems
before operating the function keys.
Steering wheel buttons – lightingWhen the light switch is operated, the light switch-
es on automatically.
Using the buttons on the back of the steering
wheel (arrow), the lighting for the function keys
and the rocker switches can be switched on and
off.
Switching lighting off
fPress button.
Switching lighting on
fPress button again.
Manual tuning
– Set radio station manually.
Scan titles, radio stations
– Scan titles, radio stations briefly.
Increase the volume of the relevant
communication system
Decrease the volume of the relevant
communication system
Next radio station/title
– Select the next radio station or title.
Last radio station/title
– Select the previous radio station or tit-
le.
Switch off the sound
Source selection
– Select available audio source.
Depending on the equipment in your
vehicle, the following sources are avai-
lable:
radio, CDS (single CD player), CDC
(CD changer).
Page 55 of 369
Controls, Safety, Instruments
55
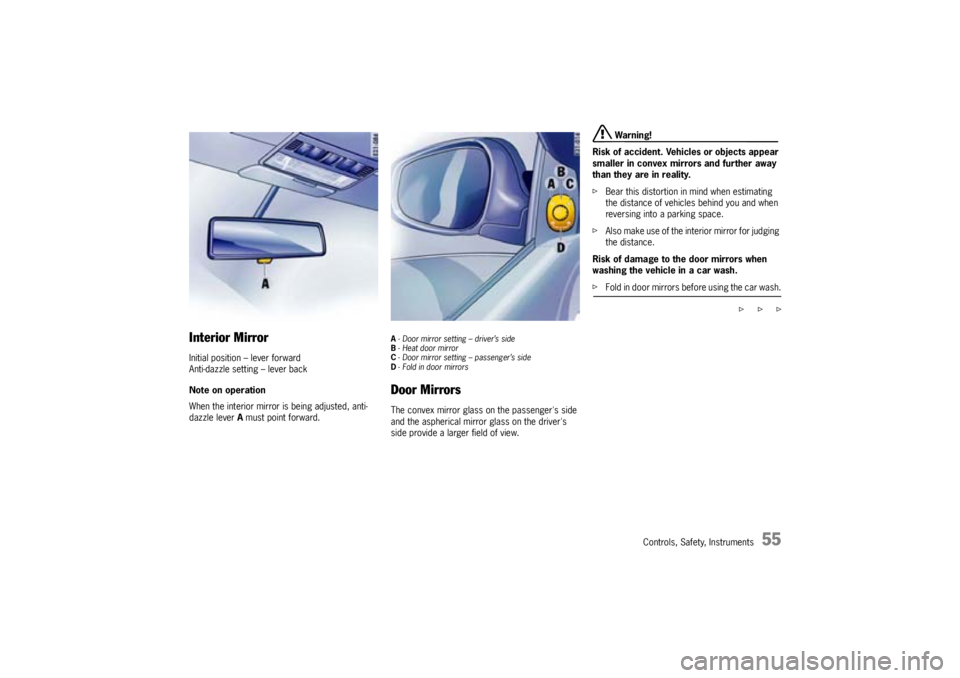
Interior MirrorInitial position – lever forward
Anti-dazzle setting – lever back
Note on operation
When the interior mirror is being adjusted, anti-
dazzle lever A must point forward.
A- Door mirror setting – driver’s side
B- Heat door mirror
C- Door mirror setting – passenger’s side
D- Fold in door mirrorsDoor MirrorsThe convex mirror glass on the passenger's side
and the aspherical mirror glass on the driver's
side provide a larger field of view.
Warning!
Risk of accident. Vehicles or objects appear
smaller in convex mirrors and further away
than they are in reality.
fBear this distortion in mind when estimating
the distance of vehicles behind you and when
reversing into a parking space.
fAlso make use of the interior mirror for judging
the distance.
Risk of damage to the door mirrors when
washing the vehicle in a car wash.
fFold in door mirrors before using the car wash.
f f f
Page 56 of 369

56
Controls, Safety, Instruments
Adjusting mirrorsfPlease observe the chapter “MIRRORS” on
Page 103.
1. Switch ignition on.
2. Select Afor the driver’s side or C for the
passenger’s side by turning the control switch.
3. Move the door mirrors in the appropriate
direction by tilting the control switch.
If the electrical adjustment facility fails
fAdjust the mirror by pressing on the mirror
face.Folding in door mirrorfSwitch ignition on.
fTurn control switch to D.
Both door mirrors fold in automatically.
If the electrical adjustment facility fails
fFold in mirror manually.
Unfolding door mirrorsfSwitch ignition on.
fTurn control switch to A or C.
Both door mirrors unfold automatically.
If the electrical adjustment facility fails
fUnfold mirrors manually.
Automatically swivelling down mirror
glass on the passenger's sidefPlease observe the chapter “FRONT SEAT
WITH MEMORY” on Page 33.
fPlease observe the chapter “PARKING AIDS”
on Page 157.Door mirror heatingThe door mirror heater is ready for operation
when the ignition is switched on.
Switching on
fTurn control switch to B.
Both door mirrors are heated.
Switching off
fChange the position of the control switch.
Page 57 of 369

Controls, Safety, Instruments
57
E- Light-emitting diodes (LED)
F- Button for automatic anti-dazzle operation
G- Light sensorsAutomatic Anti-Dazzle MirrorSensors on the front and rear sides of the interior
mirror measure the incident light. The mirrors au-
tomatically change to anti-dazzle position or revert
to their normal state, depending on the light inten-
sity.
Warning!
Danger of injury. Electrolyte fluid can
emerge from broken mirror glass. This fluid
irritates the skin and eyes.
fIf the electrolyte fluid should come into contact
with the skin or eyes, immediately rinse it off
with clean water.
See a doctor if necessary.
Risk of damage to paintwork, leather, plastic
parts, and clothing. Electrolyte fluid can be
removed only while it is still wet.
fClean the affected parts with water.Note on operation
The incident light in the area of light sensors G
must not be restricted (e.g. by stickers on the
windshield).
Switching off automatic anti-dazzle
operation
fPress button F.
Light-emitting diode E goes out.
Note on operation
Anti-dazzle operation switches off automatically,
if:
– Reverse gear is engaged or
– Interior lighting and/or
Reading lights at the front are switched on.
Switching on automatic anti-dazzle
operation
fPress button F.
Light-emitting diode E lights up.
Page 58 of 369
58
Controls, Safety, Instruments
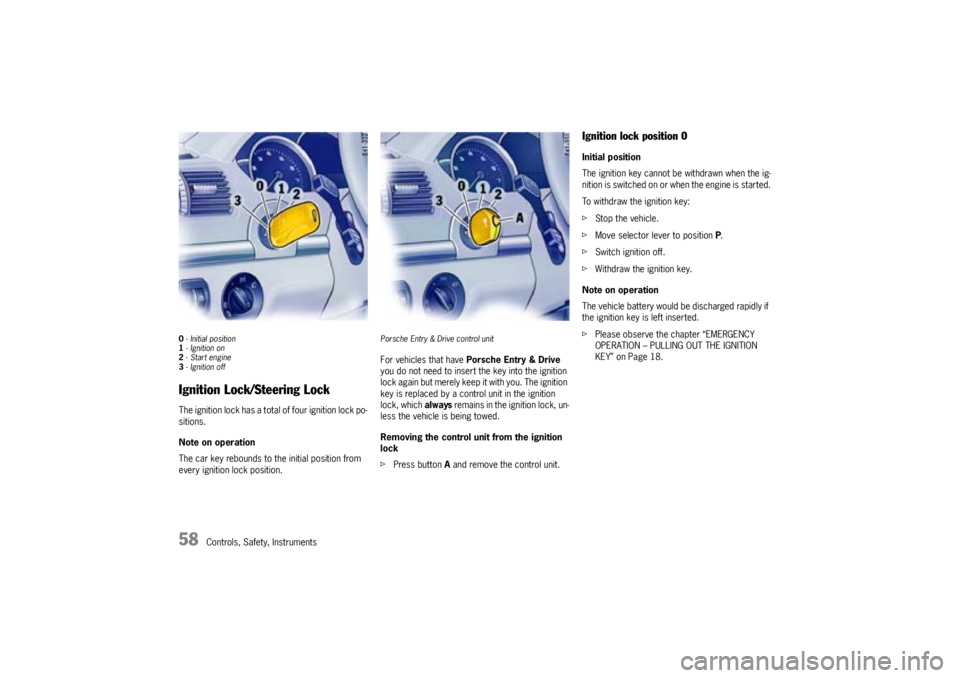
0- Initial position
1- Ignition on
2-Start engine
3- Ignition offIgnition Lock/Steering LockThe ignition lock has a total of four ignition lock po-
sitions.
Note on operation
The car key rebounds to the initial position from
every ignition lock position.
Porsche Entry & Drive control unitFor vehicles that have Porsche Entry & Drive
you do not need to insert the key into the ignition
lock again but merely keep it with you. The ignition
key is replaced by a control unit in the ignition
lock, which always remains in the ignition lock, un-
less the vehicle is being towed.
Removing the control unit from the ignition
lock
fPress button A and remove the control unit.
Ignition lock position 0Initial position
The ignition key cannot be withdrawn when the ig-
nition is switched on or when the engine is started.
To withdraw the ignition key:
fStop the vehicle.
fMove selector lever to position P.
fSwitch ignition off.
fWithdraw the ignition key.
Note on operation
The vehicle battery would be discharged rapidly if
the ignition key is left inserted.
fPlease observe the chapter “EMERGENCY
OPERATION – PULLING OUT THE IGNITION
KEY” on Page 18.
Page 59 of 369

Controls, Safety, Instruments
59
Ignition lock position 1Ignition on
fTurn ignition key to position 1.
Ignition is switched on.
Note on operation
All electrical equipment can be switched on.
The warning lights light up for a lamp check.
fPlease observe the chapter “INSTRUMENT PA-
NEL USA MODELS” on Page 68.Ignition lock position 2Starting engine
fOperate footbrake.
fMove selector lever to position P or N.
fDo not press the accelerator pedal.
The engine control module will provide the
correct starting mixture.
fTurn ignition key to ignition lock position 2.
fDo not operate the starter longer than approx.
10 seconds.
If necessary, repeat the starting procedure af-
ter a pause of approx. 10 seconds.
Turn the ignition key to ignition lock position 3
(ignition off) first.fDo not warm up the engine when stationary.
Drive off immediately.
Avoid high revolutions and full throttle until the
engine has reached operating temperature.
fIf battery output is insufficient, jump leads can
be used to start the engine.
Please observe the chapter “EMERGENCY
STARTING WITH JUMPER CABLES” on
Page 323.
Notes on operation
The first operation of the starter is ended
automatically when the engine starts.
If the engine does not start, subsequent starter
operations will not be ended automatically.
When the engine is started, the warning lights
must go out.
Ignition lock position 3Ignition off
fTurn ignition key to ignition lock position 3.
Locking the steering columnVehicles without Porsche Entry & Drive
The steering column is automatically locked
when the ignition key is withdrawn from the igni-
tion lock.
The steering column is automatically unlocked
when the ignition key is inserted into the ignition
lock.
Vehicles with Porsche Entry & Drive
The steering column is automatically locked
when the ignition is switched off and the vehicle is
locked.
fTo lock intentionally, once the ignition is
switched off, turn the control unit again to the
ignition lock position 3 and hold it there for
2seconds.
The steering column is locked.
The steering column is automatically unlocked
by turning the control unit from ignition lock posi-
tion 0.
Page 60 of 369

60
Controls, Safety, Instruments
Starting and Stopping the EnginefPlease observe the chapter “IMMOBILIZER” on
Page 19.
fPlease observe the chapter “EMISSION
CONTROL SYSTEM” on Page 254.
Danger!
Risk of poisoning. Exhaust gas contains
colorless and odorless carbon monoxide
(CO), which is toxic even in low concentra-
tion. Carbon monoxide can cause uncon-
sciousness and even death if inhaled.
fNever start or let the engine run in an en-
closed, unventilated area. It is not recommend-
ed to sit in your car for prolonged periods with
the engine on and the car not moving.
An unattended vehicle with a running engine
is potentially hazardous. If warning lights
should come on to indicate improper opera-
tion, they would go unnoticed.
fNever leave the engine idling unattended.
Danger of fire.
fDo not drive or park your car where combusti-
ble materials, such as dry grass or leaves,
can come into contact with the hot exhaust sy-
stem.
fIf your car catches on fire for any reason, call
the fire department. Do not endanger your life by attempting to put out the fire.
StartingfOperate footbrake.
fMove selector lever to position P or N.
fDo not press the accelerator pedal.
The engine control module will provide the
correct starting mixture.
fTurn ignition key to ignition lock position 2.
fDo not operate the starter longer than approx.
10 seconds.
If necessary, repeat the starting procedure af-
ter a pause of approx. 10 seconds. Turn the ig-
nition key back to ignition lock position 3first.
The first operation of the starter is ended
automatically when the engine starts.
If the engine does not start, subsequent starter
operations will not be ended automatically.
fDo not warm up the engine when stationary.
Drive off immediately.
Avoid high revolutions and full throttle until the
engine has reached operating temperature.
fIf battery output is insufficient, jump leads can
be used to start the engine.
Please observe the chapter “EMERGENCY
STARTING WITH JUMPER CABLES” on
Page 323.Note on operation
To ensure a good charge condition for the battery
and thus its ability to start the engine, all electrical
accessories which are not required should be
switched off when the ignition is switched on and
when engine revolutions are low (in stop and go
traffic).
Starting with auxiliary batteryIf your vehicle is fitted with an additional battery
in the luggage compartment, you have the possi-
bility of starting the engine with the ignition key,
even if the main battery fails.
In vehicles with Porsche Entry & Drive:
1. Remove the Porsche Entry & Drive control unit
from the ignition lock.
Please observe the chapter “REMOVING THE
CONTROL UNIT FROM THE IGNITION LOCK” on
Page 58.
2. Insert the ignition key into the ignition lock and
start the engine as described.
fPlease have the cause of the fault remedied at
an authorized Porsche dealer.