lock Ram 3500 2020 Owner's Manual
[x] Cancel search | Manufacturer: RAM, Model Year: 2020, Model line: 3500, Model: Ram 3500 2020Pages: 568
Page 418 of 568

416SERVICING AND MAINTENANCE
blade down toward the base of the wiper
arm and away from the J hook in the end of
the wiper arm).
Removing Wiper From Wiper Arm
6. Gently lower the wiper arm onto the glass.
Installing The Front Wipers
1. Lift the wiper arm off of the glass, until the wiper arm is in the full up position.
2. Position the wiper blade under the hook on the tip of the wiper arm with the wiper
locking tab open. 3. Insert the receiver bracket on the wiper
assembly into the hook on the tip of the arm
through the opening in the wiper blade
under the locking tab.
4. Slide the wiper blade up into the hook on the wiper arm until it is latched
(engagement will be accompanied by an
audible click). Fold down the latch release
tab and snap it into its locked position.
5. Gently lower the wiper blade onto the glass.
EXHAUST SYSTEM
The best protection against carbon monoxide
entry into the vehicle body is a properly
maintained engine exhaust system.
If you notice a change in the sound of the
exhaust system; or if the exhaust fumes can be
detected inside the vehicle; or when the
underside or rear of the vehicle is damaged;
have an authorized technician inspect the
complete exhaust system and adjacent body
areas for broken, damaged, deteriorated, or
mispositioned parts. Open seams or loose connections could permit exhaust fumes to
seep into the passenger compartment. In
addition, have the exhaust system inspected
each time the vehicle is raised for lubrication or
oil change. Replace as required.1 — Wiper
2 — Locking Tab
3 — Wiper Arm J Hook
WARNING!
Exhaust gases can injure or kill. They
contain carbon monoxide (CO), which is
colorless and odorless. Breathing it can
make you unconscious and can eventually
poison you. To avoid breathing CO, refer to
“Safety Tips” in “Safety” for further informa
-
tion.
A hot exhaust system can start a fire if you
park over materials that can burn. Such
materials might be grass or leaves coming
into contact with your exhaust system. Do
not park or operate your vehicle in areas
where your exhaust system can contact
anything that can burn.
20_DJD2_OM_EN_USC_t.book Page 416
Page 470 of 568
468MULTIMEDIA
Privacy of any wireless and wired
communications cannot be assured. Third
parties may unlawfully intercept information
and private communications without your
consent. For further information, refer to “Data
Collection & Privacy” in your Uconnect Owner’s
Manual Supplement or “Onboard Diagnostic
System (OBD II) Cybersecurity” in “Getting To
Know Your Instrument Panel”.
UCONNECT SETTINGS
The Uconnect system uses a combination of
buttons on the touchscreen and buttons on the
faceplate located on the center of the
instrument panel. These buttons allow you to
access and change the customer
programmable features. Many features can
vary by vehicle.
Buttons on the faceplate are located below
and/or beside the Uconnect system in the
center of the instrument panel. In addition,
there is a Scroll/Enter control knob located on
the right side. Turn the control knob to scroll
through menus and change settings. Push the
center of the control knob one or more times to
select or change a setting. Your Uconnect system may also have Screen
Off and Mute buttons on the faceplate.
Push the Screen Off button on the faceplate to
turn off the Uconnect screen. Push the button
again or tap the screen to turn the screen on.
Push the Back Arrow button to exit out of a
Menu or certain option on the Uconnect system.
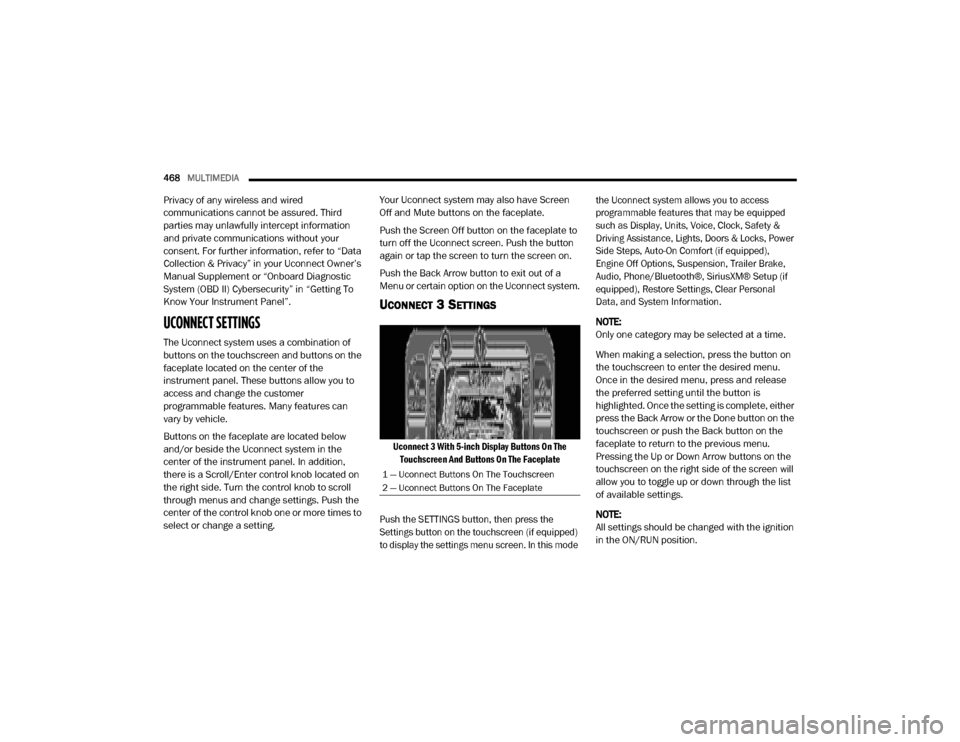
UCONNECT 3 SETTINGS
Uconnect 3 With 5-inch Display Buttons On The
Touchscreen And Buttons On The Faceplate
Push the SETTINGS button, then press the
Settings button on the touchscreen (if equipped)
to display the settings menu screen. In this mode the Uconnect system allows you to access
programmable features that may be equipped
such as Display, Units, Voice, Clock, Safety &
Driving Assistance, Lights, Doors & Locks, Power
Side Steps, Auto-On Comfort (if equipped),
Engine Off Options, Suspension, Trailer Brake,
Audio, Phone/Bluetooth®, SiriusXM® Setup (if
equipped), Restore Settings, Clear Personal
Data, and System Information.
NOTE:
Only one category may be selected at a time.
When making a selection, press the button on
the touchscreen to enter the desired menu.
Once in the desired menu, press and release
the preferred setting until the button is
highlighted. Once the setting is complete, either
press the Back Arrow or the Done button on the
touchscreen or push the Back button on the
faceplate to return to the previous menu.
Pressing the Up or Down Arrow buttons on the
touchscreen on the right side of the screen will
allow you to toggle up or down through the list
of available settings.
NOTE:
All settings should be changed with the ignition
in the ON/RUN position.
1 — Uconnect Buttons On The Touchscreen
2 — Uconnect Buttons On The Faceplate
20_DJD2_OM_EN_USC_t.book Page 468
Page 473 of 568
MULTIMEDIA471
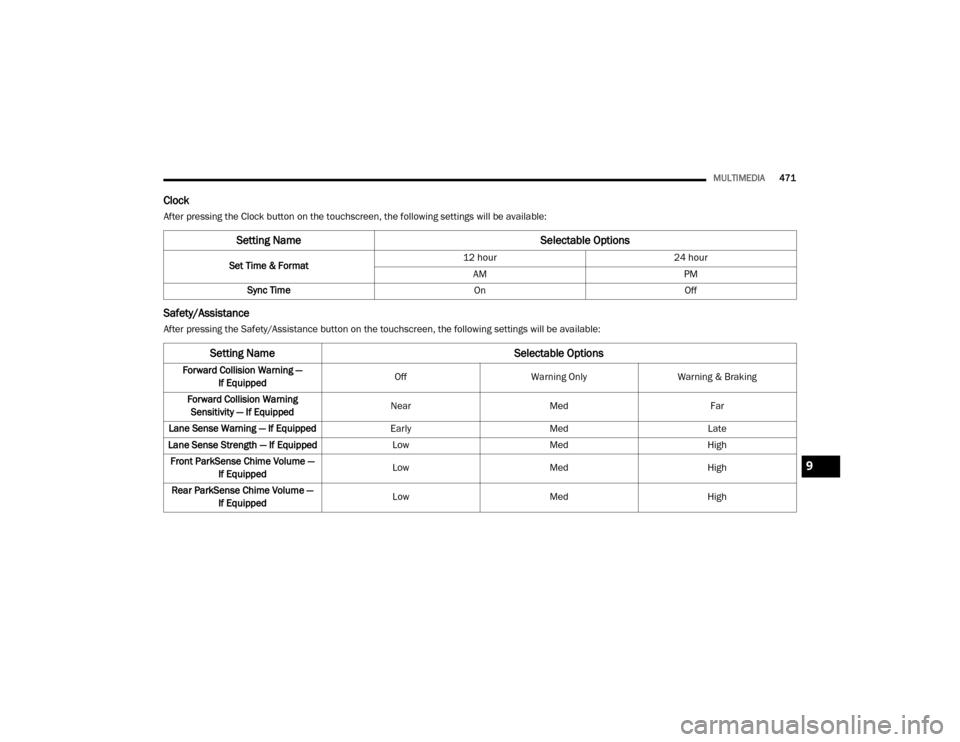
Clock
After pressing the Clock button on the touchscreen, the following settings will be available:
Safety/Assistance
After pressing the Safety/Assistance button on the touchscreen, the following settings will be available:
Setting Name Selectable Options
Set Time & Format12 hour
24 hour
AM PM
Sync Time OnOff
Setting Name Selectable Options
Forward Collision Warning —
If Equipped Off
Warning Only Warning & Braking
Forward Collision Warning Sensitivity — If Equipped Near
Med Far
Lane Sense Warning — If Equipped EarlyMedLate
Lane Sense Strength — If Equipped LowMed High
Front ParkSense Chime Volume — If Equipped Low
Med High
Rear ParkSense Chime Volume — If Equipped Low
Med High
9
20_DJD2_OM_EN_USC_t.book Page 471
Page 476 of 568
474MULTIMEDIA
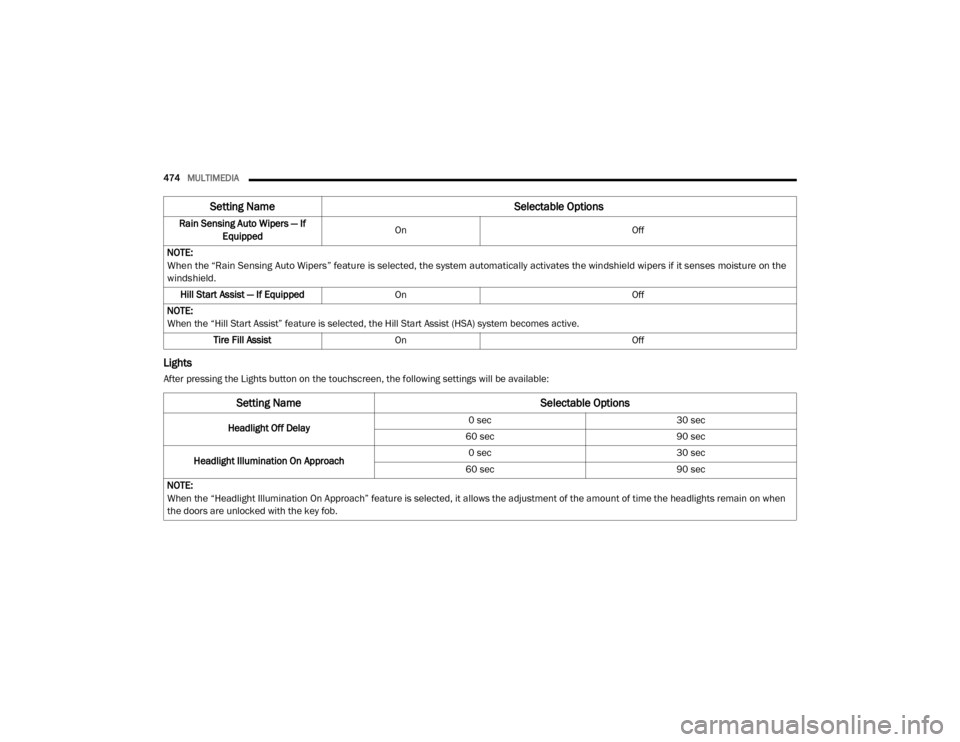
Lights
After pressing the Lights button on the touchscreen, the following settings will be available:Rain Sensing Auto Wipers — If
Equipped On
Off
NOTE:
When the “Rain Sensing Auto Wipers” feature is selected, the system automatically activates the windshield wipers if it senses moisture on the
windshield.
Hill Start Assist — If Equipped On Off
NOTE:
When the “Hill Start Assist” feature is selected, the Hill Start Assist (HSA) system becomes active. Tire Fill Assist On Off
Setting Name Selectable Options
Setting NameSelectable Options
Headlight Off Delay0 sec
30 sec
60 sec 90 sec
Headlight Illumination On Approach 0 sec
30 sec
60 sec 90 sec
NOTE:
When the “Headlight Illumination On Approach” feature is selected, it allows the adjustment of the amount of time the headlights remain on when
the doors are unlocked with the key fob.
20_DJD2_OM_EN_USC_t.book Page 474
Page 477 of 568

MULTIMEDIA475
Headlights With Wipers — If Equipped OnOff
Auto Dim High Beams — If Equipped OnOff
Daytime Running Lights OnOff
Flash Lights With Lock OnOff
NOTE:
When the “Flash Lights With Lock” feature is selected, the exterior lights flash when the doors are locked or unlocked with the key fob. This feature
may be selected with or without the Sound Horn On Lock feature selected. Steering Directed Lights - If Equipped OnOff
NOTE:
When the “Steering Directed Lights” feature is selected, the headlights turn with the direction of the steering wheel. Rear Cargo Guidance Lights — If Equipped OnOff
NOTE:
When the “Rear Cargo Guidance Lights” feature is selected, the lights in the cargo and bed of the truck will come on either when the headlight switch
is pressed, or the button on the back bed of the truck is pressed.
Setting Name Selectable Options
9
20_DJD2_OM_EN_USC_t.book Page 475
Page 478 of 568

476MULTIMEDIA
Doors & Locks
After pressing the Doors & Locks button on the touchscreen, the following settings will be available:
Setting Name Selectable Options
Auto Door Locks — If EquippedOn Off
NOTE:
When the “Auto Door Locks” feature is selected, all doors lock automatically when the vehicle reaches a speed of 15 mph (24 km/h). Auto Unlock On Exit On Off
NOTE:
When the “Auto Unlock On Exit” feature is selected, all doors unlock when the vehicle is stopped, the transmission is in the PARK or NEUTRAL position
and the driver's door is opened. Sound Horn With Lock Off1st Press 2nd Press
Remote Door Unlock All Driver
NOTE:
The “Remote Door Unlock” feature allows you to program your remote door locks to open “All doors” or only the “Driver door” with the first push of
the key fob or grabbing the Passive Entry door handle. Sound Horn With Remote Start On Off
NOTE:
When the “Sound Horn With Remote Start” feature is selected, the horn sounds when the remote start is activated.
20_DJD2_OM_EN_USC_t.book Page 476
Page 479 of 568

MULTIMEDIA477
Memory Linked To Fob —
If Equipped On
Off
NOTE:
The “Memory Linked To Fob” feature provides automatic driver seat positioning to enhance driver mobility when entering and exiting the vehicle.
The seat returns to the memorized seat location if “Memory Linked To Fob” is set to On when the key fob is used to unlock the door. Passive Entry — If Equipped On Off
NOTE:
The “Passive Entry” feature allows you to lock and unlock the vehicle’s door(s) without having to push the key fob lock or unlock buttons. It automat -
ically unlocks the doors when the outside door handle is grabbed.
Flash Lights With Lock On Off
NOTE:
When the “Flash Lights With Lock” feature is selected, the exterior lights flash when the doors are locked or unlocked with the key fob. This feature
may be selected with or without the “Sound Horn With Lock” feature selected.
Setting Name Selectable Options
9
20_DJD2_OM_EN_USC_t.book Page 477
Page 485 of 568
MULTIMEDIA483
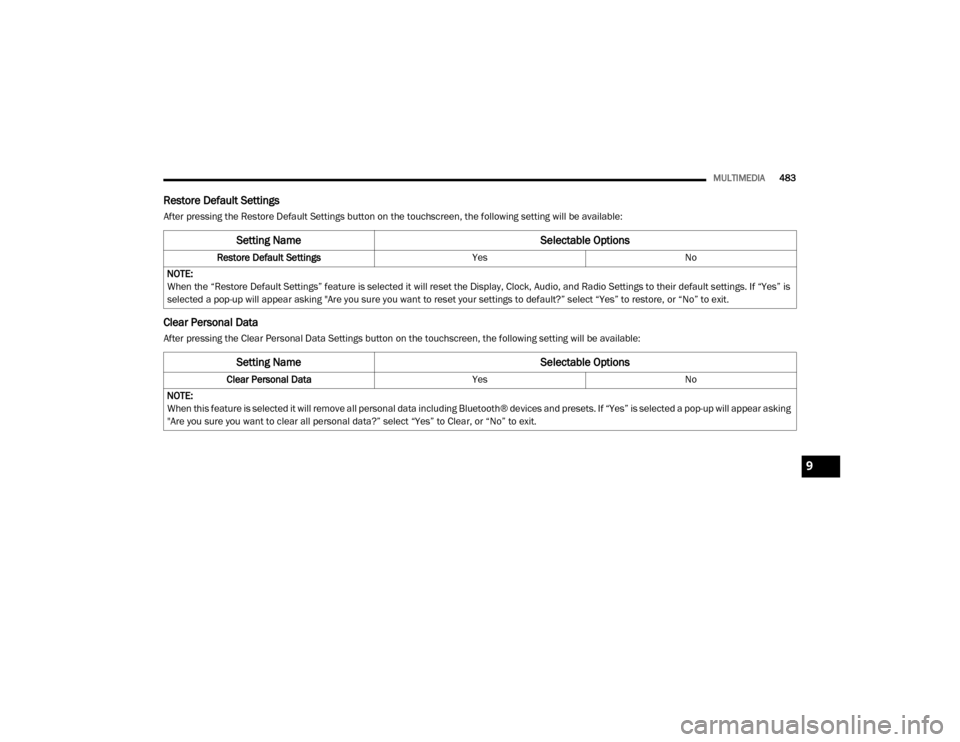
Restore Default Settings
After pressing the Restore Default Settings button on the touchscreen, the following setting will be available:
Clear Personal Data
After pressing the Clear Personal Data Settings button on the touchscreen, the following setting will be available:
Setting Name Selectable Options
Restore Default SettingsYesNo
NOTE:
When the “Restore Default Settings” feature is selected it will reset the Display, Clock, Audio, and Radio Settings to their default settings. If “Yes” is
selected a pop-up will appear asking "Are you sure you want to reset your settings to default?” select “Yes” to restore, or “No” to exit.
Setting Name Selectable Options
Clear Personal DataYesNo
NOTE:
When this feature is selected it will remove all personal data including Bluetooth® devices and presets. If “Yes” is selected a pop-up will appear asking
"Are you sure you want to clear all personal data?” select “Yes” to Clear, or “No” to exit.
9
20_DJD2_OM_EN_USC_t.book Page 483
Page 486 of 568
484MULTIMEDIA
UCONNECT 4/4C/4C NAV SETTINGS
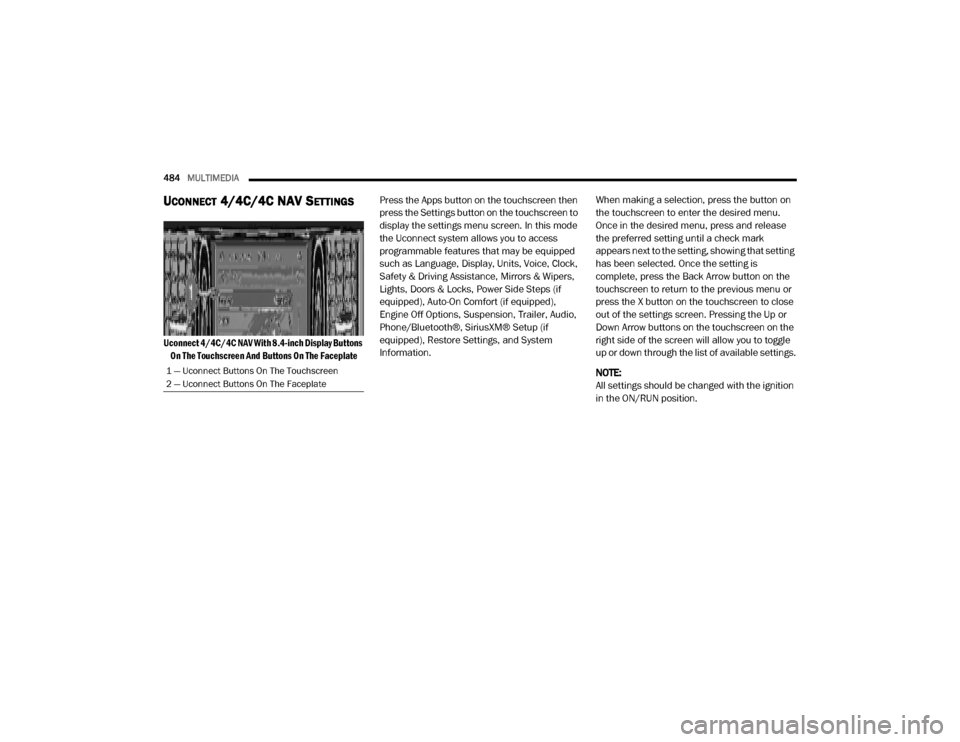
Uconnect 4/4C/4C NAV With 8.4-inch Display Buttons
On The Touchscreen And Buttons On The Faceplate
Press the Apps button on the touchscreen then
press the Settings button on the touchscreen to
display the settings menu screen. In this mode
the Uconnect system allows you to access
programmable features that may be equipped
such as Language, Display, Units, Voice, Clock,
Safety & Driving Assistance, Mirrors & Wipers,
Lights, Doors & Locks, Power Side Steps (if
equipped), Auto-On Comfort (if equipped),
Engine Off Options, Suspension, Trailer, Audio,
Phone/Bluetooth®, SiriusXM® Setup (if
equipped), Restore Settings, and System
Information.
When making a selection, press the button on
the touchscreen to enter the desired menu.
Once in the desired menu, press and release
the preferred setting until a check mark
appears next to the setting, showing that setting
has been selected. Once the setting is
complete, press the Back Arrow button on the
touchscreen to return to the previous menu or
press the X button on the touchscreen to close
out of the settings screen. Pressing the Up or
Down Arrow buttons on the touchscreen on the
right side of the screen will allow you to toggle
up or down through the list of available settings.
NOTE:
All settings should be changed with the ignition
in the ON/RUN position.
1 — Uconnect Buttons On The Touchscreen
2 — Uconnect Buttons On The Faceplate
20_DJD2_OM_EN_USC_t.book Page 484
Page 489 of 568
MULTIMEDIA487
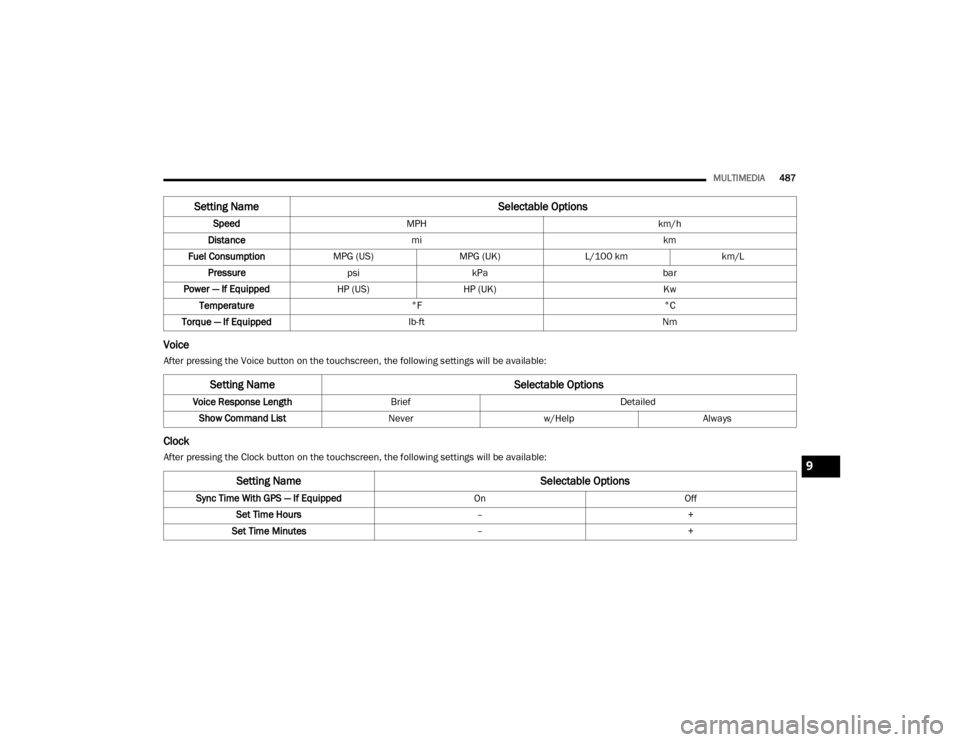
Voice
After pressing the Voice button on the touchscreen, the following settings will be available:
Clock
After pressing the Clock button on the touchscreen, the following settings will be available:Speed
MPH km/h
Distance mi km
Fuel Consumption MPG (US)MPG (UK)L/100 km km/L
Pressure psikPa bar
Power — If Equipped HP (US)HP (UK) Kw
Temperature °F °C
Torque — If Equipped lb-ft Nm
Setting Name Selectable Options
Setting NameSelectable Options
Voice Response LengthBrief Detailed
Show Command List Neverw/Help Always
Setting Name Selectable Options
Sync Time With GPS — If Equipped OnOff
Set Time Hours –+
Set Time Minutes –+
9
20_DJD2_OM_EN_USC_t.book Page 487