Ram ProMaster City 2018 User Guide
Manufacturer: RAM, Model Year: 2018, Model line: ProMaster City, Model: Ram ProMaster City 2018Pages: 180, PDF Size: 7.52 MB
Page 111 of 180
SERVICING AND MAINTENANCE
SCHEDULED SERVICING..........110
Maintenance Plan..............111
ENGINE COMPARTMENT .........114
Engine Compartment — 2.4L .......114
RAISING THE VEHICLE...........115
TIRES .................... .115
Tire Safety Information..........115
Tires — General Information .......123
Tire Types ...................127
Spare Tires — If Equipped .........128
Wheel And Wheel Trim Care .......130
DEPARTMENT OF TRANSPORTATION
UNIFORM TIRE QUALITY GRADES . . . .132
Treadwear...................132
Traction Grades ...............132
Temperature Grades .............132
INTERIORS................. .133
Seats And Fabric Parts...........133
Plastic And Coated Parts ..........133
Leather Parts .................134
SERVICING AND MAINTENANCE
109
Page 112 of 180
SCHEDULED SERVICING
Your vehicle is equipped with an automatic
oil change indicator system. The oil change
indicator system will remind you that it is
time to take your vehicle in for scheduled
maintenance.
Based on engine operation conditions, the oil
change indicator message will illuminate.
This means that service is required for your
vehicle. Operating conditions such as fre-
quent short-trips, trailer tow, extended en-
gine idle time, extremely hot or cold ambient
temperatures will influence when the “Oil
Change Required” message is displayed. Se-
vere Operating Conditions can cause the
change oil message to illuminate as early as
3,500 miles (5,600 km) since last reset.
Have your vehicle serviced as soon as pos-
sible, within the next 500 miles (805 km).Your authorized dealer will reset the oil
change indicator message after completing
the scheduled oil change. If a scheduled oil
change is performed by someone other than
your authorized dealer, the message can be
reset by referring to the steps described un-
der “Oil Change Reset” in “Instrument Clus-
ter Display” in “Getting To Know Your Instru-
ment Panel” in the Owner’s Manual at
www.mopar.com/en-us/care/owners-manual.html
(U.S. Residents) or www.owners.mopar.ca
(Canadian Residents) for further information.
NOTE:
Under no circumstances should oil change
intervals exceed 10,000 miles (16,000 km),
350 hours of engine run time or twelve
months, whichever comes first. The 350
hours of engine run or idle time is generally
only a concern for fleet customers.
Severe Duty All Models
Change Engine Oil at 4,000 miles
(6,500 km) or 350 hours of engine run time
if the vehicle is operated in a dusty and off
road environment or is operated predomi-
nantly at idle, or only very low engine RPM’s.
This type of vehicle use is considered Severe
Duty.
SERVICING AND MAINTENANCE
110
Page 113 of 180
Once A Month Or Before A Long Trip:
• Check engine oil level.
• Check windshield washer fluid level.
• Check tire pressure and look for unusualwear or damage. Rotate tires at the first
sign of irregular wear, even if it occurs
before the oil indicator system turns on.
• Check the fluid levels of the coolant reser- voir and brake master cylinder, fill as
needed.
• Check function of all interior and exterior lights.Maintenance Plan
Required Maintenance Intervals
Refer to the maintenance schedules on the
following page for the required maintenance
intervals.
At Every Oil Change Interval As Indicated By Oil Change Indicator System:
• Change oil and filter
• Rotate the tires
Rotate at the first sign of irregular wear, even
if it occurs before the oil indicator system
turns on
• Inspect battery and clean and tighten ter- minals as required
• Inspect brake pads, shoes, rotors, drums, hoses, lines and park brake
• Inspect engine cooling system protection and hoses
• Inspect exhaust system
• Inspect engine air cleaner if using in dusty or off-road conditions
111
Page 114 of 180
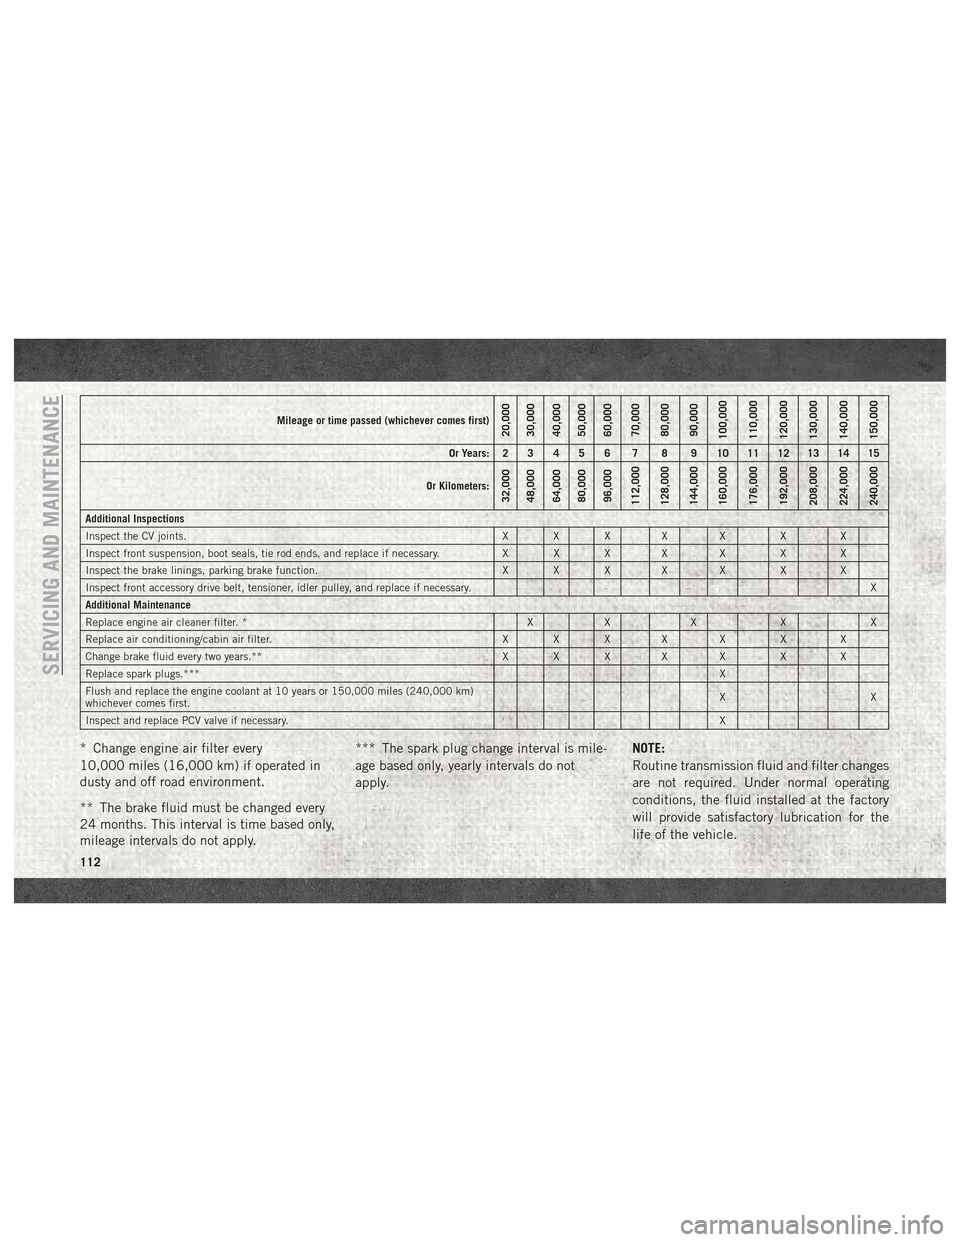
Mileage or time passed (whichever comes first)20,000
30,000
40,000
50,000
60,000
70,000
80,000
90,000
100,000
110,000
120,000
130,000
140,000
150,000
Or Years: 2 3 4 5 6 7 8 9 10 11 12 13 14 15
Or Kilometers:
32,000
48,000
64,000
80,000
96,000
112,000
128,000
144,000
160,000
176,000
192,000
208,000
224,000
240,000
Additional Inspections
Inspect the CV joints. X X X X X X X
Inspect front suspension, boot seals, tie rod ends, and replace if necessary. X X X X X X X
Inspect the brake linings, parking brake function. X X X X X X X
Inspect front accessory drive belt, tensioner, idler pulley, and replace if necessary. X
Additional Maintenance
Replace engine air cleaner filter. * X X X X X
Replace air conditioning/cabin air filter. X X X X X X X
Change brake fluid every two years.** X X X X X X X
Replace spark plugs.*** X
Flush and replace the engine coolant at 10 years or 150,000 miles (240,000 km)
whichever comes first. XX
Inspect and replace PCV valve if necessary. X
* Change engine air filter every
10,000 miles (16,000 km) if operated in
dusty and off road environment.
** The brake fluid must be changed every
24 months. This interval is time based only,
mileage intervals do not apply.*** The spark plug change interval is mile-
age based only, yearly intervals do not
apply.
NOTE:
Routine transmission fluid and filter changes
are not required. Under normal operating
conditions, the fluid installed at the factory
will provide satisfactory lubrication for the
life of the vehicle.
SERVICING AND MAINTENANCE
112
Page 115 of 180

WARNING!
• You can be badly injured working on oraround a motor vehicle. Do only service
work for which you have the knowledge
and the right equipment. If you have any
doubt about your ability to perform a
service job, take your vehicle to a com-
petent mechanic.
• Failure to properly inspect and maintain
your vehicle could result in a component
malfunction and effect vehicle handling
and performance. This could cause an
accident.
113
Page 116 of 180
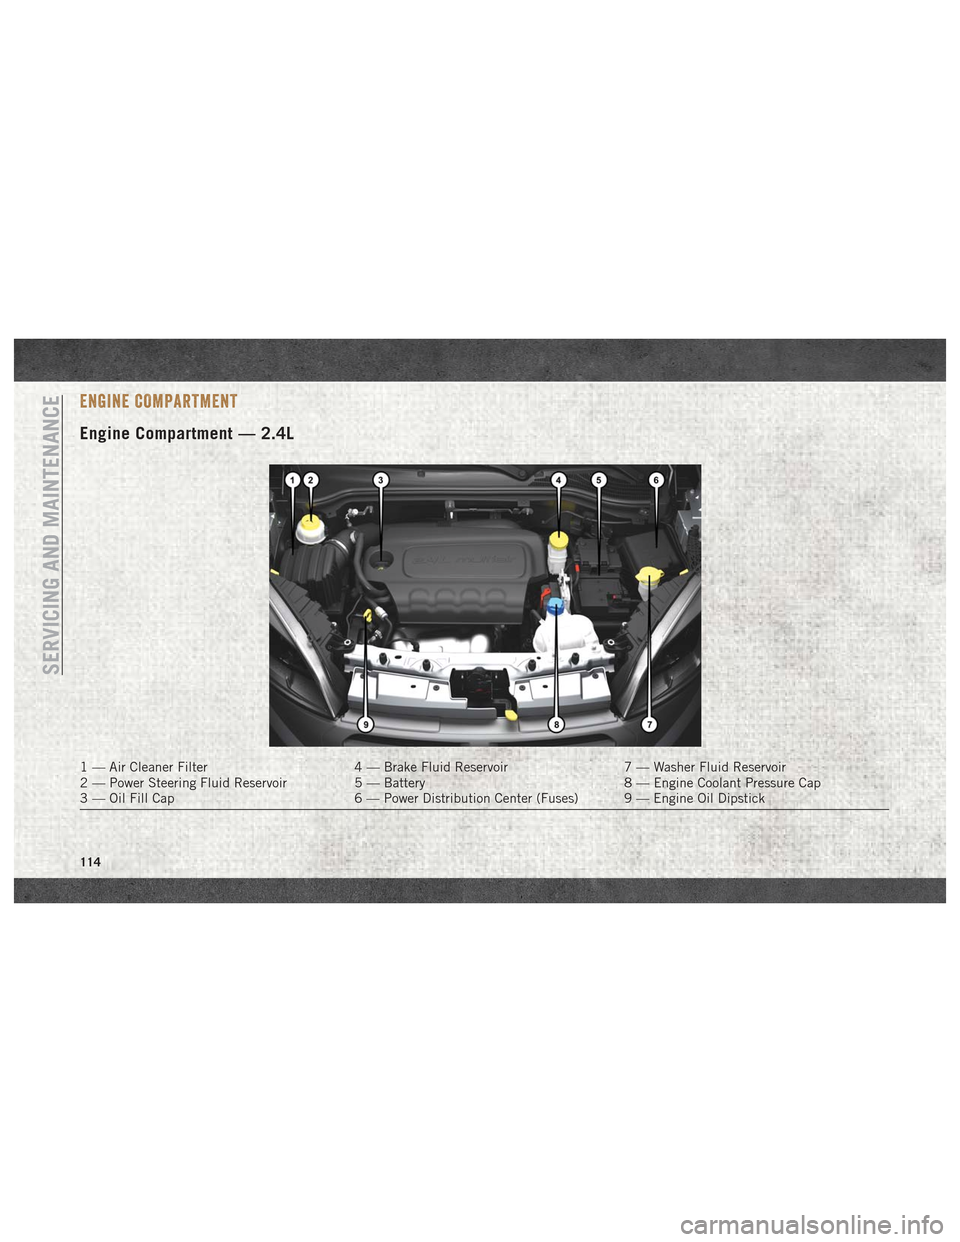
ENGINE COMPARTMENT
Engine Compartment — 2.4L
1 — Air Cleaner Filter4 — Brake Fluid Reservoir7 — Washer Fluid Reservoir
2 — Power Steering Fluid Reservoir 5 — Battery8 — Engine Coolant Pressure Cap
3 — Oil Fill Cap 6 — Power Distribution Center (Fuses) 9 — Engine Oil Dipstick
SERVICING AND MAINTENANCE
114
Page 117 of 180

RAISING THE VEHICLE
In the case where it is necessary to raise the
vehicle, go to an authorized dealer or service
station.
TIRES
Tire Safety Information
Tire safety information will cover aspects of
the following information: Tire Markings, Tire
Identification Numbers, Tire Terminology and
Definitions, Tire Pressures, and Tire Loading.
Tire Markings
NOTE:
• P (Passenger) — Metric tire sizing is basedon U.S. design standards. P-Metric tires
have the letter “P” molded into the sidewall
preceding the size designation. Example:
P215/65R15 95H. •
European — Metric tire sizing is based on
European design standards. Tires designed to
this standard have the tire size molded into
the sidewall beginning with the section width.
The letter "P" is absent from this tire size
designation. Example: 215/65R15 96H.
• LT (Light Truck) — Metric tire sizing is
based on U.S. design standards. The size
designation for LT-Metric tires is the same
as for P-Metric tires except for the letters
“LT” that are molded into the sidewall pre-
ceding the size designation. Example:
LT235/85R16.
• Temporary spare tires are designed for tem- porary emergency use only. Temporary high
pressure compact spare tires have the letter
“T” or “S” molded into the sidewall preced-
ing the size designation. Example: T145/
80D18 103M.
• High flotation tire sizing is based on U.S. design standards and it begins with the tire
diameter molded into the sidewall. Ex-
ample: 31x10.5 R15 LT.
Tire Markings
1 — U.S. DOT
Safety Stan-
dards Code
(TIN) 4 — Maximum
Load
2 — Size Desig-
nation 5 — Maximum
Pressure
3 — Service
Description 6 — Treadwear,
Traction and
Temperature
Grades
115
Page 118 of 180

Tire Sizing Chart
EXAMPLE:
Example Size Designation: P215/65R15XL 95H, 215/65R15 96H, LT235/85R16C, T145/80D18 103M, 31x10.5 R15 LT
P = Passenger car tire size based on U.S. design standards, or
"....blank...." = Passenger car tire based on European design standards, or
LT = Light truck tire based on U.S. design standards, or
TorS= Temporary spare tire or
31 = Overall diameter in inches (in)
215, 235, 145 = Section width in millimeters (mm)
65, 85, 80 = Aspect ratio in percent (%)
• Ratio of section height to section width of tire, or
10.5 = Section width in inches (in)
R = Construction code
• "R" means radial construction, or
• "D" means diagonal or bias construction
15, 16, 18 = Rim diameter in inches (in)
SERVICING AND MAINTENANCE
116
Page 119 of 180

EXAMPLE:
Service Description:
95 = Load Index
• A numerical code associated with the maximum load a tire can carry
H = Speed Symbol
• A symbol indicating the range of speeds at which a tire can carry a load corresponding to its load index under certain operating conditions
• The maximum speed corresponding to the speed symbol should only be achieved under specified operating conditions (i.e., tire pressure, vehicle
loading, road conditions, and posted speed limits)
Load Identification:
Absence of the following load identification symbols on the sidewall of the tire indicates a Standard Load (SL) tire:
• XL= Extra load (or reinforced) tire, or
• LL= Light load tire or
• C, D, E, F, G = Load range associated with the maximum load a tire can carry at a specified pressure
Maximum Load – Maximum load indicates the maximum load this tire is designed to carry
Maximum Pressure – Maximum pressure indicates the maximum permissible cold tire inflation pressure for this tire
117
Page 120 of 180

Tire Identification Number (TIN)
The TIN may be found on one or both sides of
the tire; however, the date code may only be
on one side. Tires with white sidewalls will
have the full TIN, including the date code,
located on the white sidewall side of the tire.
Look for the TIN on the outboard side of black
sidewall tires as mounted on the vehicle. If
the TIN is not found on the outboard side,
then you will find it on the inboard side of the
tire.
EXAMPLE:
DOT MA L9 ABCD 0301
DOT = Department of Transportation
• This symbol certifies that the tire is in compliance with the U.S. Department of Transportation tire safety standards and is approved for highway
use
MA = Code representing the tire manufacturing location (two digits)
L9 = Code representing the tire size (two digits)
ABCD = Code used by the tire manufacturer (one to four digits)
03 = Number representing the week in which the tire was manufactured (two digits)
• 03 means the 3rd week
01 = Number representing the year in which the tire was manufactured (two digits)
• 01 means the year 2001
• Prior to July 2000, tire manufacturers were only required to have one number to represent the year in which the tire was manufactured. Example:
031 could represent the 3rd week of 1981 or 1991
SERVICING AND MAINTENANCE
118