RAM PROMASTER CITY 2022 Manual Online
Manufacturer: RAM, Model Year: 2022, Model line: PROMASTER CITY, Model: RAM PROMASTER CITY 2022Pages: 260, PDF Size: 8.45 MB
Page 81 of 260
MULTIMEDIA79
UCONNECT SETTINGS
The Uconnect system uses a combination of
buttons on the touchscreen and buttons on the
faceplate located on the center of the instrument
panel. These buttons allow you to access and
change the customer programmable features.
Many features can vary by vehicle.
Buttons on the faceplate are located below and/or
beside the Uconnect system in the center of the
instrument panel. In addition, there is a Scroll/
Enter control knob located on the right side. Turn
the control knob to scroll through menus and
change settings. Push the center of the control
knob one or more times to select or change a
setting.
Your Uconnect system may also have Screen Off
and Mute buttons on the faceplate.
Push the Screen Off button on the faceplate to turn
off the Uconnect screen. Push the button again or
tap the screen to turn the screen on.
Push the Back Arrow button to exit out of a menu
or certain option on the Uconnect system.
NOTE:The NAV button in the middle of your Uconnect
System may also contain the word CAMERA.
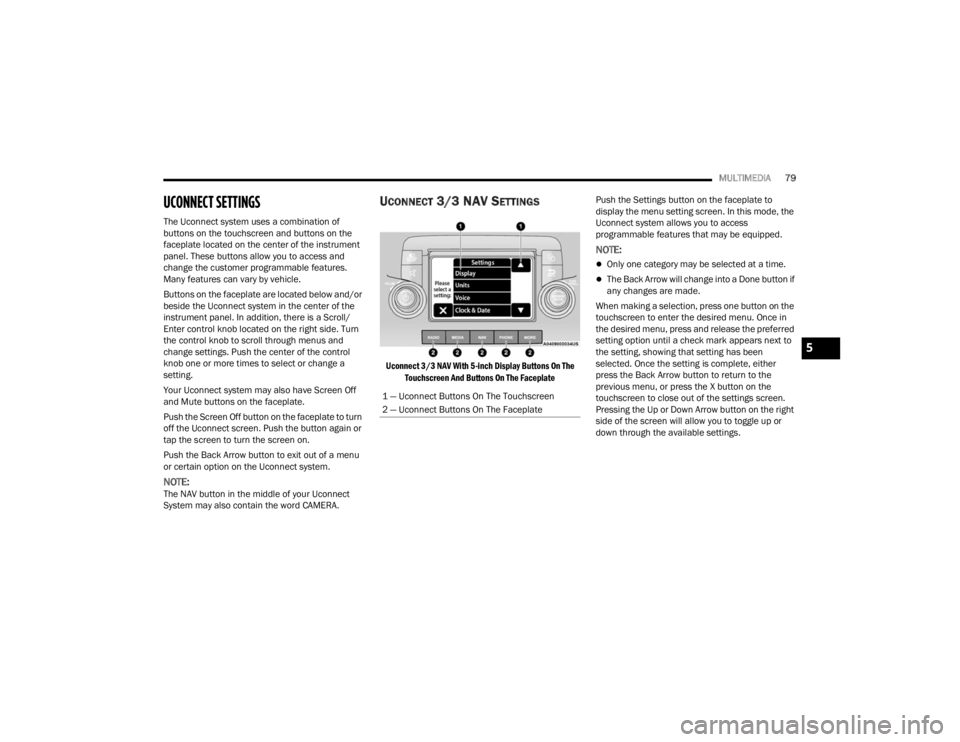
UCONNECT 3/3 NAV SETTINGS
Uconnect 3/3 NAV With 5-inch Display Buttons On The
Touchscreen And Buttons On The Faceplate
Push the Settings button on the faceplate to
display the menu setting screen. In this mode, the
Uconnect system allows you to access
programmable features that may be equipped.
NOTE:
Only one category may be selected at a time.
The Back Arrow will change into a Done button if
any changes are made.
When making a selection, press one button on the
touchscreen to enter the desired menu. Once in
the desired menu, press and release the preferred
setting option until a check mark appears next to
the setting, showing that setting has been
selected. Once the setting is complete, either
press the Back Arrow button to return to the
previous menu, or press the X button on the
touchscreen to close out of the settings screen.
Pressing the Up or Down Arrow button on the right
side of the screen will allow you to toggle up or
down through the available settings.
1 — Uconnect Buttons On The Touchscreen
2 — Uconnect Buttons On The Faceplate
5
22_VM_OM_EN_USC_t.book Page 79
Page 82 of 260

80MULTIMEDIA
Language
Display
When the Language button is pressed on the touchscreen, the system displays the different language options. Once an option is selected, the system will
display in the chosen language. The available setting is:
NOTE:Depending on the vehicle’s options, feature settings may vary.
Setting Name Description
Language This setting will change the language of the Uconnect system. The available
languages are English, Français, and Español.
When the Display button is pressed on the touchscreen, the system will display the options related to the theme (if equipped), brightness, and color of the
touchscreen. The available settings are:
NOTE:Depending on the vehicle’s options, feature settings may vary.
Setting Name
Description
Display Mode This setting will allow you to set the brightness manually or have the system
set it automatically. The “Auto” setting has the system automatically adjust
the display brightness. The “Manual” setting will allow the user to adjust the
brightness of the display.
Brightness This setting will allow you to set the brightness when the headlights are on. To
access this setting, Display Mode must be set to Manual. The “With
Headlights On” setting will increase or decrease the brightness with the
headlight on; the “With Headlights Off” will increase or decrease the
brightness with the headlights off.
22_VM_OM_EN_USC_t.book Page 80
Page 83 of 260
MULTIMEDIA81
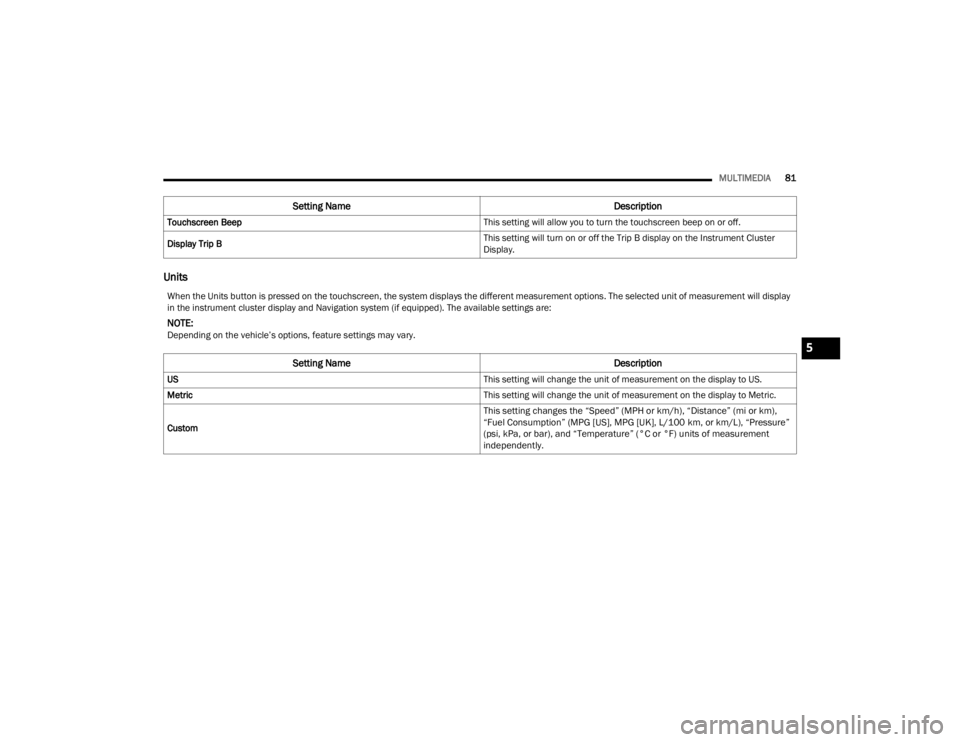
Units
Touchscreen Beep This setting will allow you to turn the touchscreen beep on or off.
Display Trip B This setting will turn on or off the Trip B display on the Instrument Cluster
Display.
Setting Name
Description
When the Units button is pressed on the touchscreen, the system displays the different measurement options. The selected unit of measurement will display
in the instrument cluster display and Navigation system (if equipped). The available settings are:
NOTE:Depending on the vehicle’s options, feature settings may vary.
Setting NameDescription
US This setting will change the unit of measurement on the display to US.
Metric This setting will change the unit of measurement on the display to Metric.
Custom
This setting changes the “Speed” (MPH or km/h), “Distance” (mi or km),
“Fuel Consumption” (MPG [US], MPG [UK], L/100 km, or km/L), “Pressure”
(psi, kPa, or bar), and “Temperature” (°C or °F) units of measurement
independently.
5
22_VM_OM_EN_USC_t.book Page 81
Page 84 of 260
82MULTIMEDIA
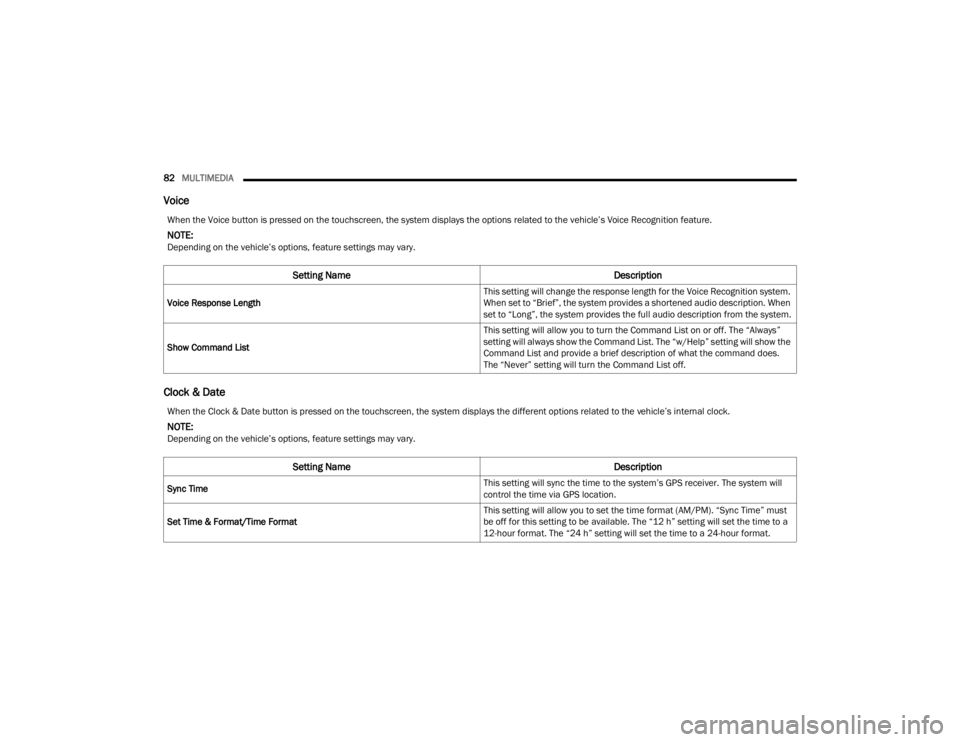
Voice
Clock & Date
When the Voice button is pressed on the touchscreen, the system displays the options related to the vehicle’s Voice Recognition feature.
NOTE:Depending on the vehicle’s options, feature settings may vary.
Setting Name Description
Voice Response Length This setting will change the response length for the Voice Recognition system.
When set to “Brief”, the system provides a shortened audio description. When
set to “Long”, the system provides the full audio description from the system.
Show Command List This setting will allow you to turn the Command List on or off. The “Always”
setting will always show the Command List. The “w/Help” setting will show the
Command List and provide a brief description of what the command does.
The “Never” setting will turn the Command List off.
When the Clock & Date button is pressed on the touchscreen, the system displays the different options related to the vehicle’s internal clock.
NOTE:Depending on the vehicle’s options, feature settings may vary.
Setting Name
Description
Sync Time This setting will sync the time to the system’s GPS receiver. The system will
control the time via GPS location.
Set Time & Format/Time Format This setting will allow you to set the time format (AM/PM). “Sync Time” must
be off for this setting to be available. The “12 h” setting will set the time to a
12-hour format. The “24 h” setting will set the time to a 24-hour format.
22_VM_OM_EN_USC_t.book Page 82
Page 85 of 260
MULTIMEDIA83
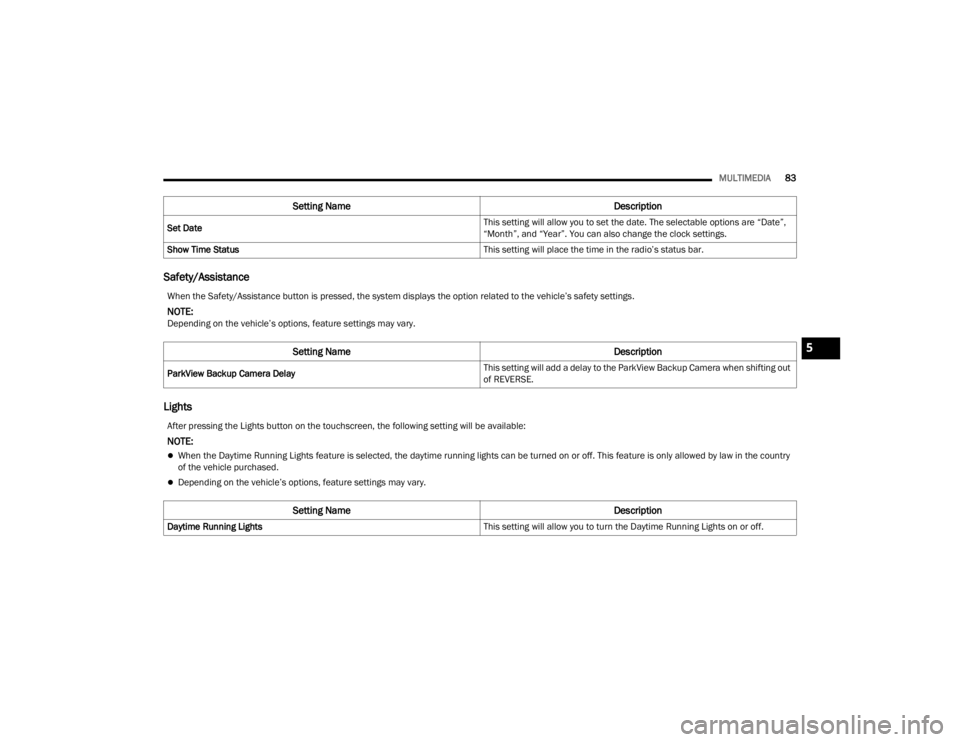
Safety/Assistance
Lights
Set Date This setting will allow you to set the date. The selectable options are “Date”,
“Month”, and “Year”. You can also change the clock settings.
Show Time Status This setting will place the time in the radio’s status bar.
Setting NameDescription
When the Safety/Assistance button is pressed, the system displays the option related to the vehicle’s safety settings.
NOTE:Depending on the vehicle’s options, feature settings may vary.
Setting NameDescription
ParkView Backup Camera Delay This setting will add a delay to the ParkView Backup Camera when shifting out
of REVERSE.
After pressing the Lights button on the touchscreen, the following setting will be available:
NOTE:
When the Daytime Running Lights feature is selected, the daytime running lights can be turned on or off. This feature is only allowed by law in the country
of the vehicle purchased.
Depending on the vehicle’s options, feature settings may vary.
Setting Name
Description
Daytime Running Lights This setting will allow you to turn the Daytime Running Lights on or off.
5
22_VM_OM_EN_USC_t.book Page 83
Page 86 of 260

84MULTIMEDIA
Doors & Locks
Key Off/Engine Off Options
When the Doors & Locks button is pressed on the touchscreen, the system displays the options related to locking and unlocking the vehicle’s doors.
NOTE:Depending on the vehicle’s options, feature settings may vary.
Setting Name Description
Sound Horn With Lock This setting will sound the horn when the key fob’s Lock button is pushed. The
“Off” setting will not sound the horn. The “1st Press” setting will sound the
horn when the Lock button is pushed once. The “2nd Press” setting will sound
the horn when the Lock button is pushed twice.
Auto Door Locks This setting will allow you to change if the doors lock automatically when the
vehicle reaches 12 mph (20 km/h).
When the Key Off/Engine Off Options button is pressed on the touchscreen, the system displays the option related to vehicle shut off. These settings will only
activate when the ignition is set to OFF.
NOTE:Depending on the vehicle’s options, feature settings may vary.
Setting Name
Description
Radio Off Delay This setting will allow you to set the amount of time the radio remains on after
the vehicle has been turned off. The “0 min” setting will shut the radio off the
moment the vehicle is turned off. The “20 min” setting will leave the radio on
for 20 minutes after the vehicle has been turned off or until one of the doors
has been opened.
22_VM_OM_EN_USC_t.book Page 84
Page 87 of 260
MULTIMEDIA85
Audio
When the Audio button is pressed on the touchscreen, the system displays options related to the vehicle’s sound system. These settings can change the audio
location within the vehicle, adjust the bass or treble levels, and auto-play music from an audio device or smartphone.
NOTE:Depending on the vehicle’s options, feature settings may vary.
Setting Name Description
Equalizer This setting will adjust the “Bass”, “Mid”, and “Treble” ranges of the audio.
Balance
This setting will adjust audio levels from specific speakers in the front/back and
left/right of the vehicle. The Speaker icon can be moved to set audio location.
Speed Adjusted Volume This setting will adjust audio volume as speeds increase. At a higher setting,
the volume will increase more as the vehicle speeds up. The available settings
are “Off”, “1”, “2”, and “3”.
Surround Sound This setting will turn the Surround Sound system on or off.
Auto Play This setting will automatically begin playing audio from a connected device.
Loudness This setting will improve audio quality at lower volumes.
Auto-On Radio This setting will set how the radio behaves when the ignition is switched to
ON/RUN. The available settings are “On”, “Off”, and “Recall Last”.
5
22_VM_OM_EN_USC_t.book Page 85
Page 88 of 260

86MULTIMEDIA
Phone/Bluetooth®
SiriusXM® Setup
When the Phone/Bluetooth® button is pressed on the touchscreen, the system displays the option related to Bluetooth® connectivity from an external audio
device or smartphone. The list of paired audio devices or smartphones can be accessed from this menu.
NOTE:Depending on the vehicle’s options, feature settings may vary.
Setting Name Description
Paired Phones/Devices This setting will show which phones are paired to the Uconnect system.
When the SiriusXM® Setup button is pressed on the touchscreen, the system displays options related to SiriusXM® Satellite Radio. These settings can be
used to skip specific radio channels and restart favorite songs from the beginning.
NOTE:
A subscription to SiriusXM® Satellite Radio is required for these settings to be functional.
Depending on the vehicle’s options, feature settings may vary.
Setting NameDescription
Tune Start This setting will play the current song from the beginning when you tune to a
music channel using one of the 12 presets.
Channel Skip This setting allows you to set channels that you wish to skip. A channel list will
display of the skipped channels.
Subscription Information This menu provides SiriusXM® subscription information. SiriusXM® Travel
Link is a separate subscription.
22_VM_OM_EN_USC_t.book Page 86
Page 89 of 260
MULTIMEDIA87
Restore Settings
Clear Personal Data
When the Restore Settings button is pressed on the touchscreen, the system displays the option related to resetting the Uconnect system back to its factory
settings. This setting can clear personal data and reset selected settings from other menus.
NOTE:Depending on the vehicle’s options, feature settings may vary.
Setting Name Description
Restore Settings to Default This setting will return all the previously changed settings to their factory
default.
When the Clear Personal Data button is pressed on the touchscreen, a pop-up will display asking if you would like to clear all personal data from the system.
NOTE:Depending on the vehicle’s options, feature settings may vary.
Setting Name
Description
Clear Personal Data This setting will display a pop-up that provides the option to clear all personal
data from the system, including Bluetooth® devices and presets.
5
22_VM_OM_EN_USC_t.book Page 87
Page 90 of 260
88MULTIMEDIA
UCONNECT INTRODUCTION
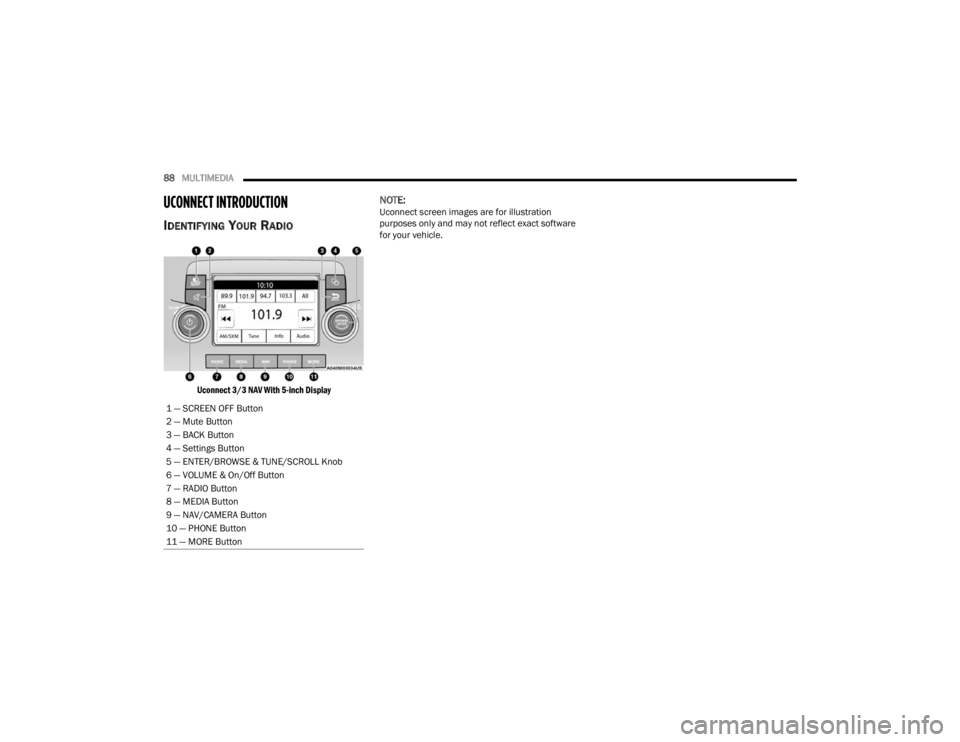
IDENTIFYING YOUR RADIO
Uconnect 3/3 NAV With 5-inch Display
NOTE:Uconnect screen images are for illustration
purposes only and may not reflect exact software
for your vehicle.
1 — SCREEN OFF Button
2 — Mute Button
3 — BACK Button
4 — Settings Button
5 — ENTER/BROWSE & TUNE/SCROLL Knob
6 — VOLUME & On/Off Button
7 — RADIO Button
8 — MEDIA Button
9 — NAV/CAMERA Button
10 — PHONE Button
11 — MORE Button
22_VM_OM_EN_USC_t.book Page 88