RENAULT ALASKAN 2017 Service Manual
Manufacturer: RENAULT, Model Year: 2017, Model line: ALASKAN, Model: RENAULT ALASKAN 2017Pages: 340, PDF Size: 6.93 MB
Page 41 of 340

5. Shorten the rigid attachment to have the child
restraint firmly tightened; press downward ➄
and rearward ➅firmly in the centre of the child
restraint with your knee to compress the vehicle
seat cushion and seatback. Adjustable
seatbacks should be positioned to ensure full
contact between child restraint and seatback.
6. If the child restraint is equipped with atop tether
strap, route the top tether strap and secure the
tether strap to the tether anchor point. (See
“Child restraint anchorage (where fitted)” earlier
in this section.)
If the child restraint is equipped with other anti-
rotation devices such as support legs, use them
instead of (or together with) the top tether strap
following the child restraint manufacturer’s in-
structions.
7. Test the child restraint before you place the child in it ➆.P
ush the child restraint from side to side
and tug it forward to make sure that it is held
securely in place. 8. Check to make sure that the child restraint is
properly secured prior to each use. If the child
restraint is loose, repeat steps 1through 7.
Rear-facing child restraints:
Be sure to follow the child restraint manufacturer’s
instructions for the proper use of your child restraint.
Follow these steps to install arear-facing child re-
straint on the second row outboard seats using
ISOFIX:
1. Remove the head restraint on the seat.
2. Position the child restraint on the seat ➁.
3. Secure the child restraint anchor attachments to the ISOFIX lower anchors ➂. 4. Shorten the rigid attachment to have the child
restraint firmly tightened. To compress the ve-
hicle seat cushion and seatback, firmly press
downward ➃and rearward
j4a in the centre of
the child restraint with your hand.
If there is any contact between the child restraint
and the front seat, slide the front seat forward
until contact no longer occurs.
If the child restraint is equipped with other anti-
rotation devices such as support legs, use them
following the child restraint manufacturer’s in-
structions. NIC2413
Step 7 NP A1525
Step 2, and 3 NP A1409
Step 4
Safety —seats, seat belts and supplemental restraint system 1-23
Page 42 of 340

5. Test the child restraint before you place the child
in it ➄.P
ush the child restraint from side to side
and tug it forward to make sure that it is held
securely in place.
6. Check to make sure that the child restraint is properly secured prior to each use. If the child
restraint is loose, repeat steps 1through 5. CHILD RESTRAINT INSTALLATION
USING THREE-POINT TYPE SEAT
BELT
Installation on rear seats (Double Cab
models)
Front-facing child restraint:
Be sure to follow the manufacturer’s instructions for
the proper use of your child restraint. Follow these
steps to install
afront-facing child restraint on the
rear seats using three-point type seat belt without
automatic locking mode:
1. Position the child restraint on the seat ➀.Ifa
ny
contact occurs between the child restraint and
the front seat, slide the front seat forward until
contact no longer occurs.
Remove the head restraint to obtain the correct child restraint fit.
Once removed, store the head restraint in ase-
cure location. 2. Route the seat belt tongue through the child re-
straint and insert it into the buckle ➁until you
hear and feel the latch engage.
3. To prevent slack in the seat belt webbing, it is necessary to secure the seat belt in place with
locking devices attached to the child restraint. NP A1410
Step 5 SSS0758AZ
Front-facing: Step 1 SSS0493AZ
Front-facing: Step 2
SSS0647AZ
Front-facing: Step 4
1-24 Safety —seats, seat belts and supplemental restraint system
Page 43 of 340

4. Remove any additional slack from the seat belt;
press downward ➂and rearward
➃firmly in
the centre of the child restraint with your knee to
compress the vehicle seat cushion and seatback
while pulling up on the seat belt.
5. Test the child restraint before you place the child in it ➄.P
ush the child restraint from side to side
and tug it forward to make sure that it is held
securely in place.
6. Check to make sure that the child restraint is properly secured prior to each use. If the child
restraint is loose, repeat steps 3through 5. Rear-facing child restraint:
Be sure to follow the manufacturer’s instructions for
the proper use of your child restraint. Follow these
steps to install
arear-facing child restraint on the
rear seats using three-point type seat belt without
automatic locking mode:
1. Position the child restraint on the seat ➀.
2. Route the seat belt tongue through the child re- straint and insert it into the buckle ➁until you
hear and feel the latch engage. 3. To prevent slack in the seat belt webbing, it is
necessary to secure the seat belt in place withlocking devices attached to the child restraint.
4. Remove any additional slack from the seat belt; press downward ➂and rearward
➃firmly in
the centre of the child restraint with your hand to
compress the vehicle seat cushion and seatback
while pulling up on the seat belt. SSS0638AZ
Front-facing: Step 5
SSS0759AZ
Rear-facing: Step 1
SSS0654AZ
Rear-facing: Step 2 SSS0639AZ
Rear-facing: Step 4
SSS0658AZ
Rear-facing: Step 5
Safety —seats, seat belts and supplemental restraint system 1-25
Page 44 of 340
5. Test the child restraint before you place the child
in it ➄.P
ush the child restraint from side to side
and tug it forward to make sure that it is held
securely in place.
6. Check to make sure that the child restraint is properly secured prior to each use. If the child
restraint is loose, repeat steps 3through 5.
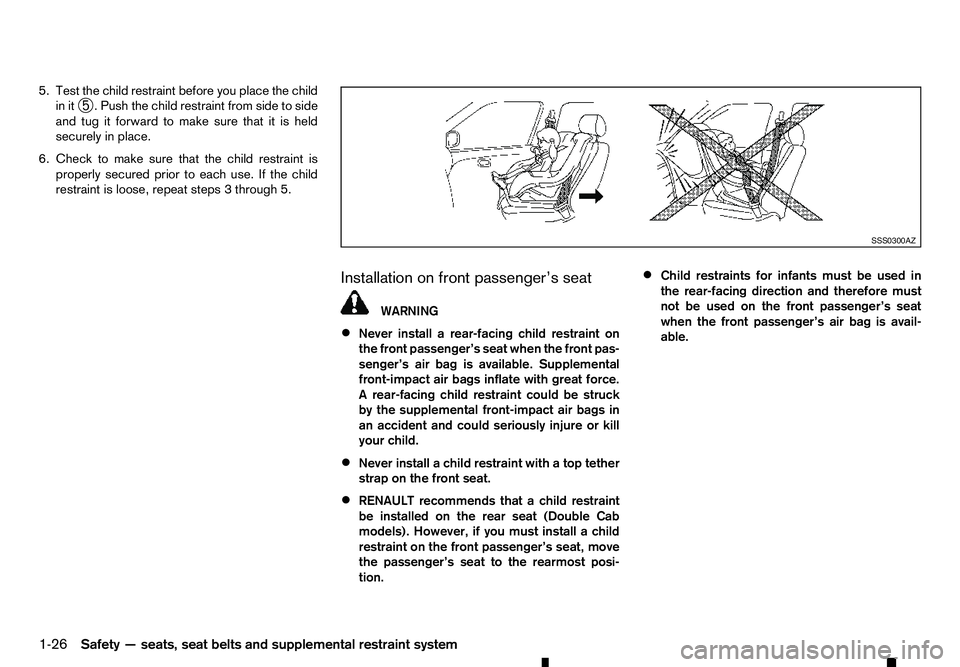
Installation on front passenger’s seat WARNING
• Never install
arear-facing child restraint on
the front passenger’s seat when the front pas-
senger’s air bag is available. Supplemental
front-impact air bags inflate with great force.
Ar ear-facing child restraint could be struck
by the supplemental front-impact air bags in
an accident and could seriously injure or kill
your child.
• Never install
achild restraint with atop tether
strap on the front seat.
• RENAULT recommends that
achild restraint
be installed on the rear seat (Double Cab
models). However, if you must install achild
restraint on the front passenger’s seat, move
the passenger’s seat to the rearmost posi-
tion. •
Child restraints for infants must be used in
the rear-facing direction and therefore must
not be used on the front passenger’s seat
when the front passenger’s air bag is avail-
able. SSS0300AZ
1-26 Safety —seats, seat belts and supplemental restraint system
Page 45 of 340
Front-facing child restraint:
Be sure to follow the child restraint manufacturer’s
instructions for the proper use of your child restraint.
Follow these steps to install afront-facing child re-
straint on the front passenger’s seat using three-
point type seat belt without automatic locking mode:
If you must install afront-facing child restraint sys-
tem on the front seat, follow these steps:
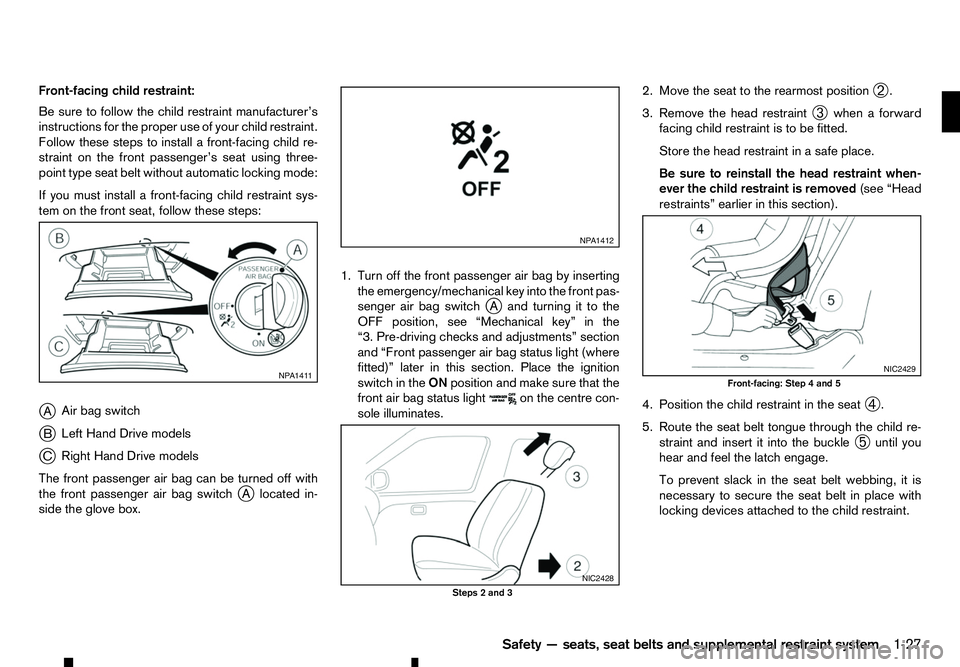
j A Air bag switch
j B Left Hand Drive models
j C Right Hand Drive models
The front passenger air bag can be turned off with
the front passenger air bag switch j
Al ocated in-
side the glove box. 1. Turn off the front passenger air bag by inserting
the emergency/mechanical key into the front pas-
senger air bag switch jAa nd turning it to the
OFF position, see “Mechanical key” in the
“3. Pre-driving checks and adjustments” section
and “Front passenger air bag status light (where
fitted)” later in this section. Place the ignition
switch in the ONposition and make sure that the
front air bag status light on the centre con-
sole illuminates. 2. Move the seat to the rearmost position
➁.
3. Remove the head restraint ➂when
aforward
facing child restraint is to be fitted.
Store the head restraint in asafe place.
Be sure to reinstall the head restraint when-
ever the child restraint is removed (see “Head
restraints” earlier in this section).
4. Position the child restraint in the seat ➃.
5. Route the seat belt tongue through the child re- straint and insert it into the buckle ➄until you
hear and feel the latch engage.
To prevent slack in the seat belt webbing, it is
necessary to secure the seat belt in place with
locking devices attached to the child restraint. NP A1411 NP A1412
NIC2428
Steps 2and 3 NIC2429
Front-facing: Step
4and 5
Safety —seats, seat belts and supplemental restraint system 1-27
Page 46 of 340

6. Remove any additional slack from the seat belt;
press downward ➅and rearward
j6a firmly in
the centre of the child restraint with your knee to
compress the vehicle seat cushion and seatback
while pulling up on the seat belt.
7. Test the child restraint before you place the child in it ➆.P
ush the child restraint from side to side
and tug it forward to make sure that it is held
securely in place. 8. Check to make sure that the child restraint is
properly secured prior to each use. If the child
restraint is loose, repeat steps 1through 7.
Rear-facing child restraint:
Be sure to follow the child restraint manufacturer’s
instructions for the proper use of your child restraint.
Follow these steps to install afront-facing child re-
straint on the front passenger’s seat using three-
point type seat belt without automatic locking mode:
If you must install arear-facing child restraint system
on the front seat, follow these steps:
j A Air bag switch
j B Left Hand Drive models
j C Right Hand Drive models
The front passenger air bag can be turned off with
the front passenger air bag switch jAl ocated in-
side the glove box. 1. Turn off the front passenger air bag by inserting
the emergency/mechanical key into the front pas-
senger air bag switch jA, see “Mechanical key”
in the “3. Pre-driving checks and adjustments”
section and “Front passenger air bag status light
(where fitted)” later in this section. Place the igni-
tion switch in the ONposition and make sure that
the front air bag status light on the centre
console illuminates.
2. Move the seat to the rearmost position ➁. NIC2430
Step 6
NIC2431
Step 7 NP A1411 NP A1412
NIC2428
Steps 2and 3
1-28 Safety —seats, seat belts and supplemental restraint system
Page 47 of 340
3. Adjust the head restraint to its highest position
➂ .R
emove it if it interferes with the child re-
straint installation. In such situations, securely
store the head restraint so that it does not be-
come adangerous projectile during asudden
stop or in an accident.
4. Position the child restraint system in the font pas- senger seat.
Always follow the child seat manufacturer’s in-
structions for installation and use.
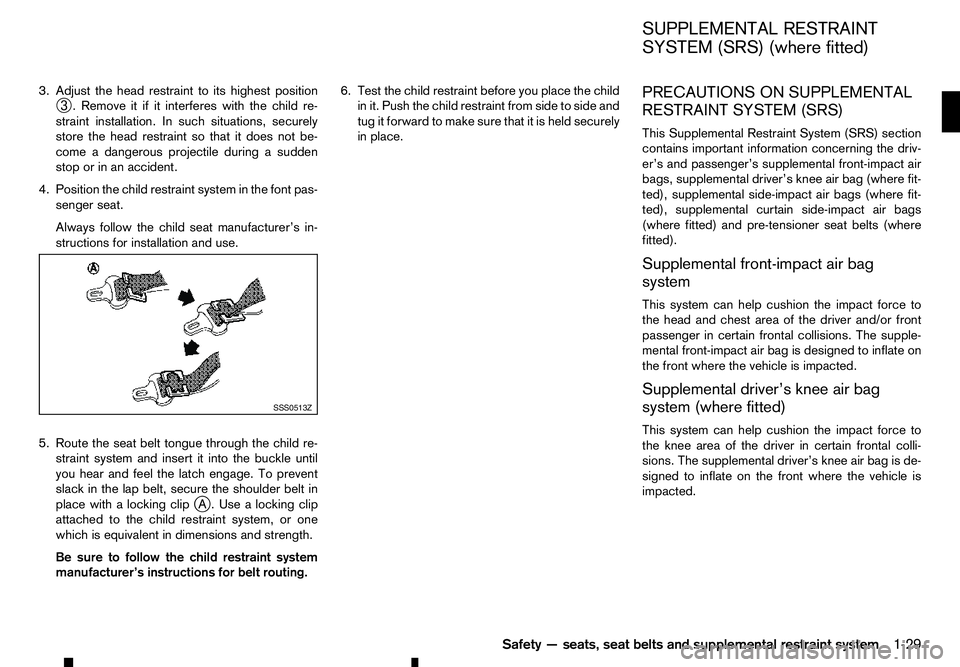
5. Route the seat belt tongue through the child re- straint system and insert it into the buckle until
you hear and feel the latch engage. To prevent
slack in the lap belt, secure the shoulder belt in
place with alocking clip j
A. Use alocking clip
attached to the child restraint system, or one
which is equivalent in dimensions and strength.
Be sure to follow the child restraint system
manufacturer’s instructions for belt routing. 6. Test the child restraint before you place the child
in it. Push the child restraint from side to side and
tug it forward to make sure that it is held securely
in place. PRECAUTIONS ON SUPPLEMENTAL
RESTRAINT SYSTEM (SRS)
This Supplemental Restraint System (SRS) section
contains important information concerning the driv-
er’s and passenger’s supplemental front-impact air
bags, supplemental driver’s knee air bag (where fit-
ted), supplemental side-impact air bags (where fit-
ted), supplemental curtain side-impact air bags
(where fitted) and pre-tensioner seat belts (where
fitted).
Supplemental front-impact air bag
system
This system can help cushion the impact force to
the head and chest area of the driver and/or front
passenger in certain frontal collisions. The supple-
mental front-impact air bag is designed to inflate on
the front where the vehicle is impacted.
Supplemental driver’s knee air bag
system (where fitted)
This system can help cushion the impact force to
the knee area of the driver in certain frontal colli-
sions. The supplemental driver’s knee air bag is de-
signed to inflate on the front where the vehicle is
impacted.SSS0513Z SUPPLEMENTAL RESTRAINT
SYSTEM (SRS) (where fitted)
Safety —seats, seat belts and supplemental restraint system 1-29
Page 48 of 340
Supplemental side-impact air bag
system (where fitted)
This system can help cushion the impact force to
the chest and pelvis area of the driver and front pas-
senger in certain side-impact collisions. The supple-
mental side-impact air bag is designed to inflate on
the side where the vehicle is impacted.
Supplemental curtain side-impact air
bag system (where fitted)
This system can help cushion the impact force to
the head of the driver and passengers in front seat-
ing positions and rear outboard seating positions
(where fitted) in certain side-impact collisions. The
supplemental curtain side-impact air bag is designed
to inflate on the side where the vehicle is impacted.
The SRS is designed to supplementthe accident
protection provided by the driver’s and passenger’s
seat belts and is notdesigned to substitutefor
them. The SRS can help save lives and reduce seri-
ous injuries. However, inflating air bags may cause
abrasions or other injuries. Air bags do not provide
protection to the lower body. Seat belts should al-
ways be correctly worn and the occupants should
always be seated asuitable distance away from the
steering wheel, instrument panel and door finishers.
(See “Seat belts” earlier in this section.) The air
bags inflate quickly in order to help protect the oc-
cupants. The force of the air bags inflating can in-
crease the risk of injury if the occupants are too
close to, or are against, the air bag modules during
inflation. The air bags will deflate quickly after de-
ployment. The SRS operates only when the ignition switch
is in the ON position.
When the ignition switch is in the ON position,
the SRS air bag warning light illuminates for
about
7seconds and then turns off. This indi-
cates that the SRS is operational. (See “Warning
lights, indicator lights and audible reminders” in
the “2. Instruments and controls” section.)
1-30 Safety —seats, seat belts and supplemental restraint system
Page 49 of 340
WARNING
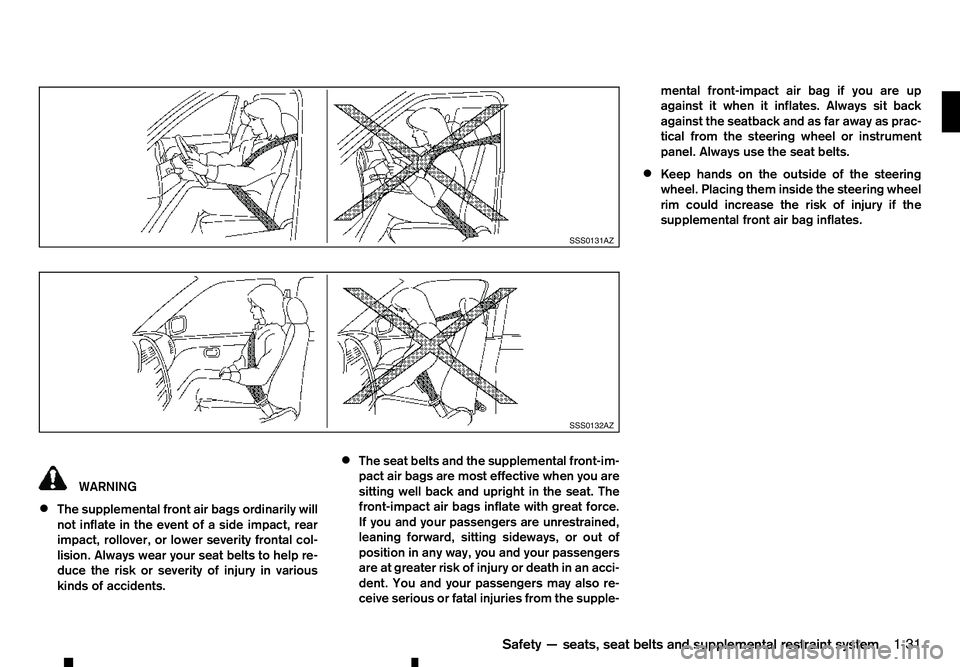
• The supplemental front air bags ordinarily will
not inflate in the event of aside impact, rear
impact, rollover, or lower severity frontal col-
lision. Always wear your seat belts to help re-
duce the risk or severity of injury in various
kinds of accidents. •
The seat belts and the supplemental front-im-
pact air bags are most effective when you are
sitting well back and upright in the seat. The
front-impact air bags inflate with great force.
If you and your passengers are unrestrained,
leaning forward, sitting sideways, or out of
position in any way, you and your passengers
are at greater risk of injury or death in an acci-
dent. You and your passengers may also re-
ceive serious or fatal injuries from the supple- mental front-impact air bag if you are up
against it when it inflates. Always sit back against the seatback and as far away as prac-
tical from the steering wheel or instrument
panel. Always use the seat belts.
• Keep hands on the outside of the steering
wheel. Placing them inside the steering wheel
rim could increase the risk of injury if the
supplemental front air bag inflates. SSS0131AZ
SSS0132AZ
Safety —seats, seat belts and supplemental restraint system
1-31
Page 50 of 340
WARNING
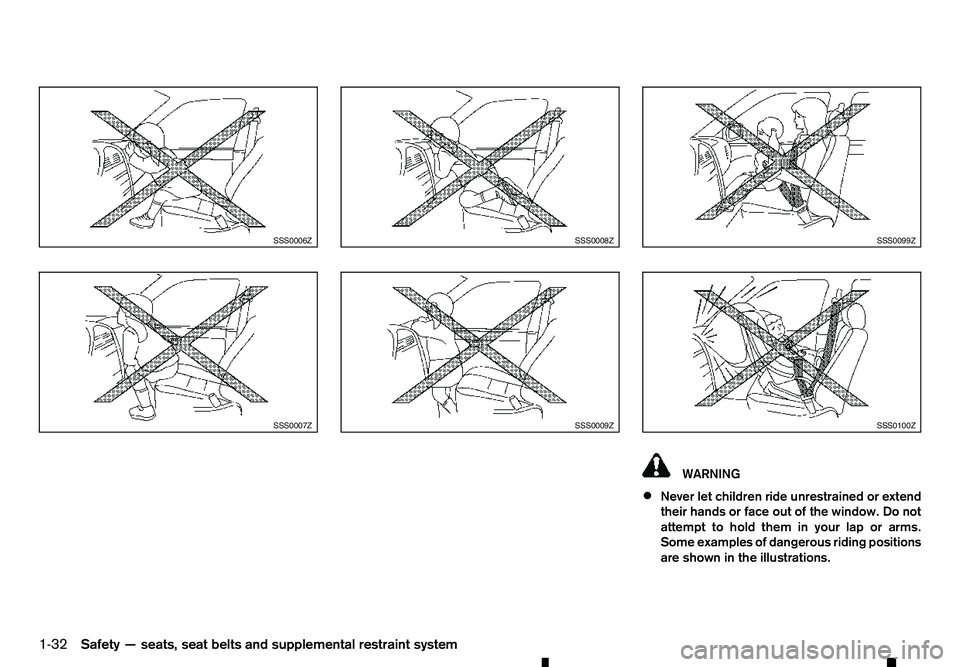
• Never let children ride unrestrained or extend
their hands or face out of the window. Do not
attempt to hold them in your lap or arms.
Some examples of dangerous riding positions
are shown in the illustrations. SSS0006Z
SSS0007Z SSS0008Z
SSS0009Z SSS0099Z
SSS0100Z
1-32 Safety —seats, seat belts and supplemental restraint system