RENAULT ESPACE 2012 J81 / 4.G Owners Manual
Manufacturer: RENAULT, Model Year: 2012, Model line: ESPACE, Model: RENAULT ESPACE 2012 J81 / 4.GPages: 267, PDF Size: 8.95 MB
Page 161 of 267
storage compartments .......................... (up to the end of the DU)
storage compartment ............................(up to the end of the DU)
fittings ................................................... (up to the end of the DU)
3.39
ENG_UD20391_1
Rangements/Aménagements habitacle (X81 - J81 - Renault)
ENG_NU_932-3_X81ph3_Renault_3
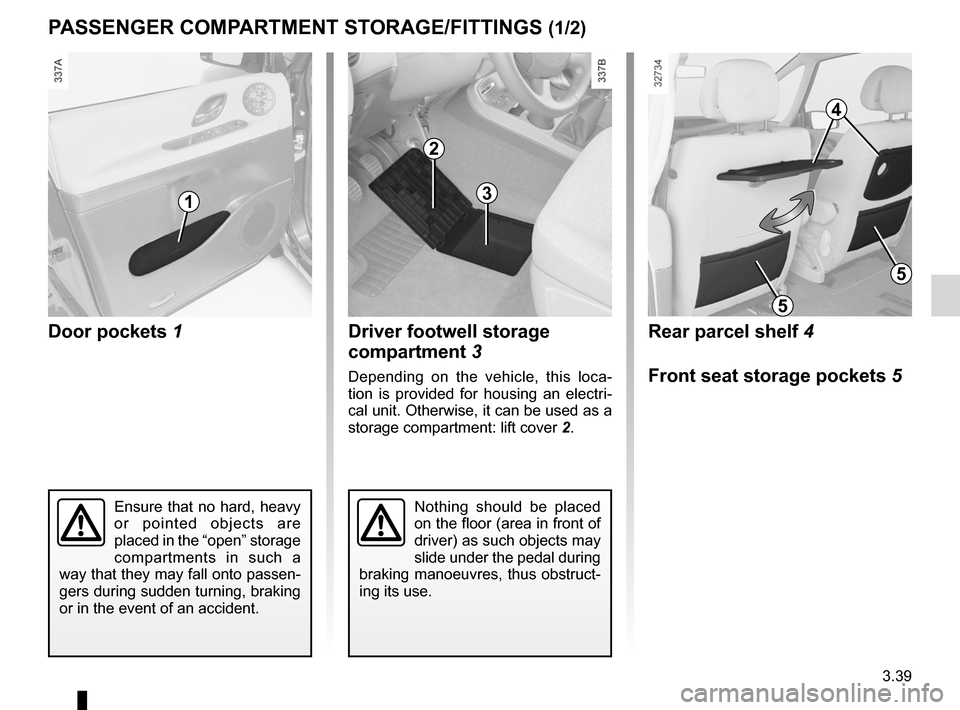
PASSENGER COMPARTMENT STORAGE/FITTINGS (1/2)
Door pockets 1 Driver footwell storage
compartment 3
Depending on the vehicle, this loca -
tion is provided for housing an electri -
cal unit. Otherwise, it can be used as a
storage compartment: lift cover 2.
Rear parcel shelf 4
Front seat storage pockets 5
Nothing should be placed
on the floor (area in front of
driver) as such objects may
slide under the pedal during
braking manoeuvres, thus obstruct-
ing its use.
1
2
3
5
5
Ensure that no hard, heavy
or pointed objects are
placed in the “open” storage
compartments in such a
way that they may fall onto passen-
gers during sudden turning, braking
or in the event of an accident.
4
Page 162 of 267
3.40
ENG_UD20391_1
Rangements/Aménagements habitacle (X81 - J81 - Renault)
ENG_NU_932-3_X81ph3_Renault_3
PASSENGER COMPARTMENT STORAGE/FITTINGS (2/2)
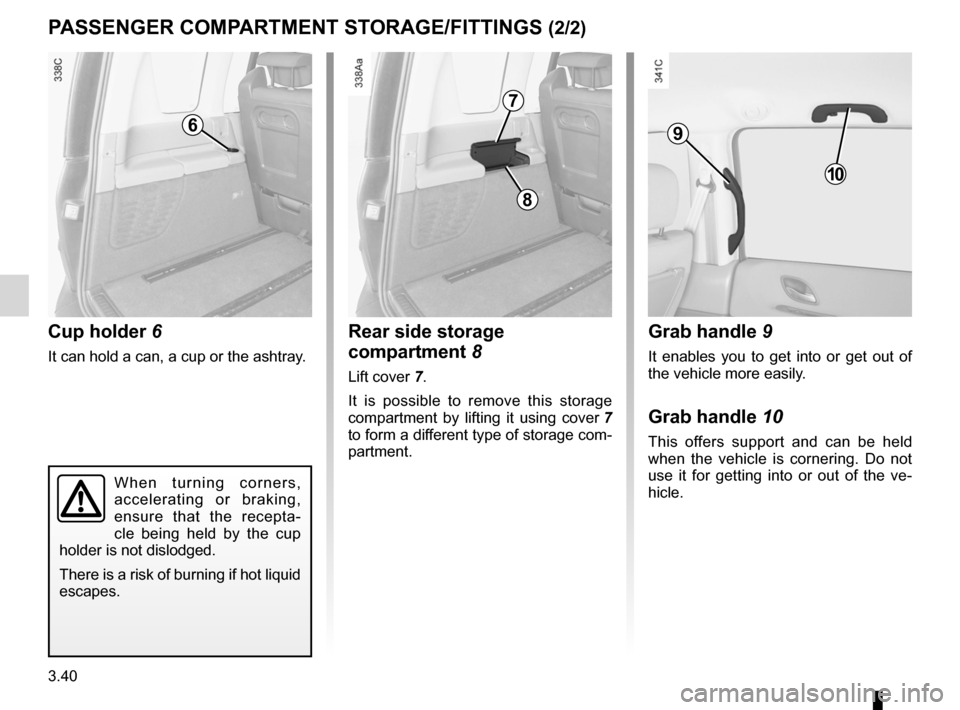
Cup holder 6
It can hold a can, a cup or the ashtray.
Rear side storage
compartment 8
Lift cover 7.
It is possible to remove this storage
compartment by lifting it using cover 7
to form a different type of storage com-
partment.
6
8
7
Grab handle 9
It enables you to get into or get out of
the vehicle more easily.
Grab handle 10
This offers support and can be held
when the vehicle is cornering. Do not
use it for getting into or out of the ve -
hicle.
9
10
W h e n t u r n i n g c o r n e r s ,
accelerating or braking,
ensure that the recepta -
cle being held by the cup
holder is not dislodged.
There is a risk of burning if hot liquid
escapes.
Page 163 of 267
ashtrays ................................................................. (current page)
cigar lighter ............................................................ (current page)
3.41
ENG_UD20392_1
Cendriers - Allume-cigares (X81 - J81 - Renault)
ENG_NU_932-3_X81ph3_Renault_3
Ashtray - cigar lighter
ASHTRAYS/CIGAR LIGHTER/ACCESSORIES SOCkET
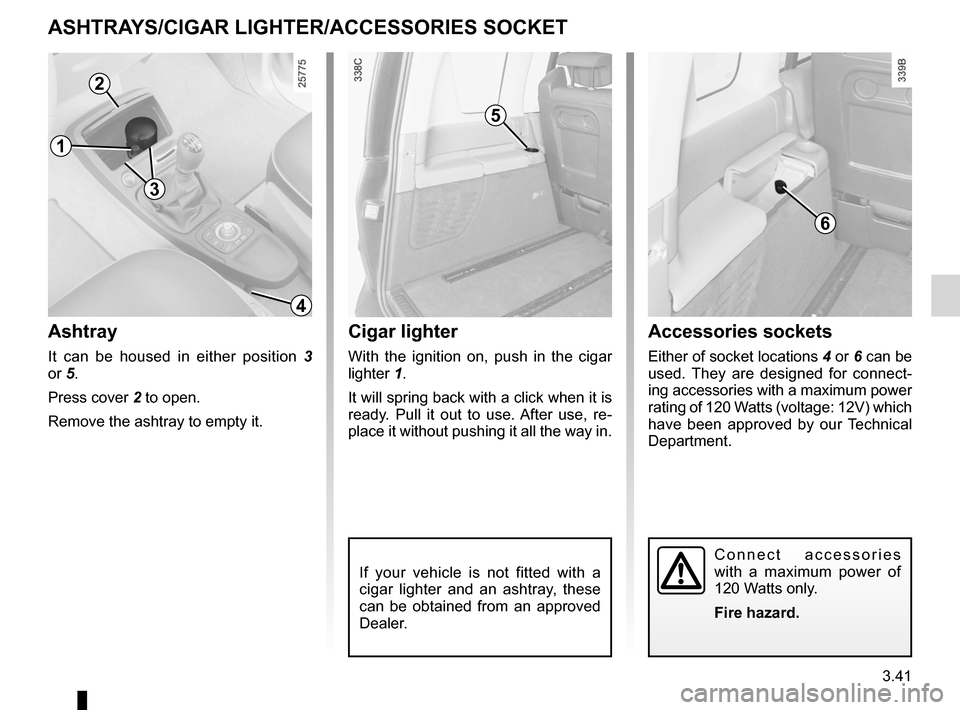
Ashtray
It can be housed in either position 3
or 5.
Press cover 2 to open.
Remove the ashtray to empty it.
Cigar lighter
With the ignition on, push in the cigar
lighter 1.
It will spring back with a click when it is
ready. Pull it out to use. After use, re -
place it without pushing it all the way in.
2
1
3
5
Accessories sockets
Either of socket locations 4 or 6 can be
used. They are designed for connect -
ing accessories with a maximum power
rating of 120 Watts (voltage: 12V) which
have been approved by our Technical
Department.
6
C o n n e c t a c c e s s o r i e s
with a maximum power of
120 Watts only.
Fire hazard.
4
If your vehicle is not fitted with a
cigar lighter and an ashtray, these
can be obtained from an approved
Dealer.
Page 164 of 267

rear seats............................................................... (current page)
3.42
ENG_UD20393_1
Sièges arrière : appuis-tête (X81 - J81 - Renault)
ENG_NU_932-3_X81ph3_Renault_3
Rear seats
REAR SEATS: headrests
To refit the headrest
Insert the rods into the sleeves, with the
notches at bottom to the front, and lower
the headrest to the desired height.
Rear headrest storage
position
Press tab 1 on the headrest guide and
lower the headrest completely.
The fully lowered headrest position
is a storage position: it should not be
in this position when a passenger is
seated.
To adjust the height
Slide the headrest slowly while pulling it
towards the front of the vehicle.
The headrest does not lower fully.
To remove the headrest
Press tab 1 on the headrest guide
and lift the headrest. If the headrest is
trapped against the roof of the vehicle,
tilt the seatback.The headrest is a safety
component, check that it
is fitted and in the correct
position. The distance be -
tween your head and the headrest
should be as small as possible. The
top of your head should be in line
with the top of the headrest.
1
Page 165 of 267
child headrest ....................................... (up to the end of the DU)
child safety ............................................ (up to the end of the DU)
children ................................................. (up to the end of the DU)
3.43
ENG_UD20394_1
Appuis-tête convertible enfant (X81 - J81 - Renault)
ENG_NU_932-3_X81ph3_Renault_3
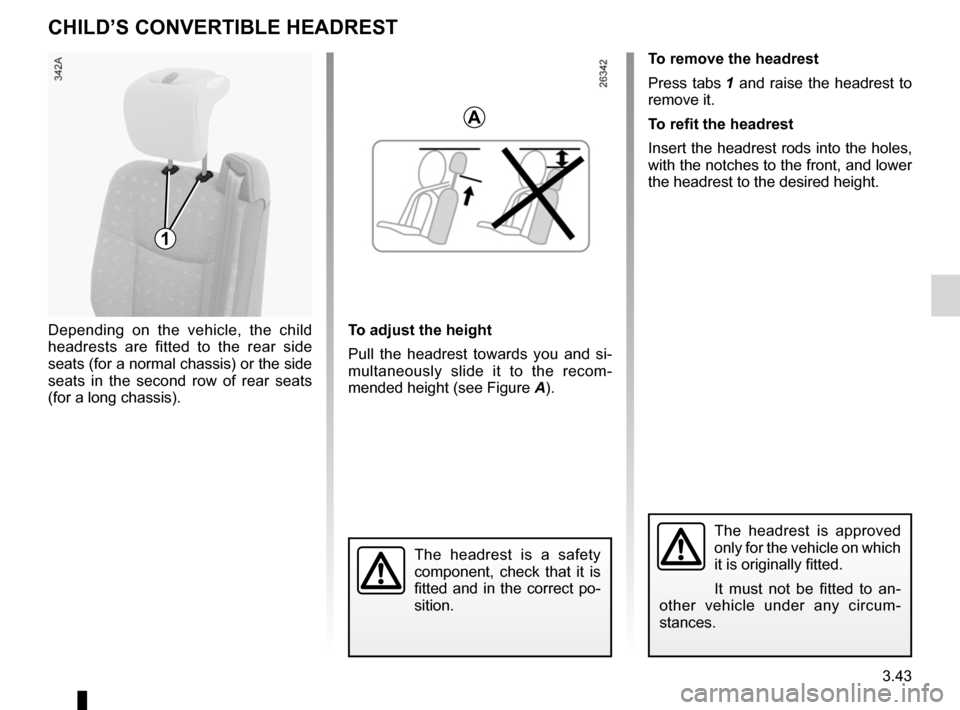
CHILD’S CONVERTIBLE HEADREST
Depending on the vehicle, the child
headrests are fitted to the rear side
seats (for a normal chassis) or the side
seats in the second row of rear seats
(for a long chassis). To adjust the height
Pull the headrest towards you and si
-
multaneously slide it to the recom -
mended height (see Figure A).
The headrest is a safety
component, check that it is
fitted and in the correct po-
sition.
The headrest is approved
only for the vehicle on which
it is originally fitted.
It must not be fitted to an-
other vehicle under any circum -
stances.
To remove the headrest
Press tabs 1 and raise the headrest to
remove it.
To refit the headrest
Insert the headrest rods into the holes,
with the notches to the front, and lower
the headrest to the desired height.
1
A
Page 166 of 267
3.44
ENG_UD20394_1
Appuis-tête convertible enfant (X81 - J81 - Renault)
ENG_NU_932-3_X81ph3_Renault_3
CHILD’S CONVERTIBLE HEADREST (continued)
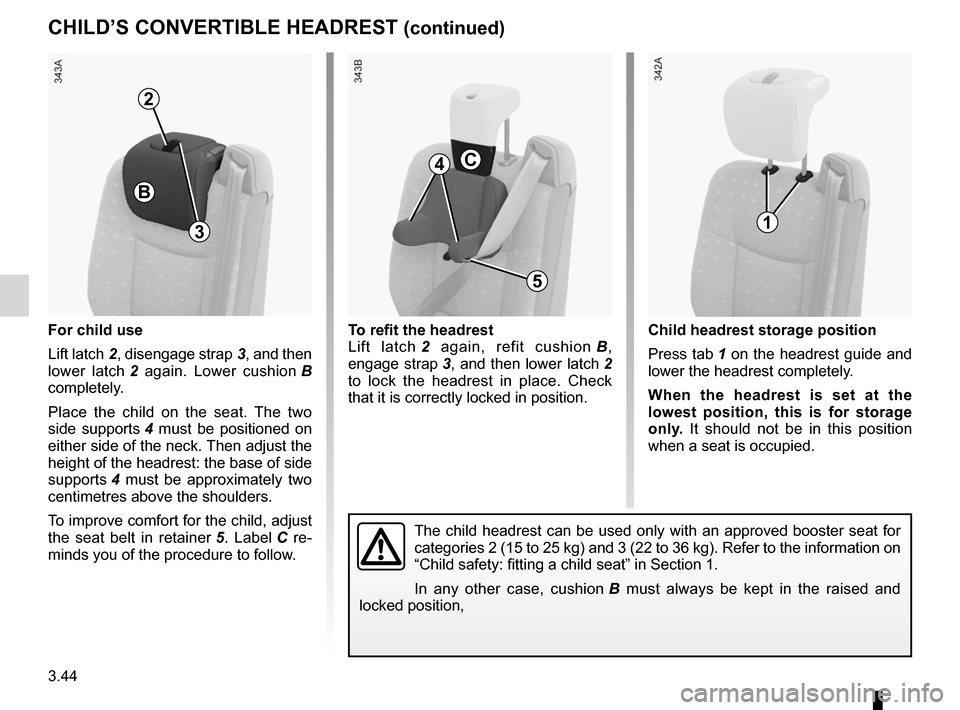
For child use
Lift latch 2, disengage strap 3, and then
lower latch 2 again. Lower cushion B
completely.
Place the child on the seat. The two
side supports 4 must be positioned on
either side of the neck. Then adjust the
height of the headrest: the base of side
supports 4 must be approximately two
centimetres above the shoulders.
To improve comfort for the child, adjust
the seat belt in retainer 5 . Label C re -
minds you of the procedure to follow. To refit the headrest
Lift latch
2 again, refit cushion B ,
engage strap 3, and then lower latch 2
to lock the headrest in place. Check
that it is correctly locked in position. Child headrest storage position
Press tab 1 on the headrest guide and
lower the headrest completely.
When the headrest is set at the
lowest position, this is for storage
only.
It should not be in this position
when a seat is occupied.
2
B
3
4
5
C
1
The child headrest can be used only with an approved booster seat for
categories 2 (15 to 25 kg) and 3 (22 to 36 kg). Refer to the information on
“Child safety: fitting a child seat” in Section 1.
In any other case, cushion B must always be kept in the raised and
locked position,
Page 167 of 267
armrest .................................................................. (current page)
rear seats ............................................................... (current page)
3.45
ENG_UD20395_1
Sièges arrière : accoudoirs (X81 - J81 - Renault)
ENG_NU_932-3_X81ph3_Renault_3
REAR SEATS: armrests
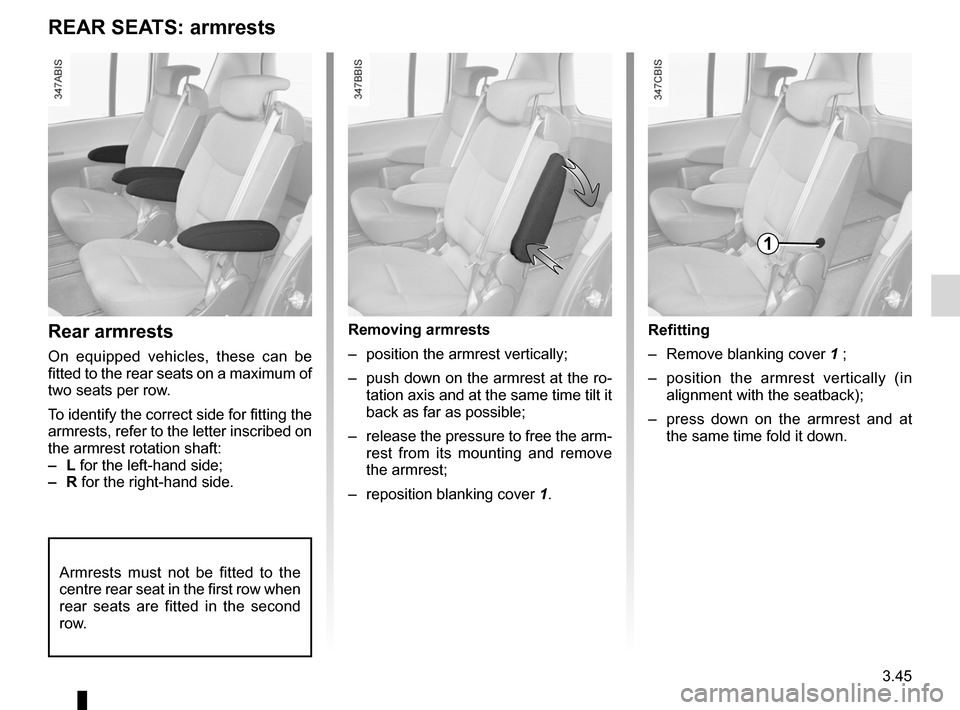
Rear armrests
On equipped vehicles, these can be
fitted to the rear seats on a maximum of
two seats per row.
To identify the correct side for fitting the
armrests, refer to the letter inscribed on
the armrest rotation shaft:
– L for the left-hand side;
– R for the right-hand side. Removing armrests
–
position the armrest vertically;
– push down on the armrest at the ro-
tation axis and at the same time tilt it
back as far as possible;
– release the pressure to free the arm-
rest from its mounting and remove
the armrest;
– reposition blanking cover 1.Refitting
–
Remove blanking cover 1 ;
– position the armrest vertically (in
alignment with the seatback);
– press down on the armrest and at
the same time fold it down.
Armrests must not be fitted to the
centre rear seat in the first row when
rear seats are fitted in the second
row.
1
Page 168 of 267
rear seats............................................................... (current page)
3.46
ENG_UD20396_1
Sièges arrière : réglages (X81 - J81 - Renault)
ENG_NU_932-3_X81ph3_Renault_3
REAR SEATS: adjustment
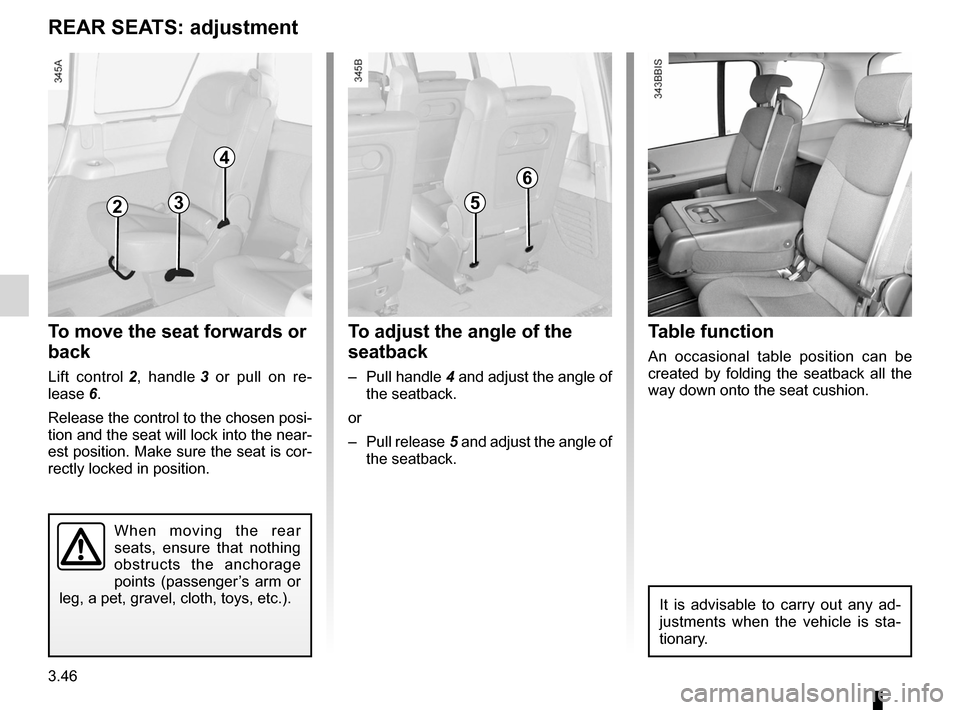
To move the seat forwards or
back
Lift control 2 , handle 3 or pull on re -
lease 6.
Release the control to the chosen posi-
tion and the seat will lock into the near-
est position. Make sure the seat is cor-
rectly locked in position.
To adjust the angle of the
seatback
– Pull handle 4 and adjust the angle of
the seatback.
or
– Pull release 5 and adjust the angle of
the seatback.
Table function
An occasional table position can be
created by folding the seatback all the
way down onto the seat cushion.
It is advisable to carry out any ad -
justments when the vehicle is sta -
tionary.
23
4
5
6
When moving the rear
seats, ensure that nothing
obstructs the anchorage
points (passenger’s arm or
leg, a pet, gravel, cloth, toys, etc.).
Page 169 of 267
rear seatsfunctions ......................................... (up to the end of the DU)
3.47
ENG_UD20397_1
Fonctionnalité des sièges arrière (X81 - J81 - Renault)
ENG_NU_932-3_X81ph3_Renault_3
REAR SEATS: FUNCTIONS (1/4)
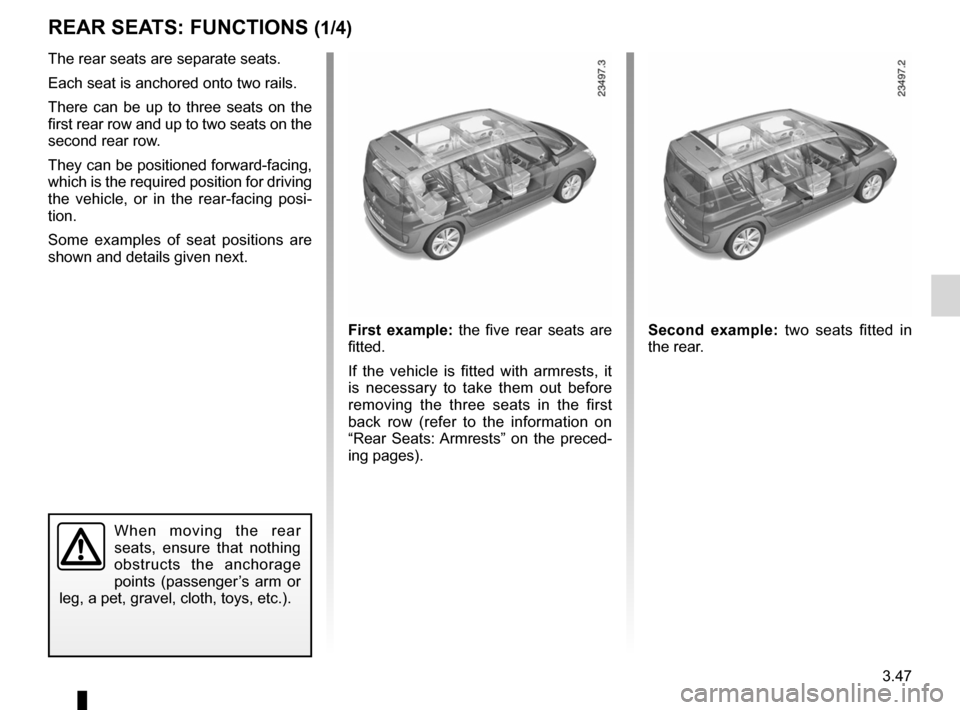
The rear seats are separate seats.
Each seat is anchored onto two rails.
There can be up to three seats on the
first rear row and up to two seats on the
second rear row.
They can be positioned forward-facing,
which is the required position for driving
the vehicle, or in the rear-facing posi -
tion.
Some examples of seat positions are
shown and details given next.
First example: the five rear seats are
fitted.
If the vehicle is fitted with armrests, it
is necessary to take them out before
removing the three seats in the first
back row (refer to the information on
“Rear Seats: Armrests” on the preced-
ing pages). Second example:
two seats fitted in
the rear.
When moving the rear
seats, ensure that nothing
obstructs the anchorage
points (passenger’s arm or
leg, a pet, gravel, cloth, toys, etc.).
Page 170 of 267
3.48
ENG_UD20397_1
Fonctionnalité des sièges arrière (X81 - J81 - Renault)
ENG_NU_932-3_X81ph3_Renault_3
Jaune NoirNoir texte
REAR SEATS: FUNCTIONS (2/4)
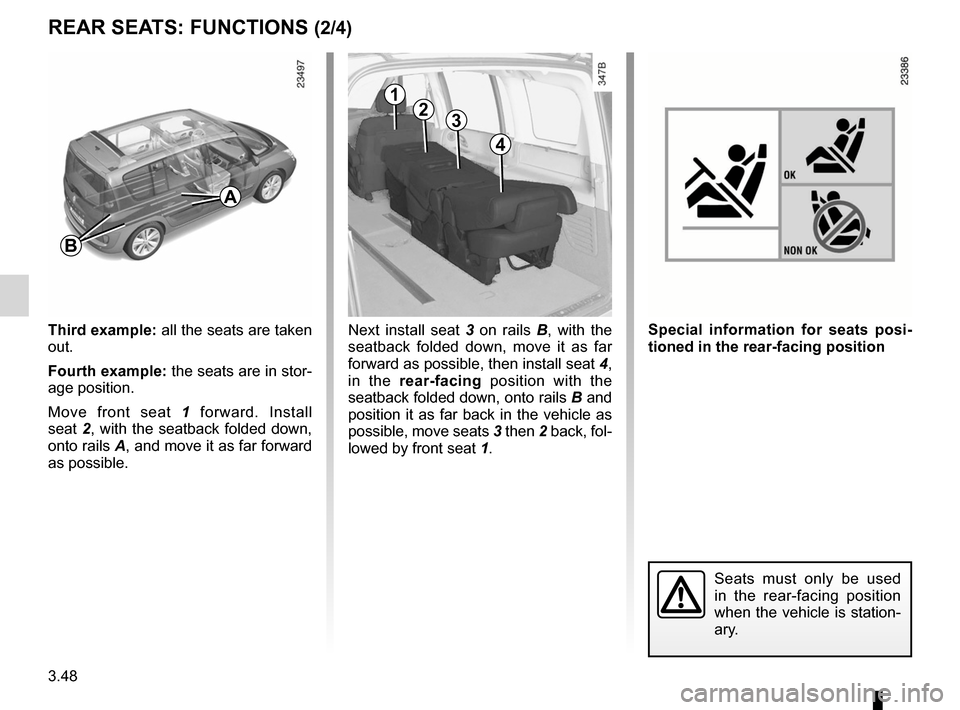
Third example: all the seats are taken
out.
Fourth example: the seats are in stor-
age position.
Move front seat 1 forward. Install
seat 2, with the seatback folded down,
onto rails A, and move it as far forward
as possible. Next install seat
3 on rails B , with the
seatback folded down, move it as far
forward as possible, then install seat 4,
in the rear-facing position with the
seatback folded down, onto rails B and
position it as far back in the vehicle as
possible, move seats 3 then 2 back, fol-
lowed by front seat 1. Special information for seats posi
-
tioned in the rear-facing position
Seats must only be used
in the rear-facing position
when the vehicle is station-
ary.
B
A
123
4