engine RENAULT ESPACE 2012 J81 / 4.G Repair Manual
[x] Cancel search | Manufacturer: RENAULT, Model Year: 2012, Model line: ESPACE, Model: RENAULT ESPACE 2012 J81 / 4.GPages: 267, PDF Size: 8.95 MB
Page 192 of 267
brake fluid .............................................................. (current page)
tanks and reservoirs brake fluid ........................................................ (current page)
levels: brake fluid ........................................................ (current page)
4.10
ENG_UD24345_4
Niveaux/Filtres (X81 - Renault)
ENG_NU_932-3_X81ph3_Renault_4
Jaune NoirNoir texte
brake fluid
LeVeLS (3/4)
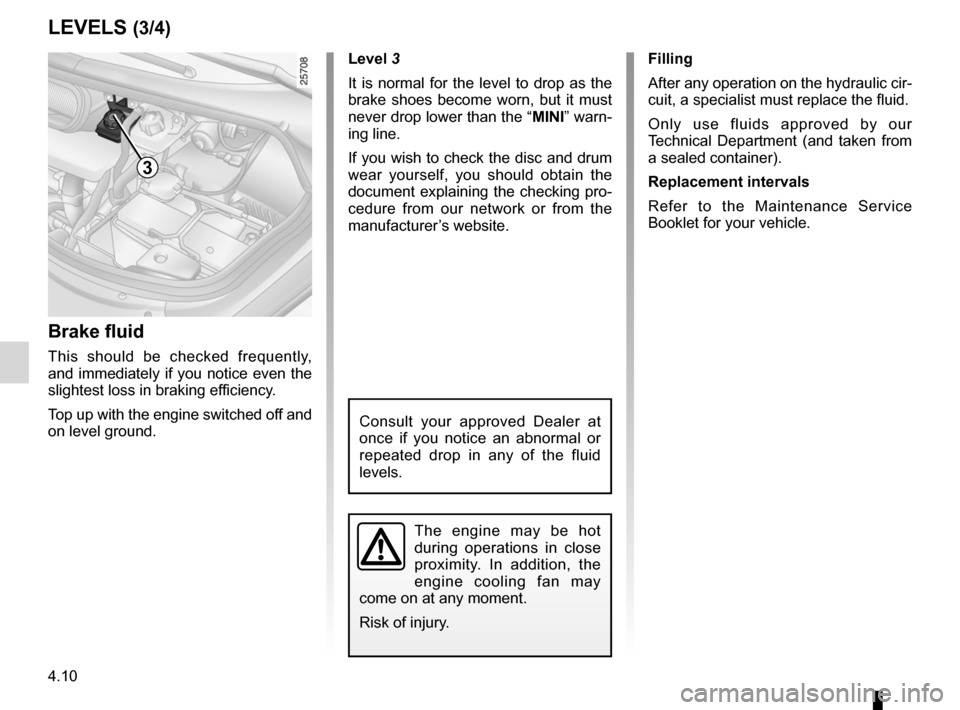
3
Brake fluid
This should be checked frequently,
and immediately if you notice even the
slightest loss in braking efficiency.
Top up with the engine switched off and
on level ground.
Level 3
It is normal for the level to drop as the
brake shoes become worn, but it must
never drop lower than the “MInI” warn-
ing line.
If you wish to check the disc and drum
wear yourself, you should obtain the
document explaining the checking pro-
cedure from our network or from the
manufacturer’s website.Filling
After any operation on the hydraulic cir-
cuit, a specialist must replace the fluid.
Only use fluids approved by our
Technical Department (and taken from
a sealed container).
Replacement intervals
Refer to the Maintenance Service
Booklet for your vehicle.
Consult your approved Dealer at
once if you notice an abnormal or
repeated drop in any of the fluid
levels.
The engine may be hot
during operations in close
proximity. In addition, the
engine cooling fan may
come on at any moment.
Risk of injury.
Page 193 of 267
filterair filter ............................................................. (current page)
tanks and reservoirs: windscreen washer .......................................... (current page)
filter ........................................................................\
(current page)
filter oil filter ............................................................. (current page)
filter passenger compartment filter .......................... (current page)
JauneNoirNoir texte
4.11
ENG_UD24345_4
Niveaux/Filtres (X81 - Renault)
ENG_NU_932-3_X81ph3_Renault_4
windscreen/headlight washer reservoir
Filters
LeVeLS (4/4)/FIL teRS
Windscreen/headlight washer
reservoir
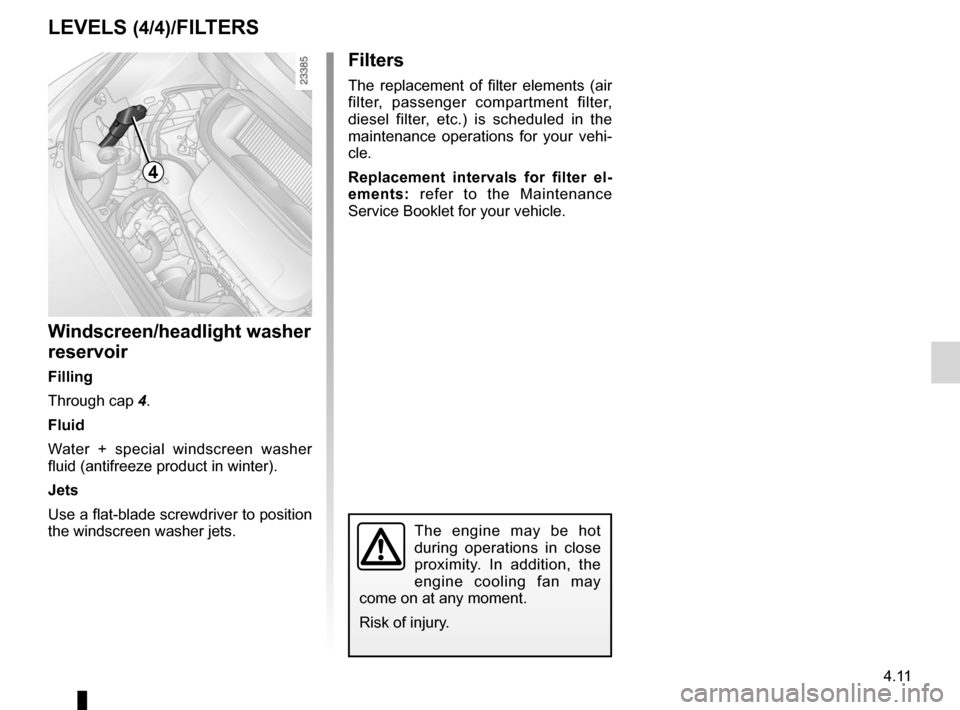
Filling
Through cap 4.
Fluid
Water + special windscreen washer
fluid (antifreeze product in winter).
Jets
Use a flat-blade screwdriver to position
the windscreen washer jets.
Filters
The replacement of filter elements (air
filter, passenger compartment filter,
diesel filter, etc.) is scheduled in the
maintenance operations for your vehi -
cle.
Replacement intervals for filter el -
ements: refer to the Maintenance
Service Booklet for your vehicle.
4
The engine may be hot
during operations in close
proximity. In addition, the
engine cooling fan may
come on at any moment.
Risk of injury.
Page 196 of 267
maintenance:bodywork ........................................ (up to the end of the DU)
washing ................................................ (up to the end of the DU)
paintwork maintenance ................................... (up to the end of the DU)
anti-corrosion protection ........................................ (current page)
4.14
ENG_UD25392_1
Entretien de la carrosserie (X95 - J95 - R95 - Renault)
ENG_NU_932-3_X81ph3_Renault_4
Jaune NoirNoir texte
Bodywork maintenance
BoDyWoRk MAIntenAnCe (1/2)
Allow rust to form following minor im -
pacts.
Use solvents not approved by our
Technical Department to remove stains
as this could damage the paintwork.
Drive frequently in snow or muddy con-
ditions without washing the vehicle,
particularly under the wheel arches and
body.
Minor impacts
You should take a minimum number of
precautions in order to safeguard your
vehicle against such risks and not to
lose the benefit of your vehicle’s anti
-
corrosion protection.
What you should not do
Do not degrease or clean mechanical
components (e.g. the engine compart -
ment), underneath the body, parts with
hinges (e.g. inside the charging flap)
and painted plastic external fittings
(e.g. bumpers) using high-pressure
cleaning equipment or by spraying on
products not approved by our Technical
Department. If adequate precautions
are not taken, this could give rise to cor-
rosion or operational faults.
Wash the vehicle in bright sunlight or
freezing temperatures.
Scrape off mud or dirt without pre-wet-
ting.
Allow dirt to accumulate on the exterior.
A well-maintained vehicle will last
longer. It is therefore recommended to
maintain the exterior of the vehicle reg-
ularly.
Protection against the effects
of corrosive agents
Although your vehicle has been treated
with very effective anti-corrosion prod
-
ucts, it nevertheless remains subject to
the effects of different parameters.
Corrosive agents in the
atmosphere:
– atmospheric pollution (built-up and
industrial areas);
– saline atmospheres (near the sea,
particularly in hot weather);
– seasonal and damp weather condi -
tions, (e.g. road salt in winter, water
from road cleaners, etc.).
Abrasive action
Wind-borne dust and sand, mud, road
grit thrown up by other vehicles, etc.
Page 197 of 267
JauneNoirNoir texte
4.15
ENG_UD25392_1
Entretien de la carrosserie (X95 - J95 - R95 - Renault)
ENG_NU_932-3_X81ph3_Renault_4
– bird droppings , which cause a
chemical reaction with the paint that
rapidly discolours paintwork and
may even cause the paint to peel
off;
Wash the vehicle immediately to
remove these marks since it is im -
possible to remove them by polish -
ing;
– salt, particularly in the wheel arches
and underneath the body after driv -
ing in areas where the roads have
been gritted.
Using a roller type car wash
Return the windscreen wiper stalk to
the Park position (refer to the informa-
tion on the “Windscreen washer, wiper”
in Section 1). Check the mounting of
external accessories, additional lights
and mirrors, and ensure that the wiper
blades are secured with adhesive tape.
Remove the radio aerial mast if your
vehicle is fitted with this equipment.
Remember to remove the tape and refit
the antenna after washing.y ou should
Observe the vehicle stopping distances
when driving on gravelled surfaces to
prevent paint damage.
Repair, or have repaired quickly, areas
where the paint has been damaged, to
prevent corrosion spreading.
Remember to visit the body shop pe -
riodically in order to maintain your
anti-corrosion warranty. Refer to the
Maintenance Service Booklet.
Respect local regulations about wash -
ing vehicles (e.g. do not wash your ve-
hicle on a public highway).
Wash your car frequently, with the
engine off, with cleaning products rec-
ommended by the manufacturer (never
use abrasive products). Rinse thor -
oughly beforehand with a jet:
– spots of tree resin and industrial
grime;
– mud in the wheel arches and under -
neath the body which forms damp
patches;
BoDyWoRk MAIntenAnCe (2/2)
If it is necessary to clean mechani -
cal components, hinges, etc., spray
them with products approved by our
Technical Department to protect them
after they have been cleaned.
Cleaning the headlights
As the headlights are made of plastic
“glass”, use a soft cloth or cotton wool
to clean them. If this does not clean
them properly, moisten the cloth with
soapy water, then wipe clean with a soft
damp cloth or cotton wool.
Finally, carefully dry off with a soft dry
cloth.
Cleaning products containing alco -
hol must not be used.
We have selected special products
to care for your vehicle and you can
obtain these from the manufactur -
er’s accessory outlets.
Page 205 of 267
JauneNoirNoir texte
5.5
ENG_UD24347_2
Add J81 kit de gonflage (X81 - J81 - Renault)
ENG_NU_932-3_X81ph3_Renault_5
tYre InFLA tIOn KIt (continued)
Depending on the vehicle, in the event
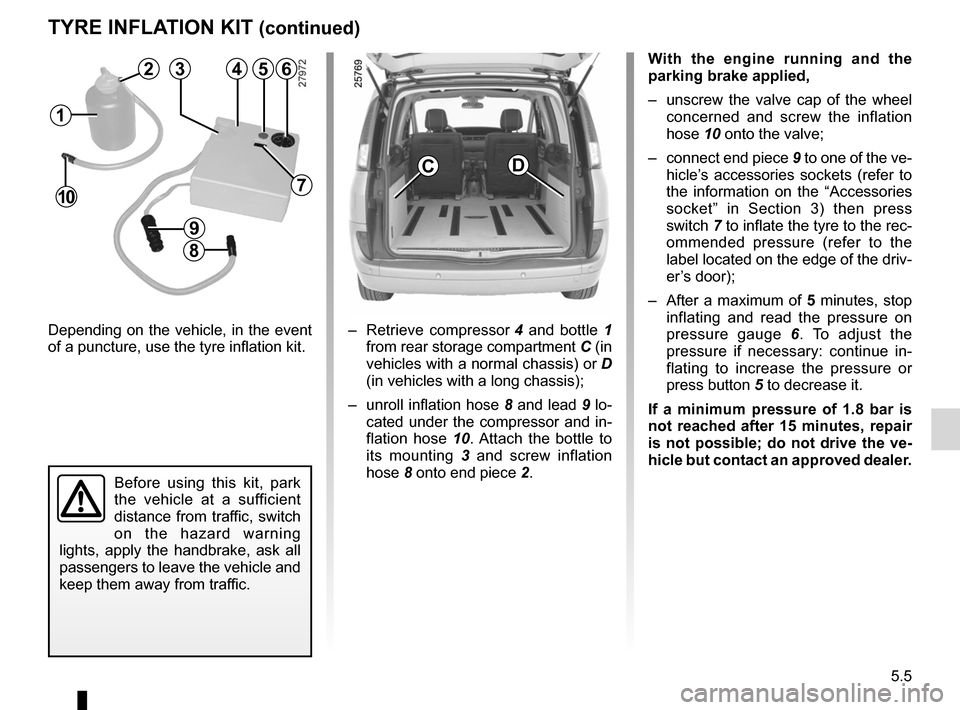
of a puncture, use the tyre inflation kit.– Retrieve compressor 4 and bottle 1
from rear storage compartment C (in
vehicles with a normal chassis) or D
(in vehicles with a long chassis);
– unroll inflation hose 8 and lead 9 lo-
cated under the compressor and in-
flation hose 10 . Attach the bottle to
its mounting 3 and screw inflation
hose 8 onto end piece 2.With the engine running and the
parking brake applied,
–
unscrew the valve cap of the wheel
concerned and screw the inflation
hose 10 onto the valve;
– connect end piece 9 to one of the ve-
hicle’s accessories sockets (refer to
the information on the “Accessories
socket” in Section 3) then press
switch 7 to inflate the tyre to the rec-
ommended pressure (refer to the
label located on the edge of the driv-
er’s door);
– After a maximum of 5 minutes, stop
inflating and read the pressure on
pressure gauge 6 . To adjust the
pressure if necessary: continue in -
flating to increase the pressure or
press button 5 to decrease it.
If a minimum pressure of 1.8 bar is
not reached after 15 minutes, repair
is not possible; do not drive the ve-
hicle but contact an approved dealer.
Before using this kit, park
the vehicle at a sufficient
distance from traffic, switch
on the hazard warning
lights, apply the handbrake, ask all
passengers to leave the vehicle and
keep them away from traffic.
1
23456
7
8
9
10
cD
Page 227 of 267
JauneNoirNoir texte
5.27
ENG_UD24349_2
Fusibles (X81 - J81 - Renault)
ENG_NU_932-3_X81ph3_Renault_5
FuSeS (continued)
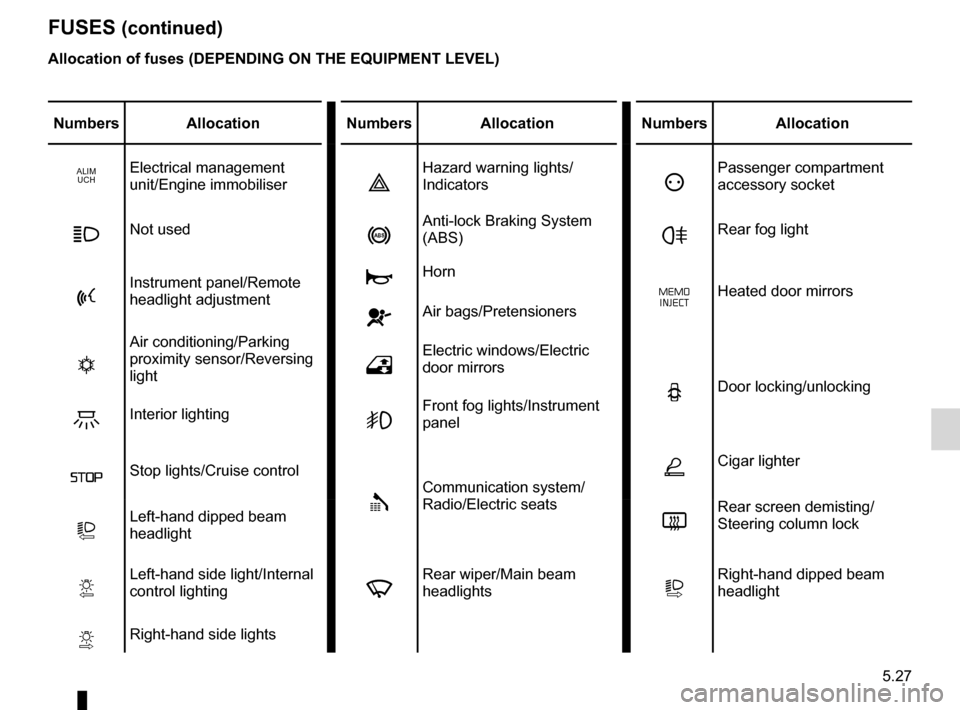
Allocation of fuses (DePenDInG On tHe eQuIPMent LeVeL)
numbers Allocation numbersAllocation numbersAllocation
ALIM
UCHElectrical management
unit/Engine immobiliserÉHazard warning lights/
IndicatorsëPassenger compartment
accessory socket
ÁNot usednAnti-lock Braking System
(ABS)FRear fog light
ÞInstrument panel/Remote
headlight adjustmentÌHorn
ðHeated door mirrors
ÅAir bags/Pretensioners
t
Air conditioning/Parking
proximity sensor/Reversing
light
hElectric windows/Electric
door mirrors
NDoor locking/unlocking
ZInterior lightingGFront fog lights/Instrument
panel
ßStop lights/Cruise control
ÏCommunication system/
Radio/Electric seats
ÆCigar lighter
CRear screen demisting/
Steering column lock
LLeft-hand dipped beam
headlight
YLeft-hand side light/Internal
control lightingfRear wiper/Main beam
headlightsTRight-hand dipped beam
headlight
VRight-hand side lights
Page 229 of 267
batterytroubleshooting ............................... (up to the end of the DU)
practical advice ..................................... (up to the end of the DU)
5.29
ENG_UD20429_1
Batterie : dépannage (X81 - J81 - Renault)
ENG_NU_932-3_X81ph3_Renault_5
Battery
BA tter Y: troubleshooting
Handle the battery with care
as it contains sulphuric acid,
which must not come into
contact with eyes or skin. If
it does, wash the affected area with
plenty of cold water. If necessary,
consult a doctor.
Ensure that naked flames, red hot
objects and sparks do not come into
contact with the battery as there is a
risk of explosion.
The engine may be hot when car -
rying out operations in close prox -
imity. In addition, the engine cooling
fan can come on at any moment.
Risk of injury.
t o avoid all risk of sparks:
– Ensure that any electrical consumers
(courtesy lights, etc.) are switched
off before disconnecting or recon -
necting the battery.
– When charging, stop the charger
before connecting or disconnecting
the battery.
– Do not place metal objects on the
battery to avoid creating a short cir-
cuit between the terminals.
– Always wait at least one minute after
the engine has been switched off
before disconnecting a battery.
– Make sure that you reconnect the
battery terminals after refitting.
Page 230 of 267
5.30
ENG_UD20429_1
Batterie : dépannage (X81 - J81 - Renault)
ENG_NU_932-3_X81ph3_Renault_5
Jaune NoirNoir texte
BAtter Y: troubleshooting (continued)
connecting a battery charger
t he battery charger must be com -
patible with a battery with a nominal
voltage of 12 volts.
It is essential to disconnect both bat -
tery leads from the terminals (engine
stopped) starting with the negative
terminal.
Do not disconnect the battery when the
engine is running. Follow the instruc-
tions given by the manufacturer of
the battery charger you are using.
Only a fully charged and well-main -
tained battery will have a long and
useful life and enable you to start the
vehicle’s engine normally.
The battery must be kept clean and dry.
Have the battery’s charge status
checked regularly:
– Especially if you use your vehicle for
short journeys or for frequent driving
in town. –
When the exterior temperature drops
(in winter), the charge decreases.
In winter, only use electrical equip -
ment which is really necessary.
– Finally, you should understand that
the charge decreases naturally as a
result of certain permanent electrical
consumers such as the clock, after-
sales accessories, etc.
When a large number of accessories
are fitted to the vehicle, have them con-
nected to the + after ignition feed. In
this case, it is advisable to have your
vehicle fitted with a battery which has
an increased nominal capacity. Contact
an approved dealer. If your vehicle is to be left stationary
for a relatively long time, disconnect
the battery or have it recharged regu
-
larly, particularly during cold weather.
The equipment with a memory, radio
etc. will then have to be reprogrammed.
The battery must be stored in a cool dry
place, protected from frost.
Special procedures may be
required to charge some
batteries. Contact your ap -
proved dealer.
Avoid all risk of sparks which may
cause an immediate explosion, and
charge the battery in a well-venti -
lated area. Risk of serious injury.
Page 231 of 267
JauneNoirNoir texte
5.31
ENG_UD20429_1
Batterie : dépannage (X81 - J81 - Renault)
ENG_NU_932-3_X81ph3_Renault_5
BA tter Y: troubleshooting (continued)
Starting the vehicle using the
battery from another vehicle
If you have to use the battery from an-
other vehicle to start, obtain suitable
jump leads (with a large cross section)
from an approved dealer or, if you al -
ready have jump leads, ensure that
they are in perfect condition.
the two batteries must have an iden-
tical nominal voltage of 12 volts. The
battery supplying the current should
have a capacity (amp-hours, Ah) which
is at least the same as that of the dis-
charged battery.
Ensure that there is no risk of contact
between the two vehicles (risk of short
circuiting when the positive terminals
are connected) and that the discharged
battery is properly connected. Switch
off your vehicle ignition.
Start the engine of the vehicle supply -
ing the current and run it at an interme-
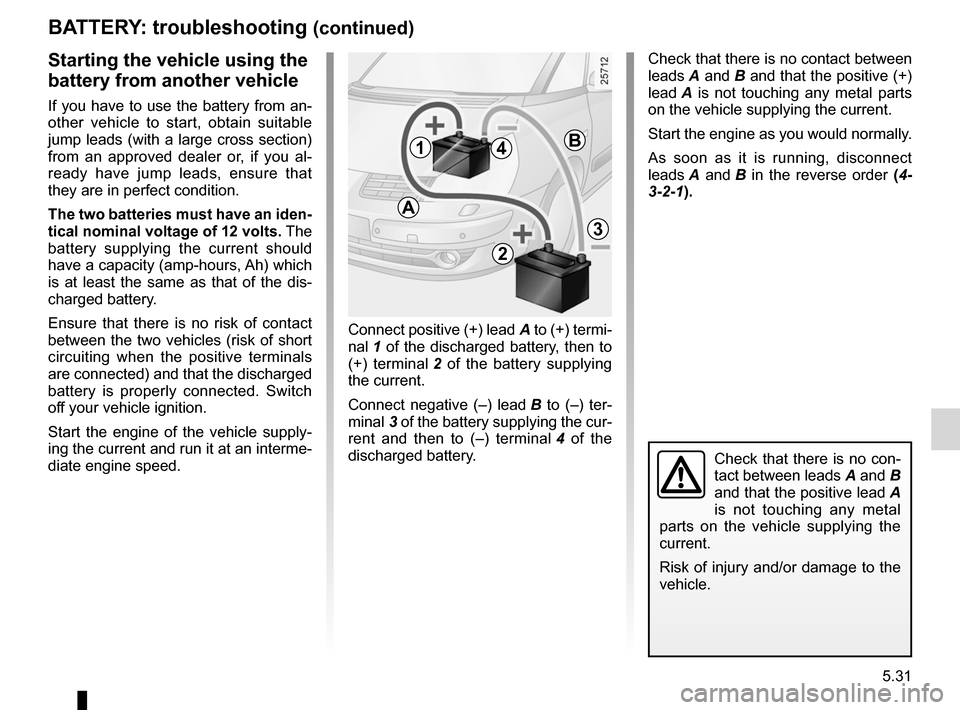
diate engine speed. Connect positive (+) lead A to (+) termi-
nal 1 of the discharged battery, then to
(+) terminal
2 of the battery supplying
the current.
Connect negative (–) lead B to (–) ter-
minal 3 of the battery supplying the cur-
rent and then to (–) terminal 4 of the
discharged battery.
Check that there is no contact between
leads A and B and that the positive (+)
lead A is not touching any metal parts
on the vehicle supplying the current.
Start the engine as you would normally.
As soon as it is running, disconnect
leads A and B in the reverse order (4-
3-2-1).
1
A
2
3
B4
Check that there is no con-
tact between leads A and B
and that the positive lead A
is not touching any metal
parts on the vehicle supplying the
current.
Risk of injury and/or damage to the
vehicle.
Page 235 of 267

JauneNoirNoir texte
5.35
ENG_UD24496_2
Remorquage : dépannage (X81 - J81 - Renault)
ENG_NU_932-3_X81ph3_Renault_5
t OWInG: breakdown (continued)
towing a vehicle with an
automatic transmission:
special features
With the engine switched off: the
gearbox is no longer lubricated. It is
preferable to tow this type of vehicle on
a trailer or tow it with the front wheels
off the ground.
u nder exceptional circumstances ,
you may tow the vehicle with all four
wheels on the ground, only going for -
ward, with the gear lever in the n posi-
tion, and for a distance not exceeding
30 miles (50 km).
W h e n t h e e n g i n e i s
stopped, steering and brak-
ing assistance are not op -
erational.
2
1
3
– Use a rigid towing bar.
If a rope or cable is used
(where the law allows this),
the vehicle being towed
must be able to brake.
– A vehicle must not be towed if it is
not fit to be driven.
– Avoid accelerating or braking
suddenly when towing, as this
may result in damage being
caused to the vehicle.
– When towing a vehicle, it is ad -
visable not to exceed 15 mph
(25 km/h).
If the lever is stuck in P,
even though you are de -
pressing the brake pedal,
the lever can be released
manually.
To do this, unclip the cover at the
base of the lever.
Press simultaneously on button 2
and on the unlocking button on
lever 1.