RENAULT SCENIC 2000 J64 / 1.G Technical Note 3426A Owners Manual
Manufacturer: RENAULT, Model Year: 2000, Model line: SCENIC, Model: RENAULT SCENIC 2000 J64 / 1.GPages: 118, PDF Size: 1.5 MB
Page 91 of 118
Downloaded from www.Manualslib.com manuals search engine DIESEL EQUIPMENT
Accelerator potentiometer
13
13-40
Accelerator potentiometer
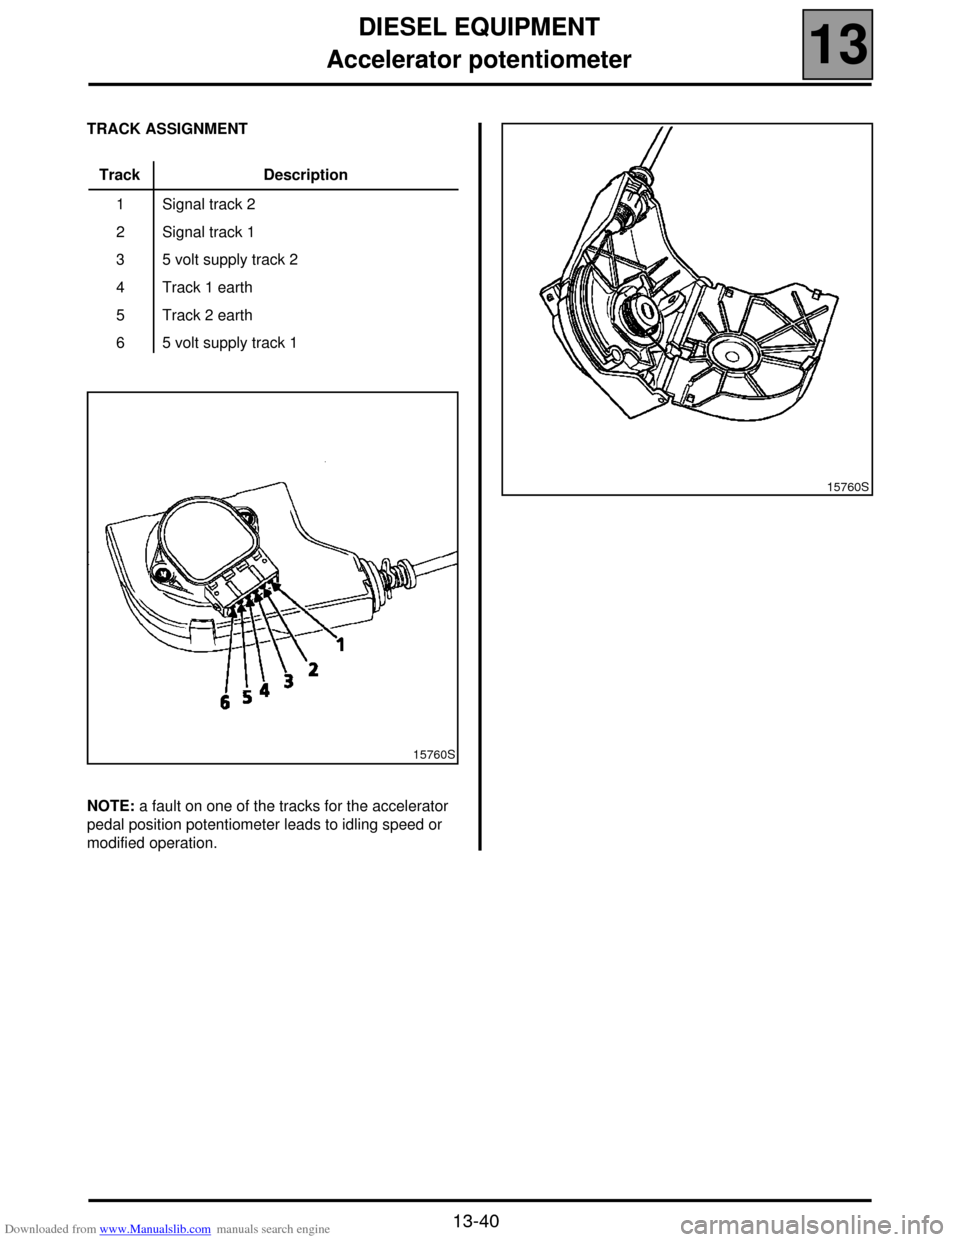
TRACK ASSIGNMENT
NOTE: a fault on one of the tracks for the accelerator
pedal position potentiometer leads to idling speed or
modified operation.Track Description
1
2
3
4
5
6 Signal track 2
Signal track 1
5 volt supply track 2
Track 1 earth
Track 2 earth
5 volt supply track 1
15760S
15760S
Page 92 of 118
Downloaded from www.Manualslib.com manuals search engine DIESEL EQUIPMENT
Coolant temperature management
13
13-41
Coolant temperature management
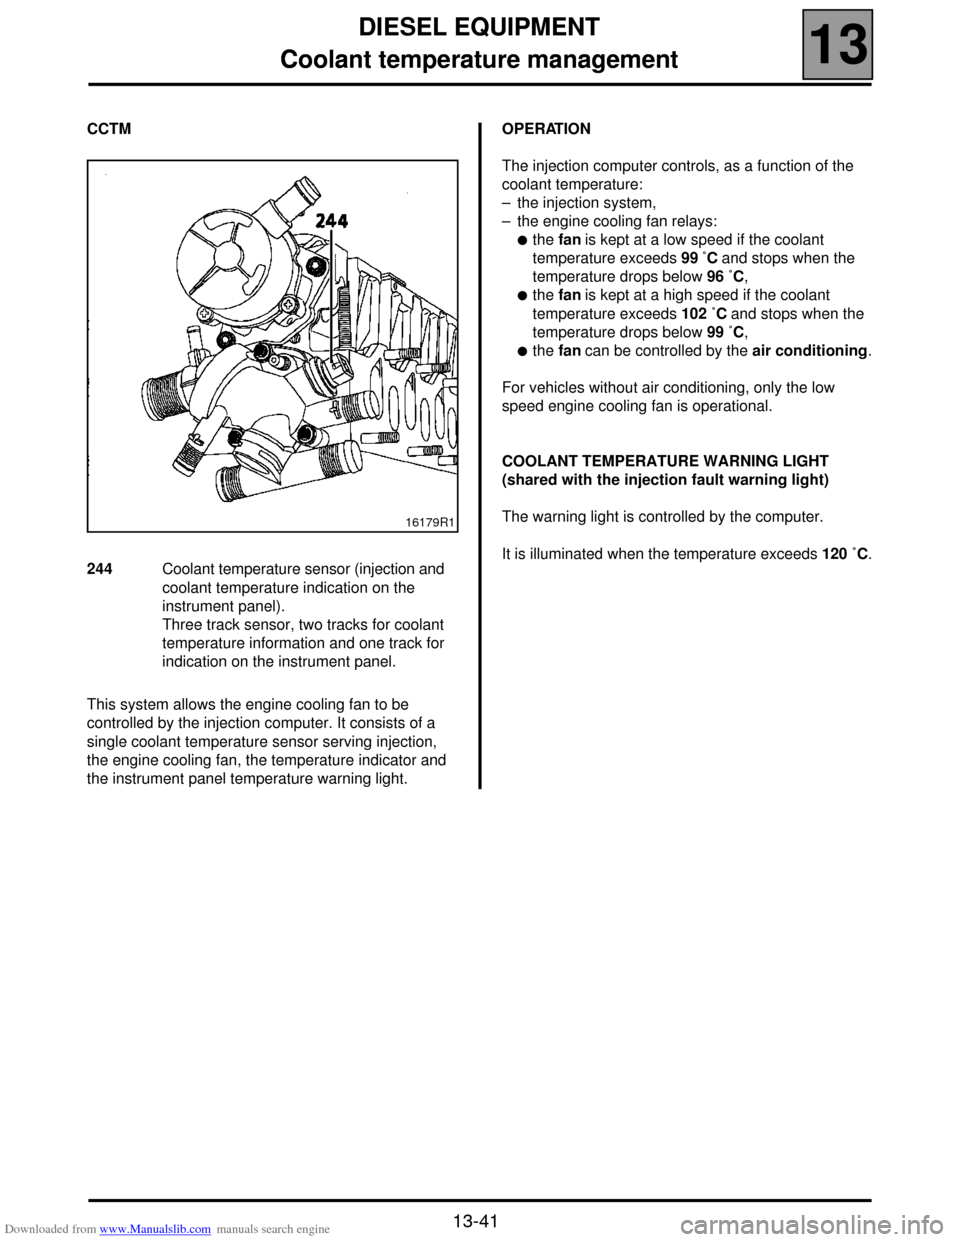
CCTM
This system allows the engine cooling fan to be
controlled by the injection computer. It consists of a
single coolant temperature sensor serving injection,
the engine cooling fan, the temperature indicator and
the instrument panel temperature warning light.OPERATION
The injection computer controls, as a function of the
coolant temperature:
– the injection system,
– the engine cooling fan relays:
!the fan is kept at a low speed if the coolant
temperature exceeds 99 ˚C and stops when the
temperature drops below 96 ˚C,
!the fan is kept at a high speed if the coolant
temperature exceeds 102 ˚C and stops when the
temperature drops below 99 ˚C,
!the fan can be controlled by the air conditioning.
For vehicles without air conditioning, only the low
speed engine cooling fan is operational.
COOLANT TEMPERATURE WARNING LIGHT
(shared with the injection fault warning light)
The warning light is controlled by the computer.
It is illuminated when the temperature exceeds 120 ˚C.
16179R1
244 Coolant temperature sensor (injection and
coolant temperature indication on the
instrument panel).
Three track sensor, two tracks for coolant
temperature information and one track for
indication on the instrument panel.
Page 93 of 118
Downloaded from www.Manualslib.com manuals search engine DIESEL EQUIPMENT
Computer
13
13-42
Computer
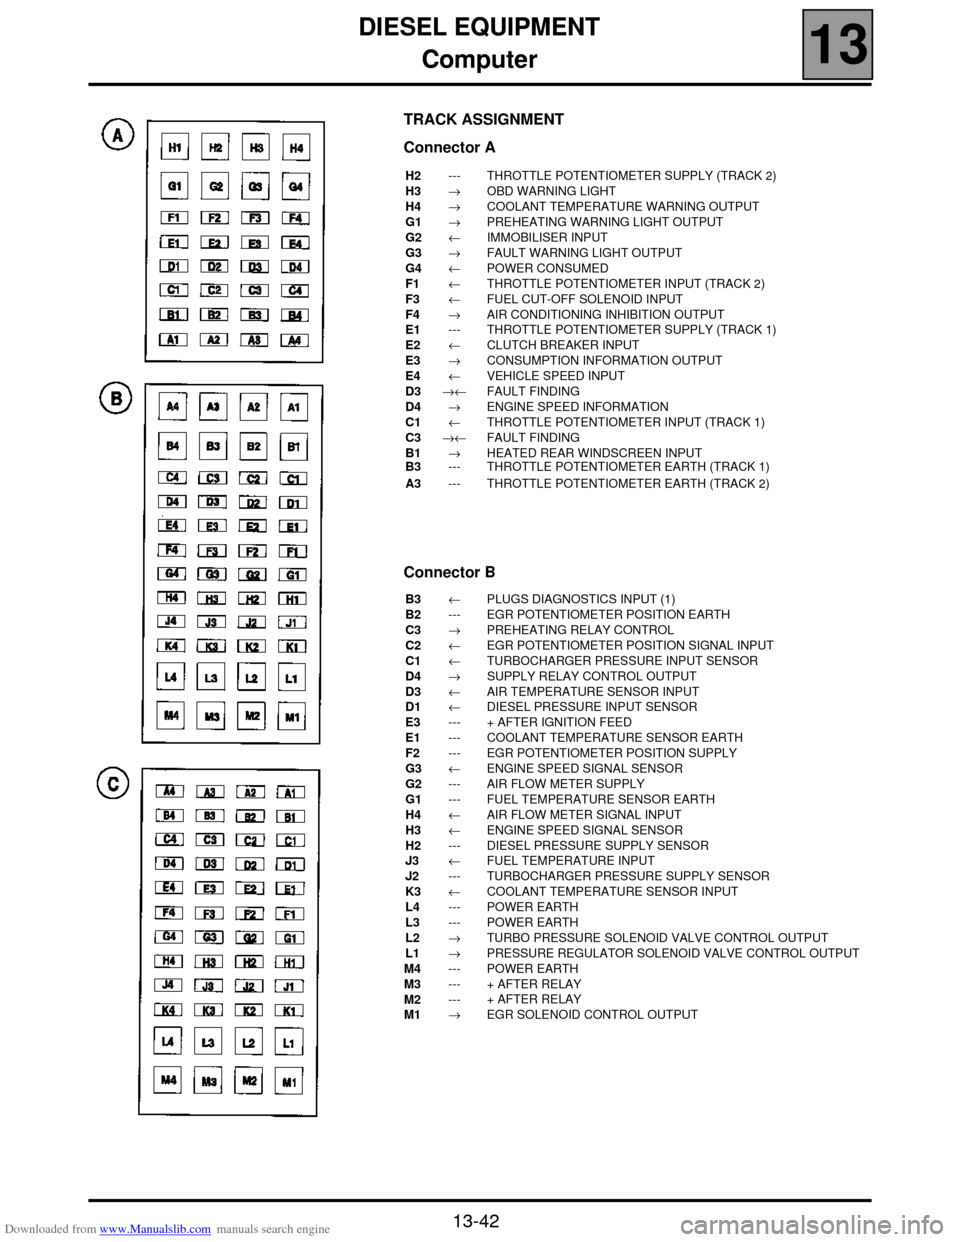
TRACK ASSIGNMENT
Connector A
H2
H3
H4
G1
G2
G3
G4
F1
F3
F4
E1
E2
E3
E4
D3
D4
C1
C3
B1
B3
A3---
→
→
→
←
→
←
←
←
→
---
←
→
←
→←
→
←
→←
→
---
---THROTTLE POTENTIOMETER SUPPLY (TRACK 2)
OBD WARNING LIGHT
COOLANT TEMPERATURE WARNING OUTPUT
PREHEATING WARNING LIGHT OUTPUT
IMMOBILISER INPUT
FAULT WARNING LIGHT OUTPUT
POWER CONSUMED
THROTTLE POTENTIOMETER INPUT (TRACK 2)
FUEL CUT-OFF SOLENOID INPUT
AIR CONDITIONING INHIBITION OUTPUT
THROTTLE POTENTIOMETER SUPPLY (TRACK 1)
CLUTCH BREAKER INPUT
CONSUMPTION INFORMATION OUTPUT
VEHICLE SPEED INPUT
FAULT FINDING
ENGINE SPEED INFORMATION
THROTTLE POTENTIOMETER INPUT (TRACK 1)
FAULT FINDING
HEATED REAR WINDSCREEN INPUT
THROTTLE POTENTIOMETER EARTH (TRACK 1)
THROTTLE POTENTIOMETER EARTH (TRACK 2)
Connector B
B3
B2
C3
C2
C1
D4
D3
D1
E3
E1
F2
G3
G2
G1
H4
H3
H2
J3
J2
K3
L4
L3
L2
L1
M4
M3
M2
M1←
---
→
←
←
→
←
←
---
---
---
←
---
---
←
←
---
←
---
←
---
---
→
→
---
---
---
→PLUGS DIAGNOSTICS INPUT (1)
EGR POTENTIOMETER POSITION EARTH
PREHEATING RELAY CONTROL
EGR POTENTIOMETER POSITION SIGNAL INPUT
TURBOCHARGER PRESSURE INPUT SENSOR
SUPPLY RELAY CONTROL OUTPUT
AIR TEMPERATURE SENSOR INPUT
DIESEL PRESSURE INPUT SENSOR
+ AFTER IGNITION FEED
COOLANT TEMPERATURE SENSOR EARTH
EGR POTENTIOMETER POSITION SUPPLY
ENGINE SPEED SIGNAL SENSOR
AIR FLOW METER SUPPLY
FUEL TEMPERATURE SENSOR EARTH
AIR FLOW METER SIGNAL INPUT
ENGINE SPEED SIGNAL SENSOR
DIESEL PRESSURE SUPPLY SENSOR
FUEL TEMPERATURE INPUT
TURBOCHARGER PRESSURE SUPPLY SENSOR
COOLANT TEMPERATURE SENSOR INPUT
POWER EARTH
POWER EARTH
TURBO PRESSURE SOLENOID VALVE CONTROL OUTPUT
PRESSURE REGULATOR SOLENOID VALVE CONTROL OUTPUT
POWER EARTH
+ AFTER RELAY
+ AFTER RELAY
EGR SOLENOID CONTROL OUTPUT
Page 94 of 118
Downloaded from www.Manualslib.com manuals search engine DIESEL EQUIPMENT
Computer
13
13-43
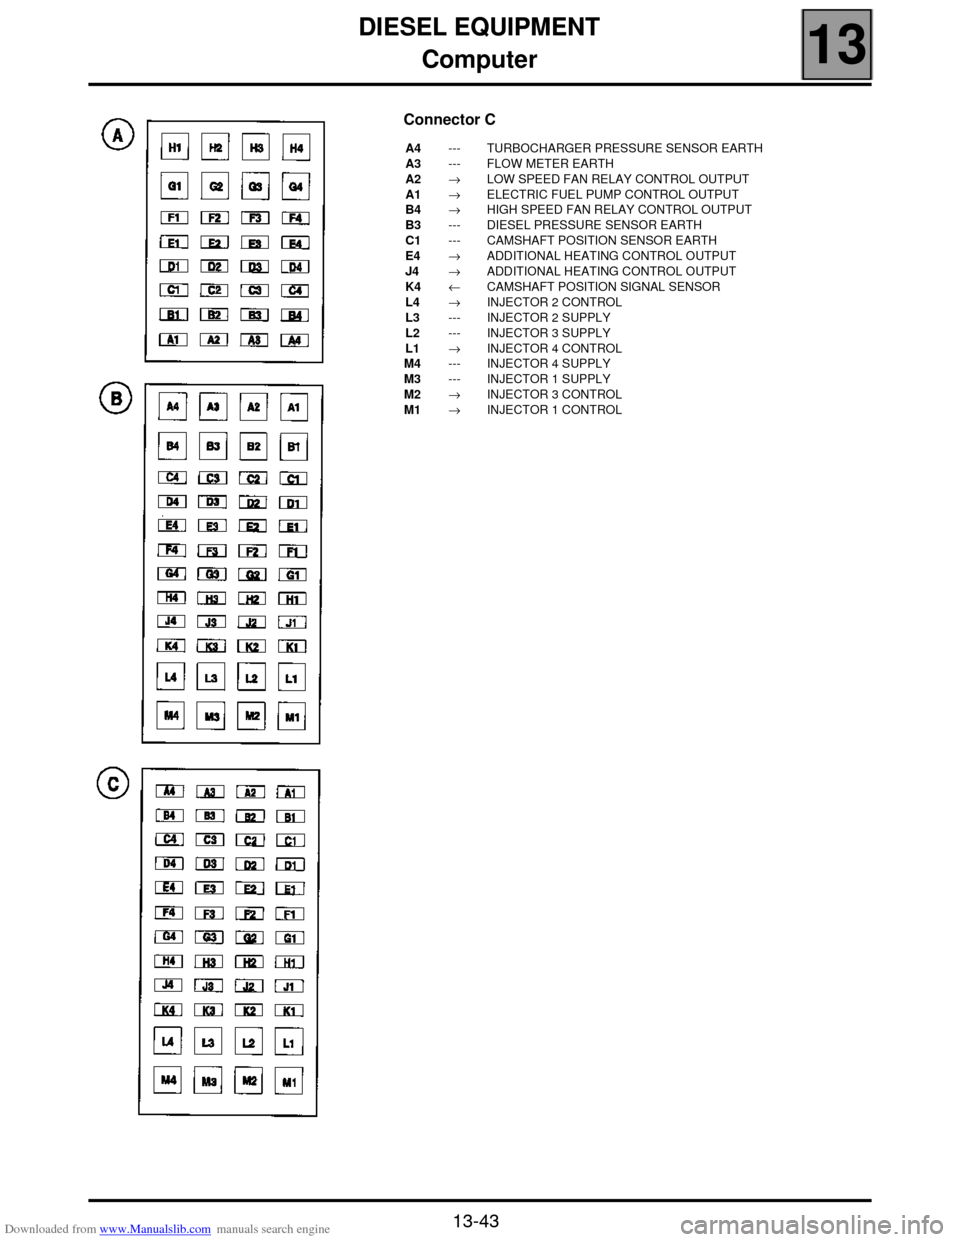
Connector C
A4
A3
A2
A1
B4
B3
C1
E4
J4
K4
L4
L3
L2
L1
M4
M3
M2
M1---
---
→
→
→
---
---
→
→
←
→
---
---
→
---
---
→
→TURBOCHARGER PRESSURE SENSOR EARTH
FLOW METER EARTH
LOW SPEED FAN RELAY CONTROL OUTPUT
ELECTRIC FUEL PUMP CONTROL OUTPUT
HIGH SPEED FAN RELAY CONTROL OUTPUT
DIESEL PRESSURE SENSOR EARTH
CAMSHAFT POSITION SENSOR EARTH
ADDITIONAL HEATING CONTROL OUTPUT
ADDITIONAL HEATING CONTROL OUTPUT
CAMSHAFT POSITION SIGNAL SENSOR
INJECTOR 2 CONTROL
INJECTOR 2 SUPPLY
INJECTOR 3 SUPPLY
INJECTOR 4 CONTROL
INJECTOR 4 SUPPLY
INJECTOR 1 SUPPLY
INJECTOR 3 CONTROL
INJECTOR 1 CONTROL
Page 95 of 118
Downloaded from www.Manualslib.com manuals search engine ANTIPOLLUTION
Oil vapour rebreathing
14
14-1
114ANTIPOLLUTION
Oil vapour rebreathing
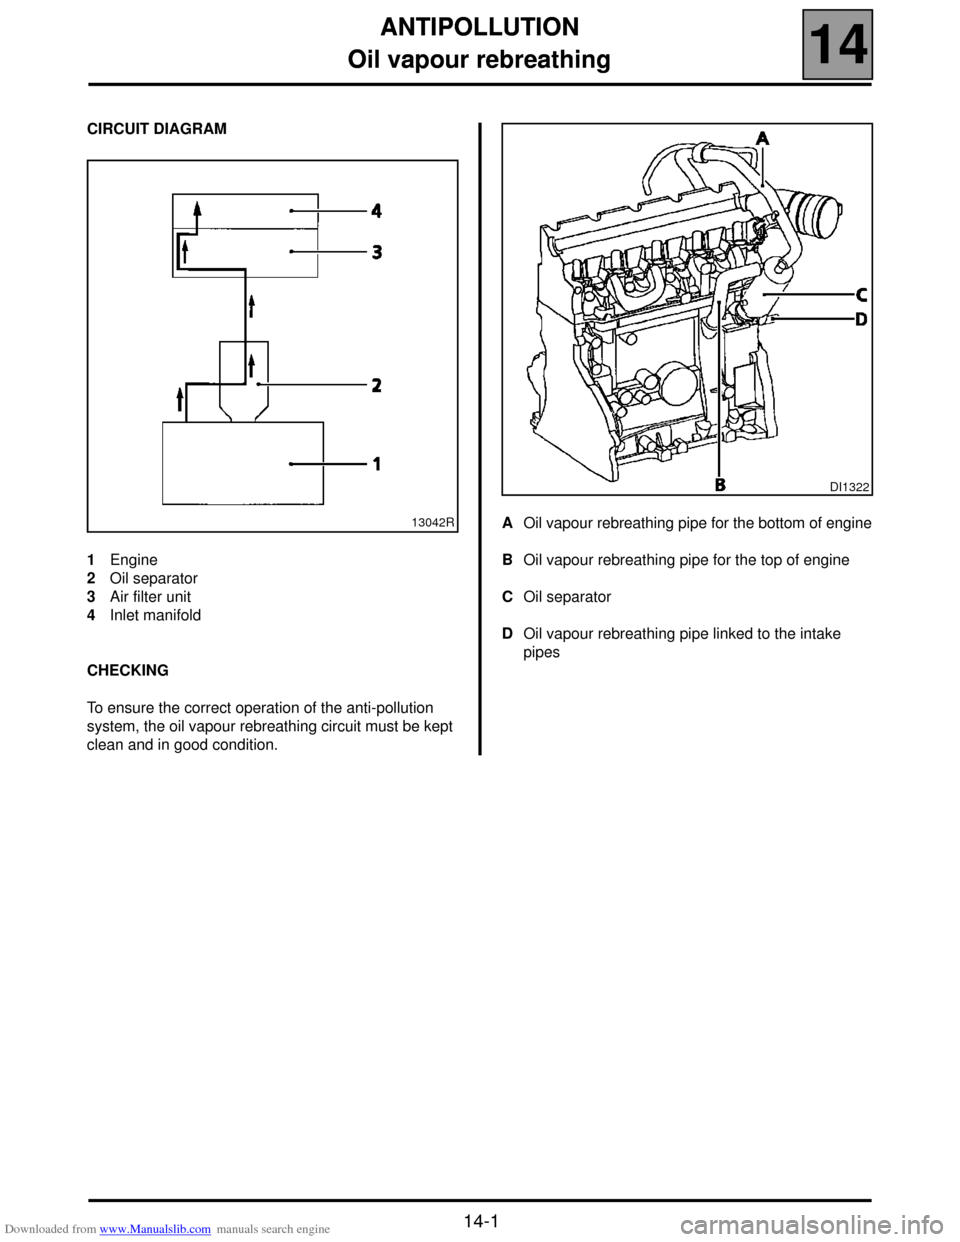
CIRCUIT DIAGRAM
1Engine
2Oil separator
3Air filter unit
4Inlet manifold
CHECKING
To ensure the correct operation of the anti-pollution
system, the oil vapour rebreathing circuit must be kept
clean and in good condition.AOil vapour rebreathing pipe for the bottom of engine
BOil vapour rebreathing pipe for the top of engine
COil separator
DOil vapour rebreathing pipe linked to the intake
pipes
13042R
DI1322
Page 96 of 118
Downloaded from www.Manualslib.com manuals search engine ANTIPOLLUTION
Exhaust gas recirculation
14
14-2
Exhaust gas recirculation
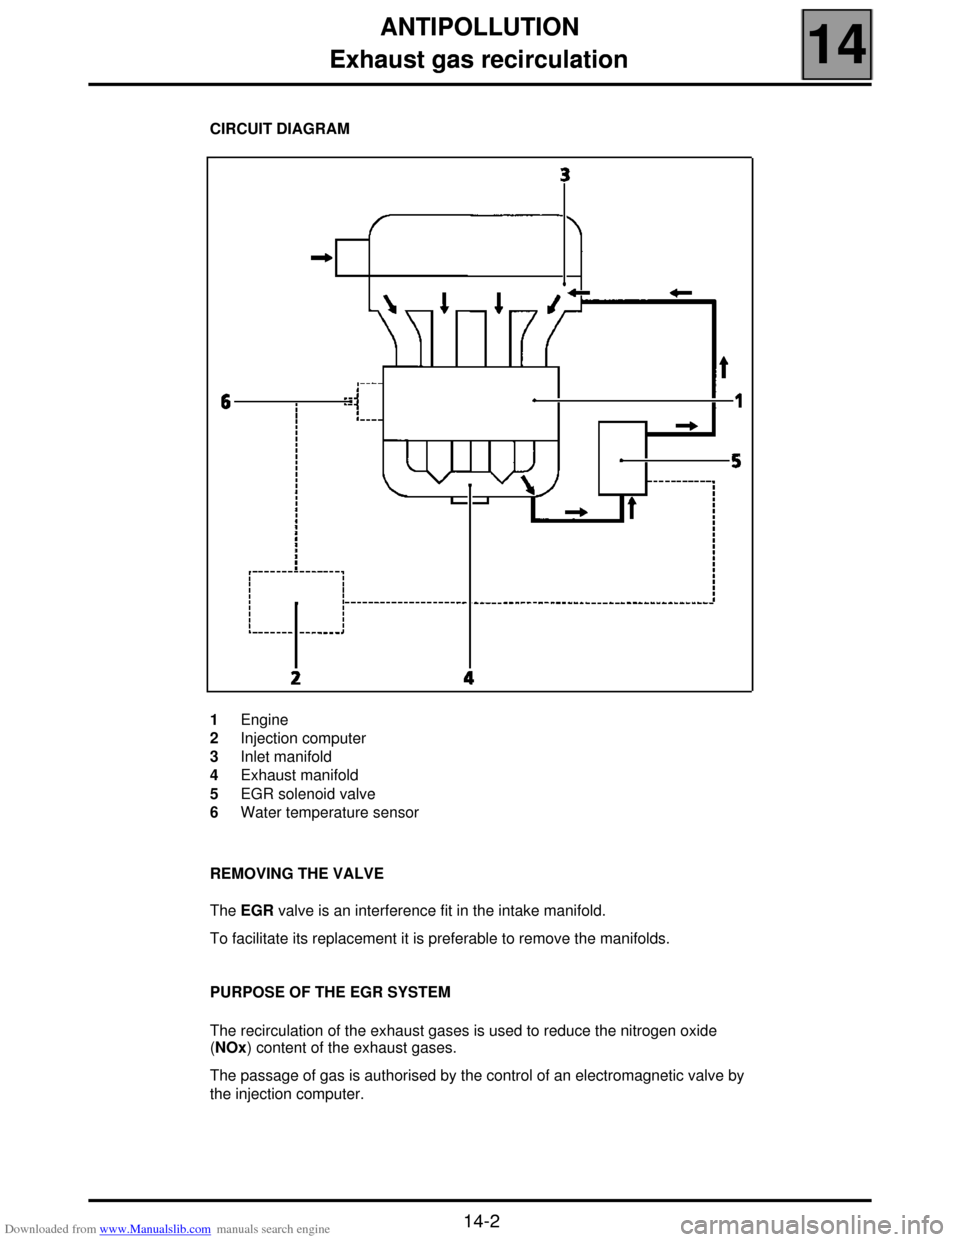
CIRCUIT DIAGRAM
1Engine
2Injection computer
3Inlet manifold
4Exhaust manifold
5EGR solenoid valve
6Water temperature sensor
REMOVING THE VALVE
The EGR valve is an interference fit in the intake manifold.
To facilitate its replacement it is preferable to remove the manifolds.
PURPOSE OF THE EGR SYSTEM
The recirculation of the exhaust gases is used to reduce the nitrogen oxide
(NOx) content of the exhaust gases.
The passage of gas is authorised by the control of an electromagnetic valve by
the injection computer.
Page 97 of 118
Downloaded from www.Manualslib.com manuals search engine ANTIPOLLUTION
Exhaust gas recirculation
14
14-3
OPERATING PRINCIPLE
The valve is controlled by an RCO signal issued by the
injection computer. The RCO signal permits
modulation of the opening of the valve, and
consequently, the quantity of exhaust gas directed
back towards the inlet manifold.
The computer continuously carries out a test to detect
the position of the EGR valve flap.
OPERATING CONDITIONS
The parameters which determine the actuation of the
EGR valve are as follows:
– the coolant temperature,
– the air temperature,
– the air pressure,
– the accelerator pedal position,
– the engine speed.
The EGR function is cut if:
– the battery voltage is less than 9 volts,
– the engine speed is greater than 3000 rpm.,
– a characteristics map (engine speed/load) exceeds a
given threshold,
– the vehicle speed is less than 12 km/h, the engine
speed is less than 1000 rpm and if the coolant
temperature is greater than 60 ˚C for 40 seconds.
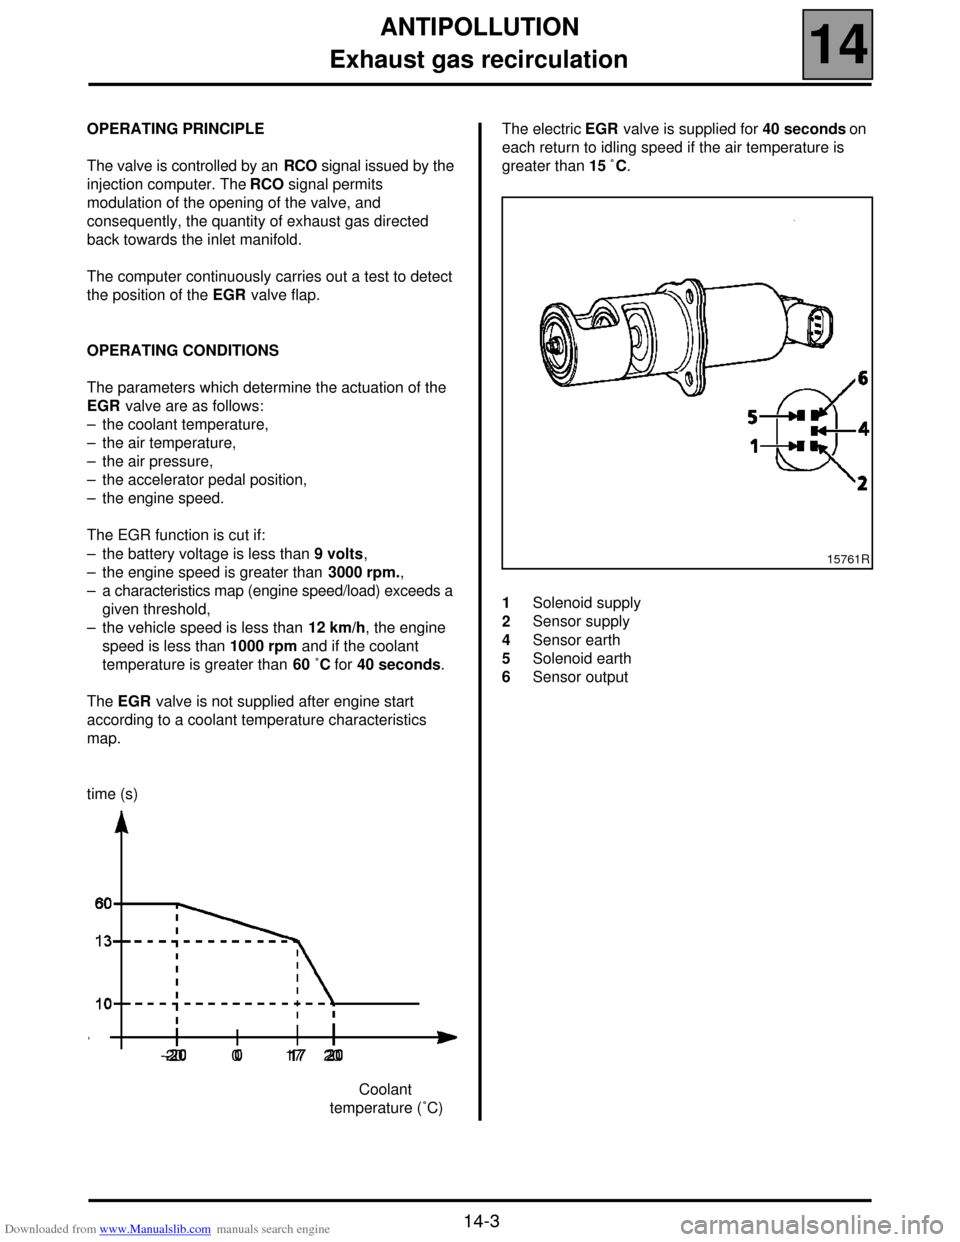
The EGR valve is not supplied after engine start
according to a coolant temperature characteristics
map.
time (s)The electric EGR valve is supplied for 40 seconds on
each return to idling speed if the air temperature is
greater than 15 ˚C.
Coolant
temperature (˚C)
15761R
1
2
4
5
6Solenoid supply
Sensor supply
Sensor earth
Solenoid earth
Sensor output
-20 0 17 20
Page 98 of 118

Downloaded from www.Manualslib.com manuals search engine STARTING - CHARGING
Alternator
16
116STARTING - CHARGING
Alternator
IDENTIFICATION
CHECKING
After 15 minutes warming up at a voltage of 13.5 volts. Type Engine Alternator Current
XA0 5 F9Q 732
SG 10 B010
SG 10 B011
A13VI252
A11VI88120 A
80 A
75 A
Rpm. 75 Amps 80 Amps 120 Amps
1 000 40 54 -
1 500 - - 26
2 000 68 75 -
3 000 71 80 -
4 000 72 82 94
6 000 - - 105
16-1
Page 99 of 118
Downloaded from www.Manualslib.com manuals search engine STARTING - CHARGING
Alternator
16
16-2
REMOVAL
Put the vehicle on a 2 post lift.
Disconnect the battery as well as all electrical
connections on the alternator.
Separate the diesel filter from its mounting and
remove.
Unclip the power steering reservoir.
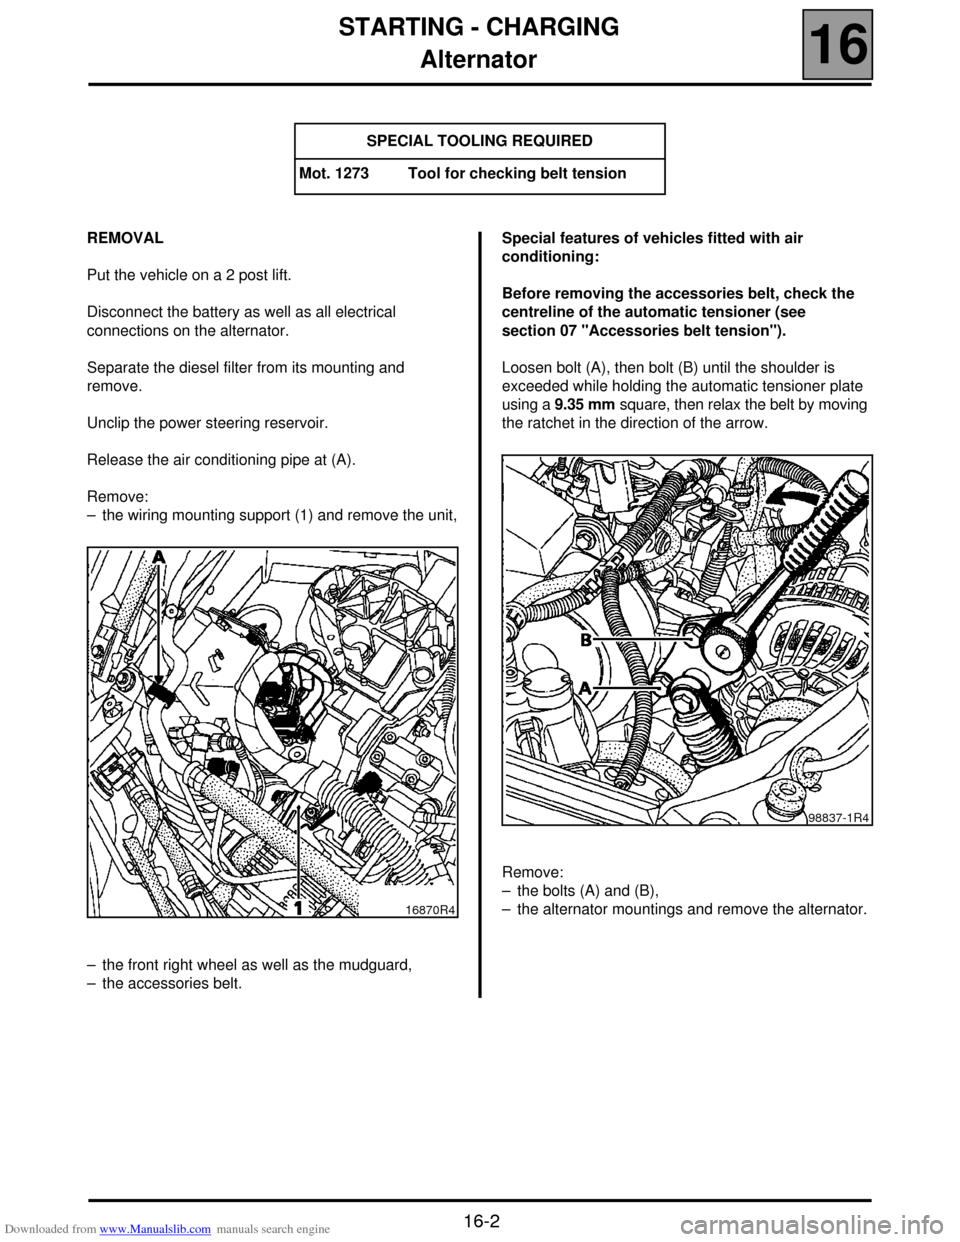
Release the air conditioning pipe at (A).
Remove:
– the wiring mounting support (1) and remove the unit,
– the front right wheel as well as the mudguard,
– the accessories belt.Special features of vehicles fitted with air
conditioning:
Before removing the accessories belt, check the
centreline of the automatic tensioner (see
section 07 "Accessories belt tension").
Loosen bolt (A), then bolt (B) until the shoulder is
exceeded while holding the automatic tensioner plate
using a 9.35 mm square, then relax the belt by moving
the ratchet in the direction of the arrow.
Remove:
– the bolts (A) and (B),
– the alternator mountings and remove the alternator. SPECIAL TOOLING REQUIRED
Mot. 1273 Tool for checking belt tension
16870R4
98837-1R4
Page 100 of 118
Downloaded from www.Manualslib.com manuals search engine STARTING - CHARGING
Alternator
16
16-3
REFITTING (special notes)
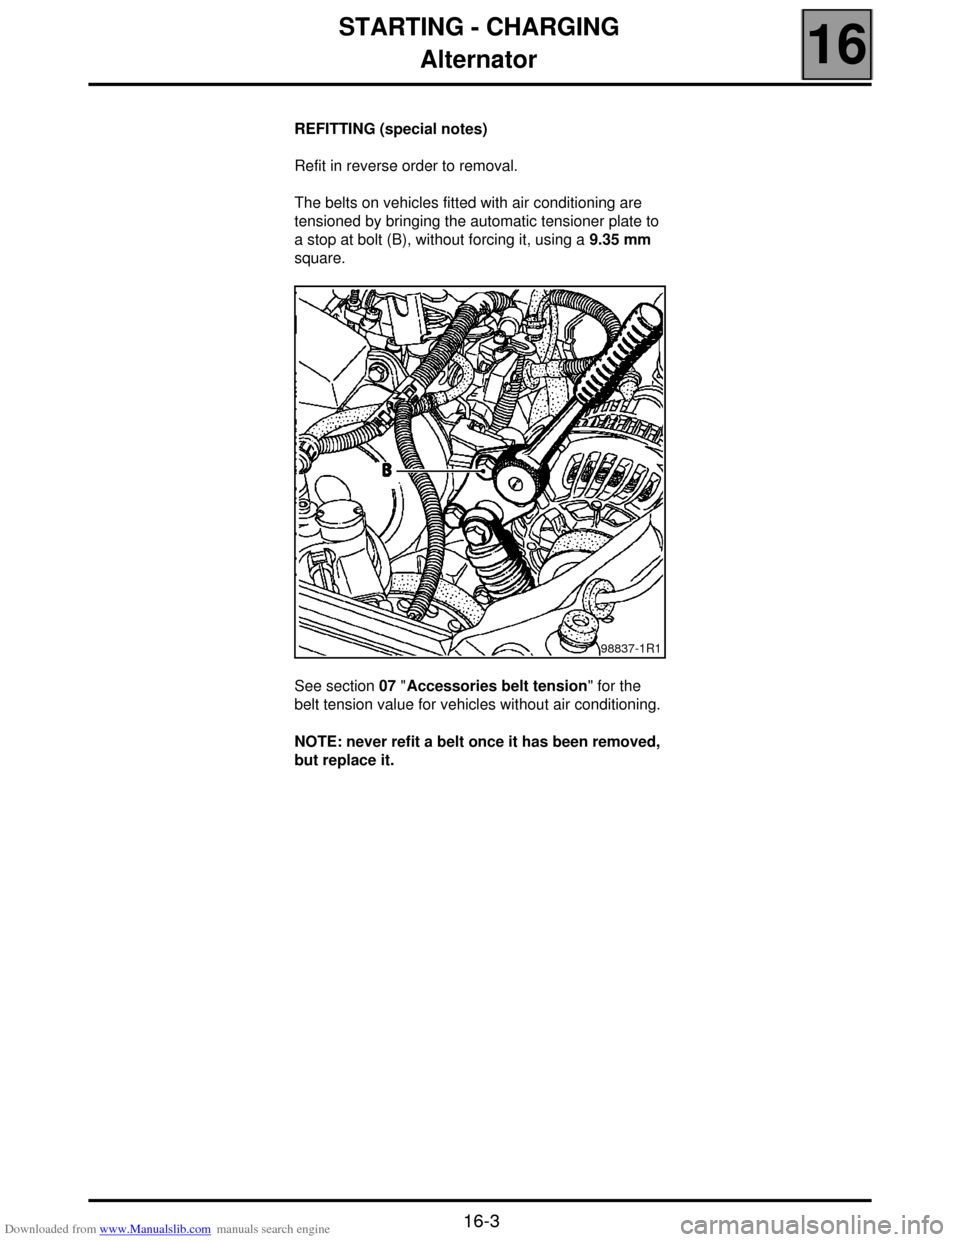
Refit in reverse order to removal.
The belts on vehicles fitted with air conditioning are
tensioned by bringing the automatic tensioner plate to
a stop at bolt (B), without forcing it, using a 9.35 mm
square.
See section 07 "Accessories belt tension" for the
belt tension value for vehicles without air conditioning.
NOTE: never refit a belt once it has been removed,
but replace it.
98837-1R1