technical data Seat Altea 2010 Owner's Guide
[x] Cancel search | Manufacturer: SEAT, Model Year: 2010, Model line: Altea, Model: Seat Altea 2010Pages: 310, PDF Size: 7.46 MB
Page 45 of 310
Airbag system43
Safety First
Operating instructions
Practical tips
Technical Data
•There must be no other persons, animals or objects between the occu-
pants of the outer seats and the deployment space of the curtain airbags
so that the curtain airbag can deploy without restriction and provide the
greatest possible protection. Therefore, sun blinds which have not been
expressly approved for use in your vehicle may not be attached to the side
windows ⇒page 218, “Accessories, replacement of parts and modifica-
tions”.•The built-in coat hooks should be used only for lightweight clothing. Do
not leave any heavy or sharp-edged objects in the pockets. Please, do not
hang the clothes on coat hangers.•The airbags provide protection for just one accident; replace them once
they have deployed.•Any work on the curtain airbag system or removal and installation of
the airbag components for other repairs (such as removal of the roof lining)
should only be performed by a qualified workshop. Otherwise, faults may
occur during the airbag system operation.•Do not attempt to modify components of the airbag system in any way.•The side and head airbags are managed through sensors located in the
interior of the front doors. To ensure the correct functioning of the side and
head airbags neither the doors nor the door panels should be modified in
any way (e.g. fitting loudspeakers). If the front door is damaged, the airbag
system may not work correctly. All work carried out on the front door must
be made in a qualified workshop.WARNING (continued)
altea_EN Seite 43 Mittwoch, 26. August 2009 6:00 18
Page 47 of 310
Airbag system45
Safety First
Operating instructions
Practical tips
Technical Data
– Check that the warning lamp on the instrument panel does
⇒page 44, fig. 27 not light up when the ignition is switched on
⇒ .
WARNING
•The driver is responsible for the proper position of the key-operated
switch. •You should deactivate the front passenger airbag only when, in excep-
tional cases, you have to use a rear-facing child seat ⇒page 46, “Child
safety”•Never install a child seat facing backwards (or rear-facing) on the front
passenger seat unless the front passenger airbag has been disabled. This
represents a risk of fatal injuries to the child! However, if it is necessary in
exceptional circumstances to transport a child in a rear-facing child seat on
the front passenger seat, you must always disable the front passenger
airbag.•As soon as the child seat is no longer needed on the front passenger
seat, enable the front passenger airbag again.•Only deactivate the passenger airbag when the ignition is off, other-
wise a fault may occur in the airbag system, this will create a danger that
in case of an accident, the airbag does not deploy properly or does not
deploy at all.•When the passenger airbag is deactivated, if the warning lamp AIRBAG
OFF is not continuously lit up when the front passenger airbag is disabled,
there may be a fault in the airbag system:
−Have the airbag system inspected immediately by a qualified work-
shop.
− Do not use a child seat on the front passenger seat! The front
passenger airbag could be triggered despite the fact that there is a fault
in the system and, as a result, a child could sustain serious or fatal inju-
ries. −
It is predictable whether the front passenger airbag will deploy
during an accident! Warn all your passengers of this.
•When using the ignition key to activate / deactivate the passenger front
airbag, only the passenger front airbag will be activated / deactivated. The
side airbag and head airbag on the passenger side will remain active.WARNING (continued)
altea_EN Seite 45 Mittwoch, 26. August 2009 6:00 18
Page 49 of 310
Child safety47
Safety First
Operating instructions
Practical tips
Technical Data
Safety notes on using child seats
Proper use of child seats substantially reduces the risk of
injury in an accident!As the driver, you are responsible for any children you transport in
your vehicle.
– Protect your children by properly using appropriate child seats
⇒page 48.
– Always ensure that the belt webbing is properly positioned according to the instructions prov ided by the manufacturer of the
child seat.
– When travelling, do not allow children to distract you from traffic.
– Take breaks regularly during long trips. Take a break at least every two hours.
WARNING
•Never install a child seat facing backwards (or rear-facing) on the front
passenger seat unless the front passenger airbag has been disabled. This
could lead to a risk of potentially fatal injuries to the child! However, if it is
necessary, in exceptional cases, to transport a child in the front passenger
seat, the front passenger airbag must always be disabled ⇒page 44,
“Deactivating airbags*”. If the passenger seat has a height adjustment
option, move it to the highest position.•For those vehicles that do not include a key lock switch to turn the
airbag off, an Authorised Service Centre must be consulted.•All passengers, especially children, must assume the proper sitting
position and be properly belted in while travelling.
•Never hold children or babies on your lap, this can result in potentially
fatal injuries to the child!•Never allow a child to be transported in a vehicle without being properly
secured, or to stand up or kneel on a seat while travelling. In an accident,
the child could be flung through the vehicle, causing possibly fatal injuries
to themselves and to the other passengers.•If children assume an improper sitting position when the car is moving,
they expose themselves to greater risk of injury in the event of sudden
braking manoeuvre or in an accident. This is particularly important if the
child is travelling on the front passenger seat and the airbag system is trig-
gered in an accident; as this could cause serious injury or even death.•A suitable child seat can protect your child!•Never leave an unsupervised child alone on a child seat or in the
vehicle.•Depending on weather conditions, it may become extremely hot or cold
inside the vehicle. This can be fatal.•Children who are less than 1.5 metres tall must not wear a normal seat
belt without a child restraint system, as this could cause injuries to the
abdominal and neck areas during a sudden braking manoeuvre or in an
accident.•Do not allow the belt webbing to become twisted or jammed, or to rub
on any sharp edges.•Incorrectly worn seat belts can cause injuries even in a minor collision
or in sudden braking manoeuvres.•The seat belt provides maximum protection only when the belt web is
properly positioned ⇒page 24, “Seat belts”.•Only one child may occupy a child seat ⇒page 48, “Child seats”.WARNING (continued)
altea_EN Seite 47 Mittwoch, 26. August 2009 6:00 18
Page 51 of 310
Child safety49
Safety First
Operating instructions
Practical tips
Technical Data
Group 1 child seats
A suitable child seat and a correctly adjusted seat belt can
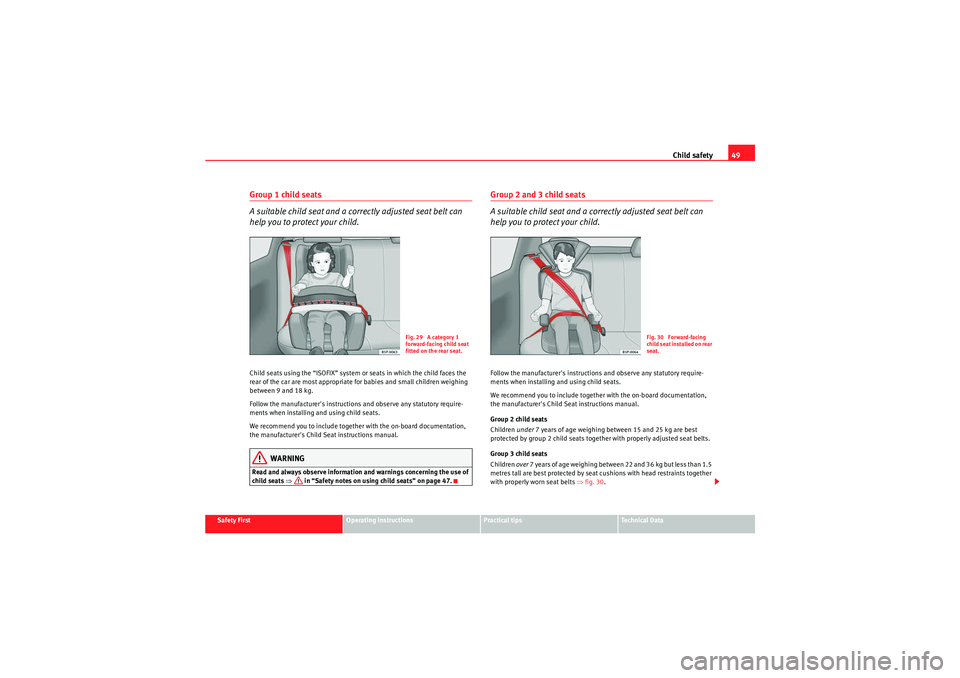
help you to protect your child.Child seats using the “ISOFIX” system or seats in which the child faces the
rear of the car are most appropriate for babies and small children weighing
between 9 and 18 kg.
Follow the manufacturer's instructions and observe any statutory require-
ments when installing and using child seats.
We recommend you to include together with the on-board documentation,
the manufacturer's Child Seat instructions manual.
WARNING
Read and always observe information and warnings concerning the use of
child seats ⇒ in “Safety notes on using child seats” on page 47.
Group 2 and 3 child seats
A suitable child seat and a correctly adjusted seat belt can
help you to protect your child.Follow the manufacturer's instructions and observe any statutory require-
ments when installing and using child seats.
We recommend you to include together with the on-board documentation,
the manufacturer's Child Seat instructions manual.
Group 2 child seats
Children under 7 years of age weighing between 15 and 25 kg are best
protected by group 2 child seats together with properly adjusted seat belts.
Group 3 child seats
Children over 7 years of age weighing between 22 and 36 kg but less than 1.5
metres tall are best protected by seat cushions with head restraints together
with properly worn seat belts ⇒ fig. 30.
Fig. 29 A category 1
forward-facing child seat
fitted on the rear seat.
Fig. 30 Forward-facing
child seat installed on rear
seat.
altea_EN Seite 49 Mittwoch, 26. August 2009 6:00 18
Page 53 of 310
Child safety51
Safety First
Operating instructions
Practical tips
Technical Data
Securing child seatsWays to secure a child seat
A child seat can be secured differently on the rear seat and on
the front passenger seat.You can secure a child seat to the rear seat or front passenger seat in the
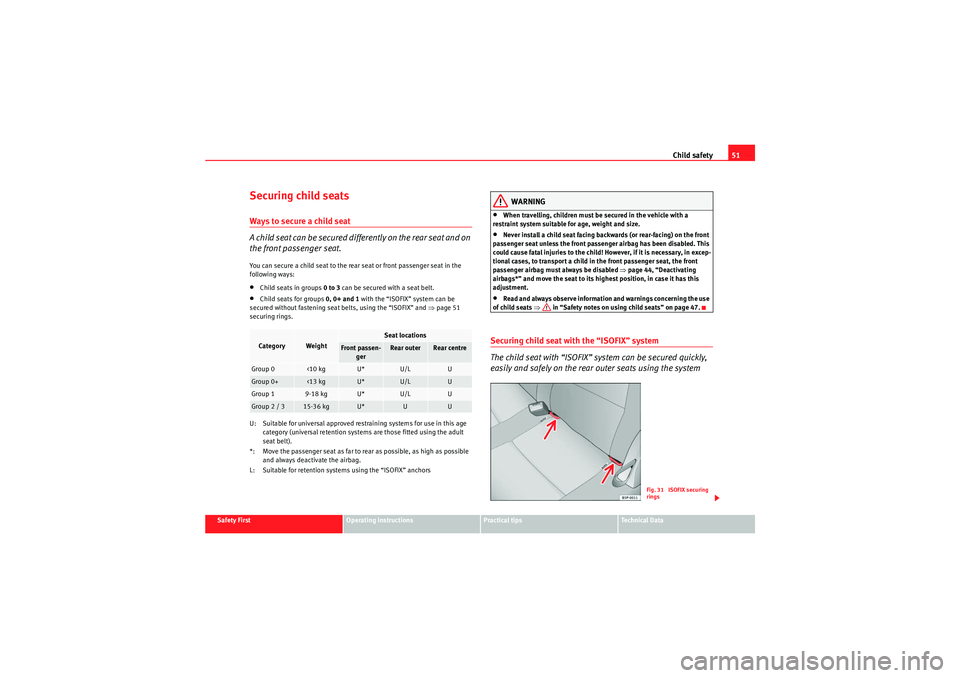
following ways:•Child seats in groups 0 to 3 can be secured with a seat belt.•Child seats for groups 0, 0+ and 1 with the “ISOFIX” system can be
secured without fastening seat belts, using the “ISOFIX” and ⇒page 51
securing rings.
U: Suitable for universal approved restraining systems for use in this age category (universal retention systems are those fitted using the adult
seat belt).
*: Move the passenger seat as far to rear as possible, as high as possible and always deactivate the airbag.
L: Suitable for retention systems using the “ISOFIX” anchors
WARNING
•When travelling, children must be secured in the vehicle with a
restraint system suitable for age, weight and size.•Never install a child seat facing backwards (or rear-facing) on the front
passenger seat unless the front passenger airbag has been disabled. This
could cause fatal injuries to the child! However, if it is necessary, in excep-
tional cases, to transport a child in the front passenger seat, the front
passenger airbag must always be disabled ⇒page 44, “Deactivating
airbags*” and move the seat to its highest position, in case it has this
adjustment.•Read and always observe information and warnings concerning the use
of child seats ⇒ in “Safety notes on using child seats” on page 47.
Securing child seat with the “ISOFIX” system
The child seat with “ISOFIX” system can be secured quickly,
easily and safely on the rear outer seats using the system
Category
Weight
Seat locations
Front passen-
ger
Rear outer
Rear centre
Group 0
<10 kg
U*
U/L
U
Group 0+
<13 kg
U*
U/L
U
Group 1
9-18 kg
U*
U/L
U
Group 2 / 3
15-36 kg
U*
U
U
Fig. 31 ISOFIX securing
rings
altea_EN Seite 51 Mittwoch, 26. August 2009 6:00 18
Page 55 of 310
53
Safety First
Operating instructions
Practical tips
Technical Data
altea_EN Seite 53 Mittwoch, 26. August 2009 6:00 18
Page 57 of 310
Cockpit55
Safety First
Operating instructions
Practical tips
Technical Data
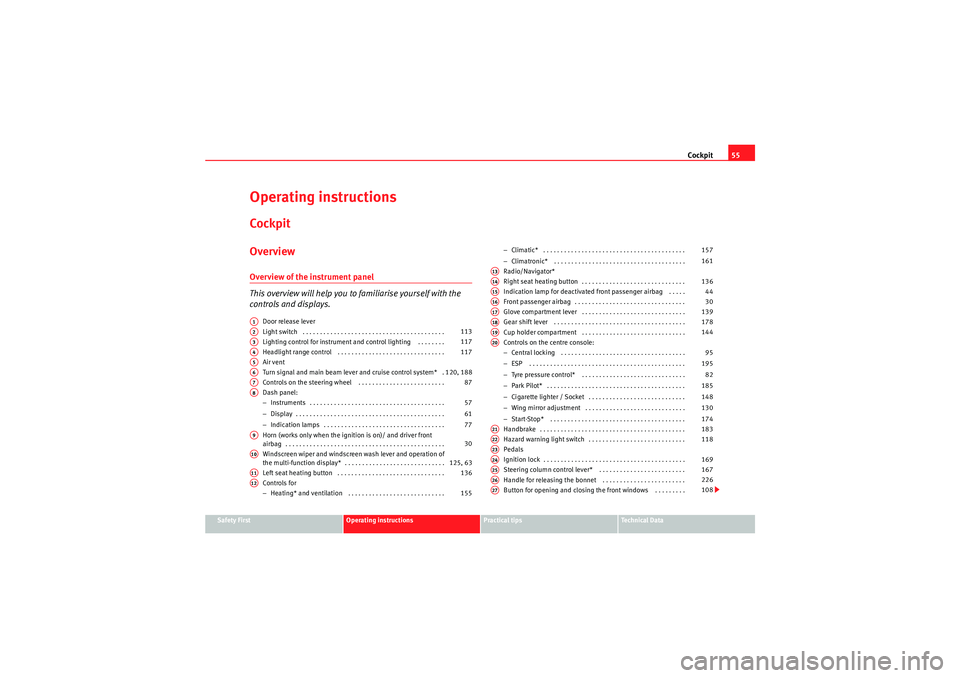
Operating instructionsCockpitOverviewOverview of the instrument panel
This overview will help you to familiarise yourself with the
controls and displays.
Door release lever
Light switch . . . . . . . . . . . . . . . . . . . . . . . . . . . . . . . . . . . . . . . . .
Lighting control for instrument and control lighting . . . . . . . .
Headlight range control . . . . . . . . . . . . . . . . . . . . . . . . . . . . . . .
Air vent
Turn signal and main beam lever and cruise control system* .
Controls on the steering wheel . . . . . . . . . . . . . . . . . . . . . . . . .
Dash panel:
−Instruments . . . . . . . . . . . . . . . . . . . . . . . . . . . . . . . . . . . . . . .
− Display . . . . . . . . . . . . . . . . . . . . . . . . . . . . . . . . . . . . . . . . . . .
− Indication lamps . . . . . . . . . . . . . . . . . . . . . . . . . . . . . . . . . . .
Horn (works only when the ignition is on)/ and driver front
airbag . . . . . . . . . . . . . . . . . . . . . . . . . . . . . . . . . . . . . . . . . . . . . .
Windscreen wiper and windscreen wash lever and operation of
the multi-function display* . . . . . . . . . . . . . . . . . . . . . . . . . . . . .
Left seat heating button . . . . . . . . . . . . . . . . . . . . . . . . . . . . . . .
Controls for
− Heating* and ventilation . . . . . . . . . . . . . . . . . . . . . . . . . . . . −
Climatic* . . . . . . . . . . . . . . . . . . . . . . . . . . . . . . . . . . . . . . . . .
− Climatronic* . . . . . . . . . . . . . . . . . . . . . . . . . . . . . . . . . . . . . .
Radio/Navigator*
Right seat heating button . . . . . . . . . . . . . . . . . . . . . . . . . . . . . .
Indication lamp for deactivated front passenger airbag . . . . .
Front passenger airbag . . . . . . . . . . . . . . . . . . . . . . . . . . . . . . . .
Glove compartment lever . . . . . . . . . . . . . . . . . . . . . . . . . . . . . .
Gear shift lever . . . . . . . . . . . . . . . . . . . . . . . . . . . . . . . . . . . . . .
Cup holder compartment . . . . . . . . . . . . . . . . . . . . . . . . . . . . . .
Controls on the centre console:
− Central locking . . . . . . . . . . . . . . . . . . . . . . . . . . . . . . . . . . . .
− ESP . . . . . . . . . . . . . . . . . . . . . . . . . . . . . . . . . . . . . . . . . . . . .
− Tyre pressure control* . . . . . . . . . . . . . . . . . . . . . . . . . . . . . .
− Park Pilot* . . . . . . . . . . . . . . . . . . . . . . . . . . . . . . . . . . . . . . . .
− Cigarette lighter / Socket . . . . . . . . . . . . . . . . . . . . . . . . . . . .
− Wing mirror adjustment . . . . . . . . . . . . . . . . . . . . . . . . . . . . .
− Start-Stop* . . . . . . . . . . . . . . . . . . . . . . . . . . . . . . . . . . . . . . .
Handbrake . . . . . . . . . . . . . . . . . . . . . . . . . . . . . . . . . . . . . . . . . .
Hazard warning light switch . . . . . . . . . . . . . . . . . . . . . . . . . . . .
Pedals
Ignition lock . . . . . . . . . . . . . . . . . . . . . . . . . . . . . . . . . . . . . . . . .
Steering column control lever* . . . . . . . . . . . . . . . . . . . . . . . . .
Handle for releasing the bonnet . . . . . . . . . . . . . . . . . . . . . . . .
Button for opening and closing the front windows . . . . . . . . .
A1A2
113
A3
117
A4
117
A5A6
120, 188
A7
87
A8
57
61
77
A9
30
A10
125, 63
A11
136
A12
155 157
161
A13A14
136
A15
44
A16
30
A17
139
A18
178
A19
144
A20
95
195 82
185
148
130
174
A21
183
A22
118
A23A24
169
A25
167
A26
226
A27
108
altea_EN Seite 55 Mittwoch, 26. August 2009 6:00 18
Page 59 of 310
Cockpit57
Safety First
Operating instructions
Practical tips
Technical Data
InstrumentsInstrument overview
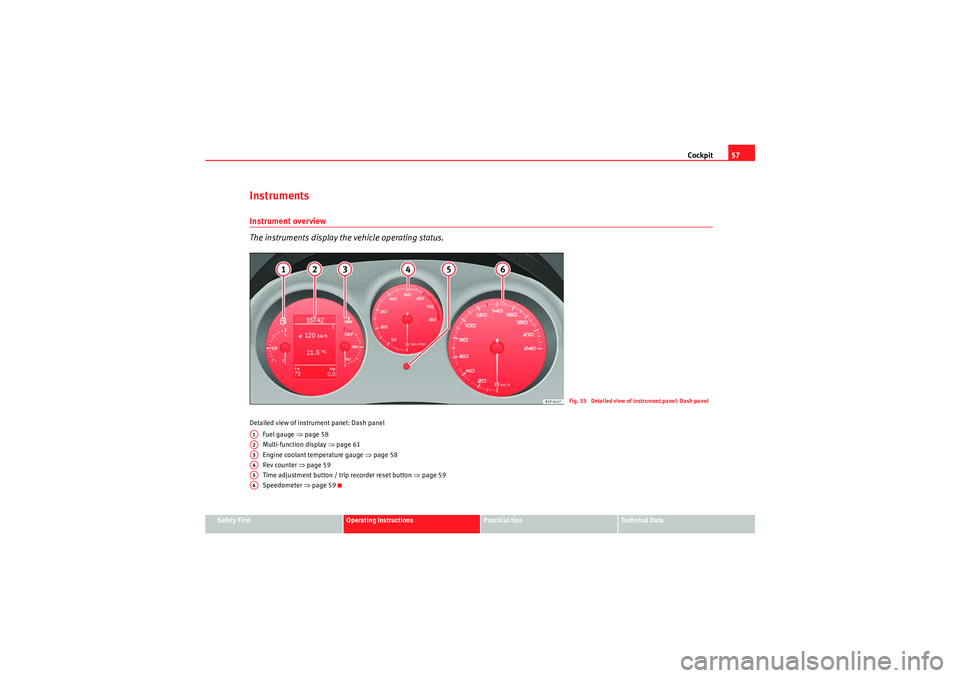
The instruments display the vehicle operating status.Detailed view of instrument panel: Dash panel
Fuel gauge ⇒page 58
Multi-function display ⇒page 61
Engine coolant temperature gauge ⇒page 58
Rev counter ⇒page 59
Time adjustment button / trip recorder reset button ⇒page 59
Speedometer ⇒page 59
Fig. 33 Detailed view of instrument panel: Dash panel
A1A2A3A4A5A6
altea_EN Seite 57 Mittwoch, 26. August 2009 6:00 18
Page 61 of 310
Cockpit59
Safety First
Operating instructions
Practical tips
Technical Data
Stop the car and switch off the engine.
Check the coolant level ⇒page 233
⇒ .
Even if the coolant level is correct do not continue driving. You should obtain
technical assistance.
WARNING
When working in the engine compartment, always observe the safety warn-
ings ⇒page 226.
Caution
Accessories in front of the air inlet reduce the cooling effect of the coolant. At
high outside temperatures and high engine loads, there is a risk of the
engine overheating.Rev counter
The rev. counter displays the engine speed in revolutions per
minute.The start of the red zone ⇒page 57, fig. 33 indicates the maximum
engine speed operating at service temperature. However, it is advisable to
change up a into a higher gear, move the selector lever to D or lift your foot
off the accelerator before the needle reaches the red zone.
Caution
The rev counter needle must never enter the red zone on the scale. Risk of
engine damage.
For the sake of the environment
Changing up into higher gears early will help you to save fuel and minimise
engine noise.SpeedometerThe speedometer is equipped with a digital odometer and a trip counter, in
addition to a service intervals display.
During the running-in period, the instructions shown on ⇒page 200 should
be followed.Setting the digital clock*
The digital clock is located in the dash panel display.– Turn the setting knob ⇒ page 57, fig. 33 clockwise until the
first “click” to set the hour. The hour will flash. To change the
hour, press the button.
– Turn the setting knob clockwise to the second “click” to set the minutes. The minutes will flash. To change the minutes, press the
button.
A4
A5
altea_EN Seite 59 Mittwoch, 26. August 2009 6:00 18
Page 63 of 310
Cockpit61
Safety First
Operating instructions
Practical tips
Technical Data
Note
•The values shown in the average fuel consumption and the fuel remaining
displays on the MFA display
5) on the dash panel insert are approximate value
only.
•Please check the fuel level on the petrol tank fuel level indicator on the
dash panel ⇒ page 58.•If frequent short journeys are made, especially when the outside temper-
ature is low, the vehicle will tend to run on petrol more often than on LPG.
Therefore, the petrol tank may empty before the LPG tank.
Digital display in the dash panelDisplay (without warning or information texts)
The display in the dash panel shows, amongst other things,
the mileage and trip recorder as well as the selector lever
position.
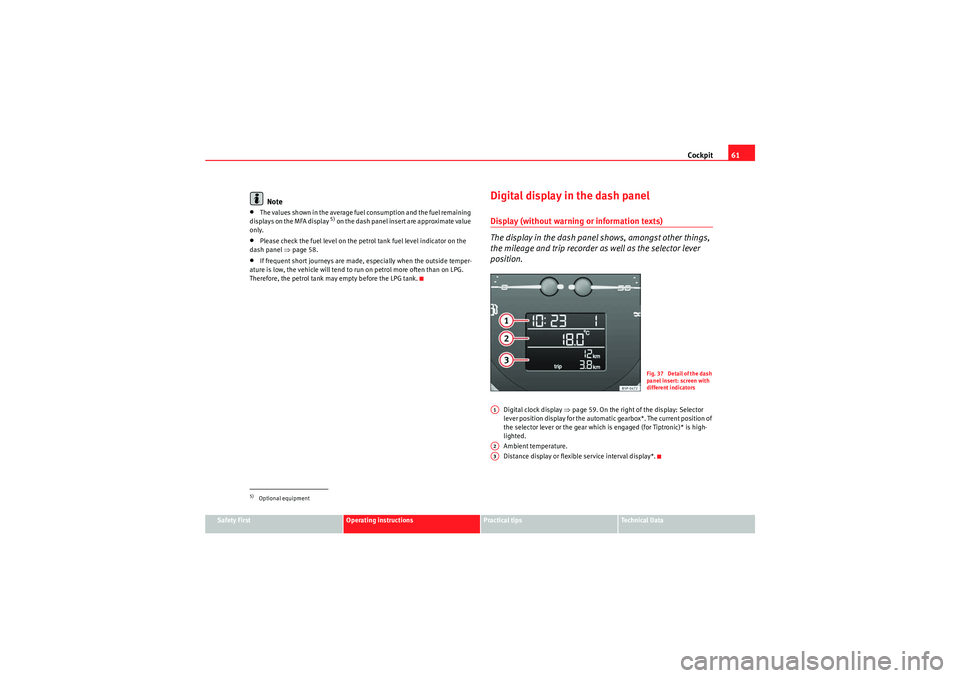
Digital clock display ⇒page 59. On the right of the display: Selector
lever position display for the automatic gearbox*. The current position of
the selector lever or the gear which is engaged (for Tiptronic)* is high-
lighted.
Ambient temperature.
Distance display or flexible service interval display*.
5)Optional equipment
Fig. 37 Detail of the dash
panel insert: screen with
different indicators
A1A2A3
altea_EN Seite 61 Mittwoch, 26. August 2009 6:00 18