technical data Seat Altea 2010 Owner's Guide
[x] Cancel search | Manufacturer: SEAT, Model Year: 2010, Model line: Altea, Model: Seat Altea 2010Pages: 310, PDF Size: 7.46 MB
Page 65 of 310
Cockpit63
Safety First
Operating instructions
Practical tips
Technical Data
Service interval display
A
Service pre-warning will appear in the mileage displays if a service is due
soon. A “spanner” symbol appears and the display “km” with the distance
that can be driven until the next service appointment is due. The display will
change after approximately 10 seconds. A “clock symbol” appears and the
number of days until the service appointment should be carried out. The
following message is shown in the dash panel display: SERV. IN... KM OR...
DAYS . The service message will disappear approximately 20 seconds after
the ignition is switched on or the engine is running. The normal display can
be resumed by pressing the reset button on the trip counter or by pressing the
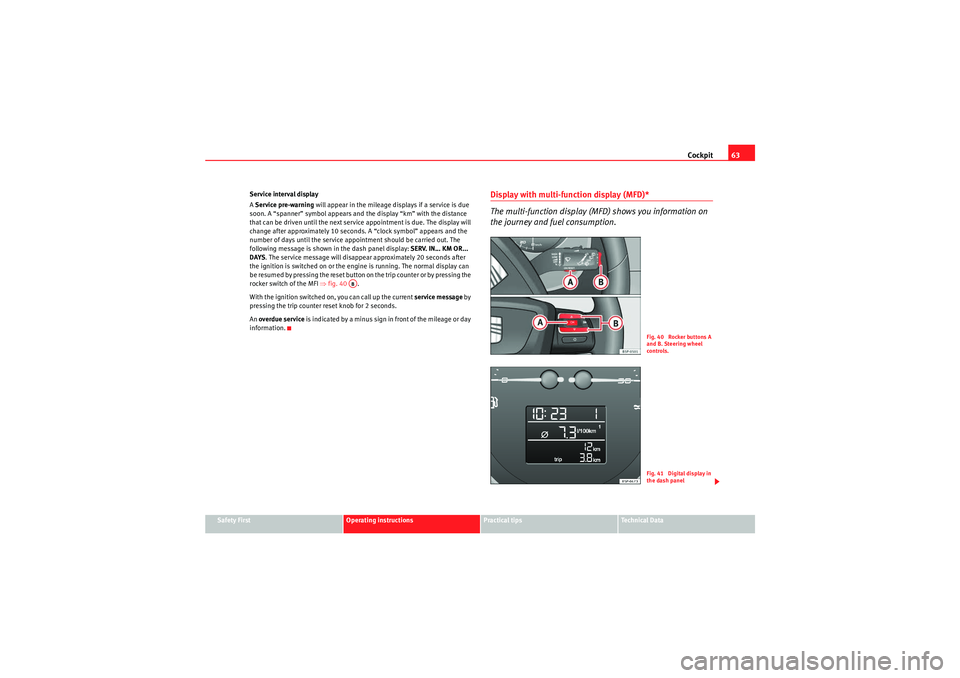
rocker switch of the MFI ⇒fig. 40 .
With the ignition switched on, you can call up the current service message by
pressing the trip counter reset knob for 2 seconds.
An overdue service is indicated by a minus sign in front of the mileage or day
information.
Display with multi-function display (MFD)*
The multi-function display (MFD) shows you information on
the journey and fuel consumption.
AB
Fig. 40 Rocker buttons A
and B. Steering wheel
controls.Fig. 41 Digital display in
the dash panel
altea_EN Seite 63 Mittwoch, 26. August 2009 6:00 18
Page 67 of 310
Cockpit65
Safety First
Operating instructions
Practical tips
Technical Data
Memory displays
•Driving speed•Journey duration•Average speed•Distance•Distance to empty (the distance you can travel with the remaining fuel)•Average fuel consumption•Current fuel consumption•Ambient temperature display•Speed warning
km/h - Driving speed
Driving speed is digitally shown on the display.
min - Journey duration
The display shows the amount of time which has elapsed since the ignition
was switched on.
The maximum display value in both memories is 19 hours and 59 minutes.
The memory will automatically be deleted once this value has been reached.
Økm/h - Average speed
The average speed will be shown after running a distance of approximately
100 metres. Dashes will appear in the display until that time. The display will
be updated every 5 seconds while the vehicle is in motion.
km - Distance travelled
The display shows the distance travelled since the ignition was switched on.
The maximum display value in both memories is 1,999 km. The memory will
automatically be deleted once this value has been reached.
Km - Fuel range
The fuel range is calculated using the figures for tank content and current fuel
consumption. It shows how far the vehicle can travel using the same condi-
tions as a reference.
Ø litre/100 km - Average fuel consumption
The average fuel consumption will be shown ⇒page 64, fig. 43 after a
distance of approximately 100 metres has been travelled. Dashes will appear
in the display until that time. The display will be updated every 5 seconds
while the vehicle is in motion. The amount of fuel used will not be shown.
ltr/100 km or ltr/hr - Current fuel consumption
The display will show the current fuel consumption in litre/km whilst the
vehicle is in motion or in litre/hour when the vehicle is in a stationary position
with the engine running.
Using this display you can see how your driving style affects fuel consump-
tion ⇒page 202.
Ambient temperature display
The measurement margin extends from -45°C to +58°C. At temperatures
lower than +4°C, an “ice crystal symbol” is displayed and a “warning” sounds
if the vehicle is moving at more than 20 km/h (ice warning). This symbol will
flash for about 10 seconds and remains lit until the exterior temperature rises
above +4°C or 6°C if it was already lit.
Set speed indicator
When driving at the required speed, enter the speed indicator mode and
press the button (Reset), the display remembers the indicated speed. If
the indicated speed is exceeded, a warning text is displayed on the screen
6)
and a warning signal sounds.
This may be deactivated by pressing the button (Reset).
6)Depending on the model version, the message on the screen may vary and may be
represented by flashing of the speed indication or by a speed message.
AA
AA
altea_EN Seite 65 Mittwoch, 26. August 2009 6:00 18
Page 69 of 310
Cockpit67
Safety First
Operating instructions
Practical tips
Technical Data
If several priority 2 warning reports are detected at the same time, the
symbols are displayed one after the other for about 2 seconds at a time. After
a set time, the information text will disappear and the symbol will be shown
as a reminder at the side of the display.
Priority 2
warning reports will not be shown until all Priority 1 warning
reports have been dealt with!
Examples of priority 2 warning reports (yellow):
7)
•Fuel warning light with the information text PLEASE REFUEL. •Windscreen washer fluid symbol
with the information text REFILL
WINDSCREEN WASHER FLUID . Refill the windscreen washer tank
⇒ page 235.
7)Depending on the version of the model.
altea_EN Seite 67 Mittwoch, 26. August 2009 6:00 18
Page 71 of 310
Cockpit69
Safety First
Operating instructions
Practical tips
Technical Data
– Press button on the windscreen wiper lever. The Configura-
tion menu is opened.
2. Access the “Configuration” menu with the steering wheel
controls
– To access the “Configuration” menu, press button ⇒page 68, fig. 45 until the menu is displayed. Now you are in
this menu.
3. Open the main menu “Winter tyres”
– Select option Winter tyres using switch .
– Press button . The menu Winter tyres is opened.
4. Program a speed limit warning
– Use switch to select the menu entry +10 km/h or -10 km/h
and press button to either increase or decrease the set speed.
5. To activate and deactivate the speed limit warning
– Use switch to select the menu point On / Off and press the
button to switch the speed warning on or off. If the speed
warning is deactivated, three dashes will be displayed ---
6. To close the menu “Winter tyres”
– In the menu select Back.The function “Winter tyres” sends an optical and an acoustic signal when the
vehicle reaches the set speed. Example menu “Winter tyres”
Note
For electronic and vehicle equipment one or more of these menus will be
displayed.
AA
AC
AB
AAAB
AB
AB
On the display
Winter tyres
Function
Name of menu displayed
X km/h
The current set speed is displayed
or ---
or dashes will be shown if the function is deactivated.
On / Off
If the function is activated or deactivated
+10 km/h
The set value increases by 10 km/h
-10 km/h
The set value decreases by 10 km/h
Back
The menu “Winter tyres” is closed and the last dis-
played menu is shown.
altea_EN Seite 69 Mittwoch, 26. August 2009 6:00 18
Page 73 of 310
Cockpit71
Safety First
Operating instructions
Practical tips
Technical Data
Note
For electronic and vehicle equipment one or more of these menus will be
displayed.
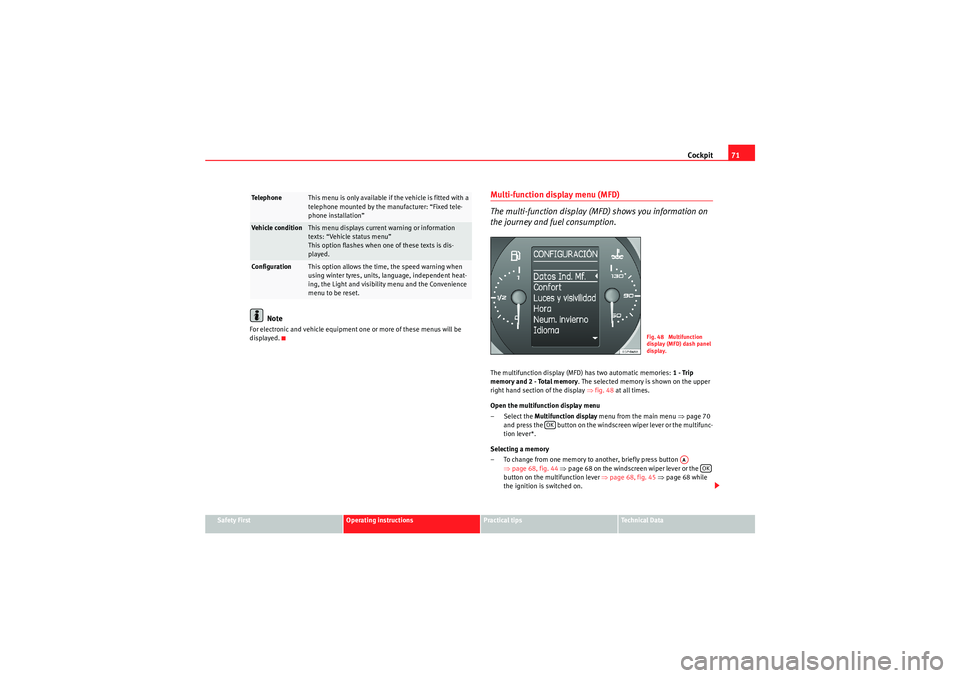
Multi-function display menu (MFD)
The multi-function display (MFD) shows you information on
the journey and fuel consumption.The multifunction display (MFD) has two automatic memories: 1 - Trip
memory and 2 - Total memory . The selected memory is shown on the upper
right hand section of the display ⇒fig. 48 at all times.
Open the multifunction display menu
– Select the Multifunction display menu from the main menu ⇒page 70
and press the button on the windscreen wiper lever or the multifunc-
tion lever*.
Selecting a memory
– To change from one memory to another, briefly press button ⇒page 68, fig. 44 ⇒ page 68 on the windscreen wiper lever or the
button on the multifunction lever ⇒page 68, fig. 45 ⇒ page 68 while
the ignition is switched on.
Te l e p h o n e
This menu is only available if the vehicle is fitted with a
telephone mounted by the manufacturer: “Fixed tele-
phone installation”
Vehicle condition
This menu displays current warning or information
texts: “Vehicle status menu”
This option flashes when one of these texts is dis-
played.
Configuration
This option allows the time, the speed warning when
using winter tyres, units, language, independent heat-
ing, the Light and visibility menu and the Convenience
menu to be reset.
Fig. 48 Multifunction
display (MFD) dash panel
display.
OK
AA
OK
altea_EN Seite 71 Mittwoch, 26. August 2009 6:00 18
Page 75 of 310
Cockpit73
Safety First
Operating instructions
Practical tips
Technical Data
Distance travelled in km
The display shows the distance travelled since the ignition was switched on.
The
maximum display value in both memories is 1999 km. The memory will
automatically be deleted once this value has been reached.
Average speed in km/h
The average speed will be shown after a distance of approximately 100
metres has been travelled. Dashes will appear in the display until that time.
The display will be updated every 5 seconds while the vehicle is in motion.
Digital display of speed
The dash panel display gives the speed in digital format
8).
Speed warning to --- km/h
This function may help you to keep within the speed limits. Press the
button on the windscreen wiper lever or the multifunction steering wheel*
to select the current speed. The dash panel display gives the selected speed,
for example, Speed warning 120 km/h . You have five seconds to reset the
speed between 30 km/hand 250 km/h using rocker switch or buttons
or on the multifunction steering wheel*. Press the button or wait five
seconds until the speed is stored and the warning is activated. If the set
speed is exceeded, an acoustic signal is heard and a warning message is
displayed until the speed is reduced to at least 4 km/h below the stored
speed. The function is switched off by pressing the button again. Speed
warning --- km/h is now displayed on the dash panel.
Ambient temperature display
The measurement margin ranges from -40°C (-40°F) to +50°C (+125°F). At
outside temperatures below +4°C (+39.2°F), “a snowflake symbol” (ice
warning) appears in addition to the outside temperature display. This symbol
flashes for a few seconds and remains lit until the outside temperature rises
above +6°C (+42.8°F).
WARNING
There could be black ice on the road surface even if the “snowflake symbol”
is not shown. You should, for this reason, not rely exclusively on this
display - Risk of accident!
Note
•There are different instrument panels; therefore the multifunction display
may vary.•When the vehicle is stationary or travelling at very low speeds, the
temperature displayed may be slightly higher than the actual ambient
temperature as a result of the heat radiated from the engine.•Vehicles with a multifunction steering wheel* do not have buttons on the
windscreen wiper lever. The multifunction display can only be controlled from
the buttons on the multifunction steering wheel*.Vehi cle s ta tus m e nu
This menu shows warning or information textsOpen Vehicle Condition menu
– Select the option Vehicle status from the main menu: “Main
menu” and press button on the windscreen wiper lever
⇒ page 70, fig. 46 or
– Press button or on the multifunction steering wheel* ⇒page 68, fig. 45 until the Vehicle S tatus menu is displayed.Priority 2 warning messages and information texts: “Information and warning
messages on the screen” will automatically disappear from the screen after a
time and will be stored in the Vehicle status menu.
OK
AA
AB
OKOK
OK
AA
altea_EN Seite 73 Mittwoch, 26. August 2009 6:00 18
Page 77 of 310
Cockpit75
Safety First
Operating instructions
Practical tips
Technical Data
•SEAT dealers are able to programme other functions or change the
existing functions depending upon the vehicle equipment.•The Configuration menu is only accessible when the vehicle is at a
standstill.Convenience menu
From this menu it is it possible to alter the vehicle conven-
ience settings.Open menu Convenience
– Choose the option Configuration from the main menu and press
the button ⇒page 68, fig. 44 on the windscreen wiper
lever.
– Press button or on the multifunction steering wheel* ⇒page 68, fig. 45 until the Config uration menu is displayed.
– Choose the option Conven ien ce from the main menu and press
the button on the windscreen wiper lever.Example of menu use ⇒page 68
Note
For electronic and vehicle equipment one or more of these menus will be
displayed.
OK
AA
AA
Displayed on the
screen
Function
Open door
One door: Individual unlocking activated.
Auto. locking: the doors are automatically locked
when the vehicle is travelling at more than approx
15 km/h.
Auto unlock: the doors are unlocked when the key is
removed from the ignition.
Elec. window control
Opening and closing electric windows: this deter-
mines whether to open or close all the windows
when the vehicle is unlocked or locked. The open
function can also be activated for the driver's door
only.
Wing mirror adjust.
If synchronised adjustment is selected, when the
driver's side wing mirror is adjusted, the passenger
wing mirror is also moved.
Manufacturer's set-
tings
The manufacturer's predefined values for the func-
tions of this menu are restored.
Back
This returns to the Configuration menu
altea_EN Seite 75 Mittwoch, 26. August 2009 6:00 18
Page 79 of 310
Cockpit77
Safety First
Operating instructions
Practical tips
Technical Data
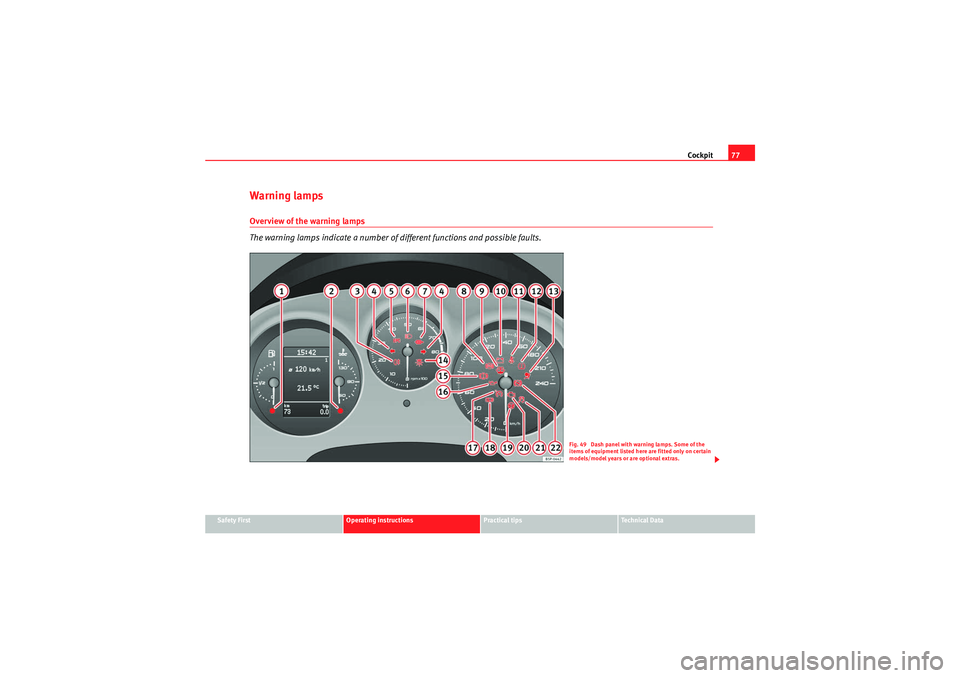
Warning lampsOverview of the warning lamps
The warning lamps indicate a number of different functions and possible faults.
Fig. 49 Dash panel with warning lamps. Some of the
items of equipment listed here are fitted only on certain
models/model years or are optional extras.
altea_EN Seite 77 Mittwoch, 26. August 2009 6:00 18
Page 81 of 310
Cockpit79
Safety First
Operating instructions
Practical tips
Technical Data
•The risk of an accident increases if your vehicle breaks down. Use a
warning triangle to draw the attention of other road users in order to
prevent danger to thirds.•The engine compartment is a dangerous area! Before you open the
bonnet to work on the engine or in the engine compartment, you must
switch the engine off and allow it to cool to reduce the risk of scalding or
other kind of injuries. Read and observe the relevant warnings
⇒ page 226.Note
•The appropriate warning lamp for a fault will light up in vehicles without
warning or information texts in the display.•In vehicles with warning or information texts on the screen, the appro-
priate warning lamp for a fault will light up and a warning or information text
will also appear on the screen.Fuel level / reserve
This symbol lights up to indica te that the fuel tank under the
reserve level.It lights up when only 7 litres of fuel remain in the tank. Also, an audible
warning is given. This serves as a reminder to fill up with fuel at the earliest
opportunity ⇒page 220.
The dash panel displays the following message
9): PLEASE REFUEL! .
Coolant Level* / temperature
The warning lamp lights up if the coolant temperature is too
high or if the coolant level is too low.There is a fault if:•The warning symbol does not go out again after a few seconds.•The warning lamp lights up or flashes while the vehicle is moving, while
three acoustic warning signals ⇒ are emitted.
This means that either the coolant level is too low or the coolant temperature
is too high.
Coolant temperature too high
The dash panel displays the following message
10): CHECK COOLANT
INSTRUCTIONS MANUAL ⇒ page 233.
First look at the coolant temperature gauge. The coolant temperature is too
high if the needle is over the warning area on the dial. Stop the vehicle,
switch the engine off and wait for it to cool down. Check the coolant level.
If the coolant level is correct, the overheating may be caused by a malfunction
of the radiator fan. Check the radiator fan fuse and have it replaced if neces-
sary ⇒page 261.
If the warning lamp lights up again after driving on for a short distance, stop
the vehicle and switch the engine off . Contact an Authorised Service Centre
or a qualified workshop.
Coolant level too low
The dash panel displays the following message11): STOP CHECK COOLANT
INSTRUCTIONS MANUAL .
9)Depending on the version of the model.WARNING (continued)
10)Depending on the version of the model.11)Depending on the version of the model.
altea_EN Seite 79 Mittwoch, 26. August 2009 6:00 18
Page 83 of 310
Cockpit81
Safety First
Operating instructions
Practical tips
Technical Data
Main beam headlights
This warning lamp lights up when the main beams are on.The warning lamp
is switched on once main beams are on or once the
headlight flasher is operating.
Further information ⇒ page 120.
Soot accumulation in the diesel engine particulate filter
If the indicator lights
you may help the filter clear itself by driving in the
appropriate manner.
To do this, drive about 15 minutes in 4t h or 5th gear (automatic gearbox: S
gear range) at a speed of 60 km/h, with the engine running at approximately
2000 rpm. In this way, the pollen build up in the filter is burned. When
cleaning is successful, the indicator turns off.
If the indicator
is not deactivated, bring the vehicle to a specialised work-
shop to repair the fault.
WARNING
•Always drive according to the road weather conditions, the terrain and
traffic. Driving recommendations should never lead to illegal manoeuvres
in surrounding traffic.•The diesel engine particulate filter may reach extremely high tempera-
tures; it should not enter into contact with flammable materials under-
neath the vehicle. Failure to comply could result in fire.
Anti-lock brake system (ABS)
A warning lamp system monitors the ABS.
The warning lamp
should light up for a few seconds when the ignition is
switched on. It goes out again after the system has run through an automatic
test sequence.
There is a fault in the ABS if:
•The warning lamp
does not light up when the ignition is switched on.
•The warning lamp does not go out again after a few seconds.•The warning lamp lights up when the vehicle is moving.
The vehicle can still be braked in the normal way (except that the ABS control
function will not function). Please take the vehicle to a qualified workshop as
soon as possible. For further information on the ABS see the ⇒ page 193.
If a fault occurs in the ABS, the ESP* warning lamp will also light up.
Brake system fault
If the ABS warning lamp
lights up together with the brake warning lamp
, this indicates not only a fault in the ABS function, but also a possible fault
in the brake system ⇒.
WARNING
•Before opening the bonnet, read and observe the warnings on
⇒ page 226, “Working in the engine compartment”.•If the brake warning lamp
should light up together with the ABS
warning lamp
, stop the vehicle immediately and check the brake fluid
level in the reservoir ⇒ page 239, “Brake fluid”. If the fluid level has
dropped below the “MIN” mark you must not drive on. Risk of accident.
Obtain technical assistance.
•If the brake fluid level is correct, the fault in the brake system may have
been caused by a failure of the ABS system. This could cause the rear
altea_EN Seite 81 Mittwoch, 26. August 2009 6:00 18