gearbox Seat Ateca 2017 Owner's Guide
[x] Cancel search | Manufacturer: SEAT, Model Year: 2017, Model line: Ateca, Model: Seat Ateca 2017Pages: 328, PDF Size: 6.36 MB
Page 186 of 328

Operation
Gearbox: press the brake and
engage a gear again.
If the f
ault was caused by a gearbox with a
high temperature, this driver message will be
displayed when the gearbox has cooled
again.
Run-in and economical driving Ru
nning-in the engine A new vehicle should be run in over a dis-
t
anc
e of 1500 km (1000 miles). For the first
1,000 km the engine speed should not ex-
ceed 2/3 of the maximum permissible engine
speed. In doing so, do not accelerate at full
throttle and do not drive with a trailer! From
1000 to 1500 km (600 to 1000 miles) you
can gradually increase the engine rpm and
road speed.
During its first few hours of running, the in-
ternal friction in the engine is greater than
later on when all the moving parts have bed-
ded down.
How the vehicle is driven for the first 1,500
km influences the future engine perform-
ance. Subsequently, also drive at a moderate
rate, especially when the engine is still cold:
this will lead to less engine wear and tear
and will prolong its useful life. You should also avoid driving with the engine
speed t
oo low. Change down to a lower gear
when the engine no longer runs “smoothly”.
If the engine revs too much, cut fuel injection
to protect the engine.
Environmental compatibility Environmental protection is a top priority in
the de
s
ign, choice of materials and manufac-
ture of your new SEAT.
Constructive measures to encourage recy-
cling
● Joints and connections designed for easy
di sm
antling
● Modular construction to facilitate disman-
tling
● Inc
reased use of single-grade materials.
● Plastic parts and elastomers are marked in
acc
ordance with ISO 1043, ISO 11469 and
ISO 1629.
Choice of materials
● Use of recycled materials.
● Use of compatible plastics in the same part
if its
components are not easily separated.
● Use of recycled materials and/or materials
originatin
g from renewable sources. ●
Reduction of
volatile components, includ-
ing odour, in plastic materials.
● Use of CFC-free coolants.
Ban on he
avy metals, with the exceptions
dictated by law (Annex II of ELV Directive
2000/53/EC): cadmium, lead, mercury, hexa-
valent chromium.
Manufacturing methods
● Reduction of the quantity of thinner in the
prot
ective wax for cavities.
● Use of plastic film as protection during ve-
hicl
e transport.
● Use of solvent-free adhesives.
● Use of CFC-free coolants in cooling sys-
tems.
● R
ecycling and energy recovery from resi-
dues
(RDF).
● Improvement in the quality of waste water.
● Use of systems for the recovery of residual
heat
(thermal recovery, enthalpy wheels,
etc.).
● The use of water-soluble paints.
184
Page 187 of 328
Driving
Economical and environmentally-
friendly driv
ingFuel consumption, environmental pollution
and w
e
ar to the engine, brakes and tyres de-
pends largely on driving style. Fuel consump-
tion can be reduced by 10-15% with an eco-
nomical driving style and proper anticipation
of traffic conditions. The following section
gives you some tips on lessening the impact
on the environment and reducing your oper-
ating costs at the same time.
Active cylinder management (ACT ®
)*display
Depending on vehicle equipment, the active
cylinder management (ACT ®
) may automati-
cally deactivate some of the engine cylinders
if the driving situation does not require too
much power. When it is switched off, no fuel
is injected into these cylinders, hence total
fuel consumption may be reduced. The num-
ber of active cylinders can be seen on the in-
strument panel display ›››
page 30.
Foresight when driving
Acceleration causes the vehicle to consume
more fuel. If you think ahead when driving,
you will need to brake less and thus acceler-
ate less. Wherever possible, let the car roll
slowly to a stop, with a gear engaged (for in-
stance when you can see that the next traffic
lights are red). This takes advantage of the
engine braking effect, reducing wear on the brakes and tyres. Emissions and fuel con-
s
umption w
ill drop to zero due to the overrun
fuel cut-off.
Changing gear to save energy
An effective way of saving is to change in ad-
vance to a higher gear. Running the engine at
high rpm in the lower gears uses an unneces-
sary amount of fuel.
Manual gearbox : shift up from first to second
gear as soon as possible. In any case, we rec-
ommend that you change to a higher gear
upon reaching 2,000 rpm. Choosing the right
gear enables fuel savings. Select the highest
possible gear appropriate for the driving sit-
uation (the engine should continue function-
ing with cyclical regularity).
Automatic gearbox : accelerate gradually and
without reaching the “kick-down” position.
Avoid driving at high speed
Avoid travelling at top speed, whenever pos-
sible. Fuel consumption, emission of harmful
gases and noise pollution multiply dispropor-
tionately as speed is increased. Driving at
moderate speeds will help to save fuel.
Reduce idling time
In vehicles with the Start-Stop system idling
is automatically reduced. In vehicles without
the Start-Stop system it is worth switching off
the engine, for example, at level crossings and at traffic lights that remain red for long
periods
of time. When an engine has reached
operating temperature, and depending on
the cylinder capacity, keeping it switched off
for a minimum of about 5 seconds already
saves more than the amount of fuel necessa-
ry for restarting.
The engine takes a long time to warm up
when it is idling. Mechanical wear and pollu-
tant emissions are also especially high dur-
ing this initial warm-up phase. It is therefore
best to drive off immediately after starting
the engine. Avoid running the engine at high
speed.
Regular maintenance
Regular servicing helps in saving fuel even
before the engine is started. A well-serviced
engine gives you the benefit of improved fuel
efficiency as well as maximum reliability and
an enhanced resale value. A badly serviced
engine can consume up to 10% more fuel
than necessary.
Avoid short journeys
The engine and catalytic converter need to
reach their optimal operating temperature in
order to minimise fuel consumption and
emissions.
A cold engine consumes a disproportionate
amount of fuel. The engine reaches its work-
ing temperature after about four kilometres »
185
Technical data
Advice
Operation
Emergencies
Safety
Page 189 of 328
Driving
(automatic gearbox: gear S). Maintain the en-
gine s peed at
approximately 2,000 rpm. The
rise in temperature causes the soot on the fil-
ter to burn. On completion of the cleaning
the warning lamp will switch off. If the warn-
ing lamp does not switch off, go immediately
to a specialised workshop to rectify the prob-
lem.
Engine management* This warning lamp monitors the engine man-
ag
ement
system for petrol engines.
The warning lamp (Electronic Power Con-
trol) lights up when the ignition is switched
on while system operation is being verified. It
should go out once the engine is started.
If there is a fault in the electronic engine
management system while you are driving,
this warning lamp will light up. Take the vehi-
cle to a specialised workshop as soon as
possible and have the engine checked.
Emission control system* Control lamp
fla
shes:
When there is misfiring that can damage the
catalytic converter. Reduce speed and drive
carefully to the nearest specialised workshop
to have the engine checked. The control lamp
lights
up:
If a fault has developed during driving which
has reduced the quality of the exhaust gas
(e.g. lambda probe fault). Reduce speed and
drive carefully to the nearest specialised
workshop to have the engine checked.
Engine pre-heating/fault system* The warning lamp lights up to show that the
glo
w p
lugs are preheating the diesel engine.
The control lamp lights up
If the control lamp lights up when the en-
gine is started it means that the glow plugs
are preheating. The engine can be started
straight away when the lamp switches off.
Control lamp flashes
If a fault develops in the engine management
system while you are driving, the glow plug
system lamp will flash . Take the vehicle to
a specialised workshop as soon as possible
and have the engine checked. Driving tips
Driv in
g on flooded roads To prevent damage to the vehicle when driv-
in
g thr
ough water, for example, along a floo-
ded road, please observe the following:
● The water should never come above the
low
er edge of the bodywork.
● Drive at pedestrian speed. WARNING
After driving through water, mud, sludge,
et c
., the braking effect can be delayed slight-
ly due to moisture build-up on the discs and
brake pads. Applying the brakes carefully
several times will remove the moisture and
restore the full braking effect. CAUTION
● Driv in
g through flooded areas may severely
damage vehicle components such as the en-
gine, transmission, running gear or electrical
system.
● Whenever driving through water, the Start-
Stop sy
stem* must be switched off
››› page 188. Note
● Chec k
the depth of the water before enter-
ing the flooded zone. » 187
Technical data
Advice
Operation
Emergencies
Safety
Page 190 of 328
Operation
●
Do not s
top in the water, drive in reverse, or
stop the engine in any situation.
● Note that vehicles travelling in the opposite
direction m
ay splash water that could exceed
the maximum permitted water height for your
vehicle.
● Avoid driving through salt water (corro-
sion). Driver assistance systems
St ar
t-Stop System*
Description and operation The Start-Stop system helps save fuel and re-
duc
e C
O2 emissions.
In Start-Stop mode, the engine will automati-
cally switch off when the vehicle stops, when
stopping at traffic lights for example. The ig-
nition remains switched on during the stop-
ping phase. The engine automatically
switches back on when required. In this sit-
uation the light of the START ENGINE STOP but-
t on s
tays on.
As soon as the ignition is switched on, the
Start-Stop function is automatically activa-
ted.
Basic requirements for the Start-Stop mode
● The driver door must be closed.
● The driver must have their seat belt fas-
tened.
● The bonnet
must be closed.
● The engine must have reached a minimum
serv
ice temperature.
● The reverse gear must not be engaged.
● The vehicle must not be on a very steep
slope. WARNING
● Nev er sw
itch the engine off until the vehi-
cle is stationary. The brake servo and power
steering functions will not be completely cov-
ered under warranty. More force may also be
needed to turn the steering wheel or to brake.
As you cannot steer and brake in the normal
manner, there is a greater risk of accidents
and serious injury.
● Never remove the key from the ignition if
the v
ehicle is in motion. Otherwise, the steer-
ing could lock making it impossible to steer
the vehicle.
● To avoid injury, make sure that the Start-
Stop sy
stem is switched off when working in
the engine compartment ››› page 190. CAUTION
The Start-Stop system must always be
sw it
ched off when driving through flooded
areas ››› page 190. Stopping/Starting the engine
Vehicles with a manual gearbox
– When the vehicle is stopped, put it into
neutr al
and release the clutch pedal. The
engine will switch off. The warning lamp
will appear on the instrument panel dis-
play.
188
Page 191 of 328
Driver assistance systems
– When the c lut
ch pedal is pressed the en-
gine will start up again. The warning lamp
will switch off.
Vehicles with an automatic gearbox
– Use the foot brake to bring the vehicle to a
st
op and keep the brake pedal pressed
down with your foot. The engine will switch
off. The warning lamp will appear in the
display.
– When you take your foot off the brake pedal
the engine w
ill start up again. The warning
lamp will switch off.
Additional information related to the auto-
matic gearbox
The engine stops when the selector lever is in
the positions P, D, N and S, in addition to
when in manual mode. With the selector lev-
er in position P, the engine will also remain
switched off when you take your foot off the
brake pedal. In order to start the engine up
again the accelerator must be pressed, or an-
other gear engaged or the brake released.
If the selector lever is placed in position R
during the stopping phase, the engine will
start up again.
Change from position D to P to prevent the
engine from accidentally starting when
changing and passing by position R. Note
● You c
an control whether the engine should
switch off or not by reducing or increasing the
brake force applied. While the vehicle re-
mains stopped, the engine will not stop if the
brake pedal is slightly pressed, in traffic jams
with frequent stopping and starting for exam-
ple. As soon as strong pressure is applied to
the brake pedal, the engine will stop.
● In vehicles with manual gearbox, during
the st
opping phases the brake pedal must re-
main depressed to prevent the vehicle from
moving.
● If the engine “stalls” in vehicles with man-
ual
gearbox, it can be directly started up
again by immediately pressing the clutch
pedal. General notes
The system can interrupt the Start-Stop mode
fr
equently
for different reasons.
The engine does not switch off
Before the stopping phase, the system veri-
fies whether certain conditions are met. The
engine does not switch off, in the following
situations for example:
● The engine has not yet reached the mini-
mum requir
ed temperature for the Start-Stop
mode. ●
The interior t
emperature selected for the air
conditioner has not yet been reached.
● The interior temperature is very high/low.
● Defrost function button activated
››
› page 42.
● The parking aid* is switched on.
● The battery is very low.
● The steering wheel is overly turned or is be-
ing t
urned.
● If there is a danger of misting.
● After engaging reverse gear.
● In case of a very steep gradient.
The indication i
s shown on the instrument
panel display, and in addition, the driver in-
formation system* shows, .
The engine starts by itself
During a stopping phase the normal Start-
Stop mode can be interrupted in the follow-
ing situations: The engine restarts by itself
without involvement from the driver.
● The interior temperature differs from the
value sel
ected on the air conditioner.
● Defrost function button activated
››
› page 42.
● The brake has been pressed several times
con
secutively.
● The battery is too low.
● High power consumption. »
189
Technical data
Advice
Operation
Emergencies
Safety
Page 192 of 328
Operation
Note
In vehicles with an automatic gearbox, if the
sel ect
or lever is placed in position D, N or S
after engaging reverse gear, the vehicle must
be driven at a speed faster than 10 km/h (6
mph) for the system to return to conditions in
which the engine can be stopped. Manually switching on/off the Start-
St
op sy
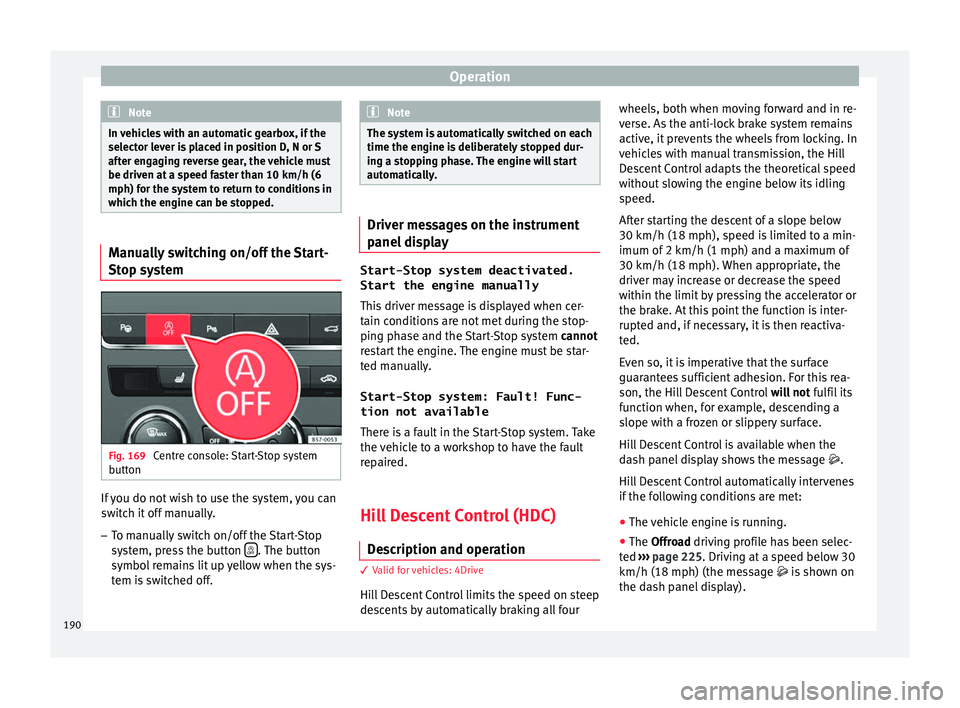
stem Fig. 169
Centre console: Start-Stop system
b utt
on If you do not wish to use the system, you can
sw
it
ch it off manually.
– To manually switch on/off the Start-Stop
sys
tem, press the button . The button
symbo l
remains lit up yellow when the sys-
tem is switched off. Note
The system is automatically switched on each
time the en gine i
s deliberately stopped dur-
ing a stopping phase. The engine will start
automatically. Driver messages on the instrument
p
anel
display Start-Stop system deactivated.
Start the engine manually
Thi s
driver message is displayed when cer-
tain conditions are not met during the stop-
ping phase and the Start-Stop system cannot
restart the engine. The engine must be star-
ted manually.
Start-Stop system: Fault! Func-
tion not available There is a fault in the Start-Stop system. Take
the vehicle to a workshop to have the fault
repaired.
Hill Descent Control (HDC) D e
scription and operation 3
V
alid for vehicles: 4Drive
Hill Descent Control limits the speed on steep
descents by automatically braking all four wheels, both when moving forward and in re-
v
er
se. As the anti-lock brake system remains
active, it prevents the wheels from locking. In
vehicles with manual transmission, the Hill
Descent Control adapts the theoretical speed
without slowing the engine below its idling
speed.
After starting the descent of a slope below
30 km/h (18 mph), speed is limited to a min-
imum of 2 km/h (1 mph) and a maximum of
30 km/h (18 mph). When appropriate, the
driver may increase or decrease the speed
within the limit by pressing the accelerator or
the brake. At this point the function is inter-
rupted and, if necessary, it is then reactiva-
ted.
Even so, it is imperative that the surface
guarantees sufficient adhesion. For this rea-
son, the Hill Descent Control will not fulfil its
function when, for example, descending a
slope with a frozen or slippery surface.
Hill Descent Control is available when the
dash panel display shows the message .
Hill Descent Control automatically intervenes
if the following conditions are met:
● The vehicle engine is running.
● The Offroad driving profile has been selec-
t
ed ›››
page 225. Driving at a speed below 30
km/h (18 mph) (the message is shown on
the dash panel display).
190
Page 194 of 328
Operation
● The en gine i
s running.
Switching the Auto Hold function on and off
Press the button ››› . The control lamp on
the b utt
on goes out when the Auto Hold func-
tion is switched off.
Automatically engaging and disengaging the
Auto Hold function
If the Auto Hold function was switched on
with the button before disengaging the ig-
nition, the function will remain on after the
ignition is re-engaged.
If the Auto Hold function was not switched
on, it will automatically remain off next time
the ignition is engaged.
The Auto Hold function is automatically
switched on if the following conditions are
met:
All conditions must be met at the same time
››› :
Manual gearboxAutomatic gearbox
1.The vehicle is kept stationary with the brake ped-
al on a flat surface or on a slope.
2.The engine rotates “correctly”.
All conditions must be met at the same time
››› :
Manual gearboxAutomatic gearbox
Upon pressing the
clutch and accelerating
at the same time, the
brake releases gradu-
ally.Upon accelerating, the
brake releases gradu-
ally. The Auto Hold function is automatically
t
urned off
if the following conditions are
met:
Manual gearboxAutomatic gearbox
1.
If any of the conditions mentioned on
››› page 191, Conditions for keeping the vehicle
stationary with the Auto Hold function are no lon- ger met.
2.If the engine is running irregularly or an anomalyis detected.
3.If the engine is turnedoff or stalls.If the engine is switch- ed off.
4.The clutch and the ac-
celerator are pressed at the same time.If the accelerator is pressed.
5.
If any of the tyres hasonly minimal contact
with the ground, e.g. in the case of axle articu- lation. WARNING
The smart technology incorporated into the
Aut o Ho
ld function cannot defy the laws of
physics; it only works within the limits of the
system. The greater convenience provided by
the Auto Hold function should never tempt
you to take any risk that may compromise
safety.
● Never leave the vehicle running and with
the Auto Ho
ld function switched on.
● The Auto Hold function cannot always keep
the v
ehicle stationary uphill or downhill or
stop it sufficiently, for example, on slippery
or frozen surfaces. Note
Before entering a car wash, always switch off
the Aut o Ho
ld function, because if the elec-
tronic parking brake is automatically connec-
ted, it may cause damage. 192
Page 200 of 328
Operation
km/h (18 and 150 mph), as well as the tem-
por ar
y distance required with regard to the
vehicle in front. The ACC function will adapt
the vehicle's cruise speed at all times, main-
taining a safe distance with the vehicle in
front.
The ACC function is based on a radar sensor
that can measure the distance to the vehicles
in front.
If the vehicle is equipped with automatic
gearbox, the ACC can brake the vehicle until
it stops completely if a vehicle in front of it
stops.
Driver intervention prompt
During driving, the ACC is subject to certain
limitations inherent in the system. In other
words, in certain circumstances the driver will
have to adjust speed him or herself, as well
as the distance from other vehicles.
In this case, the instrument panel screen will
warn you to intervene by applying the brake
and a warning tone will be heard
››› page 199. WARNING
The intelligent technology in the ACC cannot
o v
ercome the system's inherent limitations
or change the laws of physics. If used negli-
gently or involuntarily, it may cause serious
accidents and injuries. The system is not a re-
placement for driver awareness. ●
Ad apt
your speed and safe distance to the
vehicle in front of you at all times to suit visi-
bility, weather, road and traffic conditions.
● Do not use the ACC when visibility is bad,
on st
eep roads, with several bends or in slip-
pery circumstances such as snow, ice, rain or
loose gravel, or on flooded roads.
● Never use the ACC when driving off-road or
on unp
aved roads. The ACC has been de-
signed for use on paved roads only.
● The ACC does not react on approaching a
fix
ed obstacle, such as the tail of a traffic
jam, a damaged vehicle or a vehicle stopped
at the traffic lights.
● The ACC only reacts to people if a pedes-
trian monit
oring system is available. In addi-
tion, the system does not react to animals or
vehicles crossing your path or approaching
head-on down the same lane.
● If the ACC does not reduce speed sufficient-
ly, br
ake the vehicle immediately by applying
the pedal.
● If you are driving using the spare wheel,
the AC
C system could automatically switch
off during the journey. Switch off the system
when starting off.
● If the vehicle continues to move involuntar-
ily
after a driver intervention prompt, brake
the vehicle by applying the pedal.
● If the dash panel displays a dri
ver interven-
tion prompt, adjust the distance yourself.
● The driver should be ready to accelerate or
brak
e by him/herself at all times. CAUTION
If you have the sensation that the radar sen-
sor i s
damaged, disconnect the ACC. This will
avoid possible damage. If this occurs have it
adjusted.
● Repairs to the radar sensor require special-
is
t knowledge and special tools. SEAT recom-
mends visiting a SEAT dealership for this pur-
pose. Note
● If the A
CC system does not work as descri-
bed in this chapter, do not use it until it has
been checked by a specialised workshop.
SEAT recommends visiting a SEAT dealership
for this purpose.
● Maximum speed with the ACC activated is
limited t
o 210 km/h (150 mph).
● When the ACC is switched on, strange
noise
s may be heard during automatic brak-
ing cause by the braking system. 198
Page 203 of 328
Driver assistance systems
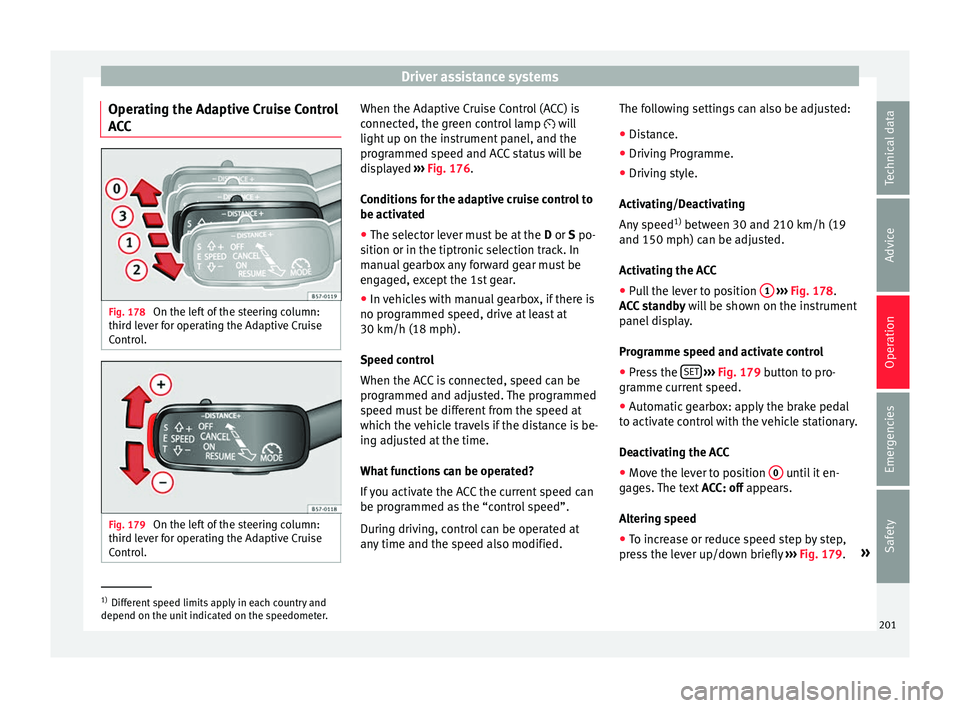
Operating the Adaptive Cruise Control
A C
C Fig. 178
On the left of the steering column:
thir d l
ever for operating the Adaptive Cruise
Control. Fig. 179
On the left of the steering column:
thir d l
ever for operating the Adaptive Cruise
Control. When the Adaptive Cruise Control (ACC) is
c
onnect
ed, the green control lamp will
light up on the instrument panel, and the
programmed speed and ACC status will be
displayed ››› Fig. 176.
Conditions for the adaptive cruise control to
be activated ● The selector lever must be at the D or S po-
sition or in the tiptr
onic selection track. In
manual gearbox any forward gear must be
engaged, except the 1st gear.
● In vehicles with manual gearbox, if there is
no progr
ammed speed, drive at least at
30 km/h (18 mph).
Speed control
When the ACC is connected, speed can be
programmed and adjusted. The programmed
speed must be different from the speed at
which the vehicle travels if the distance is be-
ing adjusted at the time.
What functions can be operated?
If you activate the ACC the current speed can
be programmed as the “control speed”.
During driving, control can be operated at
any time and the speed also modified. The following settings can also be adjusted:
●
Distance.
● Driving Programme.
● Driving style.
Activ
ating/Deactivating
Any speed 1)
between 30 and 210 km/h (19
and 150 mph) can be adjusted.
Activating the ACC
● Pull the lever to position 1
› ›
›
Fig. 178.
ACC standby will be shown on the instrument
panel display.
Programme speed and activate control
● Press the SET
› ›
›
Fig. 179 button to pro-
gramme current speed.
● Automatic gearbox: apply the brake pedal
to activ
ate control with the vehicle stationary.
Deactivating the ACC
● Move the lever to position 0 until it en-
g ag
es. The text ACC: off appears.
Altering speed
● To increase or reduce speed step by step,
pre
ss the lever up/down briefly ›››
Fig. 179. »1)
Different speed limits apply in each country and
depend on the u nit
indicated on the speedometer. 201
Technical data
Advice
Operation
Emergencies
Safety
Page 204 of 328
Operation
Any modification to the programmed speed
i s
shown on the bottom left part of the instru-
ment panel display.
Adjusting distance level
The distance according to speed with regard
to the vehicle in front can be controlled on
the Easy Connect system on 5 levels
››› page 26.
In wet road conditions, you should always set
a larger distance with regard to the vehicle in
front than when driving in dry conditions.
The following distances can be preselected:
● Very short
● Short
● Media
● Long
● Very long
In the Ea
sy Connect system the distance that
must be set when connecting the ACC may be
adjusted using the button and the
Set
up and
Driv
er a
ssistance function buttons
› ›
› page 26.
Adjusting the driving programme
In vehicles with driving profile selection
(SEAT Drive Profile), the profile selected can
influence acceleration behaviour
››› page 225. The following driving programmes items can
be select
ed:
● Normal
● Sport
● Eco
● Convenience
In v
ehicles without the driving profile selec-
tion function, acceleration behaviour can be
influenced by selecting a driving programme
on the Easy Connect system using the button and the
Set
up and
Driv
er a
ssistance function buttons
››
›
page 26.
The following conditions may lead the ACC
not to react:
● If the accelerator is pressed.
● If there is no gear engaged.
● If the ESC is controlling.
● If the driver is not wearing his/her seat
belt.
● If
several brake lights of the vehicle or elec-
trical
ly connected trailer are damaged.
● If the vehicle is reversing.
● Driving faster than 210 km/h (150 mph). WARNING
There is a danger of rear collision when the
minimum di s
tance to the vehicle in front is
exceeded and the speed difference between both vehicles is so great that a speed reduc-
tion b
y
the ACC will not suffice. In this case
the brake pedal should be applied immedi-
ately.
● The ACC may not be able to detect all situa-
tions
properly.
● “Stepping” on the accelerator may cause
the AC
C not to intervene in braking. Driver
braking will have priority over intervention by
the speed control or adaptive cruise control.
● Always be ready to use the brakes!
● Observe country-specific provisions gov-
erning o
bligatory minimum distances be-
tween vehicles. Note
● The pr ogr
ammed speed is erased once the
ignition or the ACC are switched off.
● When the traction control system (ASR) is
deactiv
ated during acceleration or else the
ESC is activated in Sport* Mode
( ››› page 108), the ACC switches off automati-
cally.
● In vehicles with the Start-Stop system, the
engine sw
itches off automatically during the
ACC stopping phase and restarts automatical-
ly to begin driving. Vehicles with an automatic gearbox
If the vehicle is equipped with automatic
g
e
arbox, the ACC can brake the vehicle until
202