ECO Seat Exeo ST 2013 MEDIA SYSTEM E
[x] Cancel search | Manufacturer: SEAT, Model Year: 2013, Model line: Exeo ST, Model: Seat Exeo ST 2013Pages: 167, PDF Size: 5.48 MB
Page 2 of 167
Contents1
ContentsNotes about this Owner's Manual
Operating
. . . . . . . . . . . . . . . . . . . . . . . . . . . . .
Overview
. . . . . . . . . . . . . . . . . . . . . . . . . . . . . . . . .
Control panel with screen . . . . . . . . . . . . . . . . . .
Switching on and off . . . . . . . . . . . . . . . . . . . . . .
Opening and closing the display . . . . . . . . . . . .
Notes on road safety . . . . . . . . . . . . . . . . . . . . . .
Cleaning and care . . . . . . . . . . . . . . . . . . . . . . . .
Handling: General information
. . . . . . . . . . . .
Control switches . . . . . . . . . . . . . . . . . . . . . . . . .
Multi-function steering wheel* . . . . . . . . . . . . . .
Display
. . . . . . . . . . . . . . . . . . . . . . . . . . . . . . . . . . .
Display orientation . . . . . . . . . . . . . . . . . . . . . . .
Working with the alphanumeric keyboard . . . . .
Control wheel . . . . . . . . . . . . . . . . . . . . . . . . . . . .
Drives
. . . . . . . . . . . . . . . . . . . . . . . . . . . . . . . . . . . .
System drives . . . . . . . . . . . . . . . . . . . . . . . . . . .
General instructions on CD mode . . . . . . . . . . . .
Instructions relating to memory cards . . . . . . . .
iPod interface* . . . . . . . . . . . . . . . . . . . . . . . . . . .
USB interface* . . . . . . . . . . . . . . . . . . . . . . . . . . .
Aux-in connection* . . . . . . . . . . . . . . . . . . . . . . .
RADIO, MEDIA (audiovisual
systems)
. . . . . . . . . . . . . . . . . . . . . . . . . . . . . .
RADIO
. . . . . . . . . . . . . . . . . . . . . . . . . . . . . . . . . . . .
Introduction . . . . . . . . . . . . . . . . . . . . . . . . . . . . .
Band function . . . . . . . . . . . . . . . . . . . . . . . . . . . Main radio menu . . . . . . . . . . . . . . . . . . . . . . . . .
"Memory" Menu . . . . . . . . . . . . . . . . . . . . . . . . . .
Tuning Menu . . . . . . . . . . . . . . . . . . . . . . . . . . . .
Radio setups . . . . . . . . . . . . . . . . . . . . . . . . . . . .
MEDIA
. . . . . . . . . . . . . . . . . . . . . . . . . . . . . . . . . . .
Introduction . . . . . . . . . . . . . . . . . . . . . . . . . . . . .
Source control button . . . . . . . . . . . . . . . . . . . . .
Main audio CD / MP3 CD menu . . . . . . . . . . . . .
Audio CD: Control menu . . . . . . . . . . . . . . . . . . .
Main MP3 menu . . . . . . . . . . . . . . . . . . . . . . . . .
MP3: Control menu . . . . . . . . . . . . . . . . . . . . . . .
MP3 settings . . . . . . . . . . . . . . . . . . . . . . . . . . . .
Adjusting sound settings
. . . . . . . . . . . . . . . . .
Setting the sound . . . . . . . . . . . . . . . . . . . . . . . .
DSP ("Digital Signal Processing") . . . . . . . . . . . .
Dynamic noise compensation* . . . . . . . . . . . . . .
Volume settings of other functions . . . . . . . . . .
NAME, TEL
. . . . . . . . . . . . . . . . . . . . . . . . . . . .
NAME (Directory)
. . . . . . . . . . . . . . . . . . . . . . . . .
Introduction . . . . . . . . . . . . . . . . . . . . . . . . . . . . .
Main directory menu . . . . . . . . . . . . . . . . . . . . . .
Mobile phone system*
. . . . . . . . . . . . . . . . . . . .
Introduction . . . . . . . . . . . . . . . . . . . . . . . . . . . . .
Installation . . . . . . . . . . . . . . . . . . . . . . . . . . . . . .
Using the telephone . . . . . . . . . . . . . . . . . . . . . .
Main telephone menu . . . . . . . . . . . . . . . . . . . . .
"Memory" Menu . . . . . . . . . . . . . . . . . . . . . . . . . .
Phone settings . . . . . . . . . . . . . . . . . . . . . . . . . . .
Telephone speech control system . . . . . . . . . . .
Speech recognition for some countries . . . . . . .
NAV, INFO
. . . . . . . . . . . . . . . . . . . . . . . . . . . . .
Navigation (NAV)*
. . . . . . . . . . . . . . . . . . . . . . . .
General safety precautions . . . . . . . . . . . . . . . . .
Introduction . . . . . . . . . . . . . . . . . . . . . . . . . . . . .
Main navigation menu . . . . . . . . . . . . . . . . . . . .
"Memory" Menu . . . . . . . . . . . . . . . . . . . . . . . . . .
Route control button . . . . . . . . . . . . . . . . . . . . . .
Map control button . . . . . . . . . . . . . . . . . . . . . . .
Nav-Info control button . . . . . . . . . . . . . . . . . . . .
Navigation settings . . . . . . . . . . . . . . . . . . . . . . .
INFO (Traffic information)
. . . . . . . . . . . . . . . . . .
Introduction . . . . . . . . . . . . . . . . . . . . . . . . . . . . .
Main traffic information menu . . . . . . . . . . . . . .
Memo TP control button . . . . . . . . . . . . . . . . . . .
Source function button . . . . . . . . . . . . . . . . . . . .
Traffic information setup . . . . . . . . . . . . . . . . . . .
CAR, SETUP
. . . . . . . . . . . . . . . . . . . . . . . . . .
CAR (vehicle settings)
. . . . . . . . . . . . . . . . . . . . .
Introduction . . . . . . . . . . . . . . . . . . . . . . . . . . . . .
SETUP
. . . . . . . . . . . . . . . . . . . . . . . . . . . . . . . . . . . .
Introduction . . . . . . . . . . . . . . . . . . . . . . . . . . . . .
Settings control button . . . . . . . . . . . . . . . . . . . .
Display control button . . . . . . . . . . . . . . . . . . . . .
Frequently Asked Questions (FAQ)
. . . . . . . . .
Emergencies . . . . . . . . . . . . . . . . . . . . . . . . . . . .
Index
. . . . . . . . . . . . . . . . . . . . . . . . . . . . . . . . . .
2
3
3
3
4
5
6
6
8
8
12
15
15
18
21
22
22
26
28
28
31
33
35
35
35
36 36
38
39
41
48
48
50
51
51
54
54
57
59
59
60
60
61
63
63
63
63
68
68
69
72
74
77
83
86
95
97
97
97
97
104
116
120
123
130
131
141
141
143
146
147
148
151
151
151
153
153
154
156
158
158
161
media_systemE_EN.book Seite 1 Montag, 21. September 2009 1:48 13
Page 9 of 167
Handling: General information
8Handling: General informationControl switchesConcept for handling
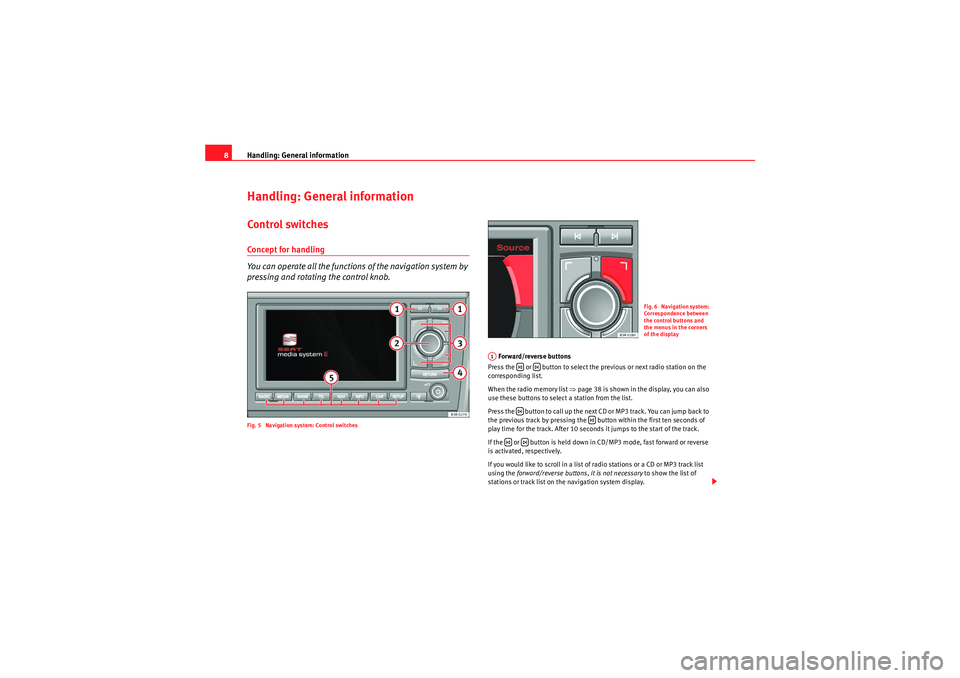
You can operate all the functions of the navigation system by
pressing and rotating the control knob.Fig. 5 Navigation system: Control switches
Forward/reverse buttons
Press the or button to select the previous or next radio station on the
corresponding list.
When the radio memory list ⇒ page 38 is shown in the display, you can also
use these buttons to select a station from the list.
Press the button to call up the next CD or MP3 track. You can jump back to
the previous track by pressing the button within the first ten seconds of
play time for the track. After 10 seconds it jumps to the start of the track.
If the or button is held down in CD/MP3 mode, fast forward or reverse
is activated, respectively.
If you would like to scroll in a list of radio stations or a CD or MP3 track list
using the forward/reverse buttons, it is not necessary to show the list of
stations or track list on the navigation system display.
Fig. 6 Navigation system:
Correspondence between
the control buttons and
the menus in the corners
of the display
A1
media_systemE_EN.book Seite 8 Montag, 21. September 2009 1:48 13
Page 12 of 167

Handling: General information11
Operating
RADIO, MEDIA (audiovisual
systems)
NAME, TEL
NAV, INFO
CAR, SETUP
History function
The system recalls the previous settings.When a function button is pressed, the system will switch to the most recently
accessed menu level for the specific main function. This includes any
sublevels that were opened. This excludes the Setup menus.
The history memory is erased when the system moves into standby mode.
An example: You are currently in radio mode and have selected the Control
menu. You switch to the navigation menu by pressing the button. If you
then press the button, you will return to the menu selected before
leaving radio mode. In this case, the Control menu of the radio is shown in the
display.Resetting the navigation system
The procedure described below will restart your navigation system
and restore full normal operation.
– Press the ON/OFF knob to switch the navigation system off ⇒fig. 10 .
– Press and hold the ON/OFF knob until the display reappears and turns black.
– Release the ON/OFF knob as soon as the display has turned black . After a few seconds, the navigation system will restart, or
you can switch it on manually ⇒page 4.
NAV
RADIO
Fig. 10 Navigation
system: ON/OFF button
media_systemE_EN.book Seite 11 Montag, 21. September 2009 1:48 13
Page 15 of 167
Handling: General information
14
Making a call
–Use the left thumbwheel ⇒page 12, fig. 11 to scroll up and
down through the phone book.
– Press the left thumbwheel . The number is dialled and the audio system is muted automatically.
Answering or ending calls
– Press the left thumbwheel ⇒page 12, fig. 11 .
Rejecting a call
– Press and hold the left thumbwheel ⇒page 12, fig. 11 .
Replacing a call
– If a second call is received (call waiting), briefly press the left thumbwheel ⇒page 12, fig. 11 . The current call will be
ended and you will be connected with the second caller.The following telephone status messages appear on the display in the instru-
ment panel: Phone numbers can be stored in different categories in the mobile phone
directory. These categories are displayed as follows:
P Private phone number
W Work phone number
M Mobile phone number
Scroll the left thumbwheel downwards to scroll down the list of stored names
from
A to Z . Scroll the left thumbwheel upwards to scroll up the list of stored
names from Z to A. If you "flick" the left thumbwheel you can jump to the next
letter of the alphabet.
Note
The information shown on the instrument panel display depends on the type
of mobile phone used.
Please wait...
The SIM card memory is being scanned.
SIM CARD
There is no SIM card in the mobile phone.
PIN CODE
The PIN code has not yet been entered.
NO SERVICE
No network connection
CALL
A call is active or incoming. If the caller's telephone
number is available, the display will alternately
give the caller's number and the message CALL .
LINE ENGAGED
Number dialled is engaged.
AAAAAA
AA
AA
TELEPHONE OFF
The telephone is switched off.
CALLING
The connection is being established.
NO ENTRIES
The phone book has no entries.
media_systemE_EN.book Seite 14 Montag, 21. September 2009 1:48 13
Page 21 of 167
Display
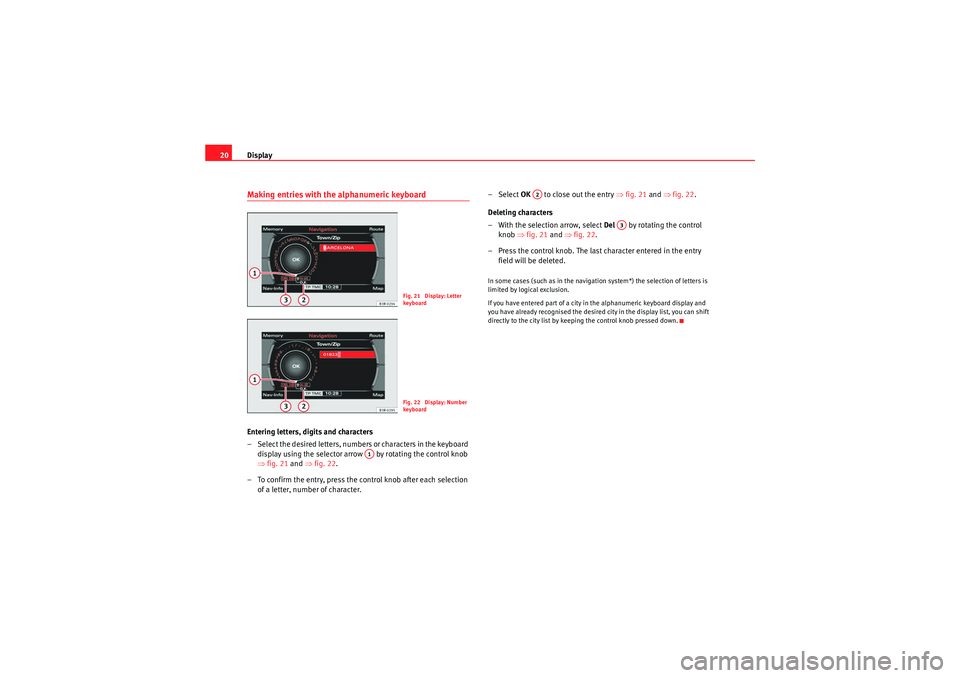
20Making entries with the alphanumeric keyboardEntering letters, digits and characters
– Select the desired letters, numbers or characters in the keyboard
display using the selector arrow by rotating the control knob
⇒ fig. 21 and ⇒fig. 22.
– To confirm the entry, press the control knob after each selection of a letter, number of character. – Select
OK to close out the entry ⇒fig. 21 and ⇒fig. 22 .
Deleting characters
– With the selection arrow, select Del by rotating the control
knob ⇒fig. 21 and ⇒fig. 22 .
– Press the control knob. The last character entered in the entry field will be deleted.
In some cases (such as in the navigation system*) the selection of letters is
limited by logical exclusion.
If you have entered part of a city in the alphanumeric keyboard display and
you have already recognised the desired city in the display list, you can shift
directly to the city list by keeping the control knob pressed down.
Fig. 21 Display: Letter
keyboa rdFig. 22 Display: Number
keyboa rd
A1
A2
A3
media_systemE_EN.book Seite 20 Montag, 21. September 2009 1:48 13
Page 23 of 167
Drives
22DrivesSystem drivesGeneral observations
The navigation DVD, audio CDs, MP3 CDs and memory cards
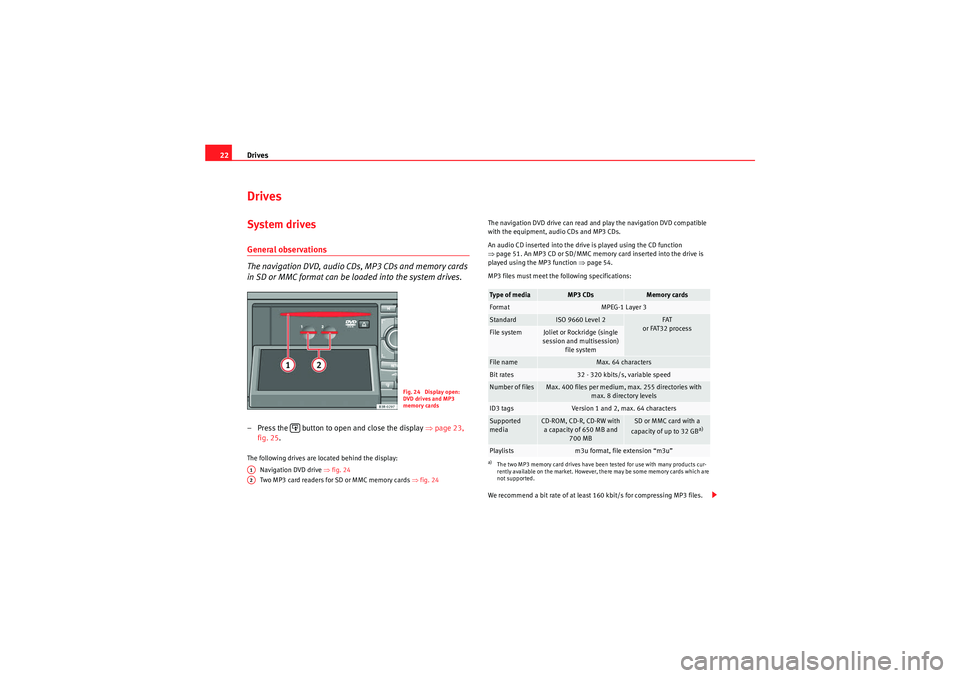
in SD or MMC format can be loaded into the system drives.– Press the button to open and close the display ⇒page 23,
fig. 25 .The following drives are located behind the display:
Navigation DVD drive ⇒ fig. 24
Two MP3 card readers for SD or MMC memory cards ⇒fig. 24 The navigation DVD drive can read and play the navigation DVD compatible
with the equipment, audio CDs and MP3 CDs.
An audio CD inserted into the drive is played using the CD function
⇒
page 51. An MP3 CD or SD/MMC memory card inserted into the drive is
played using the MP3 function ⇒ page 54.
MP3 files must meet the following specifications:
We recommend a bit rate of at least 160 kbit/s for compressing MP3 files.
Fig. 24 Display open:
DVD drives and MP3
memory cards
A1A2
Type of media
MP3 CDs
Memory cards
Format
MPEG-1 Layer 3
Standard
ISO 9660 Level 2
FAT
or FAT32 process
File system
Joliet or Rockridge (single
session and multisession) file system
File name
Max. 64 characters
Bit rates
32 - 320 kbits/s, variable speed
Number of files
Max. 400 files per medium, max. 255 directories with max. 8 directory levels
ID3 tags
Version 1 and 2, max. 64 characters
Supported
media
CD-ROM, CD-R, CD-RW with a capacity of 650 MB and 700 MB
SD or MMC card with a
capacity of up to 32 GB
a)
a)The two MP3 memory card drives have been tested for use with many products cur-
rently available on the market. However, there may be some memory cards which are
not supported.Playlists
m3u format, file extension “m3u”
media_systemE_EN.book Seite 22 Montag, 21. September 2009 1:48 13
Page 24 of 167
Drives23
Operating
RADIO, MEDIA (audiovisual
systems)
NAME, TEL
NAV, INFO
CAR, SETUP
The playing time indication may differ from the actual time in MP3 files with
a variable bit rate.
As a rule, the MP3 music files are copyright-protected under the applicable
international and national laws. In some countries it is not allowed to make
copies, not even for personal use, without prior authorisation by the rightful
owners.
Please make inquiries into and observe the applicable copyright laws.
These restrictions do not
apply if you are the rightful owner of these rights
(e.g. in the case of your own compositions or recordings) or if the rightful
owner has given you permission to use these rights.
Note
•Please observe the notes for handling CDs ⇒page 26.•An MP3 CD is a CD-ROM on which you can store MP3 files.•In view of the variety of CD-Rs and CD-RWs and the difference in memory
capacities, the quality of the MP3 function may vary in the case of some
memory media.•When you insert the DVD for the first time, new software for the navigation
system will automatically be installed. It will then no longer be possible to use
older DVDs.
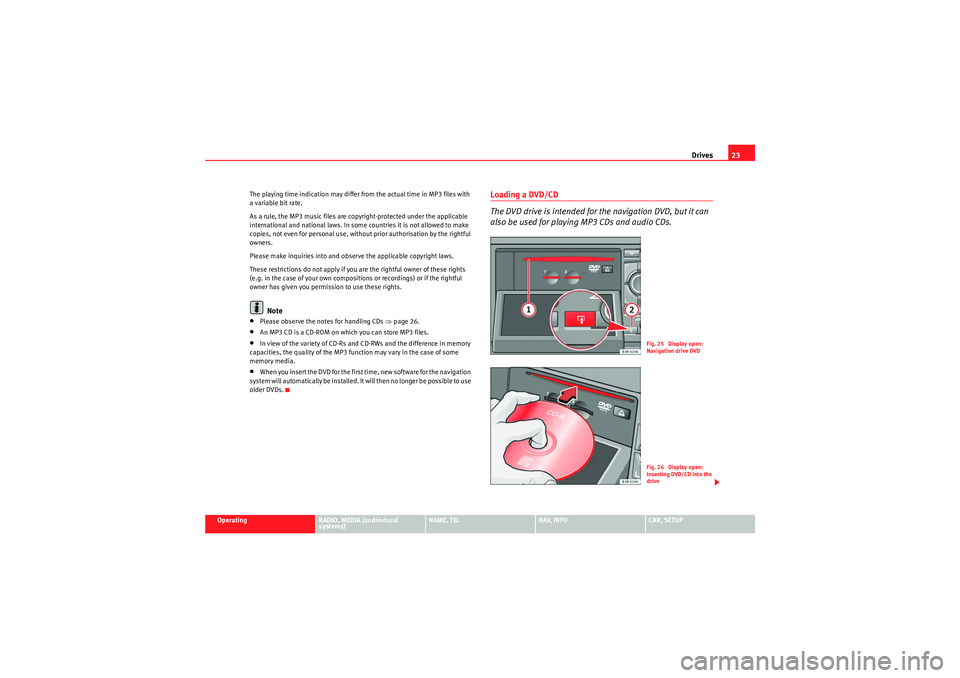
Loading a DVD/CD
The DVD drive is intended for the navigation DVD, but it can
also be used for playing MP3 CDs and audio CDs.
Fig. 25 Display open:
Navigation drive DVDFig. 26 Display open:
Inserting DVD/CD into the
drive
media_systemE_EN.book Seite 23 Montag, 21. September 2009 1:48 13
Page 28 of 167
Drives27
Operating
RADIO, MEDIA (audiovisual
systems)
NAME, TEL
NAV, INFO
CAR, SETUP
Do not use dirty CDs or navigation DVDs
Do not use CD covers/stabilisers
Always keep unused CDs or navigation DVDs in a suitable case and never
expose them to direct sunlight.
Cleaning drives and CDs or navigation DVDs
Never use a CD player cleaning disc to clean drives.
Clean CDs or navigation DVDs with a soft lint-free cloth. Wipe the disc in a
straight line from the centre outwards. If necessary, stubborn stains can be
removed with a commercially available CD cleaner or with isopropyl alcohol.
Please never use petrol, paint thinner or vinyl record cleaner, as these can
damage the CDs or the navigation DVDs.
Use of laser equipment
Laser devices are categorised according to DIN IEC 76 (CO) 6/VDE 0837 into
four safety classes. The audio devices used in your vehicle are classified as
safety class 1. Lasers used in devices that fall into this category are very weak
and well shielded, so there is no danger if used correctly.
Error messages
The following may be the reason for a read error on the display:
Note
•It is possible that you may not be able to play CDs which are copy-
protected or CDs containing CD ROM format that do not correspond to the
standard for audio CDs in your player. Only CDs that comply with this
standard have the logo “Compact Disc Digital Audio” printed on the CD.•At extremely high or low outside temperatures, it is possible that the play-
back of a DVD/CD will temporarily not function. A thermostat switch is
installed to protect the DVD/CDs and the reading laser.•Never remove the cover of the equipment. The equipment has no compo-
nents that can be serviced by the owner.Problem
Solution
The navigation DVD, audio CD or
MP3 CD is dirty.
Clean the CD.
The navigation DVD, audio CD or
MP3 CD is scratched.
Check the CD for scratches.
The navigation DVD, audio CD or
MP3 CD has been inserted upside
down.
Insert the CD with the printed side
upwards.
There is condensation on the naviga-
tion DVD, audio CD or MP3 CD.
Wait until the equipment is dry.
The drive mechanism is malfunction-
ing.
Contact a Dealer or qualified work-
shop.
media_systemE_EN.book Seite 27 Montag, 21. September 2009 1:48 13
Page 29 of 167
Drives
28Instructions relating to memory cardsThe system is compatible with SD and MMC memory cards.The two MP3 memory card drives have been tested for use with many prod-
ucts currently available on the market. However, there may be some memory
cards which are not supported.
Store the memory cards in a suitable case to protect them from dirt and dust
and to avoid scratches or other kind of damage.
Caution
Only use one-piece SD/MMC memory cards. If you use SD/MMC adapter
cards (more than one piece), the memory card can detach from the adapter
(e.g. caused by jolting, etc). Parts could then get stuck in the drive.
Note
The quality of the MP3 function may vary for certain types of memory card.iPod interface*General notes
The iPod interface can be used to connect an iPod to your
navigation system and allows you to play audio files directly
over the vehicle's sound system.The iPod interface is located in your vehicle's glove box. It is compatible with
3rd generation or higher iPod
2) devices (made from about 2003 onwards),
with the exception of the iPod Shuffle. The iPod is controlled using the CD function
⇒page 48.
•The navigation system orders (first numerically and then alphabetically)
the playlists with the tracks stored in the iPod and then assigns them in the
sequence CD 1 to CD 5. For easier playing of these playlists through the
vehicle's sound system, we recommend you create five playlists (e.g. 1.... to
5....) in your iPod.•If you select CD 6, all the tracks on the iPod will be played even if they are
stored in different playlists.
Information stored on the iPod, such as artist, track, album and genre, or the
name of a playlist, does not appear on the navigation system display.Caution
Very high or very low temperatures (a common occurrence in a vehicle's inte-
rior) can cause damage to the iPod and/or impair its performance.•Please do not leave your iPod in the vehicle in case of extreme tempera-
tures.Note
Please refer to the iPod operating instructions for important information on
how to use your iPod.2)iPod is a registered trademark of Apple Computer Inc.
media_systemE_EN.book Seite 28 Montag, 21. September 2009 1:48 13
Page 31 of 167
Drives
30•Make sure that the iPod is fixed in place with one of the adapters
supplied.Note
•Your Dealer also offers appropriate adapters for iPods that are not latest
generation.•For further information on adapter adaptation, please see the information
enclosed with the adapters supplied.Inserting the iPod into the iPod interface– Switch on the navigation system ⇒ page 4.
– With the display facing upwards and the contact towards the front, slide the iPod into the bay until you hear it engages. The
iPod will switch on automatically and the battery will be charged.
– If the navigation system does not detect the iPod after you insert it, please “reset” the iPod (refer to the iPod operating instruc-
tions).To start the iPod, press the button ⇒page 48.
The iPod is switched off automatically when you switch off the navigation
system or the ignition.
Note
•To ensure optimum sound quality, you should enable the “sound check”
setting on the iPod and disable the “EQ” (equaliser) before inserting the iPod
(please refer to the iPod operating instructions).•Slight scoring marks may occur on the iPod when used with the adapter.
Functions
The iPod is operated using the navigation system controls.– To start the iPod, press the button.The following functions are available:•Play all tracks stored on the iPod•Select directly and play up to five track lists•Switch between the different track lists•Fast forward and rewind within a track•Change tracks within a playlist•Play tracks in shuffle mode ("shuffle")•SCAN function
For further information on handling, please refer to the “MEDIA” chapter
⇒ page 48.TipsHere are some tips and points to remember when using the iPod in the
vehicle:•Track numbers appear with a maximum of two digits in the navigation
system display. The first digit is suppressed if you select a track with a three-
digit number, i.e. track 125 and track 25 are both displayed as track “25”. For
this reason we do not recommend allocating more than 99 tracks to each
playlist.•If you reach the end of a playlist when selecting a track directly
(forward/reverse), the count is resumed at track “1”.
MEDIA
MEDIA
media_systemE_EN.book Seite 30 Montag, 21. September 2009 1:48 13