Seat Toledo 2013 Manual Online
Manufacturer: SEAT, Model Year: 2013, Model line: Toledo, Model: Seat Toledo 2013Pages: 258, PDF Size: 3.94 MB
Page 81 of 258

79
Communication
Audio system adjustment
Fig. 38 Controls on the steering wheel
ButtonRadioMedia (except AUX)AUXA TurnIncrease/lower volumeIncrease/lower volumeIncrease/lower volumeA PressNo functionNo functionNo functionBMutePauseMute
CSearch for last stationShort press: Switch to previous song
Long press: RewindNo function
DSearch for next stationShort press: Change to next song
Long press: Fast forwardNo function
EPrevious presetPrevious folderNo functionFNext presetNext folderNo functionGChange sourceChange sourceChange sourceH TurnSwitch MFA functionSwitch MFA functionSwitch MFA functionH PressOperates on MFAOperates on MFAOperates on MFA
Safety FirstOperating instructionsPractical TipsTechnical specifications
Page 82 of 258
80Communication
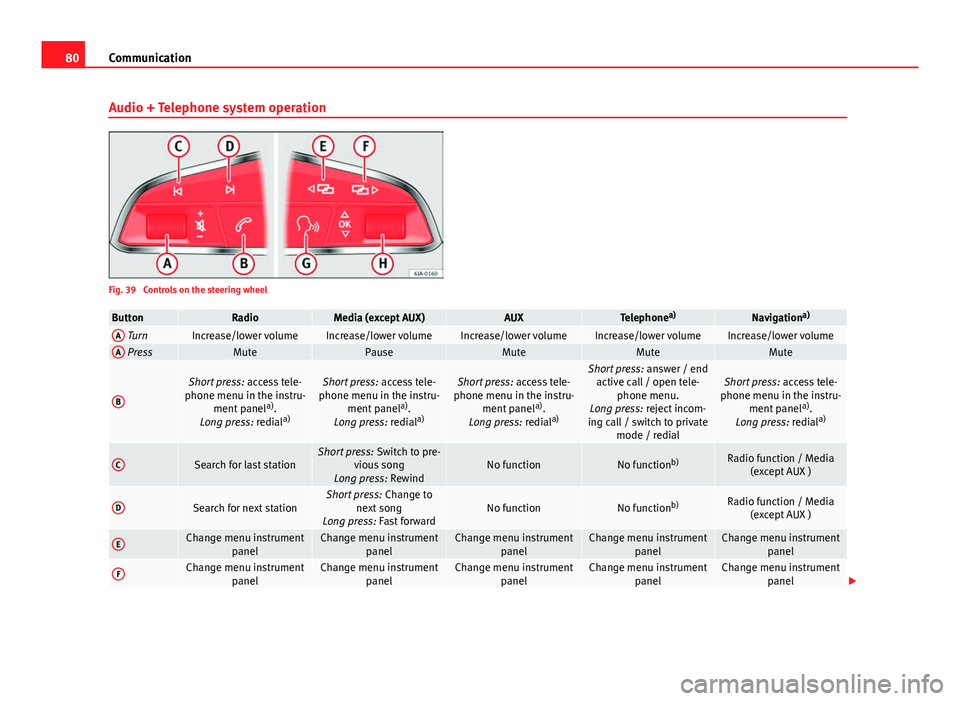
Audio + Telephone system operation
Fig. 39 Controls on the steering wheel
ButtonRadioMedia (except AUX)AUXTelephone a)Navigation a)A TurnIncrease/lower volumeIncrease/lower volumeIncrease/lower volumeIncrease/lower volumeIncrease/lower volumeA PressMutePauseMuteMuteMute
B
Short press:
access tele-
phone menu in the instru- ment panel a)
.
Long press: redial a)Short press:
access tele-
phone menu in the instru- ment panel a)
.
Long press: redial a)Short press:
access tele-
phone menu in the instru- ment panel a)
.
Long press: redial a)Short press:
answer / end
active call / open tele- phone menu.
Long press: reject incom-
ing call / switch to private mode / redialShort press: access tele-
phone menu in the instru- ment panel a)
.
Long press: redial a)
CSearch for last stationShort press:
Switch to pre-
vious song
Long press: RewindNo functionNo function b)Radio function / Media
(except AUX )
DSearch for next stationShort press: Change to
next song
Long press: Fast forwardNo functionNo function b)Radio function / Media
(except AUX )
EChange menu instrument panelChange menu instrumentpanelChange menu instrumentpanelChange menu instrumentpanelChange menu instrumentpanel
FChange menu instrument panelChange menu instrumentpanelChange menu instrumentpanelChange menu instrumentpanelChange menu instrumentpanel
Page 83 of 258

81
Communication
ButtonRadioMedia (except AUX)AUXTelephone a)Navigation a)
GActivating/deactivating
voice control a)Activating/deactivating
voice control a)Activating/deactivating
voice control a)No functionb)Activating/deactivating
voice control
H TurnNext / previous preset c)Next / previous presetc)Operates on the instrument
panel menu you are inOperates on the instru-
ment panel menu you are inOperates on the instru-
ment panel menu you are in
H Press
Operates on the MFA or
confirms instrument panel
menu option depending on the menu optionOperates on the MFA or
confirms instrument panel
menu option depending on the menu optionOperates on the MFA or
confirms instrument panel
menu option depending on the menu optionOperates on the MFA or
confirms instrument panel menu option depending on the menu optionOperates on the MFA or
confirms instrument panel menu option depending on the menu option
a) Depending on the vehicle equipment.
b) In call-in-progress situation, if not Radio/Media function (except AUX).
c) Only if the instrument panel is in the Audio menu.
Multimedia AUX-IN and MDI Inputs
Fig. 40 AUX-IN input/MDI input The operating description is located in the respective Instruction Manuals of
the audio system or the navigation system.
AUX-IN Input
The AUX-IN input is located in one of the following places:
●
in the centre console between the front seats ⇒ Fig. 40 - ;
● above the storage compartment in the front centre console ⇒ Fig. 40 -
;
● in the front panel of the SEAT Media System 2.2 navigation system.
The purpose of the AUX-IN input is to connect external devices in order to
play music (i.e. iPod ®
or an mp3 player) using the factory-fitted audio sys-
tem or the navigation system.
MDI Input
The MDI input is located above the storage compartment in the front centre
console ⇒ Fig. 40 - ;
Safety FirstOperating instructionsPractical TipsTechnical specifications
Page 84 of 258
82Communication
The MDI input is composed of the USB and AUX-IN inputs.
The purpose of the MDI input is to connect external devices (i.e. iPod ®
, mp3
players or USB memories) in order to play music using the audio system or
the navigation system.
In order to connect Apple multimedia devices (such as an iPod ®
/iPhone ®
…)
the corresponding adaptor from the SEAT Original Accessories catalogue is
required.
Voice control
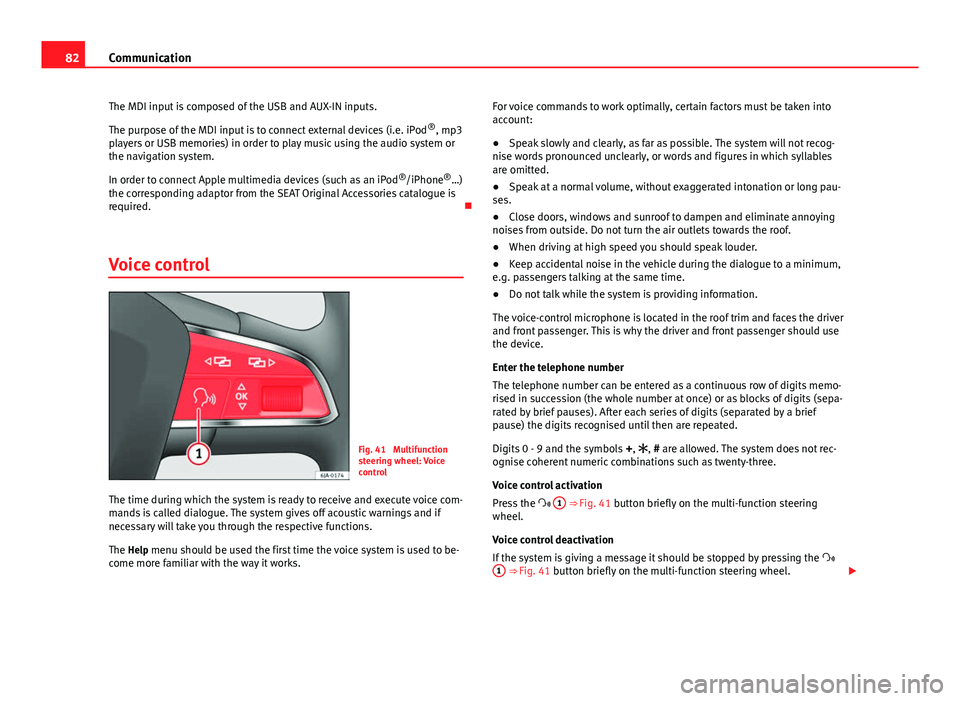
Fig. 41 Multifunction
steering wheel: Voice
control
The time during which the system is ready to receive and execute voice com-
mands is called dialogue. The system gives off acoustic warnings and if
necessary will take you through the respective functions.
The Help menu should be used the first time the voice system is used to be-
come more familiar with the way it works. For voice commands to work optimally, certain factors must be taken into
account:
●
Speak slowly and clearly, as far as possible. The system will not recog-
nise words pronounced unclearly, or words and figures in which syllables
are omitted.
● Speak at a normal volume, without exaggerated intonation or long pau-
ses.
● Close doors, windows and sunroof to dampen and eliminate annoying
noises from outside. Do not turn the air outlets towards the roof.
● When driving at high speed you should speak louder.
● Keep accidental noise in the vehicle during the dialogue to a minimum,
e.g. passengers talking at the same time.
● Do not talk while the system is providing information.
The voice-control microphone is located in the roof trim and faces the driver
and front passenger. This is why the driver and front passenger should use
the device.
Enter the telephone number
The telephone number can be entered as a continuous row of digits memo-
rised in succession (the whole number at once) or as blocks of digits (sepa-
rated by brief pauses). After each series of digits (separated by a brief
pause) the digits recognised until then are repeated.
Digits 0 - 9 and the symbols +, , # are allowed. The system does not rec-
ognise coherent numeric combinations such as twenty-three.
Voice control activation
Press the 1
⇒ Fig. 41 button briefly on the multi-function steering
wheel.
Voice control deactivation
If the system is giving a message it should be stopped by pressing the
1
⇒ Fig. 41 button briefly on the multi-function steering wheel.
Page 85 of 258

83
Communication
If the system is waiting for a voice command the dialogue may be ended as
follows:
● with the CANCEL voice command;
● pressing the 1
⇒ Fig. 41 button briefly on the multi-function steer-
ing wheel.
Basic voice commands
Voice commandAction
HELPAfter this command, the system repeats all the possi-
ble commands.
CALL [XYZ]This command is used to call a contact in the phone
book.
PHONE BOOKAfter this command you can hear the phone book, cor-
rect or delete a name tag for a contact, etc.
CALL LISTLists of the number selected, missed calls, etc.
DIAL NUMBERAfter this command you can enter a phone number to
call the desired person.
REDIALAfter this command the system dials the last number.
MUSICMusic playback from the mobile phone or other paired
telephone.
OTHER OPTIONSAfter this command, the system offers other com-
mands depending on the context.
SETTINGSSelect the setting for Bluetooth ®
, dialogue, etc.CANCELThe dialogue ends.
Note
● An incoming call will end the dialogue immediately.
● Voice control is only possible in vehicles equipped with a multi-function
steering wheel with telephone control (High version).
Safety FirstOperating instructionsPractical TipsTechnical specifications
Page 86 of 258
84Opening and closing
Opening and closing
Keys
General notes
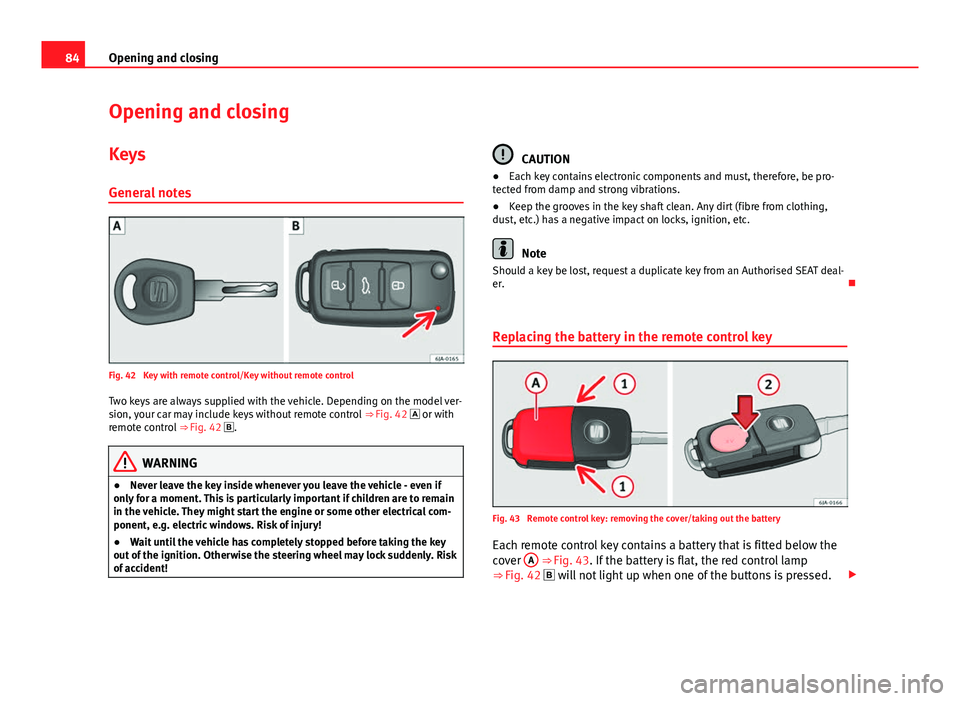
Fig. 42 Key with remote control/Key without remote control Two keys are always supplied with the vehicle. Depending on the model ver-
sion, your car may include keys without remote control ⇒ Fig. 42 or with
remote control ⇒ Fig. 42 .
WARNING
● Never leave the key inside whenever you leave the vehicle - even if
only for a moment. This is particularly important if children are to remain
in the vehicle. They might start the engine or some other electrical com-
ponent, e.g. electric windows. Risk of injury!
● Wait until the vehicle has completely stopped before taking the key
out of the ignition. Otherwise the steering wheel may lock suddenly. Risk
of accident!
CAUTION
● Each key contains electronic components and must, therefore, be pro-
tected from damp and strong vibrations.
● Keep the grooves in the key shaft clean. Any dirt (fibre from clothing,
dust, etc.) has a negative impact on locks, ignition, etc.
Note
Should a key be lost, request a duplicate key from an Authorised SEAT deal-
er.
Replacing the battery in the remote control key
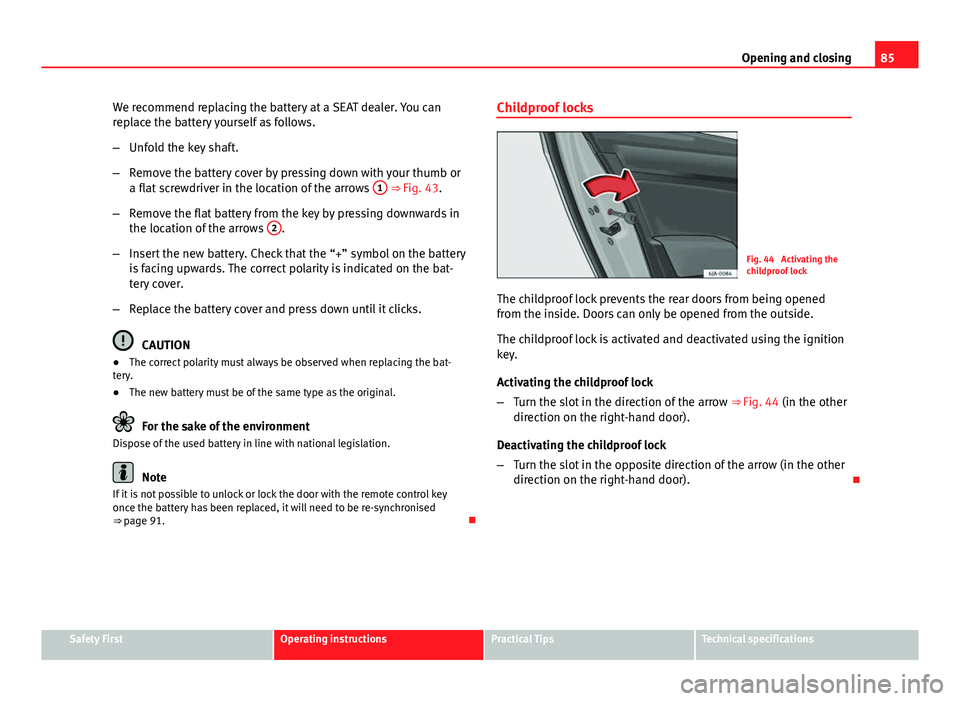
Fig. 43 Remote control key: removing the cover/taking out the battery
Each remote control key contains a battery that is fitted below the
cover A
⇒ Fig. 43. If the battery is flat, the red control lamp
⇒ Fig. 42 will not light up when one of the buttons is pressed.
Page 87 of 258
85
Opening and closing
We recommend replacing the battery at a SEAT dealer. You can
replace the battery yourself as follows.
– Unfold the key shaft.
– Remove the battery cover by pressing down with your thumb or
a flat screwdriver in the location of the arrows 1
⇒ Fig. 43.
– Remove the flat battery from the key by pressing downwards in
the location of the arrows 2
.
– Insert the new battery. Check that the “+” symbol on the battery
is facing upwards. The correct polarity is indicated on the bat-
tery cover.
– Replace the battery cover and press down until it clicks.
CAUTION
● The correct polarity must always be observed when replacing the bat-
tery.
● The new battery must be of the same type as the original.
For the sake of the environment
Dispose of the used battery in line with national legislation.
Note
If it is not possible to unlock or lock the door with the remote control key
once the battery has been replaced, it will need to be re-synchronised
⇒ page 91. Childproof locks
Fig. 44 Activating the
childproof lock
The childproof lock prevents the rear doors from being opened
from the inside. Doors can only be opened from the outside.
The childproof lock is activated and deactivated using the ignition
key.
Activating the childproof lock
– Turn the slot in the direction of the arrow ⇒ Fig. 44 (in the other
direction on the right-hand door).
Deactivating the childproof lock
– Turn the slot in the opposite direction of the arrow (in the other
direction on the right-hand door).
Safety FirstOperating instructionsPractical TipsTechnical specifications
Page 88 of 258
86Opening and closing
Central locking system
General notes
All of the doors will unlock or lock at the same time when the central locking
system is used. The rear lid is unlocked. It is then possible to open the rear
lid by pressing the release catch located at the top of the registration plate
recess ⇒ page 93.
Warning lamp on the driver door
Once the doors are locked, the warning lamp will flash quickly for 2 seconds
and then at a slower rate.
If the vehicle is locked with the Safe lock engaged ⇒ page 86, the warning
lamp on the driver door will flash quickly for 2 seconds before switching off
for 30 seconds and then flashing at a slower rate.
If the warning lamp flashes quickly for 2 seconds and then remains switch-
ed on before flashing at a slower rate after 30 seconds, there is a fault in
the interior monitor and tow-away protection system ⇒ page 92. Seek pro-
fessional help.
Individual settings
Unlocking single doors
This optional function unlocks the driver door only. The other doors remain
locked and are only unlocked when the next command is given (unlock).
Automatic unlock and lock
The doors and the rear lid are locked automatically when the vehicle rea-
ches a speed of about 15 km/h (9 mph). The doors unlock automatically when the key is removed from the ignition.
Additionally, the driver or front passenger can unlock the doors by pressing
the ⇒
page 88 central lock button or by pulling the front door handle.
WARNING
Locking the doors prevents intruders from getting into the car, e.g. while
waiting at junctions. However, it can also delay assistance in the event of
an accident. Risk of death!
Note
● Activation of the single door setting can be requested at your SEAT deal-
er.
● In the event of an accident in which the airbags activate, the doors will
be automatically unlocked for easier access and assistance.
● If the central locking system should fail to work at any time, only the
driver door can be locked or unlocked using the key ⇒ page 88. All other
doors and the rear lid can be operated manually.
–Manual release ⇒ page 89.
– Manual release of the rear lid ⇒ page 94.
Safe Lock
The central locking system is equipped with a Safe lock. If the vehicle is
closed from outside, the door locks will automatically lock. The warning
lamp on the driver door will flash quickly for 2 seconds and then at a slower
rate. It is not possible to open any of the doors from the inside or outside
using the handle. This limits the possibility of intruders getting into the ve-
hicle.
The Safe lock can be deactivated by pressing the lock button twice in less
than 2 seconds.
Page 89 of 258
87
Opening and closing
If the Safe lock is out of service, the control lamp on the driver door will
flash quickly for 2 seconds before switching off for 30 seconds and then
flashing at a slower rate.
The Safe lock is re-activated on unlocking and locking the vehicle again.
If the vehicle is locked and the Safe lock is deactivated, the vehicle can be
opened from inside by pulling on the door handle.
WARNING
Do not leave people or animals in locked vehicles with the Safe lock acti-
vated: the doors and windows cannot then be opened from the inside.
Doors locked in this manner could delay assistance in an emergency.
Risk of death!
Note
● The anti-theft alarm switches on automatically when the vehicle is
locked, even if the Safe lock is deactivated. The Vehicle interior monitoring,
however, is not activated.
● Given that the Safe function will be activated on locking the vehicle,
CHECK DEADLOCK will be shown on the general instrument panel display. On
vehicles equipped with an informative display, Caution SAFE! On-board docu-
mentation! will be indicated. Unlocking the vehicle with the key
Fig. 45 Key positions
during vehicle locking
and unlocking
– Turn the key in the driver door in the forward driving direction to
its unlock position A
⇒ Fig. 45.
– Pull the handle and open the door.
● All doors (driver door only on vehicles with anti-theft alarm) are un-
locked.
● The rear lid is unlocked.
● The courtesy lights switch on.
● The Safe lock is deactivated.
● The driver door warning lamp stops flashing (on vehicles not equipped
with an anti-theft system) ⇒ page 91.
Note
If the vehicle is equipped with an anti-theft alarm system, you have 15 sec-
onds as of opening the door to insert the key in the ignition and start the
vehicle. If, during these 15 seconds, the vehicle is not started , the alarm is
triggered.
Safety FirstOperating instructionsPractical TipsTechnical specifications
Page 90 of 258
88Opening and closing
Locking the vehicle with the key
–Turn the key in the driver door lock cylinder in the reverse direc-
tion to its lock position B ⇒ Fig. 45.
● The doors and the rear lid are locked.
● The courtesy lights switch off.
● The Safe lock is immediately activated.
● Warning lamp on the driver door starts to flash.
Note
The vehicle doors cannot be locked if the driver door is open.
Central lock button
Fig. 46 Central lock but-
ton
If the vehicle has not been locked from outside, it is possible to
lock and unlock the doors from inside by pressing the ⇒ Fig. 46
button, even without the key in the ignition. Locking all doors and rear lid
–
Press the button ⇒ Fig. 46. The warning lamp on the button
will light up.
Unlocking all doors and rear lid
– Press the button ⇒ Fig. 46. The warning lamp on the button
will switch off.
If the vehicle has been locked using the central lock button.
● The rear lid cannot be unlocked from outside (security measure, e.g.
when stopped at a junction).
● The doors can be unlocked individually by pulling the handle.
● The vehicle doors cannot be locked if any of the doors are open.
● In the event of an accident in which the airbags activate, doors locked
from the inside will be automatically unlocked for easier access and assis-
tance.
WARNING
The central locking system remains operative when the ignition is
switched off. Never leave children unattended in the vehicle, as locked
doors delay assistance in an emergency. Doors locked from the inside de-
lay assistance in an emergency. Risk of death!
Note
The handles and the central lock buttons will not work if the Safe lock
⇒ page 86 is activated.