technical specifications Seat Toledo 2014 User Guide
[x] Cancel search | Manufacturer: SEAT, Model Year: 2014, Model line: Toledo, Model: Seat Toledo 2014Pages: 200, PDF Size: 4.37 MB
Page 25 of 200

Airbag system
● the airbag is disabled, signalled with the
warning lamp
which lights up with the
word placed in the cen-
tre part of the dash panel ››› Fig. 18 3 .
Note
● Follow the current legislation in your coun-
try regarding the disabling of airbags.
● At your authorised SEAT dealer you can find
information on which vehicle airbags can be
disabled. Front passenger front airbag switch
Fig. 18
Front passenger front airbag
switch/warning lamp for disabling the front
passenger airbag. The switch disables only the front passenger
front airbag.
Disabling the airbag
– Switch the ignition off.
– Open the passenger side storage compart-
ment. –
Insert the key into the slot of the switch for
deactivating the front passenger airbag
››› Fig. 18 . About 3/4 of the key should en-
t er
, as far as it will go.
– Then turn the key gently to the position.
Do not f
orce it if you feel resistance, and
make sure you have inserted the key fully.
– Check, with the ignition switched on, that
the control lamp
illuminates with the
word in the centre
part of the dash panel.
Switching on the airbag
– Switch the ignition off.
– Open the passenger side storage compart-
ment.
– Insert the key into the slot of the switch for
deactivating the front passenger airbag
››› Fig. 18. About 3/4 of the key should en-
ter
, as far as it will go.
– Then turn the key gently to the position.
Do not force it if you feel resistance, and
make sure you have inserted the key fully.
– Close the passenger side storage compart-
ment.
– Check, with the ignition switched on, that
the control lamp does not illuminate,
with the words in the
centre of the dash panel. »
23
Technical specifications
Advice
Operation
Safety
Page 27 of 200

Transporting children safety
Important information regarding the
front passenger's airbag Fig. 19
Passenger's side sun visor: airbag
sticker. Fig. 20
On the rear frame of the passenger
side door: airbag sticker. A sticker with important information about
the passenger airbag is located on the pas-
senger's sun visor and/or on the passenger
side door frame. Read and always observe the safety information included in the follow-
ing chapters:
● Safety distance with respect to the passen-
ger airbag ››› page 16, Why wear a seat belt
and assume the correct sitting position? .
● Objects between the passenger and the
passenger side airbag ››› in Front airbags
on page 20 .
The p a
ssenger side front airbag, when ena-
bled, is a serious risk for a child that is facing
backward since the airbag can strike the seat
with such force that it can cause serious or
fatal injuries. Children up to 12 years old
should always travel on the rear seat.
Therefore we strongly recommend you to
transport children on the rear seats. This is
the safest location in the vehicle. Alternative-
ly, the front passenger airbag can be disa-
bled with a key-operated switch ››› page 22.
When transporting children, use a child seat
suitable for the age and size of each child
››› page 24. WARNING
● If a child seat is secured to the front pas-
senger seat, the risk to the child of sustain-
ing critical or fatal injuries in the event of an
accident increases.
● An inflating front passenger airbag can
strike the rear-facing child seat and project it with great force against the door, the roof or
the backrest.
●
Never install a child seat facing backwards
on the front passenger seat unless the front
passenger front airbag has been disabled.
Risk of potentially fatal injuries to the child!
However, if it is necessary, in exceptional ca-
ses, to transport a child in the front passen-
ger seat, the front passenger front airbag
must always be disabled ››› page 22. If the
front passenger seat has a height adjustment
option, move it to the highest position.
● For those vehicles that do not include a key
lock switch to deactivate the airbag, the vehi-
cle must be taken to a technical service.
● All vehicle occupants, especially children,
must assume the proper sitting position and
be properly belted in while travelling.
● Never hold children or babies on your lap,
this can result in potentially fatal injuries to
the child!
● Never allow a child to be transported in a
vehicle without being properly secured, or to
stand up or kneel on a seat while travelling.
In an accident, the child could be flung
through the vehicle, causing possibly fatal in-
juries to themselves and to the other vehicle
occupants.
● If children assume an improper sitting posi-
tion when the vehicle is moving, they expose
themselves to greater risk of injury in the
event of a sudden braking manoeuvre or in an
accident. This is particularly important if the
child is travelling on the front passenger seat » 25
Technical specifications
Advice
Operation
Safety
Page 29 of 200
Transporting children safety
Suitable for universal approved restrain-
ing systems for use in this age category
(universal retention systems are those
fitted using the adult seat belt).
Move the front passenger seat as far
back as possible, as high as possible
and always disable the airbag.
Suitable for retention systems using the
“ISOFIX” and Top Tether* anchors. WARNING
● When travelling, children must be secured
in the vehicle with a restraint system suitable
for age, weight and size.
● Read and always observe information and
warnings concerning the use of child seats
››› page 25. Child seats fastened with the
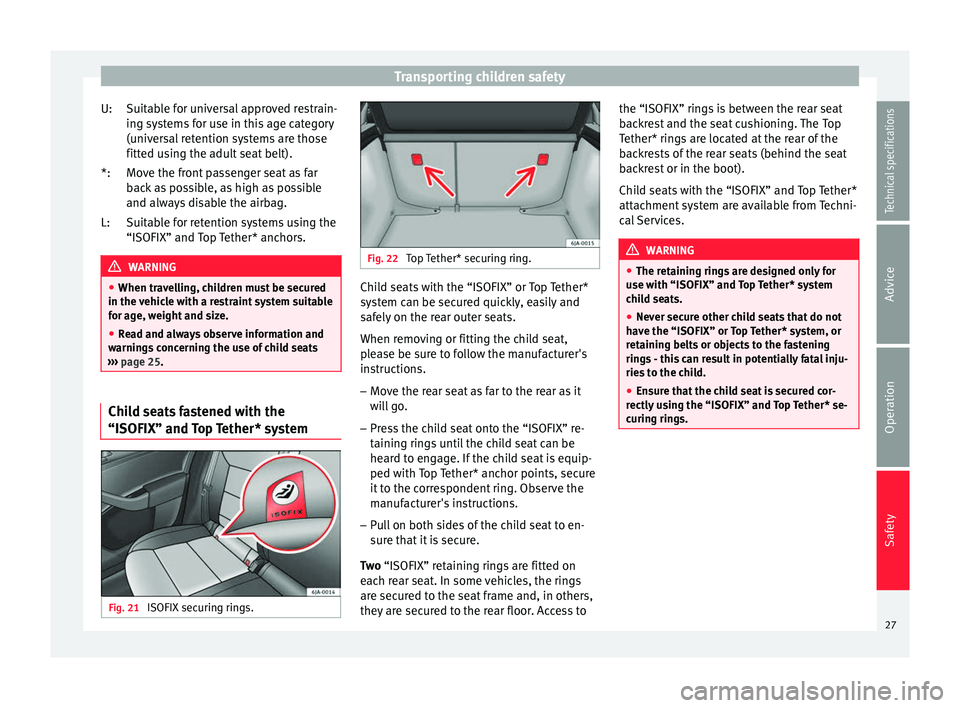
“ISOFIX” and Top Tether* system
Fig. 21
ISOFIX securing rings. U:
*:
L:
Fig. 22
Top Tether* securing ring. Child seats with the “ISOFIX” or Top Tether*
system can be secured quickly, easily and
safely on the rear outer seats.
When removing or fitting the child seat,
please be sure to follow the manufacturer's
instructions.
– Move the rear seat as far to the rear as it
will go.
– Press the child seat onto the “ISOFIX” re-
taining rings until the child seat can be
heard to engage. If the child seat is equip-
ped with Top Tether* anchor points, secure
it to the correspondent ring. Observe the
manufacturer's instructions.
– Pull on both sides of the child seat to en-
sure that it is secure.
Two “ISOFIX” retaining rings are fitted on
e ac
h rear seat. In some vehicles, the rings
are secured to the seat frame and, in others,
they are secured to the rear floor. Access to the “ISOFIX” rings is between the rear seat
backrest and the seat cushioning. The Top
Tether* rings are located at the rear of the
backrests of the rear seats (behind the seat
backrest or in the boot).
Child seats with the “ISOFIX” and Top Tether*
attachment system are available from Techni-
cal Services.
WARNING
● The retaining rings are designed only for
use with “ISOFIX” and Top Tether* system
child seats.
● Never secure other child seats that do not
have the “ISOFIX” or Top Tether* system, or
retaining belts or objects to the fastening
rings - this can result in potentially fatal inju-
ries to the child.
● Ensure that the child seat is secured cor-
rectly using the “ISOFIX” and Top Tether* se-
curing rings. 27
Technical specifications
Advice
Operation
Safety
Page 31 of 200
Controls and displays
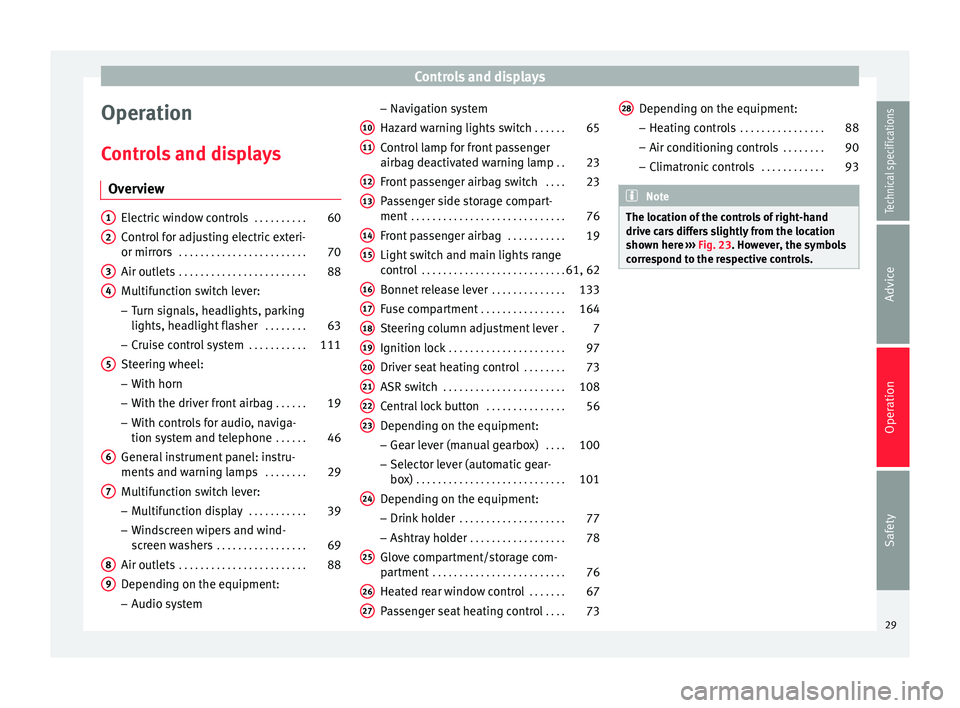
Operation
Controls and displays Overview Electric window controls
. . . . . . . . . .60
Control for adjusting electric exteri-
or mirrors . . . . . . . . . . . . . . . . . . . . . . . . 70
Air outlets . . . . . . . . . . . . . . . . . . . . . . . . 88
Multifunction switch lever:
– Turn signals, headlights, parking
lights, headlight flasher . . . . . . . .63
– Cruise control system . . . . . . . . . . .111
Steering wheel:
– With horn
– With the driver front airbag . . . . . .19
– With controls for audio, naviga-
tion system and telephone . . . . . .46
General instrument panel: instru-
ments and warning lamps . . . . . . . .29
Multifunction switch lever:
– Multifunction display . . . . . . . . . . .39
– Windscreen wipers and wind-
screen washers . . . . . . . . . . . . . . . . . 69
Air outlets . . . . . . . . . . . . . . . . . . . . . . . . 88
Depending on the equipment:
– Audio system
1 2
3
4
5
6
7
8
9 –
Navigation system
Hazard warning lights switch . . . . . .65
Control lamp for front passenger
airbag deactivated warning lamp . .23
Front passenger airbag switch . . . .23
Passenger side storage compart-
ment . . . . . . . . . . . . . . . . . . . . . . . . . . . . . 76
Front passenger airbag . . . . . . . . . . .19
Light switch and main lights range
control . . . . . . . . . . . . . . . . . . . . . . . . . . . 61, 62
Bonnet release lever . . . . . . . . . . . . . .133
Fuse compartment . . . . . . . . . . . . . . . . 164
Steering column adjustment lever .7
Ignition lock . . . . . . . . . . . . . . . . . . . . . . 97
Driver seat heating control . . . . . . . .73
ASR switch . . . . . . . . . . . . . . . . . . . . . . . 108
Central lock button . . . . . . . . . . . . . . .56
Depending on the equipment:
– Gear lever (manual gearbox) . . . .100
– Selector lever (automatic gear-
box) . . . . . . . . . . . . . . . . . . . . . . . . . . . . 101
Depending on the equipment:
– Drink holder . . . . . . . . . . . . . . . . . . . . 77
– Ashtray holder . . . . . . . . . . . . . . . . . . 78
Glove compartment/storage com-
partment . . . . . . . . . . . . . . . . . . . . . . . . . 76
Heated rear window control . . . . . . .67
Passenger seat heating control . . . .73
10 11
12
13
14
15
16
17
18
19
20
21
22
23
24
25
26
27 Depending on the equipment:
– Heating controls . . . . . . . . . . . . . . . . 88
– Air conditioning controls . . . . . . . .90
– Climatronic controls . . . . . . . . . . . .93 Note
The location of the controls of right-hand
drive cars differs slightly from the location
shown here ››› Fig. 23. However, the symbols
c orr
espond to the respective controls. 28
29
Technical specifications
Advice
Operation
Safety
Page 33 of 200
Instruments and warning lamps
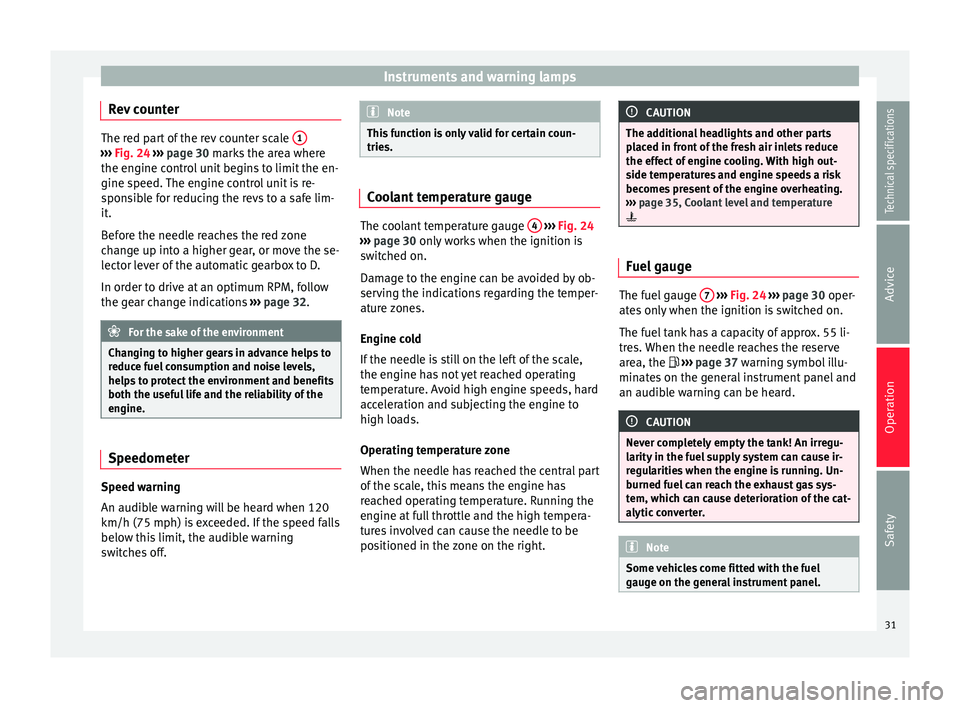
Rev counter The red part of the rev counter scale
1›››
Fig. 24 ››› page 30 marks the area where
the engine control unit begins to limit the en-
gine speed. The engine control unit is re-
sponsible for reducing the revs to a safe lim-
it.
Before the needle reaches the red zone
change up into a higher gear, or move the se-
lector lever of the automatic gearbox to D.
In order to drive at an optimum RPM, follow
the gear change indications ››› page 32. For the sake of the environment
Changing to higher gears in advance helps to
reduce fuel consumption and noise levels,
helps to protect the environment and benefits
both the useful life and the reliability of the
engine. Speedometer
Speed warning
An audible warning will be heard when 120
km/h (75 mph) is exceeded. If the speed falls
below this limit, the audible warning
switches off. Note
This function is only valid for certain coun-
tries. Coolant temperature gauge
The coolant temperature gauge
4
››› Fig. 24
››› page 30 only works when the ignition is
sw it
ched on.
Damage to the engine can be avoided by ob-
serving the indications regarding the temper-
ature zones.
Engine cold
If the needle is still on the left of the scale,
the engine has not yet reached operating
temperature. Avoid high engine speeds, hard
acceleration and subjecting the engine to
high loads.
Operating temperature zone
When the needle has reached the central part
of the scale, this means the engine has
reached operating temperature. Running the
engine at full throttle and the high tempera-
tures involved can cause the needle to be
positioned in the zone on the right. CAUTION
The additional headlights and other parts
placed in front of the fresh air inlets reduce
the effect of engine cooling. With high out-
side temperatures and engine speeds a risk
becomes present of the engine overheating.
››› page 35, Coolant level and temperature
Fuel gauge
The fuel gauge
7
›››
Fig. 24 ›
›
›
page 30 oper-
ates only when the ignition is switched on.
The fuel tank has a capacity of approx. 55 li-
tres. When the needle reaches the reserve
area, the ›››
page 37
warning symbol illu-
minates on the general instrument panel and
an audible warning can be heard. CAUTION
Never completely empty the tank! An irregu-
larity in the fuel supply system can cause ir-
regularities when the engine is running. Un-
burned fuel can reach the exhaust gas sys-
tem, which can cause deterioration of the cat-
alytic converter. Note
Some vehicles come fitted with the fuel
gauge on the general instrument panel. 31
Technical specifications
Advice
Operation
Safety
Page 35 of 200
Instruments and warning lamps
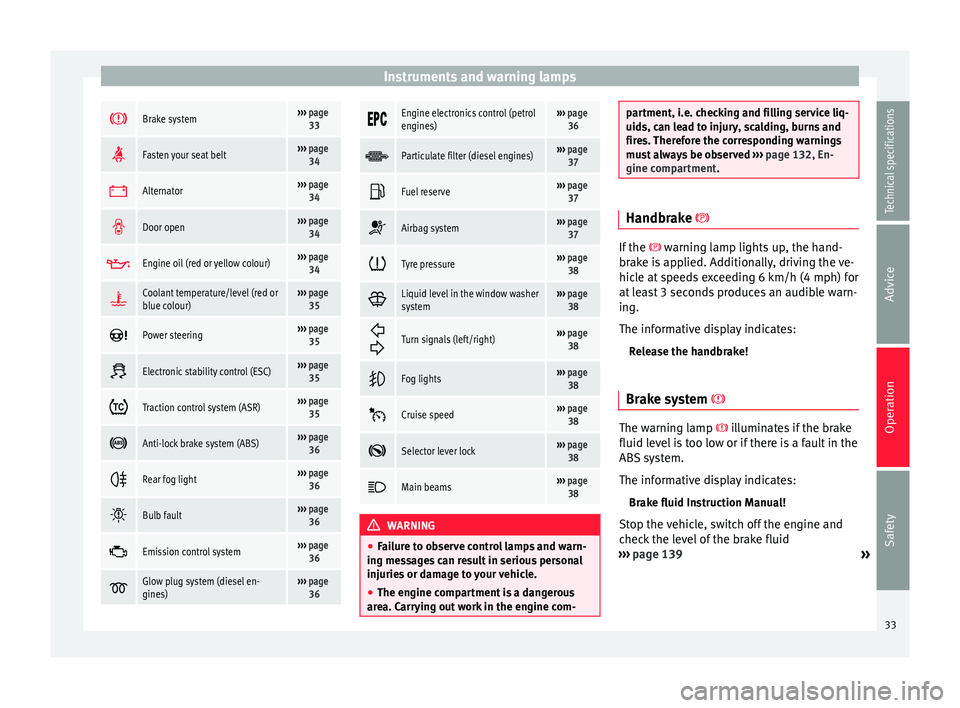
Brake system›››
page
33
Fasten your seat belt›››
page
34
Alternator›››
page
34
Door open›››
page
34
Engine oil (red or yellow colour)›››
page
34
Coolant temperature/level (red or
blue colour)›››
page
35
Power steering›››
page
35
Electronic stability control (ESC)›››
page
35
Traction control system (ASR)›››
page
35
Anti-lock brake system (ABS)›››
page
36
Rear fog light›››
page
36
Bulb fault›››
page
36
Emission control system›››
page
36
Glow plug system (diesel en-
gines)›››
page
36
Engine electronics control (petrol
engines)›››
page
36
Particulate filter (diesel engines)›››
page
37
Fuel reserve›››
page
37
Airbag system›››
page
37
Tyre pressure›››
page
38
Liquid level in the window washer
system›››
page
38
Turn signals (left/right)››› page
38
Fog lights›››
page
38
Cruise speed›››
page
38
Selector lever lock›››
page
38
Main beams›››
page
38 WARNING
● Failure to observe control lamps and warn-
ing messages can result in serious personal
injuries or damage to your vehicle.
● The engine compartment is a dangerous
area. Carrying out work in the engine com- partment, i.e. checking and filling service liq-
uids, can lead to injury, scalding, burns and
fires. Therefore the corresponding warnings
must always be observed
››› page 132, En-
gine compartment. Handbrake
If the
warning lamp lights up, the hand-
br ak
e is applied. Additionally, driving the ve-
hicle at speeds exceeding 6 km/h (4 mph) for
at least 3 seconds produces an audible warn-
ing.
The informative display indicates:
Release the handbrake!
Brake system The warning lamp
illuminates if the brake
fluid level is too low or if there is a fault in the
ABS system.
The informative display indicates:
Brake fluid Instruction Manual!
Stop the vehicle, switch off the engine and
check the level of the brake fluid
››› page 139
»
33
Technical specifications
Advice
Operation
Safety
Page 37 of 200

Instruments and warning lamps
Coolant level and temperature If the warning lamp
(blue) is lit up, the en-
gine h a
s not yet reached its operating tem-
perature 1)
. Avoid high engine speeds, hard
acceleration and subjecting the engine to
high loads.
If the warning lamp (red) is lit up or flash-
ing, the c
oolant temperature is too high or its
level is too low.
The informative display indicates:
Check coolant! Instruction Manual!
Stop the vehicle, switch off the engine, check
the coolant level ›››
page 138 and refill if
nec e
ssary ››› page 138.
If the c
oolant is situated in the prescribed
area, the high temperature may be due to a
fault in the cooling system fan. Check the ra-
diator fan fuse and replace it if necessary
››› page 165, Changing fuses in the engine
compartment
.
If the warning lamp (red) remains lit up,
despite both the coolant level and the radia-
tor fan fuse being in correct condition,
stop the vehicle!
Go to a technical service. WARNING
● Take care when opening the coolant reser-
voir. When the engine is warm or hot, the
system is pressurised – Danger of burns!
Wait for the engine to cool before opening
the cover.
● Do not touch the fan. The fan can switch on
automatically regardless of whether the igni-
tion is switched on. Power steering
If the
warning lamp is illuminated, there is
a fault in the power steering.
The power steering system functions with re-
duced power steering effect.
Go to a technical service.
Stability Control (ESC) If the control lamp
flashes, the ESC is
working.
If the warning lamp illuminates on igni-
tion, the ESC system may have switched off
due to technical reasons. Turn off the ignition
and turn it on again. Upon switching on the
ignition again, if the warning lamp has switched off, this means the ESC is function-
ing correctly again.
If the
warning lamp is illuminated there is
a f au
lt in the ESC.
The informative display indicates: Report No.: electronic stability control (ESC)
or Report No.: Traction control system (ASR)
Go to a technical service.
Further information ››› page 108, Stability
system (ESC). Note
If the battery is disconnected and connected
again, the yellow warning lamp lights up
when the ignition i s
switched on. This warn-
ing lamp must switch off after covering a
short distance. Traction control system (ASR)
If the control lamp
flashes, the ASR is
working.
If the
warning lamp illuminates on igni-
tion, the TCS system may have switched off
due to technical reasons. Turn off the ignition »1)
This does not apply to vehicles equipped with an
informative display. 35
Technical specifications
Advice
Operation
Safety
Page 39 of 200

Instruments and warning lamps
Go to a technical service.
Particulate filter (diesel engines)The particulate filter eliminates soot from
emissions. The particles accumulate in the
filter where they are normally burned off.
If the warning lamp
is illuminated, the fil-
ter is obstructed by soot.
In order for the filter to clean itself (if the traf-
fic conditions ››› so permit) it is essential
to drive for at least 15 minutes (or until the
warning lamp switches off) with 4th or 5th
gear engaged (automatic gearbox: position
S) at a minimum speed of 60 km/h (37 mph)
with the engine speed between
1,800-2,500 rpm.
The warning lamp switches off once the
filter has been successfully cleaned.
If the cleaning process is not successful, the
warning lamp does not switch off and the
warning lamp starts to flash.
The informative display indicates:
Diesel particulate filter. Instruction Manual!
The engine control unit allows driving to con-
tinue in an emergency program. When
switching the ignition off and on again, the
warning lamp also illuminates.
Go to a technical service. WARNING
● The particulate filter attains very high tem-
peratures. Therefore, do not park the vehicle
in places where the exhaust pipe could come
into contact with dry grass or with highly-
flammable materials. Risk of fire! CAUTION
While the warning lamp is lit up, the fuel
c
onsumption is high, and in certain condi-
tions, the engine power is reduced. Note
● In order for the particulate filter to burn off
soot in a correct manner, avoid carrying out
frequent short journeys.
● Using diesel fuel with a high sulphur count
can considerably reduce the useful life of the
particulate filter. The specialised service pro-
vides information about the countries where
fuel with a high sulphur content is used. Fuel reserve
The warning lamp illuminates when ap-
proximately only 7 litres of fuel remain in the
tank
The informative display indicates:
Refuel! Fuel range…km...(miles) Note
The message on the display switches off only
after refuelling and carrying out a short jour-
ney. Airbag system
If the warning lamp
is lit up, there is a
f au
lt in the airbag system.
The informative display indicates: Airbag fault!
The airbag system availability is controlled
electronically, regardless of whether an air-
bag is disabled.
If the front airbag, side airbag, head protec-
tion airbag or the belt tensioner are disabled
using the diagnostics system:
● After switching on the ignition, the warn-
ing lamp illuminates for about 4 seconds and
flashes for another 12 seconds.
The informative display indicates:
Airbag/belt tensioner disabled! »
37
Technical specifications
Advice
Operation
Safety
Page 41 of 200
Information system
Information system
Multi-function display* (on
board computer) Introduction The multifunction display can only be operat-
ed when the ignition is switched on. When
the ignition is switched on the last function
selected before it was switched off is dis-
played.
The multifunction display data is shown on
the screen
›››
Fig. 26 › › ›
page 39.
In vehicles fitted with an informative display
››› page 43 the system can be adjusted so
that
certain data is not shown. WARNING
Always keep your attention on driving! As the
driver, you have the full responsibility for the
safety of traffic. Note
● If the second speed in mph (km/h) is dis-
played, the current speed in km/h (mph) is
not displayed on the screen. Memory
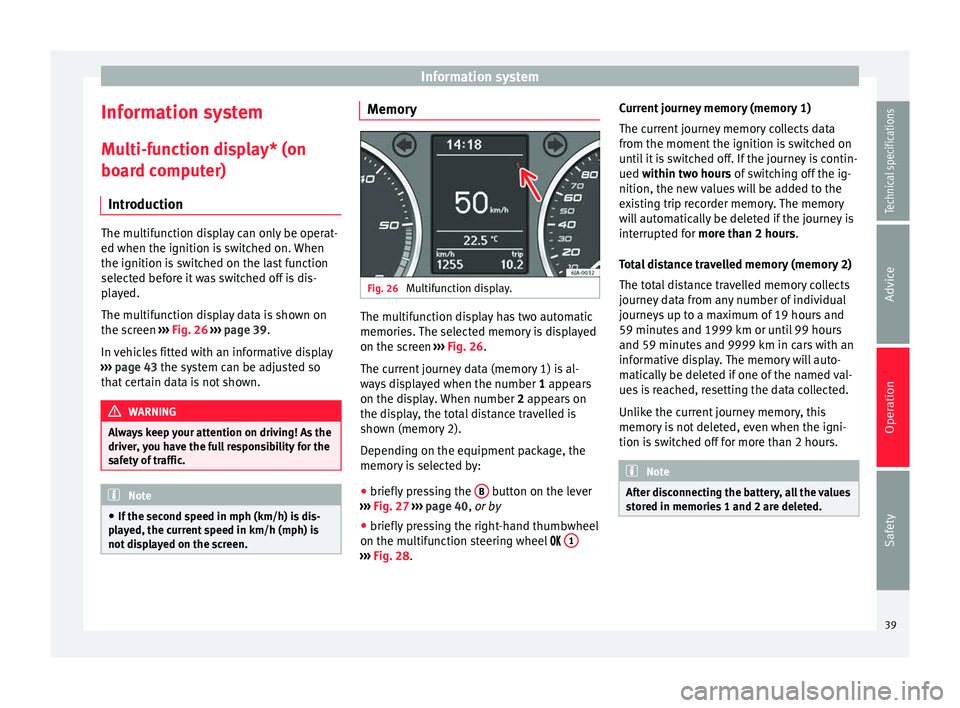
Fig. 26
Multifunction display. The multifunction display has two automatic
memories. The selected memory is displayed
on the screen
››› Fig. 26 .
The c urr
ent journey data (memory 1) is al-
ways displayed when the number 1
appears
on the display. When number 2 appears on
the display, the total distance travelled is
shown (memory 2).
Depending on the equipment package, the
memory is selected by:
● briefly pressing the B button on the lever
››› Fig. 27 ›
›
›
page 40, or by
● briefly pressing the right-hand thumbwheel
on the multifunction steering wheel 1 ›››
Fig. 28 . C
urr
ent journey memory (memory 1)
The current journey memory collects data
from the moment the ignition is switched on
until it is switched off. If the journey is contin-
ued
within two hours of switching off the ig-
nition, the new values will be added to the
existing trip recorder memory. The memory
will automatically be deleted if the journey is
interrupted for
more than 2 hours.
Total distance travelled memory (memory 2)
The total distance travelled memory collects
journey data from any number of individual
journeys up to a maximum of 19 hours and
59 minutes and 1999 km or until 99 hours
and 59 minutes and 9999 km in cars with an
informative display. The memory will auto-
matically be deleted if one of the named val-
ues is reached, resetting the data collected.
Unlike the current journey memory, this
memory is not deleted, even when the igni-
tion is switched off for more than 2 hours. Note
After disconnecting the battery, all the values
stored in memories 1 and 2 are deleted. 39
Technical specifications
Advice
Operation
Safety
Page 43 of 200

Information system
Current fuel consumption
Current fuel consumption is indicated on the
display in litres/100 km (miles) 1)
. You can
adapt your driving style to the required con-
sumption with the assistance of this indica-
tor.
The consumption is displayed in litres per
hour while the vehicle is stopped or at idling
speed 2)
.
Average fuel consumption
The display shows the average fuel consump-
tion in litres/100 km 1)
calculated since the
memory was last reset ››› page 39.
If you wish to measure the average fuel con-
sumption for a specific period, the memory
must first be deleted ››› page 40. While driv-
ing the first 300 m after deleting the memory
this value is not shown on the display.
The value is updated regularly while the vehi-
cle is in motion.
Operating range
The approximate operating range is indicated
in kilometres (miles) on the display. It shows how far the vehicle can travel with the availa-
ble fuel using the same driving conditions as
a reference.
The operating range is calculated in sections
of 10 kilometres (miles). When the fuel
gauge enters the reserve zone, the operating
range is displayed in steps of 5 kilometres.
The operating range is calculated based on
the fuel consumption during the last 50 kilo-
metres (miles). The operating range increa-
ses when driving in a more economical man-
ner.
When the memory is reset (after disconnect-
ing the battery), the operating range is calcu-
lated with a 10 litres per 100 km consump-
tion and adjusts to represent the current driv-
ing style.
Distance
The display shows the distance you have cov-
ered since the memory was last reset
››› page 39 . If you wish to measure the dura-
tion of a j
ourney from a specific moment, the
memory must be deleted ››› page 40.
The maximum value for both memories is
1999 km (miles), or 9999 km (miles) in vehi- cles fitted with an informative display. The
memory is reset if this value is exceeded.
Average speed
The display shows the average speed in
km/h (mph) calculated from the last time the
memory was reset
››› page 39. If you wish to
mea
sure the average speed for a specific pe-
riod, the memory must first be deleted
››› page 40.
Whil
e driving the first 300 m after deleting
the memory, this value is not shown on the
display.
The value is updated regularly while the vehi-
cle is in motion.
Driving speed
The current driving speed, the same as indi-
cated on the speedometer, is shown on the
display 3
››› Fig. 24
›
›› p
age 30.
Oil temperature
If the oil temperature is lower than +50 °C
(+122 °F) or if a fault appears on the oil tem-
perature control, in place of the temperature
indication, the sign
– –.– is shown. »1)
The indication of consumption is given in kms
(miles)/litres in models for certain countries.
2) The indication of the consumption when the vehi-
cle is stationary is given in – –.– km/litre in models
for certain countries. 41
Technical specifications
Advice
Operation
Safety