check engine SKODA FABIA 2014 2.G / 5J User Guide
[x] Cancel search | Manufacturer: SKODA, Model Year: 2014, Model line: FABIA, Model: SKODA FABIA 2014 2.G / 5JPages: 197, PDF Size: 13.56 MB
Page 105 of 197
WARNING■Greater physical effort is required for braking when the engine is switch-
ed off – there is the risk of an accident.■
The clutch pedal must be depressed when braking on a vehicle with man-
ual transmission, when the vehicle is in gear and at low revs. If you fail to
do so, the functionality of the brake servo can be impaired – there is the
risk of an accident.
■
If a front spoiler, full wheel trim, etc. is mounted retrospectively, it must
be ensured that the air supply to the front wheel brakes is not reduced.
The front brakes may overheat, which can have a negative impact on the
functioning of the braking system – there is a risk of an accident.
■
When leaving the vehicle, never leave persons who might, for example,
release the handbrake or take the vehicle out of gear unattended in the ve-
hicle. The vehicle might then move off – there is the risk of an accident.
CAUTION
■ Observe the recommendations on the new brake pads » page 109.■Never let the brakes slip with light pressure on the pedal if braking is not
necessary. This causes the brakes to overheat and can also result in a longer
braking distance and excessive wear.
Information for braking
Read and observe
and on page 103 first.
If the brakes are applied in full and the control unit for the braking system con-siders the situation to be dangerous for the following traffic, the brake light
flashes automatically.
After the speed was reduced below around 10 km/h or the vehicle was stop-
ped, the brake light stops flashing and the hazard warning light system
switches on. The hazard warning light system is switched off automatically af- ter accelerating or driving off again.
Before travelling a long distance down a steep gradient, reduce speed and
shift into the next lowest gear. As a result, the braking effect of the engine will
be used, reducing the load on the brakes. Any additional braking should be
completed intermittently, not continuously.
Wear-and-tear
The wear of the brake pads is dependent on the operating conditions and driv- ing style.
The brake pads wear more quickly if a lot of journeys are completed in towns and over short distances or if a very sporty style of driving is adopted.
Under these severe conditions , the thickness of the brake pads must also be
checked by a specialist garage between services.
Wet roads or road salt
The performance of the brakes can be delayed as the brake discs and brake
pads may be moist or have a coating of ice or layer of salt on them in winter.
The brakes are cleaned and dried by applying the brakes several times.
Corrosion
Corrosion on the brake discs and dirt on the bake pads occur if the vehicle has
been parked for a long period and if you do not make much use of the braking
system. The brakes are cleaned and dried by applying the brakes several times.
Faults in the brake surface
If it is found that the braking distance has suddenly become longer and that
the brake pedal can be depressed further, the brake system may be faulty.
Visit a specialist garage immediately and adjust your style of driving appropri-
ately as you will not know how great the damage is.
Low brake fluid level
An insufficient level of brake fluid may result in problems in the brake system.
The level of the brake fluid is monitored electronically » page 36,
Brake sys-
tem .
Brake booster
The brake booster increases the pressure generated with the brake pedal. The
brake booster only operates when the engine is running.103Starting-off and Driving
Page 111 of 197
New tyres
New tyres have to be “run in” since they do not offer optimal grip at first. Drive
especially carefully for the first 500 km or so.
New brake pads
New brake pads initially do not provide optimal braking performance. They first
need to be “run in”. Drive especially carefully for the first 200 km or so.
Economical driving and respect the environment
Introduction
This chapter contains information on the following subjects:
Driving with anticipation
109
Economical gear changing.
109
Avoiding full throttle
110
Reducing idling
110
Avoiding short distances
110
Checking tyre pressure
110
Avoiding unnecessary ballast
111
Regular maintenance
111
Saving electrical energy
111
Environmental compatibility
111
The technical requirements for low fuel usage and economic efficiency of the
vehicle have already been built into the vehicle at the works. ŠKODA places a
particular emphasis on minimising negative effects on the environment.
It is necessary to take note of the guidelines given in this chapter in order to make best use of these characteristics and to maintain their effectiveness.
Fuel consumption, environmental pollution and the wear to the engine, brakes
and tyres depend essentially on the following three factors.
› Your personal driving style
› Operating conditions
› Technical requirements
The fuel economy by can be improved by 10 -15 % by always looking ahead and
driving in an economical way.
Fuel consumption is also be influenced by external factors which are beyond
the driver's control. Consumption increases during the winter or under difficult
conditions, on poor roads, etc.
Fuel consumption can vary considerably from the manufacturer's data, as a re-
sult of outside temperatures, the weather and driving style.
The optimal engine speed should be maintained when accelerating, to avoid a high fuel consumption and resonance of the vehicle.
CAUTION
All the speed and engine revolution figures apply only when the engine is at
its normal operating temperature.
Driving with anticipation
Read and observe
on page 109 first.
A vehicle's highest fuel consumption occurs when accelerating, therefore un-necessary accelerating and braking should be avoided. If looking ahead when
driving, less braking and consequently less accelerating are required.
If possible, let your vehicle coast to a stop, or use the engine brake, if you can see that the next set of traffic lights is on red, for example.
Economical gear changing.
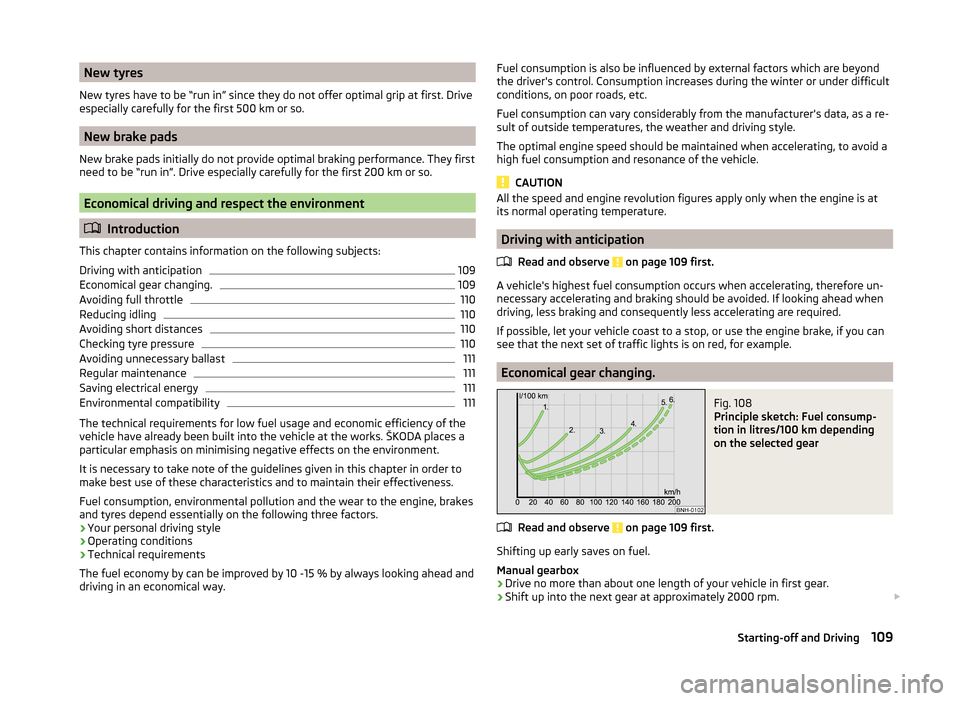
Fig. 108
Principle sketch: Fuel consump-
tion in litres/100 km depending
on the selected gear
Read and observe on page 109 first.
Shifting up early saves on fuel.
Manual gearbox › Drive no more than about one length of your vehicle in first gear.
› Shift up into the next gear at approximately 2000 rpm.
109Starting-off and Driving
Page 112 of 197
An effective way of achieving good fuel economy is to shift up early. Observe
the recommended gear » page 28, Recommended gear .
A suitably selected gear can have an effect on fuel consumption » Fig. 108.
Automatic gearbox
› Depress the accelerator pedal
slowly. However, do not depress it as far as
the kickdown position » page 107.
› An economic driving programme is automatically selected if the accelerator
pedal is only depressed slowly.
Avoiding full throttle
Fig. 109
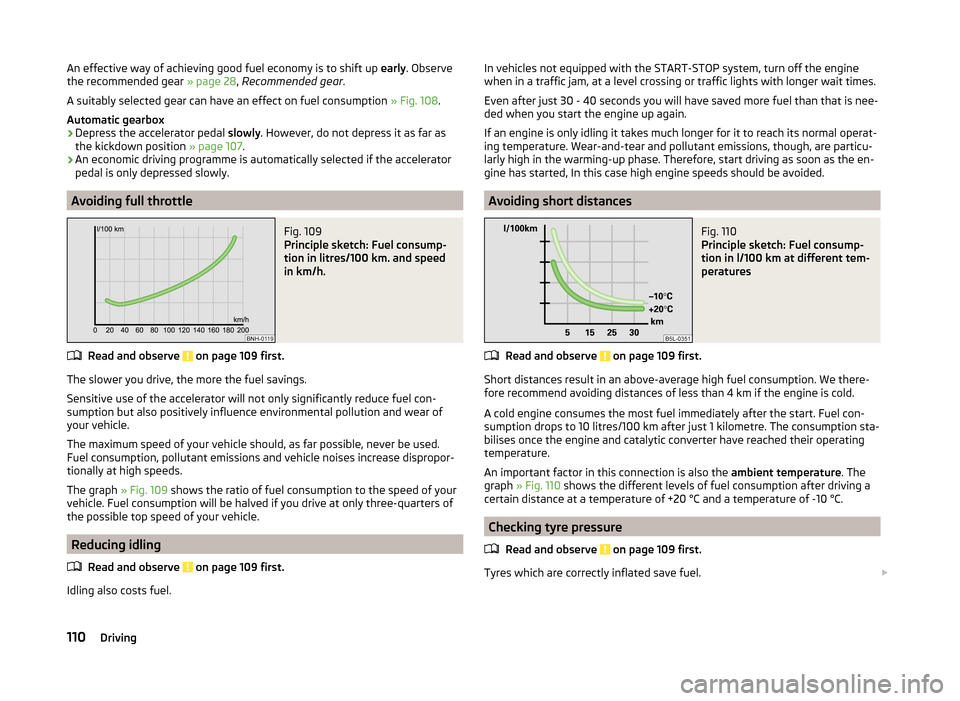
Principle sketch: Fuel consump-
tion in litres/100 km. and speed
in km/h.
Read and observe on page 109 first.
The slower you drive, the more the fuel savings.
Sensitive use of the accelerator will not only significantly reduce fuel con-
sumption but also positively influence environmental pollution and wear of
your vehicle.
The maximum speed of your vehicle should, as far possible, never be used.
Fuel consumption, pollutant emissions and vehicle noises increase dispropor-
tionally at high speeds.
The graph » Fig. 109 shows the ratio of fuel consumption to the speed of your
vehicle. Fuel consumption will be halved if you drive at only three-quarters of
the possible top speed of your vehicle.
Reducing idling
Read and observe
on page 109 first.
Idling also costs fuel.
In vehicles not equipped with the START-STOP system, turn off the engine
when in a traffic jam, at a level crossing or traffic lights with longer wait times.
Even after just 30 - 40 seconds you will have saved more fuel than that is nee-
ded when you start the engine up again.
If an engine is only idling it takes much longer for it to reach its normal operat-
ing temperature. Wear-and-tear and pollutant emissions, though, are particu- larly high in the warming-up phase. Therefore, start driving as soon as the en-
gine has started, In this case high engine speeds should be avoided.
Avoiding short distances
Fig. 110
Principle sketch: Fuel consump-
tion in l/100 km at different tem-
peratures
Read and observe on page 109 first.
Short distances result in an above-average high fuel consumption. We there- fore recommend avoiding distances of less than 4 km if the engine is cold.
A cold engine consumes the most fuel immediately after the start. Fuel con-
sumption drops to 10 litres/100 km after just 1 kilometre. The consumption sta-
bilises once the engine and catalytic converter have reached their operating
temperature.
An important factor in this connection is also the ambient temperature. The
graph » Fig. 110 shows the different levels of fuel consumption after driving a
certain distance at a temperature of +20 °C and a temperature of -10 °C.
Checking tyre pressure
Read and observe
on page 109 first.
Tyres which are correctly inflated save fuel.
110Driving
Page 113 of 197
Always ensure the tyre inflation pressure is correct. If the pressure is too low,
the tyres will have to overcome a higher rolling resistance. This will not only
increase fuel consumption but also tyre wear and the driving behaviour will
worsen.
Always check the tyre inflation pressure when the tyres are cold.
Avoiding unnecessary ballast
Read and observe
on page 109 first.
Transporting ballast costs fuel.
Each kilogramme of weight increases the fuel consumption. Therefore, we rec-
ommend that you carry no unnecessary weight.
It is particularly in town traffic, when one is accelerating quite often, that the
vehicle weight will have a significant effect upon the fuel consumption. A rule
of thumb here is that an increase in weight of 100 kilograms will cause an in-
crease in fuel consumption of about 1 litre/100 kilometres.
At a speed of 100 - 120 km/h, a vehicle fitted with a roof rack cross member
without a load will use about 10 % more fuel than normal due to the increased
aerodynamic drag.
Regular maintenance
Read and observe
on page 109 first.
A poorly tuned engine uses an unnecessarily high amount of fuel.
By having your vehicle regularly maintained by a specialist garage, you create
the conditions needed for driving economically. The maintenance state of your
vehicle has a positive effect on traffic safety and value retention
A poorly tuned engine can result in a fuel consumption which is 10 % higher
than normal.
Check the oil level at regular intervals, e.g. when refuelling. Oil consumption is
dependent to a considerable extent on the load and speed of the engine. Oil
consumption could be as high as 0.5 litres/1 000 km depending on your style
of driving.
It is quite normal that a new engine has a higher oil consumption at first, and
reaches its lowest level only after a certain running in time. The oil consump-
tion of a new vehicle can therefore only be correctly assessed after driving
about 5 000 km.
For the sake of the environment■ Additional improvements to the fuel economy can be made by using synthet-
ic high-lubricity oils.■
Regularly check the ground under the vehicle. Have your vehicle inspected by
a specialist garage if you find any stains caused by oil or other fluids on the
ground.
Note
We recommend that your vehicle is serviced on a regular basis by a ŠKODA
Service Partner.
Saving electrical energy
Read and observe
on page 109 first.
When the engine is running, the alternator generates and supplies electricalpower. If more electrical components of the electrical system are switched on,
more fuel is needed to operate the alternator. We therefore recommend
switching off electrical components if these are no longer required.
Environmental compatibility
Read and observe
on page 109 first.
Environmental protection has played a major role in the design, selection ofmaterials, and manufacture of your new ŠKODA. Particular emphasis has been
placed on the following points.
Design measures › Joints designed to be easily detached.
› Simplified disassembly due to the modular structure system.
› Improved purity of different classes of materials.
› Identification of all plastic parts in accordance with VDA Recommendation
260.
› Reduced fuel consumption and exhaust emission CO
2.
› Minimum fuel leakage during accidents.
› Reduced noise.
Choice of materials
› Extensive use of recyclable material.
› Air conditioning filled with CFC-free refrigerant.
› No cadmium.
111Starting-off and Driving
Page 115 of 197
WARNING■Driving through water, mud, sludge etc. can reduce the braking power
and extend the braking distance – there is the risk of an accident.■
Avoid abrupt and sudden braking immediately after water crossings.
■
After driving through bodies of water, the brakes must be cleaned and
dried as soon as possible by intermittent braking. Only apply the brakes for
the purpose of drying and cleaning the brake discs if the traffic conditions
permit this. Do not place any other road users in jeopardy.
CAUTION
■ When driving through water, some parts of the vehicle such as the engine,
gearbox, chassis or electrics can be severely damaged.■
Oncoming vehicles can generate water waves which can exceed the permis-
sible water level for your vehicle.
■
Potholes, mud or rocks can be hidden under the water making it difficult or
impossible to drive through the body of water.
■
Do not drive through salt water. The salt can lead to corrosion. Any vehicle
parts that have come into contact with salt water must be rinsed immediately
with fresh water.
Note
We recommend that the vehicle is checked by a specialist garage after it has
been driven through water.
Driving abroad
Introduction
This chapter contains information on the following subjects:
Unleaded petrol
113
Headlights
113
In certain countries, it may be possible that the ŠKODA service partner net-
work is limited or has not been established. This is the reason why procuring
certain spare parts may be somewhat complicated and specialist garages may
only be able to make limited repairs.
Unleaded petrol
A vehicle fitted with a petrol engine must always be refuelled with unleaded
petrol » page 136 , Unleaded petrol . Information regarding the locations of fill-
ing stations that offer unleaded petrol is, for example, provided by the auto-
mobile associations.
Headlights
The low beam of your headlights is set asymmetrically. It illuminates the side
of the road on which the vehicle is being driven to a greater extent.
When driving in countries in which the traffic drives on the other side of the
road than in your home country, the asymmetrical low beam may dazzle on-
coming drivers. To prevent oncoming traffic from being dazzled, the headlights
must be adjusted by a specialist garage.
Note
For more information on adjusting the headlights, consult a specialist garage.113Starting-off and Driving
Page 121 of 197
If after stopping the car, the message UNABLE TO START STOP appears in the
segment display or in the MAXI DOT display the check mark » Fig. 115 , then
the conditions for automatic engine shutdown are not met.
Running the engine is essential, for example, for the following reasons.
› The engine temperature for the proper function of the system has not yet
been reached.
› The charge state of the vehicle battery is too low.
› The current consumption is too high.
› High air-conditioning or heating capacity (high fan speed, big difference be-
tween the desired and actual indoor temperature).
Note
■ If the vehicle remains outdoors for a long time in minus temperatures or in
direct sunlight, it can take several hours until the internal temperature of the
vehicle battery reaches a suitable temperature for proper operation of the
START STOP system.■
If the driver's seat belt is removed for more than approx. 30 seconds or the
driver's door is opened during stop mode, the engine will have to be started
manually.
■
After manual engine start, the automatic engine shutdown can take place
only when a minimum distance required for the system function has been cov-
ered.
Operation
Read and observe
on page 118 first.
In compliance with the operating conditions, automatic engine shutdown / au-
tomatic engine start takes place as described.
Automatic engine shut down
›
Stop the vehicle.
›
Shift the gear lever to Neutral.
›
Release the clutch pedal.
Automatic engine shutdown takes place, segment display shows START STOP
ACTIVE or a check mark appears in the MAXI DOT display
» Fig. 115 on
page 118 .
Automatic engine start
›
Depress the clutch pedal.
The automatic start procedure takes place again.
System conditioned automatic start-up
Read and observe
on page 118 first.
When the engine is off, the system can automatically start the engine before
the desired journey continues. The possible reasons for this are, for example:
› The vehicle has begun to roll, e.g. on a slope.
› The brake pedal has been actuated several times.
› The current consumption is too high.
Manually deactivating/activating
Fig. 116
Button for the START-STOP sys-
tem
Read and observe on page 118 first.
Deactivate/activate
›
Press the button
» Fig. 116 .
When start-stop mode is deactivated, the warning light in the button lights up.
Note
If the system is automatically deactivated when the engine is turned off, then
the automatic start process takes place.
Information messages
Read and observe
on page 118 first.
The messages and information are shown in the instrument cluster display. Start the engine manually.
START MANUALLY
One of the conditions for automatic engine start is not satisfied or the driver's
seat belt is not fastened. The engine must be started manually.
119Assist systems
Page 127 of 197
On downhill sections shift down a gear in good time to also use the engine as
a brake.
Engine overheating
The speed must be reduced immediately if the needle for the coolant tempera-
ture gauge moves into the right-hand area or the red area of the scale.
Stop and switch off the engine if the warning light
in the instrument cluster
starts to flash. Wait a few minutes and check the level of coolant » page 144,
Checking the coolant level .
The following guidelines must be observed » page 37,
Coolant .
The coolant temperature can be reduced by switching on the heating.WARNING■ Adapt your speed to the conditions of the road surface and to the traffic
situation.■
Improper or incorrectly connected electric cables can energise the trailer
and cause functional faults to the vehicle's entire electrical system as well
as accidents and severe injuries.
■
Work on the electrical system must only be carried out by specialist ga-
rages.
■
Never directly connect the trailer's electrical system with the electrical
connections for the tail lights or other current sources.
Note
■ After coupling the trailer and connecting up the power socket, check the rear
lights on the trailer to ensure they work.■
If there is an error in the trailer lighting system, check the fuses in the fuse
box in the dashboard » page 168.
■
If you tow a trailer frequently, you should also have your car inspected be-
tween service intervals.
■
The handbrake on the towing vehicle must be applied when coupling and un-
coupling the trailer.
Anti-theft alarm system
Read and observe
on page 124 first.
When the vehicle is locked, the alarm is activated as soon as the electrical con-
nection to the trailer is interrupted.
Always switch off the anti-theft alarm system before a trailer is coupled or un-
coupled » page 49 .
Conditions for including a trailer in the anti-theft alarm system. The vehicle is factory-fitted with an anti-theft alarm system and towing
equipment.
The trailer is electrically connected to the towing vehicle by means of the
trailer socket.
The electrical system of the vehicle and trailer is functional.
The vehicle is locked with the vehicle key and the anti-theft alarm system is activated.
Note
For technical reasons, trailers with rear LED lights cannot be connected to the
anti-theft alarm system.125Towing a trailer
Page 137 of 197
Soiled belts may impair proper operation of the inertia reels.WARNING■The seat belts must not be removed for cleaning.■Never clean the seat belts chemically as chemical cleaning products could
destroy the fabric.■
The seat belts must not be allowed to come into contact with corrosive
liquids (such as acids etc.).
■
Check the condition of all the seat belts on a regular basis. If any damage
is found in the belt fabric, seat belt connections, inertia reel or the buckle,
the relevant seat belt must be replaced by a specialist garage.
■
Inertia reel belts must be completely dried before being rolled up.
Inspecting and replenishing
Fuel
Introduction
This chapter contains information on the following subjects:
Refuelling
136
Unleaded petrol
136
Diesel fuel
137
The correct grades of fuel for your vehicle are stated on a sticker affixed to the
inside of the fuel filler flap » Fig. 123 on page 136 -
.
WARNINGThe national legal requirements must be observed if carrying a spare canis-
ter in the vehicle. We do not recommend carrying any fuel canisters in your
vehicle for safety reasons. In the event of an accident this could be dam-
aged and fuel could escape – there is a risk of fire.
CAUTION
■ Never drive until the fuel tank is completely empty! The irregular supply of
fuel can cause misfiring, which can result in considerable damage to parts of
the engine and exhaust system.■
Immediately remove any fuel that has spilled onto the vehicle's paintwork –
there is a risk of paint damage.
■
If the vehicle was not purchased in the country in which it was intended to
be operated, you should check whether the fuel specified by the manufacturer
is offered in the country where the vehicle will be operated. You should also
perhaps check whether the manufacturer has recommended a different fuel
for operation of the vehicle in the country concerned. Is this not the case, then
you must check whether the manufacturer permits operation of the vehicle
with another fuel type.
135Inspecting and replenishing
Page 141 of 197
WARNINGInformation for working on the fuel system or the electrical system■Always disconnect the vehicle battery from the electrical system.■
Do not smoke.
■
Never work near open flames.
■
Always have a functioning fire extinguisher nearby.
WARNING■Read the information and warning instructions on the fluid containers.■Keep the working fluids in sealed original containers and safe from peo-
ple who are not completely independent, e.g. children.■
If you wish to work under the vehicle, you must secure the vehicle against
rolling away and support it with suitable axle stands: the car jack is not suf-
ficient for this – there is a risk of injury.
■
Never cover the engine with additional insulation material (e.g. with a
blanket) – there is a risk of fire.
■
The bonnet must always be properly closed when driving. This is why af-
ter closing the bonnet, the lock must always be checked to ensure it has
engaged properly.
■
If you notice that the lock is not properly engaged while driving, stop the
vehicle immediately and close the bonnet – there is the risk of an accident.
CAUTION
Always top up using the correct specification of fluids. This may result in major
operating problems and also vehicle damage!
For the sake of the environment
In view of the requirements for the environmentally friendly disposal of fluids and the special tools and knowledge required for such work, we recommend
that fluids be changed by a specialist garage.
Note
■ If there is anything you are not sure about concerning fluids, please consult a
specialist garage.■
Fluids with the proper specifications can be purchased from the ŠKODA Origi-
nal Accessories or from the ŠKODA Genuine Parts ranges.
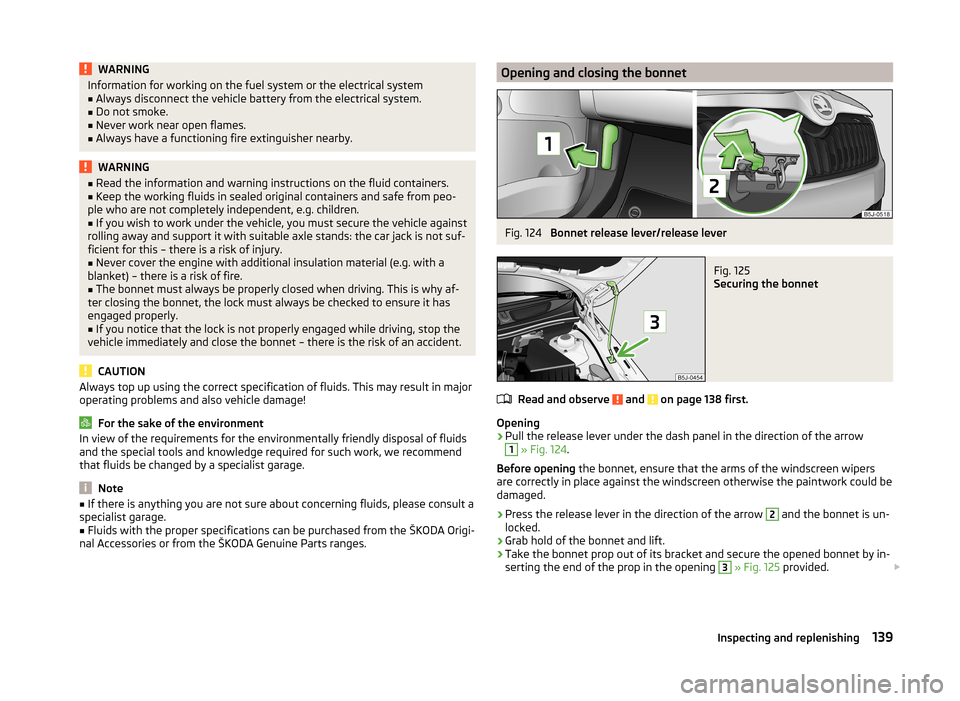
Opening and closing the bonnetFig. 124
Bonnet release lever/release lever
Fig. 125
Securing the bonnet
Read and observe and on page 138 first.
Opening
›
Pull the release lever under the dash panel in the direction of the arrow
1
» Fig. 124 .
Before opening the bonnet, ensure that the arms of the windscreen wipers
are correctly in place against the windscreen otherwise the paintwork could be
damaged.
›
Press the release lever in the direction of the arrow
2
and the bonnet is un-
locked.
›
Grab hold of the bonnet and lift.
›
Take the bonnet prop out of its bracket and secure the opened bonnet by in-
serting the end of the prop in the opening
3
» Fig. 125 provided.
139Inspecting and replenishing
Page 142 of 197

Closing›Lift the bonnet slightly and unhook the bonnet support. Press the bonnet
prop into the bracket provided.›
Let the bonnet drop into the lock carrier lock from a height of around 20 cm –
do not push it in .
WARNINGCheck that the bonnet is closed properly.
CAUTION
Never open the bonnet by the locking lever » Fig. 124.
Engine compartment overview
Fig. 126
Principle sketch: Engine compartment
Read and observe
and on page 138 first.
Explanation of graphic » Fig. 126
Coolant expansion reservoir
144
Windscreen washer fluid reservoir
140
Engine oil filler opening
143
Engine oil dipstick
142
Brake fluid reservoir
145
Vehicle battery
145123456NoteThe location of the inspection points in the engine compartment of petrol and
diesel engines is practically identical.
Radiator fan
Read and observe
and on page 138 first.
The radiator fan is powered by an electric motor. Operation is controlled ac-
cording to the temperature of the coolant.
WARNINGThe fan can intermittently continue to run for approximately 10 minutes af-
ter the ignition is switched off.
Windscreen washer system
Fig. 127
Engine compartment: Wind-
screen washer fluid reservoir
Read and observe and on page 138 first.
The windscreen washer fluid reservoir is located in the engine compart-
ment » Fig. 127 .
This contains the cleaning fluid for the windscreen or rear window and for the
headlight cleaning system.
The capacity of the reservoir is about 3.5 litres or about 5.4 litres on vehicles
that have a headlight cleaning system 1)
.
1)
In some countries, 5.4 ltr. applies for both variants.
140General Maintenance