check engine SKODA FABIA 2014 2.G / 5J Owner's Manual
[x] Cancel search | Manufacturer: SKODA, Model Year: 2014, Model line: FABIA, Model: SKODA FABIA 2014 2.G / 5JPages: 197, PDF Size: 13.56 MB
Page 8 of 197
Safety
Passive Safety
General information
Introduction
This chapter contains information on the following subjects:
Before every journey
6
Driving safety
6
Safety equipment
6
In this section you will find important information, tips and notes on the sub-
ject of passive safety in your vehicle.
We have combined everything here which you should be familiar with, for ex-
ample, regarding seat belts, airbags, child seats and safety of children.
WARNING■ This chapter contains important information on how to use the vehicle for
the driver and his occupants.■
You will find further information on safety, which concerns you and those
travelling with you, in the following chapters of this Owner's Manual.
■
The complete on-board literature should always be in the vehicle. This
applies in particular, if you rent out or sell the vehicle.
Before every journey
Read and observe
on page 6 first.
For your own safety and the safety of the people travelling with you, please
pay attention to the following points before setting off.
Ensure that the lighting and the turn signal system are functioning proper-
ly.
Make sure that the function of the wiper and the condition of the wiper
blades are free of any defects.
Ensure that all of the windows offer good visibility to the outside.
Adjust the rear-view mirror so that vision to the rear is guaranteed.
Ensure that the mirrors are not covered.
Check the tyre inflation pressure.
Check the engine oil, brake fluid and coolant level.
Secure all items of luggage.
Do not exceed the permissible axle loads and permissible gross weight of
the vehicle – risk of accident.
Close all doors and the engine compartment and luggage compartment lid.
Ensure that no objects can obstruct the pedals.
Protect children in suitable child seats with correctly fastened seat
belts » page 19 , Transporting children safely .
Adopt the correct seated position » page 7, Correct and safe seated
position . Tell your passengers to assume the correct seated position.
Driving safety
Read and observe
on page 6 first.
The driver is fully responsible for himself and his occupants. If your driving
safety is effected, you place yourself and the oncoming traffic at risk.
The following guidelines must therefore be observed. Do not get distracted from concentrating on the traffic situation, e.g. by
your passengers or mobile phone calls.
Never drive when your driving ability is impaired, e.g. through medication,
alcohol or drugs.
Keep to the traffic regulations and the permissible speed limit.
Always adjust the driving speed to the road, traffic and weather condi-
tions.
Take regular breaks on long journeys – at least every two hours.
Safety equipment
Read and observe
on page 6 first.
The following list contains only part of the safety equipment in your vehicle.
› Three-point seat belts for all the seats.
› Belt force limiters for the front seats.
› Belt tensioners for the front seats.
› Seat belt height adjusters for the front seats.
› Front airbag for the driver and the front passenger.
› Side airbags.
6Safety
Page 33 of 197
The display is updated regularly while you are driving.
Range
The estimated range is displayed in kilometres. It indicates the distance you can still drive with your vehicle based on the level of fuel in the tank and the
same style of driving.
The display is shown in steps of 10 km. The value is displayed in steps of 5 km
after the
warning light has come on.
The fuel consumption over the preceding 50 km is used to calculate the infor-
mation. The range will increase if you drive in a more economical manner.
If the memory is set to zero (after the battery has been disconnected), a fuel
consumption of 10 l/100 km is used initially, then the value is adapted accord-
ing to the style of driving.
Distance travelled
The distance travelled since the memory was last erased is displayed. Reset
the memory to zero if you want to measure the distance travelled from a par-
ticular moment » page 30, Operation .
The maximum distance indicated in both memories is 1999 km or 9999 km on
vehicles with a MAXI DOT display. The indicator is reset to zero when this val-
ue is exceeded.
Average speed
The average speed since the memory was last erased is displayed in km/hour .
Set the memory to zero at the start of measurement to determine the average
speed over a certain period » page 30, Operation .
No value will appear in the display until you have driven approximately 300 m after this information has been deleted.
The display is updated regularly while you are driving.
Current speed
The current speed, identical to the display on the speedometer 3
» Fig. 19 on
page 26 , is displayed.
Oil temperature 1)
The current engine oil temperature is displayed. If the oil temperature is lower
than 50 °C or if a fault in the system for checking the oil temperature is
present, only - -.- is displayed instead of the oil temperature.
Warning against speeding
The warning that the speed limit is being exceeded can be enabled/disabled in
the display » page 31.
Warning against speeding
Read and observe
on page 29 first.
Adjust the speed limit while the vehicle is stationary
›
Press button
A
» Fig. 22 on page 30 to select the Warning at (MAXI DOT
display) or
(segment display) menu item.
›
Press button
B
to activate the ability to set the speed limit 2)
(value flashes).
›
Use the button
A
to set the required speed limit, e.g. 50 km/h.
›
Confirm the speed limit that was set with button
B
, or wait approx. 5 sec-
onds until the setting is saved automatically (the value stops flashing).
This allows you to set the speed in 5 km/h intervals.
Adjusting the speed limit while the vehicle is moving
›
Press button
A
» Fig. 22 on page 30 to select the Warning at (MAXI DOT
display) or (segment display) menu item.
›
Drive at the desired speed, e.g. 50 km/h.
›
Press button
B
to accept the current speed as the speed limit (the value
flashes).
If you wish to adjust the set speed limit, you can do so in 5 km/h intervals (e.g. the accepted speed of 47 km/h increases to 50 km/h or decreases to 45 km/h).
›
Confirm the speed limit that was set by pressing button
B
again, or wait ap-
prox. 5 seconds until the setting is saved automatically (the value stops
flashing).
Change or delete speed limit
›
Press button
A
» Fig. 22 on page 30 to select the Warning at (MAXI DOT
display) or (segment display) menu item.
›
Pressing button
B
disables the speed limit.
›
Pressing the button
B
activates the ability to change the speed limit.
If the set speed limit is exceeded, an audible signal will sound as a warning.
The Warning at (MAXI DOT display) or
(segment display) menu item appears
in the display with the limit set.
1)
Applies for vehicles equipped with the MAXI DOT display.
2)
An initial value of 30 km/h is displayed automatically if no value has been specified.
31Instruments and Indicator Lights
Page 36 of 197
SettingsRead and observe
on page 33 first.
You can change certain settings yourself through the MAXI DOT display. The
current menu item is shown in the top of the display under a line.
You can select the following menu options:
Language
You can set the language for the warning and information texts here.
MFD data
Activate or deactivate certain displays of the multifunction display here.
Time
The time, time format (12 or 24 hour indicator) and the changeover between
summer/winter time can be set here.
Winter tyres
Here, you can set the speed at which an audible signal should sound. This
function is, for example, used for winter tyres where the maximum permissible
speed is lower than the maximum speed of the vehicle.
The following is shown on the information display if this speed is exceeded: Winter tyres max. speed ... km/h.
Units of measurement
The units for the temperature, consumption and distance driven can be set
here.
Alt. speed dis.
Display of the second speed in mph 1)
can be activated here.
Service
The days and kilometres remaining until the next service can be displayed
here.
Factory setting
The display can be restored to its factory settings here.
Door, boot lid and bonnet warning
Read and observe
on page 33 first.
If at least one door is open, or the boot or bonnet is open, the MAXI DOT dis-
play shows the vehicle with the corresponding door or boot/bonnet open.
An audible signal also sounds if the vehicle is travelling at more than 6 km/h.
Auto Check Control
Read and observe
on page 33 first.
Vehicle condition
Certain functions and conditions of individual vehicle systems are checked
continuously when the ignition is switched on and also while driving.
Some error messages and other information are displayed in the MAXI DOT
display. The messages are displayed simultaneously with the icons in the MAXI
DOT display or with the warning lights in the instrument cluster » page 35.
The Vehicle status menu item is shown in the main menu of the MAXI DOT
display whenever at least one fault message is present. The first of the fault
messages is displayed after this menu item is selected. Several error messages
are shown on the display under the message e.g. 1/3. This indicates that the
first of a total of three error messages is being displayed.
As long as the operational faults are not rectified, the symbols are always indi-
cated again. After they are displayed for the first time, the symbols continue to
be indicated without any extra messages for the driver.
Warning symbols
Engine oil pressure too low» page 36Clutches of the automatic DSG gearbox
are too hot» page 34Check engine oil level,
engine oil sensor defective» page 36
Clutches of the automatic DSG gearbox are too hot
If the symbol appears in the MAXI DOT display, this indicates that the tem-
perature of the automatic DSG gearbox clutches is too high.
1)
On models on which the speedometer indicates mph, the second speed is displayed in km/h.
34Using the system
Page 38 of 197
Brake systemRead and observe
on page 35 first.
The
indicator light comes on if the brake fluid level in the braking system is
too low or there is a fault in the ABS.
The following message is shown in the MAXI DOT display.
Brake fluid: Log book!
Stop the vehicle, switch off the engine, and check the level of the brake flu-
id » page 145 .
Further information » page 102, Brakes .
WARNING■
If you have to stop for technical reasons, then park the vehicle at a safe
distance from the traffic, switch off the engine and activate the hazard
warning light system » page 59.■
The following guidelines should be observed when opening the bonnet
and checking the brake fluid level » page 138, Engine compartment .
■
If the warning light
is displayed simultaneously with warning light
» page 38 ,
Antilock brake system (ABS) ,
do not continue your
journey! Seek help from a specialist garage.
■
A fault to the ABS system or the braking system can increase the vehi-
cle's braking distance – there is a risk of accident.
Seat belt warning light
Read and observe
on page 35 first.
The indicator light comes on after the ignition is switched on as a reminder
for the driver and front passenger to fasten their seat belt. The indicator light
only goes out once the driver and front passenger have fastened their seat
belt.
A steady warning signal sounds at vehicle speeds greater than 20 km/h and
the flashes if the driver and front passenger have not fastened their seat
belts.
The warning signal is switched off and the indicator light is permanently lit if
the driver and front passenger have not fastened their seat belts within the
next 90 seconds.
Further information » page 10.
Generator
Read and observe
on page 35 first.
If the warning light lights up
when the engine is running, the vehicle battery
is not being charged.
Seek help from a specialist garage. The electrical system requires checking.
WARNINGIf you have to stop for technical reasons, park the vehicle at a safe distance
from the traffic, switch off the engine and switch on the hazard warning
lights system » page 59.
CAUTION
Do not continue driving if the warning light (coolant system fault) lights
up in addition to the warning light while you are driving. Stop the engine -
there is a risk of engine damage.
OPen door
Read and observe
on page 35 first.
The warning light
comes on if one or several doors are opened or if the boot
lid is opened.
The warning light comes on even when the ignition is switched off. The warn-
ing light lights up for a maximum of 5 minutes.
WARNINGIf you have to stop for technical reasons, park the vehicle at a safe distance
from the traffic, switch off the engine and switch on the hazard warning
lights system » page 59.
Engine oil
Read and observe
on page 35 first.
The warning light lights up red (low oil pressure)
The following message is shown in the MAXI DOT display.
Oil pressure: Engine off! Log book!
36Using the system
Page 39 of 197
The warning light comes on for a few seconds when the ignition is switch-
ed on 1)
.
Stop the vehicle, switch off the engine, and check the engine oil lev-
el » page 142 .
Even if the oil level is correct,
do not drive any further if the warning light is
flashing. Also do not leave the engine running at an idling speed.
Seek help from a specialist garage.
The warning light
lights up yellow (oil quantity too low)
The following message is shown in the MAXI DOT display.
Check oil level!
Stop the vehicle, switch off the engine, and check the engine oil lev-
el » page 142 .
An audible signal sounds as a warning signal.
The warning light will go out if the bonnet is left open for more than 30 sec-
onds. If no engine oil has been replenished, the warning light will come on
again after driving about 100 km.
The warning light flashes yellow (engine oil level sensor faulty)
The following message is shown in the MAXI DOT display.
Oil sensor workshop!
If the engine oil level sensor is faulty, the warning light flashes several
times and an audible signal sounds when the ignition is turned on.
Seek help from a specialist garage.WARNINGIf you have to stop for technical reasons, park the vehicle at a safe distance
from the traffic, switch off the engine and switch on the hazard warning
lights system » page 59.
CAUTION
The red oil pressure light is not an oil level indicator! One should therefore
check the oil level at regular intervals, preferably after every refuelling stop. Coolant
Read and observe
on page 35 first.
The indicator light
lights up until the engine reaches operating tempera-
ture 2)
. Avoid high speeds, full throttle and high engine loads.
If the warning light
lights up or flashes, either the coolant temperature is
too high or the coolant level is too low.
An audible signal sounds as a warning tone.
The following message is shown in the MAXI DOT display. ENGINE COOLANT PLEASE CHECK Log book!
Stop the vehicle, switch off the engine, check the level of the cool-
ant » page 144 , and refill the coolant if necessary » page 144.
If the coolant is within the specified range, the increased temperature may be
caused by an operating problem at the radiator fan. Check the fuse for the ra-
diator fan, replace if necessary » page 170, Fuses in the engine compartment .
Do not continue driving if the warning light
does not go off even though
the coolant level is correct and the fuse for the fan is in working order!
Seek help from a specialist garage.
WARNING■ If you have to stop for technical reasons, park the vehicle at a safe dis-
tance from the traffic, switch off the engine and activate the hazard warn-
ing light system » page 59.■
Carefully open the coolant expansion bottle. If the engine is hot, the cool-
ing system is pressurized - risk of scalding! It is therefore best to allow the
engine to cool down before removing the cap.
■
Do not touch the radiator fan. The radiator fan may switch itself on auto-
matically even if the ignition is off.
CAUTION
■ Additional headlights and other attached components in front of the air inlet
impair the cooling efficiency of the coolant.■
Never cover the radiator - there is a risk of the engine overheating.
1)
The warning light does not light up in vehicles fitted with the MAXI DOT display when the ignition is
switched on, but only if there is a fault or the engine oil level is too low.
2)
Not on vehicles with the MAXI DOT display.
37Instruments and Indicator Lights
Page 41 of 197
The following message is shown in the MAXI DOT display.Error: ABS
The vehicle will only be braked by the normal brake system without the ABS.
Seek help from a specialist garage.WARNING■ If you have to stop for technical reasons, then park the vehicle at a safe
distance from the traffic, switch off the engine and activate the hazard
warning light system » page 59.■
If the warning light
» page 36 is displayed simultaneously with the ABS
warning light
,
do not continue your journey! Seek help from a special-
ist garage.
■
A fault to the ABS system or the braking system can increase the vehi-
cle's braking distance – there is a risk of accident.
The rear fog light
Read and observe
on page 35 first.
The warning light comes on when the rear fog lights are operat-
ing » page 58 .
Bulb failure
Read and observe
on page 35 first.
The warning light comes on if a bulb is faulty:
› within a few seconds of the ignition being switched on;
› when a light with a defective bulb is switched on.
The following message may be shown in the MAXI DOT display, for example. INFORMATION Check front right low beam!
Note
The rear side lights and the licence plate lighting have several light bulbs. The
indicator light only lights up if all light bulbs of the licence plate lighting or
the parking light (in one rear light) are defective. For this reason, regular check
that these light bulbs are working correctly. Exhaust inspection system
Read and observe
on page 35 first.
If the warning light
lights up, there is a fault in the exhaust inspection sys-
tem. The engine control unit allows the vehicle to run in emergency mode.
Seek help from a specialist garage.
Glow plug system (diesel engine)
Read and observe
on page 35 first.
The warning light comes on after the ignition has been switched on. The
engine can be started immediately after the pre-glow warning light goes out.
There is a fault in the glow plug system if the warning light
does not come
on at all or lights up continuously .
If the warning light begins to
flash while driving, a fault exists in the engine
control. The engine control unit allows the vehicle to run in emergency mode.
Seek help from a specialist garage.
EPC fault light (petrol engine)
Read and observe
on page 35 first.
If the warning light comes on or begins to flash while driving, a fault exists
in the engine control unit. The engine control unit allows the vehicle to run in
emergency mode.
Seek help from a specialist garage.
Diesel particulate filter (diesel engine)
Read and observe
on page 35 first.
The diesel particulate filter separates the soot particles from the exhaust. The soot particles collect in the diesel particulate filter where they are burnt on a
regular basis.
The warning light comes on if soot has accumulated in the filter.
39Instruments and Indicator Lights
Page 43 of 197
WARNINGWhen a fault of the airbag system occurs, there is a risk of the system not
being triggered in the event of an accident. Therefore, this is to be checked
immediately by a specialized company.
Tyre pressure
Read and observe
on page 35 first.
The warning light lights up, if there is a substantial drop in inflation pres-
sure in one of the tyres. Check and adjust the pressure in all tyres.
If the indicator light flashes, there is a fault in the tyre pressure monitoring
system. Stop the car, turn the ignition off and on again.
If the warning light flashes again after re-starting the engine, then the help
of a professional service provider is to be sought.
Further information » page 154, Tyre pressure monitor .
WARNINGIf you have to stop for technical reasons, then park the vehicle at a safe
distance from the traffic, switch off the engine and activate the hazard
warning lights system » page 59.
Note
If the battery has been disconnected, the warning light illuminates after the
ignition is switched on. The warning light should go out after driving a short
distance.
Windscreen washer fluid level
Read and observe
on page 35 first.
If the windscreen washer fluid level is too low, the warning light comes on.
The following message is shown in the MAXI DOT display. Top up wash fluid!
Top up with liquid » page 140.
Traction control (TCS) switched off
Read and observe
on page 35 first.
The ASR is switched off by pressing the button » page 115 and the warning
light
illuminates.
The following message is shown in the MAXI DOT display.
Traction control (ASR) deactivated.
Turn signal system
Read and observe
on page 35 first.
Either the left or right
warning light flashes depending on the position of
the turn signal lever.
If a turn signal light fails, the warning light flashes at twice its normal rate.
Switching off the hazard warning light system is switched on will cause all of
the turn signal lights as well as both warning lights to flash.
Further information » page 57, Turn signal and main beam lights .
Low beam
Read and observe
on page 35 first.
The warning light comes on when low beam is selected
» page 56.
Fog lights
Read and observe
on page 35 first.
The warning light comes on when the fog lights are operating
» page 58.
Cruise control system
Read and observe
on page 35 first.
The warning light comes on when the cruise control is operat-
ing » page 117 .
41Instruments and Indicator Lights
Page 45 of 197
WARNING■Never leave the key in the vehicle when you exit the vehicle. Unauthor-
ized persons, such as children, for example, could lock the car, turn on the
ignition or start the engine - there is the danger of injury and accidents oc-
curring!■
When leaving the vehicle, never leave people who are not completely in-
dependent, such as children, unattended in the vehicle. The children might,
for example, release the handbrake or take the vehicle out of gear. The
vehicle could then start to move – risk of accident! These individuals would
possibly not be able to leave the vehicle on their own or to help them-
selves. At very high or very low temperatures can be fatal!
CAUTION
■ Each key contains electronic components; therefore it must be protected
against moisture and severe shocks.■
Keep the groove of the keys absolutely clean. Impurities (textile fibres, dust,
etc.) have a negative effect on the functionality of the locking cylinder and ig-
nition lock.
■
Operation of the remote control may temporarily be affected by interference
from transmitters close to the car operating in the same frequency range (e.g.
mobile phone, TV transmitter).
■
The battery must be replaced if the central locking only reacts to the remote
control at less than 3 metres away » page 43.
Note
■
When leaving the vehicle, always check if this is locked.■Please contact a specialist garage if you lose a key as they can obtain a new
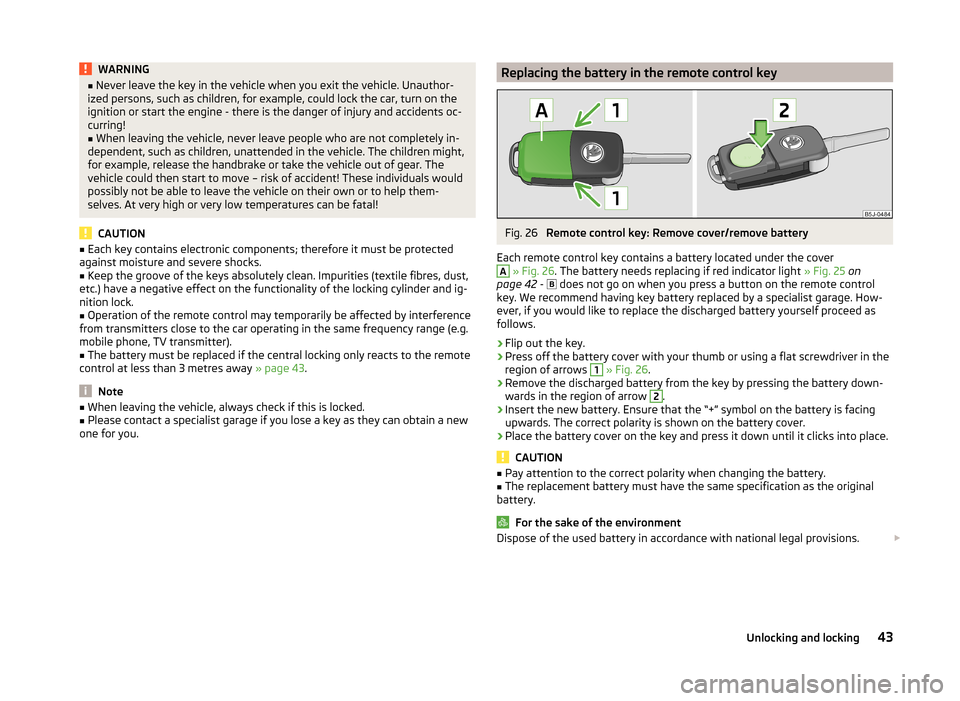
one for you.Replacing the battery in the remote control keyFig. 26
Remote control key: Remove cover/remove battery
Each remote control key contains a battery located under the cover
A
» Fig. 26 . The battery needs replacing if red indicator light » Fig. 25 on
page 42 -
does not go on when you press a button on the remote control
key. We recommend having key battery replaced by a specialist garage. How-
ever, if you would like to replace the discharged battery yourself proceed as
follows.
›
Flip out the key.
›
Press off the battery cover with your thumb or using a flat screwdriver in the
region of arrows
1
» Fig. 26 .
›
Remove the discharged battery from the key by pressing the battery down-
wards in the region of arrow
2
.
›
Insert the new battery. Ensure that the “+” symbol on the battery is facing upwards. The correct polarity is shown on the battery cover.
›
Place the battery cover on the key and press it down until it clicks into place.
CAUTION
■ Pay attention to the correct polarity when changing the battery.■The replacement battery must have the same specification as the original
battery.
For the sake of the environment
Dispose of the used battery in accordance with national legal provisions. 43Unlocking and locking
Page 87 of 197

Note■The exhaust air streams out through vents at the rear of the luggage com-
partment.■
We recommend that you do not smoke in the vehicle when the recirculating
air mode is operating since the smoke which is drawn at the evaporator from
the interior of the vehicle forms deposits in the evaporator of the air condition-
ing system. This produces a permanent odour when the air conditioning sys-
tem is operating which can only be eliminated through considerable effort and
expense (replacement of compressor).
Air outlets
Fig. 94
Air outlet vents
Read and observe
and on page 84 first.
Warmed, not warmed fresh or cooled air will flow out of the opened air outlet
vents according to the setting of the control and the outside atmospheric con-
ditions.
The direction of airflow can be adjusted using the air outlet vents 3 and
4 » Fig. 94 and the outlets can also be opened and closed individually.
Open the air outlet vents 3 and 4
›
Turn the vertical wheel (air vents 3) » Fig. 94 or the horizontal wheel (air out-
let nozzles 4) to the
position.
Close air outlet vents 3 and 4›Turn the vertical wheel (air vents
3) » Fig. 94 or the horizontal wheel (air out-
let nozzles 4) to the 0 position.
Change air flow of air outlet vents 3 and 4›
In order to change the strength of the air flow, swivel the horizontal lamellas
with the aid of the moveable adjuster » Fig. 94.
›
In order to change the lateral direction of the air flow, swivel the vertical la-
mellas with the aid of the moveable adjuster.
Set the air supply to the individual vents with the air distribution control
C
» Fig. 95 on page 86 .
Note
Do not cover the air outlet vents with objects of any kind.
Using the air conditioning system economically
Read and observe
and on page 84 first.
The air conditioning system compressor uses power from the engine when in
cooling mode, which will affect the fuel consumption.
It recommended to open the windows or the doors of a vehicle for which the
interior has been strongly heated through the effect of direct sunlight in order
to allow the heated air to escape.
The cooling system should not be switched on if the windows are open.
For the sake of the environment
Pollutant emissions are also lower when fuel is being saved » page 109.
Operational problems
Read and observe
and on page 84 first.
If the cooling system does not operate at outside temperatures higher than +5
°C, there is a problem in the system. The reasons for this may be.
› One of the fuses has blown. Check the fuse and replace if necessa-
ry » page 168 .
› The cooling system has switched off automatically for a short time because
the coolant temperature of the engine is too hot » page 27.
85Heating and air conditioning
Page 103 of 197
Driving
Starting-off and Driving
Starting and stopping the engine
Introduction
This chapter contains information on the following subjects:
Electronic immobilizer
101
Ignition lock
102
Starting the engine
102
Switching off the engine
102
The engine can only be started using a correctly coded original key.
The engine running noises may louder at first be louder for a short time after starting the cold engine. This is quite normal and is not an operating problem.
WARNING■ When the vehicle is travelling with the engine off, the ignition key must
always be in position 2 » Fig. 102 on page 102 (ignition switched on). This
position is indicated by the warning lights coming on. If this is not the case,
it could result in unexpected locking of the steering wheel – there is the
risk of an accident.■
Only pull the ignition key from the ignition lock when the vehicle has
come to a complete stop (by applying the handbrake). Otherwise the steer-
ing wheel could lock – there is the risk of an accident.
■
Never leave the key in the vehicle when you exit the vehicle. Unauthor-
ized persons, such as children, for example, could lock the car, turn on the
ignition or start the engine - there is a danger of injury and accidents!
■
Never leave the vehicle unattended with the engine running - there is an
accident, damage or theft risk!
■
Never switch off the engine before the vehicle has come to a halt – there
is the risk of an accident.
WARNING■ Never leave the engine running in unventilated or closed rooms. The en-
gine's exhaust gases also contain the odourless and colourless carbon
monoxide, a poisonous gas – risk of death. ■ Carbon monoxide can cause unconsciousness and death.CAUTION■The starter must only be operated when the engine is not running and the
vehicle is at a standstill. The starter or engine can be damaged if the starter is
activated when the engine is running 3
» Fig. 102 on page 102 .
■
If the engine does not start up after a second attempt, the fuse for the fuel
pump may have a fault. Check the fuse and replace, if necessary » page 168 or
seek assistance from a specialist garage.
■
Let go of the ignition key as soon as the engine starts otherwise the starter
could be damaged.
■
Do not tow start the engine – there is a risk of damaging the engine and the
catalytic converter. The battery from another vehicle can be used as a jump-
start aid » page 164 , Jump-starting .
CAUTION
■
Avoid high engine speeds, full throttle and high engine loads until the engine
has yet reached its operating temperature – there is a risk of damaging the en-
gine.■
Do not switch the engine off immediately at the end of your journey after the
engine has been operated over a prolonged period at high loads but leave it to
run at an idling speed for about 1 minute. This prevents any possible accumula-
tion of heat when the engine is switched off.
For the sake of the environment
Do not warm up the engine while the vehicle is stationary. If possible, start
your journey as soon as the engine has started. Through this the engine rea-
ches its operating temperature more rapidly and the pollutant emissions are
lower.
Note
The radiator fan can intermittently continue to run for approximately 10 mi-
nutes after the ignition has been switched off.
Electronic immobilizer
Read and observe
and on page 101 first.
An electronic chip is integrated in the head of the key. The immobiliser is deac-
tivated with the aid of this chip when the key is inserted in the ignition lock.
The electronic immobiliser is automatically activated when the ignition key is
withdrawn from the lock.
The engine will not start if a non-authorized ignition key is used.
101Starting-off and Driving