headlights SKODA FABIA 2014 2.G / 5J User Guide
[x] Cancel search | Manufacturer: SKODA, Model Year: 2014, Model line: FABIA, Model: SKODA FABIA 2014 2.G / 5JPages: 197, PDF Size: 13.56 MB
Page 143 of 197
Clear water is not sufficient to intensively clean the windscreen and head-
lights. We recommend using clean washing water together with the screen
cleaner from the range of ŠKODA Original Accessories (in winter additionally
with antifreeze) which is capable of removing stubborn dirt.
The washing water should always be mixed with antifreeze in winter even if
the vehicle has heated windscreen washer nozzles.
Under exceptional circumstances, methylated spirits can also be used if no
screen cleaner with antifreeze is available. The concentration of methylated
spirits must not be more than 15 %. The freeze protection at this concentration
is sufficient only to -5 °C.
CAUTION
■ Under no circumstances must radiator antifreeze or other additives be added
to the windscreen washer fluid.■
If the vehicle is fitted with a headlight cleaning system, only cleaning prod-
ucts which do not attack the polycarbonate coating of the headlights must be
added to the windscreen washer fluid.
■
Do not remove the filter from the windscreen washer fluid reservoir when re-
plenishing it with liquid otherwise the liquid transportation system can be con-
taminated, which can cause the windscreen washer system to malfunction.
Engine oil
Introduction
This chapter contains information on the following subjects:
Specifications and capacity
141
Checking the oil level
142
Replenishing
143
Changing
143
The engine has been factory-filled with a high-grade oil that can be use
throughout the year - except in extreme climate zones.
Engine oils are the subject of continuous further development. Thus the infor-
mation stated in this Owner's Manual is only correct at the time of publication.
ŠKODA Service Partners are informed about the latest changes by the manu-
facturer. We therefore recommend that you have the oil changed by a ŠKODA
Service Partner.
The specifications (VW standards) stated in the following can be indicated sep-
arately or together with other specifications on the bottle.
The oil capacities include oil filter change. Check the oil level when filling; do
not over fill. The oil level must be between the markings » page 142.WARNING■
The engine compartment of your car is a hazardous area. While working in
the engine compartment, be sure to observe the following warn-
ings » page 138 .■
Do not continue your journey if for some reason it is not possible to top
up the engine oil under the current conditions. Switch off the engine and
seek assistance from a specialist garage.
■
Do not drive on if the oil level is above range
A
» Fig. 128 on page 142 .
Switch off the engine and seek assistance from a specialist garage.
CAUTION
Do not pour any additives into the engine oil – there is a risk of serious engine
damage.
Note
■ Before a long drive we recommend that you purchase and carry with you en-
gine oil which complies with the specification for your vehicle.■
We recommend that you use oils from ŠKODA Original Accessories.
■
You must wash yourself thoroughly if your skin has come into contact with
oil.
Specifications and capacity
Read and observe
and on page 141 first.
Specifications and capacity (in l) for vehicles with flexible service intervals
Petrol enginesSpecificationCapacity1.2 litres/44 kWVW 503 00, VW 504 002.81.2 l/51 kWVW 503 00, VW 504 002.81.4 l/63 kWVW 503 00, VW 504 003.21.4 l/132 kW TSIVW 504 003.61.2 l/63 kW TSIVW 504 003.91.2 l/77 kW TSIVW 504 003.9 141Inspecting and replenishing
Page 145 of 197
We recommend maintaining the oil level within the range A, but not above , if
the engine has been operating at high loads, for example, during a lengthy
motorway trip during the summer months, towing a trailer or negotiating a
high mountain pass.
The warning light in the instrument cluster will indicate whether the oil level is
too low » page 36 ,
Engine oil . Check the oil level using the dipstick as
soon as possible. Add oil accordingly.
CAUTION
■ Always check the oil level on vehicles with the 1.2 l/44 kW engine when the
engine is cold. Otherwise the measuring result is incorrect und oil could be in-
correctly replenished - risk of engine damage!■
The oil level must never be above the
A
range » Fig. 128 – there is a risk of
damaging the exhaust system.
Replenishing
Read and observe
and on page 141 first.
›
Check the oil level » page 142.
›
Unscrew the cap of the engine oil filler opening » Fig. 126 on page 140 .
›
Replenish the oil in portions of 0.5 litres in accordance with the correct speci-
fications » page 141 .
›
Check the oil level » page 142.
›
Carefully screw on the oil filler opening cap and push the dipstick in fully.
Changing
Read and observe
and on page 141 first.
The engine oil must be changed according to prescribed service intervals or ac-cording to the » Service plan service interval display.
Coolant
Introduction
This chapter contains information on the following subjects:
Capacity
144
Checking the coolant level
144
Replenishing
144The coolant consists of water with a concentration of coolant additive. This mixture guarantees antifreeze protection, protects the cooling/heater system
against corrosion and prevents the formation of scale.
Vehicles exported to countries with a mild climate are already factory-filled
with a coolant which offers antifreeze protection down to about -25 ℃. In
these countries the concentration of coolant additive should be at least 40 %.
Vehicles exported to countries with a cold climate are already factory-filled
with a coolant which offers antifreeze protection down to about -35 °C. In
these countries the concentration of coolant additive should be at least 50 %.
If a higher concentration of antifreeze is required for climatic reasons, the
amount of coolant additive can only be increased up to a maximum of 60 %
(antifreeze protection down to approx. -40 °C).
When refilling, only use the same antifreeze identified on the coolant expan-
sion vessel » Fig. 129 on page 144 .WARNING■
The engine compartment of your car is a hazardous area. While working in
the engine compartment, be sure to observe the following warn-
ings » page 138 .■
Do not continue your journey if for some reason it is not possible to top
up the coolant under the current conditions. Switch off the engine and
seek assistance from a specialist garage.
CAUTION
■ The amount of coolant additive in the coolant must never be allowed to fall
below 40 %.■
Over 60 % coolant additive in the coolant reduces the antifreeze protection
and coolant effectiveness.
■
A coolant additive that does not comply with the correct specifications can
significantly reduce the corrosion protection.
■
Any faults resulting from corrosion may cause a loss of coolant and can con-
sequently result in major engine damage!
■
Do not fill the coolant above the mark
A
» Fig. 129 on page 144 .
■
We recommend that you visit a specialist garage if a fault causes the engine
to overheat, otherwise serious engine damage may occur.
■
Additional headlights and other attached components in front of the air inlet
impair the cooling efficiency of the coolant.
■
Never cover the radiator - there is a risk of the engine overheating.
143Inspecting and replenishing
Page 171 of 197
Fuse assignment in the dash panelNo.Power consumer1S-contact2START-STOP, air-conditioning system3Instrument cluster, headlamp beam adjustment4Control unit for ABS, button for START STOP5Petrol engine: Speed regulating system6Reversing light (manual gearbox)7Ignition, engine control unit, automatic gearbox8Brake pedal switch, clutch pedal switch9Operating controls for the heating, control unit for air conditioning
system, parking aid, control unit for cornering lights, radiator fan,
washing nozzles10Windscreen Wiper and Washer System11Mirror adjustment12Control unit for trailer detection13Control unit for automatic gearbox14Motor for halogen projector headlights with cornering light function15PDA navigation system16Electro-hydraulic power steering17Light switch power supply18Mirror heater19S-contact20Alarm21Reversing light, fog lights with the function CORNER
22
Operating controls for the heating, control unit for air conditioning
system, parking aid, mobile phone, instrument cluster, steering an-
gle sender, ESC, vehicle voltage control unit, multifunction steering
wheel23Interior lighting, storage compartment and luggage compartment,
side lights24Central control unit25Seat heaters26Rear window wiperNo.Power consumer27Telephone preinstallation28Petrol engine: AKF valve, Diesel engine: Control flap29Injection, coolant pump30Fuel pump, ignition, Cruise control system, operation of PTC relay31Lambda probe32High pressure fuel pump, pressure valve33Engine control unit34Engine control unit, vacuum pump35Daytime running lights/radio for vehicles with START-STOP36Main beam37Rear fog light, DC/DC converter START-STOP38Fog lights39Air blower for heating40-41Not assigned42Rear window heater43Horn44Windscreen wipers45Central control unit for convenience system46Engine control unit, fuel pump47Cigarette lighter, power socket in the luggage compartment48ABS, START-STOP (DC/DC) converter ESP49Turn signal lights, brake lights50START-STOP (DC/DC) transformer, radio51Electrical power window (front and rear) - left side52Electrical power window (front and rear) - right side53Parking light = left side, electrical sliding/tilting roof54START-STOP (instrument cluster), alarm55Control unit for automatic gearbox56Headlight cleaning system, parking light - right side57Left low beam, headlight range adjustment58Low beam on the right169Fuses and light bulbs
Page 172 of 197
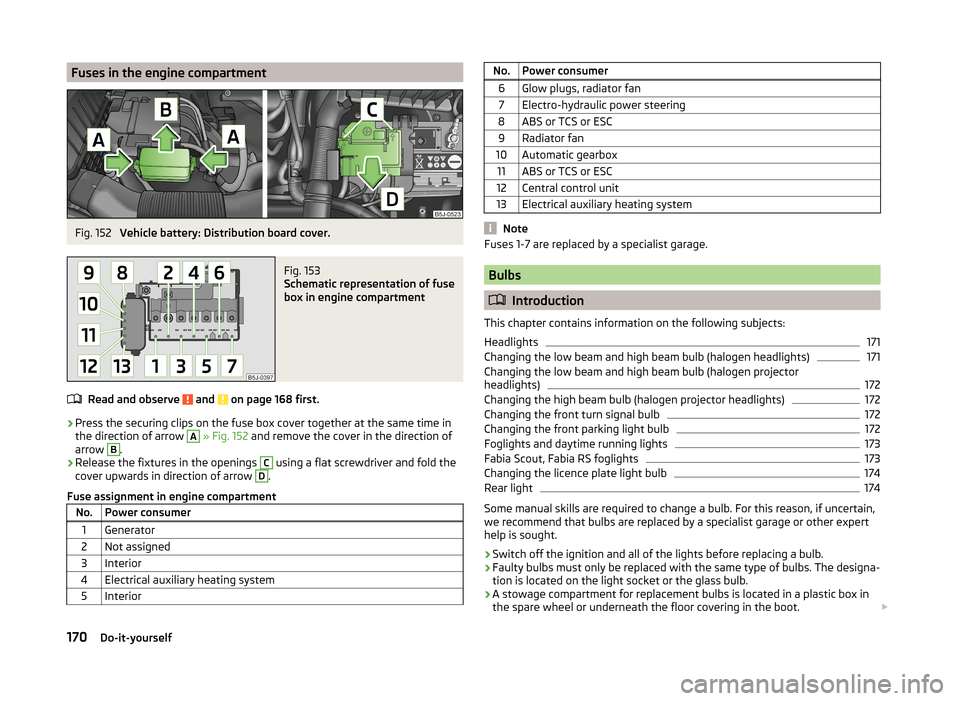
Fuses in the engine compartmentFig. 152
Vehicle battery: Distribution board cover.
Fig. 153
Schematic representation of fuse
box in engine compartment
Read and observe and on page 168 first.
› Press the securing clips on the fuse box cover together at the same time in
the direction of arrow
A
» Fig. 152 and remove the cover in the direction of
arrow
B
.
› Release the fixtures in the openings
C
using a flat screwdriver and fold the
cover upwards in direction of arrow
D
.
Fuse assignment in engine compartment
No.Power consumer1Generator2Not assigned3Interior4Electrical auxiliary heating system5InteriorNo.Power consumer6Glow plugs, radiator fan7Electro-hydraulic power steering8ABS or TCS or ESC9Radiator fan10Automatic gearbox11ABS or TCS or ESC12Central control unit13Electrical auxiliary heating system
Note
Fuses 1-7 are replaced by a specialist garage.
Bulbs
Introduction
This chapter contains information on the following subjects:
Headlights
171
Changing the low beam and high beam bulb (halogen headlights)
171
Changing the low beam and high beam bulb (halogen projector
headlights)
172
Changing the high beam bulb (halogen projector headlights)
172
Changing the front turn signal bulb
172
Changing the front parking light bulb
172
Foglights and daytime running lights
173
Fabia Scout, Fabia RS foglights
173
Changing the licence plate light bulb
174
Rear light
174
Some manual skills are required to change a bulb. For this reason, if uncertain,
we recommend that bulbs are replaced by a specialist garage or other expert
help is sought.
› Switch off the ignition and all of the lights before replacing a bulb.
› Faulty bulbs must only be replaced with the same type of bulbs. The designa-
tion is located on the light socket or the glass bulb.
› A stowage compartment for replacement bulbs is located in a plastic box in
the spare wheel or underneath the floor covering in the boot.
170Do-it-yourself
Page 173 of 197
WARNING■Always read and observe the warnings before completing any work in the
engine compartment » page 138.■
Accidents can be caused if the road in front of the vehicle is not suffi-
ciently illuminated and the vehicle cannot or can only be seen with difficul-
ty by other road users.
■
Bulbs H7 and H4 are pressurised and may burst when changed - there is a
risk of injury. We therefore recommended wearing gloves and safety
glasses when changing a bulb.
■
Switch off the respective vehicle light when changing the bulb.
CAUTION
■ Do not take hold of the glass bulb with naked fingers (even the smallest
amount of dirt reduces the working life of the light bulb). Use a clean cloth,
napkin, or similar.■
When removing and installing the number plate light and tail light make sure
that the paintwork of the vehicle and the tail light are not damaged.
Note
■ This Owner's Manual only describes the replacement of bulbs where it is pos-
sible to replace the bulbs on your own without any complications arising. Other
light bulbs should be changed by your specialist garage.■
We recommend that you always carry a box of replacement bulbs in the vehi-
cle. Replacement bulbs can be purchased from ŠKODAOriginal Accessories.
■
We recommend having the headlight settings checked by a specialist garage
after replacing a bulb in the main beam, low beam or fog lights.
■
Visit a specialist garage if an LED is faulty.
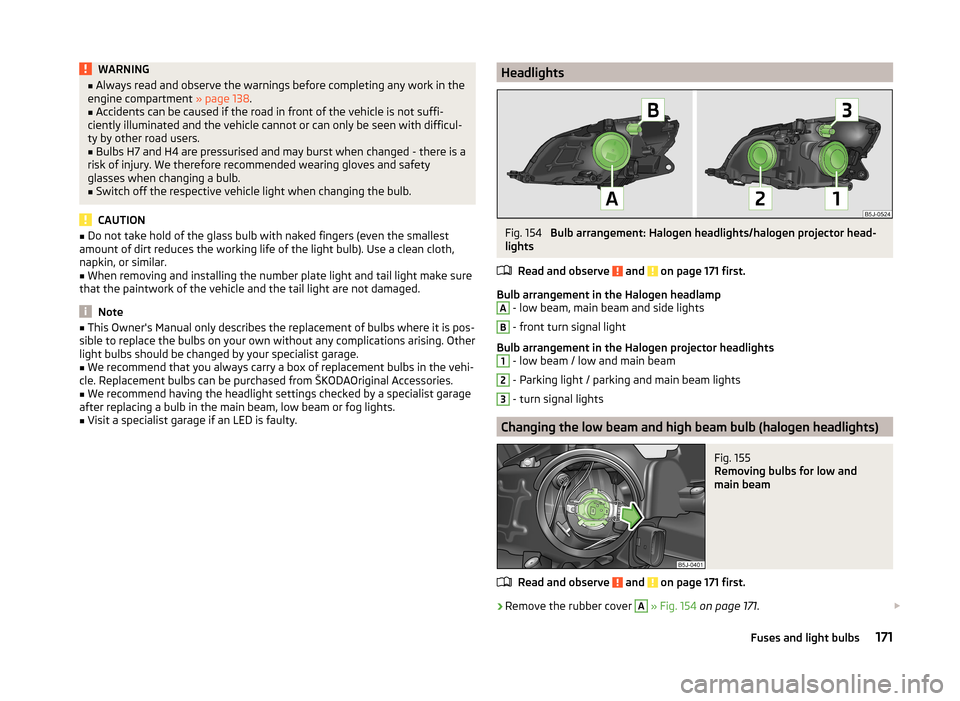
HeadlightsFig. 154
Bulb arrangement: Halogen headlights/halogen projector head-
lights
Read and observe
and on page 171 first.
Bulb arrangement in the Halogen headlamp
A
- low beam, main beam and side lights
B
- front turn signal light
Bulb arrangement in the Halogen projector headlights
1
- low beam / low and main beam
2
- Parking light / parking and main beam lights
3
- turn signal lights
Changing the low beam and high beam bulb (halogen headlights)
Fig. 155
Removing bulbs for low and
main beam
Read and observe and on page 171 first.
›
Remove the rubber cover
A
» Fig. 154 on page 171 .
171Fuses and light bulbs
Page 174 of 197
›Remove the connector from the bulb, unlock the securing clip and remove
the bulb » Fig. 155 .›
Insert a new light bulb in such a way that the fixing lugs of the bulb socket fit
in the recesses of the reflector.
›
Lock the circlip and insert the connector in the bulb.
›
Fit the rubber cover
A
.
Changing the low beam and high beam bulb (halogen projector
headlights)
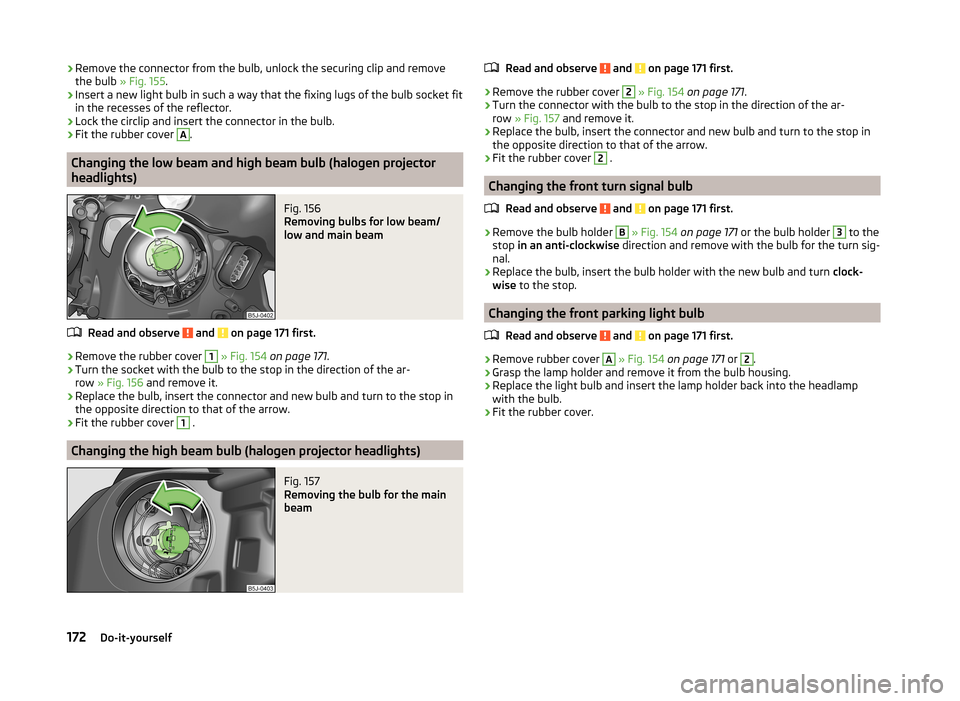
Fig. 156
Removing bulbs for low beam/
low and main beam
Read and observe and on page 171 first.
›
Remove the rubber cover
1
» Fig. 154 on page 171 .
›
Turn the socket with the bulb to the stop in the direction of the ar-
row » Fig. 156 and remove it.
›
Replace the bulb, insert the connector and new bulb and turn to the stop in
the opposite direction to that of the arrow.
›
Fit the rubber cover
1
.
Changing the high beam bulb (halogen projector headlights)
Fig. 157
Removing the bulb for the main
beam
Read and observe and on page 171 first.›
Remove the rubber cover
2
» Fig. 154 on page 171 .
›
Turn the connector with the bulb to the stop in the direction of the ar-
row » Fig. 157 and remove it.
›
Replace the bulb, insert the connector and new bulb and turn to the stop in
the opposite direction to that of the arrow.
›
Fit the rubber cover
2
.
Changing the front turn signal bulb
Read and observe
and on page 171 first.
›
Remove the bulb holder
B
» Fig. 154 on page 171 or the bulb holder
3
to the
stop in an anti-clockwise direction and remove with the bulb for the turn sig-
nal.
›
Replace the bulb, insert the bulb holder with the new bulb and turn clock-
wise to the stop.
Changing the front parking light bulb
Read and observe
and on page 171 first.
›
Remove rubber cover
A
» Fig. 154 on page 171 or
2
.
›
Grasp the lamp holder and remove it from the bulb housing.
›
Replace the light bulb and insert the lamp holder back into the headlamp
with the bulb.
›
Fit the rubber cover.
172Do-it-yourself
Page 188 of 197

BulbsChanging170
In the rear light174
Button in the driver's door Electrical power windows
51
C
Car care
126
Jack132
Washing128
Car computer see Multifunction display
29
Caring for paintwork130
Car park ticket holder80
Carrier76
Central locking button47
Central locking system45
lock47
unlock47
Changing Brake fluid
145
Bulbs170
Bulbs in the rear light174
Engine oil143
Foglight bulb (Scout, RS)173
Foglights and daytime running lights bulbs173
Front parking light bulb172
Front turn signal bulb172
Fuses168
Fuses in the dash panel168
Fuses in the engine compartment170
High beam bulb - halogen projector headlights 172
Licence plate light bulb
174
Low beam and high beam bulb - halogen head- lights
171
Low beam and high beam bulb - halogen pro- jector headlights
172
Wheels159
Changing a wheel Preparation160
Removing and fitting a wheel160
Subsequent steps160
Charging a vehicle battery148
Check Fit ball head properly
122
Checking Battery electrolyte level
147
Brake fluid145
Coolant level144
Engine oil142
Oil level142
Windscreen washer fluid140
Children and safety19
Child safety Side airbag
21
Child safety lock44
Child safety seat Use of child safety seats
21
Child seat Classification
21
ISOFIX22
on the front passenger seat20
TOP TETHER23
Use of ISOFIX child seats22
Chrome parts refer to Taking care of your vehicle
130
Cigarette lighter79
Cleaning126
Alcantara134
Covers on electrically heated seats134
Fabrics134
Headlight lenses131
Natural leather133
Plastic parts130
Synthetic leather134
Wheels132
Climatronic90
Automatic mode91
Control elements90
Controlling the blower91
Defrosting windscreen92
Recirculated air mode91
Setting the temperature91
Clock28
Clothes hook80
Cockpit 12-volt power outlet
79
Ashtray78
Cigarette lighter79
General view25
Lighting59
Storage compartments80
Compartments80
Computer see Multifunction display
29
Convenience turn signal57
Coolant143
Checking144
Display messages37
Replenishing144
Warning light37
Coolant temperature gauge display
27
Correct seated position7
Driver7
Front passenger8
Notes9
Rear seats9
Counter for distance driven28
Cruise control system117
Cupholders78
D
DAY LIGHT see Daylight running lights
56
Daylight running lights56
186Index
Page 190 of 197
Refuelling136
Unleaded petrol136
fuel consumption177
Fuel consumption109
Fuses Assignment
168
Changing168
Colour coding168
G
Gear Recommended gear
28
Gearbox Display messages
34
Gear changing Gear stick
104
General view Cockpit
25
Glow plug system Warning light
39
GSM92
H
Handbrake
104
Hazard warning light system59
Head airbag17
Headlight cleaning system Headlight cleaning system
63
Headlights171
Driving abroad113
Headlight cleaning system63
Head restraint68
Storing in the seat squabs68
Heating Deicing the windows
87
Exterior mirrors64
Operating86
Operation86
Rear window61
Recirculated air mode87
Seats66
Heating and air conditioning84
Hill hold control114
Horn25
I
Ignition
102
Ignition lock102
Immobilizer101
Individual settings locking
46
unlocking46
Inertia reel13
Instrument cluster26
Overview26
see instrument cluster26
Interior monitor50
ISOFIX22
J
Jack
159
Maintenance132
Jacking points Raise vehicle
161
Jump-starting164, 165
L
Light Beam adjustment
56
Cockpit59
Headlight flash57
Lights55
Cockpit60
Daylight running56
Fog lights58
Foglights with the CORNER function58
Halogen projector headlights with cornering light function
57
Hazard warning light system59
Low beam lights56
Main beam lights57
Parking lights56, 59
Rear fog light58
Replacing bulbs170
Switching on and off56
Tourist lights58
Turn signals57
warning lights35
Lock Central locking system
47
Locking Emergency locking
45
Remote control48
without central locking45
Locking and unlocking from the inside47
Low beam lights56
Luggage compartment Class N1 vehicles
69
Lighting61
Retractable luggage compartment cover (Fabia Estate)
71
Variable loading floor72
M
Main beam
57
Maintenance111
Decorative films131
Manual air conditioning Recirculated air mode
89
Manual gear changing see Gear changing
104
MAXI DOT Main menu
33
see MAXI DOT display33
Settings34
MAXI DOT display33
maximum allowable weights
176
188Index