check engine SKODA YETI 2011 1.G / 5L Owner's Guide
[x] Cancel search | Manufacturer: SKODA, Model Year: 2011, Model line: YETI, Model: SKODA YETI 2011 1.G / 5LPages: 252, PDF Size: 3.61 MB
Page 176 of 252
–
Engage the reverse gear and carefully drive backwards in your own tracks.
– Press the foot brake in order to maintain a constant speed.
Downhill
– Switch on the Off-road mode ⇒ page 160 .
– Shift into first gear or select the first driving stage, while in the Tiptronic
mode, to drive downhill on steep hillsides in order to use the Downhill Drive
Support to its maximum.
– Press the foot brake gently, so you do not lose the control over your vehicle.
– If it is feasible and safe, drive straight down (maximum gradient).
– Do not release the clutch or shift into Neutral. WARNING
● Never attempt to drive uphill or downhill if it is too steep for your vehicle.
The vehicle could slip or roll over - risk of accident!
● Never attempt to make a turn on a hillside. The vehicle could tilt or roll
over. This can result in serious accidents.
● If the engine cuts out on a slope or you can no longer go on for whatever
other reason, then stop!
● Never let the vehicle roll down the hillside at idling speed. You can lose the
control over your vehicle.
● If the engine cuts out, press the foot brake and restart the engine. Engage
the reverse gear and carefully drive backwards in your own tracks. Use the en-
gine braking power and press the foot brake in order to maintain a slow and
constant speed.
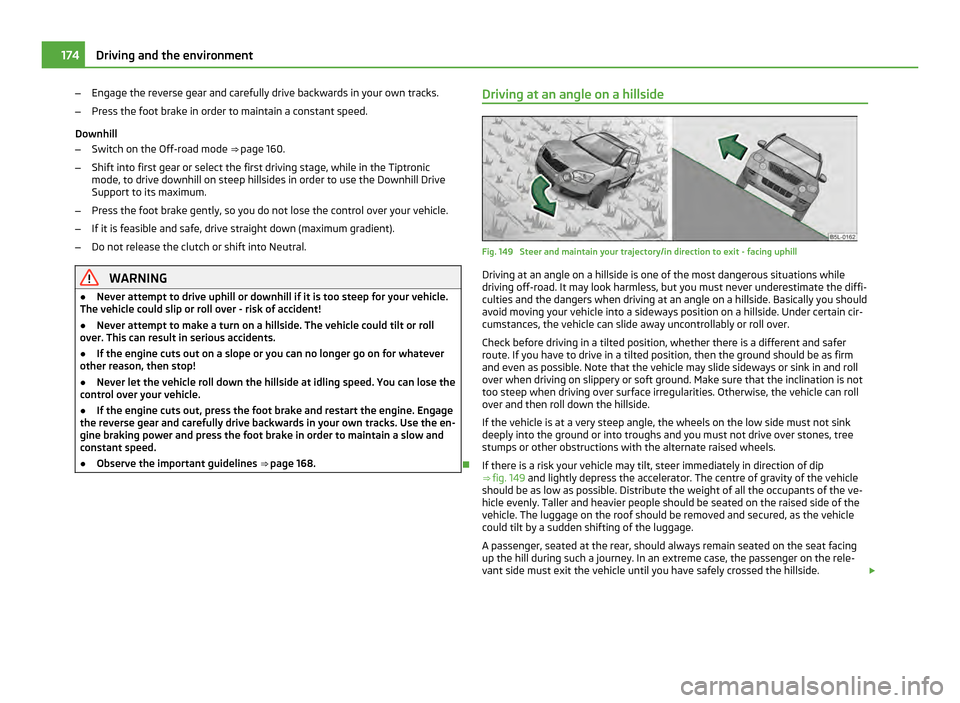
● Observe the important guidelines ⇒ page 168. Driving at an angle on a hillside Fig. 149 Steer and maintain your trajectory/in direction to exit - facing uphill
Driving at an angle on a hillside is one of the most dangerous situations while
driving off-road. It may look harmless, but you must never underestimate the diffi-
culties and the dangers when driving at an angle on a hillside. Basically you should
avoid moving your vehicle into a sideways position on a hillside. Under certain cir-
cumstances, the vehicle can slide away uncontrollably or roll over.
Check before driving in a tilted position, whether there is a different and safer
route. If you have to drive in a tilted position, then the ground should be as firm
and even as possible. Note that the vehicle may slide sideways or sink in and roll
over when driving on slippery or soft ground. Make sure that the inclination is not
too steep when driving over surface irregularities. Otherwise, the vehicle can roll
over and then roll down the hillside.
If the vehicle is at a very steep angle, the wheels on the low side must not sink
deeply into the ground or into troughs and you must not drive over stones, tree
stumps or other obstructions with the alternate raised wheels.
If there is a risk your vehicle may tilt, steer immediately in direction of dip
⇒ fig. 149 and lightly depress the accelerator. The centre of gravity of the vehicle
should be as low as possible. Distribute the weight of all the occupants of the ve-
hicle evenly. Taller and heavier people should be seated on the raised side of the
vehicle. The luggage on the roof should be removed and secured, as the vehicle
could tilt by a sudden shifting of the luggage.
A passenger, seated at the rear, should always remain seated on the seat facing
up the hill during such a journey. In an extreme case, the passenger on the rele-
vant side must exit the vehicle until you have safely crossed the hillside. £174
Driving and the environment
Page 178 of 252
Driving through sand
Do not reduce
the tyre inflation pressure. If you nevertheless reduce the inflation
pressure, do not forget to re-establish the correct tyre inflation pressure level be-
fore you continue driving. Driving with a reduced tyre inflation pressure increases
the risk that you lose control over your vehicle and that the vehicle rolls over.
Driving through mud
Do not change speed or direction when you drive through the mud. The tyres can
lose their grip in the mud. If the vehicle slides, you must steer in the appropriate
direction in order to regain control over the vehicle. WARNING
● Driving through mud can be dangerous. The vehicle can slide uncontrolla-
bly which causes an increased risk of injury. Adopt a particularly cautious style
of driving. Pay attention to the information and warning notes.
● An incorrect tyre inflation pressure may cause a major or fatal accident! An
incorrect tyre inflation pressure may result in bursting of a tyre, which causes
the vehicle to get out of control.
● Observe the important guidelines ⇒ page 168.
Stuck vehicle If you can no longer drive on ...
–
Carefully dig out all the wheels and make sure that no other parts of the vehi-
cle are stuck in the sand.
– Engage reverse gear.
– Gently depress the accelerator and try to drive backwards in your own track.
– Place scrub, footmats or a sackcloth directly in front of the tyres in order to im-
prove the road adherence and thus achieve an improved traction to drive out.
Rocking out vehicle
– Switch off the TCS ⇒ page 155.
– Set the steering wheel straight.
– Drive so far back until the wheels just begin to spin.
– Quickly shift into first gear and drive forwards until the wheels begin to spin. –
Drive back and forth repeatedly until the momentum is sufficient to free the
vehicle.
– Switch on the TCS.
A few tips
– Ensure that the Off-road mode is switched on ⇒ page 160.
– Avoid prolonged spinning of the wheels, otherwise the vehicle would still sink
deeper into the ground.
– Remove mud, dirt and stones from the tread of the tyre.
You need training and experience if you wish to rock out a vehicle. If you make a
mistake, the vehicle can still sink in further and you can only free it with the help
of others. WARNING
Observe the important guidelines ⇒
page 168.
After driving off-road Check the vehicle for damage after driving off-road - especially on the underside
of the vehicle.
–
Switch off the Off-road mode
⇒
page 160.
– Check the tyres and the axles for damage and remove coarse dirt, stones and
foreign bodies from the tyre tread.
– Clean the turn signal lights, the headlights, the number plate and the win-
dows.
– Check the underbody of the vehicle and remove trapped objects, such as scrub
or wood pieces.
– Contact your specialist garage if you detect any damage.
– In case of thick layers of dirt, clean the radiator grille, the engine compartment
and the underbody of the vehicle. £176
Driving and the environment
Page 180 of 252
Towing a trailer
Towing a trailer
Technical requirements Your vehicle is designed primarily for transporting persons and luggage. It can,
however, also be used for towing a trailer - provided certain technical equipment
is fitted.
If your vehicle has been
factory-fitted with a towing device or has a towing device
from
ŠKODA Original Accessories, the towing device satisfies all technical and le-
gal requirements.
Your vehicle is fitted with a 13-pin power socket for the electrical connection be-
tween the vehicle and trailer. If the trailer which you wish to tow has a 7-pin con-
nector , you can use a suitable adapter from ŠKODA Original Accessories.
This work must be carried out in accordance with the manufacturer's specifica-
tions if a towing device is retrofitted.
Authorised ŠKODA Service Partners can provide detailed information about retro-
fitting a towing device and for any necessary modifications to the cooling system. WARNING
We recommend that you have the towing device from ŠKODA Original Acces-
sories installed by an authorised
ŠKODA Service Partner. He is familiar with all
the relevant details relating to retrofitting such equipment. There is a risk of
an accident if the towing device is not properly fitted!
General Maintenance Trailer load
The permissible trailer load must on no account be exceeded.
You can negotiate appropriately steeper inclines and descents if you do not make
full use of the permissible trailer load.
The trailer loads specified only apply for
altitudes up to 1000 metres above mean
sea level. The fact that the engine power output drops with increasing height due
to a lowering of air pressure and thus the ability to climb, means that the towed
weight must be reduced by 10 % for every further increase of 1 000 metres in height above sea level. The towed weight is the weight of the (laden) vehicle and
the (laden) trailer together. One should take this into account before driving up to
higher altitudes.
The trailer and drawbar load information on the type plate of the towing device
are merely test data for the towing device The data relating to your vehicle,
which is often less than this test data, can be found in your vehicle registration
documents.
Distribution of the load
Distribute the load in the trailer in such a way that any heavy items are located as
close as possible to the axle. Secure the items to prevent them slipping.
Tyre pressure
Correct the tyre inflation pressure on your vehicle for that of
“fully laden”
⇒ page 201. The inflation pressure of the tyres fitted to the trailer adjust in ac-
cordance with the manufacturer's recommendation.
Exterior mirrors
You have to have additional exterior mirrors fitted if you are not able to see the
traffic behind the trailer with the standard rear-view mirrors. Both exterior mirrors
should be attached to folding arms. Adjust the mirrors so that they provide you
with an adequate field of view to the rear.
Headlights
Before starting off with a hitched trailer, also check the setting of the headlights.
Alter the setting as necessary with the aid of the headlight beam adjuster
⇒ page 50.
Detachable ball head
The ball head is detachable on vehicles with towing device and can be obtained
from ŠKODA Original Accessories. It is stowed together with separate fitting in-
structions in the spare wheel well in the luggage compartment of the vehicle. Note
● We recommend that you also have your vehicle inspected between service in-
tervals if you tow a trailer frequently.
● The handbrake on the towing vehicle must be put on when coupling and de-
coupling the trailer. 178
Towing a trailer
Page 181 of 252
Driving Tips
–
Do not, as far as possible, drive with your vehicle unladen and the trailer laden.
– Do not make full use of the legal maximum speeds. This applies in particular to
downhill sections.
– Apply the brakes in good time.
– Keep a check on the coolant temperature gauge if the outside temperature is
high.
Distribution of weight
The distribution of the weight is very poor if your vehicle is unladen and the trailer
is laden. Maintain a particularly low speed if you cannot avoid driving with this
combination.
Driving speed
Do not drive faster than 80 km/hour for safety reasons. This also applies for coun-
tries in which higher speeds are allowed.
The fact that the driving stability of the vehicle + trailer combination reduces with
increasing speed means that the legally allowed speed should not be used when
there are unfavourable road, weather or wind conditions, particularly near acci-
dent black spots.
You must always reduce your speed immediately as soon as you detect even just
the slightest swaying of the trailer. On no account attempt to stop the trailer
from “swaying” by accelerating.
Apply the brakes in good time! If the trailer is fitted with a trailer brake, apply the
brakes gently at first and then brake firmly. This will avoid brake jolts resulting
from the trailer wheels locking. Shift down gears in good time before negotiating
a downhill section to allow the engine to also act as a brake.
Engine overheating
Please keep a check on the coolant temperature gauge if you have to negotiate a
lengthy slope in a low gear at a high engine speed when the outside temperature
is very high ⇒ page 11, Coolant temperature gauge
.
If the needle of the coolant temperature gauge moves into the right-hand area or
even the red area of the scale, reduce your speed immediately. Stop and switch
off the engine if the warning light in the instrument cluster begins flashing.
Wait a few minutes and check the level of coolant in the coolant expansion bottle
⇒ page 193, Inspecting the coolant level. Please refer to the following guidelines
⇒
page 26, Coolant temperature/Coolant
quantity .
The coolant temperature can be reduced by switching on the heating.
Any increase in the cooling effect of the coolant fan through shifting down a gear
and increasing the engine speed is not possible since the fan speed is independ-
ent of the engine speed. One should also not drop a gear for this reason when
towing a trailer as long as the engine can manage the slope without any drop in
speed. 179
Towing a trailer Using the system Safety Driving Tips General Maintenance Breakdown assistance Technical data
Page 191 of 252
Inspecting and Replenishing
Engine compartment
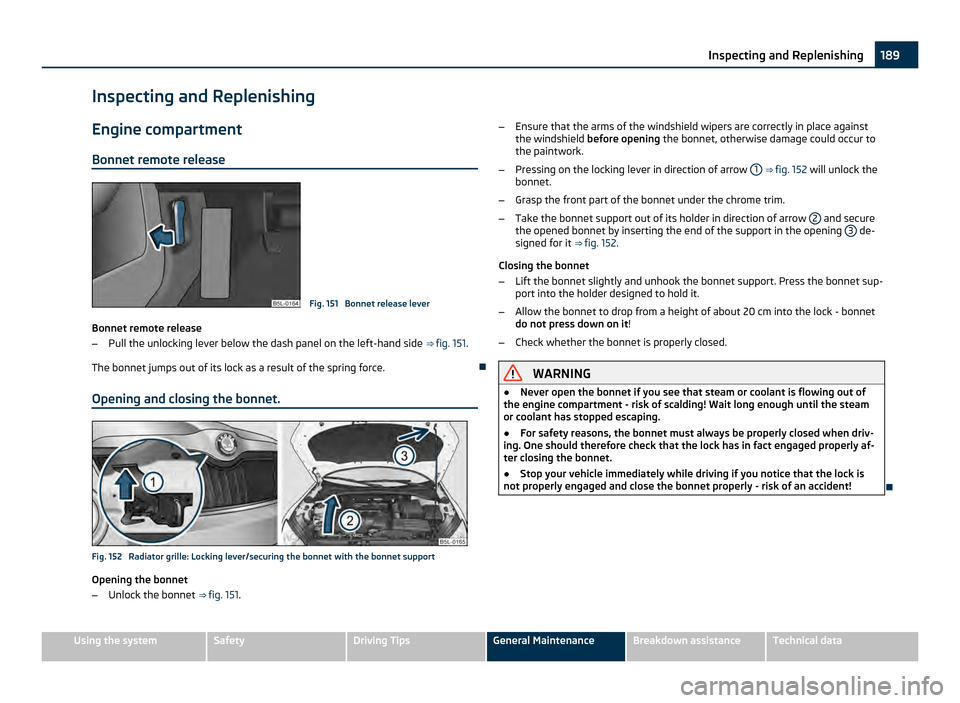
Bonnet remote release Fig. 151 Bonnet release lever
Bonnet remote release
– Pull the unlocking lever below the dash panel on the left-hand side ⇒ fig. 151.
The bonnet jumps out of its lock as a result of the spring force.
Opening and closing the bonnet. Fig. 152 Radiator grille: Locking lever/securing the bonnet with the bonnet support
Opening the bonnet
–
Unlock the bonnet ⇒
fig. 151. –
Ensure that the arms of the windshield wipers are correctly in place against
the windshield before opening the bonnet, otherwise damage could occur to
the paintwork.
– Pressing on the locking lever in direction of arrow 1 ⇒
fig. 152 will unlock the
bonnet.
– Grasp the front part of the bonnet under the chrome trim.
– Take the bonnet support out of its holder in direction of arrow 2 and secure
the opened bonnet by inserting the end of the support in the opening 3 de-
signed for it ⇒ fig. 152.
Closing the bonnet
– Lift the bonnet slightly and unhook the bonnet support. Press the bonnet sup-
port into the holder designed to hold it.
– Allow the bonnet to drop from a height of about 20 cm into the lock - bonnet
do not press down on it!
– Check whether the bonnet is properly closed. WARNING
● Never open the bonnet if you see that steam or coolant is flowing out of
the engine compartment - risk of scalding! Wait long enough until the steam
or coolant has stopped escaping.
● For safety reasons, the bonnet must always be properly closed when driv-
ing. One should therefore check that the lock has in fact engaged properly af-
ter closing the bonnet.
● Stop your vehicle immediately while driving if you notice that the lock is
not properly engaged and close the bonnet properly - risk of an accident! 189
Inspecting and Replenishing Using the system Safety Driving Tips General Maintenance Breakdown assistance Technical data
Page 193 of 252
Overview of the engine compartment
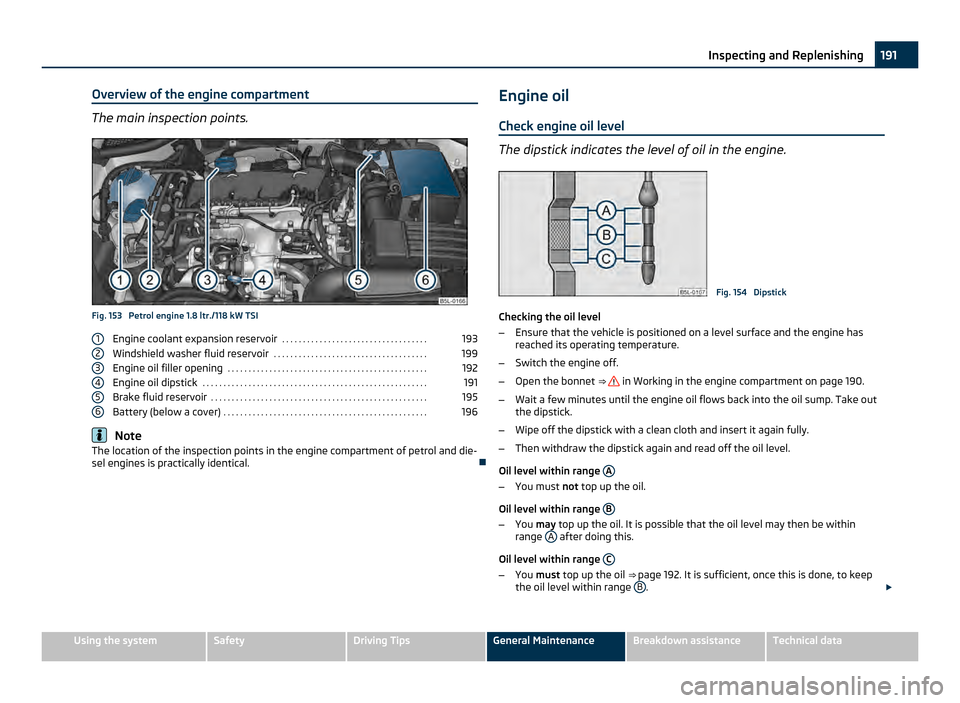
The main inspection points.
Fig. 153 Petrol engine 1.8 ltr./118 kW TSI
Engine coolant expansion reservoir . . . . . . . . . . . . . . . . . . . . . . . . . . . . . . . . . . . 193
Windshield washer fluid reservoir . . . . . . . . . . . . . . . . . . . . . . . . . . . . . . . . . . . . . 199
Engine oil filler opening . . . . . . . . . . . . . . . . . . . . . . . . . . . . . . . . . . . . . . . . . . . . . . . . 192
Engine oil dipstick . . . . . . . . . . . . . . . . . . . . . . . . . . . . . . . . . . . . . . . . . . . . . . . . . . . . . . 191
Brake fluid reservoir . . . . . . . . . . . . . . . . . . . . . . . . . . . . . . . . . . . . . . . . . . . . . . . . . . . . 195
Battery (below a cover) . . . . . . . . . . . . . . . . . . . . . . . . . . . . . . . . . . . . . . . . . . . . . . . . . 196Note
The location of the inspection points in the engine compartment of petrol and die-
sel engines is practically identical.
1 2
3
4
5
6 Engine oil
Check engine oil level The dipstick indicates the level of oil in the engine.
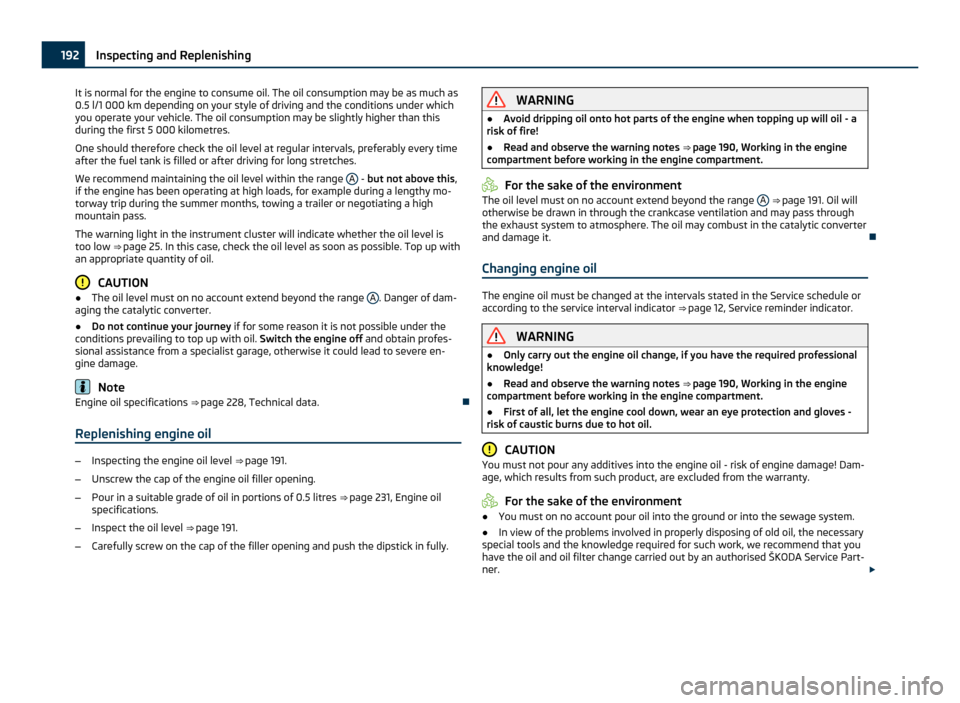
Fig. 154 Dipstick
Checking the oil level
– Ensure that the vehicle is positioned on a level surface and the engine has
reached its operating temperature.
– Switch the engine off.
– Open the bonnet ⇒ in Working in the engine compartment on page 190.
– Wait a few minutes until the engine oil flows back into the oil sump. Take out
the dipstick.
– Wipe off the dipstick with a clean cloth and insert it again fully.
– Then withdraw the dipstick again and read off the oil level.
Oil level within range A –
You must not top up the oil.
Oil level within range B –
You may top up the oil. It is possible that the oil level may then be within
range A after doing this.
Oil level within range C –
You must top up the oil ⇒ page 192. It is sufficient, once this is done, to keep
the oil level within range B .
£ 191
Inspecting and Replenishing Using the system Safety Driving Tips General Maintenance Breakdown assistance Technical data
Page 194 of 252
It is normal for the engine to consume oil. The oil consumption may be as much as
0.5 l/1 000 km depending on your style of driving and the conditions under which
you operate your vehicle. The oil consumption may be slightly higher than this
during the first 5 000 kilometres.
One should therefore check the oil level at regular intervals, preferably every time
after the fuel tank is filled or after driving for long stretches.
We recommend maintaining the oil level within the range A - but not above this
,
if the engine has been operating at high loads, for example during a lengthy mo-
torway trip during the summer months, towing a trailer or negotiating a high
mountain pass.
The warning light in the instrument cluster will indicate whether the oil level is
too low ⇒ page 25. In this case, check the oil level as soon as possible. Top up with
an appropriate quantity of oil. CAUTION
● The oil level must on no account extend beyond the range A . Danger of dam-
aging the catalytic converter.
● Do not continue your journey if for some reason it is not possible under the
conditions prevailing to top up with oil. Switch the engine off and obtain profes-
sional assistance from a specialist garage, otherwise it could lead to severe en-
gine damage. Note
Engine oil specifications ⇒ page 228, Technical data.
Replenishing engine oil –
Inspecting the engine oil level ⇒
page 191.
– Unscrew the cap of the engine oil filler opening.
– Pour in a suitable grade of oil in portions of 0.5 litres ⇒ page 231, Engine oil
specifications.
– Inspect the oil level ⇒ page 191
.
– Carefully screw on the cap of the filler opening and push the dipstick in fully. WARNING
● Avoid dripping oil onto hot parts of the engine when topping up will oil - a
risk of fire!
● Read and observe the warning notes ⇒
page 190, Working in the engine
compartment before working in the engine compartment. For the sake of the environment
The oil level must on no account extend beyond the range A ⇒
page 191. Oil will
otherwise be drawn in through the crankcase ventilation and may pass through
the exhaust system to atmosphere. The oil may combust in the catalytic converter
and damage it.
Changing engine oil The engine oil must be changed at the intervals stated in the Service schedule or
according to the service interval indicator
⇒ page 12, Service reminder indicator
. WARNING
● Only carry out the engine oil change, if you have the required professional
knowledge!
● Read and observe the warning notes ⇒
page 190, Working in the engine
compartment before working in the engine compartment.
● First of all, let the engine cool down, wear an eye protection and gloves -
risk of caustic burns due to hot oil. CAUTION
You must not pour any additives into the engine oil - risk of engine damage! Dam-
age, which results from such product, are excluded from the warranty. For the sake of the environment
● You must on no account pour oil into the ground or into the sewage system.
● In view of the problems involved in properly disposing of old oil, the necessary
special tools and the knowledge required for such work, we recommend that you
have the oil and oil filter change carried out by an authorised
ŠKODA Service Part-
ner. £192
Inspecting and Replenishing
Page 196 of 252
–
Open the bonnet ⇒ page 189 .
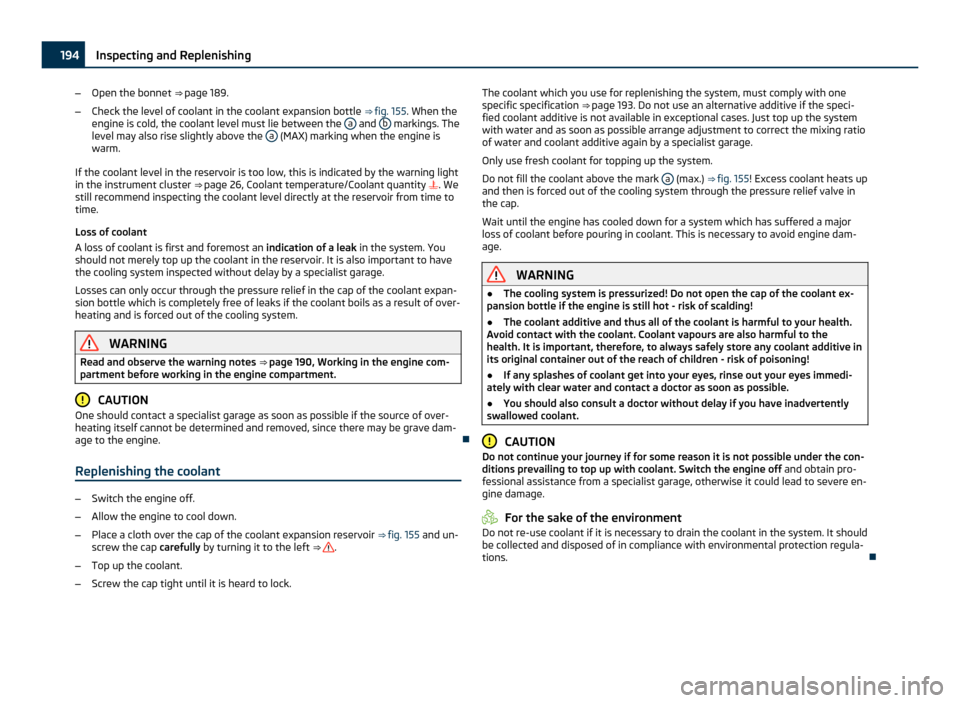
– Check the level of coolant in the coolant expansion bottle ⇒ fig. 155. When the
engine is cold, the coolant level must lie between the a and
b markings. The
level may also rise slightly above the a (MAX) marking when the engine is
warm.
If the coolant level in the reservoir is too low, this is indicated by the warning light
in the instrument cluster ⇒ page 26
, Coolant temperature/Coolant quantity . We
still recommend inspecting the coolant level directly at the reservoir from time to
time.
Loss of coolant
A loss of coolant is first and foremost an indication of a leak in the system. You
should not merely top up the coolant in the reservoir. It is also important to have
the cooling system inspected without delay by a specialist garage.
Losses can only occur through the pressure relief in the cap of the coolant expan-
sion bottle which is completely free of leaks if the coolant boils as a result of over-
heating and is forced out of the cooling system. WARNING
Read and observe the warning notes ⇒ page 190
, Working in the engine com-
partment before working in the engine compartment. CAUTION
One should contact a specialist garage as soon as possible if the source of over-
heating itself cannot be determined and removed, since there may be grave dam-
age to the engine.
Replenishing the coolant –
Switch the engine off.
– Allow the engine to cool down.
– Place a cloth over the cap of the coolant expansion reservoir ⇒
fig. 155 and un-
screw the cap carefully by turning it to the left ⇒ .
– Top up the coolant.
– Screw the cap tight until it is heard to lock. The coolant which you use for replenishing the system, must comply with one
specific specification ⇒ page 193. Do not use an alternative additive if the speci-
fied coolant additive is not available in exceptional cases. Just top up the system
with water and as soon as possible arrange adjustment to correct the mixing ratio
of water and coolant additive again by a specialist garage.
Only use fresh coolant for topping up the system.
Do not fill the coolant above the mark a (max.)
⇒ fig. 155 ! Excess coolant heats up
and then is forced out of the cooling system through the pressure relief valve in
the cap.
Wait until the engine has cooled down for a system which has suffered a major
loss of coolant before pouring in coolant. This is necessary to avoid engine dam-
age. WARNING
● The cooling system is pressurized! Do not open the cap of the coolant ex-
pansion bottle if the engine is still hot - risk of scalding!
● The coolant additive and thus all of the coolant is harmful to your health.
Avoid contact with the coolant. Coolant vapours are also harmful to the
health. It is important, therefore, to always safely store any coolant additive in
its original container out of the reach of children - risk of poisoning!
● If any splashes of coolant get into your eyes, rinse out your eyes immedi-
ately with clear water and contact a doctor as soon as possible.
● You should also consult a doctor without delay if you have inadvertently
swallowed coolant. CAUTION
Do not continue your journey if for some reason it is not possible under the con-
ditions prevailing to top up with coolant. Switch the engine off and obtain pro-
fessional assistance from a specialist garage, otherwise it could lead to severe en-
gine damage. For the sake of the environment
Do not re-use coolant if it is necessary to drain the coolant in the system. It should
be collected and disposed of in compliance with environmental protection regula-
tions. 194
Inspecting and Replenishing
Page 199 of 252
●
Do not place the battery in direct daylight in order to protect the battery hous-
ing from the effects of ultra-violet light.
● If the vehicle has not been driven for more than 3 to 4 weeks, the battery will
discharge This is because certain electrical components consume electricity (e. g.
control units) also in idle state. You can prevent the discharging of the battery by
disconnecting the negative terminal or charging the battery constantly with a very
low charging current. For the sake of the environment
A removed battery is a special type of waste which is harmful to the environment
- contact your specialist garage regarding disposing of the battery. Note
● Please also refer to the guidelines ⇒ page 198
, also after connecting the bat-
tery.
● You should replace batteries older than 5 years.
Battery cover Fig. 157 Engine compartment: Polyester cover of the vehicle battery/plastic cover of the vehi-
cle battery
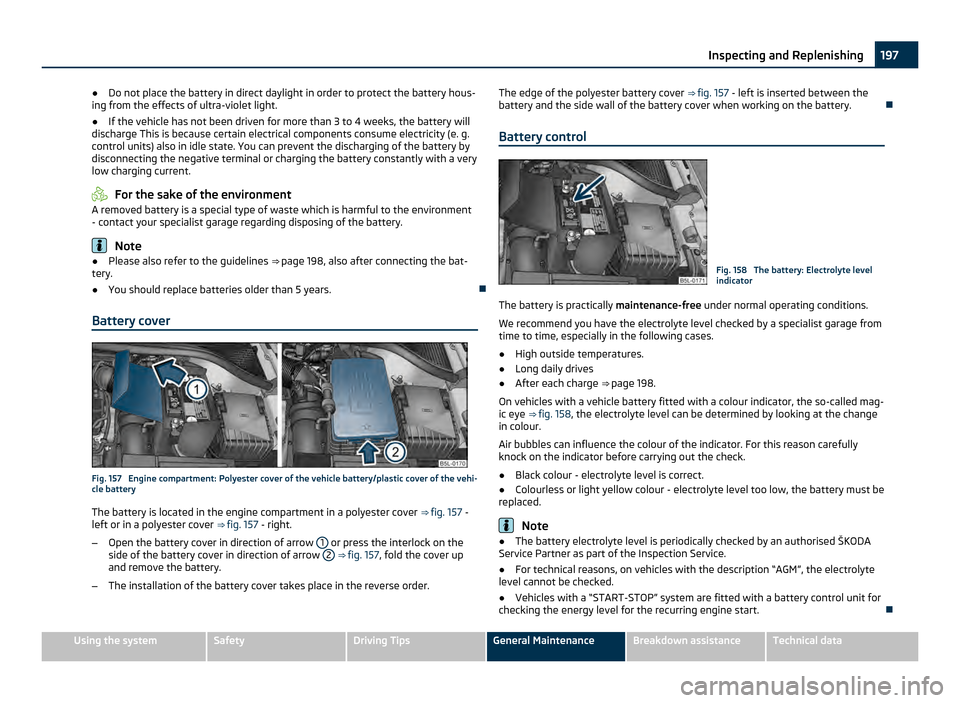
The battery is located in the engine compartment in a polyester cover ⇒ fig. 157 -
left or in a polyester cover ⇒ fig. 157 - right.
– Open the battery cover in direction of arrow 1 or press the interlock on the
side of the battery cover in direction of arrow 2
⇒
fig. 157, fold the cover up
and remove the battery.
– The installation of the battery cover takes place in the reverse order. The edge of the polyester battery cover
⇒
fig. 157 - left is inserted between the
battery and the side wall of the battery cover when working on the battery.
Battery control Fig. 158 The battery: Electrolyte level
indicator
The battery is practically maintenance-free under normal operating conditions.
We recommend you have the electrolyte level checked by a specialist garage from
time to time, especially in the following cases.
● High outside temperatures.
● Long daily drives
● After each charge ⇒
page 198.
On vehicles with a vehicle battery fitted with a colour indicator, the so-called mag-
ic eye ⇒ fig. 158 , the electrolyte level can be determined by looking at the change
in colour.
Air bubbles can influence the colour of the indicator. For this reason carefully
knock on the indicator before carrying out the check.
● Black colour - electrolyte level is correct.
● Colourless or light yellow colour - electrolyte level too low, the battery must be
replaced. Note
● The battery electrolyte level is periodically checked by an authorised
ŠKODA
Service Partner as part of the Inspection Service.
● For technical reasons, on vehicles with the description “AGM”, the electrolyte
level cannot be checked.
● Vehicles with a “START-STOP” system are fitted with a battery control unit for
checking the energy level for the recurring engine start. 197
Inspecting and Replenishing Using the system Safety Driving Tips General Maintenance Breakdown assistance Technical data
Page 200 of 252
Operation in winter
The battery has to provide greater amounts of electricity during the winter. It also
has only part of the initial power output at low temperatures that it has at normal
temperatures.
A discharged battery may already freeze at temperatures just below 0 °C.
We therefore recommend that you have the battery checked by a specialist ga-
rage before the start of winter and recharged if necessary. WARNING
Never charge a frozen or thawed battery - risk of explosion and caustic burns.
Replace a frozen battery.
Charging the battery A properly charged battery is essential for reliably starting the en-
gine.
– Read the warning notes ⇒ in General information on page 196 and
⇒ .
– Switch the ignition and all electrical components off.
– Only for “quick-charging”: Disconnect both battery cables (first of all “nega-
tive
”, then “positive”).
– Carefully attach the terminal clamps of the charger to the battery terminals
(red = “positive
”, black = “negative”).
– You can now plug the mains cable of the charger into the power socket and
switch on the charger.
– When charging is completed: switch the charger off and unplug the mains ca-
ble from the power socket.
– Only then should you disconnect the terminal clamps of the charger.
– Reconnect the cables to the battery (first of all “positive”, then “negative”).
It is not normally necessary to disconnect the cables of the battery if you recharge
the battery using low amperages (as for example from a mini-charger). Please al-
so refer to the instructions from the charger manufacturer.
A charging current of 0.1 of the total battery capacity (or lower) is that which
should be used until full charging is achieved. It is, however, necessary to disconnect both cables before charging the battery
with high amperages, so-called
“quick-charging ”.
“Quick-charging” a battery is dangerous ⇒ in General information on page 196.
It requires a special charger and specialist knowledge. We recommend having the
quick charging of vehicle batteries undertaken by a specialist garage.
A discharged battery may already freeze at temperatures just below 0
°C ⇒ . We
recommend that you no longer use a battery which has thawed out because the
casing of the battery may be cracked through the formation of ice and this would
allow battery electrolyte to flow out.
The vent plugs of the battery should not be opened for charging. WARNING
● Never charge a frozen or thawed battery - risk of explosion and caustic
burns. Replace a frozen battery.
● Never charge a battery which has a too low electrolyte level - risk of explo-
sion and caustic burns. CAUTION
On vehicles with the “START/STOP” system, the pole terminal of the charger must
not be connected directly to the negative terminal of the vehicle battery, but only
to the engine earth ⇒ fig. 174.
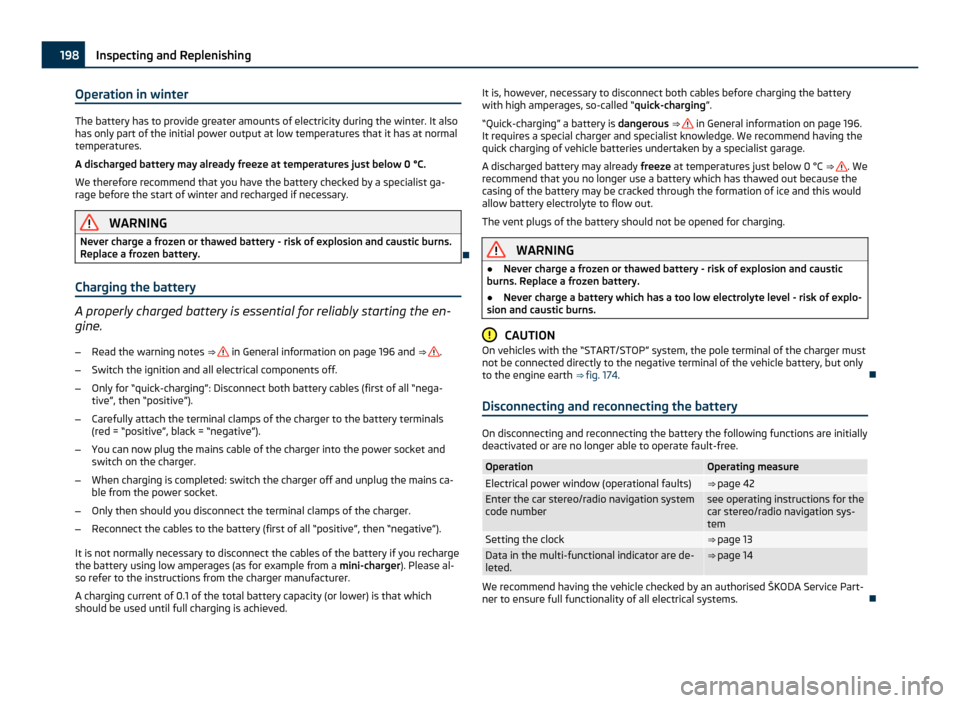
Disconnecting and reconnecting the battery On disconnecting and reconnecting the battery the following functions are initially
deactivated or are no longer able to operate fault-free.
Operation Operating measure
Electrical power window (operational faults) ⇒ page 42
Enter the car stereo/radio navigation system
code number see operating instructions for the
car stereo/radio navigation sys-
tem
Setting the clock ⇒ page 13
Data in the multi-functional indicator are de-
leted. ⇒ page 14
We recommend having the vehicle checked by an authorised ŠKODA Service Part-
ner to ensure full functionality of all electrical systems.
198
Inspecting and Replenishing