technical data SKODA YETI 2011 1.G / 5L Owner's Guide
[x] Cancel search | Manufacturer: SKODA, Model Year: 2011, Model line: YETI, Model: SKODA YETI 2011 1.G / 5LPages: 252, PDF Size: 3.61 MB
Page 61 of 252
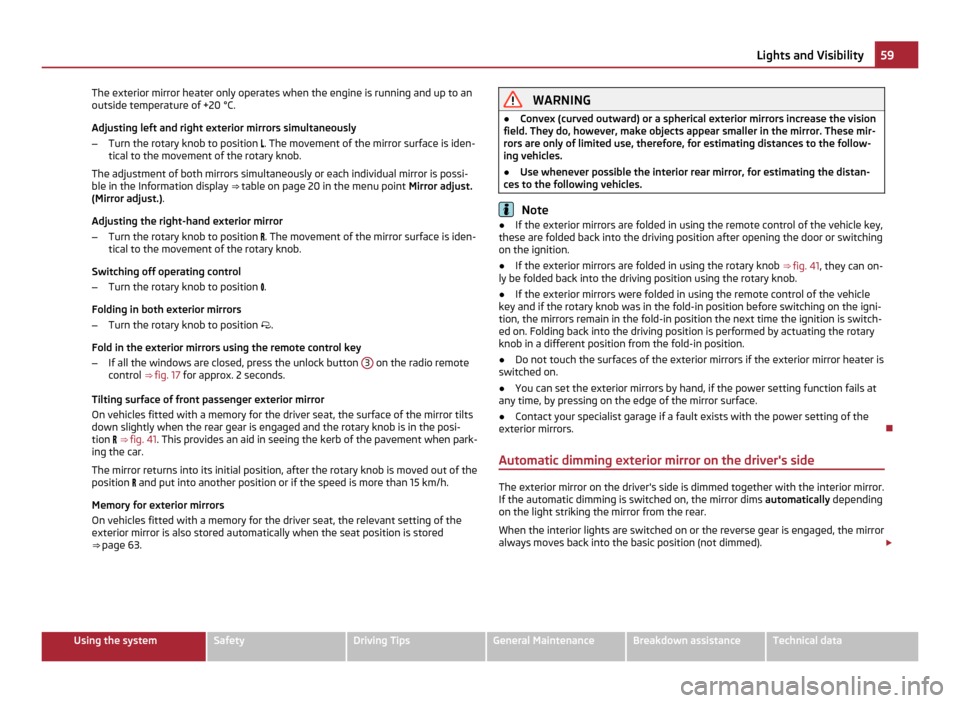
The exterior mirror heater only operates when the engine is running and up to an
outside temperature of +20 °C.
Adjusting left and right exterior mirrors simultaneously
– Turn the rotary knob to position . The movement of the mirror surface is iden-
tical to the movement of the rotary knob.
The adjustment of both mirrors simultaneously or each individual mirror is possi-
ble in the Information display ⇒
table on page 20 in the menu point Mirror adjust.
(Mirror adjust.).
Adjusting the right-hand exterior mirror
– Turn the rotary knob to position . The movement of the mirror surface is iden-
tical to the movement of the rotary knob.
Switching off operating control
– Turn the rotary knob to position .
Folding in both exterior mirrors
– Turn the rotary knob to position .
Fold in the exterior mirrors using the remote control key
– If all the windows are closed, press the unlock button 3 on the radio remote
control ⇒ fig. 17 for approx. 2 seconds.
Tilting surface of front passenger exterior mirror
On vehicles fitted with a memory for the driver seat, the surface of the mirror tilts
down slightly when the rear gear is engaged and the rotary knob is in the posi-
tion ⇒ fig. 41 . This provides an aid in seeing the kerb of the pavement when park-
ing the car.
The mirror returns into its initial position, after the rotary knob is moved out of the
position and put into another position or if the speed is more than 15 km/h.
Memory for exterior mirrors
On vehicles fitted with a memory for the driver seat, the relevant setting of the
exterior mirror is also stored automatically when the seat position is stored
⇒ page 63. WARNING
● Convex (curved outward) or a spherical exterior mirrors increase the vision
field. They do, however, make objects appear smaller in the mirror. These mir-
rors are only of limited use, therefore, for estimating distances to the follow-
ing vehicles.
● Use whenever possible the interior rear mirror, for estimating the distan-
ces to the following vehicles. Note
● If the exterior mirrors are folded in using the remote control of the vehicle key,
these are folded back into the driving position after opening the door or switching
on the ignition.
● If the exterior mirrors are folded in using the rotary knob ⇒
fig. 41, they can on-
ly be folded back into the driving position using the rotary knob.
● If the exterior mirrors were folded in using the remote control of the vehicle
key and if the rotary knob was in the fold-in position before switching on the igni-
tion, the mirrors remain in the fold-in position the next time the ignition is switch-
ed on. Folding back into the driving position is performed by actuating the rotary
knob in a different position from the fold-in position.
● Do not touch the surfaces of the exterior mirrors if the exterior mirror heater is
switched on.
● You can set the exterior mirrors by hand, if the power setting function fails at
any time, by pressing on the edge of the mirror surface.
● Contact your specialist garage if a fault exists with the power setting of the
exterior mirrors.
Automatic dimming exterior mirror on the driver's side The exterior mirror on the driver's side is dimmed together with the interior mirror.
If the automatic dimming is switched on, the mirror dims automatically depending
on the light striking the mirror from the rear.
When the interior lights are switched on or the reverse gear is engaged, the mirror
always moves back into the basic position (not dimmed). £ 59
Lights and Visibility Using the system Safety Driving Tips General Maintenance Breakdown assistance Technical data
Page 63 of 252
Seats and Stowage
Front seats
Basic information The front seats have a wide range of different settings and can thus be matched
to the physical characteristics of the driver and front passenger. Correct adjust-
ment of the seats is particularly important for:
● safely and quickly reaching the controls;
● a relaxed, fatigue-free body position;
● achieving the maximum protection offered by the seat belts and the airbag
system. WARNING
● Never transport more occupants than the maximum seating in the vehicle.
● Each occupant must correctly fasten the seat belt belonging to the seat.
Children must be fastened ⇒
page 146, Transporting children safely with a
suitable restraint system.
● The front seats and the head restraints must always be adjusted to match
the body size of the seat occupant as well as the seat belts must always be
correctly fastened in order to provide an optimal protection for you and your
occupants.
● Always keep your feet in the footwell when the car is being driven - never
place your feet on the instrument panel, out of the window or on the surfaces
of the seats. This is particularly important for the front seat passenger. You
will be exposed to increased risk of injury if it becomes necessary to apply the
brake or in the event of an accident. If an airbag is deployed, you may suffer
fatal injuries when adopting an incorrect seated position!
● It is important for the driver and front passenger to maintain a distance of
at least 25 cm from the steering wheel or dash panel. Not maintaining this
minimum distance will mean that the airbag system will not be able to proper-
ly protect you - hazard! The front seats and the head restraints must always
also be correctly adjusted to match the body size of the occupant. WARNING (Continued)
● Ensure that there are no objects in the footwell as any objects may get be-
hind the pedals during a driving or braking manoeuvre. You would then no
longer be able to operate the clutch, to brake or accelerate.
● Do not transport any objects on the front passenger seat except objects
(e.g. child safety seat) provided for this purpose - risk of accident!
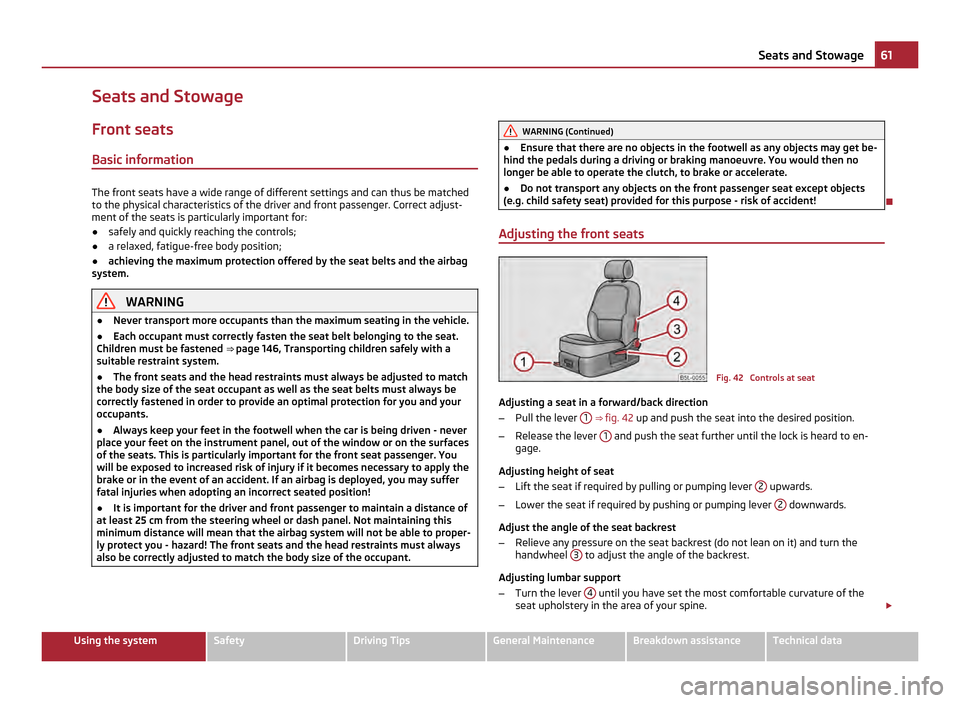
Adjusting the front seats Fig. 42 Controls at seat
Adjusting a seat in a forward/back direction
– Pull the lever 1
⇒
fig. 42 up and push the seat into the desired position.
– Release the lever 1 and push the seat further until the lock is heard to en-
gage.
Adjusting height of seat
– Lift the seat if required by pulling or pumping lever 2 upwards.
– Lower the seat if required by pushing or pumping lever 2 downwards.
Adjust the angle of the seat backrest
– Relieve any pressure on the seat backrest (do not lean on it) and turn the
handwheel 3 to adjust the angle of the backrest.
Adjusting lumbar support
– Turn the lever 4 until you have set the most comfortable curvature of the
seat upholstery in the area of your spine. £ 61
Seats and Stowage Using the system Safety Driving Tips General Maintenance Breakdown assistance Technical data
Page 65 of 252
WARNING
● The folding table must not be in the horizontal position while driving. This
could lead to injuries in the event of an accident.
● Do not place any hot beverages into the folding table. If the vehicle moves,
they may spill - risk of scalding!
● Do not use any cups or beakers which are made of brittle material (e.g.
glass, porcelain). This could lead to injuries in the event of an accident. CAUTION
● Do not leave any open beverages in the holder. They may spill when braking
and while doing so damage the vehicle.
● The folding table on the seat backrest of the front passenger seats is de-
signed to hold smaller objects up to a maximum total weight of 10 kg.
Adjusting front seats electrically
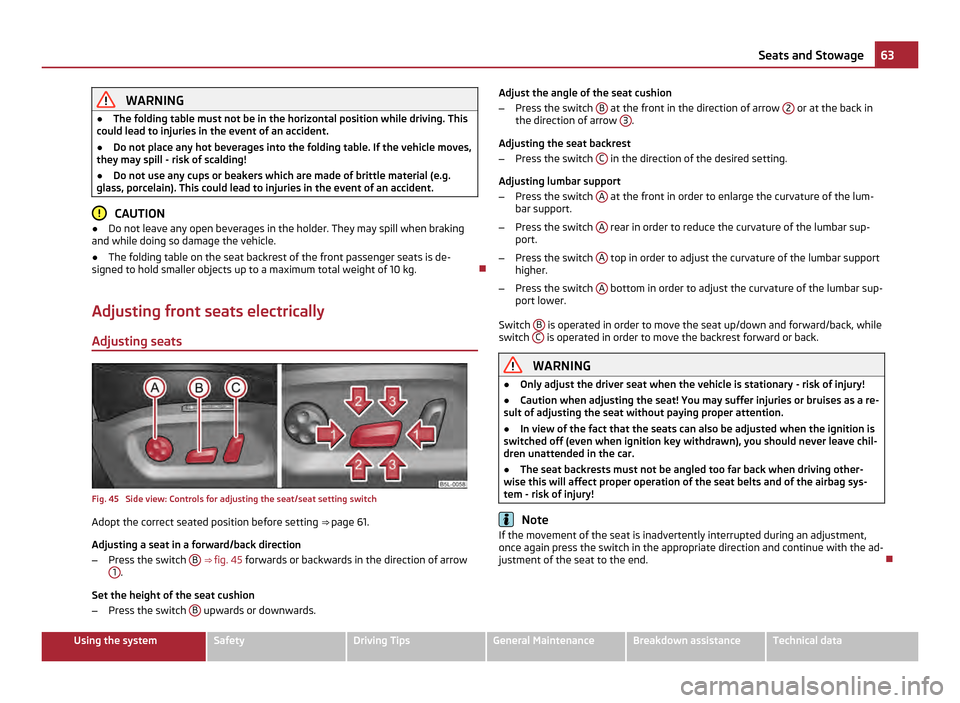
Adjusting seats Fig. 45 Side view: Controls for adjusting the seat/seat setting switch
Adopt the correct seated position before setting ⇒ page 61.
Adjusting a seat in a forward/back direction
– Press the switch B
⇒ fig. 45 forwards or backwards in the direction of arrow
1 .
Set the height of the seat cushion
– Press the switch B upwards or downwards. Adjust the angle of the seat cushion
–
Press the switch B at the front in the direction of arrow
2 or at the back in
the direction of arrow 3 .
Adjusting the seat backrest
– Press the switch C in the direction of the desired setting.
Adjusting lumbar support
– Press the switch A at the front in order to enlarge the curvature of the lum-
bar support.
– Press the switch A rear in order to reduce the curvature of the lumbar sup-
port.
– Press the switch A top in order to adjust the curvature of the lumbar support
higher.
– Press the switch A bottom in order to adjust the curvature of the lumbar sup-
port lower.
Switch B is operated in order to move the seat up/down and forward/back, while
switch C is operated in order to move the backrest forward or back.
WARNING
● Only adjust the driver seat when the vehicle is stationary - risk of injury!
● Caution when adjusting the seat! You may suffer injuries or bruises as a re-
sult of adjusting the seat without paying proper attention.
● In view of the fact that the seats can also be adjusted when the ignition is
switched off (even when ignition key withdrawn), you should never leave chil-
dren unattended in the car.
● The seat backrests must not be angled too far back when driving other-
wise this will affect proper operation of the seat belts and of the airbag sys-
tem - risk of injury! Note
If the movement of the seat is inadvertently interrupted during an adjustment,
once again press the switch in the appropriate direction and continue with the ad-
justment of the seat to the end. 63
Seats and Stowage Using the system Safety Driving Tips General Maintenance Breakdown assistance Technical data
Page 67 of 252
●
The assignment of the radio remote control to a memory button is retained,
however, after reassigning the seats and exterior mirrors.
● After the successful assignment, the turn signal lights flash and an audible
signal will sound as a confirmation. The setting is stored with the memory button
which you have selected.
Retrieving settings of the seat and mirrors You can retrieve the stored settings either with the memory but-
tons or with the remote control.
Retrieving settings with memory buttons
– In order to retrieve the stored setting, you have two possibilities:
– By briefly pressing:Briefly press the desired memory button B
⇒ fig. 46 . The
seat and exterior mirror are moved automatically into the stored positions (this
applies only if the ignition is switched on and the speed is less than 5 km/h).
– By pressing for a long period of time: press and hold the desired memory but-
ton B pressed long enough until the seat and the exterior mirrors are moved
into the stored positions.
Retrieving settings with remote control
– If the driver door is closed and the ignition is switched off, briefly press the un-
lock button of the remote control ⇒ page 37 and then open the driver door.
– The seat and exterior mirrors now move automatically into the stored posi-
tions.
Retrieving setting of exterior mirror for reversing
– Turn the rotary knob for the exterior mirror setting into the position
⇒ page 58
before engaging the reverse gear.
The mirror returns into its initial position, after the rotary knob is moved out of the
position and put into another position or if the speed is more than 15 km/h.
Emergency Off
You can interrupt the setting operation at any time, if you operate any button of
the driver seat. Head restraints
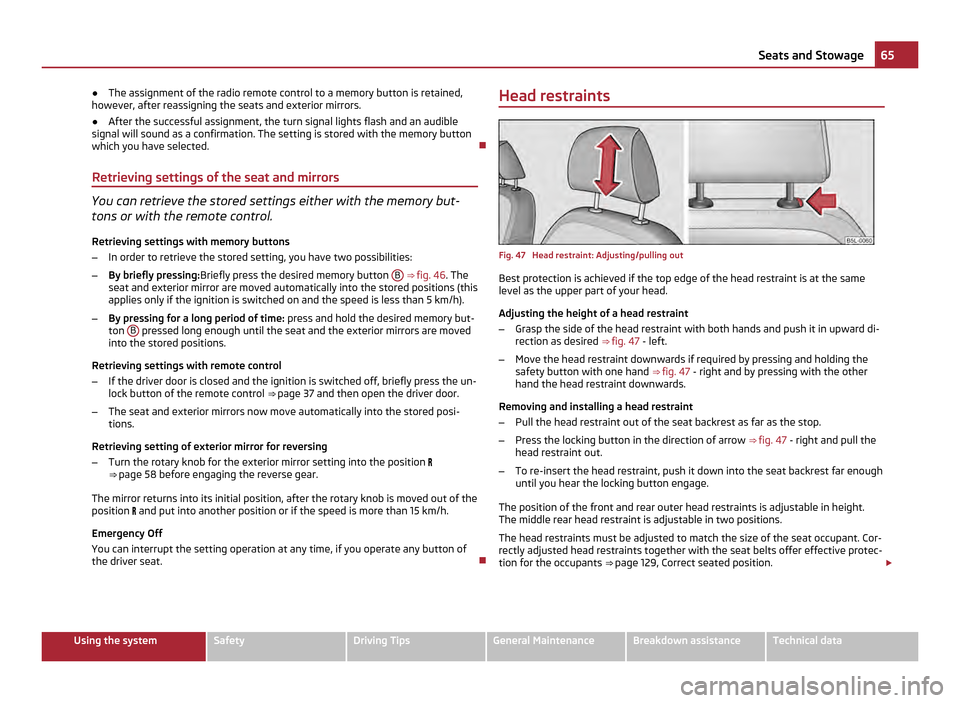
Fig. 47 Head restraint: Adjusting/pulling out
Best protection is achieved if the top edge of the head restraint is at the same
level as the upper part of your head.
Adjusting the height of a head restraint
–
Grasp the side of the head restraint with both hands and push it in upward di-
rection as desired ⇒ fig. 47 - left.
– Move the head restraint downwards if required by pressing and holding the
safety button with one hand ⇒ fig. 47 - right and by pressing with the other
hand the head restraint downwards.
Removing and installing a head restraint
– Pull the head restraint out of the seat backrest as far as the stop.
– Press the locking button in the direction of arrow ⇒
fig. 47 - right and pull the
head restraint out.
– To re-insert the head restraint, push it down into the seat backrest far enough
until you hear the locking button engage.
The position of the front and rear outer head restraints is adjustable in height.
The middle rear head restraint is adjustable in two positions.
The head restraints must be adjusted to match the size of the seat occupant. Cor-
rectly adjusted head restraints together with the seat belts offer effective protec-
tion for the occupants ⇒ page 129, Correct seated position
.£ 65
Seats and Stowage Using the system Safety Driving Tips General Maintenance Breakdown assistance Technical data
Page 69 of 252
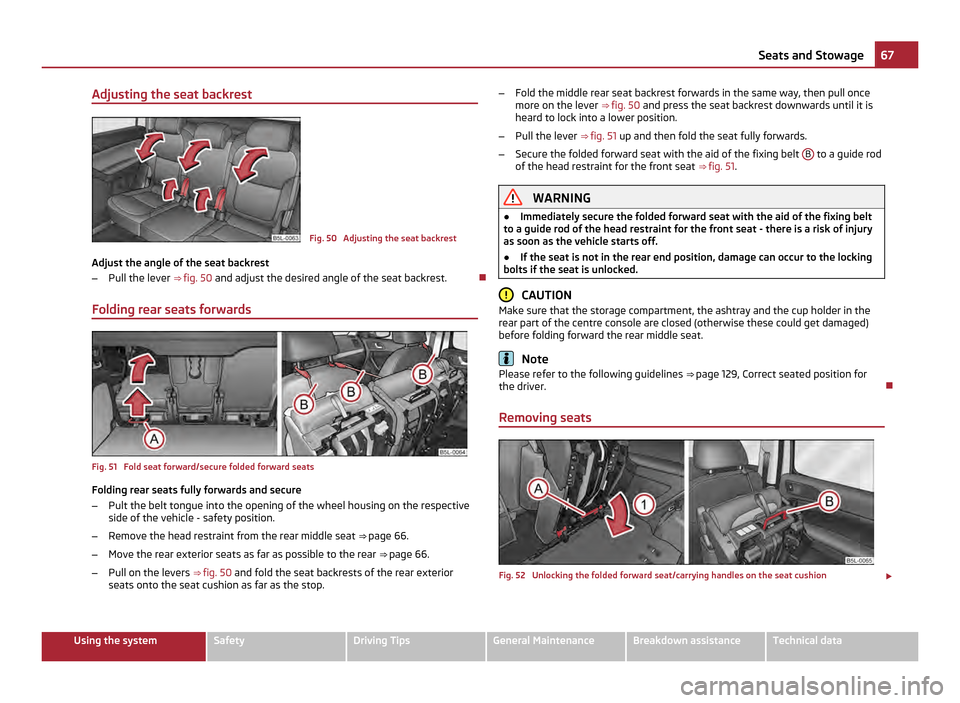
Adjusting the seat backrest
Fig. 50 Adjusting the seat backrest
Adjust the angle of the seat backrest
– Pull the lever ⇒ fig. 50 and adjust the desired angle of the seat backrest.
Folding rear seats forwards Fig. 51 Fold seat forward/secure folded forward seats
Folding rear seats fully forwards and secure
–
Pult the belt tongue into the opening of the wheel housing on the respective
side of the vehicle - safety position.
– Remove the head restraint from the rear middle seat ⇒ page 66
.
– Move the rear exterior seats as far as possible to the rear ⇒
page 66.
– Pull on the levers ⇒ fig. 50 and fold the seat backrests of the rear exterior
seats onto the seat cushion as far as the stop. –
Fold the middle rear seat backrest forwards in the same way, then pull once
more on the lever ⇒
fig. 50 and press the seat backrest downwards until it is
heard to lock into a lower position.
– Pull the lever ⇒
fig. 51 up and then fold the seat fully forwards.
– Secure the folded forward seat with the aid of the fixing belt B to a guide rod
of the head restraint for the front seat ⇒ fig. 51. WARNING
● Immediately secure the folded forward seat with the aid of the fixing belt
to a guide rod of the head restraint for the front seat - there is a risk of injury
as soon as the vehicle starts off.
● If the seat is not in the rear end position, damage can occur to the locking
bolts if the seat is unlocked. CAUTION
Make sure that the storage compartment, the ashtray and the cup holder in the
rear part of the centre console are closed (otherwise these could get damaged)
before folding forward the rear middle seat. Note
Please refer to the following guidelines ⇒
page 129, Correct seated position for
the driver.
Removing seats Fig. 52 Unlocking the folded forward seat/carrying handles on the seat cushion
£ 67
Seats and Stowage Using the system Safety Driving Tips General Maintenance Breakdown assistance Technical data
Page 71 of 252
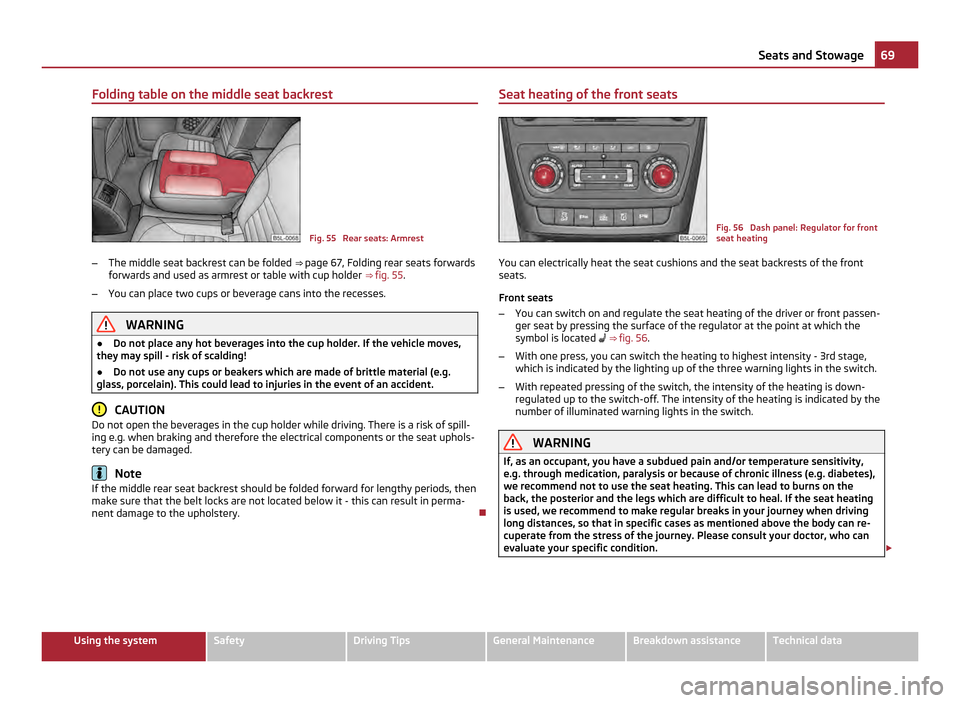
Folding table on the middle seat backrest
Fig. 55 Rear seats: Armrest
– The middle seat backrest can be folded ⇒ page 67, Folding rear seats forwards
forwards and used as armrest or table with cup holder ⇒ fig. 55 .
– You can place two cups or beverage cans into the recesses. WARNING
● Do not place any hot beverages into the cup holder. If the vehicle moves,
they may spill - risk of scalding!
● Do not use any cups or beakers which are made of brittle material (e.g.
glass, porcelain). This could lead to injuries in the event of an accident. CAUTION
Do not open the beverages in the cup holder while driving. There is a risk of spill-
ing e.g. when braking and therefore the electrical components or the seat uphols-
tery can be damaged. Note
If the middle rear seat backrest should be folded forward for lengthy periods, then
make sure that the belt locks are not located below it - this can result in perma-
nent damage to the upholstery. Seat heating of the front seats Fig. 56 Dash panel: Regulator for front
seat heating
You can electrically heat the seat cushions and the seat backrests of the front
seats.
Front seats
– You can switch on and regulate the seat heating of the driver or front passen-
ger seat by pressing the surface of the regulator at the point at which the
symbol is located ⇒
fig. 56 .
– With one press, you can switch the heating to highest intensity - 3rd stage,
which is indicated by the lighting up of the three warning lights in the switch.
– With repeated pressing of the switch, the intensity of the heating is down-
regulated up to the switch-off. The intensity of the heating is indicated by the
number of illuminated warning lights in the switch. WARNING
If, as an occupant, you have a subdued pain and/or temperature sensitivity,
e.g. through medication, paralysis or because of chronic illness (e.g. diabetes),
we recommend not to use the seat heating. This can lead to burns on the
back, the posterior and the legs which are difficult to heal. If the seat heating
is used, we recommend to make regular breaks in your journey when driving
long distances, so that in specific cases as mentioned above the body can re-
cuperate from the stress of the journey. Please consult your doctor, who can
evaluate your specific condition. £ 69
Seats and Stowage Using the system Safety Driving Tips General Maintenance Breakdown assistance Technical data
Page 73 of 252
Note
Tyre pressure must be adjusted to the load ⇒ page 201.
Vehicles of category N1 On vehicles of the category N1, which are not fitted with a protective grille, a lash-
ing set which complies with the standard EN
12195 (1 - 4) must be used for fasten-
ing the load.
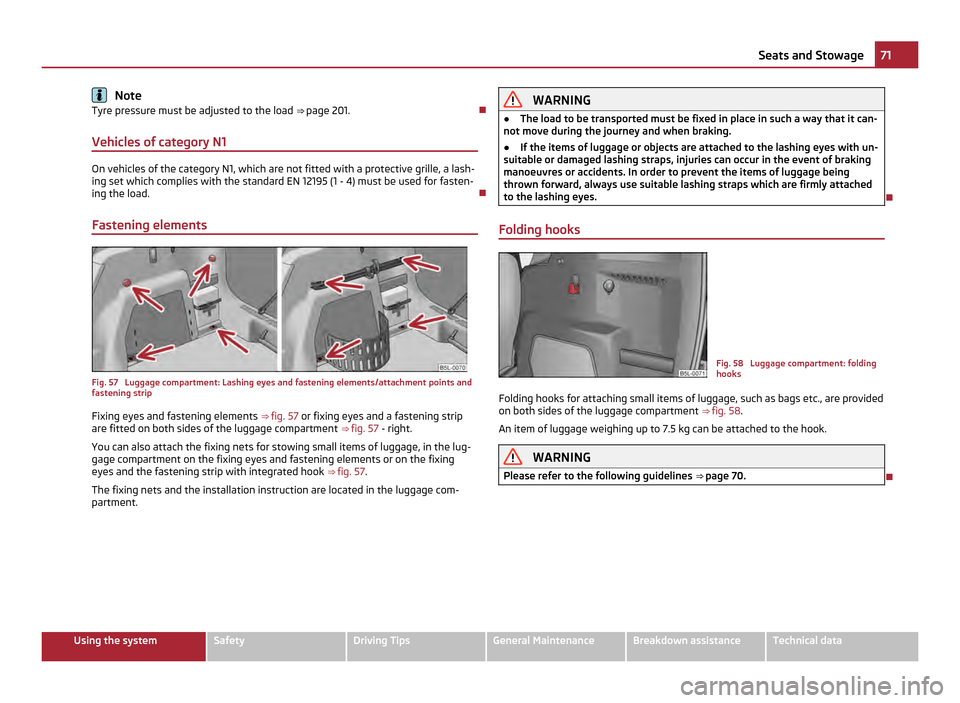
Fastening elements Fig. 57 Luggage compartment: Lashing eyes and fastening elements/attachment points and
fastening strip
Fixing eyes and fastening elements ⇒ fig. 57 or fixing eyes and a fastening strip
are fitted on both sides of the luggage compartment ⇒
fig. 57 - right.
You can also attach the fixing nets for stowing small items of luggage, in the lug-
gage compartment on the fixing eyes and fastening elements or on the fixing
eyes and the fastening strip with integrated hook ⇒ fig. 57.
The fixing nets and the installation instruction are located in the luggage com-
partment. WARNING
● The load to be transported must be fixed in place in such a way that it can-
not move during the journey and when braking.
● If the items of luggage or objects are attached to the lashing eyes with un-
suitable or damaged lashing straps, injuries can occur in the event of braking
manoeuvres or accidents. In order to prevent the items of luggage being
thrown forward, always use suitable lashing straps which are firmly attached
to the lashing eyes.
Folding hooks Fig. 58 Luggage compartment: folding
hooks
Folding hooks for attaching small items of luggage, such as bags etc., are provided
on both sides of the luggage compartment ⇒ fig. 58 .
An item of luggage weighing up to 7.5 kg can be attached to the hook. WARNING
Please refer to the following guidelines ⇒ page 70. 71
Seats and Stowage Using the system Safety Driving Tips General Maintenance Breakdown assistance Technical data
Page 75 of 252
The luggage compartment cover
You can use the luggage compartment cover behind the head re-
straints for storing light and soft items.
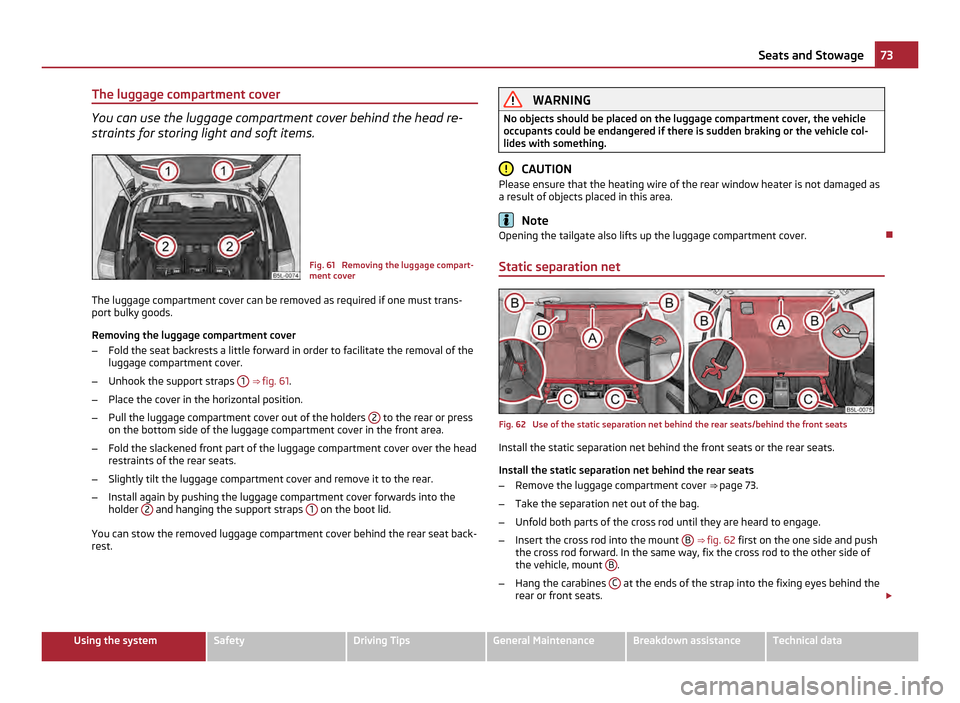
Fig. 61 Removing the luggage compart-
ment cover
The luggage compartment cover can be removed as required if one must trans-
port bulky goods.
Removing the luggage compartment cover
– Fold the seat backrests a little forward in order to facilitate the removal of the
luggage compartment cover.
– Unhook the support straps 1
⇒ fig. 61 .
– Place the cover in the horizontal position.
– Pull the luggage compartment cover out of the holders 2 to the rear or press
on the bottom side of the luggage compartment cover in the front area.
– Fold the slackened front part of the luggage compartment cover over the head
restraints of the rear seats.
– Slightly tilt the luggage compartment cover and remove it to the rear.
– Install again by pushing the luggage compartment cover forwards into the
holder 2 and hanging the support straps
1 on the boot lid.
You can stow the removed luggage compartment cover behind the rear seat back-
rest. WARNING
No objects should be placed on the luggage compartment cover, the vehicle
occupants could be endangered if there is sudden braking or the vehicle col-
lides with something. CAUTION
Please ensure that the heating wire of the rear window heater is not damaged as
a result of objects placed in this area. Note
Opening the tailgate also lifts up the luggage compartment cover.
Static separation net Fig. 62 Use of the static separation net behind the rear seats/behind the front seats
Install the static separation net behind the front seats or the rear seats.
Install the static separation net behind the rear seats
–
Remove the luggage compartment cover ⇒ page 73.
– Take the separation net out of the bag.
– Unfold both parts of the cross rod until they are heard to engage.
– Insert the cross rod into the mount B
⇒ fig. 62 first on the one side and push
the cross rod forward. In the same way, fix the cross rod to the other side of
the vehicle, mount B .
– Hang the carabines C at the ends of the strap into the fixing eyes behind the
rear or front seats. £ 73
Seats and Stowage Using the system Safety Driving Tips General Maintenance Breakdown assistance Technical data
Page 77 of 252
Remove carrier rails
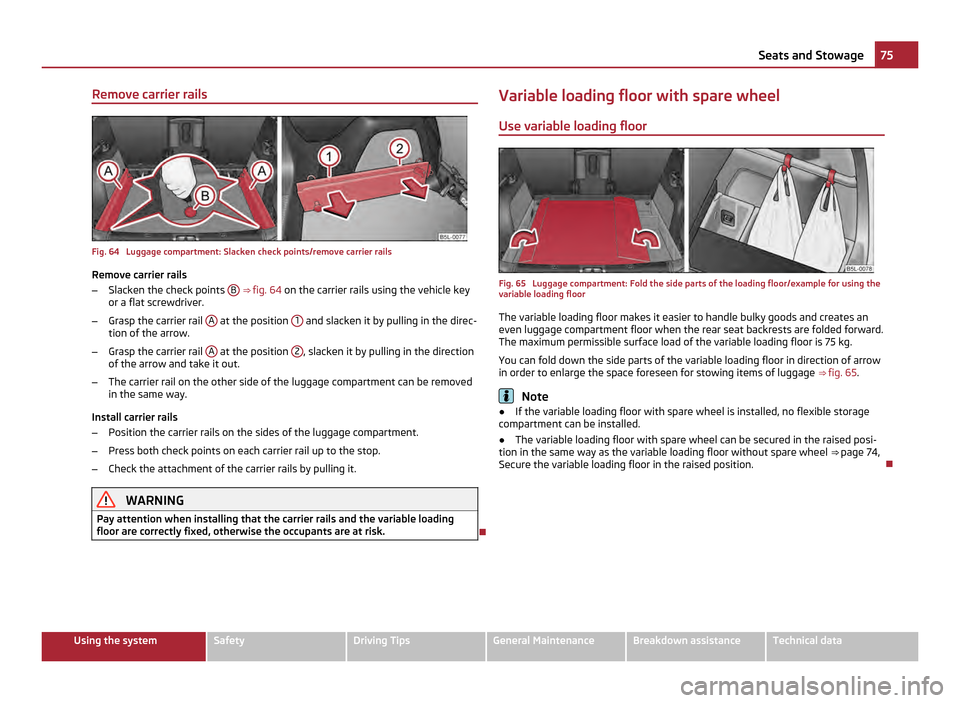
Fig. 64 Luggage compartment: Slacken check points/remove carrier rails
Remove carrier rails
– Slacken the check points B
⇒ fig. 64 on the carrier rails using the vehicle key
or a flat screwdriver.
– Grasp the carrier rail A at the position
1 and slacken it by pulling in the direc-
tion of the arrow.
– Grasp the carrier rail A at the position
2 , slacken it by pulling in the direction
of the arrow and take it out.
– The carrier rail on the other side of the luggage compartment can be removed
in the same way.
Install carrier rails
– Position the carrier rails on the sides of the luggage compartment.
– Press both check points on each carrier rail up to the stop.
– Check the attachment of the carrier rails by pulling it. WARNING
Pay attention when installing that the carrier rails and the variable loading
floor are correctly fixed, otherwise the occupants are at risk. Variable loading floor with spare wheel
Use variable loading floor
Fig. 65 Luggage compartment: Fold the side parts of the loading floor/example for using the
variable loading floor
The variable loading floor makes it easier to handle bulky goods and creates an
even luggage compartment floor when the rear seat backrests are folded forward.
The maximum permissible surface load of the variable loading floor is 75
kg.
You can fold down the side parts of the variable loading floor in direction of arrow
in order to enlarge the space foreseen for stowing items of luggage ⇒ fig. 65 . Note
● If the variable loading floor with spare wheel is installed, no flexible storage
compartment can be installed.
● The variable loading floor with spare wheel can be secured in the raised posi-
tion in the same way as the variable loading floor without spare wheel ⇒
page 74,
Secure the variable loading floor in the raised position. 75
Seats and Stowage Using the system Safety Driving Tips General Maintenance Breakdown assistance Technical data
Page 79 of 252
Cup holder
Cup holder in front centre console Fig. 68 Front centre console: Cup holder
You can place two cups or beverage cans into the recesses ⇒ fig. 68 . WARNING
● Do not place any hot beverages into the cup holder. If the vehicle moves,
they may spill - risk of scalding!
● Do not use any cups or beakers which are made of brittle material (e.g.
glass, porcelain). This could lead to injuries in the event of an accident. CAUTION
Do not open the beverages in the cup holder while driving. There is a risk of spill-
ing e.g. when braking and therefore the electrical components or the seat uphols-
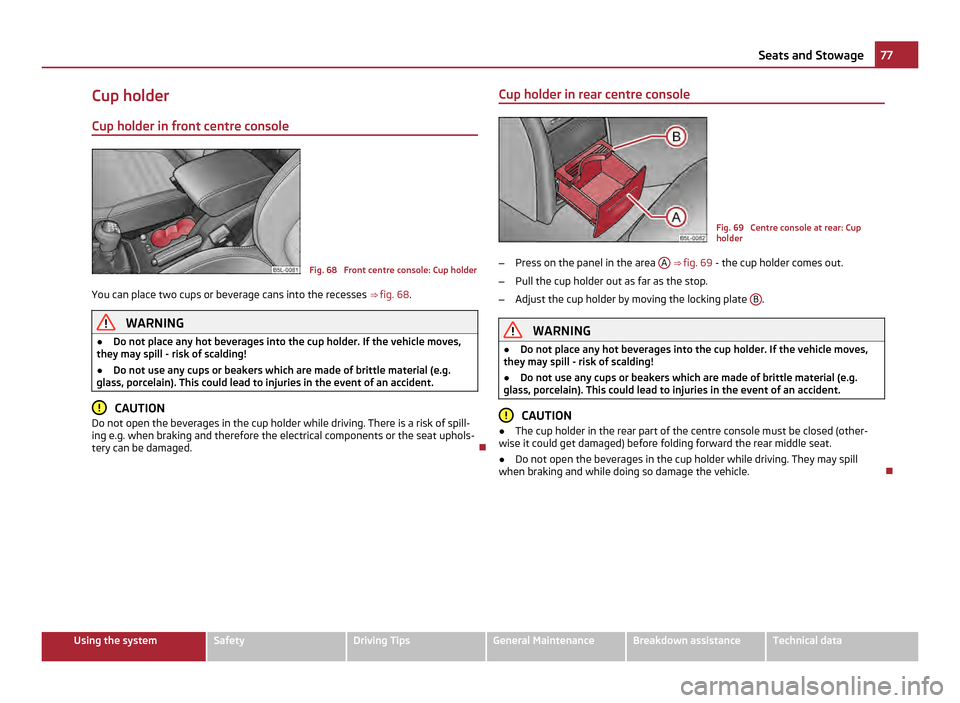
tery can be damaged. Cup holder in rear centre console Fig. 69 Centre console at rear: Cup
holder
– Press on the panel in the area A
⇒
fig. 69 - the cup holder comes out.
– Pull the cup holder out as far as the stop.
– Adjust the cup holder by moving the locking plate B .
WARNING
● Do not place any hot beverages into the cup holder. If the vehicle moves,
they may spill - risk of scalding!
● Do not use any cups or beakers which are made of brittle material (e.g.
glass, porcelain). This could lead to injuries in the event of an accident. CAUTION
● The cup holder in the rear part of the centre console must be closed (other-
wise it could get damaged) before folding forward the rear middle seat.
● Do not open the beverages in the cup holder while driving. They may spill
when braking and while doing so damage the vehicle. 77
Seats and Stowage Using the system Safety Driving Tips General Maintenance Breakdown assistance Technical data