head SSANGYONG KORANDO 1997 Service Repair Manual
[x] Cancel search | Manufacturer: SSANGYONG, Model Year: 1997, Model line: KORANDO, Model: SSANGYONG KORANDO 1997Pages: 2053, PDF Size: 88.33 MB
Page 1643 of 2053

SUPPLEMENTAL RESTRAINTS SYSTEM 8B-61
SSANGYONG MY2002
KAA8B050
CLOCK SPRING
Removal and installation Procedure
Caution: The SDM can maintain sufficient voltage
to deploy the airbags for 0.15 seconds after the
Ignition is OFF and the airbag fuse has been
removed. If the airbags are not disconnected, service
cannot begin until one minute has passed after
disconnecting power to the SDM. If the airbags are
disconnected, service can begin immediately
without waiting for one-minute time period to
expire. Failure to temporarily disable the SRS
during service result in unexpected deployment,
personal injury, and otherwise unneeded SRS repair.
1. Disconnect the negative battery cable.
2. Remove the driver airbag module. Refer to “Driver
Airbag Module” in this section.
3. Remove the steering wheel. Refer to Section 6E,
Steering Wheel and Column.
4. Remove the steering column cover. Refer to
Section 6E, Steering Wheel and Column.
5. Carefully full the instrument panel lower cover.
6. Remove driver side knee bolster.
7. Disconnect the clock spring, horn and remote
audio control connectors at the lower steering
column.
8. Remove the screws and the clock spring from the
steering shaft.
Installation Notice
Turning the clock spring more than three turns
clockwise or counterclockwise can damage the
spring.
Align the clock spring before installation. Turn
the lobe of the clock spring clockwise to lock
but do not force. Then turn the lobe of clock
spring count clockwise approximately three
turns to the neutral position, with the front of
the wheels straight ahead. Properly align the
pointed marks on the components of the clock
spring.
9. Installation should follow the removal procedure
in the reverse order.
Caution: If the clock spring is not properly
aligned, the steering wheel may not be able to
rotate completely during a turn. Restricted
turning ability can cause the vehicle to crash.
Improper alignment of the clock spring also may
make the supplemental restraint system (SRS)
inoperative, preventing the airbag from
deploying during crash. Both of the out comes
can result in injury.
Tightening Torque 4 Nm (35 lb-in)
Page 1656 of 2053
BODY WIRING SYSTEM 9A-5
SSANGYONG MY2002
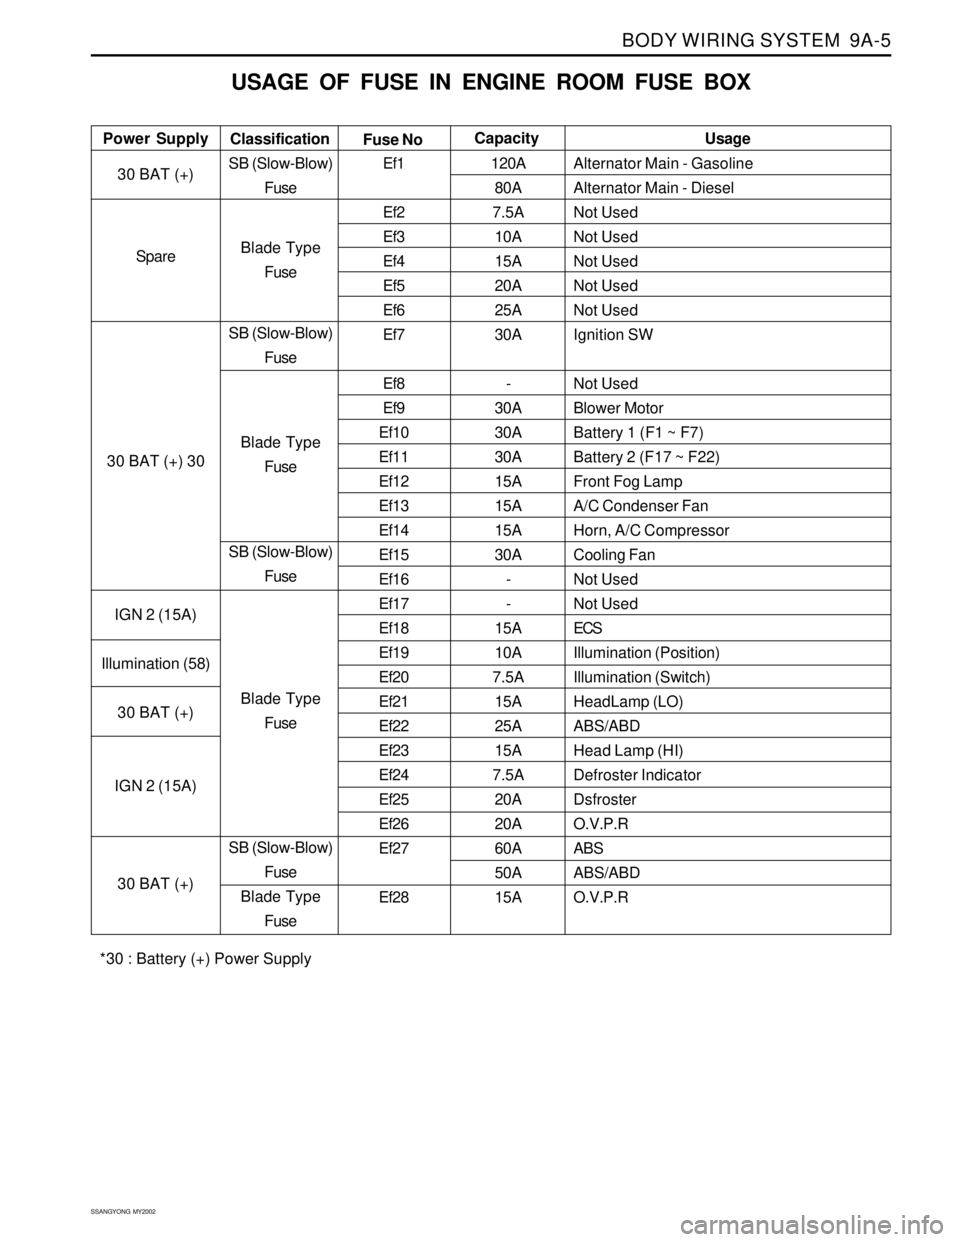
USAGE OF FUSE IN ENGINE ROOM FUSE BOX
Alternator Main - Gasoline
Alternator Main - Diesel
Not Used
Not Used
Not Used
Not Used
Not Used
Ignition SW
Not Used
Blower Motor
Battery 1 (F1 ~ F7)
Battery 2 (F17 ~ F22)
Front Fog Lamp
A/C Condenser Fan
Horn, A/C Compressor
Cooling Fan
Not Used
Not Used
ECS
Illumination (Position)
Illumination (Switch)
HeadLamp (LO)
ABS/ABD
Head Lamp (HI)
Defroster Indicator
Dsfroster
O.V.P.R
ABS
ABS/ABD
O.V.P.R Power SupplyUsage
Classification
Fuse NoCapacity
30 BAT (+)
Spare
30 BAT (+) 30
IGN 2 (15A)
Illumination (58)
30 BAT (+)
IGN 2 (15A)
30 BAT (+)SB (Slow-Blow)
Fuse
Blade Type
Fuse
SB (Slow-Blow)
Fuse
Blade Type
Fuse
SB (Slow-Blow)
Fuse
Blade Type
Fuse
SB (Slow-Blow)
Fuse
Blade Type
FuseEf1
Ef2
Ef3
Ef4
Ef5
Ef6
Ef7
Ef8
Ef9
Ef10
Ef11
Ef12
Ef13
Ef14
Ef15
Ef16
Ef17
Ef18
Ef19
Ef20
Ef21
Ef22
Ef23
Ef24
Ef25
Ef26
Ef27
Ef28120A
80A
7.5A
10A
15A
20A
25A
30A
-
30A
30A
30A
15A
15A
15A
30A
-
-
15A
10A
7.5A
15A
25A
15A
7.5A
20A
20A
60A
50A
15A
*30 : Battery (+) Power Supply
Page 1658 of 2053
BODY WIRING SYSTEM 9A-7
SSANGYONG MY2002
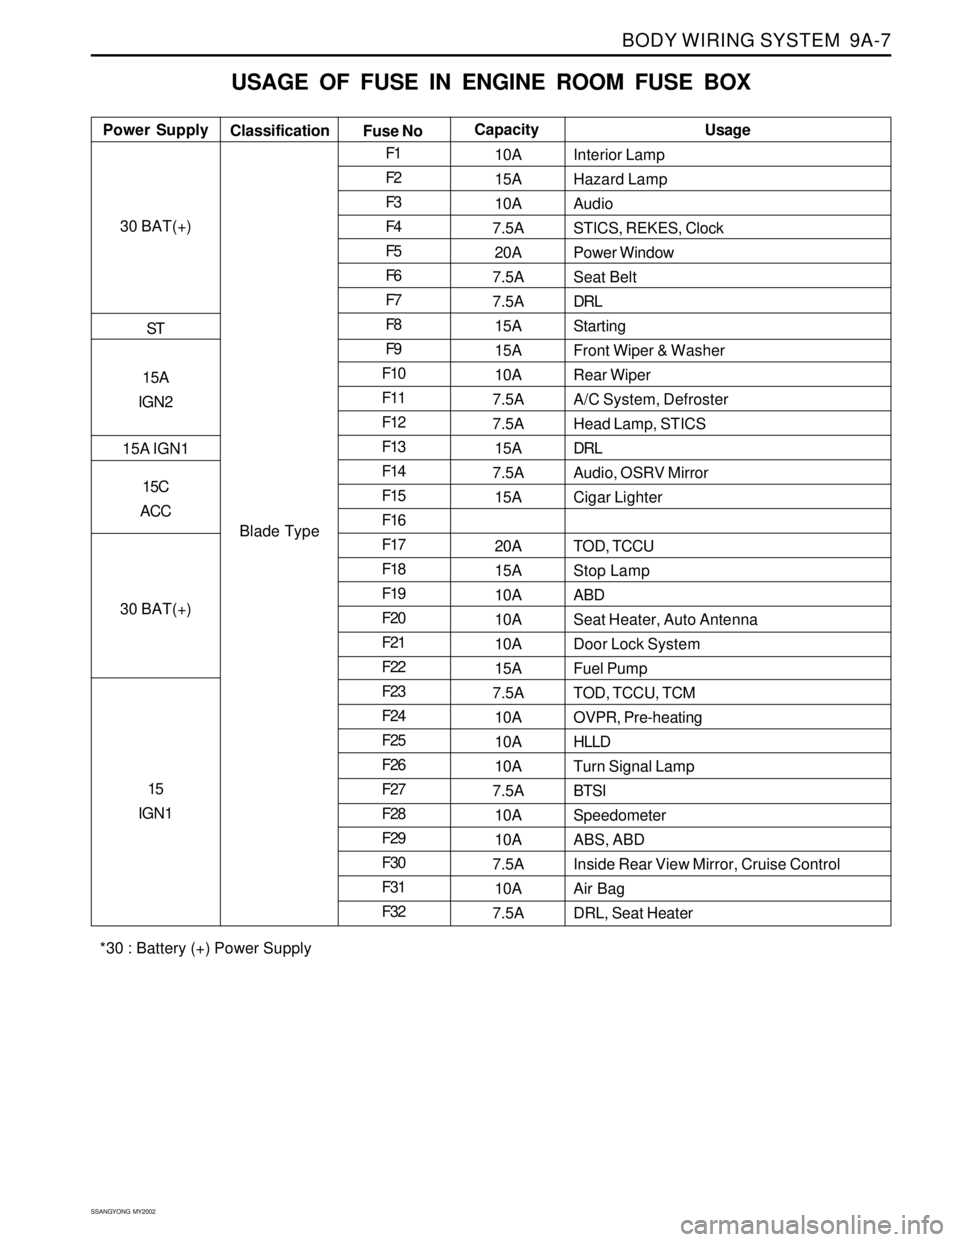
USAGE OF FUSE IN ENGINE ROOM FUSE BOX
Interior Lamp
Hazard Lamp
Audio
STICS, REKES, Clock
Power Window
Seat Belt
DRL
Starting
Front Wiper & Washer
Rear Wiper
A/C System, Defroster
Head Lamp, STICS
DRL
Audio, OSRV Mirror
Cigar Lighter
TOD, TCCU
Stop Lamp
ABD
Seat Heater, Auto Antenna
Door Lock System
Fuel Pump
TOD, TCCU, TCM
OVPR, Pre-heating
HLLD
Turn Signal Lamp
BTSI
Speedometer
ABS, ABD
Inside Rear View Mirror, Cruise Control
Air Bag
DRL, Seat Heater Power SupplyUsage
Classification
Fuse NoCapacity
30 BAT(+)
ST
15A
IGN2
15A IGN1
15C
ACC
30 BAT(+)
15
IGN1
Blade TypeF1
F2
F3
F4
F5
F6
F7
F8
F9
F10
F11
F12
F13
F14
F15
F16
F17
F18
F19
F20
F21
F22
F23
F24
F25
F26
F27
F28
F29
F30
F31
F3210A
15A
10A
7.5A
20A
7.5A
7.5A
15A
15A
10A
7.5A
7.5A
15A
7.5A
15A
20A
15A
10A
10A
10A
15A
7.5A
10A
10A
10A
7.5A
10A
10A
7.5A
10A
7.5A
*30 : Battery (+) Power Supply
Page 1662 of 2053

BODY WIRING SYSTEM 9A-11
SSANGYONG MY2002
WIRING HARNESS & CONNECTOR & GROUND LOCATION
W/H ENGINE ROOM
KAA9A070
1 Starting motor
2 G102
3 Damper solenoid (FRT LH)
4 Compressor
5 Wheel speed sensor (FRT LH)
6 Starting motor “ST” terminal connector
7 Canister purge valve (Gasoline E/G)
8 Pre-heating time control unit (Diesel E/G)
9 C109 (Diesel E/G)
10 J102
11 J101
12 G101
13 Turn signal & position lamp (FRT LH)
14 Fog lamp (FRT LH)
15 Head lamp (FRT LH)
16 HLLD (FRT LH)
17 Hood switch
18 Thermo switch (Diesel E/G)
19 LH horn
20 Condenser fan motor-Non A/conditioner
21 Condenser fan motor (LH)22 Resistor
23 RH horn
24 Fog lamp (FRT RH)
25 Condenser fan motor (RH)
26 Head lamp (FRT RH)
27 HLLD (FRT RH)
28 Turn signal & position lamp (FRT RH)
29 G103
30 C110 (Diesel E/G)
31 Alternator B+ (Diesel E/G)
32 J104
33 J103
34 C110 (Gasoline E/G)
35 Alternator B+ (Gasoline E/G)
36 Damper Solenoid (FRT RH)
37 C111
38 Wheel speed sensor (FRT RH)
39 Dual pressure switch
40 Washer motor
41 ADD (FRT RH)
42 C112
43 C113
Page 1675 of 2053

SECTION 9B
LIGHTING SYSTEM
CAUTION: Disconnect the negative battery cable before removing or installing any electrical unit or when a
tool or equipment could easily come in contact with exposed electrical terminals. Disconnecting this cable
will help prevent personal injury and damage to the vehicle. The ignition must also be in LOCK unless
otherwise noted.
TABLE OF CONTENTS
Description and Operation...................................9B-2
Head Lamps - ON Reminder................................9B-2
Head Lamps........................................................9B-2
Daytime Running Lamps......................................9B-2
Parking and Turn Signal Lamps...........................9B-2
Fog Lamps..........................................................9B-2
Rear Combination Lamps.....................................9B-2
Center High-Mounted Stop Lamp.........................9B-2
Backup Lamps....................................................9B-3
License Plate Lamps ...........................................9B-3
Interior Room Lamps ...........................................9B-3
Luggage Lamps..................................................9B-3
Components Locator............................................9B-4
Diagnostic Information and Procedure...............9B-5
Head Lamps........................................................9B-5
Fog Lamps..........................................................9B-7
Tail Lamps..........................................................9B-8
Interior Room and Luggage Lamps....................9B-11
Door Courtesy Lamps ........................................9B-13
Cigar Lighter......................................................9B-14
Repair Instructions..............................................9B-15
On-Vehicle Service Unit Repair..............................9B-15
Head Lamps......................................................9B-15Front Combination Lamp....................................9B-16
Center High-Mounted Stop Lamp.......................9B-16
Rear Combination Lamps...................................9B-17
Fog Lamps........................................................9B-17
Interior Courtesy Lamp .......................................9B-18
Door Courtesy Lamp ..........................................9B-18
Luggage Lamp..................................................9B-19
License Plate Lamps .........................................9B-19
Specifications.....................................................9B-20
Bulb Usage Chart..............................................9B-20
Fastener Tightening Specifications.....................9B-20
Schematic and Routing Diagrams.....................9B-21
Head Lamp Leveling Device (HLLD) : Gasoline ..9B-21
Head Lamp Leveling Device (HLLD) : Diesel......9B-22
Tail Lamp Relay Circuit Position Lamp,
Tail Lamp, License Lamp................................9B-23
Illumination Switch.............................................9B-24
Turn Signal Lamp...............................................9B-25
Front Fog Lamp.................................................9B-26
Rear Fog Lamp..................................................9B-27
Stop Lamp, BTSI (Brake Transmission
Shift Interlock) - Metal Top..............................9B-28
Stop Lamp, BTSI (Brake Transmission
Shift Interlock) - Soft Top.................................9B-29
Page 1676 of 2053
SSANGYONG MY2002
9B-2 LIGHTING SYSTEM
DESCRIPTION AND OPERATION
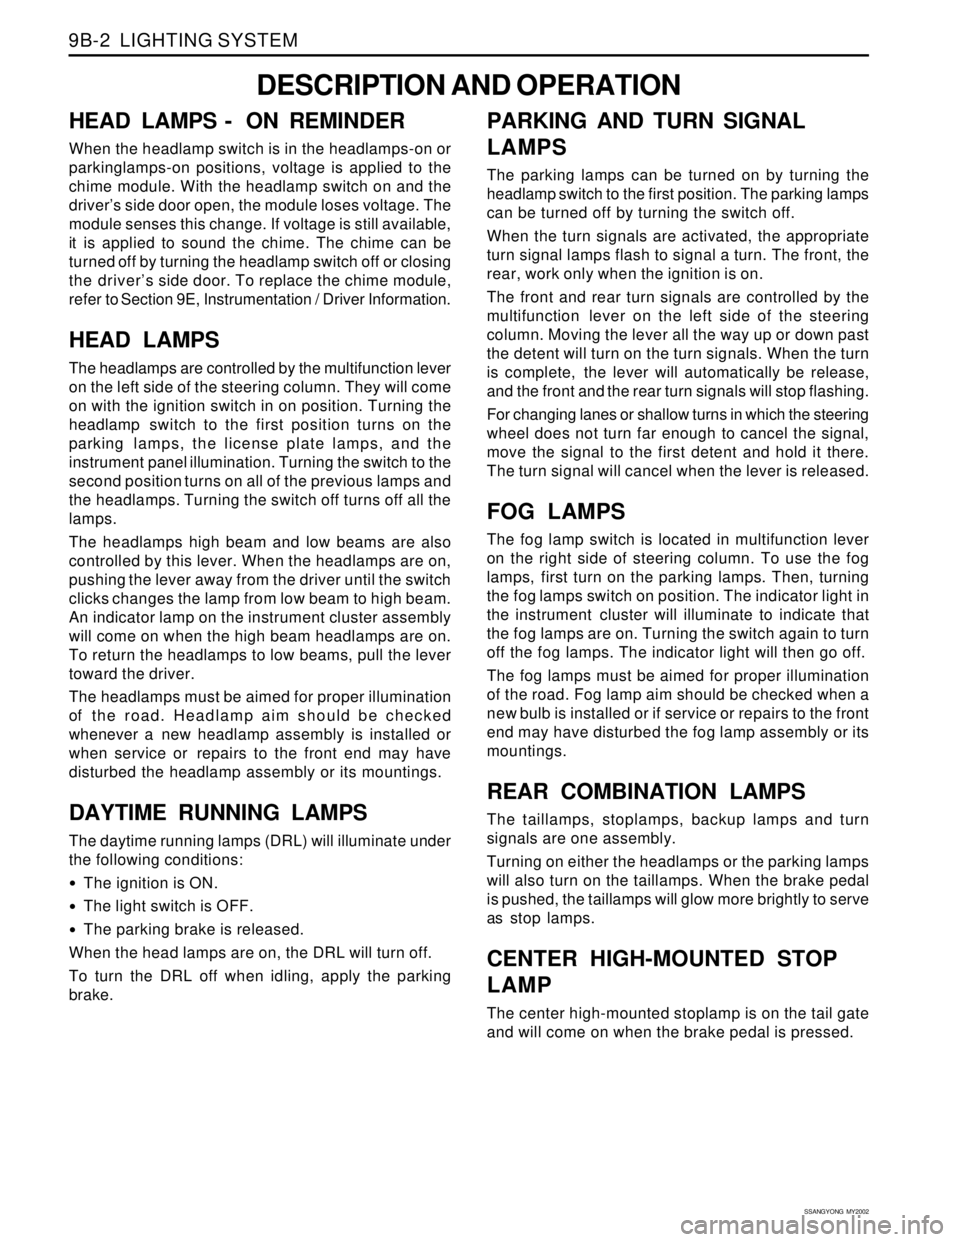
HEAD LAMPS - ON REMINDER
When the headlamp switch is in the headlamps-on or
parkinglamps-on positions, voltage is applied to the
chime module. With the headlamp switch on and the
driver’s side door open, the module loses voltage. The
module senses this change. If voltage is still available,
it is applied to sound the chime. The chime can be
turned off by turning the headlamp switch off or closing
the driver’s side door. To replace the chime module,
refer to Section 9E, Instrumentation / Driver Information.
HEAD LAMPS
The headlamps are controlled by the multifunction lever
on the left side of the steering column. They will come
on with the ignition switch in on position. Turning the
headlamp switch to the first position turns on the
parking lamps, the license plate lamps, and the
instrument panel illumination. Turning the switch to the
second position turns on all of the previous lamps and
the headlamps. Turning the switch off turns off all the
lamps.
The headlamps high beam and low beams are also
controlled by this lever. When the headlamps are on,
pushing the lever away from the driver until the switch
clicks changes the lamp from low beam to high beam.
An indicator lamp on the instrument cluster assembly
will come on when the high beam headlamps are on.
To return the headlamps to low beams, pull the lever
toward the driver.
The headlamps must be aimed for proper illumination
of the road. Headlamp aim should be checked
whenever a new headlamp assembly is installed or
when service or repairs to the front end may have
disturbed the headlamp assembly or its mountings.
DAYTIME RUNNING LAMPS
The daytime running lamps (DRL) will illuminate under
the following conditions:
The ignition is ON.
The light switch is OFF.
The parking brake is released.
When the head lamps are on, the DRL will turn off.
To turn the DRL off when idling, apply the parking
brake.
PARKING AND TURN SIGNAL
LAMPS
The parking lamps can be turned on by turning the
headlamp switch to the first position. The parking lamps
can be turned off by turning the switch off.
When the turn signals are activated, the appropriate
turn signal lamps flash to signal a turn. The front, the
rear, work only when the ignition is on.
The front and rear turn signals are controlled by the
multifunction lever on the left side of the steering
column. Moving the lever all the way up or down past
the detent will turn on the turn signals. When the turn
is complete, the lever will automatically be release,
and the front and the rear turn signals will stop flashing.
For changing lanes or shallow turns in which the steering
wheel does not turn far enough to cancel the signal,
move the signal to the first detent and hold it there.
The turn signal will cancel when the lever is released.
FOG LAMPS
The fog lamp switch is located in multifunction lever
on the right side of steering column. To use the fog
lamps, first turn on the parking lamps. Then, turning
the fog lamps switch on position. The indicator light in
the instrument cluster will illuminate to indicate that
the fog lamps are on. Turning the switch again to turn
off the fog lamps. The indicator light will then go off.
The fog lamps must be aimed for proper illumination
of the road. Fog lamp aim should be checked when a
new bulb is installed or if service or repairs to the front
end may have disturbed the fog lamp assembly or its
mountings.
REAR COMBINATION LAMPS
The taillamps, stoplamps, backup lamps and turn
signals are one assembly.
Turning on either the headlamps or the parking lamps
will also turn on the taillamps. When the brake pedal
is pushed, the taillamps will glow more brightly to serve
as stop lamps.
CENTER HIGH-MOUNTED STOP
LAMP
The center high-mounted stoplamp is on the tail gate
and will come on when the brake pedal is pressed.
Page 1677 of 2053

LIGHTING SYSTEM 9B-3
SSANGYONG MY2002
BACKUP LAMPS
The backup lamps will come on when the transaxle is
shifted into reverse. On a vehicle with an automatic
transaxle, the backup lamps are activated by inhibitor
switch. On a vehicle with a manual transaxle, they are
activated by a reverse switch with is part of the
transaxle.
LICENSE PLATE LAMPS
The license plate lamps will come on when the head
lamps or the parking lamps are on. The license plate
lamps are mounted on the rear door handle cover,
above the license plate.
INTERIOR ROOM LAMPS
The room lamp is located on the front position of head
liner and has three the center switch pushed, both of
two bulbs of the lamp are on at the same tine. When
any door is open. The switchs on the left and right
side turn on the bulbs of each side. They are off, if the
switch is pushed again the second room lamp is located
on the middle position it the switch push off again, the
lamp will turn off.
LUGGAGE LAMPS
The luggage lamp is under the trin plate on the left
side of quarter.
Page 1678 of 2053

SSANGYONG MY2002
9B-4 LIGHTING SYSTEM
COMPONENTS LOCATOR
1 Head Lamp
2 Front Room Lamp
3 Center Room Lamp
4 Rear Combination Lamp
5 License Plate Lamp6 Center High Mounted Stop Lamp
7 Rear Side Marker Lamp
8 Luggage Lamp
9 Door Courtesy Lamp
10 Front Combination Lamp
KAA9B010
Page 1679 of 2053
LIGHTING SYSTEM 9B-5
SSANGYONG MY2002
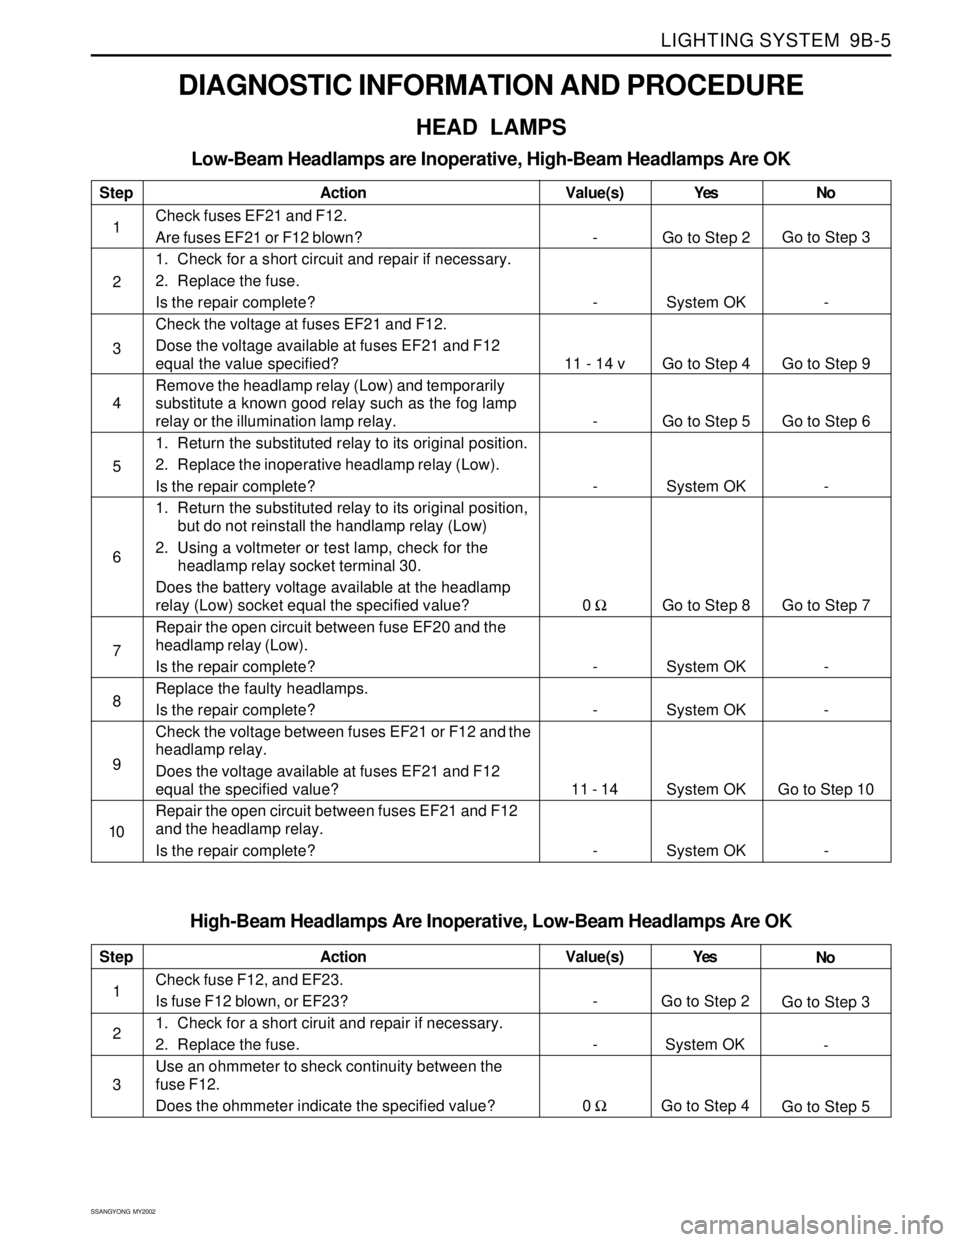
DIAGNOSTIC INFORMATION AND PROCEDURE
HEAD LAMPS
Low-Beam Headlamps are Inoperative, High-Beam Headlamps Are OK
Step
1
2
3
4
5
6
7
8
9
10Action
Check fuses EF21 and F12.
Are fuses EF21 or F12 blown?
1. Check for a short circuit and repair if necessary.
2. Replace the fuse.
Is the repair complete?
Check the voltage at fuses EF21 and F12.
Dose the voltage available at fuses EF21 and F12
equal the value specified?
Remove the headlamp relay (Low) and temporarily
substitute a known good relay such as the fog lamp
relay or the illumination lamp relay.
1. Return the substituted relay to its original position.
2. Replace the inoperative headlamp relay (Low).
Is the repair complete?
1. Return the substituted relay to its original position,
but do not reinstall the handlamp relay (Low)
2. Using a voltmeter or test lamp, check for the
headlamp relay socket terminal 30.
Does the battery voltage available at the headlamp
relay (Low) socket equal the specified value?
Repair the open circuit between fuse EF20 and the
headlamp relay (Low).
Is the repair complete?
Replace the faulty headlamps.
Is the repair complete?
Check the voltage between fuses EF21 or F12 and the
headlamp relay.
Does the voltage available at fuses EF21 and F12
equal the specified value?
Repair the open circuit between fuses EF21 and F12
and the headlamp relay.
Is the repair complete?Yes
Go to Step 2
System OK
Go to Step 4
Go to Step 5
System OK
Go to Step 8
System OK
System OK
System OK
System OKNo
Go to Step 3
-
Go to Step 9
Go to Step 6
-
Go to Step 7
-
-
Go to Step 10
- Value(s)
-
-
11 - 14 v
-
-
0 Ω
-
-
11 - 14
-
High-Beam Headlamps Are Inoperative, Low-Beam Headlamps Are OK
Step
1
2
3Action
Check fuse F12, and EF23.
Is fuse F12 blown, or EF23?
1. Check for a short ciruit and repair if necessary.
2. Replace the fuse.
Use an ohmmeter to sheck continuity between the
fuse F12.
Does the ohmmeter indicate the specified value?Yes
Go to Step 2
System OK
Go to Step 4No
Go to Step 3
-
Go to Step 5 Value(s)
-
-
0 Ω
Page 1680 of 2053
SSANGYONG MY2002
9B-6 LIGHTING SYSTEM
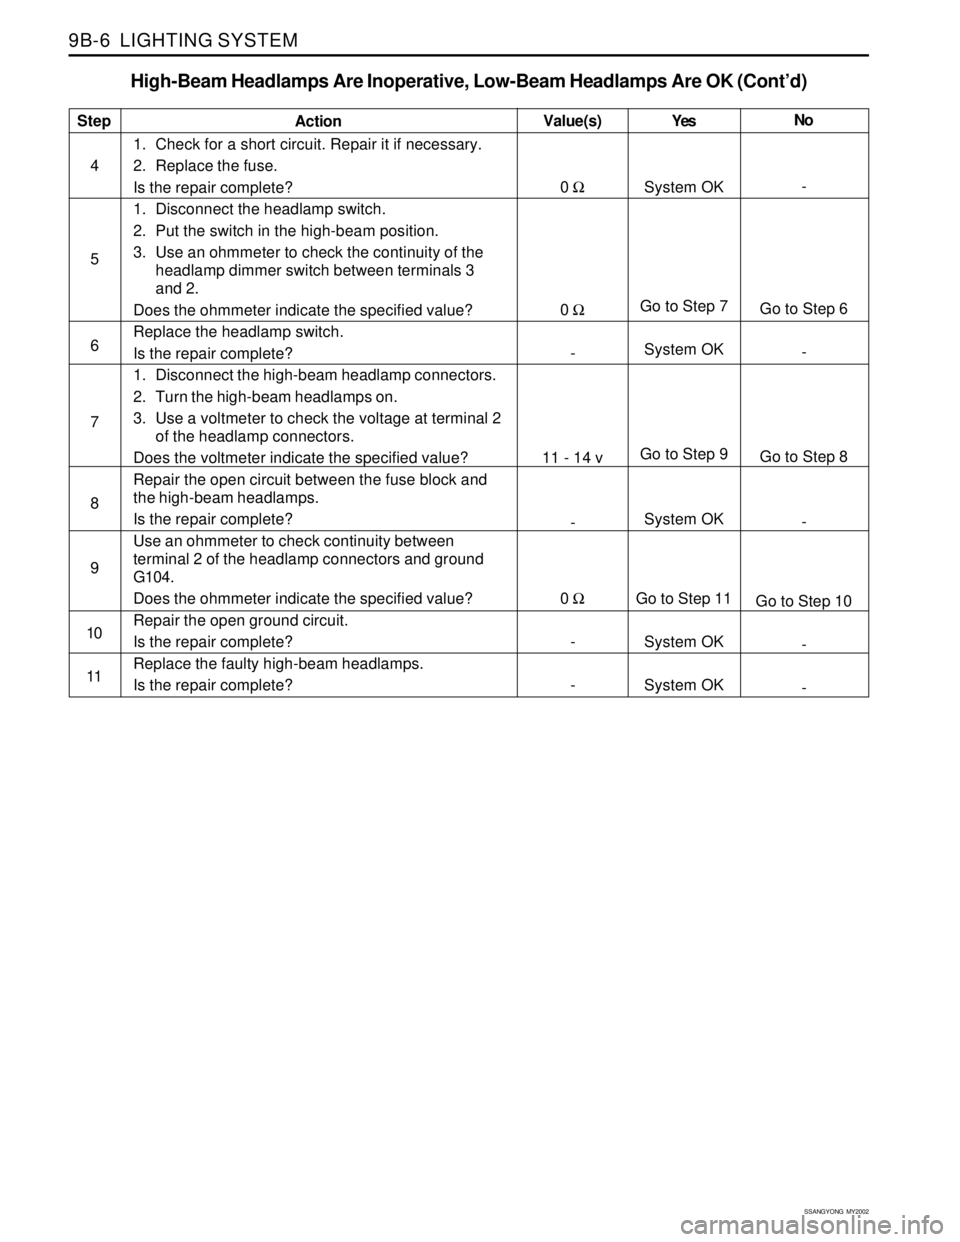
High-Beam Headlamps Are Inoperative, Low-Beam Headlamps Are OK (Cont’d)
Step
4
5
6
7
8
9
10
11Action
1. Check for a short circuit. Repair it if necessary.
2. Replace the fuse.
Is the repair complete?
1. Disconnect the headlamp switch.
2. Put the switch in the high-beam position.
3. Use an ohmmeter to check the continuity of the
headlamp dimmer switch between terminals 3
and 2.
Does the ohmmeter indicate the specified value?
Replace the headlamp switch.
Is the repair complete?
1. Disconnect the high-beam headlamp connectors.
2. Turn the high-beam headlamps on.
3. Use a voltmeter to check the voltage at terminal 2
of the headlamp connectors.
Does the voltmeter indicate the specified value?
Repair the open circuit between the fuse block and
the high-beam headlamps.
Is the repair complete?
Use an ohmmeter to check continuity between
terminal 2 of the headlamp connectors and ground
G104.
Does the ohmmeter indicate the specified value?
Repair the open ground circuit.
Is the repair complete?
Replace the faulty high-beam headlamps.
Is the repair complete?Yes
System OK
Go to Step 7
System OK
Go to Step 9
System OK
Go to Step 11
System OK
System OKNo
-
Go to Step 6
-
Go to Step 8
-
Go to Step 10
-
- Value(s)
0 Ω
0 Ω
-
11 - 14 v
-
0 Ω
-
-