SSANGYONG MUSSO 2003 Service Manual
MUSSO 2003
SSANGYONG
SSANGYONG
https://www.carmanualsonline.info/img/67/57511/w960_57511-0.png
SSANGYONG MUSSO 2003 Service Manual
Page 498 of 1574
OM600 ENGINE COOLING 1D3-15
Removal & Installation Procedure Cooling Fan Shroud
1. Remove the radiator deaeration hose and tube.Installation Notice
Tightening Torque 3 - 7 Nm
Tightening torque 3-7Nm
2. Check the shroud.
3. Installation should follow the removal procedure in the reverse order.
Coolant Sub-Tank
1. Drain the coolant from radiator.
2. Remove the each hose.
3. Loosen the mounting bolt of sub-tank and remove the coolant sub-tank. Installation Notice
4. Installation should follow the removal procedure in the reverse order.
Tightening Torque 3 - 7 Nm
Page 499 of 1574
1D3-16 OM600 ENGINE COOLING
THERMOSTAT
1 Thermostat
2 Seal....................................................... Replace
3 Thermostat Housing Cover 4 Coolant Hose
5 Bolt
............................................................ 10Nm
Page 500 of 1574
OM600 ENGINE COOLING 1D3-17
Removal & Installation Procedure
1. Drain the coolant completely.
2. Disconnect the coolant hose(4) from the thermostat housingcover(3).
3. Remove the bolts(5) and then remove the thermostat(1) and housing cover(3) Installation Notice Align the groove on thermostat and the housing cover rib(arrow).
Tightening Torque 10 Nm
Notice Replace the seal(2).
4. Installation should follow the removal procedure in the reverse order.
Page 501 of 1574

SECTION 1E1
M162 ENGINE ELECTRICAL
Specifications . . . . . . . . . . . . . . . . . . . . . . . 1E1-1Alternator Specifications . . . . . . . . . . . . . . . . 1E1-1
Starting Motor Specifications . . . . . . . . . . . . 1E1-2
Battery Specifications . . . . . . . . . . . . . . . . . . 1E1-2
Fastener Tightening Specifications . . . . . . . . 1E1-2
Special Tools . . . . . . . . . . . . . . . . . . . . . . . 1E1-3 Special Tools Table . . . . . . . . . . . . . . . . . . . . 1E1-3
Maintenance and Repair . . . . . . . . . . . . . . 1E1-4 On-Vehicle Service . . . . . . . . . . . . . . . . . . . . .
1E1-4
Alternator . . . . . . . . . . . . . . . . . . . . . . . . . . . 1E1-4
Starting Motor . . . . . . . . . . . . . . . . . . . . . . . . 1E1-5
Battery . . . . . . . . . . . . . . . . . . . . . . . . . . . . . 1E1-6
Spark Plug . . . . . . . . . . . . . . . . . . . . . . . . . . 1E1-7
Ignition Cable . . . . . . . . . . . . . . . . . . . . . . . . 1E1-9
Unit Repair . . . . . . . . . . . . . . . . . . . . . . . . 1E1-12 Battery . . . . . . . . . . . . . . . . . . . . . . . . . . . . 1E1-12
SPECIFICATIONS
ALTERNATOR SPECIFICATIONS
CAUTION: Disconnect the negative battery cable before removing or installing any electrical unit or when a tool or equipment could easily come in contact with exposed electrical terminals. Disconnecting this cablewill help prevent personal injury and damage to the vehicle. The ignition must also be in LOCK unless otherwisenoted.
TABLE OF CONTENTS
Application
Output Voltage CurrentResistance Between Rotor Core and Slip Ring Description
12 - 14 V115 A� �
Page 502 of 1574
1E1-2 M162 ENGINE ELECTRICALNm
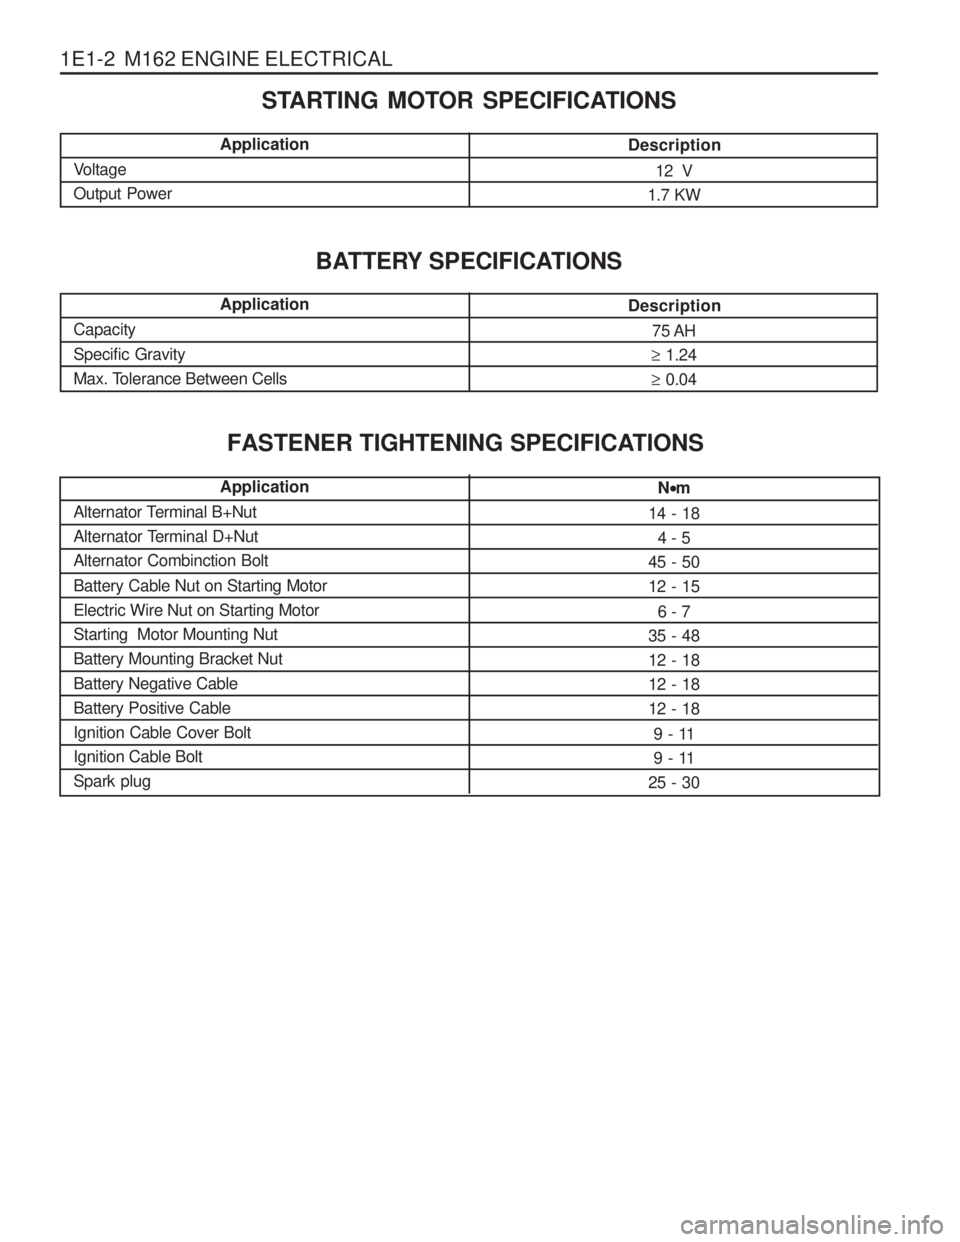
14 - 18 4 - 5
45 - 50 12 - 15
6 - 7
35 - 4812 - 1812 - 1812 - 18
9 - 11
9 - 11
25 - 30
STARTING MOTOR SPECIFICATIONS
Application
Voltage Output Power Description
12 V
1.7 KW
BATTERY SPECIFICATIONS
FASTENER TIGHTENING SPECIFICATIONS
Application
Capacity Specific Gravity
Max. Tolerance Between Cells Description
75 AH
� 1.24
� 0.04
Application
Alternator Terminal B+Nut
Alternator Terminal D+NutAlternator Combinction Bolt Battery Cable Nut on Starting Motor Electric Wire Nut on Starting MotorStarting Motor Mounting NutBattery Mounting Bracket Nut Battery Negative Cable Battery Positive CableIgnition Cable Cover BoltIgnition Cable BoltSpark plug
Page 503 of 1574
M162 ENGINE ELECTRICAL 1E1-3
SPECIAL TOOLS
SPECIAL TOOLS TABLE
120 589 02 09 00
Spark Plug Wrench
Page 504 of 1574
1E1-4 M162 ENGINE ELECTRICALMAINTENANCE AND REPAIR
ON-VEHICLE SERVICE
ALTERNATOR Preceding Work : Removal of the drivebelt Removal & Installation Procedure
1. Disconnect the negative battery terminal.
2. Unscrew the nut and disconnect the terminal (1). Installation Notice
1 Terminal (B+)
2 Terminal (D+)
3 Combination Bolt
4 Alternator
3. Unscrew the nut and disconnect the terminal (2).Installation Notice
Tightening Torque 14 - 18 Nm
4. Unscrew the combination bolt (3). Installation Notice
Tightening Torque 4 - 5 Nm
5. Remove the alternator.
6. Installation should follow the removal procedure in the reverse order.
Tightening Torque 42 - 50 Nm
Page 505 of 1574
M162 ENGINE ELECTRICAL 1E1-5
3 Fixing Bolt
4 Starting Motor
4. Unscrew the mounting bolts (3) of starting motor.
Installation Notice
5. Remove the starting motor.
6. Installation should follow the removal procedure in the reverse order.
Tightening Torque 35 - 48 Nm
STARTING MOTOR Removal & Installation Procedure
1. Disconnect the ground cable.
2. Unscrew the nut and disconnect the battery cable(1).
Installation Notice
1 Battery Cable
2 Engine Electric Wire
3. Unscrew the nut and disconnect the engine electric wire
(2). Installation Notice
Tightening Torque 12 - 15 Nm
Tightening Torque 6 - 7 Nm
Page 506 of 1574
1E1-6 M162 ENGINE ELECTRICAL
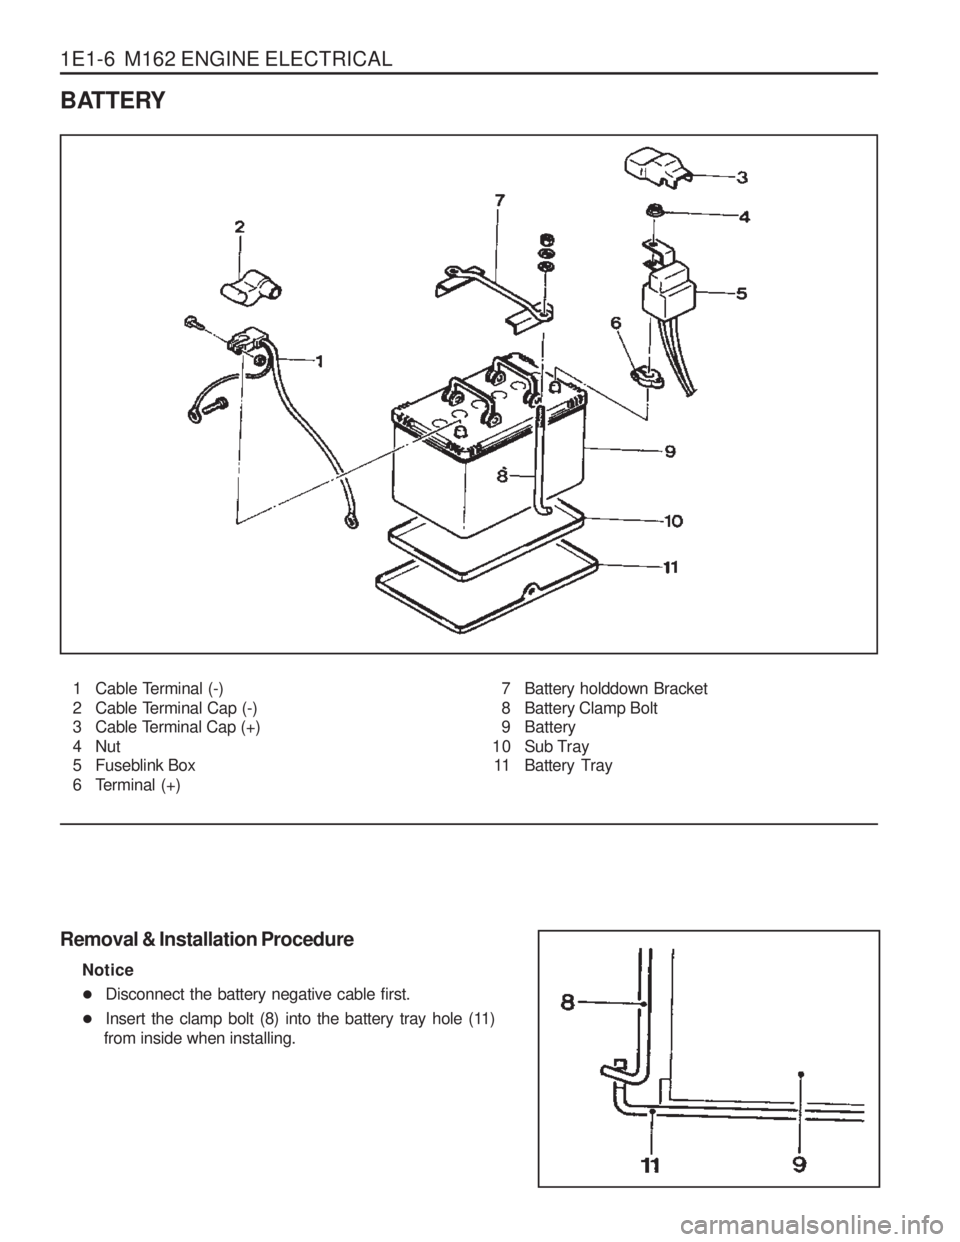
BATTERY
1 Cable Terminal (-)
2 Cable Terminal Cap (-)
3 Cable Terminal Cap (+)
4 Nut
5 Fuseblink Box
6 Terminal (+)7 Battery holddown Bracket
8 Battery Clamp Bolt
9 Battery
10 Sub Tray 11 Battery Tray
Removal & Installation Procedure Notice
� Disconnect the battery negative cable first.
� Insert the clamp bolt (8) into the battery tray hole (11)
from inside when installing.
Page 507 of 1574
M162 ENGINE ELECTRICAL 1E1-7
1 Ignition Coil Cable Cover
2 Bolt (M6 X 60, 7 pieces)......................... 9-11 Nm
3 Spark Plug
SPARK PLUG Preceding Work : Removal of intake air ductT1/1
Ignition Coil : Cylinder 2 and 5
T1/2 Ignition Coil : Cylinder 3 and 4
T1/3 Ignition Coil : Cylinder 1 and 6


