SUBARU FORESTER 2004 Service Repair Manual
Manufacturer: SUBARU, Model Year: 2004, Model line: FORESTER, Model: SUBARU FORESTER 2004Pages: 2870, PDF Size: 38.67 MB
Page 2851 of 2870
CL-25
CLUTCH SYSTEM
Operating Cylinder
B: INSTALLATION
1) Apply grease (SUNLIGHT 2: Part No.
003602010) to the contact point of the release lever
and operating cylinder.
2) Install in the reverse order of removal.
Before installing the operating cylinder, apply
grease (SUNLIGHT 2: Part No. 003602010) to con-
tact point of the release lever and operating cylin-
der.
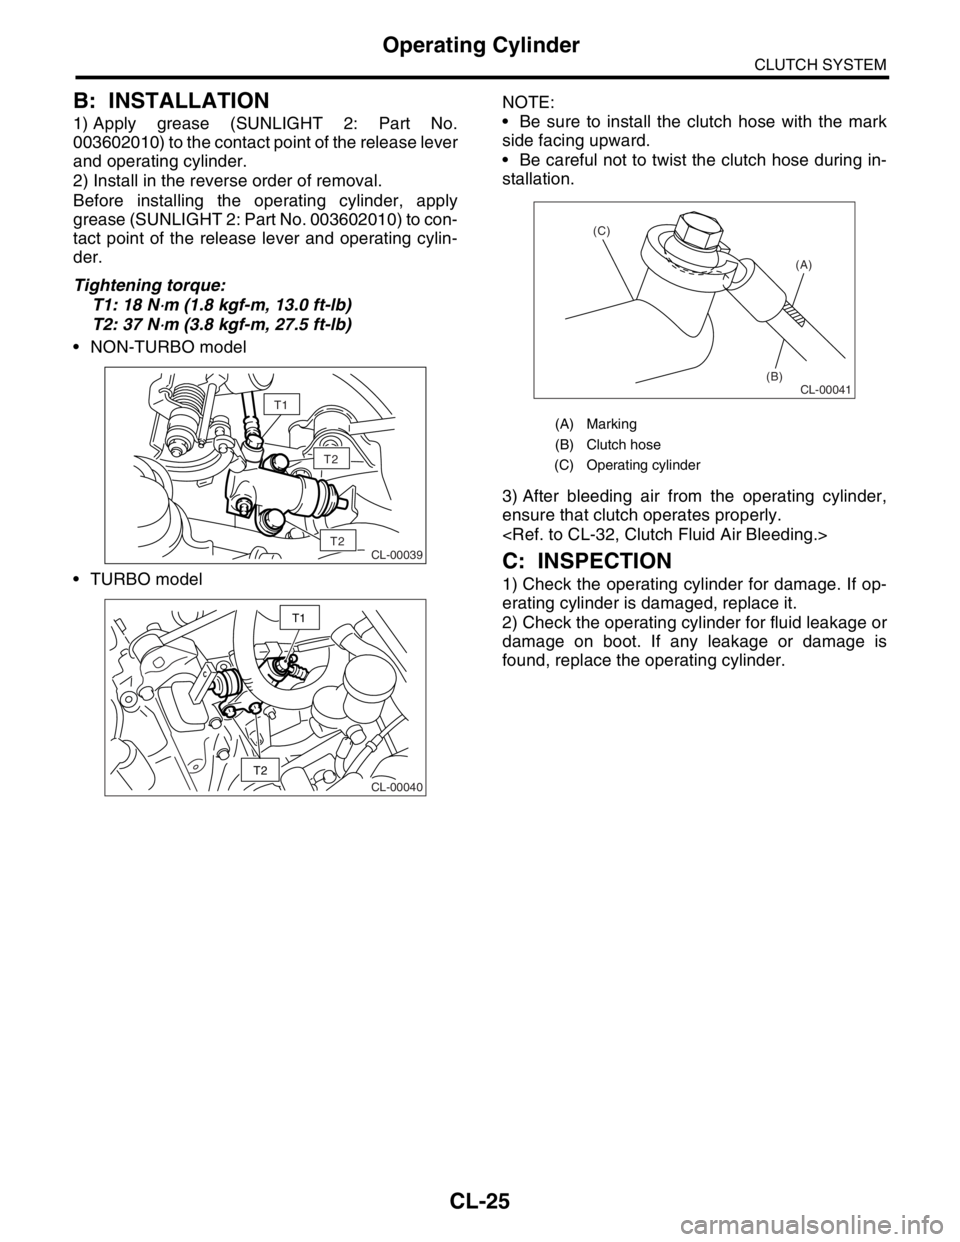
Tightening torque:
T1: 18 N
⋅m (1.8 kgf-m, 13.0 ft-lb)
T2: 37 N
⋅m (3.8 kgf-m, 27.5 ft-lb)
NON-TURBO model
TURBO modelNOTE:
Be sure to install the clutch hose with the mark
side facing upward.
Be careful not to twist the clutch hose during in-
stallation.
3) After bleeding air from the operating cylinder,
ensure that clutch operates properly.
C: INSPECTION
1) Check the operating cylinder for damage. If op-
erating cylinder is damaged, replace it.
2) Check the operating cylinder for fluid leakage or
damage on boot. If any leakage or damage is
found, replace the operating cylinder.
T2
CL-00039T2
T1
CL-00040
T2
T1
(A) Marking
(B) Clutch hose
(C) Operating cylinder
CL-00041
(A)
(B) (C)
Page 2852 of 2870
CL-26
CLUTCH SYSTEM
Master Cylinder
6. Master Cylinder
A: REMOVAL
1) Thoroughly drain the brake fluid from reservoir
tank.
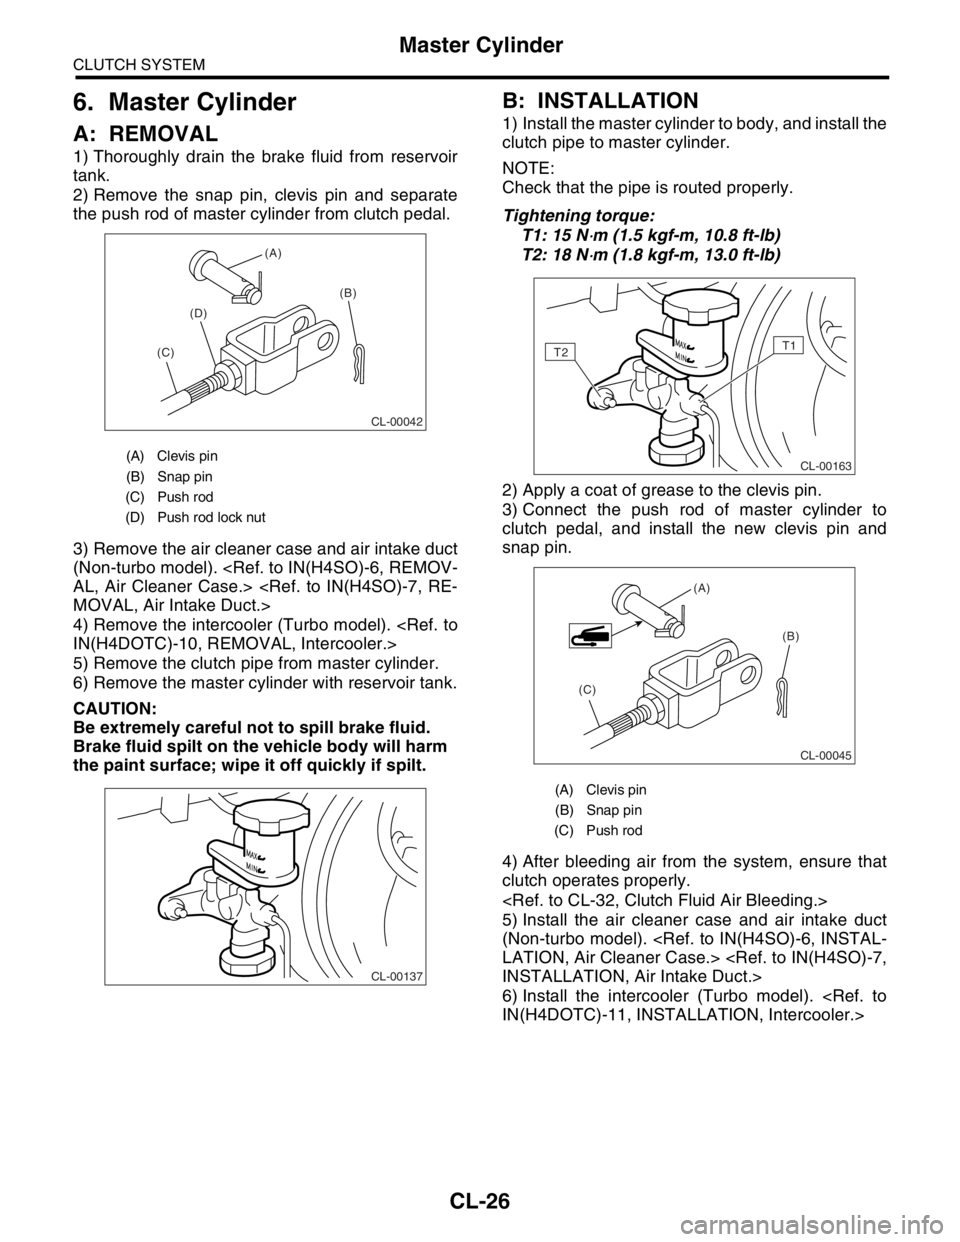
2) Remove the snap pin, clevis pin and separate
the push rod of master cylinder from clutch pedal.
3) Remove the air cleaner case and air intake duct
(Non-turbo model).
4) Remove the intercooler (Turbo model).
5) Remove the clutch pipe from master cylinder.
6) Remove the master cylinder with reservoir tank.
CAUTION:
Be extremely careful not to spill brake fluid.
Brake fluid spilt on the vehicle body will harm
the paint surface; wipe it off quickly if spilt.
B: INSTALLATION
1) Install the master cylinder to body, and install the
clutch pipe to master cylinder.
NOTE:
Check that the pipe is routed properly.
Tightening torque:
T1: 15 N
⋅m (1.5 kgf-m, 10.8 ft-lb)
T2: 18 N
⋅m (1.8 kgf-m, 13.0 ft-lb)
2) Apply a coat of grease to the clevis pin.
3) Connect the push rod of master cylinder to
clutch pedal, and install the new clevis pin and
snap pin.
4) After bleeding air from the system, ensure that
clutch operates properly.
5) Install the air cleaner case and air intake duct
(Non-turbo model).
6) Install the intercooler (Turbo model).
(A) Clevis pin
(B) Snap pin
(C) Push rod
(D) Push rod lock nut
CL-00042
(A)
(B)
(C)(D)
CL-00137
(A) Clevis pin
(B) Snap pin
(C) Push rod
CL-00163
T2T1
CL-00045
(A)
(B)
(C)
Page 2853 of 2870
CL-27
CLUTCH SYSTEM
Master Cylinder
C: DISASSEMBLY
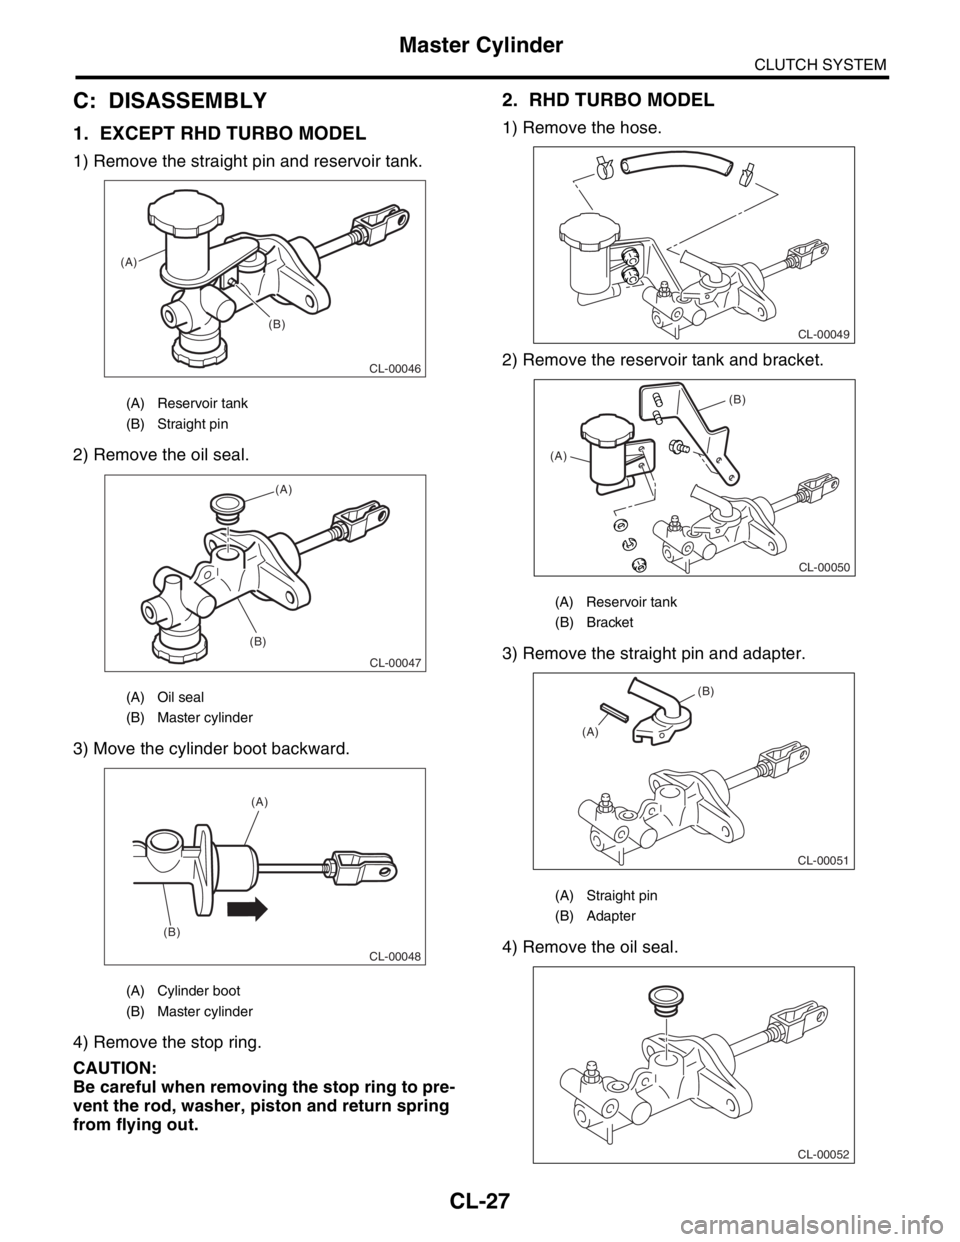
1. EXCEPT RHD TURBO MODEL
1) Remove the straight pin and reservoir tank.
2) Remove the oil seal.
3) Move the cylinder boot backward.
4) Remove the stop ring.
CAUTION:
Be careful when removing the stop ring to pre-
vent the rod, washer, piston and return spring
from flying out.
2. RHD TURBO MODEL
1) Remove the hose.
2) Remove the reservoir tank and bracket.
3) Remove the straight pin and adapter.
4) Remove the oil seal.
(A) Reservoir tank
(B) Straight pin
(A) Oil seal
(B) Master cylinder
(A) Cylinder boot
(B) Master cylinder
CL-00046
(A)
(B)
CL-00047
(A)
(B)
CL-00048
(A)
(B)
(A) Reservoir tank
(B) Bracket
(A) Straight pin
(B) Adapter
CL-00049
CL-00050
(A)(B)
CL-00051 (A)(B)
CL-00052
Page 2854 of 2870
CL-28
CLUTCH SYSTEM
Master Cylinder
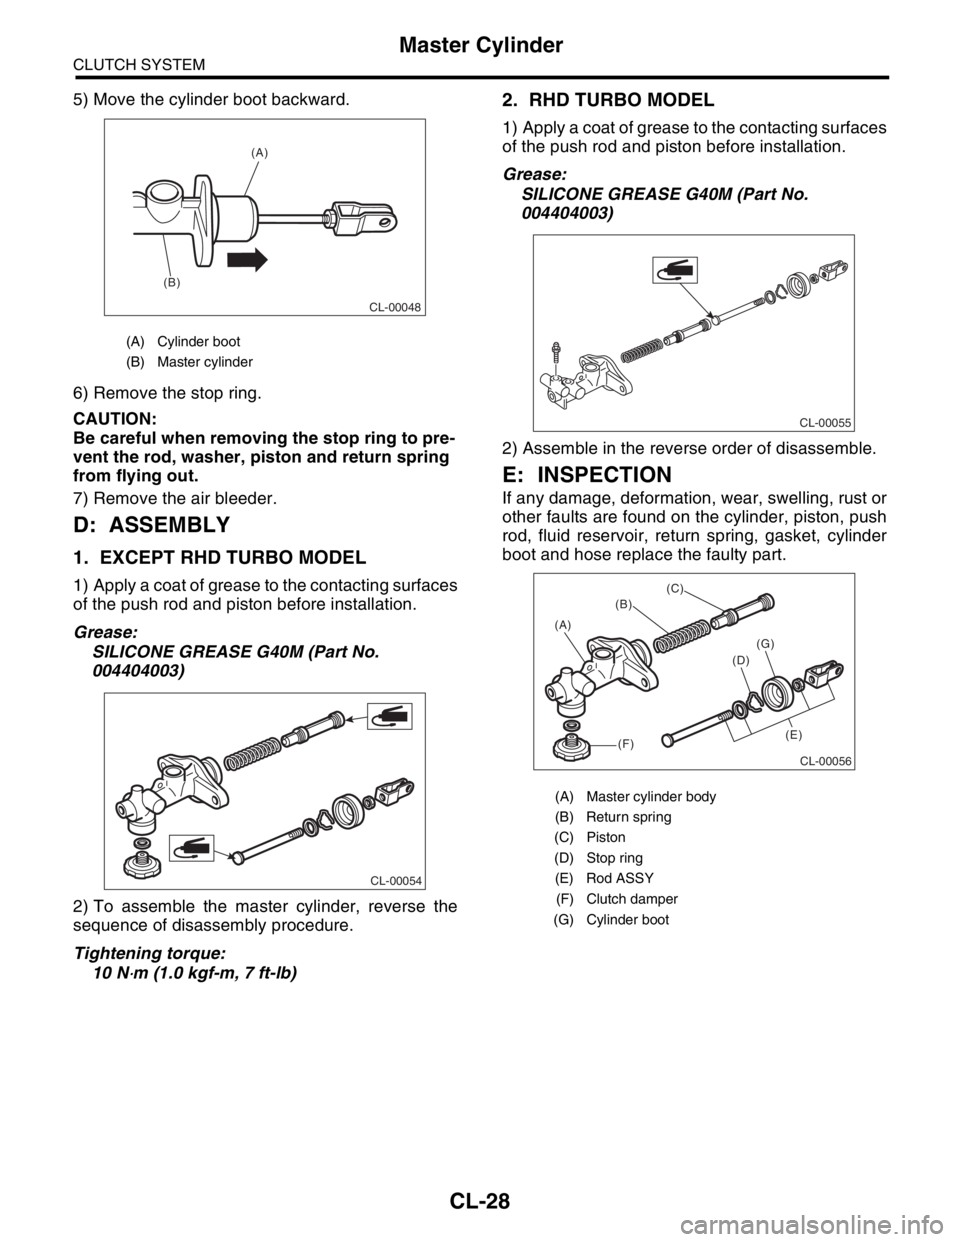
5) Move the cylinder boot backward.
6) Remove the stop ring.
CAUTION:
Be careful when removing the stop ring to pre-
vent the rod, washer, piston and return spring
from flying out.
7) Remove the air bleeder.
D: ASSEMBLY
1. EXCEPT RHD TURBO MODEL
1) Apply a coat of grease to the contacting surfaces
of the push rod and piston before installation.
Grease:
SILICONE GREASE G40M (Part No.
004404003)
2) To assemble the master cylinder, reverse the
sequence of disassembly procedure.
Tightening torque:
10 N
⋅m (1.0 kgf-m, 7 ft-lb)
2. RHD TURBO MODEL
1) Apply a coat of grease to the contacting surfaces
of the push rod and piston before installation.
Grease:
SILICONE GREASE G40M (Part No.
004404003)
2) Assemble in the reverse order of disassemble.
E: INSPECTION
If any damage, deformation, wear, swelling, rust or
other faults are found on the cylinder, piston, push
rod, fluid reservoir, return spring, gasket, cylinder
boot and hose replace the faulty part.
(A) Cylinder boot
(B) Master cylinder
CL-00048
(A)
(B)
CL-00054
(A) Master cylinder body
(B) Return spring
(C) Piston
(D) Stop ring
(E) Rod ASSY
(F) Clutch damper
(G) Cylinder boot
CL-00055
CL-00056
(B)
(C)
(D)
(E) (A)
(F)
(G)
Page 2855 of 2870
CL-29
CLUTCH SYSTEM
Clutch Pipe and Hose
7. Clutch Pipe and Hose
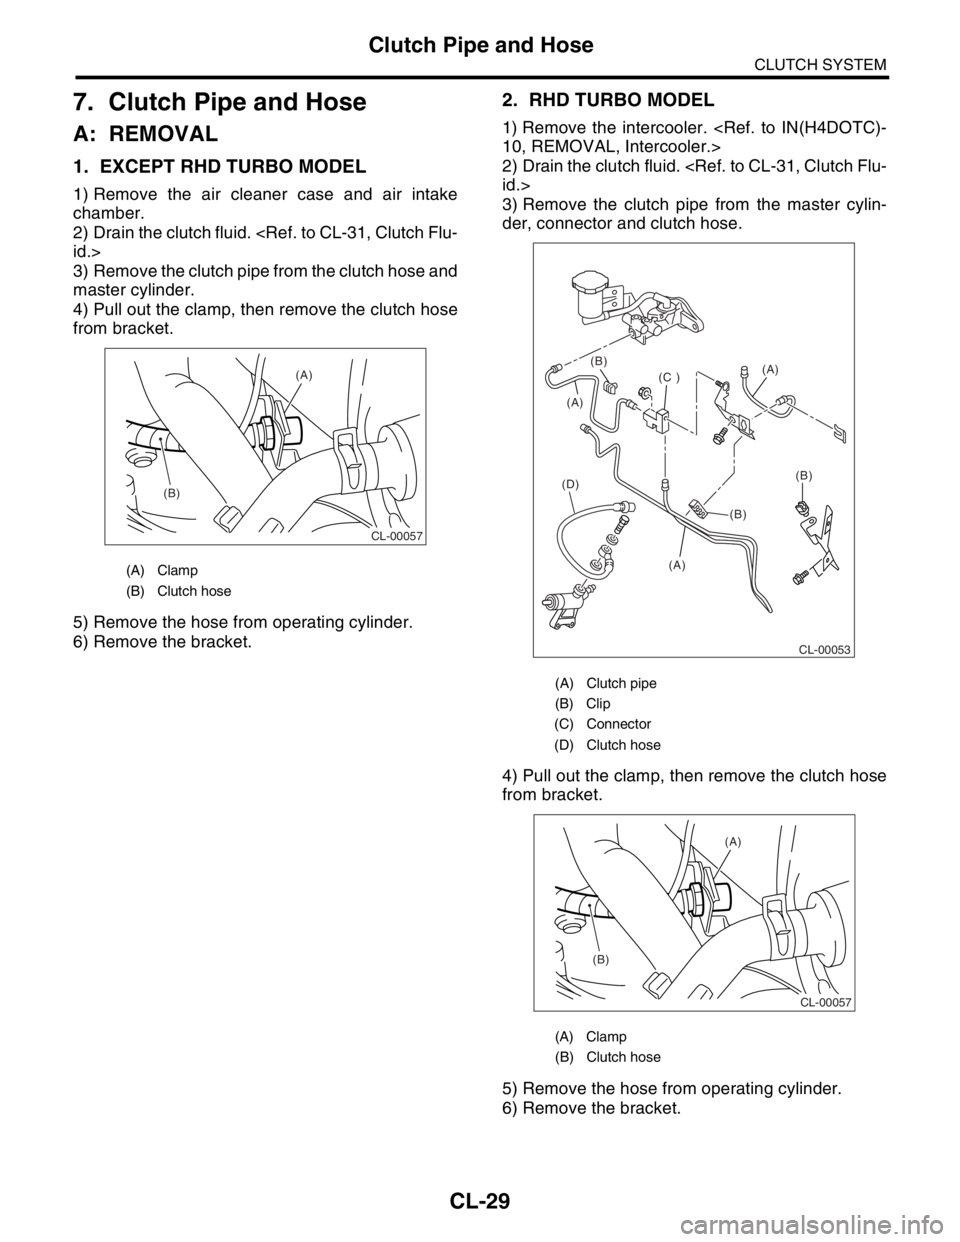
A: REMOVAL
1. EXCEPT RHD TURBO MODEL
1) Remove the air cleaner case and air intake
chamber.
2) Drain the clutch fluid.
3) Remove the clutch pipe from the clutch hose and
master cylinder.
4) Pull out the clamp, then remove the clutch hose
from bracket.
5) Remove the hose from operating cylinder.
6) Remove the bracket.
2. RHD TURBO MODEL
1) Remove the intercooler.
2) Drain the clutch fluid.
3) Remove the clutch pipe from the master cylin-
der, connector and clutch hose.
4) Pull out the clamp, then remove the clutch hose
from bracket.
5) Remove the hose from operating cylinder.
6) Remove the bracket.
(A) Clamp
(B) Clutch hose
CL-00057
(A)
(B)
(A) Clutch pipe
(B) Clip
(C) Connector
(D) Clutch hose
(A) Clamp
(B) Clutch hose
CL-00053
(A)
(B)(B) (B)
(A)
(D)
(A)
(C )
CL-00057
(A)
(B)
Page 2856 of 2870
CL-30
CLUTCH SYSTEM
Clutch Pipe and Hose
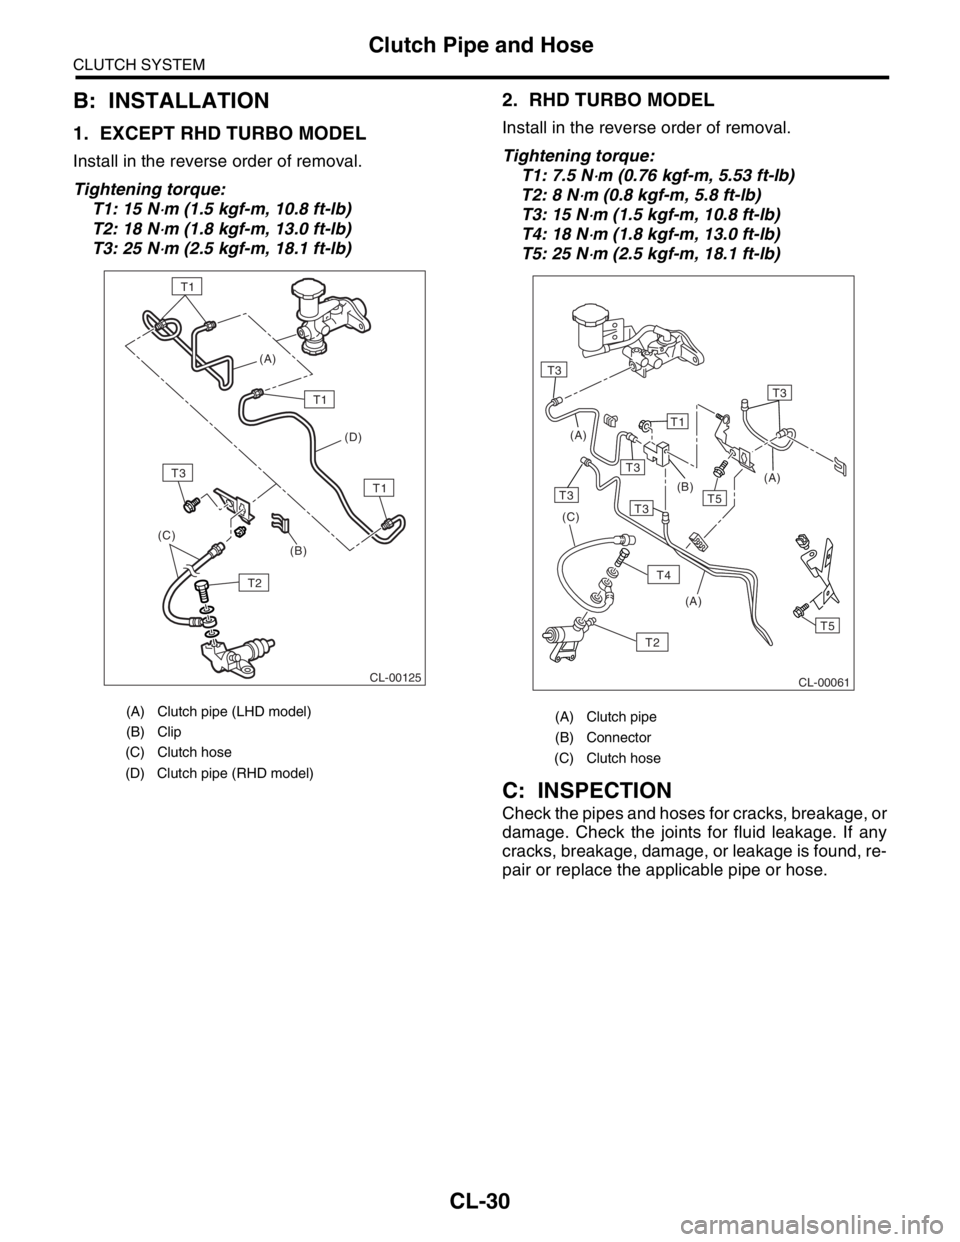
B: INSTALLATION
1. EXCEPT RHD TURBO MODEL
Install in the reverse order of removal.
Tightening torque:
T1: 15 N
⋅m (1.5 kgf-m, 10.8 ft-lb)
T2: 18 N
⋅m (1.8 kgf-m, 13.0 ft-lb)
T3: 25 N
⋅m (2.5 kgf-m, 18.1 ft-lb)
2. RHD TURBO MODEL
Install in the reverse order of removal.
Tightening torque:
T1: 7.5 N
⋅m (0.76 kgf-m, 5.53 ft-lb)
T2: 8 N
⋅m (0.8 kgf-m, 5.8 ft-lb)
T3: 15 N
⋅m (1.5 kgf-m, 10.8 ft-lb)
T4: 18 N
⋅m (1.8 kgf-m, 13.0 ft-lb)
T5: 25 N
⋅m (2.5 kgf-m, 18.1 ft-lb)
C: INSPECTION
Check the pipes and hoses for cracks, breakage, or
damage. Check the joints for fluid leakage. If any
cracks, breakage, damage, or leakage is found, re-
pair or replace the applicable pipe or hose.
(A) Clutch pipe (LHD model)
(B) Clip
(C) Clutch hose
(D) Clutch pipe (RHD model)
(D)
(B) (C)(A)
T1
T1
T2
T1
T3
CL-00125
(A) Clutch pipe
(B) Connector
(C) Clutch hose
(A)
(A) (A)
T3
T3T3
T3
T1
T3
T5
T5
(C)
T2
T4
(B)
CL-00061
Page 2857 of 2870
CL-31
CLUTCH SYSTEM
Clutch Fluid
8. Clutch Fluid
A: INSPECTION
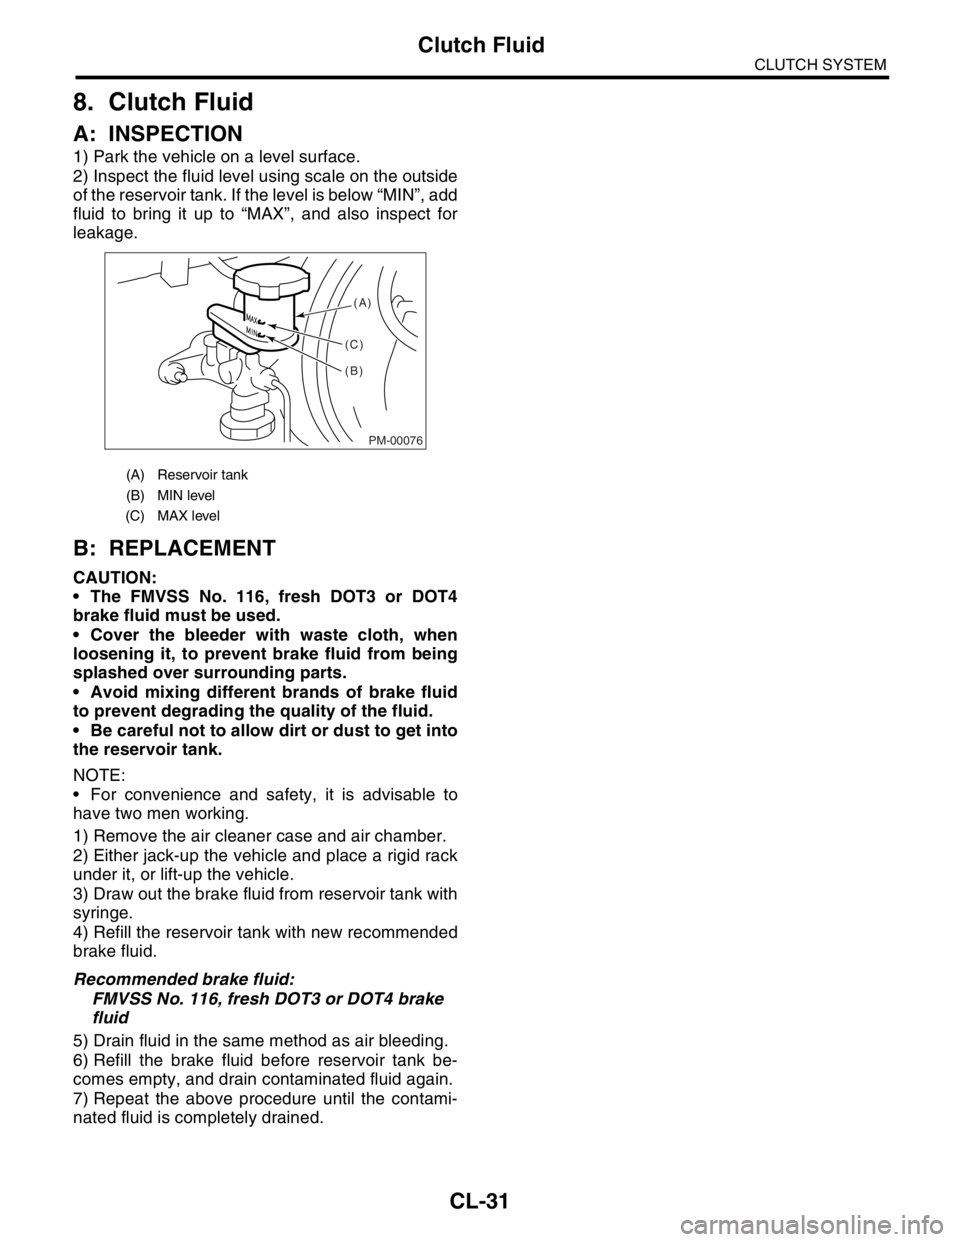
1) Park the vehicle on a level surface.
2) Inspect the fluid level using scale on the outside
of the reservoir tank. If the level is below “MIN”, add
fluid to bring it up to “MAX”, and also inspect for
leakage.
B: REPLACEMENT
CAUTION:
The FMVSS No. 116, fresh DOT3 or DOT4
brake fluid must be used.
Cover the bleeder with waste cloth, when
loosening it, to prevent brake fluid from being
splashed over surrounding parts.
Avoid mixing different brands of brake fluid
to prevent degrading the quality of the fluid.
Be careful not to allow dirt or dust to get into
the reservoir tank.
NOTE:
For convenience and safety, it is advisable to
have two men working.
1) Remove the air cleaner case and air chamber.
2) Either jack-up the vehicle and place a rigid rack
under it, or lift-up the vehicle.
3) Draw out the brake fluid from reservoir tank with
syringe.
4) Refill the reservoir tank with new recommended
brake fluid.
Recommended brake fluid:
FMVSS No. 116, fresh DOT3 or DOT4 brake
fluid
5) Drain fluid in the same method as air bleeding.
6) Refill the brake fluid before reservoir tank be-
comes empty, and drain contaminated fluid again.
7) Repeat the above procedure until the contami-
nated fluid is completely drained.
(A) Reservoir tank
(B) MIN level
(C) MAX level
PM-00076
(A)
(B) (C)
Page 2858 of 2870
CL-32
CLUTCH SYSTEM
Clutch Fluid Air Bleeding
9. Clutch Fluid Air Bleeding
A: PROCEDURE
1. NON-TURBO MODEL
NOTE:
Bleed air from the oil line with help of co-worker.
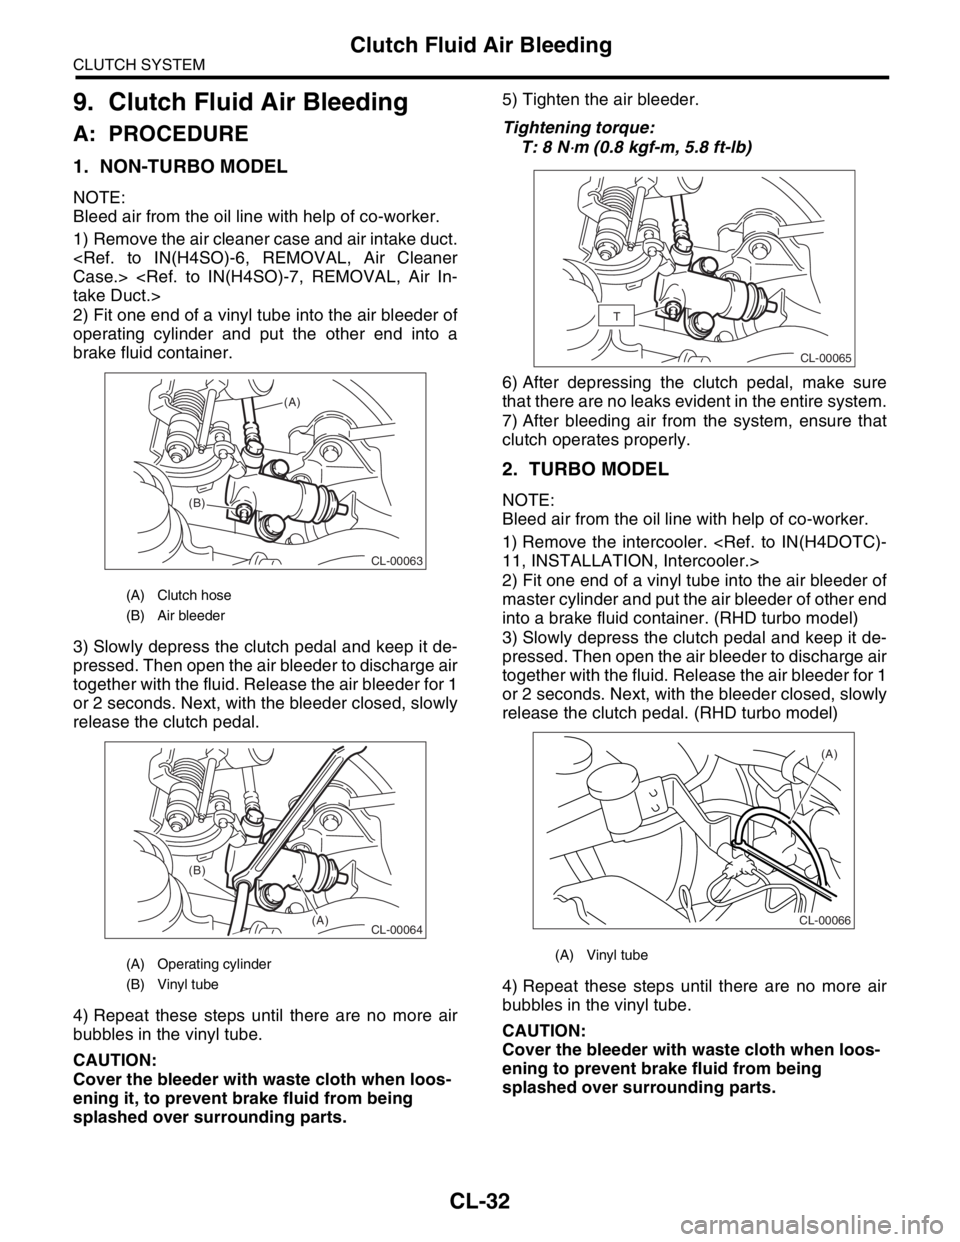
1) Remove the air cleaner case and air intake duct.
2) Fit one end of a vinyl tube into the air bleeder of
operating cylinder and put the other end into a
brake fluid container.
3) Slowly depress the clutch pedal and keep it de-
pressed. Then open the air bleeder to discharge air
together with the fluid. Release the air bleeder for 1
or 2 seconds. Next, with the bleeder closed, slowly
release the clutch pedal.
4) Repeat these steps until there are no more air
bubbles in the vinyl tube.
CAUTION:
Cover the bleeder with waste cloth when loos-
ening it, to prevent brake fluid from being
splashed over surrounding parts.5) Tighten the air bleeder.
Tightening torque:
T: 8 N
⋅m (0.8 kgf-m, 5.8 ft-lb)
6) After depressing the clutch pedal, make sure
that there are no leaks evident in the entire system.
7) After bleeding air from the system, ensure that
clutch operates properly.
2. TURBO MODEL
NOTE:
Bleed air from the oil line with help of co-worker.
1) Remove the intercooler.
2) Fit one end of a vinyl tube into the air bleeder of
master cylinder and put the air bleeder of other end
into a brake fluid container. (RHD turbo model)
3) Slowly depress the clutch pedal and keep it de-
pressed. Then open the air bleeder to discharge air
together with the fluid. Release the air bleeder for 1
or 2 seconds. Next, with the bleeder closed, slowly
release the clutch pedal. (RHD turbo model)
4) Repeat these steps until there are no more air
bubbles in the vinyl tube.
CAUTION:
Cover the bleeder with waste cloth when loos-
ening to prevent brake fluid from being
splashed over surrounding parts.
(A) Clutch hose
(B) Air bleeder
(A) Operating cylinder
(B) Vinyl tube
CL-00063
(B)(A)
CL-00064
(B)
(A)
(A) Vinyl tube
CL-00065
T
(A)
CL-00066
Page 2859 of 2870
CL-33
CLUTCH SYSTEM
Clutch Fluid Air Bleeding
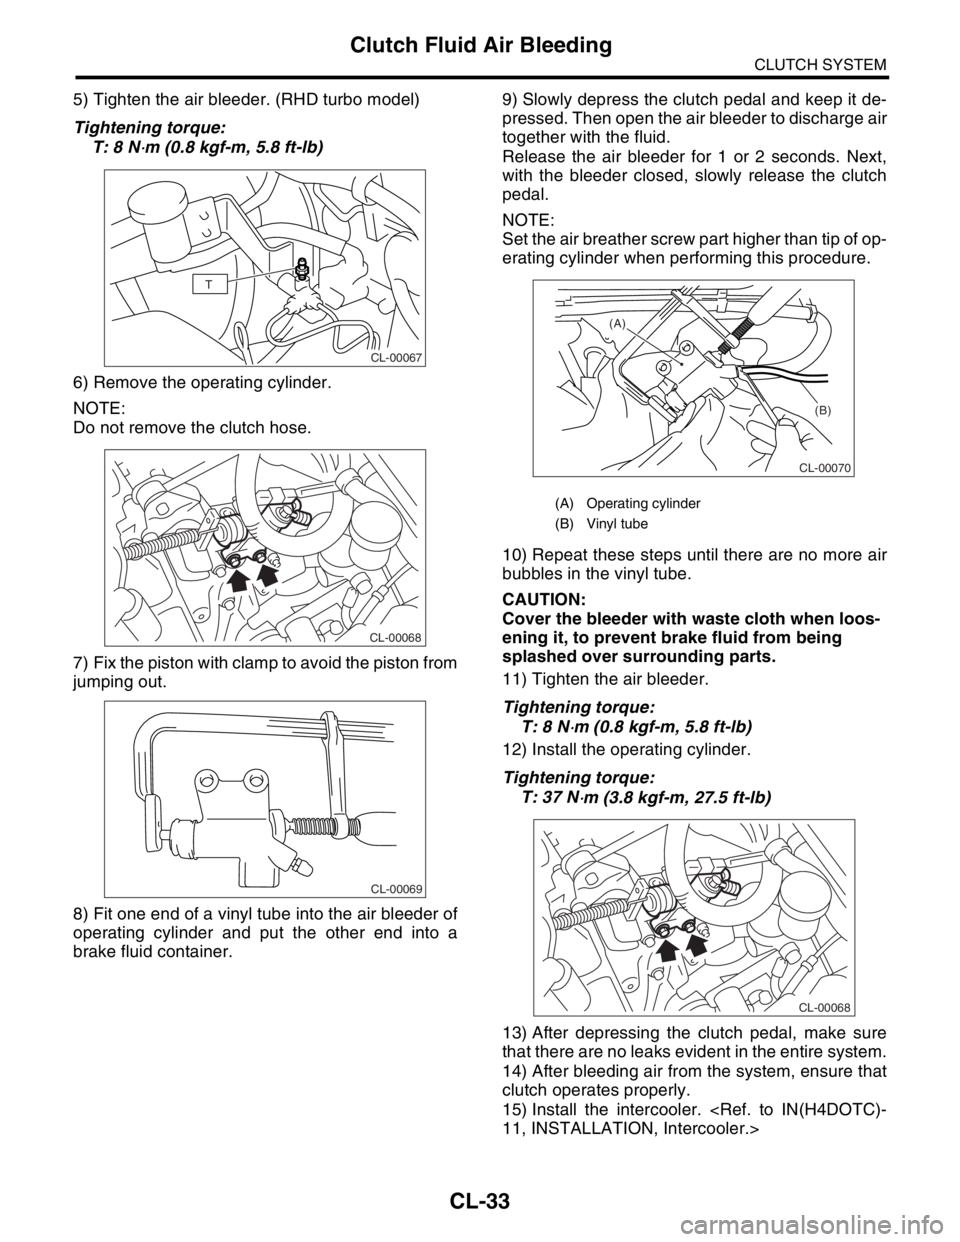
5) Tighten the air bleeder. (RHD turbo model)
Tightening torque:
T: 8 N
⋅m (0.8 kgf-m, 5.8 ft-lb)
6) Remove the operating cylinder.
NOTE:
Do not remove the clutch hose.
7) Fix the piston with clamp to avoid the piston from
jumping out.
8) Fit one end of a vinyl tube into the air bleeder of
operating cylinder and put the other end into a
brake fluid container.9) Slowly depress the clutch pedal and keep it de-
pressed. Then open the air bleeder to discharge air
together with the fluid.
Release the air bleeder for 1 or 2 seconds. Next,
with the bleeder closed, slowly release the clutch
pedal.
NOTE:
Set the air breather screw part higher than tip of op-
erating cylinder when performing this procedure.
10) Repeat these steps until there are no more air
bubbles in the vinyl tube.
CAUTION:
Cover the bleeder with waste cloth when loos-
ening it, to prevent brake fluid from being
splashed over surrounding parts.
11) Tighten the air bleeder.
Tightening torque:
T: 8 N
⋅m (0.8 kgf-m, 5.8 ft-lb)
12) Install the operating cylinder.
Tightening torque:
T: 37 N
⋅m (3.8 kgf-m, 27.5 ft-lb)
13) After depressing the clutch pedal, make sure
that there are no leaks evident in the entire system.
14) After bleeding air from the system, ensure that
clutch operates properly.
15) Install the intercooler.
CL-00067
T
CL-00068
CL-00069
(A) Operating cylinder
(B) Vinyl tube
CL-00070
(B) (A)
CL-00068
Page 2860 of 2870
CL-34
CLUTCH SYSTEM
Clutch Pedal
10.Clutch Pedal
A: REMOVAL
1. LHD MODEL
1) Remove the steering column.
2) Disconnect the connectors from stop light switch
and clutch switch.
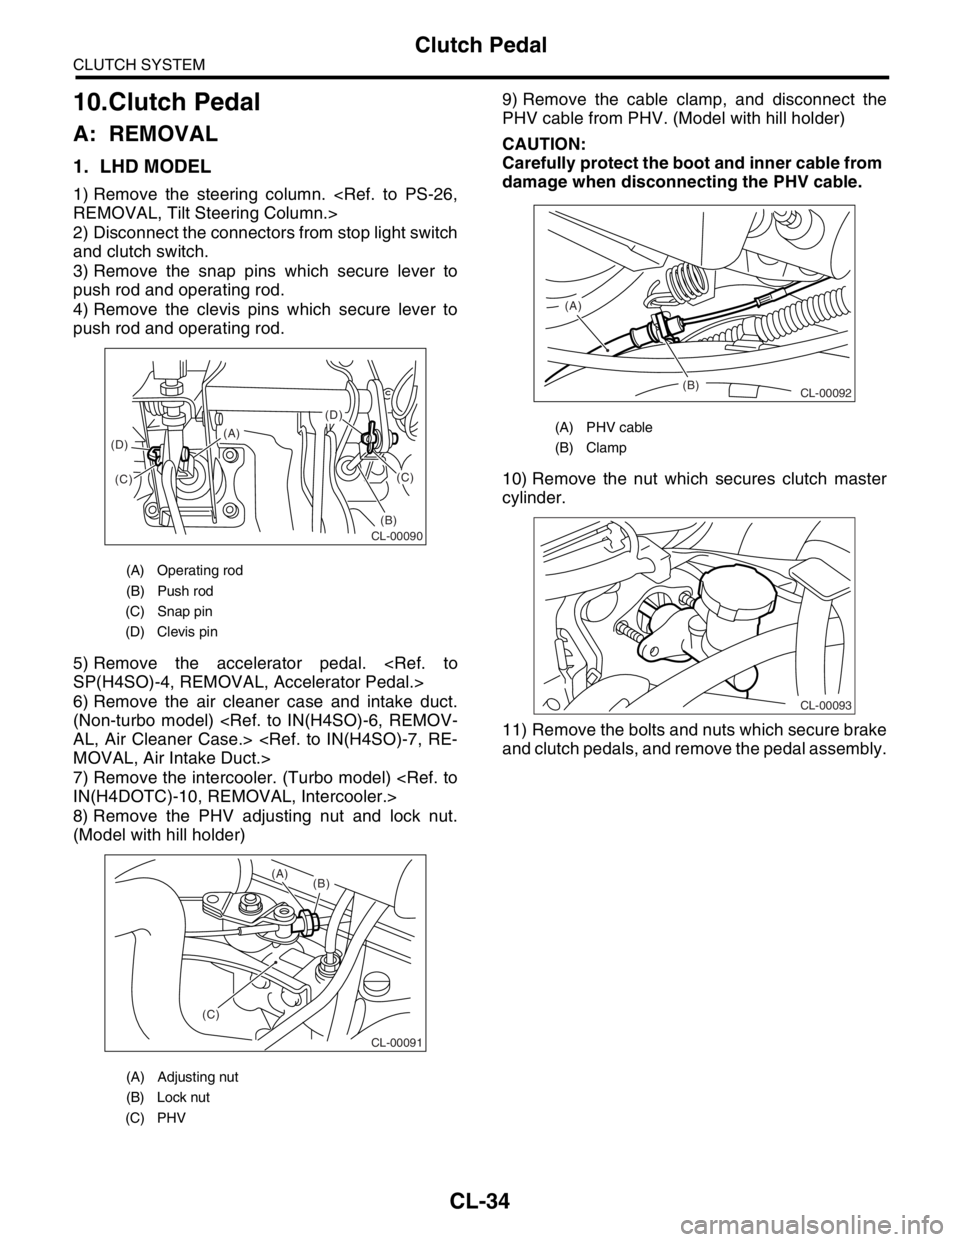
3) Remove the snap pins which secure lever to
push rod and operating rod.
4) Remove the clevis pins which secure lever to
push rod and operating rod.
5) Remove the accelerator pedal.
6) Remove the air cleaner case and intake duct.
(Non-turbo model)
7) Remove the intercooler. (Turbo model)
8) Remove the PHV adjusting nut and lock nut.
(Model with hill holder)9) Remove the cable clamp, and disconnect the
PHV cable from PHV. (Model with hill holder)
CAUTION:
Carefully protect the boot and inner cable from
damage when disconnecting the PHV cable.
10) Remove the nut which secures clutch master
cylinder.
11) Remove the bolts and nuts which secure brake
and clutch pedals, and remove the pedal assembly.
(A) Operating rod
(B) Push rod
(C) Snap pin
(D) Clevis pin
(A) Adjusting nut
(B) Lock nut
(C) PHV
(D)
(B)(C)
(C) (D)(A)
CL-00090
CL-00091
(C)(B) (A)
(A) PHV cable
(B) Clamp
(B) (A)
CL-00092
CL-00093