SUBARU FORESTER 2004 Service Repair Manual
Manufacturer: SUBARU, Model Year: 2004, Model line: FORESTER, Model: SUBARU FORESTER 2004Pages: 2870, PDF Size: 38.67 MB
Page 381 of 2870

BS-15
BODY STRUCTURE
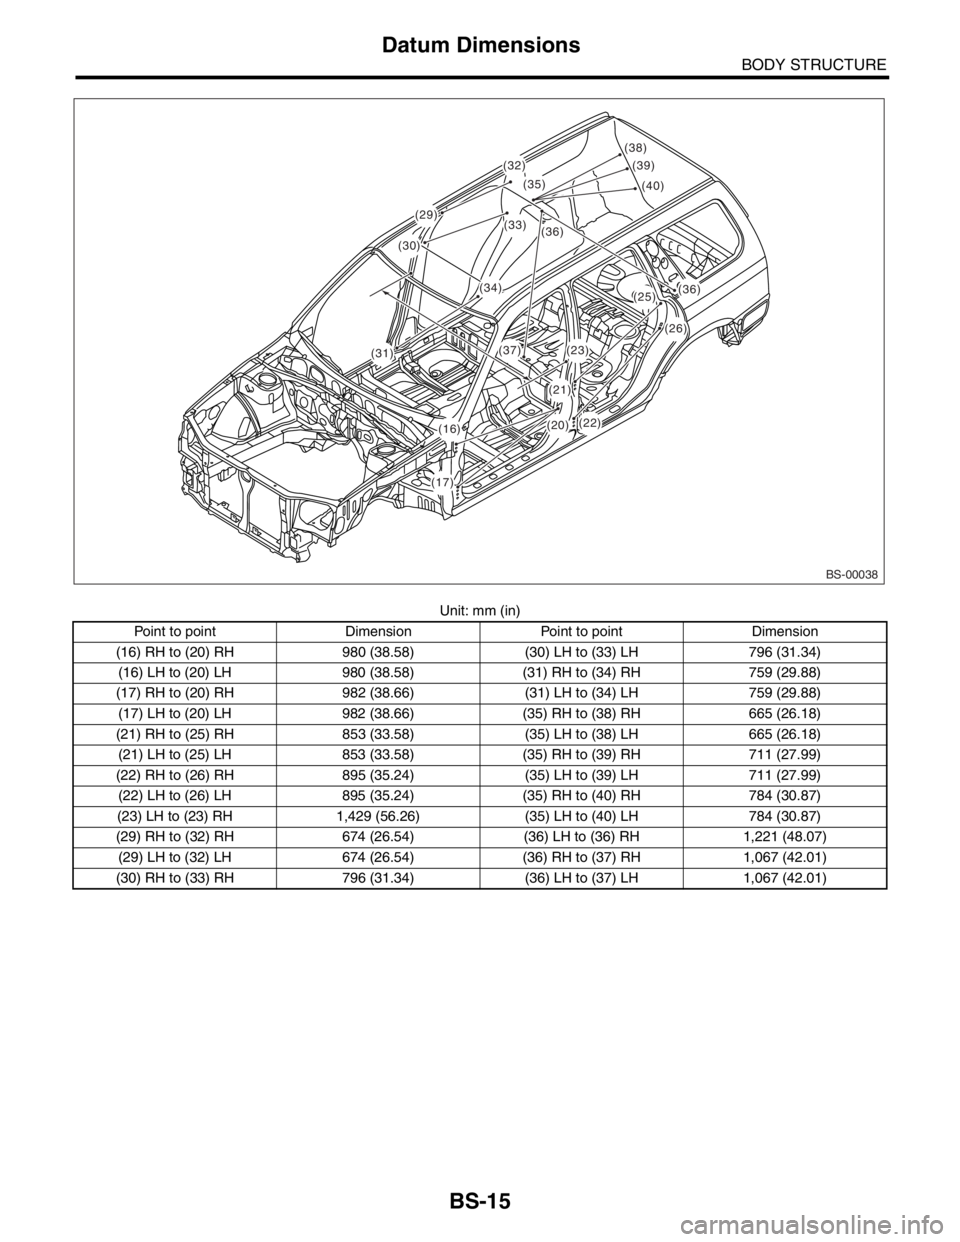
Datum Dimensions
Unit: mm (in)
Point to point Dimension Point to point Dimension
(16) RH to (20) RH 980 (38.58) (30) LH to (33) LH 796 (31.34)
(16) LH to (20) LH 980 (38.58) (31) RH to (34) RH 759 (29.88)
(17) RH to (20) RH 982 (38.66) (31) LH to (34) LH 759 (29.88)
(17) LH to (20) LH 982 (38.66) (35) RH to (38) RH 665 (26.18)
(21) RH to (25) RH 853 (33.58) (35) LH to (38) LH 665 (26.18)
(21) LH to (25) LH 853 (33.58) (35) RH to (39) RH 711 (27.99)
(22) RH to (26) RH 895 (35.24) (35) LH to (39) LH 711 (27.99)
(22) LH to (26) LH 895 (35.24) (35) RH to (40) RH 784 (30.87)
(23) LH to (23) RH 1,429 (56.26) (35) LH to (40) LH 784 (30.87)
(29) RH to (32) RH 674 (26.54) (36) LH to (36) RH 1,221 (48.07)
(29) LH to (32) LH 674 (26.54) (36) RH to (37) RH 1,067 (42.01)
(30) RH to (33) RH 796 (31.34) (36) LH to (37) LH 1,067 (42.01)
BS-00038
(30)
(29)
(17)
(16)(22)
(26)
(25)(36)
(36)
(37)(38)
(39)
(40)
(35)
(20)
(21)
(23)
(33)
(34)
(31)
(32)
Page 382 of 2870

BS-16
BODY STRUCTURE
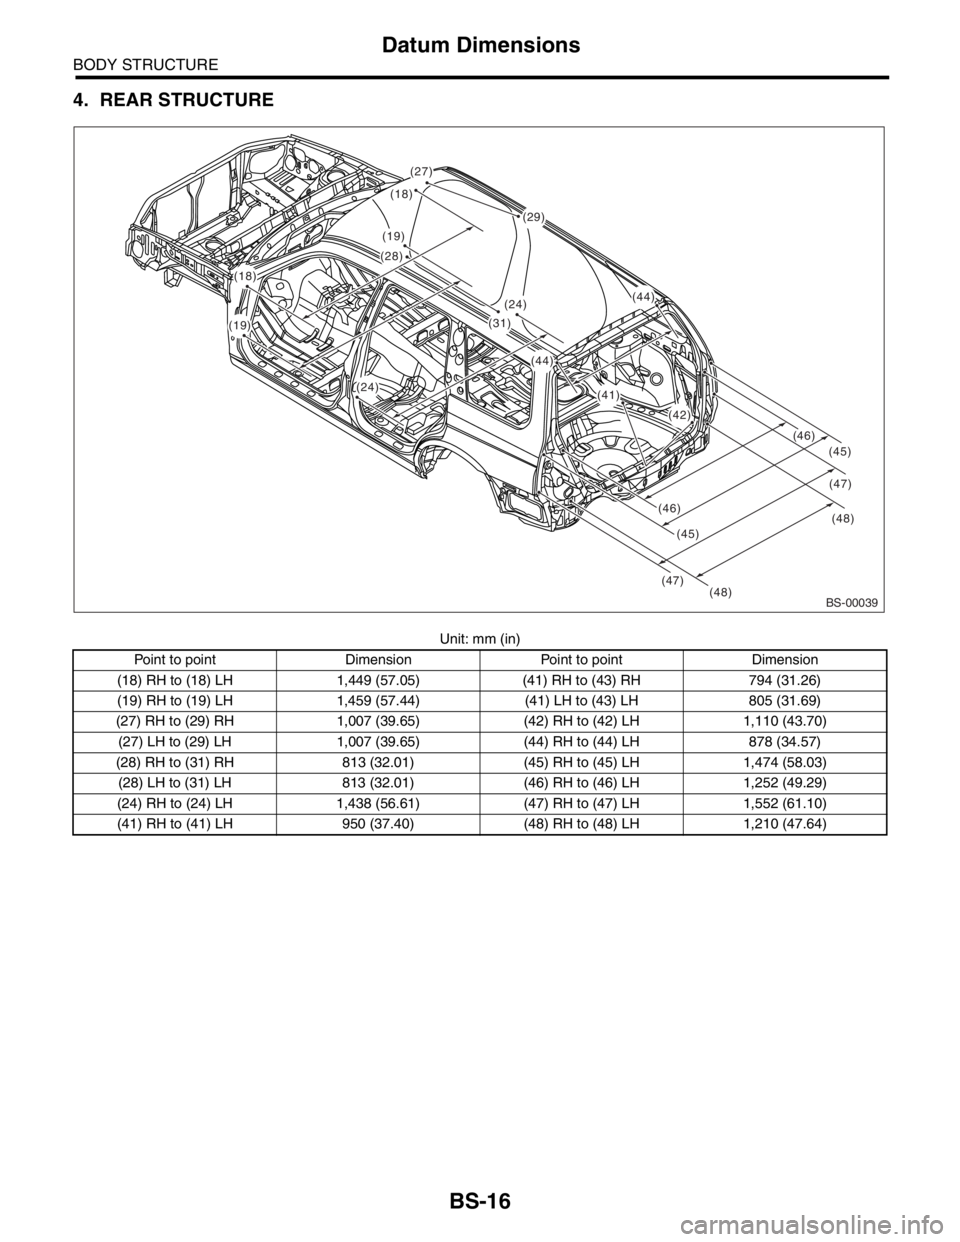
Datum Dimensions
4. REAR STRUCTURE
Unit: mm (in)
Point to point Dimension Point to point Dimension
(18) RH to (18) LH 1,449 (57.05) (41) RH to (43) RH 794 (31.26)
(19) RH to (19) LH 1,459 (57.44) (41) LH to (43) LH 805 (31.69)
(27) RH to (29) RH 1,007 (39.65) (42) RH to (42) LH 1,110 (43.70)
(27) LH to (29) LH 1,007 (39.65) (44) RH to (44) LH 878 (34.57)
(28) RH to (31) RH 813 (32.01) (45) RH to (45) LH 1,474 (58.03)
(28) LH to (31) LH 813 (32.01) (46) RH to (46) LH 1,252 (49.29)
(24) RH to (24) LH 1,438 (56.61) (47) RH to (47) LH 1,552 (61.10)
(41) RH to (41) LH 950 (37.40) (48) RH to (48) LH 1,210 (47.64)
BS-00039(48)(48) (47)
(47) (46)(46)
(45)(45) (18)
(29)
(44)
(41)
(42)
(44)
(31)
(24)
(24)
(28)
(18)
(19)
(27)
(19)
Page 383 of 2870

FUJI HEAVY INDUSTRIES LTD. G8080GE7
2004 FORESTER SERVICE MANUAL QUICK REFERENCE INDEX
BODY SECTION
This service manual has been prepared
to provide SUBARU service personnel
with the necessary information and data
for the correct maintenance and repair
of SUBARU vehicles.
This manual includes the procedures
for maintenance, disassembling, reas-
sembling, inspection and adjustment of
components and diagnostics for guid-
ance of experienced mechanics.
Please peruse and utilize this manual
fully to ensure complete repair work for
satisfying our customers by keeping
their vehicle in optimum condition.
When replacement of parts during
repair work is needed, be sure to use
SUBARU genuine parts.
All information, illustration and specifi-
cations contained in this manual are
based on the latest product information
available at the time of publication
approval.HVAC SYSTEM
(HEATER, VENTILATOR AND A/C)AC
HVAC SYSTEM (AUTO A/C)
(DIAGNOSTIC)AC
AIRBAG SYSTEM AB
AIRBAG SYSTEM (DIAGNOSTIC) AB
SEAT BELT SYSTEM SB
LIGHTING SYSTEM LI
WIPER AND WASHER SYSTEM WW
ENTERTAINMENT ET
COMMUNICATION SYSTEM COM
GLASS/WINDOW/MIRROR GW
BODY STRUCTURE BS
INSTRUMENTATION/DRIVER INFO IDI
SEAT SE
SECURITY AND LOCK SL
SUNROOF/T-TOP/CONVERTIBLE TOP
(SUNROOF)SR
EXTERIOR/INTERIOR TRIM EI
EXTERIOR BODY PANEL EB
Page 384 of 2870

2004 FORESTER SERVICE MANUAL QUICK REFERENCE INDEX
BODY SECTION
G8080GE7
CRUISE CONTROL SYSTEM CC
CRUISE CONTROL SYSTEM
(DIAGNOSTIC)CC(H4SO)
CRUISE CONTROL SYSTEM
(DIAGNOSTIC)CC(H4DOTC)
CRUISE CONTROL SYSTEM
(DIAGNOSTIC)CC(H4DOTC 2.5)
IMMOBILIZER (DIAGNOSTIC) IM
Page 385 of 2870

INSTRUMENTATION/DRIVER INFO
IDI
Page
1. General Description ....................................................................................2
2. Combination Meter System .........................................................................3
3. Combination Meter Assembly ...................................................................10
4. Speedometer.............................................................................................13
5. Tachometer ...............................................................................................14
6. Fuel Gauge ...............................................................................................15
7. Water Temperature Gauge .......................................................................16
8. Ambient Sensor.........................................................................................17
Page 386 of 2870

IDI-2
INSTRUMENTATION/DRIVER INFO
General Description
1. General Description
A: SPECIFICATION
B: CAUTION
Be careful not to damage meters and instrument panel.
Be careful not to damage meter glasses.
Make sure that electrical connector is connected securely.
After installation, make sure that each meter operates normally.
Use gloves to avoid damage and getting fingerprints on the glass surface and meter surfaces.
Do not apply excessive force to the printed circuit.
Do not drop or otherwise apply impact.
C: PREPARATION TOOL
1. GENERAL TOOL
Combination meterSpeedometer Electric pulse type
Temperature gauge Cross coil type
Fuel gauge Cross coil type
Tachometer Electric pulse type
Turn signal indicator light 14 V — 2 W
Charge indicator light 14 V — 1.4 W
Oil pressure indicator light LED
ABS warning light 14 V — 1.4 W
Malfunction indicator light LED
HI-beam indicator light 14 V — 2 W
Door open warning light LED
Seat belt warning light LED
Brake fluid and parking brake warning
light14 V — 2 W
FWD indicator light LED
AIRBAG warning light LED
Meter illumination light 14 V — 3.4 W, 14 V — 2 W
AT OIL TEMP. warning light LED
LO indicator light LED
HOLD indicator light LED
Immobilizer indicator light LED
Rear differential oil temperature warn-
ing light14 V — 2 W
Cruise indicator light 14 V — 1.4 W
Rear fog light indicator light 14 V — 2 W
POWER indicator light 14 V — 1.4 W
Low fuel warning light LED
AT select lever position indicator light 14 V — 100 mA
LCD back light 14 V — 1.4 W
TOOL NAME REMARKS
Circuit tester Used for measuring resistance and voltage.
Page 387 of 2870

IDI-3
INSTRUMENTATION/DRIVER INFO
Combination Meter System
2. Combination Meter System
A: WIRING DIAGRAM
1. COMBINATION METER
2. OUTSIDE TEMPERATURE INDICATOR
Page 388 of 2870

IDI-4
INSTRUMENTATION/DRIVER INFO
Combination Meter System
B: INSPECTION
CAUTION:
When measuring voltage and resistance of the ECM, TCM, or each sensor, use a tapered pin with a
diameter of less than 0.64 mm (0.025 in) in order to avoid poor contact. Do not insert the pin more
than 2 mm (0.08 in).
1. SYMPTOM CHART
Symptom Repair order Reference
Combination meter assembly does not operate. (1) Power supply
(2) Ground circuit
GROUND CIRCUIT,
INSPECTION, Combi-
nation Meter System.>
Speedometer does not operate. (1) (MT model) Vehicle speed sensor
(AT model) TCM
(2) Harness
(3) SpeedometerMT model:
SPEED SENSOR,
INSPECTION, Combi-
nation Meter System.>
AT model:
SION CONTROL MOD-
ULE (TCM),
INSPECTION, Combi-
nation Meter System.>
Tachometer does not operate. (1) ECM
(2) Harness
(3) Tachometer
MODULE (ECM),
INSPECTION, Combi-
nation Meter System.>
Fuel gauge does not operate. (1) Fuel level sensor
(2) Harness
(3) Fuel gauge
SOR, INSPECTION,
Combination Meter
System.>
Water temperature gauge does not operate. (1) Engine coolant temperature sensor
(2) Harness
(3) Water temperature gauge
TEMPERATURE SEN-
SOR, INSPECTION,
Combination Meter
System.>
Outside temperature indicator does not operate. (1) Ambient sensor
(2) Harness
(3) Combination meter
TURE INDICATOR,
INSPECTION, Combi-
nation Meter System.>
Page 389 of 2870

IDI-5
INSTRUMENTATION/DRIVER INFO
Combination Meter System
2. CHECK POWER SUPPLY AND GROUND CIRCUIT
3. CHECK VEHICLE SPEED SENSOR
Step Check Yes No
1 CHECK POWER SUPPLY FOR COMBINA-
TION METER.
1) Remove the combination meter.
Assembly.>
2) Disconnect the combination meter harness
connector.
3) Turn the ignition switch to ON.
4) Measure the voltage between combination
meter connector and chassis ground.
Connector & terminal
(i10) No. 9 (+) — Chassis ground (
−):Is the voltage more than 10 V? Go to step 2.Check the harness
for open or short
between ignition
switch and combi-
nation meter.
2 CHECK POWER SUPPLY FOR COMBINA-
TION METER.
Measure the voltage between combination
meter connector and chassis ground.
Connector & terminal
(i10) No. 8 (+) — Chassis ground (
−):Is the voltage more than 10 V? Go to step 3.Check the harness
for open or short
between fuse and
combination
meter.
3 CHECK GROUND CIRCUIT OF COMBINA-
TION METER.
1) Turn the ignition switch to OFF.
2) Measure the resistance of harness
between combination meter connector and
chassis ground.
Connector & terminal
(i10) No. 10 — Chassis ground:Is the resistance less than 10
Ω?Replace the com-
bination meter
printed circuit.Repair the wiring
harness.
Step Check Yes No
1 CHECK VEHICLE SPEED SENSOR.
1) Lift-up the vehicle and support it with rigid
racks.
2) Remove the combination meter with har-
ness connector.
3) Drive the vehicle at a speed greater than 20
km/h (12 MPH).
Warning:
Be careful not to get caught in the running
wheels.
4) Measure the voltage between combination
meter connector and chassis ground.
Connector & terminal
(i10) No. 12 (+) — Chassis ground (
−):Is the voltage 1 V ← → 5 V? Check the speed-
ometer.
TION, Speedome-
ter.>Go to step 2.
2 CHECK VEHICLE SPEED SENSOR POWER
SUPPLY.
1) Turn the ignition switch to OFF.
2) Disconnect the vehicle speed sensor har-
ness connector.
3) Turn the ignition switch to ON.
4) Measure the voltage between vehicle
speed sensor connector and engine ground.
Connector & terminal
(B17) No. 3 (+) — Engine ground (
−):Is the voltage more than 10 V? Go to step 3.Check the harness
for open or short
between ignition
switch and vehicle
speed sensor.
Page 390 of 2870

IDI-6
INSTRUMENTATION/DRIVER INFO
Combination Meter System
4. CHECK TRANSMISSION CONTROL MODULE (TCM)
3 CHECK HARNESS BETWEEN VEHICLE
SPEED SENSOR AND ENGINE GROUND.
1) Turn the ignition switch to OFF.
2) Measure the resistance between vehicle
speed sensor connector and engine ground.
Connector & terminal
(B17) No. 2 — Engine ground:Is the resistance less than 10
Ω?Go to step 4.Repair the wiring
harness.
4 CHECK HARNESS BETWEEN VEHICLE
SPEED SENSOR AND COMBINATION
METER.
1) Disconnect the connector from combination
meter.
2) Measure the resistance between vehicle
speed sensor harness connector and combi-
nation meter harness connector.
Connector & terminal
(B17) No. 1 — (i10) No. 12:Is the resistance less than 10
Ω?Replace the vehi-
cle speed sensor.Repair the wiring
harness.
Step Check Yes No
1 CHECK TCM SIGNAL.
1) Lift-up the vehicle and support it with rigid
racks.
2) Drive the vehicle faster than 10 km/h (6
MPH).
Warning:
Be careful not to get caught in the running
wheels.
3) Measure the voltage between TCM con-
nector and chassis ground.
Connector & terminal
(B56) No. 17 (+) — Chassis ground (
−):Is the voltage 1 V ← → 5 V? Go to step 2.Check TCM.
Basic Diagnostic
Procedure.>
2 CHECK HARNESS BETWEEN TCM AND
COMBINATION METER.
1) Turn the ignition switch to OFF.
2) Disconnect the connector from TCM and
combination meter.
3) Measure the resistance between TCM har-
ness connector and combination meter har-
ness connector.
Connector & terminal
(B56) No. 17 — (i10) No. 12:Is the resistance less than 10
Ω?Check the speedo
meter.
Speedometer.>Repair the wiring
harness. Step Check Yes No