driver SUBARU FORESTER 2004 Service Owner's Guide
[x] Cancel search | Manufacturer: SUBARU, Model Year: 2004, Model line: FORESTER, Model: SUBARU FORESTER 2004Pages: 2870, PDF Size: 38.67 MB
Page 157 of 2870
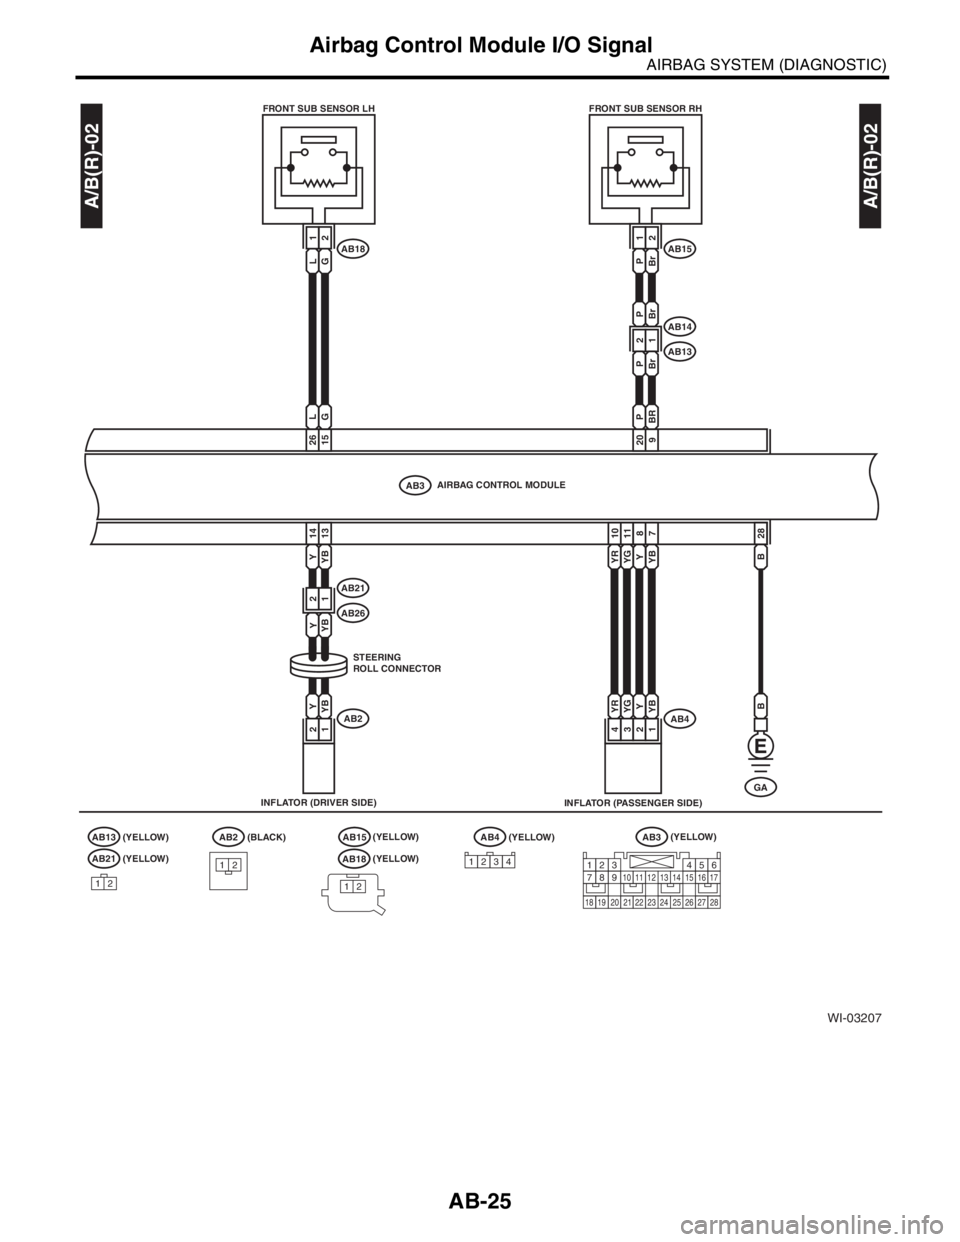
AB-25
AIRBAG SYSTEM (DIAGNOSTIC)
Airbag Control Module I/O Signal
WI-03207
AIRBAG CONTROL MODULE
L1G2P1Br 2
INFLATOR (DRIVER SIDE)FRONT SUB SENSOR LH
FRONT SUB SENSOR RH
INFLATOR (PASSENGER SIDE)
AB2
AB3
AB15AB18
AB4
GA
LG
YYBYBY
AB14
AB13P2Br
PBr 1
15 26
PBR
9 20
13 147 8
Y 2YB 1Y 2
B
28
YB 1
YGYR
11 10
YR 4YG 3B
A/B(R)-02
A/B(R)-02
STEERING
ROLL CONNECTOR
AB21
AB26Y2YB 1
AB13 (YELLOW) (BLACK)
(YELLOW)(YELLOW) (YELLOW)AB15(YELLOW)AB3
(YELLOW)
AB18
1212
AB211234567891011121314151617
1819202122232425262728
AB4
1
234
AB2
21
Page 159 of 2870
AB-27
AIRBAG SYSTEM (DIAGNOSTIC)
Airbag Connector
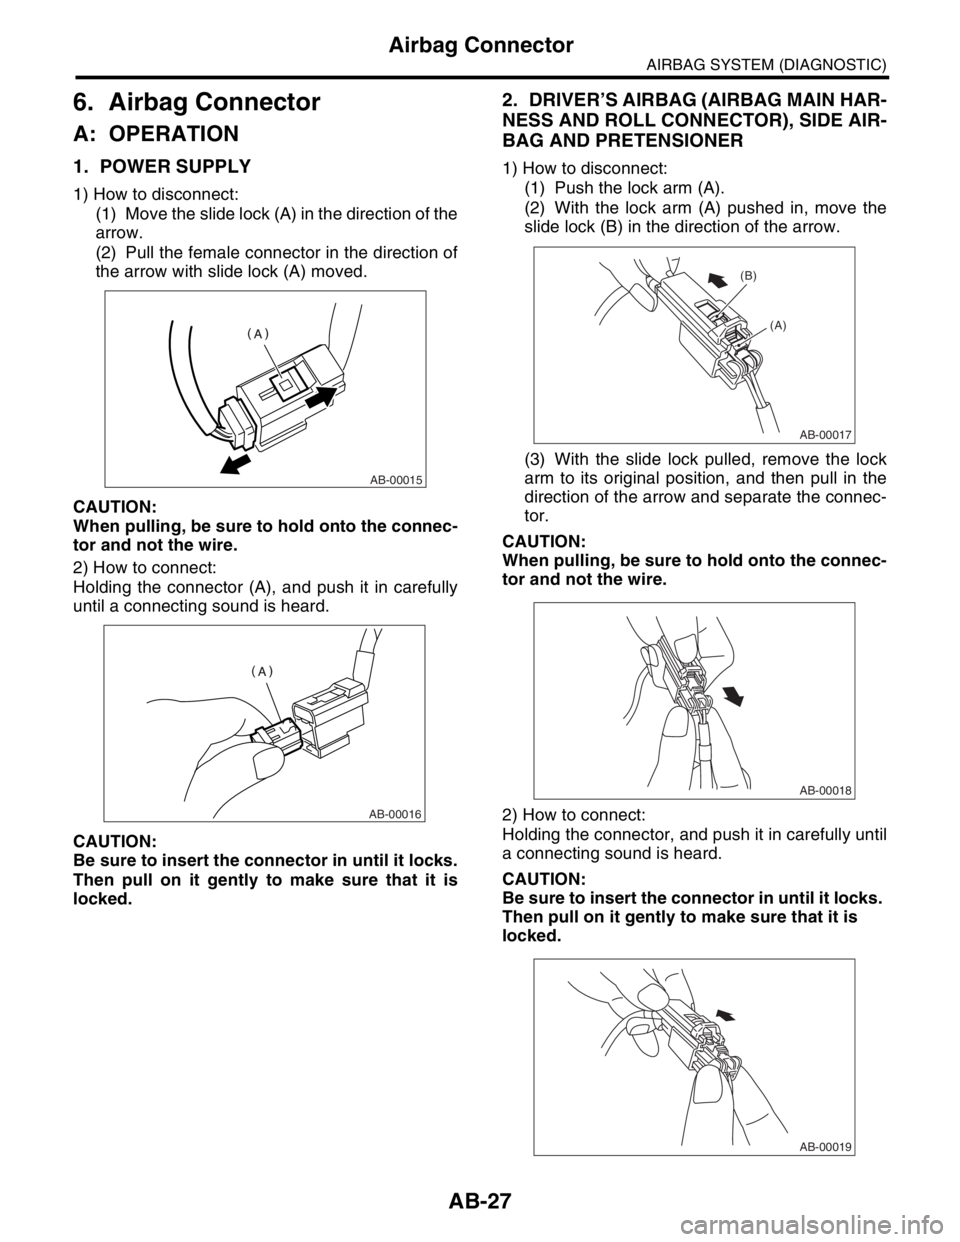
6. Airbag Connector
A: OPERATION
1. POWER SUPPLY
1) How to disconnect:
(1) Move the slide lock (A) in the direction of the
arrow.
(2) Pull the female connector in the direction of
the arrow with slide lock (A) moved.
CAUTION:
When pulling, be sure to hold onto the connec-
tor and not the wire.
2) How to connect:
Holding the connector (A), and push it in carefully
until a connecting sound is heard.
CAUTION:
Be sure to insert the connector in until it locks.
Then pull on it gently to make sure that it is
locked.
2. DRIVER’S AIRBAG (AIRBAG MAIN HAR-
NESS AND ROLL CONNECTOR), SIDE AIR-
BAG AND PRETENSIONER
1) How to disconnect:
(1) Push the lock arm (A).
(2) With the lock arm (A) pushed in, move the
slide lock (B) in the direction of the arrow.
(3) With the slide lock pulled, remove the lock
arm to its original position, and then pull in the
direction of the arrow and separate the connec-
tor.
CAUTION:
When pulling, be sure to hold onto the connec-
tor and not the wire.
2) How to connect:
Holding the connector, and push it in carefully until
a connecting sound is heard.
CAUTION:
Be sure to insert the connector in until it locks.
Then pull on it gently to make sure that it is
locked.
AB-00015
AB-00016
AB-00017
(A) (B)
AB-00018
AB-00019
Page 160 of 2870
AB-28
AIRBAG SYSTEM (DIAGNOSTIC)
Airbag Connector
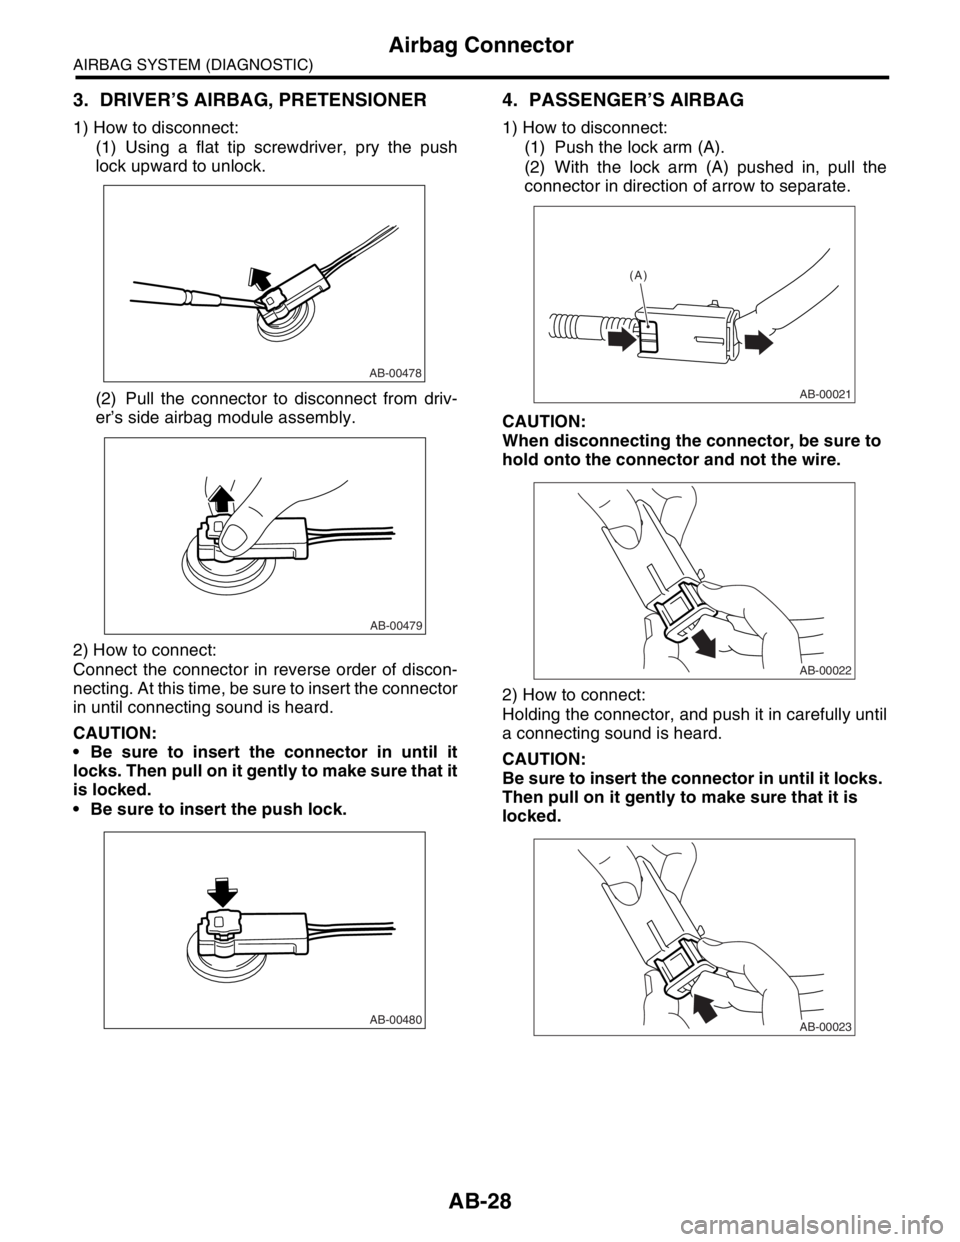
3. DRIVER’S AIRBAG, PRETENSIONER
1) How to disconnect:
(1) Using a flat tip screwdriver, pry the push
lock upward to unlock.
(2) Pull the connector to disconnect from driv-
er’s side airbag module assembly.
2) How to connect:
Connect the connector in reverse order of discon-
necting. At this time, be sure to insert the connector
in until connecting sound is heard.
CAUTION:
Be sure to insert the connector in until it
locks. Then pull on it gently to make sure that it
is locked.
Be sure to insert the push lock.
4. PASSENGER’S AIRBAG
1) How to disconnect:
(1) Push the lock arm (A).
(2) With the lock arm (A) pushed in, pull the
connector in direction of arrow to separate.
CAUTION:
When disconnecting the connector, be sure to
hold onto the connector and not the wire.
2) How to connect:
Holding the connector, and push it in carefully until
a connecting sound is heard.
CAUTION:
Be sure to insert the connector in until it locks.
Then pull on it gently to make sure that it is
locked.
AB-00478
AB-00479
AB-00480
AB-00021
(A)
AB-00022
AB-00023
Page 161 of 2870
AB-29
AIRBAG SYSTEM (DIAGNOSTIC)
Airbag Connector
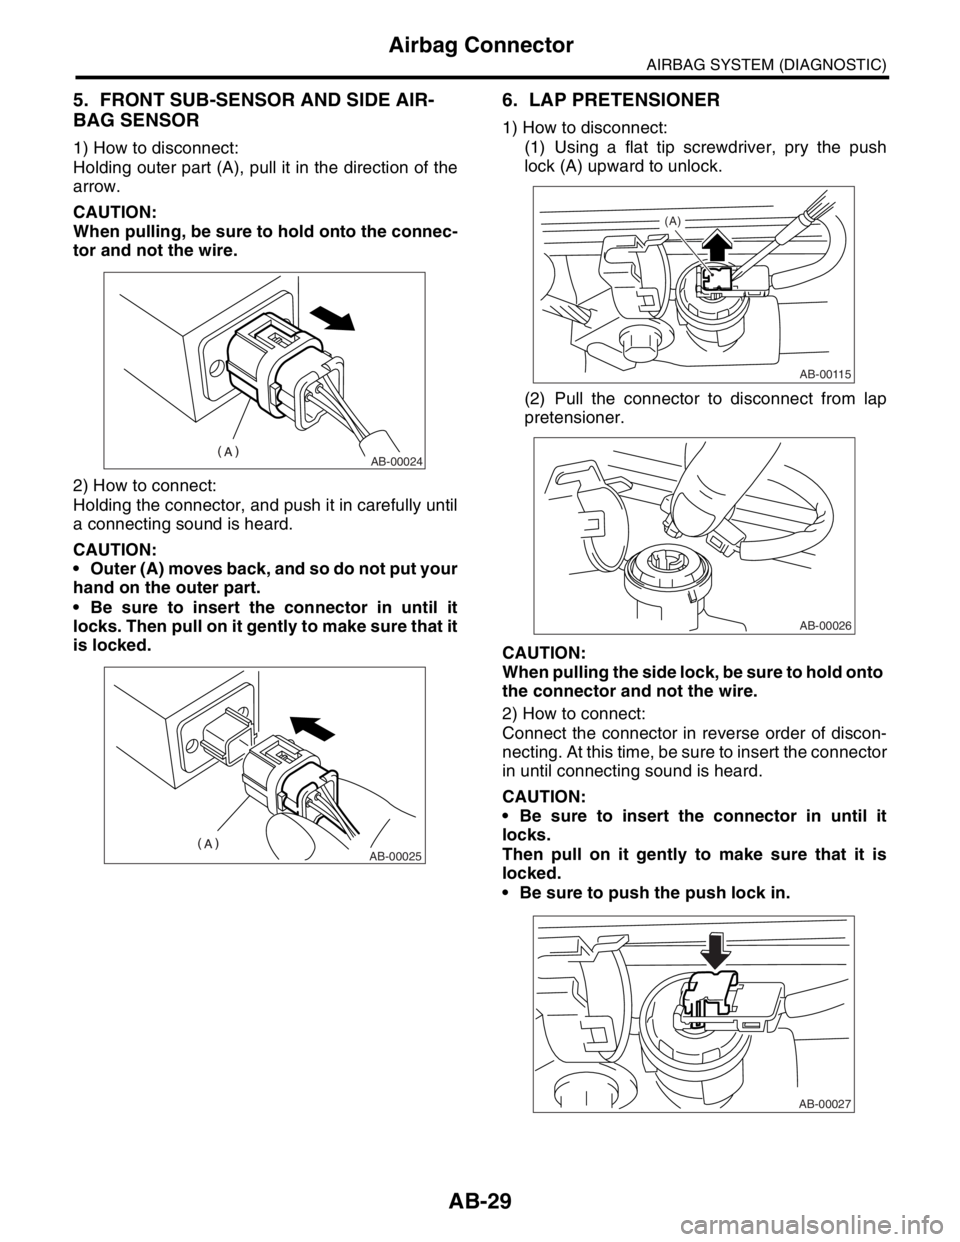
5. FRONT SUB-SENSOR AND SIDE AIR-
BAG SENSOR
1) How to disconnect:
Holding outer part (A), pull it in the direction of the
arrow.
CAUTION:
When pulling, be sure to hold onto the connec-
tor and not the wire.
2) How to connect:
Holding the connector, and push it in carefully until
a connecting sound is heard.
CAUTION:
Outer (A) moves back, and so do not put your
hand on the outer part.
Be sure to insert the connector in until it
locks. Then pull on it gently to make sure that it
is locked.
6. LAP PRETENSIONER
1) How to disconnect:
(1) Using a flat tip screwdriver, pry the push
lock (A) upward to unlock.
(2) Pull the connector to disconnect from lap
pretensioner.
CAUTION:
When pulling the side lock, be sure to hold onto
the connector and not the wire.
2) How to connect:
Connect the connector in reverse order of discon-
necting. At this time, be sure to insert the connector
in until connecting sound is heard.
CAUTION:
Be sure to insert the connector in until it
locks.
Then pull on it gently to make sure that it is
locked.
Be sure to push the push lock in.
AB-00024
AB-00025
AB-00115
(A)
AB-00026
AB-00027
Page 166 of 2870

AB-34
AIRBAG SYSTEM (DIAGNOSTIC)
Airbag Warning Light Failure
11.Airbag Warning Light Failure
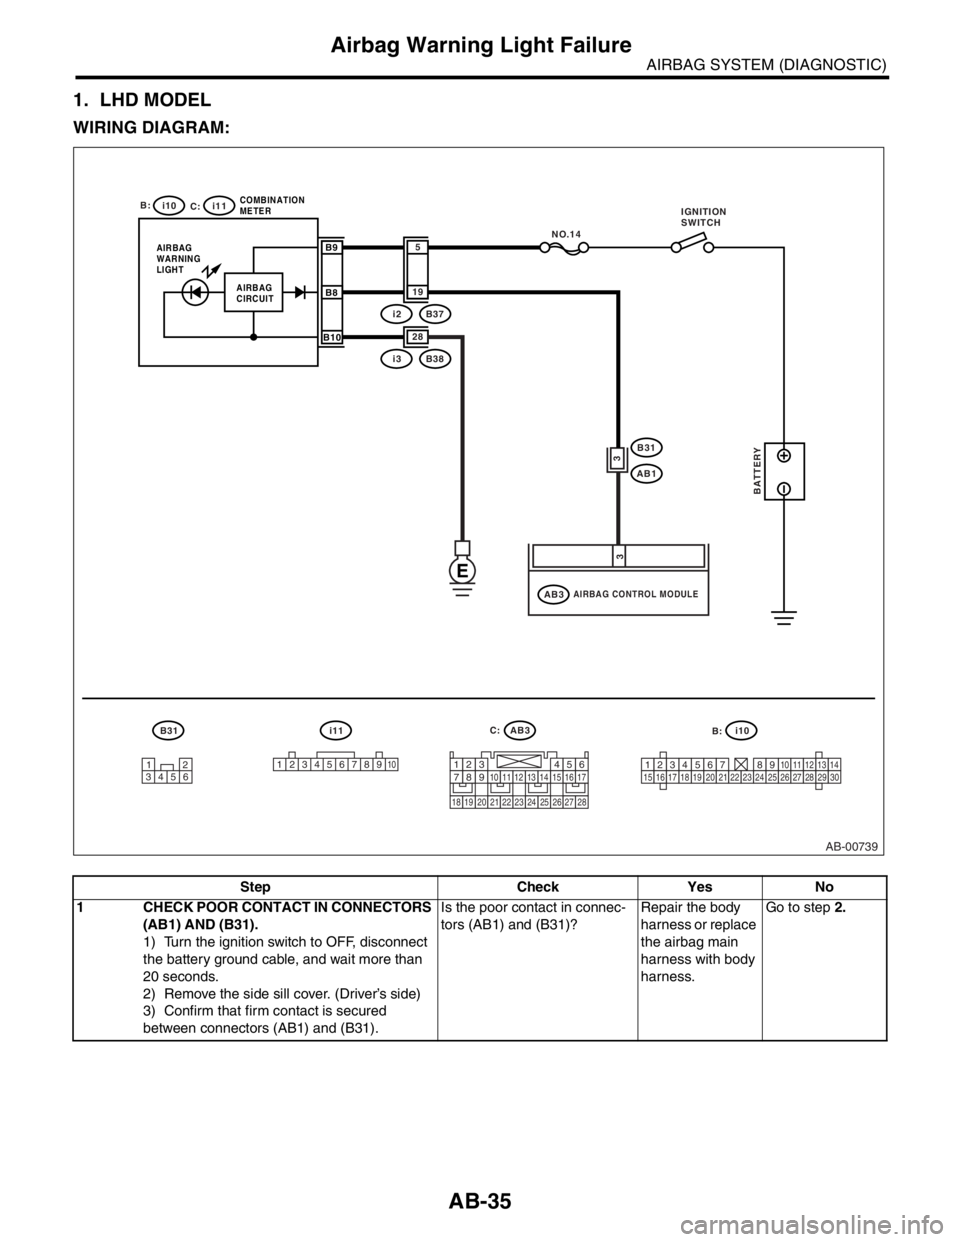
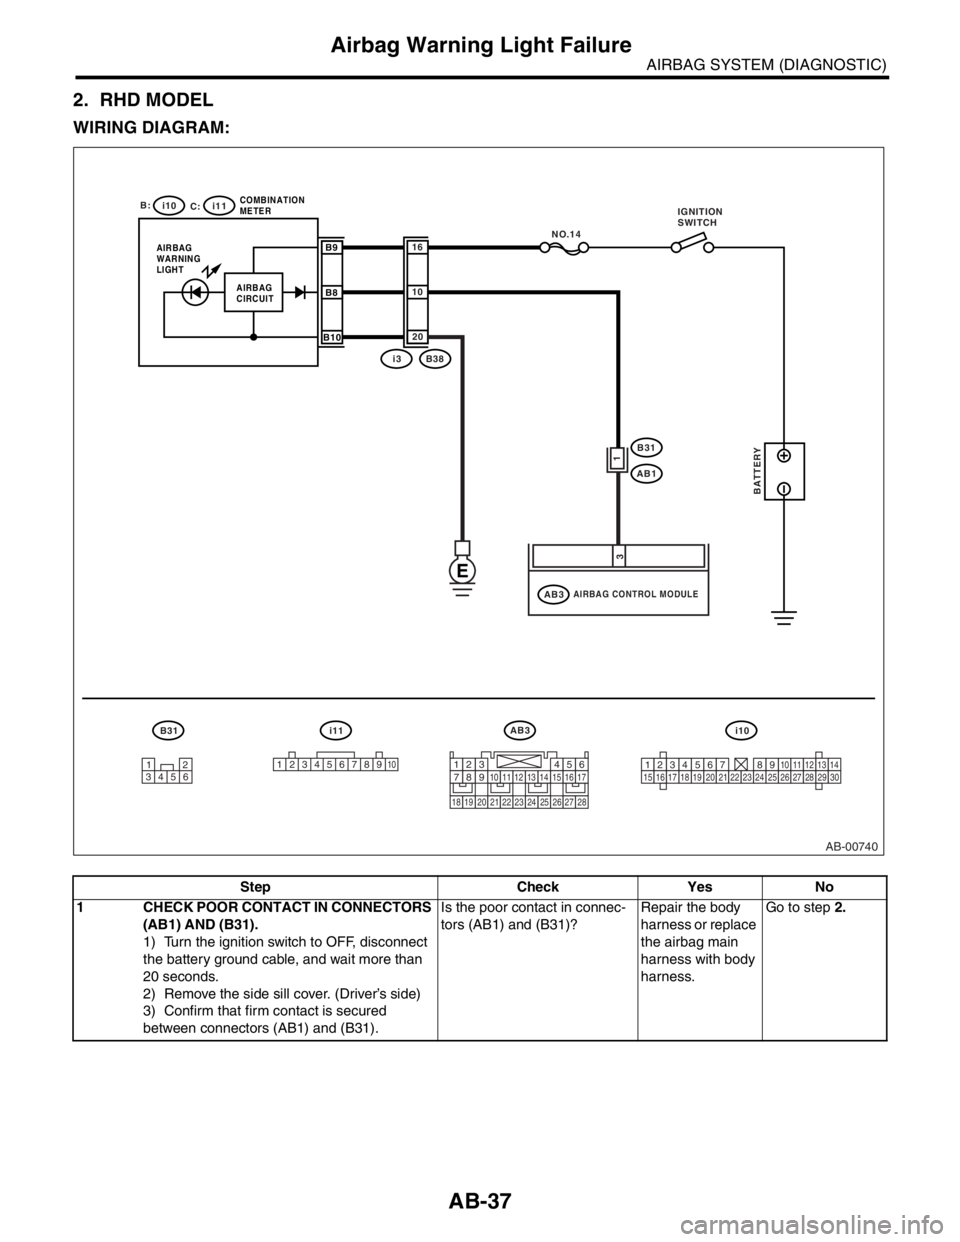
A: AIRBAG WARNING LIGHT REMAINS ON.
DIAGNOSIS:
Airbag warning light unit is faulty.
Airbag control module to airbag warning light circuit is shorted or open.
Grounding circuit is faulty.
Airbag control module is faulty.
(AB1) and (B31) are not connected properly.
(AB3) is not connected properly to the airbag control module.
CAUTION:
Before diagnosing the airbag system, be sure to turn the ignition switch to OFF, disconnect the
ground cable from battery, and wait more than 20 seconds before starting to work.
After replacing the airbag module, seat belt pretensioner, roll connector, control module or sensor,
reconnect each part and confirm that the airbag warning light operates properly.
When inspecting the airbag main harness, disconnect the airbag module connector of the driver
and passenger seats for safety reasons.
Page 167 of 2870
AB-35
AIRBAG SYSTEM (DIAGNOSTIC)
Airbag Warning Light Failure
1. LHD MODEL
WIRING DIAGRAM:
Step Check Yes No
1 CHECK POOR CONTACT IN CONNECTORS
(AB1) AND (B31).
1) Turn the ignition switch to OFF, disconnect
the battery ground cable, and wait more than
20 seconds.
2) Remove the side sill cover. (Driver’s side)
3) Confirm that firm contact is secured
between connectors (AB1) and (B31).Is the poor contact in connec-
tors (AB1) and (B31)?Repair the body
harness or replace
the airbag main
harness with body
harness.Go to step 2.
AB-00739
12
34561
2345678910123456789101112131415161718192021222324252627282930
B31 i11AB3
i10
B:
C: i10
i11
AIRBAG
WARNING
LIGHTCOMBINATION
METERB9
B8
B10
NO.14
i3B38 28
i2B37 19
5
AIRBAG CONTROL MODULEAB3
B31
AB1
3
3
AIRBAG
CIRCUIT
E
BATTERY
1234567891011121314151617
1819202122232425262728
IGNITION
SWITCH
B: C:
Page 169 of 2870
AB-37
AIRBAG SYSTEM (DIAGNOSTIC)
Airbag Warning Light Failure
2. RHD MODEL
WIRING DIAGRAM:
Step Check Yes No
1 CHECK POOR CONTACT IN CONNECTORS
(AB1) AND (B31).
1) Turn the ignition switch to OFF, disconnect
the battery ground cable, and wait more than
20 seconds.
2) Remove the side sill cover. (Driver’s side)
3) Confirm that firm contact is secured
between connectors (AB1) and (B31).Is the poor contact in connec-
tors (AB1) and (B31)?Repair the body
harness or replace
the airbag main
harness with body
harness.Go to step 2.
AB-00740
12
34561
2345678910123456789101112131415161718192021222324252627282930
B31 i11AB3
i10
B:
C: i10
i11
AIRBAG
WARNING
LIGHTCOMBINATION
METERB9
B8
B10
NO.14
i3B38 20
10
16
AIRBAG CONTROL MODULEAB3
B31
AB1
1
3
AIRBAG
CIRCUIT
E
BATTERY
1234567891011121314151617
1819202122232425262728
IGNITION
SWITCH
Page 171 of 2870

AB-39
AIRBAG SYSTEM (DIAGNOSTIC)
Airbag Warning Light Failure
B: AIRBAG WARNING LIGHT REMAINS OFF.
DIAGNOSIS:
Fuse No. 14 (in fuse box) is blown.
Body harness circuit is open.
Airbag warning light is faulty.
Airbag main harness is faulty.
Airbag control module is faulty.
CAUTION:
Before diagnosing the airbag system, be sure to turn the ignition switch to OFF, disconnect the
ground cable from battery, and wait more than 20 seconds before starting to work.
After replacing the airbag module, seat belt pretensioner, roll connector, control module or sensor,
reconnect each part and confirm that the airbag warning light operates properly.
When inspecting the airbag main harness, disconnect the airbag module connector of the driver
and passenger seats for safety reasons.
1. LHD MODEL
WIRING DIAGRAM:
AB-00739
12
34561
2345678910123456789101112131415161718192021222324252627282930
B31 i11AB3
i10
B:
C: i10
i11
AIRBAG
WARNING
LIGHTCOMBINATION
METERB9
B8
B10
NO.14
i3B38 28
i2B37 19
5
AIRBAG CONTROL MODULEAB3
B31
AB1
3
3
AIRBAG
CIRCUIT
E
BATTERY
1234567891011121314151617
1819202122232425262728
IGNITION
SWITCH
B: C:
Page 175 of 2870

AB-43
AIRBAG SYSTEM (DIAGNOSTIC)
List of Diagnostic Trouble Code (DTC)
12.List of Diagnostic Trouble Code (DTC)
A: LIST
DTCMemory func-
tionContents of diagnosis Index No.
11 Provided. Airbag main harness circuit is open, shorted or
shorted to ground.
Airbag module harness circuit (driver) is open,
shorted or shorted to ground.
Roll connector circuit is open, shorted or shorted
to ground.
Airbag control module is faulty.
Driver’s airbag module is faulty.
with Diagnostic Trouble
Code (DTC).>
12 Provided. Airbag main harness circuit is open, shorted or
shorted to ground.
Airbag module harness circuit (passenger) is
open, shorted or shorted to ground.
Airbag control module is faulty.
Passenger’s airbag module is faulty.
with Diagnostic Trouble
Code (DTC).>
15 Provided. Airbag main harness circuit (driver) is shorted to
power supply.
Airbag module harness (driver) is shorted to power
supply.
Roll connector is shorted to power supply.
Airbag control module is faulty.
Driver’s airbag module is faulty.
with Diagnostic Trouble
Code (DTC).>
16 Provided. Airbag main harness circuit (passenger) is shorted
to power supply.
Airbag module harness (passenger) is shorted to
power supply.
Airbag control module is faulty.
Passenger’s airbag module is faulty.
with Diagnostic Trouble
Code (DTC).>
21 Provided. Airbag control module is faulty.
with Diagnostic Trouble
Code (DTC).>
22 Provided.Front airbag module and seat belt pretensioner (LH/
RH) are inflated.
with Diagnostic Trouble
Code (DTC).>
23 Not provided.(AB3), (AB7) and (AB8) are not connected properly
to airbag control module.
with Diagnostic Trouble
Code (DTC).>
24 Not provided. Airbag control module is faulty.
Airbag main harness circuit is open.
Fuse No. 11 (in joint box) is blown.
Body harness circuit is open.
with Diagnostic Trouble
Code (DTC).>
25 Provided. Airbag control module is faulty.
Airbag main harness circuit is open.
Fuse No. 6 (in joint box) is blown.
Body harness circuit is open.
with Diagnostic Trouble
Code (DTC).>
31 Provided. Front sub-sensor harness circuit (RH) is shorted,
opened or shorted to power supply.
Airbag main harness circuit is shorted, opened or
shorted to power supply.
Front sub-sensor (RH) is faulty.
Airbag control module is faulty.
with Diagnostic Trouble
Code (DTC).>
Page 178 of 2870
AB-46
AIRBAG SYSTEM (DIAGNOSTIC)
Diagnostic Procedure with Diagnostic Trouble Code (DTC)
13.Diagnostic Procedure with Diagnostic Trouble Code (DTC)
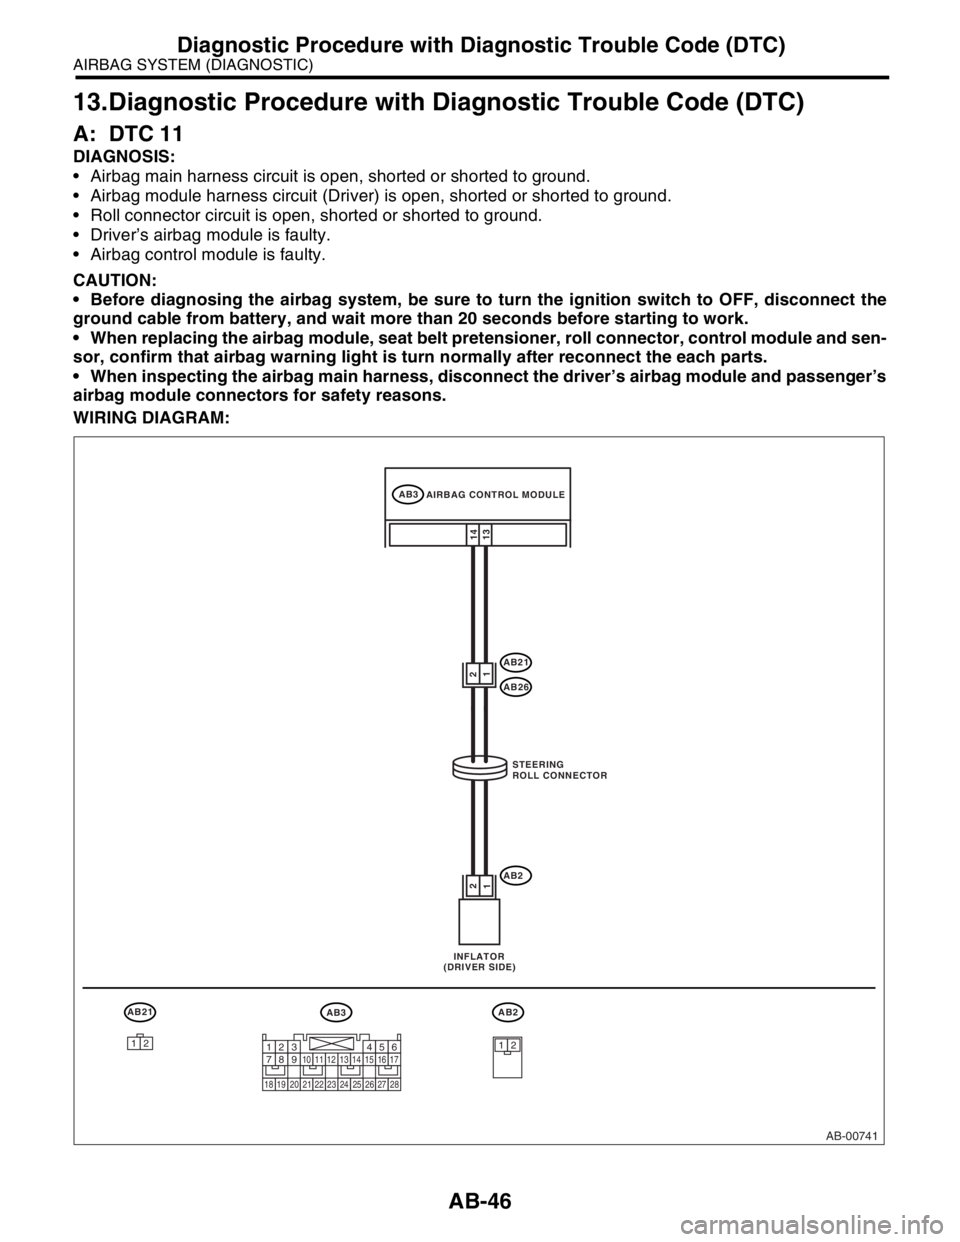
A: DTC 11
DIAGNOSIS:
Airbag main harness circuit is open, shorted or shorted to ground.
Airbag module harness circuit (Driver) is open, shorted or shorted to ground.
Roll connector circuit is open, shorted or shorted to ground.
Driver’s airbag module is faulty.
Airbag control module is faulty.
CAUTION:
Before diagnosing the airbag system, be sure to turn the ignition switch to OFF, disconnect the
ground cable from battery, and wait more than 20 seconds before starting to work.
When replacing the airbag module, seat belt pretensioner, roll connector, control module and sen-
sor, confirm that airbag warning light is turn normally after reconnect the each parts.
When inspecting the airbag main harness, disconnect the driver’s airbag module and passenger’s
airbag module connectors for safety reasons.
WIRING DIAGRAM:
AB-00741
AB3
AB21
AB26
AB222
11
14
13
AB21AB3AB2
1212
AIRBAG CONTROL MODULE
STEERING
ROLL CONNECTOR
INFLATOR
(DRIVER SIDE)
1234567891011121314151617
1819202122232425262728