air pressure switch SUBARU FORESTER 2004 Service Workshop Manual
[x] Cancel search | Manufacturer: SUBARU, Model Year: 2004, Model line: FORESTER, Model: SUBARU FORESTER 2004Pages: 2870, PDF Size: 38.67 MB
Page 1782 of 2870
EN(H4DOTC)-149
ENGINE (DIAGNOSTIC)
Diagnostic Procedure with Diagnostic Trouble Code (DTC)
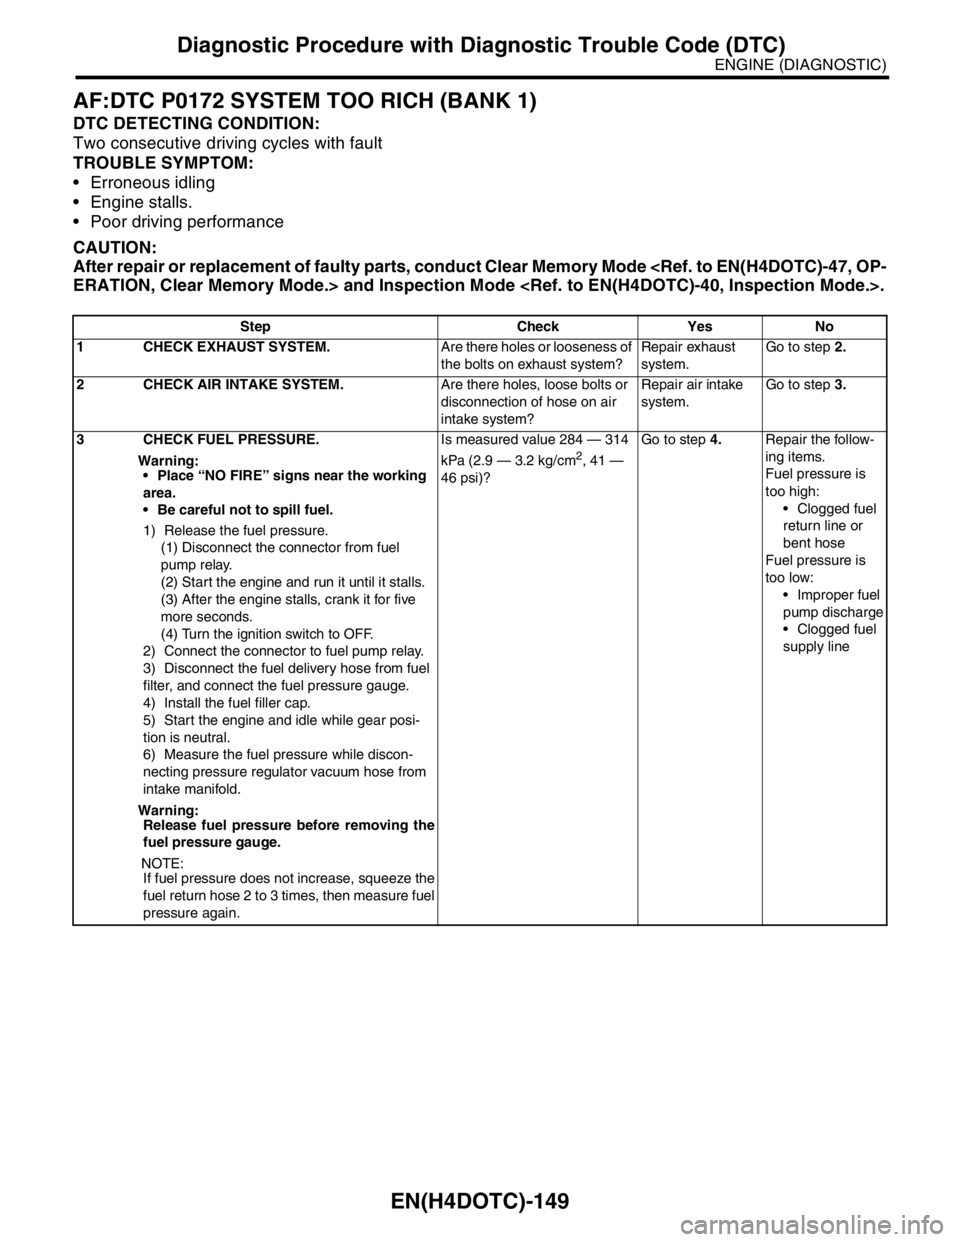
AF:DTC P0172 SYSTEM TOO RICH (BANK 1)
DTC DETECTING CONDITION:
Two consecutive driving cycles with fault
TROUBLE SYMPTOM:
Erroneous idling
Engine stalls.
Poor driving performance
CAUTION:
After repair or replacement of faulty parts, conduct Clear Memory Mode
Step Check Yes No
1 CHECK EXHAUST SYSTEM.Are there holes or looseness of
the bolts on exhaust system?Repair exhaust
system.Go to step 2.
2 CHECK AIR INTAKE SYSTEM.Are there holes, loose bolts or
disconnection of hose on air
intake system?Repair air intake
system.Go to step 3.
3 CHECK FUEL PRESSURE.
Warning:
Place “NO FIRE” signs near the working
area.
Be careful not to spill fuel.
1) Release the fuel pressure.
(1) Disconnect the connector from fuel
pump relay.
(2) Start the engine and run it until it stalls.
(3) After the engine stalls, crank it for five
more seconds.
(4) Turn the ignition switch to OFF.
2) Connect the connector to fuel pump relay.
3) Disconnect the fuel delivery hose from fuel
filter, and connect the fuel pressure gauge.
4) Install the fuel filler cap.
5) Start the engine and idle while gear posi-
tion is neutral.
6) Measure the fuel pressure while discon-
necting pressure regulator vacuum hose from
intake manifold.
Warning:
Release fuel pressure before removing the
fuel pressure gauge.
N
OTE:
If fuel pressure does not increase, squeeze the
fuel return hose 2 to 3 times, then measure fuel
pressure again.Is measured value 284 — 314
kPa (2.9 — 3.2 kg/cm
2, 41 —
46 psi)?Go to step 4.Repair the follow-
ing items.
Fuel pressure is
too high:
Clogged fuel
return line or
bent hose
Fuel pressure is
too low:
Improper fuel
pump discharge
Clogged fuel
supply line
Page 1783 of 2870
EN(H4DOTC)-150
ENGINE (DIAGNOSTIC)
Diagnostic Procedure with Diagnostic Trouble Code (DTC)
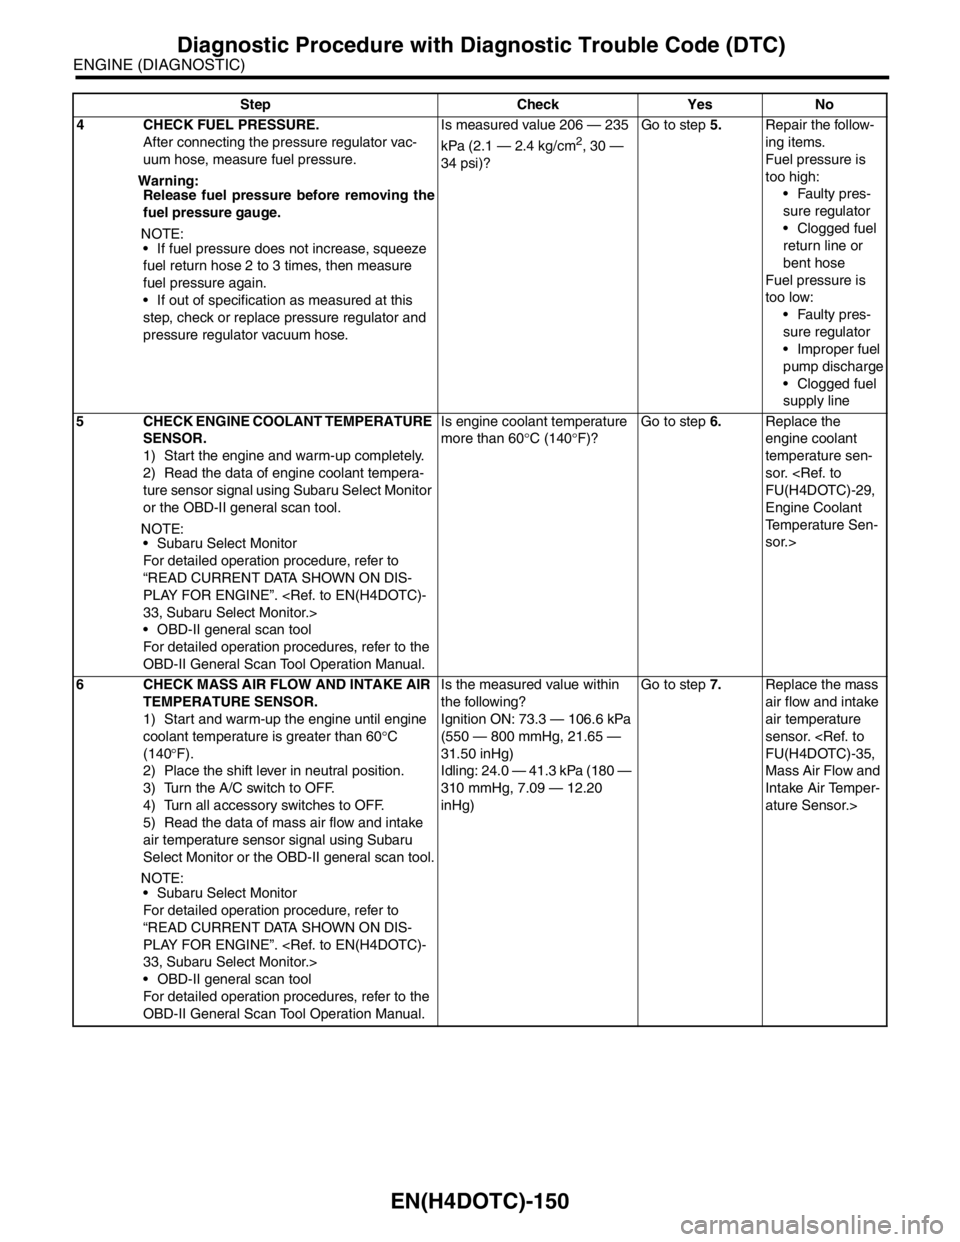
4 CHECK FUEL PRESSURE.
After connecting the pressure regulator vac-
uum hose, measure fuel pressure.
Warning:
Release fuel pressure before removing the
fuel pressure gauge.
N
OTE:
If fuel pressure does not increase, squeeze
fuel return hose 2 to 3 times, then measure
fuel pressure again.
If out of specification as measured at this
step, check or replace pressure regulator and
pressure regulator vacuum hose.Is measured value 206 — 235
kPa (2.1 — 2.4 kg/cm
2, 30 —
34 psi)?Go to step 5.Repair the follow-
ing items.
Fuel pressure is
too high:
Faulty pres-
sure regulator
Clogged fuel
return line or
bent hose
Fuel pressure is
too low:
Faulty pres-
sure regulator
Improper fuel
pump discharge
Clogged fuel
supply line
5 CHECK ENGINE COOLANT TEMPERATURE
SENSOR.
1) Start the engine and warm-up completely.
2) Read the data of engine coolant tempera-
ture sensor signal using Subaru Select Monitor
or the OBD-II general scan tool.
NOTE:
Subaru Select Monitor
For detailed operation procedure, refer to
“READ CURRENT DATA SHOWN ON DIS-
PLAY FOR ENGINE”.
OBD-II general scan tool
For detailed operation procedures, refer to the
OBD-II General Scan Tool Operation Manual.Is engine coolant temperature
more than 60°C (140°F)?Go to step 6.Replace the
engine coolant
temperature sen-
sor.
Engine Coolant
Temperature Sen-
sor.>
6 CHECK MASS AIR FLOW AND INTAKE AIR
TEMPERATURE SENSOR.
1) Start and warm-up the engine until engine
coolant temperature is greater than 60°C
(140°F).
2) Place the shift lever in neutral position.
3) Turn the A/C switch to OFF.
4) Turn all accessory switches to OFF.
5) Read the data of mass air flow and intake
air temperature sensor signal using Subaru
Select Monitor or the OBD-II general scan tool.
N
OTE:
Subaru Select Monitor
For detailed operation procedure, refer to
“READ CURRENT DATA SHOWN ON DIS-
PLAY FOR ENGINE”.
OBD-II general scan tool
For detailed operation procedures, refer to the
OBD-II General Scan Tool Operation Manual.Is the measured value within
the following?
Ignition ON: 73.3 — 106.6 kPa
(550 — 800 mmHg, 21.65 —
31.50 inHg)
Idling: 24.0 — 41.3 kPa (180 —
310 mmHg, 7.09 — 12.20
inHg)Go to step 7.Replace the mass
air flow and intake
air temperature
sensor.
Mass Air Flow and
Intake Air Temper-
ature Sensor.> Step Check Yes No
Page 1818 of 2870
EN(H4DOTC)-185
ENGINE (DIAGNOSTIC)
Diagnostic Procedure with Diagnostic Trouble Code (DTC)
Step Check Yes No
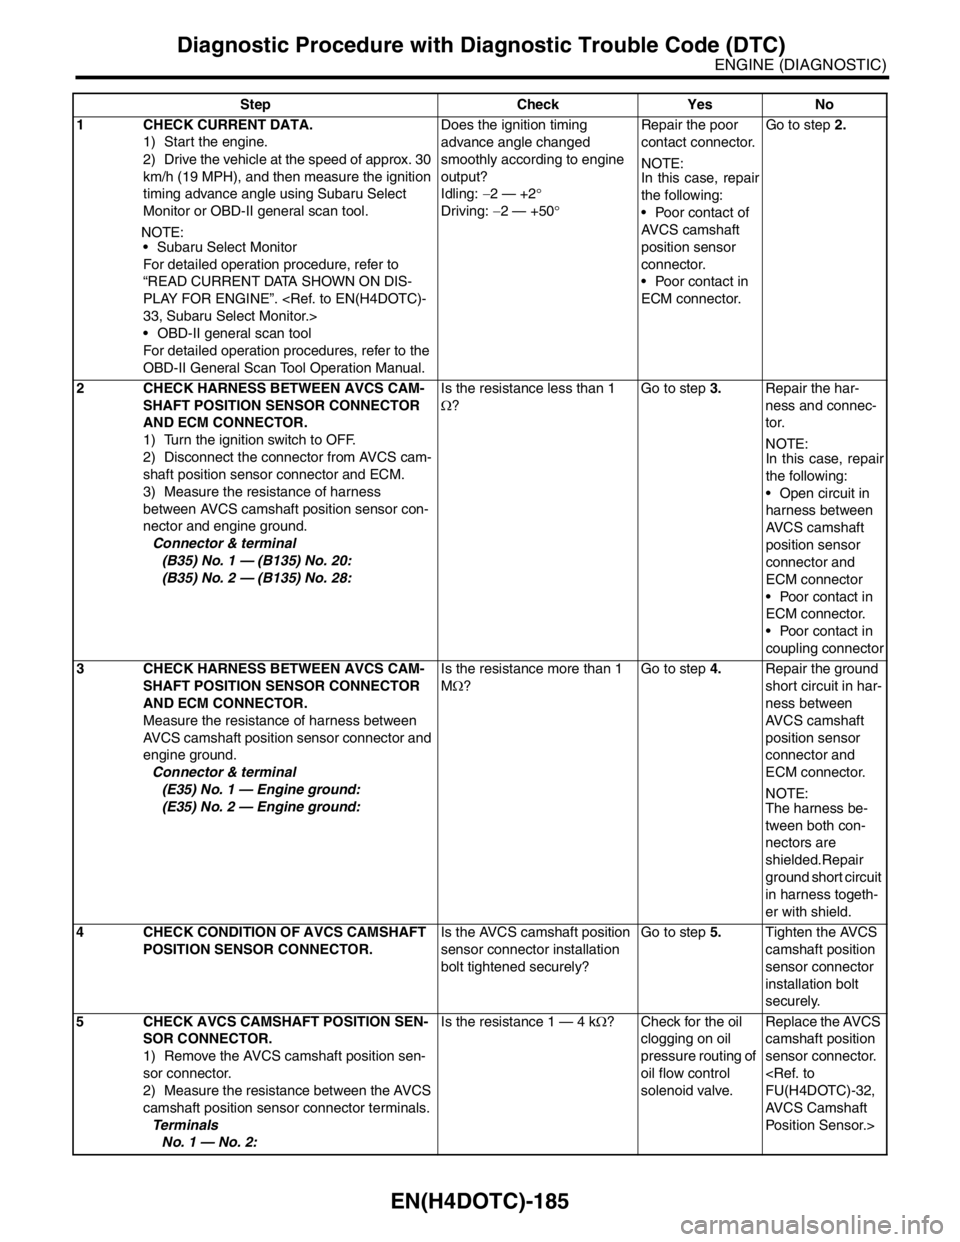
1 CHECK CURRENT DATA.
1) Start the engine.
2) Drive the vehicle at the speed of approx. 30
km/h (19 MPH), and then measure the ignition
timing advance angle using Subaru Select
Monitor or OBD-II general scan tool.
N
OTE:
Subaru Select Monitor
For detailed operation procedure, refer to
“READ CURRENT DATA SHOWN ON DIS-
PLAY FOR ENGINE”.
OBD-II general scan tool
For detailed operation procedures, refer to the
OBD-II General Scan Tool Operation Manual.Does the ignition timing
advance angle changed
smoothly according to engine
output?
Idling: −2 — +2°
Driving: −2 — +50°Repair the poor
contact connector.
N
OTE:
In this case, repair
the following:
Poor contact of
AVCS camshaft
position sensor
connector.
Poor contact in
ECM connector.Go to step 2.
2 CHECK HARNESS BETWEEN AVCS CAM-
SHAFT POSITION SENSOR CONNECTOR
AND ECM CONNECTOR.
1) Turn the ignition switch to OFF.
2) Disconnect the connector from AVCS cam-
shaft position sensor connector and ECM.
3) Measure the resistance of harness
between AVCS camshaft position sensor con-
nector and engine ground.
Connector & terminal
(B35) No. 1 — (B135) No. 20:
(B35) No. 2 — (B135) No. 28:Is the resistance less than 1
Ω?Go to step 3.Repair the har-
ness and connec-
tor.
N
OTE:
In this case, repair
the following:
Open circuit in
harness between
AVCS camshaft
position sensor
connector and
ECM connector
Poor contact in
ECM connector.
Poor contact in
coupling connector
3 CHECK HARNESS BETWEEN AVCS CAM-
SHAFT POSITION SENSOR CONNECTOR
AND ECM CONNECTOR.
Measure the resistance of harness between
AVCS camshaft position sensor connector and
engine ground.
Connector & terminal
(E35) No. 1 — Engine ground:
(E35) No. 2 — Engine ground:Is the resistance more than 1
MΩ?Go to step 4.Repair the ground
short circuit in har-
ness between
AVCS camshaft
position sensor
connector and
ECM connector.
NOTE:
The harness be-
tween both con-
nectors are
shielded.Repair
ground short circuit
in harness togeth-
er with shield.
4 CHECK CONDITION OF AVCS CAMSHAFT
POSITION SENSOR CONNECTOR.Is the AVCS camshaft position
sensor connector installation
bolt tightened securely?Go to step 5.Tighten the AVCS
camshaft position
sensor connector
installation bolt
securely.
5 CHECK AVCS CAMSHAFT POSITION SEN-
SOR CONNECTOR.
1) Remove the AVCS camshaft position sen-
sor connector.
2) Measure the resistance between the AVCS
camshaft position sensor connector terminals.
Te r m i n a l s
No. 1 — No. 2:Is the resistance 1 — 4 kΩ? Check for the oil
clogging on oil
pressure routing of
oil flow control
solenoid valve.Replace the AVCS
camshaft position
sensor connector.
AVCS Camshaft
Position Sensor.>
Page 1904 of 2870

EN(H4DOTC)-271
ENGINE (DIAGNOSTIC)
Diagnostic Procedure with Diagnostic Trouble Code (DTC)
CL:DTC P1110 ATMOSPHERIC PRESSURE SENSOR CIRCUIT MALFUNCTION
(LOW INPUT)
DTC DETECTING CONDITION:
Immediately at fault recognition
CAUTION:
After repair or replacement of faulty parts, conduct Clear Memory Mode
CM:DTC P1111 ATMOSPHERIC PRESSURE SENSOR CIRCUIT MALFUNCTION
(HIGH INPUT)
DTC DETECTING CONDITION:
Immediately at fault recognition
CAUTION:
After repair or replacement of faulty parts, conduct Clear Memory Mode
Step Check Yes No
1 CHECK HARNESS BETWEEN ECM AND
TUMBLE GENERATOR VALVE ACTUATOR
CONNECTOR.
1) Turn the ignition switch to OFF.
2) Disconnect the connector from tumble gen-
erator valve connector.
3) Measure the voltage between tumble gen-
erator valve actuator and chassis ground.
Connector & terminal
(E51) No. 1 (+) — Chassis ground (
−):
(E51) No. 2 (+) — Chassis ground (
−):Is the voltage less than 5 V? Replace the tum-
ble generator valve
assembly.
Tumble Generator
Valve Assembly.>Repair the battery
short circuit
between ECM and
tumble generator
valve actuator.
Step Check Yes No
1 CHECK ANY OTHER DTC ON DISPLAY.Does the Subaru Select Moni-
tor or OBD-II general scan tool
indicate DTC P1110?Replace the ECM.
Engine Control
Module (ECM).>
N
OTE:
Atmospheric pres-
sure sensor is built
in ECM.Temporary poor
contact occurs.
Step Check Yes No
1 CHECK ANY OTHER DTC ON DISPLAY.Does the Subaru Select Moni-
tor or OBD-II general scan tool
indicate DTC P1111?Replace the ECM.
Engine Control
Module (ECM).>
NOTE:
Atmospheric pres-
sure sensor is built
in ECM.Temporary poor
contact occurs.
Page 1928 of 2870
EN(H4DOTC)-295
ENGINE (DIAGNOSTIC)
General Diagnostic Table
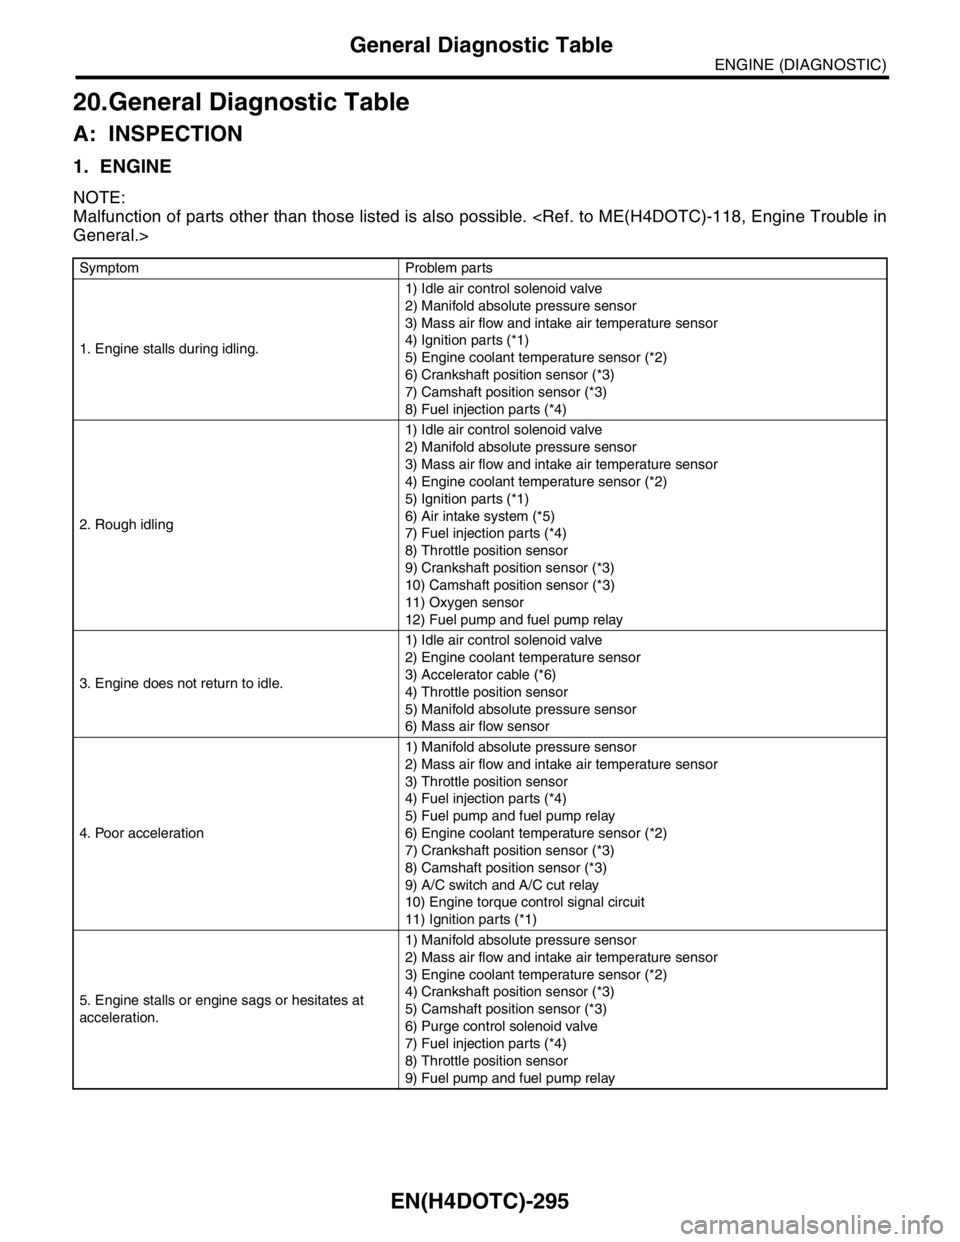
20.General Diagnostic Table
A: INSPECTION
1. ENGINE
NOTE:
Malfunction of parts other than those listed is also possible.
Symptom Problem parts
1. Engine stalls during idling.1) Idle air control solenoid valve
2) Manifold absolute pressure sensor
3) Mass air flow and intake air temperature sensor
4) Ignition parts (*1)
5) Engine coolant temperature sensor (*2)
6) Crankshaft position sensor (*3)
7) Camshaft position sensor (*3)
8) Fuel injection parts (*4)
2. Rough idling1) Idle air control solenoid valve
2) Manifold absolute pressure sensor
3) Mass air flow and intake air temperature sensor
4) Engine coolant temperature sensor (*2)
5) Ignition parts (*1)
6) Air intake system (*5)
7) Fuel injection parts (*4)
8) Throttle position sensor
9) Crankshaft position sensor (*3)
10) Camshaft position sensor (*3)
11) Oxygen sensor
12) Fuel pump and fuel pump relay
3. Engine does not return to idle.1) Idle air control solenoid valve
2) Engine coolant temperature sensor
3) Accelerator cable (*6)
4) Throttle position sensor
5) Manifold absolute pressure sensor
6) Mass air flow sensor
4. Poor acceleration1) Manifold absolute pressure sensor
2) Mass air flow and intake air temperature sensor
3) Throttle position sensor
4) Fuel injection parts (*4)
5) Fuel pump and fuel pump relay
6) Engine coolant temperature sensor (*2)
7) Crankshaft position sensor (*3)
8) Camshaft position sensor (*3)
9) A/C switch and A/C cut relay
10) Engine torque control signal circuit
11) Ignition parts (*1)
5. Engine stalls or engine sags or hesitates at
acceleration.1) Manifold absolute pressure sensor
2) Mass air flow and intake air temperature sensor
3) Engine coolant temperature sensor (*2)
4) Crankshaft position sensor (*3)
5) Camshaft position sensor (*3)
6) Purge control solenoid valve
7) Fuel injection parts (*4)
8) Throttle position sensor
9) Fuel pump and fuel pump relay
Page 1944 of 2870
FU(H4DOTC 2.5)-14
FUEL INJECTION (FUEL SYSTEM)
Intake Manifold
3. Intake Manifold
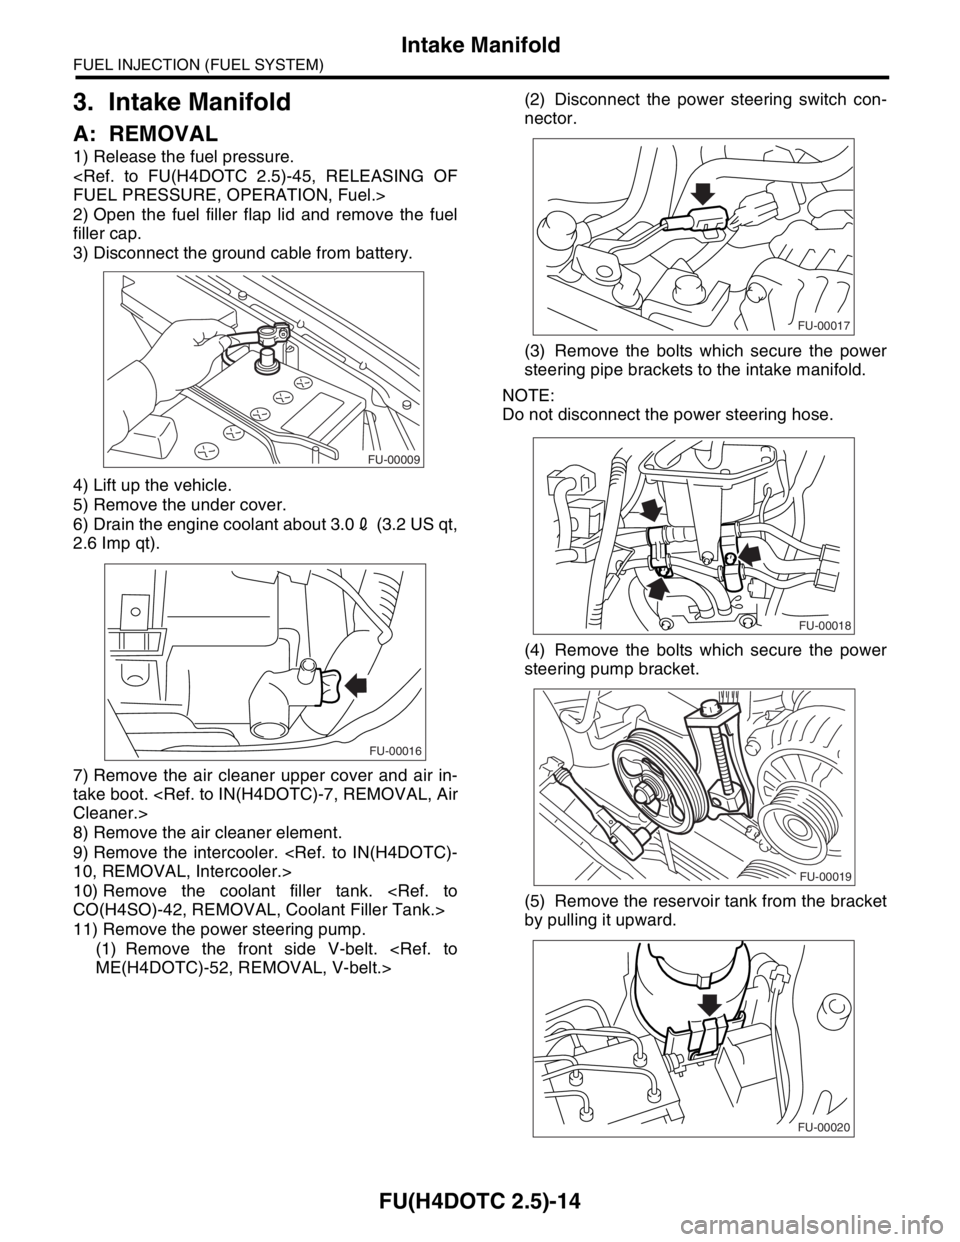
A: REMOVAL
1) Release the fuel pressure.
2) Open the fuel filler flap lid and remove the fuel
filler cap.
3) Disconnect the ground cable from battery.
4) Lift up the vehicle.
5) Remove the under cover.
6) Drain the engine coolant about 3.02 (3.2 US qt,
2.6 Imp qt).
7) Remove the air cleaner upper cover and air in-
take boot.
8) Remove the air cleaner element.
9) Remove the intercooler.
10) Remove the coolant filler tank.
11) Remove the power steering pump.
(1) Remove the front side V-belt.
nector.
(3) Remove the bolts which secure the power
steering pipe brackets to the intake manifold.
NOTE:
Do not disconnect the power steering hose.
(4) Remove the bolts which secure the power
steering pump bracket.
(5) Remove the reservoir tank from the bracket
by pulling it upward.
FU-00009
FU-00016
FU-00017
FU-00018
FU-00019
FU-00020
Page 2029 of 2870
EN(H4DOTC 2.5)-5
ENGINE (DIAGNOSTIC)
General Description
3. General Description
A: CAUTION
1) Airbag system wiring harness is routed near the
ECM, main relay and fuel pump relay.
CAUTION:
All airbag system wiring harness and con-
nectors are all colored yellow. Do not use the
electrical test equipment on these circuits.
Be careful not to damage the Airbag system
wiring harness when servicing the ECM, TCM,
main relay and fuel pump relay.
2) Never connect the battery in reverse polarity.
The ECM will be destroyed immediately.
The fuel injector and other part will be damaged.
3) Do not disconnect the battery terminals while the
engine is running.
A large counter electromotive force will be gener-
ated in the generator, and this voltage may damage
electronic parts such as ECM, etc.
4) Before disconnecting the connectors of each
sensor and the ECM, be sure to turn OFF the igni-
tion switch.
5) Poor contact has been identified as a primary
cause of this problem. Measure the voltage or re-
sistance of individual sensor or all electrical control
modules using a tapered pin with a diameter of less
than 0.64 mm (0.025 in). Do not insert the pin more
than 5 mm (0.20 in) into the part.
6) Remove the ECM from the located position after
disconnecting two cables on battery.
Otherwise, the ECM may be damaged.
CAUTION:
When replacing the ECM, be careful not to use
the wrong spec. ECM to avoid damaging the
fuel injection system.
7) Connectors to each sensor in the engine com-
partment and the harness connectors on the en-
gine side and body side are all designed to be
waterproof. However, take care not to allow water
to get into the connectors when washing the vehi-
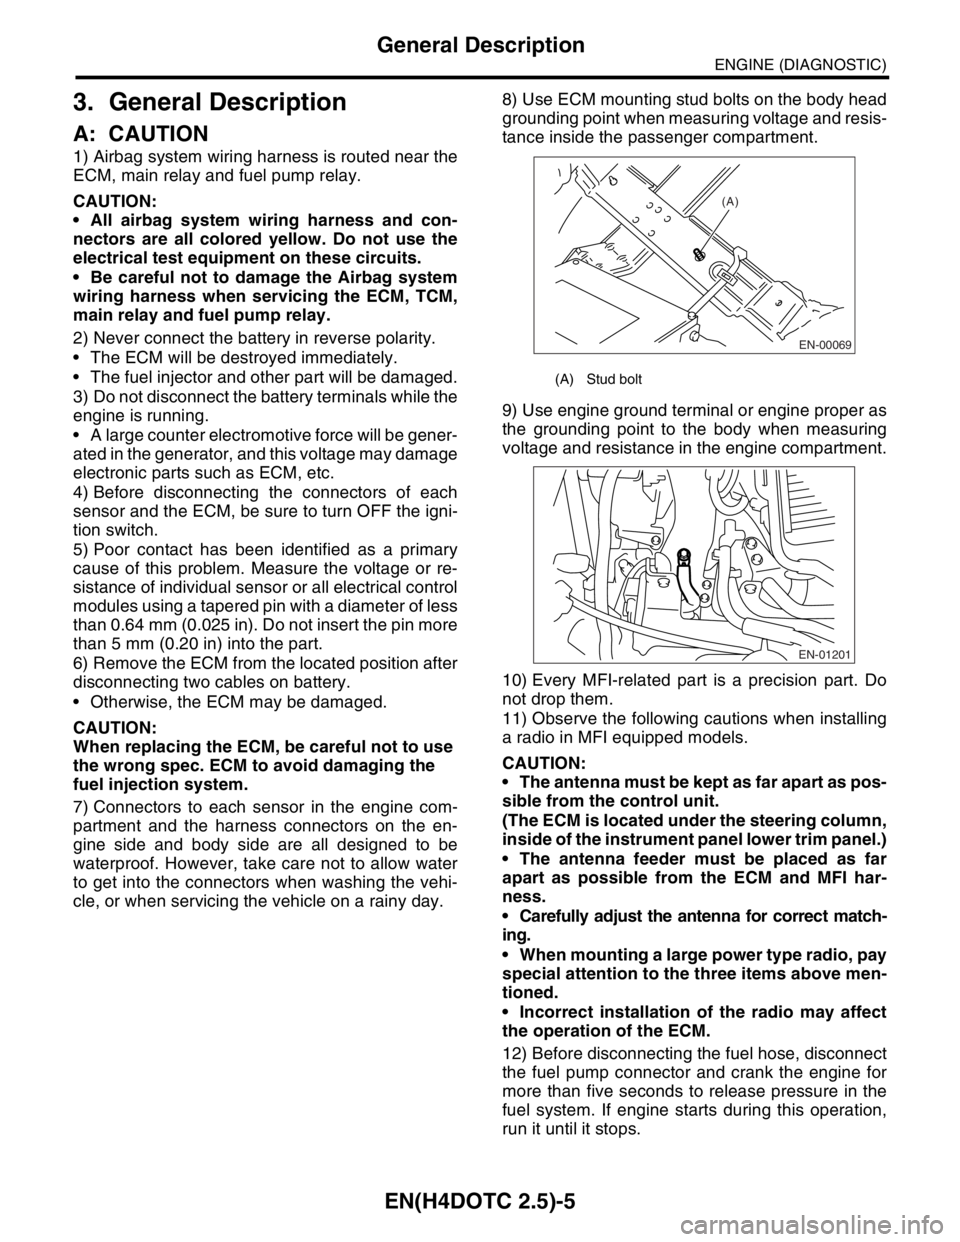
cle, or when servicing the vehicle on a rainy day. 8) Use ECM mounting stud bolts on the body head
grounding point when measuring voltage and resis-
tance inside the passenger compartment.
9) Use engine ground terminal or engine proper as
the grounding point to the body when measuring
voltage and resistance in the engine compartment.
10) Every MFI-related part is a precision part. Do
not drop them.
11) Observe the following cautions when installing
a radio in MFI equipped models.
CAUTION:
The antenna must be kept as far apart as pos-
sible from the control unit.
(The ECM is located under the steering column,
inside of the instrument panel lower trim panel.)
The antenna feeder must be placed as far
apart as possible from the ECM and MFI har-
ness.
Carefully adjust the antenna for correct match-
ing.
When mounting a large power type radio, pay
special attention to the three items above men-
tioned.
Incorrect installation of the radio may affect
the operation of the ECM.
12) Before disconnecting the fuel hose, disconnect
the fuel pump connector and crank the engine for
more than five seconds to release pressure in the
fuel system. If engine starts during this operation,
run it until it stops.
(A) Stud bolt
EN-00069
(A)
EN-01201
Page 2053 of 2870
EN(H4DOTC 2.5)-29
ENGINE (DIAGNOSTIC)
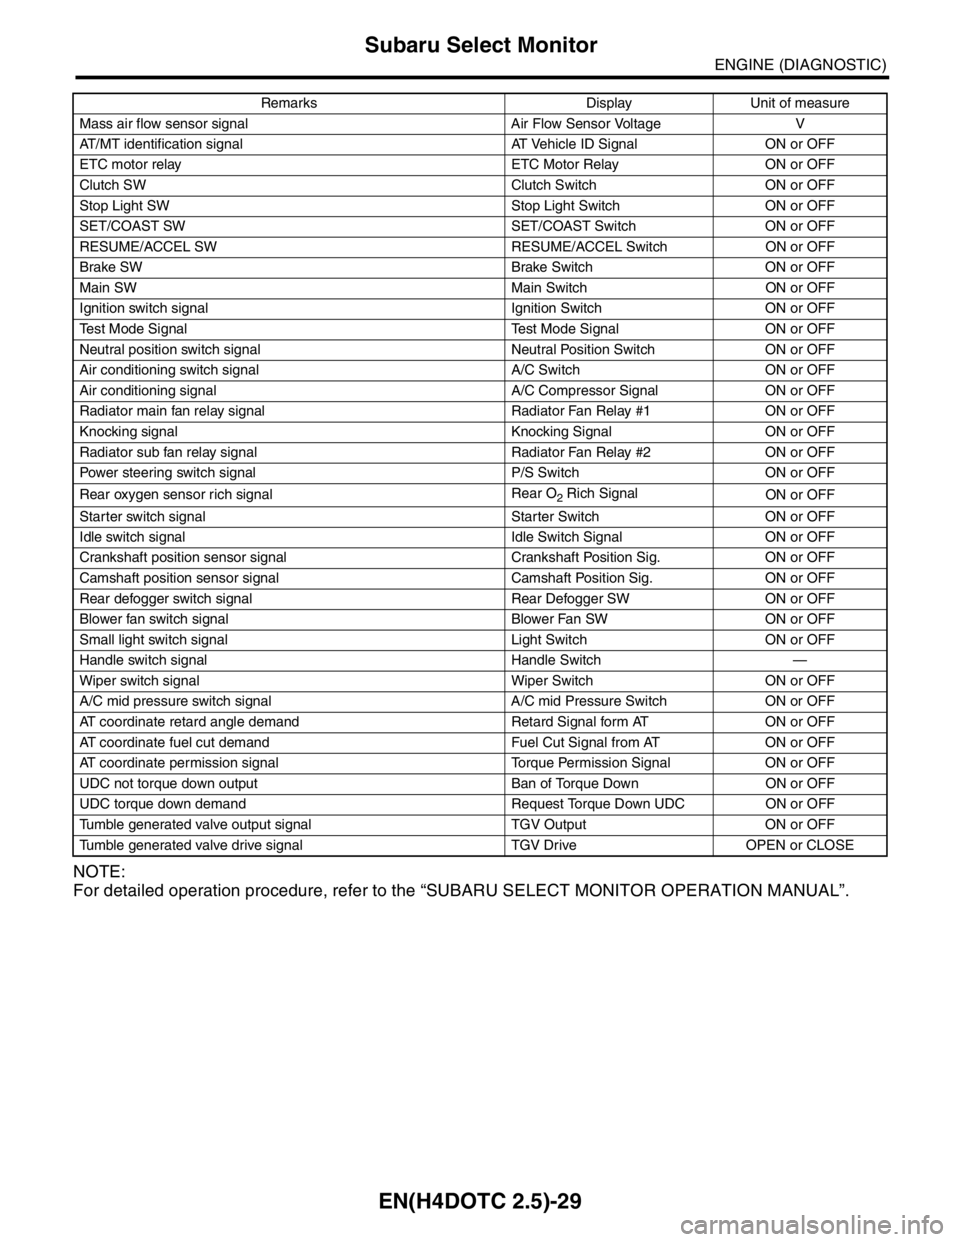
Subaru Select Monitor
NOTE:
For detailed operation procedure, refer to the “SUBARU SELECT MONITOR OPERATION MANUAL”.
Mass air flow sensor signal Air Flow Sensor Voltage V
AT/MT identification signal AT Vehicle ID Signal ON or OFF
ETC motor relay ETC Motor Relay ON or OFF
Clutch SW Clutch Switch ON or OFF
Stop Light SW Stop Light Switch ON or OFF
SET/COAST SW SET/COAST Switch ON or OFF
RESUME/ACCEL SW RESUME/ACCEL Switch ON or OFF
Brake SW Brake Switch ON or OFF
Main SW Main Switch ON or OFF
Ignition switch signal Ignition Switch ON or OFF
Test Mode Signal Test Mode Signal ON or OFF
Neutral position switch signal Neutral Position Switch ON or OFF
Air conditioning switch signal A/C Switch ON or OFF
Air conditioning signal A/C Compressor Signal ON or OFF
Radiator main fan relay signal Radiator Fan Relay #1 ON or OFF
Knocking signal Knocking Signal ON or OFF
Radiator sub fan relay signal Radiator Fan Relay #2 ON or OFF
Power steering switch signal P/S Switch ON or OFF
Rear oxygen sensor rich signalRear O
2 Rich Signal
ON or OFF
Starter switch signal Starter Switch ON or OFF
Idle switch signal Idle Switch Signal ON or OFF
Crankshaft position sensor signal Crankshaft Position Sig. ON or OFF
Camshaft position sensor signal Camshaft Position Sig. ON or OFF
Rear defogger switch signal Rear Defogger SW ON or OFF
Blower fan switch signal Blower Fan SW ON or OFF
Small light switch signal Light Switch ON or OFF
Handle switch signal Handle Switch —
Wiper switch signal Wiper Switch ON or OFF
A/C mid pressure switch signal A/C mid Pressure Switch ON or OFF
AT coordinate retard angle demand Retard Signal form AT ON or OFF
AT coordinate fuel cut demand Fuel Cut Signal from AT ON or OFF
AT coordinate permission signal Torque Permission Signal ON or OFF
UDC not torque down output Ban of Torque Down ON or OFF
UDC torque down demand Request Torque Down UDC ON or OFF
Tumble generated valve output signal TGV Output ON or OFF
Tumble generated valve drive signal TGV Drive OPEN or CLOSERemarks Display Unit of measure
Page 2056 of 2870

EN(H4DOTC 2.5)-32
ENGINE (DIAGNOSTIC)
Subaru Select Monitor
7. LED OPERATION MODE FOR ENGINE
1) On the «Main Menu» display screen, select the {Each System Check} and press the [YES] key.
2) On the «System Selection Menu» display screen, select the {Engine} and press the [YES] key.
3) Press the [YES] key after the information of engine type was displayed.
4) On the «Engine Diagnosis» screen, select the {Current Data Display/Save}, and then press the [YES] key.
5) On the «Data Display» screen, select the {Data & LED Display} and press the [YES] key.
6) Using the scroll key, move the display screen up or down until the desired data is shown.
A list of the support data is shown in the following table.
Description Display Message LED “ON” requirements
Ignition switch signal Ignition Switch ON or OFF When ignition switch is ON.
Test Mode Signal Test Mode Signal ON or OFF When test mode connector is connected.
Neutral position switch signal Neutral Position Switch ON or OFF When neutral position signal is entered.
Air conditioning switch signal A/C Switch ON or OFF When air conditioning switch is ON.
Air conditioning relay signal A/C Compressor Signal ON or OFF When air conditioning relay is in function.
Radiator main fan relay signal Radiator Fan Relay #1 ON or OFF When radiator main fan relay is in function.
Knocking signal Knocking Signal ON or OFF When knocking signal is input.
Radiator sub fan relay signal Radiator Fan Relay #2 ON or OFF When radiator sub fan relay is in function.
Rear oxygen sensor rich signalRear O
2 Rich Signal
ON or OFFWhen rear oxygen sensor mixture ratio is
rich.
Starter switch signal Starter Switch Signal ON or OFF When starter switch signal is entered.
Idle switch signal Idle Switch Signal ON or OFF When idle switch signal is entered.
Crankshaft position sensor signal Crankshaft Position Signal ON or OFFWhen crankshaft position sensor signal is
input.
Camshaft position sensor signal Camshaft Position Signal ON or OFFWhen camshaft position sensor signal is
entered.
Power steering switch signal P/S Switch ON or OFF When power steering switch is entered.
Rear defogger switch signal Rear Defogger Switch ON or OFF When rear defogger switch is ON.
Blower fan switch signal Blower Fan Switch ON or OFF When blower fan switch is ON.
Small light switch signal Light Switch ON or OFF When small light switch is ON.
Tumble generated valve actuator
signalTGV Output ON or OFF When TGV actuator signal is entered.
Tumble generated valve drive sig-
nalTGV DriveClose or
OpenWhen TGV moves and valve opens.
Handle switch signal Handle SWLow Input
or High
InputIlluminates in Low Input.
AT/MT identification terminal AT Vehicle ID Signal ON or OFF ON (AT model).
Wiper switch signal Wiper Switch ON or OFF When wiper switch is turned to ON.
A/C mid pressure switch signal A/C Mid Pressure Switch ON or OFFWhen A/C mid pressure switch is turned to
ON.
AT coordinate retard angle
demandRetard Signal from AT ON or OFF When AT retard angle signal is exists.
AT coordinate fuel cut demand Fuel Cut Signal from AT ON or OFFWhen AT coordinate fuel cut demand signal
is exists.
AT coordinate permission signal Torque Permission Signal ON or OFFWhen AT coordinate permission signal is
exists.
VDC not torque down out put Ban of Torque Down ON or OFFWhen VDC not torque down output signal is
exists.
VDC torque down demand Request Torque Down VDC ON or OFFWhen VDC torque down demand signal is
exists.
ETC motor relay signal ETC Motor Relay ON or OFFWhen electronic throttle control relay is in
function.
Clutch switch signal Clutch Switch ON or OFF When clutch switch is ON.
Stop switch signal Stop Light Switch ON or OFF When stop light switch is ON.
Page 2059 of 2870
EN(H4DOTC 2.5)-35
ENGINE (DIAGNOSTIC)
Inspection Mode
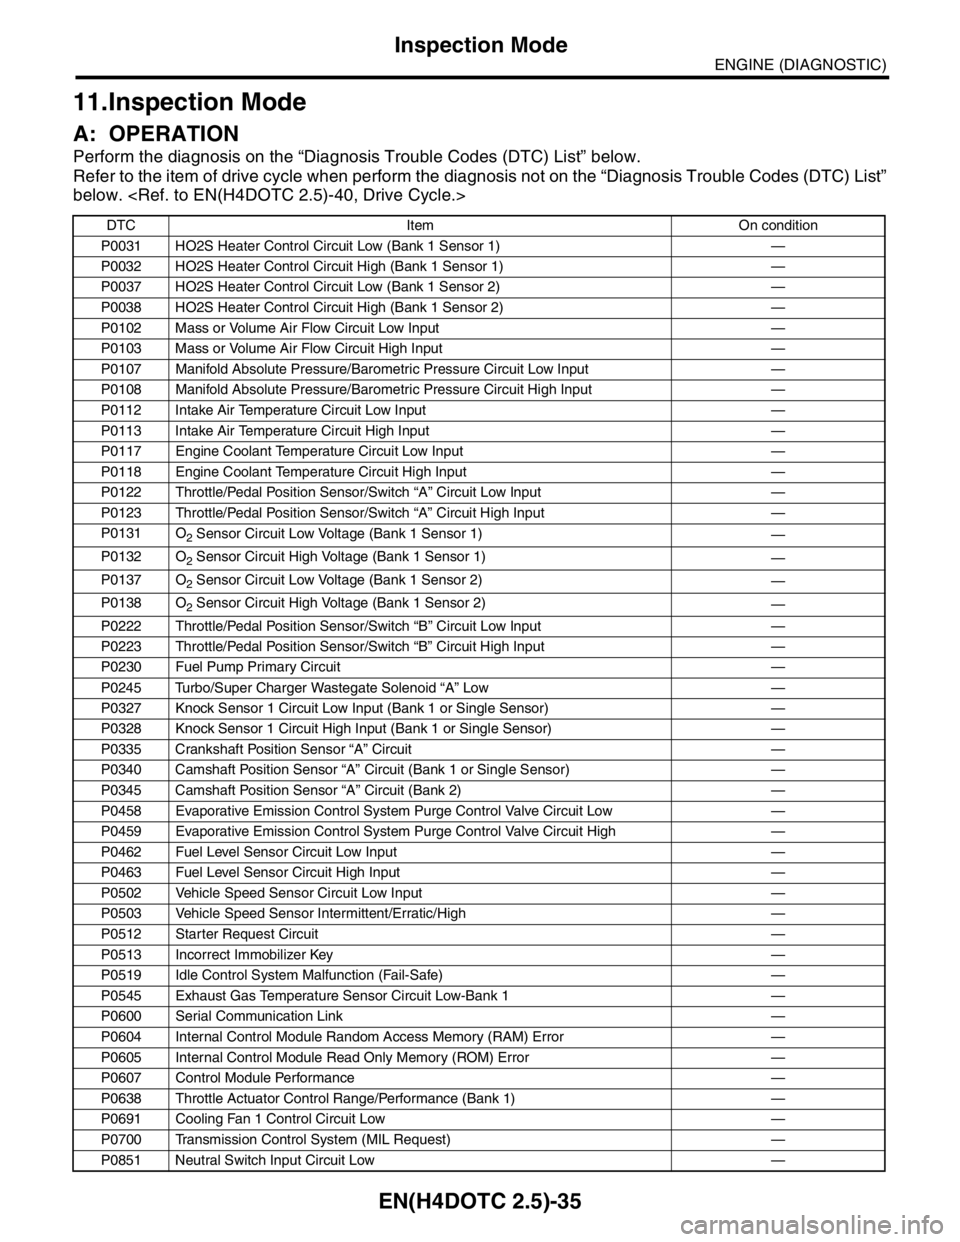
11.Inspection Mode
A: OPERATION
Perform the diagnosis on the “Diagnosis Trouble Codes (DTC) List” below.
Refer to the item of drive cycle when perform the diagnosis not on the “Diagnosis Trouble Codes (DTC) List”
below.
DTC Item On condition
P0031 HO2S Heater Control Circuit Low (Bank 1 Sensor 1) —
P0032 HO2S Heater Control Circuit High (Bank 1 Sensor 1) —
P0037 HO2S Heater Control Circuit Low (Bank 1 Sensor 2) —
P0038 HO2S Heater Control Circuit High (Bank 1 Sensor 2) —
P0102 Mass or Volume Air Flow Circuit Low Input —
P0103 Mass or Volume Air Flow Circuit High Input —
P0107 Manifold Absolute Pressure/Barometric Pressure Circuit Low Input —
P0108 Manifold Absolute Pressure/Barometric Pressure Circuit High Input —
P0112 Intake Air Temperature Circuit Low Input —
P0113 Intake Air Temperature Circuit High Input —
P0117 Engine Coolant Temperature Circuit Low Input —
P0118 Engine Coolant Temperature Circuit High Input —
P0122 Throttle/Pedal Position Sensor/Switch “A” Circuit Low Input —
P0123 Throttle/Pedal Position Sensor/Switch “A” Circuit High Input —
P0131 O
2 Sensor Circuit Low Voltage (Bank 1 Sensor 1)
—
P0132 O
2 Sensor Circuit High Voltage (Bank 1 Sensor 1)
—
P0137 O
2 Sensor Circuit Low Voltage (Bank 1 Sensor 2)
—
P0138 O
2 Sensor Circuit High Voltage (Bank 1 Sensor 2)
—
P0222 Throttle/Pedal Position Sensor/Switch “B” Circuit Low Input —
P0223 Throttle/Pedal Position Sensor/Switch “B” Circuit High Input —
P0230 Fuel Pump Primary Circuit —
P0245 Turbo/Super Charger Wastegate Solenoid “A” Low —
P0327 Knock Sensor 1 Circuit Low Input (Bank 1 or Single Sensor) —
P0328 Knock Sensor 1 Circuit High Input (Bank 1 or Single Sensor) —
P0335 Crankshaft Position Sensor “A” Circuit —
P0340 Camshaft Position Sensor “A” Circuit (Bank 1 or Single Sensor) —
P0345 Camshaft Position Sensor “A” Circuit (Bank 2) —
P0458 Evaporative Emission Control System Purge Control Valve Circuit Low —
P0459 Evaporative Emission Control System Purge Control Valve Circuit High —
P0462 Fuel Level Sensor Circuit Low Input —
P0463 Fuel Level Sensor Circuit High Input —
P0502 Vehicle Speed Sensor Circuit Low Input —
P0503 Vehicle Speed Sensor Intermittent/Erratic/High —
P0512 Starter Request Circuit—
P0513 Incorrect Immobilizer Key —
P0519 Idle Control System Malfunction (Fail-Safe) —
P0545 Exhaust Gas Temperature Sensor Circuit Low-Bank 1 —
P0600 Serial Communication Link —
P0604 Internal Control Module Random Access Memory (RAM) Error —
P0605 Internal Control Module Read Only Memory (ROM) Error —
P0607 Control Module Performance —
P0638 Throttle Actuator Control Range/Performance (Bank 1) —
P0691 Cooling Fan 1 Control Circuit Low —
P0700 Transmission Control System (MIL Request) —
P0851 Neutral Switch Input Circuit Low —